Transcripts
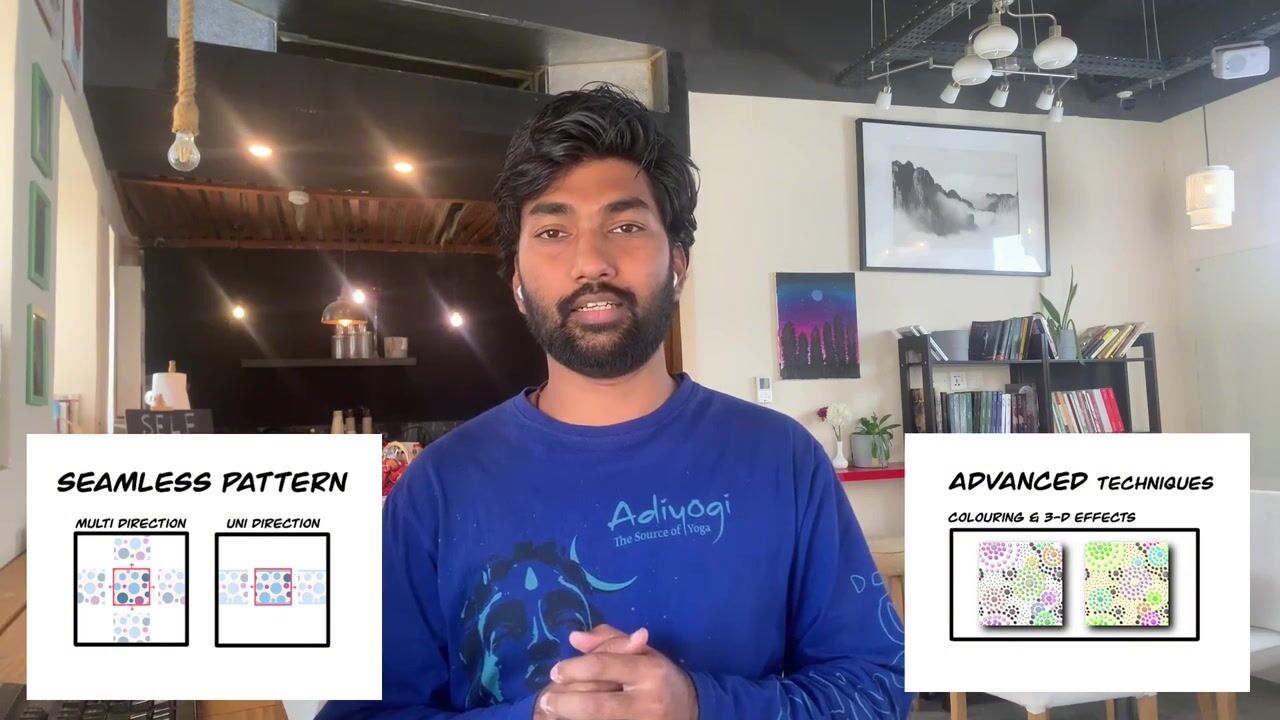
1. Class Introduction: Hi, everybody. Welcome to
this class on How to create your own seamless
PulcatPatterns in Procreate. Hi, my name is Srihari. I'm an illustrator
and a digital artist. In this class, you'll be learning what polka
dot pattern is, how to create a seamless
pattern out of it. And actually, after
taking this class, you'll be able to
create patterns like how you see on
the screen right now. We'll go at it step by step, in terms of how to create your own pattern tile and then create
variations using color, size, positions, and even create multiple
combinations of these. And even at the end,
you'll be creating your own seamless
Procreate brush based on the template which
you have done in this class. This class is designed
with beginners in mind, so it is very easy to follow. As part of class prerequisites, you might need only an iPad
and an Apple pencil with it, and the latest version
of Procreate installed in after taking this class
as part of class project, you'll be able to do at least two different seamless polcar dot pattern
tiles in Procreate, which can be used to be
printed on merchandises or even created as a backdrops
for various use cases. I'm so excited to share
everything I know about creating these polka dot patterns in a seamless fashion in Procreate. I'm so excited for you to go through every single
lesson step by step. I'll meet you in the
class section below.
2. Understanding Seamless Polka Dot Patterns: So welcome to the first lesson of creating a seamless
pol car dot patterns. So firstly, what is
a pol car dot, okay? So it is a pattern style which was kind of created
in 18th century, and eventually had
different variations of it. But to its base or foundation, what a pol card dot pattern
is is it kind of consist of circles arranged in a particular way in
rows and columns. Okay? And if you see
on a major scale, it can be classified as
two different styles. The first one is what
you see on screen, which is it's been orderly
arranged in a balanced way. Let's say one below the other like that, and
one next to the other. So it's just like
copy and paste of creating one single
pattern. A similar fashion. There's a different
style called offset. Okay? So basically
next line will be in between on the gap of the
top layer. That's one style. So these are the main two
types of polka dot patterns, which usually has been created. Not necessarily that we can't
create multiple variations. You will see in the
class section below, especially in the lessons
where you learn how to create multiple variations
using different sizes, position, colors, and
even shapes in a way. But polka dot, to its core
is made using circles alone. But in this class, we can do slight kind of
variations and bring in other styles also into
creating a seamless pat, right? So first, so basically, once you know, so basically now, since you have
already known what a pol cutout pattern
is as a introduction, it's good enough
for you to start off with creating your patterns. Okay? So we'll start
off with creating our own template first to create a seamless
pattern in pol carpat. So first, uh, tap the plus icon on the
top right hand corner. And then create a custom canvas. In this case, I'll go with 1,000 pixels by thousand pixels
and a square shape. Y square shape, you will see eventually that for
seamless pattern, square shape is
the best shape to start off with for
a pattern tile. Okay? But you can always do with multiple sizes also that is possible when you are
creating a seamless pattern. So we'll go with
thousand by 1,000. So DPA ensure it's at least 300 because you might not be printing
it out immediately. But if in case you're printing, the DPA matters a lot in terms of the
clarity of the pattern. So always ensure it's 300. About the maximum layers, it depends on your
iPad and its RAM. So for me, I have 264
layers, it's good enough. It's more than good enough
for seniors pattern. But ensure you have at least
30 to 40 layers available. Accordingly, you
size your uh kind of the whole canvas, right? Once you actually once you check all these things for the color
profile, the next version, I would recommend you
to go with RGB in the first place because I understand when
you're printing things, it's better to go with CMYK and when you're doing something
for digital, let's say, websites or let's say posters
or something like that, conditional posters,
then RGB is better. But we'll start off
with RGB and if in case we want to print out
our designs in the future, then we can always convert
it using different um um, kind of tools available, right? Once these things are set, now tab the top
right hand corner, tick Mark then you'll
get a new canvas here. Now, firstly, before
going into creating a template for our
kadapulca patterns, one very important thing I
would want to start off with is to know how a seamless pattern will
function in the first place. Okay? So let's say we
have a square canvas. The oral ideas,
whatever we do in the top part should be
half of what we want, and the other half
should be in the bottom. Right? And in a similar fashion, whatever we do on the left should be resembling the thing
which we do on the right. Is it clear? So I'll give
you a basic example. Let's say we are
creating a box or a square kind of thing. Right? So once this is
done, duplicate it. Move one to one half, other one to the other half. Okay? Now, we have a small
shape like this, right? So combine them,
duplicate it again, and change the angle. Move it ensure it is
exactly in the corners. Now since this is done, combine all these things, duplicate it, select both
and reduce the size by half. You'll see the snapping is on
the magnetics and snapping. Once it's on, you will see
exactly when you move, there'll be a slide snap where it'll go and fit
in there, right? Now, select the second layer alone and move it to the right. Do you see a difference.
So in our patent tile, we had drawn only
the half a square. Okay. But when you combine
with the next patent tile, you will see a complete square. Again, if we combine
both these things, duplicate it and move
it to the bottom, again, see that, you know, you find a complete square
in the kind of bottom also. This is the idea or how a
seamless pattern functions in the first place, right? So in the next class, we'll start off with, uh, creating pattern
tile for our um, kind of polka dot patterns, okay, with circle
and exact template. And then we'll go about
creating a pattern.
3. Creating a Base Template: So welcome to Lesson
two. Now that you have learned how a sems
pattern functions, now we will create a template
for our Pol cart patterns. Okay? So we'll go for
the new custom canvas, tap the plus icon on the
top right hand corner, and then go for square, preferably thousand by thousand. In the previous class,
we have seen how to detail how to create
a canvas size, so you can, um kind of go there. Now, you have a square
canvas right now, right? We'll create a circle
the center, okay? Ensure you choose the monoline brush under the calligraphy. Okay. In terms of the
size of the brush, anything is fine,
I'll go for 20. Then draw a circle. It need not be a perfect circle since we have options
in Procreate. If we tap the other
finger on the screen, when the pencil is intact, it'll become an exact circle,
perfect circle, right? Now, remove your hand
and pencil at once. So you'll get a
perfect circle now. Now, tap the actions. Now tap the actions and an option called fit
to Canvas, right? Tap that. So a circle is
fit to Canvas right now. Now fill that circle with black. You just have to select
the black color with your Apple pencil and then drag and drop it
into your circle. Now, once we have
a complete circle, this will be a basic
overall template, on which we'll work on. Perfect. Now in this class, we'll be creating two templates, one for the classic
organized polkart pattern. The second one is for
the offset pattern which we talked about, right? For the first balanced
version. Duplicate this. Keep it and actually
kind of rename the kind of bottom
layer as base original. So we won't touch it. We'll use the same circle for the
other pattern also. So we'll keep it just
there intact and hide it. Now, choose a second layer and can choose the first layer now on which we'll
be working on. Duplicate the
layer, select both, and move it to the
top left hand corner, ensure it snaps
on in the corner. So now you have two, let's say, kind of
quarter circles, okay? We'll select the both, we'll
reduce the size a bit. Now, this is good enough.
I'll select one of those, move it to the top
right hand corner. Enjoy it snaps that is
very, very important. Once it snaps to the corner, you have to flip
it horizontally. So you have an option
here, second option. You can flip it horizontally. Okay. Now combine
both these things. Duplicate it by
swiping from right to left and then
duplicate the layer. Again, move the new layer which you have duplicated
to the bottom. And then now you flip
it vertically, right? Once you flip it vertically,
it becomes like this. Right? It doesn't seem like something
very special, right? But this is your template for your first seamless
pol card pattern. I'll show you how it becomes
a seamless template. I've combined both these
layers, duplicate it. Now rename the bottom
layer two, first template. Okay? So template one. And hide it. Now to test the template because it's always best to
test the template. So we'll go for the first layer, duplicate it once again and
select both the layers, reduce the size by half. Perfect. So now, select one of those layers and
move it to the right. You see that the kind
of quarter circle of the first tile and
the quarter circle of the second tile has combined and become a half circle
in the center. This is how a seamless
pattern functions and how we have seen in
the previous lesson. Now we are doing it for
circle because specifically polkarPatns consist
of circles, right? Now, now combine
both these layers and duplicate it once again
and move it to the bottom. Now, you will see a complete
circle in the center, right? So this is how you create
a Polkar dot pattern. Now again, duplicate
it just to test it. We can continue the
same process again. I'm just skimming through since you already know how to do this. We do this just to test how a dot pattern is on a
larger scale, right? So it looks good.
There is no problem in terms of middle lines. Everything is synced
well. So this is what we want for the
pattern template. So for the classic
polka dot patterns, we have a pattern
template ready. We can delete the layers and keep the template
one as intact. Duplicate the base original to create the second template. Okay? Hide. Now, once you have this particular
template with you now now instead of moving the
circle to the corners, we'll be moving
them to the edge. Okay. Now, how do you do this? First, again, reduce
the size by half. Okay. Once you can
reduce the size by half, move that circle
to the left edge, ensure it snaps on the place. Once it snaps, you're
good enough, right? The size might
seem a bit bigger, so we'll reduce the
size also a bit. That's good enough.
Now, duplicate it. And move it to the right edge, see when it snaps and then
flip it horizontally. Now, again, combine both
these layers, duplicate it, and then rotate one single
set uh to 90 degree. Perfect. So this is
a pattern tile lamp. Okay? I'll rename
it as template. But I've already talked about that we have to test
the pattern, right? I have to test the pattern tile. So duplicate this again, kind of hide the
bottom template, and then the top one we'll
try it out, duplicate it. Come, select both,
reduce the size by half. Can you see in center, it becomes a circle now. Duplicate it again,
bring it to the bottom. Do you get it? You see a
difference onto both patterns. The first pattern was
a classic pattern. There'll be one circle
underneath the other circle. In the second pattern, there'll be one circle between the two circles on the top. Combine both, duplicate and
bring it to the bottom. See the difference here. So this is a second template
which you have created. Now, what is the
significance of template? Because when you're brainstorming
a Polkar dot pattern, instead of thinking
so much that, Okay, how do I create this particular style and all those things, you will just fill up the particular space
in the template, and it becomes a
seamless pattern. That's the overall idea.
Perfect. Now we'll delete this particular thing, and we'll have
templates like this. Okay? Now, and actually kind of now that you
have learned how to create a template for
your polkot pattern. In the next lesson, we'll
talk about color palettes and how to save them in your um, um, let's say, your
canvas so that you can implement the color styles immediately in the
polcdt patterns.
4. Creating a Color Palette: Now, welcome to
the Lesson three. Um, so in the previous lesson, you talked about how to create a pattern template and a
pattern tile template for both, kind of, like, first template and the second template, both. Now in the third lesson, we'll
talk about how to create a color palette so that when you brainstorm and kind
of finalize your design, it'll be easy for you to just kind of, like,
bring in the colors and, kind of complete your
artwork or actually, in this case, the seamless,
Polkadot patterns, right? So for that, we'll
open a new canvas now. In this case, uh, a vertical canvas is
good enough, okay? I'll actually show you
exactly why it is so when we import colors as
a reference, right? So go for a new canvas. With 500 is good enough, or even you can
go with 300 also. But in my case, I
will go with 600. And height is 1,000 and
everything else can be seen. And once everything is checked, you can tap the top right
hand corner check mark so that you have your canvas. Perfect. Now, how we will
plan the overall things, we'll plan the color palettes. We'll have multiple
color palettes in the same image. That
is very important. So in this case, let's say
we divide into four parts. So we'll have one
color palette here. The other here and
so on and so forth. So in one color palette sheet, you'll have four
color palette sets which you can use on
your designs. Okay? Perfect now. We'll
start off with this. Switch switch on
the grid line so we exactly know where
we are placing things. So how to switch on a grid
line, go for actions. There's something called
drawing guide, tap that, then go for edit drawing guide, increase the grid size. Since you remember that our
overall height was 1,000, we need to divide
into four, right? So 250 is good enough. So we can tap 250. Done. We'll bring the blue
collar point to the corner. So exactly we have all the four, let's say, vertical halves, and then press tick mark on the top right hand corn,
right? That's good. Now, we'll create
a circle first. It can be a normal circle,
that's totally fine. And once you see this
particular style, and using the other
finger tap on the screen, so it becomes a perfect circle. The size, you can
alter it according to your that particular, you know, as we talked
about the strips, right? So move that circle
to its position. You see it's bigger
than our set. So we reduce the size. Perfect. So this is good
enough. We'll fill it up. We'll duplicate. And we'll move it sideways. Again, duplicate it.
Move it sideways. You see that I'm overlapping things, but it's totally fine. That's actually one
option you can do. You can overlap your
entire palettes like this. Or you can even keep
them separately. It's totally up to you.
If needed while moving, you can remove the
snapping tool also, so it's easy for you to
move things around, right? Now, I'll group it and duplicate the group and
paste it on the bottom. Now for the bottom, I can
have different variations. In this case, I'll have
only three, right? So I'll remove the last one. And the bottom two,
I'll have only two. Okay? So again, I'll
remove the last one in the new group and
move the new group to the bottom and duplicate it again and move the
new tool to the bottom. So you see we have
four different rows, and first row has four colors. Second row has three colors, and third and fourth row has two colors each, it's
totally up to you. I'm just creating variety in
my own color palette sheet, but it's totally up to
you how many colors you want to use in your palette. Now, how do we choose? So we'll kind of hide
all the other groups. We'll start working
on the first group. Okay. Now, in terms of colors, how do you choose colors? Okay? That is a very
organic process. Okay? You can either choose
complementary colors. You can choose colors which are completely opposite
to each other, or you can choose colors which are in a way
in a similar shade. Although that is also possible. Okay? So we'll go with, let's say purple, dark purple. So you select the layer which you want to fill
it up with, right? So that is our color for
that particular uh, layer. Then slightly we
are reducing or you can go with complimentary, which is exactly opposite
of this particular color. We will actually go into complimentary colors for
the two color palettes. For this thing,
we'll again go with a similar just in
a lighter shade. Yeah, this is good enough.
Now we have in this case, we can have a complimentary
color, right? And then bring it on here, then reduce the color intensity
in terms of darkness. So this is our first
color palette. You will see that color
palettes are based on how you look at those
color combinations, how they're combining
between the other color. So this is our first one. Now, since this group is done, we'll start with
the second group. So this is the first
one. So in this clase, since it's three, we can
go with the shades of RGB. Okay, red, green, and
blue can do that. Yeah, perfect. So we'll
go with this red. It's a bit um, it has its own charm to it. It's not very bright
red, right, and blue. You'll see that I'm keeping the central circle
in the same place. So it has a similar shade to it in terms of its intensity. I'm just changing the
oral base colour. Red, blue, and green. I'm sorry, I had to
change the layer. Yeah. Perfect. So this is a
second palette which we have. Third one. In this case, we can
go with complimentary since we have only two
colors with us now. Let's say orange and
blue are complementary. So we'll go with
an orange shade. Then for the other color, we'll go with the blue shade. Not fully dark blue, but a lighter shade of blue. See this beautiful color
palette, actually. These two colors go
very well with, uh, your kind of kind of
extra pol cat patterns. You can slightly reduce the blue shade and make
it a bit more dark. Yeah, that's good enough. And for the fourth
color palette, again, this is complete
organic process, you need not have to have a
stringent rulebook because there are rule books
which you can follow for color palettes, but
it's your own design. You're personalizing it
for yourself, right? So try out with
multiple color sheets. Okay? Only then you will
get to know this, um, this by experience that
how to pick colors which are complimentary or for a specific design, how
do you pick a color? Only then you will
get to know it. So that's the overall
idea of creating multiple color palette
sheets, right? So for the fourth color palette
we'll go with and green. Yeah. So we have gone with red, in a way, orange shade
and blue shade, right? Can go with red and purple. Or actually we can sometimes go with
black and white also. Or we can go with black and
gray. That is also possible. It can become a bit I can become a bit more kind of
actually monochromatic, but that's also fine, right? Red, blue, purple, yellow. We have an yellow. So in the entire color pie
we don't have yellow, so we'll go with
yellow this time. Yeah, that's bright. Yeah, this color
pade is also good. We can darken the purple a bit. Yeah, so it's not very harsh on our face. That's
the overall idea. So we have four color
palettes right now, right? Now, we will hide the dry guide, and then export it by
placing an option called share in the actions
and export it as JPEG. Okay. Yeah. JP. And once it's exported, it'll
ask you where to save it. You can save it in
the save images if you want to save it and
go in actually Apple photos. Or if you want to save it
to files, that's fine. I usually save it in, let's say Apple photos itself
so that it's visually available for me
to pick when I'm kind of choosing to import it as a reference into Procreate. So save image. Perfect. So we have exported our kind
of color palette sheet, which we'll be using
for our designs. So in the next lesson. So basically before
starting the lesson, you'd have already
had a knowledge of what a seamless kind
of polkart pattern is, two different styles of it, and you'd have already created a template by now in
the previous lesson. And now you have a color
palette sheet also with you. So then we'll combine
all these learnings, and in the next lesson, we'll create first brainstorm an idea for Polka
dot and then we'll create a final design and make multiple colors out of it.
I'll meet you in the next se
5. Designing Your First Polka Dot Pattern Tile: Now, welcome to Lesson
four, where in this class, we have all the
things required to create a seamless kind
of Pol Codd pattern. Now, we'll actually start off with opening a template
file which we have, right? Open the template file. Or more importantly, you
can duplicate it. You can swipe from right
to left and duplicate the file and then work and actually kind of
rename the file to working. So this will be a
working file where you create your
seamless pattern, okay? Open the working file.
We'll start with any pattern, any one system. In this case, we'll go with
the offset pattern. Okay? When you say offset, which means that there's actually
one circle on the bottom between the
top two circles, right? When we say classic pattern, which means that the circles are just underneath the top circles. So we'll start with
offset pattern. So there are two
options which you can approach the pol cut itself
without any variations. One is exactly circular pattern. Okay? Where it's exact circle, there is no change in it at all. Okay? That's one option. Our second option is
you hand draw it. Okay? So when you hand draw it, there's a slight imperfection, which is actually beautiful on a longer run when we
see the polka pattern. Okay? If it's exactly circular, it has its own use
cases, but in this case, we'll start with the hand
drawn style of it, right? So first, we'll
actually brainstorm it. So for that, reduce the
opacity of the template. So it's easy for us to
brainstorm on top of it. Now, um, we can basically what I want to do is instead of creating an entire circle, okay? I'll draw the circle with
hand and then see how the pattern goes or just fill it up with something else. Okay? So we'll start off
with the pattern now. We have the uh template with
a reduced opacity, right? So let's say you
have, this, right? Now, there's one more thing
which I want to add on. We'll actually open up the drawing guide so
that, because remember, when we talked about seamless
pattern, as I mentioned, the top part and the bottom
part should be similar, and the right and left part
kind of at should be similar. So if you draw
manually like this, the other side also
should be similar, but we might not be able to
get exactly that, right? So what we will do is we'll
open the actions menu, again, go to Canvas,
go to drawing guide. It drawing right. Then in the last is an option
called symmetry, right? You go to symmetry,
go for options. Then go for quadrant symmetry. Okay, quadrant symmetry. And then plus and then tap
the tick mark and not test. Now, in this case, you see
if you're drawing it here, it's been replicated in
the opposite side also. In a similar fashion, if
you draw it on the top, it's replicated in
the bottom half also. So you will get an
exact seamless pattern, eventually, right? Perfect. So we'll
start off with this. We'll go with black color itself because the color we will
do it in the color section, kind of referencing the kind of color palette which you
already create. Okay? So in this case, we'll
start off Perfect. It's not exact circle. There's a slight
imperfection to it. And even here, there's a slight imperfection,
that's a good thing. Now we'll fill the
entire kind of interiors by hand instead of dragging and
dropping the color. There's a reason
behind it because you'll see the brush stokes. Okay? That's one idea. So you'll be doing like
this. Like, you can do this. In a similar fashion also, you can color it actually how a child colors his drawing
his or her drawing book, right, in a similar fashion. So this is one pattern
which we can create. But what if we change the brush and create
a texture in it? That's what we are
going to do right now. So we're going to hide or delete the layer in
the first place, that particular kind of stint was to show
how we can do it. And then on the new layer, or create a new layer and tap the layer and ensure the
drawing assist is on. Then go to brushes, then choose the brush
which of your liking. Okay? You can go for
artistic brushes. And you can kind of, like, at test and see how it is. If you see this
particular brush, it gives a pattern
or texture to it. I is actually nice in a way, okay? So we'll try that. Right. Beautiful, right? Now, we will hide the template underneath just to test the pattern which
we have created, duplicate it, serect both
and reduce the size by half, ensure the snapping is on. Then select one layer
and take it to the side. Combine both, duplicate it,
and bring it to the bottom. I'm actually doing it in
the fast way because I assume you already know
this particular step, right? This is beautiful, right? Nice. So this is one kind
of polka dot pattern. It's not exact circle, but it resembles a polka style with a slight texture to it. Okay? We'll actually
create one more. We'll combine both these things. We can rename it as example one. And hide it on the template,
create a new layer. Again, remember,
select the layer and switch on the
drawing assist, which is very, very important. So once you do this, we'll go
with a different brush now. This looks better, Leatherwood, but I don't know how it'll
be there. No, it's not good. Aurora. Again, as you see, we are kind of testing
multiple brushes. So we'll go with this brush. You will see that it no way resembles a polka dot pattern. Okay? But this is what we're trying to do some
variations of it. Wow. This looks very different. Okay? So when you see a
pattern tile like this, it doesn't resemble it's
a polka dot pattern. But again, duplicate
it, select both, reduce the size by half, and show you hide
the template layer, select one, move it to the side. Combine both, duplicate it,
and take it to the bottom. See? So in the first picture, it doesn't resemble a
pool cutout pattern, but here you are doing
multiple variations of it just by using the
different textures, right? That's one thing. Now,
since now we'll rename it as example, Perfect. We'll hide that also. Now we'll create a basic pol cudd pattern. The one which you usually see. I've given you multiple types of doing it using
textures and brushes. But in this case,
to add on colors, we'll go with a typical exactly
perfect circular pattern. Okay? So we'll switch
on the template. We'll increase
opacity, duplicate it, and remove actually hide
the bottom template, rename the one with the design. So this is our final exact
circle pattern, right? Now, we have to bring in the colors to see how
the color functions. So there are two options. Have empty layer on
the bottom so that we can have a background
also for our pattern. Now, select the design. Now
to bring in the reference, remember which we have created
in the previous lesson, what you should do is select the actions or the gear icon, go to Canvas, and there's something called
reference, right? Switch it on. Then you'll
have an image like this. What you can do is you can go to image import image and go to the praise
you have saved it. You have saved it
in the gallery, so the gallery comes up. Now we have a vertical
thing like this. So remember when I ask you to do a vertical canvas, why so? This is the reason,
so that it's very, very cute and very much
in the corner where we can easily drag and drop.
That's overall idea. If we do it like
horizontally or even square, it'll take up a lot
of space in a canvas, which is very limited
in the first place. So it'll be difficult
to draw it. So that's the
reason we have done the let's say kind
of vertical aspect or kind of active vertical shape for kind of the
whole color scheme or color palette, sheet. Now, we will go with a two color pattern or we'll go with
three color pattern, and actually one of those
colors will be a background. Okay? So just tap on the green, and we can take the green
for the background. Perfect. Now, remember, the top color and the bottom
color should be similar, right color and the left
color should be similar. Okay, that I'm sure
you are understood by now. Now tap the blue. Choose the color,
go to the design, then drag and drop to
the top and bottom. Now tap the reddish shade, dragon drop to the
left and right. So this is one pattern tile
completed with the colors. Now, combine both,
rename it to design one. Now we'll test the seamless
nature of it, duplicate it, and duplicate it once more so that the base layer is always set and select both
the top layers, reduce the size by half, select one of them, move
it to the right corner. Again, combine both, duplicate the same
process of creating a seamless pattern which I've already seen. Perfect, right? And to remove the disturbances, you can switch off
the drawing guide. Perfect. So we have
one color palette already ready and one
final pattern tile ready. So this is how you create a seamless polka
art patterns with multiple color variations
of your choice, right? So how do we export
it finally, okay? We'll actually create one
more design like this. This is the first pattern tile which we have, just this color. We'll do one more with a two color variation with the white background
itself, okay? So hide this particular design, create a new layer,
duplicate the template. And place it on top
of the empty layer. Empty layer can be white, so we'll fill the
layer with white. Always don't rely on the
background layer of the canvas. That is not the
best way, so always create a new layer and
drag and drop white. So you will see the entire background layer
has become white. Now, go to the template
layer, switch it on. Now we'll take the
last color palette. We'll choose purple, dragon
drop on top and bottom, and we'll choose yellow,
dragon drop on the sides. Perfect. Now we'll combine
both these things, rename it to design
Now, we'll test it. But as I mentioned, we
always have the base copy, and we'll hide the base copy. And we'll actually
duplicate the one more, select both, reduce
the size by half, select one layer,
move it to the right, and continue the same process to create a seamless pattern. Right? It looks good. It looks different with
a white background and a similar color pattern and a contrasting color pattern,
so there's one more option. So in the next
lesson as a bonus, we'll do multiple
variations also. But before that, how do
we export our pattern? That is very, very
important, right? So ensure all the other
layers are switched off. Okay. All the other
layers are switched off, and only the pattern tile is on. Okay. Once the pattern tile, you can actually
remove the layer, the kind of whole
reference color also. So how do you do this? The two options
that you can go to this particular same menu and
switch off the reference, or you can tap the reference. And there's actually a cross or closed button on the
top right hand corner. You can press that. Perfect. So now you have the first pattern tile or the second design
which we have. Now, actually once you have ensured that that
particular layer is selected, go to Actions, Share and export it as you can
export it as PDF for the best quality or
even JPP is good enough. I'll export as JP
then save image. Perfect. So we'll
do the same for the other design also
the first design, ensure that ensure ensure
that particular layer is on, and uh, kind of all the other
layers are switched off. Background even switching of the background layer is
actually helpful, right? Once that particular
layer is active, go to Actions menu, share, export it as JPEG and save
image. And that's it. So if you go to your gallery, you'll be able to
see your patterns. So this is your color palette
which you have created. This is your first pattern tile, and this is your second
pattern tile, right? So you have something
which you can create in a seamless fashion and the
style of pol carts, right? Perfect. So in the next lesson, since you already have
exported your design and you know how to create a
polar seamless pattern, the next lesson as a bonus, we'll create multiple
variations of this using the concept
which you have already learned using, let's say, size, color, position, brushes,
which you already tried, but we'll dig deeper into it, and then multiple
combinations also, right? So I'll meet you in
the next lesson.
6. Bonus: Creating Pattern Variations: So welcome to this lesson. We'll be talking in terms of adding more variations to the design which
you've already done. Okay. So as I mentioned, we'll start off with creating variations
in terms of, sorry. In terms of size and
then in terms of color. You would have already
seen certain aspects of this in the previous
lessons, but in this lesson, we'll go into deep onto how we can create
multiple variations of seamless polcar patterns using these actually
bonus lessons. Then position of the dots. Yes. So we have looked
into, let's say, creating offset and classic, but there are other aspects
also which we can bring in, right? And then brushes. We have tried with brushes, but this lesson we'll go into deep into how to
create, let's say, multiple brushes if
you want to create or how to use multiple
brushes which are already existing in Procreate as default to use them in your kind of
polcart patterns, right? And then combinations. This is something very important because in the combinations, you'll include let's
say different colors, different sizes,
different position, and create a new
design out of it. So that's the oral idea, right? So we'll start off with this. Firstly, I would
want you to go to the same template file
which you're using, where you have both template
one and template two and even the basic circle which we drew on
the first, right? Now, first, we'll start
with the size, okay? Duplicate the base original
layer which you had, take it to the top and hide all the other layers
which you have, right? Now unhide the base
original layer. So in terms of size when we say, it's important
that first itself, you set the different
sizes you want. So in my case, I'll start with three different sizes in the
same polka dot pattern tile. Okay? So we'll duplicate
it three times. Now we have three
different designs, right? First one will reduce the size. We'll make it exactly
half actually second one, we'll duplicate the same one
and reduce it by half again. So we have two
different polkar dots, which is there's
actually one size, another one is
half of it, right? And so I'll keep it separately, so it's easy for
you to see, right? And then we'll have something smaller than that. So
we'll duplicate that also. Bring it to the bottom, yeah. So we have three different
sizes right now, right? So how we will plan out, it's important that we plan the design before executing
it straight away, right? So we'll switch off
all the three layers. We'll take a new
layer, and we'll brainstorm how our pattern
needs to be there. Okay? So we can have one big circle in
center, that we can do. We can have smaller circles, which is the next size
of the bigger circle in all the four corners, and the smallest
one will be here. Right. Again, this is
just a brainstorm. We have to uh we have
to actually bring those design into this
particular framework and then see how the
overall pattern is, right? Now, this is the
overall idea for this particular pattern where we are bringing in
multiple sizes, okay? So we'll take it to the
base, reduce the opacity. It's just for idea, we anyways kind of actually delete
it after some time. Now we'll start with the
smallest circle, right? Duplicate it just
in case if you want to and move it to
the corner first. Ensure it's in the corner, not necessarily going
out of the canvas. And then you move the edge. It looks very small in
the overall pattern, but that's totally fine. That's overall the idea
for us where we can create multiple sizes
of polka dot patterns. Now, duplicate this
semicircle in a way or sorry, quarter circle, move
it all the way to the bottom and flip it vertical. Perfect. Now combine
both these things, duplicate them, and move
it towards your left. And then flip it horizontally. Now you have this small dot, um, kind of repeat itself
across the corner. So we have done that
part, so we can do this. Combine can merge
both those layers, rename it as, um, small dot or dot three. Okay. Perfect. Now we'll go
for the second smallest. This will be in the center, right, top, bottom,
right, and left. So we'll do the
same thing again. Ensure you have chosen
the right layer. Always ensure the snapping
is on, duplicate it. Move it to the left
all the way to the left and then
flip it horizontally. Then combine both these
things, duplicate them, and you rotate them
by 45 degree option. Do it twice, so it
becomes 90 degree. Perfect. We got that also. Now combine both these things and rename the layer as dot two. Perfect. Now we'll go for
the original main circle. First bring it to the center. Perfect. Right in the center. So this is our new polkar dot
seamless pattern which we have created just by changing
the size of the dot. Okay? Now, we'll try
the seamless nature. We'll combine we'll
rename it to dot one. Combine all the three things, remove the template
which is underneath. Duplicate it. Always remember, work on the working layer and always duplicate the
main pattern tile. Now for the top layer, duplicate it once
again, select both, reduce the size by half, and then select
the second layer, take it to the
left, combine both, duplicate it, and move
it to the bottom. Perfect. No, can you
see a difference there? It's not the same size dot moving across in
different patterns. It's different sizes, right? Again, we'll do it once again
to see a bigger picture. Same pattern on how to
create a seamless pattern. You continue it, take
it to the right, combine the both, duplicate it once again, and move
it to the bottom. Perfect. Is it good
enough for you? Right. So this is
the first variation which we have done based on the size of the
dots which we have. Imagine you increase
the number of dots. Okay. Let's say you create
one more small circle here. Possible, right? So it'll become a very filled up pattern.
You can do that. Or you can create might
be like a mandala, actually, how do you do mandala like this multiple
dots you can bring in. There are so many variations
you can do just by altering the overall size of the kind of the dot. This
is for the size. Now, since we have this option, we can delete it off and change the uh thing name to size Okay. The, we'll close it now. We start we'll open
a new layer again. Now the second one which
we talked about is color. Okay? One is multicolor. Okay? In multicolor, it can
be plain multicolor, or it can be a gradient.
That is also possible. We'll explore both and
there's something called monocolor also where it's
just black and white, or it's just like green and
dark green and light green, something like that,
monochromatic. So we'll try that
also. In this lesson, we'll try all the three different color variations
which we can do. Okay? First, we we'll special
switch on the template, duplicate it, and take it to the top. So this is a template. What we will do is we first
have multi colored thing, we'll change it to
red, and then green. We'll have a darker
shade of green. When you duplicate this, All right. So this is the multicolor
polka dot pattern. Okay. Now we'll go for
monochrome or mono coolor. You would have
seen the black and white, which is already common. Um, so we'll go with a
different color shade. Okay? So we'll select, let's say, we'll go with the
lavender or purplish color. We'll actually
create a new layer underneath and fill that
layer with this color. We'll make it a
more lighter shade. Then we'll select the
design which we have. We'll go with the same
shade but a darker color. Perfect. Then combine both duplicate it once again to
create a seamless pattern. Again, this process
of seamless pattern, I'm just kind of skimming
through since you already know, but you can always continue it. Perfect. So this is actually
a monochrome style where the colors are just
a difference of shade or even you can
try out with opacity, which is far more
beautiful, right? So this is the oral
pattern of it. You can create of same colors. You can create something
of contrasting colors with a
different background, or you can just leave it
black and white also. Or even you can play with gray and white or
gray and black. So you can even see the
small change in terms of the opacity and even in terms
of the color depth, right? So this is one more
design, we'll combine it. The third one which we talked about was for the
color for gradient. Remember? Yes. So
what we will do is, we'll duplicate
the main template, which we'll duplicate
the main template, bring it up to the top. Perfect. We have this template. Now, for gradient, it is important that we follow
the seamless nature of it. That is very, very
important, right? So what you can do is you can work on two aspects
of gradients, either in the background
or for the actual design. So first, we'll work with the background,
kind of gradient, and then the next design will
come for the gradient of the actual pattern,
right? Perfect. So, um, so first background, create a particular
color which you want, increase the brush size. You can go with airbrush. Airbrushing. Soft
brush is good enough. You can increase the size of it. You have this color then
now reduce the color. You're bringing some
mild light color into center, increase the size. You have to do it very gently only then
you'll be able to see that at the whole subtle change. If you want, you can use the Smudge tool also so that it's very
convenient for you. Now the gradient is fine. You can reduce the shade
also in the center a bit. It's far more brighter
in the center. Perfect. Always go
with trial and error. Don't try to conclude
immediately if it's good or bad. Now we'll go with the darker
shade and to the corners. And while we're doing
for the corners, ensure that the
drawing assist is on. The reason so is because
it should be seamless, right? That's the idea. Ensure that drawing assist
is symmetry and quadrant. Or even you can go with
radial also. So it's easy. You can do just one side and all the sides are already
taken care of, right? For darker shade,
be very much aware of it because it'll create
entire effect for you. As you go indoors, you need to have
a slide gradient. Perfect. Now, we can combine
both these things and see, but I would recommend make a duplicate layer for
the main template, have a lighter shade
and try to fill it up, see if there is any change. No. You can just leave it black
also that's totally fine. Duplicate it once
again and combine it and actually test
for seamlessness now. Always when you're testing
the seamless pattern, try to switch off
the drawing assist. Because what will happen is
you won't be able to see the actual pattern because
the lines will be disturbing. O now you see a
beautiful pattern here, which actually has a depth to it because of the gradient which you have given
on the background. In a way, it seems
like a tile design. I do agree with that. But again, it's a combination
of a tile design and the polka patterns. This is the pattern
which we got. If you want to increase
the depth of it more, you can even bring in the
highlights for the polka dots. Okay? How to do this. I'll actually show
it to you right now. I'll just show for
one particular thing. You can take this color, switch on the airbrush, go for a new layer, and reduce the size of it and you can create a slide
highlight on the side. Okay. So it'll look
like a three D effect. You can do that for every
single tile individually, or the best would be go and do it for the actual
template which you had, the main template which
you already created, D for that where you can
create a slight highlight. Then it'll just be
seamlessly continued in every single pattern,
right? Perfect now. Now for the fourth
and the final thing, we will look for
the gradient for the polkar dots itself,
right? Perfect. We'll hide this, um design now, duplicate the template,
switch Perfect. Now for this particular thing, switch on the drawing assist. So let's say if you
draw in one place, it's been o no, go to layer, switch on
the drawing assist. Now if you draw here, it'll it'll be shown in
all the four sides. If you do this, perfect. Yeah. So what you can do is
switch on the Alpha lock, which is two fingers wipe from left to right on
that particular layer. What is the difference
I'll show you? If you draw like this here now, you will see it'll be drawn in all the four corners
but only in the shape. In this case, I'll change the drawing assist to
quadrant over radial, so it doesn't seem like a symmetrical thing where
if you draw like this, it'll be only on one side. Or you can go for
the drawing assist. Go for radial, that's fine, but switch on the
rotational symmetry. So that it feels like it's
been continuing across. Perfect. Now we'll increase
the size for our airbrush and we'll do it from one side. Now, we'll go for a
darker shade now. We'll fill up the other part. Now go to Smudge tool, have a nice slide smudge. Perfect. Now duplicate it, remove the alpha lock for both, select both and reduce the size, select one layer,
take it to the left. Duplicate it once again, you can take it to the bottom. Yes, and switch off the
drawing assist, right? So this is kind of like a gradient which you can
try for different mandala, uh sorry, different kind of
polka dot designs, right? Now, for the brushes, which we have already
looked for brushes now, but again, we'll go into it. And we'll try one more
design with the brushes. Now we have the template with kind of minimal opacities so that we can
draw on top of it. You can choose different
brushes they are. Okay? Let's say if you choose kind of old brush like this. Now, it will create some kind of actually it'll create kind of texture which seems far more interesting than
just a round pattern. Okay? Round pattern are good for certain uh let's say products
or anything like that. But if you create a texture, those textures or those kind of seamless repeating
textures can be used in so many kind of
use cases, right? So we'll explore
the brushes now. Can try the dry brush. Artistic brushes, Leather
we have dried already. This looks good. We can reduce the size. Perfect. This is good. We'll switch on the
drawing assist. We'll ensure it is only the
whole rotational symmetry is off and we'll test it once. Yeah, perfect. We'll have this So kind of one thing to remember with the
texture brushes, always lift your
pencil while drawing and again continue because
I'll tell you something. If you do this continuously, you'll just see a
border. That's it. Okay? But if you just
do like this, again, you'll see multiple layers of the whole texture into
that particular drawing. Okay, rather than doing justice. So always, especially
when you're doing texture brushes which
has patches or greens, always try to lift
your pencil and again, try to do the whole
pattern, right? So we'll start off
with, creating that or implementing that in
our dot design template. You can change the pressure also so that there's
actually a bit of, visual interest in
your dots. Perfect. It looks good. We'll hide the template which is behind
the layer underneath. Now we will alpha lock it. Then we'll choose the airbrush. We'll create different
colors into it. We'll do a slight Yeah. I'm trying to create
an overlap circle. When we do make it
a seamless pattern, it resembles a Catie. That's the overall idea. Now we need to have a background also. We'll create something as
a complimentary color. This is too harsh. Mm it's all about trial and error where
you had to find which color suits
the overall picture. If you go for black,
will it suit, all these things you
have to look at. Actually, we can do something. We can change to this layer and we can go for the white
alpha lock the layer, and then change this p to white. Perfect. Now, combine
both this layer, duplicate it, try for the
seamless nature, how it is. Or instead of
merging the layers, the black and the
one which was there, you can just keep it aside. Just duplicate the
pattern which you had, duplicate it, reduce the size, and try for the seamless nature. Again, combine them both, duplicate it, bring it down. It looks quite good, okay? Uh, at one stage
it is horizontal, other stages it is vertical, so it gives a sense of a bit
more drama to it in a way, or more texture or
more variety into it. Yes, perfect. If you want, you can reduce the opacity of the background
if it's needed, or you can just
keep it like that. Right? Um. All right, so this is your overall
pattern with textures. So the idea was
polka dots, right? But we have added a
bit of texture to it and a bit of
interior design to it. So now it has become almost
like a different pattern, but the foundation
is polkar dots. Yes, that's very important. You're not transitioning from the polka dots
philosophies or rules, but you're just playing
with the rules and altering a few aspects so that you
can create multiple designs. For example, for the
same design, right? If you choose this layer, okay, and go for the
adjustments, Okay. And let's say you
have, you go to, uh, let's say, hue
saturation and brightness, you can actually change the hue. So within a moment, the entire different color pattern
you can achieve. Okay, this is greenish color. Okay, this is a light
blue color shade. Right? So you can achieve different
color palettes like this. Let's say pink or light blue. You can change the
saturation points or you can change the brightness of
the overall pattern, right? So by this, by playing with
a lot of different colors, you can achieve different
patterns within a short span of time just
because you've already had a strong said template which you have created and the system to create
patterns, right? So this was for the brushes. Perfect. Now, we'll combine different aspects of
what we have already learned and try to
create one pattern tile. Okay? Let's say what
we have learned now, size, color, position, okay? And then brushes, right? Based on these things and
based on these things, we'll create one pattern tile combining all of these things or at least majority of the aspects which we have learned, right? Perfect. Now, hide this duplicate the template
which we already have. Or you can create a new
layer altogether on the top, and we'll start off fresh
with the base, circle, right? Take it all the way to the top. Perfect. We'll start
off with that. Now before that, we have
to brainstorm, right? So we'll brainstorm first. Go to the monoline brush
for easy brainstorming. Now, first, we have to set the sizes and the
position, right? So in this case,
we will go with, um, three sizes. Okay, The sizes. Um, we will have a medium
sized circle here. We'll have a big circle here. Okay. And then, um, okay, or else we can have
inter merging circles, right? Kind of whole. It's kind
of layered thing, right? So what we can do is there'll be a medium sized circle here. So this is medium, this is
large, and this will be small. So the one which
is in the center, it'll be a smaller circle. Or we'll have four circles also. So medium, large, small, and this will be extra small. Right? And if needed, we can add on also like this. It's all about your creativity. Okay? There is
nothing stopping you. You can always combine multiple
aspects of the designs. So this is just by positioning and size we are
playing this, right. But eventually, you can
even after creating the brainstorm thing which
we have done and kind of positioning all the dots
in this particular order, then we will go
into, let's say, uh, creating different colors
or color patterns of that particular size and by
using different brushes. First, we have to
create the basic background template for that. That's what we'll
be doing right now. So we'll reduce the brightness
of it or opacity of it. Create a base original circle, duplicate or first,
as we mentioned, first, the bigger circle will be in all four corners, right? So we'll reduce the size by half and move
it to the corner. Duplicate it, move it to the other corner and
flip it horizontally. Combine both, duplicate it once again and actually
rotate it by 90 degrees. We have the oral outer picture. Now what we will do is
we will change the color of this to gray so that
it's easy to identify. Sorry. Perfect. Now we'll be doing the medium size circle
inside the large circle. That's overall idea for us now. Take it to the top,
reduce the size by half. Reduce the size a bit more. This thing can be based on your choice. This
size is good enough. Once you finalize the size, duplicate it once again,
move it to the other corner, and flip it horizontally,
combine the both, duplicate it once again, create a seamless
nature out of it. That's the overall idea. Now, even the second
layer is done, we'll go with the center
small size circle. If this is the size, then
it'll be good enough. Perfect, right? Now, we'll add a few more circles like that for the outdoors as we
have seen, right? Okay. So how to get the same circle on the other spots also so that
distance is very equal. How do you do that? First
complete one single layer. First complete the main
circle which we already done, which is a kind of small size, and then ces then kind of like a double X and kind the triplex, smaller size, the
smallest size circle. First, you complete one line and then we'll copy and
rotate it together, right? We'll do this. Duplicate the smallest
circle as of now and then move it in
this particular order, then reduce the size once again. You can always
rearrange it based on your ner vision. Right? Perfect. So we'll remove
the base template now. Since it's confusing and
we're not able to see the actual pattern now. The distance between the middle and this circle is good,
the second circle. Kind of second and third, kind of the whole
distance is a bit more, so we can reduce that. Yeah, so we'll move this a bit closer to the closest piece. Perfect. This looks
good. Now we'll go for the last layer, we'll bring that
also a bit closer. And we can add one
more smaller dot with an extremely small size. Perfect. Now what you do is, you create small dots on the
four corners of this layer. Combine all these layers. Talking about the
interior central part. Combine all these layers. For this layer, create a small dot on all
the four corners. We're seeing that
I'm drawing here, all the four corners, you'll be able to see this
in gray color. I'm doing it in the same layer. Now duplicate this layer. Now flip it horizontally. You get it, it'll come
in the same position. Now combine both these things, duplicate it once again
and flip it vertically. Perfect. Now combine both
these layers and choose the eraser tool
and go and arrays the corner pieces which you
have created for reference. It's easy way rather than
just using the symmetry tool. There's actually a
quicker way to do that. Okay? So in this regard, we have used different sizes. We have used different
positioning, and we are about to use
different brushes. Okay. Perfect. So now we have now we have three
different layers. One is a central part, which is like this in X shape, and the other one
is a gray zone, which is the bigger circle, and the other one is a smaller
circle in between that. Okay. Perfect. Now,
how do we color them? It's best not to combine all
these things right away. Okay? You combine them only after creating your
color patterns, okay? And then you bringing in your kind of actually
the brush strokes. At last, you combine
all the layers into one single layer and then try to create a seamless nature. Okay? Because it'll kind
of reduce the confusion. But if you think that you want
flexibility to change it, then you can group
all those things and then try seamless nature
with the group aspect. Okay? Perfect. So now we will do the group aspect
which I was talking about. Select all the three
layers, group them. And we'll work inside the group. Or we can duplicate it and
work on the working group. So we can rename it
as working group. Perfect. Open that group now, go to the base layer, um, and we'll choose be we'll choose this color.
And in terms of brushes, we'll explore
different brushes now. It's a very small brush
with very less texture. So it won't be visible much, so we'll go with a
different brush. As I mentioned, we'll go
with oil paint can try that. This is good. So we'll choose
a layer on top of it. Okay? And then ensure the
drawing guide is on. And you see which one
you're opting for. You can go for radial,
that's totally fine. Go for the layer and ensure the drawing layer is switched on and then start drawing this. But This looks good. Actually, this looks
a bit raw in nature, which I want to have
in this design. Then we'll go the base layer
again, the small circle. We'll go with a darker
shade of the same color. Perfect. Now we will have
layer with drawing assist on. Reduce the brush size. Again, guys, it's
actually trial and error. You can't come up with
something out of nowhere. You have to try out and
see how things are. Again, as you see,
these circles are not perfect and these
are done consciously. It's not exactly how we are
following the template. You have to have that small creative liberty which
you have to have. Now in the center circle will
increase the brush size. We'll have one more layer a
lighter shade in center and then one more layer
of a lighter shade in the central most core. Perfect. Now we will hide the base black and
gray layers and even switch off the
drawing guide, right? So this is a dot dot pattern. It doesn't seem so
right. We'll add it will actually add
a background also. It's a completely
lighter shade of this, or we can add something like
an yellowish tint also. Yeah, perfect. So this is
our pattern right now. What we can do is we
can duplicate it. It's important always
duplicate it so that you can work on something which you
have, let's say options for. Now, you delete all the black or the base layers
which you had, and then combine all the
top pattern elements and take it outside
of the group. Now we'll test the seamlessness of this particular pattern. So duplicate it, select both, reduce the size by half. Now move it to the side.
Duplicate it once again. Merge it and duplicate once
again, take it to the bottom. You see, this is the pattern
which you have created. I think we can do
it once again to see a bigger picture of
how the entire pattern is. Srect one layer, then
move it to the side. Merge both, duplicate
it once again, and move it to the
bottom. Perfect. So this is a final pattern with incorporating all the bonus elements which we have learned. Let's say, size, color, position, and brushes, right? So it looks very raw in
a way, and it's good. It won't feel like you
had a base of polka dots. But again, you're taking
the foundations of polka dot design and then
implementing on top of it. Right? So that's
the overall idea. In the next lesson, we
will talk about how to create a seamless pattern
brush and Procreate using the template which
you have created in the first and
second lessons with the offset patterns at the same time with
the classic patterns. I'll meet you in
the next lesson.
7. Bonus: Turning Your Design into a Seamless Brush: So welcome to this
lesson on how to create a seamless pattern
brush in Procreate. So as of now, you have learned quite a few things
like how to create multiple variations of seamless's a polka
dot patterns, right? Now, how to create a seamless
brush so that you don't have to create the
design or every time you don't have to copy and
paste the pattern tile, okay? Now, how do we do it? You open the template
which you've already done, which is the pattern
tile template. Okay. And then using the
three fingers, swipe down. Ensure all the other
layers are switched off. Even if it's empty,
ensure it's switched off. You can leave the
background layer on. That's fine. Using the
three fingers, swipe down. And then choose copy all. Once you have done
this, go for the brush. You can choose any
brush, actually, but I prefer going for the cigraphy monoline
brush, duplicated. So you will get something
called monoline two, right? Select that brush. If you double tap, you'll
go to the property section. So in the property section, you will see multiple things like stroke path stabilization. As of now, you don't
have to confuse with all of those things. We'll straightly
go for the green. And for green source, tap
the corner white color icon here and then tap
import, and then paste. That's it. Okay?
Now, in this case, using the two fingers, if you
tap, it'll invert, right? Two fingers, if you tap,
it'll invert the color. We'll create two brushes
in this class by using one port inverted image, the other one with a
classic normal image. So in this case, we are
not kind of inverting the overall text or
overall pattern green. So once you're done,
tap check mark. And then ensure you
switch on there, you opt for the
texturized pattern, not the moving pattern. Then you can check the properties and you
can check the materials and so on and so forth.
You can test it. You can test it here in terms
of what you're getting. Fine. You can increase the
size also if it's necessary. Go to green and you can
increase the scale of it. It's also possible
in the pencil, you can see multiple
options in terms of size can increase the size. There are so many
options like this which you can browse through. Now, once you check
mark, go for the black, choose the monoline brush which you have already selected, go for the new layer and try
it out. So can you see this? The seamless pattern
which you have created or pattern tile which you have created has
become a brush for you. Okay. So for actually this particular brush,
what are the advantages? It is actually a negative brush. So it'll only color the ones
which are an opposite color. So let's say if you
choose red color, okay? So it'll painted red. I'll paint the negative aspects. One advantage of this brush is you can change
the background. So if you choose, let's say, yellow color in the
background, do you see this? It'll feel like the
dots are yellow, but actually the
background is yellow and the negative part is red or green or whichever
you want to choose. Let's say we choose green
colour and draw these things. A darker shade also, right? We can choose multiple colors. I'm just kind of doing
this to give you multiple options or to show
you multiple options, right? So the dots are yellow
in all the patterns. It's just that we are
actually changing the color of the negative
which we have, right? So this is one
particular brush style. Right? We can combine these things, and
choose a new layer. Now, in a similar fashion,
we'll do the same thing, go to the brushes, duplicate
the monoline brush. You can rename this brush
also if it's required, or we'll just go
ahead straightaway. Choose the monoline
brush, go to the green. Import, paste. Now we have this. Now we will invert it now by using two
fingers, tap invert. Perfect, and everything is same. You don't have to
change anything. Now, press the tick
mark of a black, increase the size
for our visibility. Now if you draw,
sorry, 1 second. Okay, so we will duplicate
the original monoline layer. Only then we won't have any
confusion, go to properties. Again, I would want to
go to the template, the main template and
copy and paste it. Using the three fingers wipe. Three fingers wipe from
the bottom, from the top, copy all, then go
to the brush again. Monoline three, which
you have duplicated now and import the file. Check Mark and test
it straightaway here. Oh, I'm sorry, you're changing
it in the shape, right? That's a difference, right? You don't change
it in the shape. You change it in the green.
So duplicate once again, select it, go to green, and then change it in the green. That's important. All right. So if you test it
here right now, So this is a negative brush, invert it now,
increase the scale. Perfect. Now, create a new
layer, go to a new layer. Now if you draw, you will
see the positive aspects. The positive dots or positive
sketch is your brush. Instead of the negative
aspect which you have seen in the previous brush, right? So if you change the
background layer right now, let's say you create
a lavender color or a lighter shade of
lavender. All right. So this is the second brush. We have two brushes right now. I'll demonstrate both the
brushes for you in a new thing. So Monoline three brush is it will create
the dots, right? And Monoline two
brush is it'll create the negative space
around the dots. Always, you can
increase the size or scale of it so it
can draw quickly. So do you see a difference now? So one brush draws
the negative aspect, which is the spaces between the dots and the other brush
draws the dots itself. Okay? So basically
in this class, so basically in this lesson, you have created
both these brushes. What you could do is you
can even share the brushes. Okay? You can save
it to files or you can even share it
to other people also. Or you can copy and paste it and create a brush set together, which involves all
the polka dot styles. Okay? So we have done this
for one particular template, right, which is the off pattern. What if you do the same
for the classic pattern? Okay, like typical top down. And moreover, you can do
it for multiple patterns. You can do even for this
pattern where there are three different sizes or the recent one which we
have explored, right? The recent one which we have
explored, um, which is this. Even for this, you can
do a pattern, right? Or we can do a pattern brush. So you have any number
of brushes to do and create it as a set so
that you can continue, your creative endeavor and reduce the time
spent in the future.
8. Class Project + Final Thoughts: Now, finally, I'm so excited. You have come to
the last lesson, where you have learned
every single aspect. So to have a small recap of everything we
have learned, first, we have learned what
a polka dot pattern is and how to create a seamless nature out of it and how the seamless
pattern works. And we have created
two templates. If you remember, it is one is
let's say offset template, and the other one is a
classic pattern template. And then we worked on the color scheme or we
created a color scheme sheet. Yes. And then we brainstorm the idea for our
polka dot pattern, and then we implemented
it by creating or placing all the dots
in a particular order. Then we have
implemented the colors which we used in the
color schema also. And then the next lesson, we went to variations where we looked at size, position, brush, colors, and even the combination
of all these things to create multiple kind of pattern tiles of
different variations. And then finally,
we have created a seamless pattern
brush, two brushes. One is a positive brush, second one is a
negative brush of the seamless polcad
dot patterns, right? I hope you enjoyed
the class lessons and learned a thing or so. So as part of class project, what I would want you to
do is at least you create two different pattern tile as you have seen here on
the sheet on the screen, uh, I have shown four, right? In a similar fashion,
you can do any two, let's say seamless pattern
tile for polka dot designs. And then two variations
you can implement. Okay? So you can implement
size or different sizes or different colors or
different positions or combination of all
these things, right? Any two, and I would want you to upload in the
project section, I'll be so excited to share to see your sharings and even all the other
classmates will be excited to see how your
creative aspects have been showcased in this creating the seamless polka
art patterns, right? Thank you so much for
taking this class and uh ensure that you post your amazing and
beautiful designs in the project section. Thank you so much.
 Srihari Muralidhar