Transcripts
1. 01 INTRO: in today's video, I'm going over various different ways of creating patterns for, you know, on surfaces. Using grids are using scale. But most importantly, we learned how to use curva tractors, which allow us to take the maximum and minimum numbers and kind of vary the pattern depending on how close they are to occur on. We'll explore all of these different variations of patterns in today's lesson, and hopefully you enjoy it and stay tuned. Make sure ask any questions if you have any, or if you have ideas for other videos or other applications, let me know.
2. 02 PATTERN SERIES: so to start, we want to check the units just to make sure we're on the same page. So it's fitting units here. And right now I'm working with MILLIMETERS on decimal. And so we're going to start creating the pattern. And what we're gonna do first is actually create a circle. So we're gonna start with the basic geometry of a circle and we'll go down here and we'll see that we have our base circle. But let's give it a radius of five. So here we have that circle. Actually, let's increase it. So it's a little bit bigger than the plane. It kind of brings in a circus playing it right in the middle of the circle. So let's actually take that circle and to start creating a pattern. Um, let's actually create a copy. So to that to do that, it's created move component that's plug in that circle, and that circle is gonna basically move up. But now we want to create a pattern in the X direction and then in the Y direction. So let's actually create a Siri's of moves that are gonna be starting at zero. It's going to step over, Uh, weaken. Set an amount with this later, and then we could choose how many. So that's what Siri's does. It actually allows you to create a copy or a series of things, but it also you also need Teoh. Use it with the move component with the roti component with an extreme compliance of theirs . This series is worse in conjunction with other components. So let me show you how to do that. So we're gonna move it in that extraction. So we're going to create a series of moves in the extraction moving these circles who plugged it in here. And we'll see that in the X direction. We have created 10 circles that air spaced at one. So let's actually copy this lighter by dragging it over and then holding Ault so dragon and then hold. That makes a copy. So it starts at zero. Let's see that a default and let's step over instead of one that step over eight. So it actually moves each one of these circles over eight. Or we could go. We could meet you, increase it, and we could decrease this one so we could have it at 10 there and then count is how many. So we've created 10. That's the default so far, and we get decreasing or increase it. So that's how I'm gonna I want to show you the basics of creating a pattern, not using grit, but using a series of copies so we can actually do the exact same thing with the other side . Um, so we're gonna move it, move all of these circles in the Y direction. Okay, so now that we've done all of these circles here with this series, let's actually do the same thing in the Y direction. So let's take this one, drag it over and then hold out and it will make a copy. And so this is a move component, and we're gonna move, not the circles like we did last time. We're gonna actually the entire row, which is this one so that entire Oh, we're gonna move it. And it's moving at once again in the X direction. But we want to move it in the Y direction. And so, as you can see, we took this pattern and removed it over in the Y direction. The default of one. And so what we want to do now is if we want to create a square grid, we could just take the series component that we had created for the X vector, and we could put it into this one. And it won't work right away unless you right click here under motion and and hit graft. Or you could also go to geometry, and then you could do the opposite to. Instead of grafting that one, you could wrap this one, so either way it works. But you can't do both rats graphics. So there we have the pattern that we created just by using circles, a series of movements in the exit in the Y direction. And this way I think we can increase decrease the pattern. We could also decrease the spacing in between, and we can increase and decrease the circle size. Now, if that gets a little boring, you could always go to probably gone. And then here we can put the radius there, and then instead of using the circle we could use probably guns. And so we have the ability of credence and some other cool patterns, not just what's circles but with polygons. And there's even further you know things you could do with it. Like during the radius increase of Dickie's the Philip. You could also change the pattern we could, You know, there's just so many things we could do with it. But I just want to show you the basics of creating a series of movements to create a pattern. Okay, It's a real quick I want to show you. When I had an organized it nominate, select it and then you control G to group it, then go to color moving over here. And now we can move on to the next exercise. So I'm gonna select all of this space bar and then disable and move this down here. That way we can kind of keep progress of the different ways that we can create a pattern. So let's move on to the next one.
3. 03 PATTERN GRID: for this next one, we're gonna be creating a pattern using a grid. So it's created a square good. And it's going to give us a very similar results that we had before because I'm gonna be using some of the scene number. So let's go to a default of 10 here. So we'll go size 10 extents 10 and extents wide. 10. So we have that there and we can go to a circle. Put that put the points where the planus. So I don't put a circle at every intersecting point, and then we can plug into 10 for the radius. And there we have. That's how quick were able to just create a pattern here, just using by a grid and sells. We could also use a de protective gear like this one and do the same thing, but this one will allow us to vary the X and Y direction. So that's why that might use a rectangular one for for a different, you know, for a different purpose with a different kind of design that you might want to get. Um and then here we have triangular, which is pretty cool. We can do the same thing, Sense X. Why? And then we can disable that plug in the cells from the plane and there we have a pretty cool pattern. This is more like a flower of life type of pattern, and we could copy this year extents and extents. We can change this to 50 and now we can. Now we have a pattern that just that a raise. You seen this triangular grid? So with triangular grid, you'll get a different result. But you actually get some other pretty pretty interesting results like this one. Um, let's go ahead and create a polygon and show you the results that you get with that so we can plug in the points into plane. And there we have all of these cool like eggs, Agonal, type of, uh, pattern we can. Like I said before he was slider to increase or decrease the radius that when you get some pool overlaps and we can also fill it the radius to give us circles or just go back to maybe look a little bit of the software pattern. And so this is a way that you can another way that you can create some patterns and these air just to deeper. Now we're going to move on to three D patterns and how to actually use a curve to adjust these patterns or to have them vary according to where the Curtis. So that's gonna be the next steps. And for now, I'll go ahead and organizes one way that I do organize things as I select everything and I go two left. So lying to the left. And then if you hit this middle one, it'll actually space them all. Even so, let's go ahead and do that. Keep things organized, and they go here. Control G. Right click here, color go to I like going down the spectrum. So there we have. This is the next exercise that we created. Now we're gonna go ahead and create some three D patterns
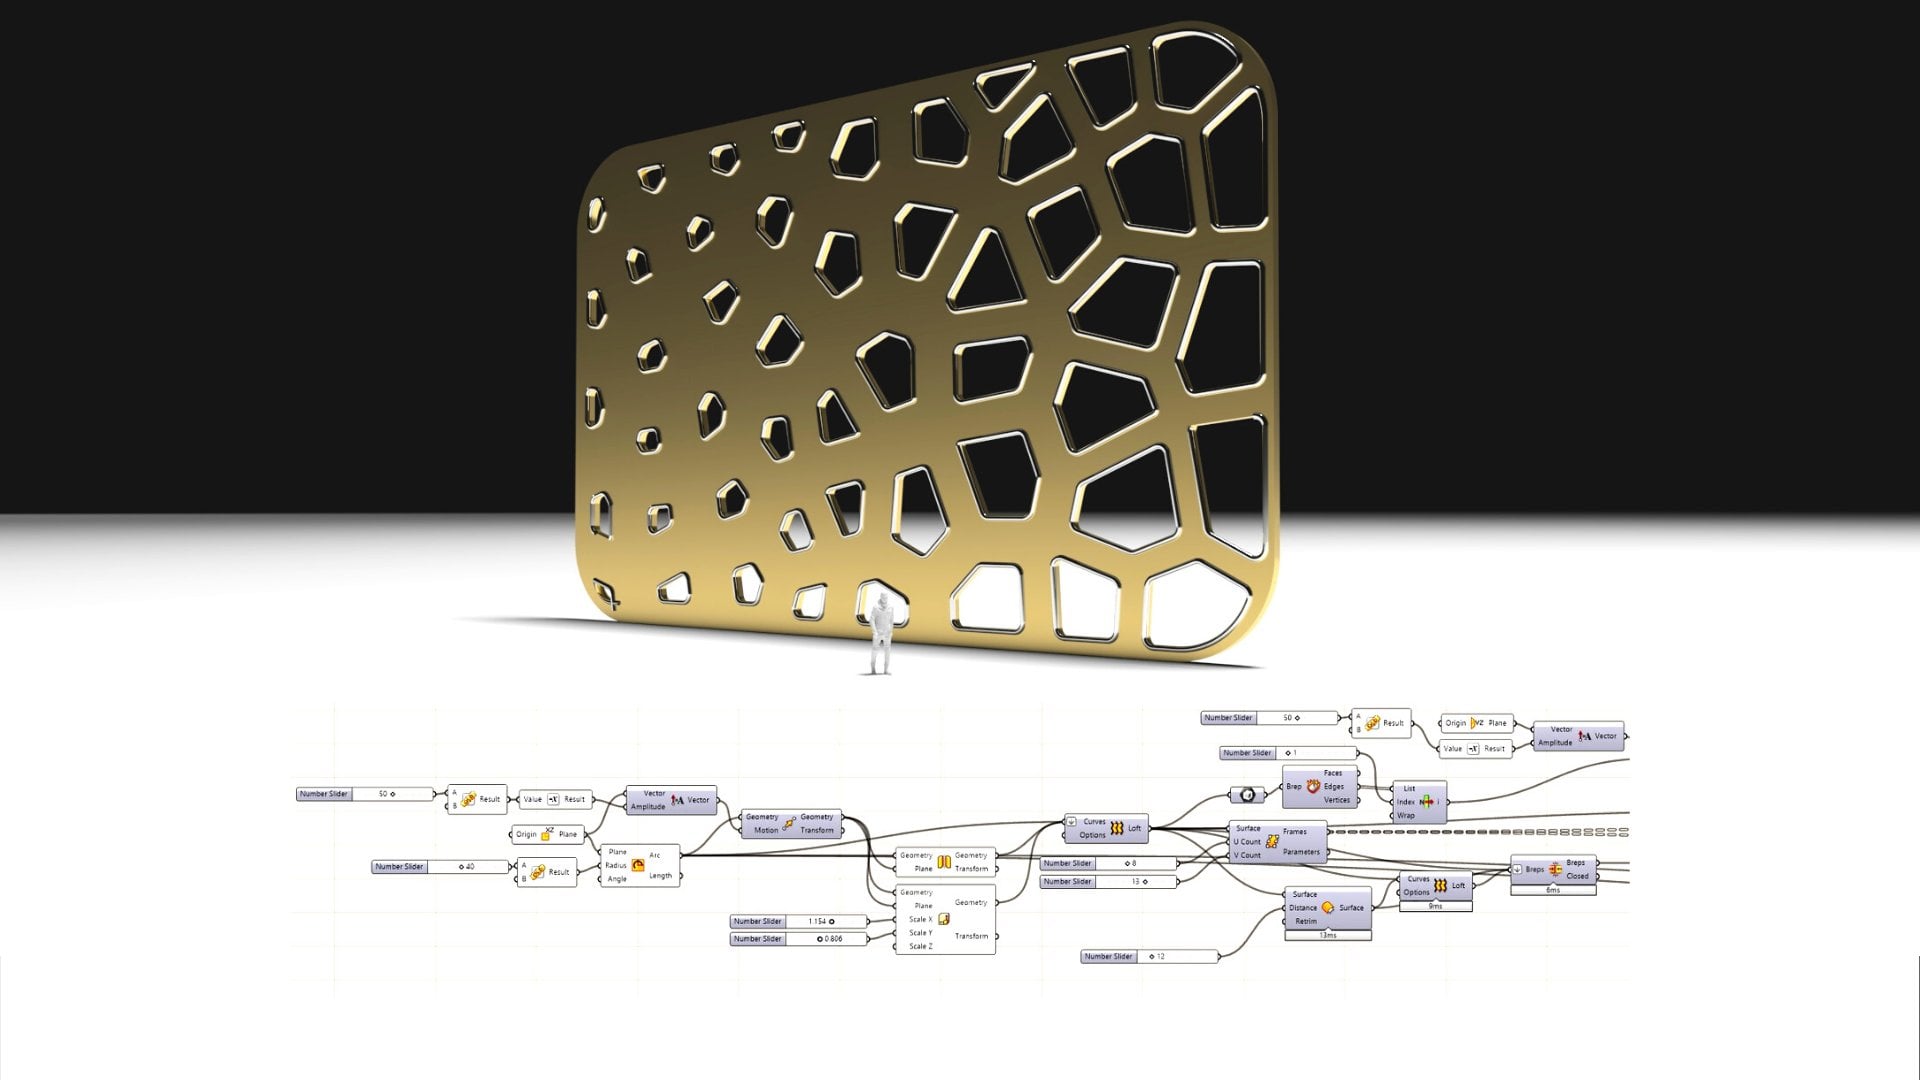
4. 04 PATTERN SRUFACE: a lot of the times you'll actually want to put a pattern on the surface. So it's not always useful to start with the grid. And, ah, let's sexually create a surface here to give you an idea. So it's going plane, and then let's just create a default plane there. Now I'm gonna go to Cage at it. I'm gonna go rectangle, and then the defaults I'm gonna take a few points here will be set, but it will be so And then have maybe these two also that we we have a A form that's kind of interesting, and I can show you how to subdivide this and put a pattern on it. And so let's go to to subdivided was good ice a trim. So I so trump. But first you need to bring in that surface. So its second surface here and grasshopper, right click there and then for the surface right quick here on the surface and then go to set one service. Now we could go to divide Domain Square. We can plug the domain here into the domain. We can plug in the surface into there, and then once you plug it into here will have a default of 10 by 10. And that's good because we know we can adjust how many subdivisions we want and then to get a point right in between every single one of those, we want to go to something called Evaluate Surface. What it's gonna do is it's gonna take every single one of these surfaces, and it's gonna, uh, basically try to find a point directly in the center here. So let's plug in the surface into surface here and let's actually go to reprogram it to rise. That way, it'll actually function. And then here we can go toe empty slider and create a point at the exact centre point. You can plug in the point there, and as you can see, we have now a bunch of construction planes or see planes that are placed around. And so let's go actually back 2.5 and then here, where you have the normals or the points or the frames. We can go ahead and create the circles like we had before or the polygons. So let's go to point there, weaken. Let's give it a release of 10 and there we have that pattern throughout the entire surface , and it's actually just sitting on top. So what we could do is, if we want it to be right on the surface, we can actually do something called Project onto the rep. Yes, it will take this curve plug in that curve. There were plug in the Europe that will be our original surface, and the direction is gonna be in the Z direction. That's gonna be the default 001 or in the Z direction, which means it's gonna project it up and down. It's gonna take that this pattern that we had before projected right onto the surface. And there we have a pattern on a surface that we're able to even adjust here with this lighter. So some pretty cool results you could get by basically using any surface, subdividing it, using ice, a trim, evaluating the surface and getting the midpoint. You can actually get more than one point if you wanted to. Actually, you can go here and you can say, as you will see another point be added. There, we can move this around in another point will be added, but for now, we'll keep it at one. And so there we have that circle that we can adjust the parameters and there we have. And lastly, we have that all that the whole pattern being projected back down to the original service. So that's a way to create three D three D surface patterns, but it's gonna be a two dimensional curve that's gonna be created. And so let's move on and show you how to use a curve attractors. That way we can create a variation in scale or even in height, So let me show you how to get that.
5. 05 PATTERN CURVE ATTRACTOR: Okay, So for this next exercise, we were actually going to bring back the grid and that pattern. That way we can hot do a curve, a tractor, and that could show you how to create that. So it's pretty straightforward. I'm gonna go here and actually enable it and start the process of doing the curb a tractor . So I'm gonna take away the the hexagonal grid and actually going to just use the original grid's grid that we had there, and I'm gonna increase actually circles for this example. So let's go here. It's actually one group this go to circle and put the points there, but the radius in and now we can start a process of putting the curve a tractor. Let's bring in the next component called curve curve, closest points. And what we're gonna do is plug in the points right here in the points, but make sure you flatten it and then for curb. We're actually gonna want to do that ourselves here. So it's going right now and go to a, uh, this is a control point current, and I'm just gonna go just do something like this, uh, so we can use this as a group. The tractor. Now we can use one inside of right grasshopper. But for now, keep it simple and use one here. So to bring that into grasshopper, we want to double click there and go to curb, bring in this component called curb up, and then select that there, right click set, one curb. And there we have that curve that we can plug into their And what it will do is it will calculate how close this curve is to all of those points that we plugged in. And so that's why we have to find them because they need to calculated us an entire one list, not as a bunch of sets of information. And so there we have. We have a list of distances that way have 121 distances, and that's what we're gonna be using for a curve a tractor, because we want to take those distances and we want to remap the numbers. We want to take the numbers that we get from this, and we want to remap them. So let's plug in the distance into the value. Next, we want to get the maximum and minimum numbers. So that's gonna be the balance. And what it's gonna do is we're gonna take that distances that we got there and it's gonna get those two numbers the smallest appoint three and the biggest of 59. We plug that into the source, and now we can construct the domain, which is gonna allow us to vary the start, which will start at one. What Sorry about that would go here to five, actually, and bring the slider down here, and then we can put the end to higher number. So that's what that's what it's going to allow us to. Whatever is closest to that curve is going to be smaller or bigger, depending on what's later we have here. So that's gonna vary our distances. And there we can plug in to the target. So now we have these numbers that are mapped and ready to be able to adjust the pattern according to So now that we have the mapped, you can take those original circles that we have there. Actually, we can bring in that grid just in case we want to look at it, and we want to move in those circles out here and instead of the radius being warned with the slider, Well, actually, get rid of that slider and plug in those map numbers right into the media's. Now what you want to do is you'll see it's not gonna work. Well, you want to do is right. Click here and go to graft. And then right here with this plane, right click here and then go to grab. And there you have the curve. A tractor. As you can see, it is working because when you live the curve, we have the pattern getting smaller, where the curve iss and then getting bigger as to get away. You can actually change that over to them getting smaller, 20 outside and bigger twin C inside. And so that's a way to use the curve. Attractors is it's fairly straight. Board is bringing in this curve, you see, so we can actually hide this. You can actually hide this also and just use this curb and we can hide that grid and have this just that. Just like that, you could go to let's todo uh 30. And we can also increase the extents here so we can have this just get a little bit crazy there. But as you can see, what we did is bring in a curb, see how close that curve is to those points, then be able to re map, plug in the original numbers, the maximum minimum and then the remap numbers and then use that as radius. And so that's how we can do that. And we don't only have to use circles. Like I said, we can use polygons and we can do the same thing. So let's go for plain, let's make sure to graft and for radius. Let's make sure graft and let's do the same thing. Let's put it in the map numbers there and this plug in the points there and there we have. We can actually hide this one there. We have a hexagonal one, and we can also change that over two. It's a rectangle one, and then we have some pretty interesting results just from you see this group a tractor. So let's move ahead and show you how to use a curve, a tractor to actually create some heights and some variation that way so we can actually take all of this grouped together and move on to the next step
6. 06 3D PATTERN – EXTRUDE CURVE ATTRACTOR: Okay, So this time we're gonna be actually creating into a three D point a tractor that changes and height. So we'll use the same grid with the extent with size of 10 extended X Y 15 and the circle reduce support. And that way we can do the same thing. We can bring in curved closest points and we can plug in the points into the point. And we're also gonna have to do that once again. We're gonna create just a circle here in the middle and use that as her curb. So we can either go to curve here or we could right click here and set one curb, so that's another way to do it. But I'll do it this way. Set one curve, plug that into there and with doing the same thing. It's calculating how close that curve is to all of this points. So let's remap the numbers and the best way to remember all these things. It's just to do them over and over again. And so let's plug in the distance there. Now bounce goes into the source, as we did before. Then target. It's gonna be the construction of the two points of constructive me, and we can do that once again, we can say to have a higher number of the other one, so it's gonna very our height. What we're gonna do is actually take these circles, and we want to extreme them in the Z direction. So we're gonna street extreme them up this amount, these circles. And so there we have. We have the circles that have been extruded up and the ones that are small, kind of get smaller. But as you can see, they're still open so we can actually come here and go to cap holes. Don't click that, and then we can hide this. What's cool about this curve? A tractor is we can move it over and it'll take a little bit of time. But it won't take too long because this is superior light calculation. It has to do. But we can also go the opposite direction. You can see where the circle is. We wanted to be higher and where the circle is not, I wanted to be lowered instead of Syria. We need to give it like an actual valley, so it gives it some thickness, and we can also increase, Let's say the maximum the minimum. That way we can play around with it a little bit more. And so there you have 10 could be a little bit more drastic. So there we have that or we could increase the size here. Yeah, and so that's way to create curva trackers by taking these and extruding them with a variable height. Now it doesn't only have to be an extrusion, it can also be a scale. But with scale it's a little bit different and the same is the other one. We can also go here to Teoh, Interval eight point. Do the same thing as we did before. Go here too. Set one curb and we can also adjust that that way. So let's go ahead and show you how to create a pattern. Not using only extraditions. But you see the scale
7. 07 3D PATTERN – SCALE CURVE ATTRACTOR: So I'm gonna take all of these extractions and be reps, and I'm gonna go ahead and delete them. And so what I'll do is I'll have all of these numbers here and let's actually extreme them . So instead of circles, that's actually create some spears and plug in the points there, the radius there and we're gonna want to take the spheres and instead of moving them in the Z direction we want to scale. So we're gonna scale spears. And with scale, it's a little bit different. You can't go from 1 to 16. Scale is gonna be a factor of, uh, it's gonna be a factor between zero and Teoh between one and two to increase in between one and zero to decrease. So we wanted to start at We'll create a slider zero dot dot 0.0.2 point 00 That will do domain. And so we'll go here and we'll go domain and and domain start. And so there we have the remap numbers that we can project plug into the factor and the center points it's actually gonna be those points to. So there we have. Let's make sure to go to graft all of these together. That way we have We can hide these, and we have the remap numbers that we can move around. So this is how you can create a three D pattern, not on Lee using Ah, change of extrusion is what you could do it a change of scale. And so the scale is gonna be from zeroed in two. It's gonna be twice as big and thes. They're gonna be tiny, tiny, tiny, so we can adjust that we could do the opposite. And so that's a way to be able to use a curve. A tractor, not just with extractions, but with patterns using a scale and a curve, a tractor remap numbers.
8. 08 CONCLUSION – OVERVIEW: So here we are at the end. Now you basically know how to use the curve. A tractor we have. We've gone through all of these different steps. Teoh show you how to create the curve. A tractor. We started by using a very simple movement of different circles and polygons in the X and y direction. Then we used a grid. There's different types of goods there. Square rectangular there, six agonal on. And so that's another way to create patterns in a more simple way. But it doesn't allow you to, let's say, create a solid and move it over and create a pattern that way. So this is a little bit limited to in certain aspect of and then here we have this one, which is a surface that we have subdivided, created a pattern and projected it back down. We could also apply all of the curve a tractor, things that you that we learn on the next step. We can apply at all to any of these bottom ones by just using the remap numbers, using the curb closest points and that way bearing the size and the radius of the circles and the pattern and then ultimately coming here and using the three D pattern of the skier and then scaling it using the remap numbers. But we have to remember that they re map numbers that were used in this portion are gonna be a little bit different. And so if you have any questions or you have ideas for future videos, let me know. I'm more than willing to research and get you guys whatever you guys want. But most importantly is that you guys understand the information, and if you don't please let me know, and I'll make sure to clarify any questions you guys have. And so thank you for watching. I appreciate you making it through the editorial today, and I hope to see you next time with some other cool Parametric or three D modeling videos . In this video, I basically created a cylinder and then used this pickle with that cylinder to move it up and down and use that as a curve, a tractor. And so I used the same example, Asai, should you in the video in the portion where I took the spheres and they scaled him up and down, I did the exact same thing, I But instead of scaling, um, actually, I used the variation and the radius of that pattern. And so that's what I am showing here is basically an example of Happel that is used in another application. So you saw a bunch of examples that I posted, and this is just another way of basically creating a three dimensional pattern.
 DCO Graphicstudio