Transcripts
1. INTRODUCTION: but hi, my name's David Petty and welcome to take a graphic studio. In this video, I'll be going over a tutorial that allows you to create a born early pattern with a curve. A tractor. This tutorial is perfect for engineers, architects, designers or anyone interested in how Parametric design works and how to use the software a little bit better. So if you have any questions or ideas for future videos, please make sure to let me know. And if you stick around to the end, I'll actually be sharing the link for you to download the script and play with it on your own. We'll also be doing a render that what you can see, what it can look like once you have, like, a final product and you go ahead and use a good rendering engine, too. Display your word. So thank you for choosing Deka graphic studio and let's go ahead and get started
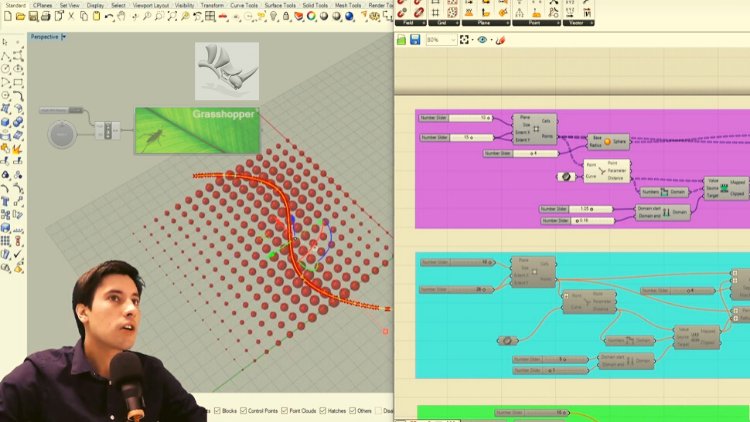
2. BASE GEOMETRY AND VORONOI: Okay, So just start. We're gonna create a plane and to create a plane, we can either create it on the why Z plane bar in the XY plane. So that tournament bringing here. So double click and go toe X z playing and you'll see that we've created a construction plane that is actually upright, um, on the X and Z plane, and this is what's gonna allow us to create a rectangle. So I'm gonna create a rectangle here, double quick and go to a rectangle and then use this one that IHSAA has, like a yellow icon inside and a rectangle outside. And we can plug in the plane right here towards explain. And now we can pick an X and y size. Now, I'm gonna go here also going to go two units to see what units were working with, some using interest in feet and inches. Um, and what I wanted to be is and feet, So I want the facade to be around 50 feet by 100 feet tall and so and the X we're gonna go , uh, let's say 50 feet. And since this is were working at inches, if I were to plug this into the X will see that it's only 50 inches and I wanted to be a lot bigger. So to get it into feet, you do a multiplication. So DoubleClick goto a star or multiplication and then 12. And that way you're able to multiply 15 by 12 getting 600 inches, and that is 50 feet. So we'll have that will be the length there, and then we'll go in the Y direction and will make it. We'll make a copy of this. So to make a quick copy, we can slide down and hold hold, Ault And it will make a quick copy so we can drag them into the why. And so we have a 15 by 50 uh, rectangle up on this construction plane that we created initially. So we could also come here and adjust the height so we could say 50 by 80. And you know, this is what we would have s are asked the facade. So now we can move on and start creating the plane in which the points are going to go to create the Voronin pattern. Okay, so our next step is going to be Teoh create a plane right where the rectangle list. So we're going to double click here and go toe boundary services. And what it will do is it will create a surface right at the boundary of where the rectangle is, and the other option that we have here is to give it a radius. So if we were to say let's say 50 here we can also do like a fill it on the outside. But for now, we'll keep it at zero. Um, so it's less complicated. And then later on, you can come back and adjust that. And so here we have that service. And so what we want to do is bring in the points. So we're gonna go to vector here and then grid and then populate three D. And so what this properly three D is going to do is if we plug in that surface into the region, we'll see that we have a lot of points that are created kind of randomly throughout that surface. And that's what this component does. It'll give you accounts a default of 100. So right now we have 100 points plotted here, and the seed is gonna be a random, uh, another random result. So let's go here to, let's say, 1 50 And for now, we don't really have to worry about points that that's not something we're gonna use today . So we got accounts and we plug in 1 50 We'll see that it will actually increase the number of points that it puts so well limited to A to like the 100 here. That way we don't have issues with it being too heavy. So we'll keep it here at 30 for now. And now we'll see that if we were to bring any Slater of to of bringing a slider and leave it up to here, and then we'll see that if we plug it into the seed will actually have a different result every time you have decided. So that's what C will do. And now that we have these points, we can go ahead and already start creating the Born A pattern. And that was pretty straightforward. There's different ways in which you can create born early. For now, we're gonna go to mesh, so go to the mesh tab and then we're gonna go triangulation. And then Warren Oy, this one, the one that has the red, the blue and the green. So once we have this component, it will go ahead and bring in all those points that we created on that surface. And we'll see here on our left hand side that we've created that Boren oy pattern. But it's way extended out past her plane, which is fine. But we can always come back here and adjust the different results every time. Then we could also increase the number of points or decrease the number of points. And so this is going to give us the ability to change our results fairly quickly. But we still have a few steps to move forward to. The next step is gonna be to take all of these lines and trim out this surface. That way we can start creating that offsets and the curve a tractor that we're trying to achieve towards the end
3. VORONOI PATTERN AND SCALE: The next step is gonna be to bring in a component that will split that surface with these curbs. So we'll go here and intersect and then under physical, we'll see that there's a component called surface split. This surface weight component will literally take that surface, which is this when we created and take the cells and these poly lines that we created and it'll subdivided. So let's go ahead and actually take thes previous surfaces or the Sikh this surface back here and let's go ahead and hide the creamy. So I select it into space bar and then hide the disabled preview. And that way we only have this final result, which is the surface is broken down. And if we actually hide, the cells will see that, Yes, we were able to subdivide that into war into as many, um, points as we have. No, no. And like I said earlier, we could always come back and increase or decrease the number of subdivisions that we want for the born I. And we could even fill it the edges to create like a cleaner, you know, a different type of facade. So here we have a interesting pattern and we can come back in, play around with the different results. So the next step is gonna be to take these and scaled them down. That way we can create, like the Inter inter form and an outer form and create a bit of a frame, and that will give us the jumping off point for creating the curve. A tractor. Okay, so for our next move, let's go ahead and take all of these segments and I'm going to actually hide all of these points that we have. So I'm gonna hide the preview and then here under fragments, I'm going to go to a component double click here and go to components called Area. So what area is going to do is it's gonna find the exact central oId of each one of these cells, and that's going to give us the point in which we can scale down into. So let's go ahead and do that. Let's bring in a component called scale, said DoubleClick. Go to scale and we can scale non uniform or scale uniform for today. We're going to school uniform, and we're gonna take the point in which we're going to scale. All of these is gonna be the central. And which wants am I going to scale? I'm gonna scale the fragments. So this broken down, this subdivided service that we created is now being scaled down to the center of each one of those. So to be able to pick how big and a small you could make them, you will notice that when we have the cell complete, that is a scale of one. And when we wanted to be small, that's gonna be a scale of zero. So let's create this lighter from zero or from yeah, from zero dot dot dot 1.0 And would that'll do is it'll give us a component slider that has the re decimal points and it goes from 0 to 1. So we'll keep it at one, and we'll get a factor of one, and we'll see that it's the exact same size. And as we start scaling down, we start seeing that the frame becomes a little bit smaller where it becomes a little bit bigger or the pattern becomes a little bit smaller. So this is going to give us the ability to do a subtraction, and that way we can create that frame, and so that's going to be our next. Our next move is to subdivide or to subtract the smaller surfaces on from that bigger surface.
4. VORONOI PATTERN FRAME: So let's bring in the next component, which is gonna be under the Tavernier intersect and then under shape will go to region difference. So what that's going to do is it's gonna take these cells, which is gonna be region A, and it's going to subtract Region B, which is gonna be these small, this smaller pattern. So let's seek that geometry and go to Kirby, and we'll see that if we actually go ahead and do select these, the ones from before Space Bar and hide the Previa. And then now we have basically the cells with the frame, and what I want to do is take this and I want to create some boundary surfaces. So let's get a boundary surfaces and we'll see that there. We have now created the hollowed out frame and one of the thing. One of the issues that we do have brain now, though, is that little by little, it's getting a little bit heavier for the computer to compute, especially when you start bringing in planes. This it doesn't have a hard time working with lines, but with planes that has a bit of heart your time. So when I go here, and I just the scene to me to change basically the result. It takes a little bit of time, especially if we want to go ahead and increase this to it's a 40 were able to, but we'll see that it'll take a little bit of time, and then we can come back and always decrease it to, like, 20 and make it a little bit easier for the computer and also down here at the factor. We can always come back and say, Point aid not we won't 0.0.5. We wanted to be a super very thick frame. So that is the way to be able to take two sets. The surfaces basically do a subtraction and then keep the frame. The next step is gonna be too instead of scale, um, down in this way, just by using the same size everywhere, we're gonna be able to bring a curve a tractor, And that way we can pick you know which area of this pattern is dense and which one is a little bit allows more light in. So that's gonna be our next step
5. VORONOI PATTERN CURVE ATTRACTOR: it's gonna be our next step. So for the curve, the tractor, what we're gonna need is something for the pattern to change according to. So we're gonna bring in. We're gonna actually use this rectangle down here or this line down here, and we're gonna be moving it up and down, and that's gonna be our curve, a tractor line. So let's go back here to this rectangle and I'm gonna Let's see, I'm gonna do a box around it. Because if I were to, let's say, I wouldn't want to explode this rectangle because if I do fill it in, I don't want it. Teoh, just be on the inside line. I wanted to be the exact outside like the outside frame of it. So I'm gonna go ahead and hide the preview of that one, and I'm just gonna create a bounding box around that rectangle. And from that I'm actually gonna bring the that Philip down to zero again. What I'm gonna do is I'm going to take this box and I'm gonna deconstruct it. So deconstruct box, deconstruct the rep. And so let's bring in that box. Let's bring that into the deconstruct be rep and it's gonna give us all of the faces, edges and ver disease. For now, I'm gonna actually hide the result here. So space bar and Disable Premium and we'll see that we have this box. Let's also hide this one. And let's just keep our current components the only one that we could be. And so we have faces, edges. We have four edges and then we have former disease. So that's pick one of those. I just It's gonna list list item, and we'll list items going to do is just allow us to pick one of the one of these lines, because right now we could Without that, we could only pick up all of them at the same time. So we're gonna plug the edges into the list here, and we'll see that the default index of zero. It's actually our bottom line, and so that's perfect, because this is the line that we actually want to move up and down, and so we see here that height is 80 and so we'll be able to actually take this line and move. This'll ein vertically in the Z direction, and we're going to move it up I'm gonna take these two components, and I'm gonna slide them down and hold Ault to make a quick copy. And I'm gonna plug that in there and then see that we have now the ability to take this bottom line that is basically at the bottom of the whole pattern. So I'm gonna hide this and I'm gonna bring Didn't the result back? So we have. This is where the pattern is and we have this line at the bottom. And what we're doing now is we're actually able to move it up and down, and this line is going to be what the Qatar will react to you. So this is gonna be basically, are curb a tractor. And this is what you need to do before you jump into the next moves? Because there's gonna be some other some other steps that we need to take for the curve A tractor, and I'm I'll go over those right now, okay? And so now that we have this curb, we're gonna need to bring in our Kurt, um, curb closest points. So closest this curve closest point. And what this is gonna ask us, uh, this component's gonna ask us for two things it's gonna ask us for the curb. This is gonna be our curve, a tractor that we just created. So this curve that we move up and down is there a curve? The tractor? But we also going to need some points that are actually the ones that are in the center here. So if we go to Central, that's going to be our all of our points. And what that does is I'm gonna actually bring back all the central It's so right click there and go to Premium. What it's doing is it's calculating how far each one of these points are relative to the line and that way, creating a list of distances that very depending on how close is this Linus. So it may be a little bit tricky and complicated to think about at the moment if it's the first time that you've come across, curve a tractor. But go ahead and give it some time and go ahead and download this script so you can play with it and learn it a little bit better. But it is just a matter of practice. So what? It is's basically you need to bring in a curve. You need to bring in this curve closest points and you need the points. Asked that the patterns on and so we'll bring in those Centrowitz right into the points will bring in this curve right into that. And this will give us all the distances that we can now remap and be able to change this pattern accordingly. So let me show you how to get that done. This step is we're going to remap the numbers, so we're gonna bring in three components at the exact same time. That always kind of work together. So we're gonna go to remap numbers. This is gonna be our ability to remap these numbers fairly quickly because, um, we could go ahead and just plug in all of these distances into the factor. But it's just not gonna work correctly until, um, we re not the numbers correctly. So let's go to distance and let's plug that right into the remap numbers. We're also going to bring in a component called bounds. And so the bounds we plug in the distance that we get on that curve closest points, we plug it into the numbers this will give us the maximum and minimum numbers and we'll plug that into the source. And now Target is gonna be what's gonna be the smallest numbers smallest number in which was gonna be the biggest number. So if we go here, double click, and we go to construct domain, so create a number domain. So it's gonna be called construct domain, and this one is gonna be our target. So our target's gonna be, uh, how, before we have here the factor. You see how if we change the factor here of the pattern and we increase it or decrease it, it's gonna just the scale factor. So what? I'm gonna do something. I'm going to unplug it from here, and I'm gonna make this a lower number, and I'm gonna make this a bit of a bigger number. So go here and I'll go here and now I've successfully re mapped basically the numbers, So we had the original numbers coming into the value. We have this number coming into balance, which is going to give us a maximum and minimum number, and that goes into the source. And then we bring in target, which is gonna be our construct domain, and it's gonna give us our start number and and number. So these three components, for the most part always come in together. Um, and you could use them for other things. But if you are going to use a carpet tractor for the most part, ning to bring in these four components at the same time, including a curve and a point grid or pattern. So here we have the clipped the map numbers, and what we're gonna do is now slide this over and these remap numbers are going to now go into the factor. And so there we have the ability now to move this curb up or move it down. You actually put it lower here. And so here we can now play around with how dense the smaller ones are and how spars the top part is. So the further away you get from this this line, it starts to actually decrease the scale size. So this is the way that you go ahead and use a curve, a tractor for basically scaling down the pattern and let's go ahead and come here and increase the count. Because this will give us, so I feel like it's gonna look pretty cool. So let's go ahead and just that. And then we see that, yes, we have. We still have that ability that's increase that a little bit more. And, yes, it's a bit heavy, but we can always, um you know, if we keep it right here just with planes, it's It'll be still manageable for the computer. And so we have the ability also here to go to change that to five. And there we have, in my opinion, a pretty cool pattern. So what I'm gonna do is I'm gonna take these these things back here, and I'm going to do the space bar and hide the Previa. And there we have a basically flat plane that has a born early pattern. Um, going from, you know, dance to lose, using a curve, a tractor. And so the next step is gonna be to give this some thickness and then see what our final results could look like.
6. 3D VORONOI PATTERN: Okay, so now that we have these, let's go ahead and give it some thickness. But before we move on to that, let's actually go back here and decrease the pattern. Just so it's not so heavy and gives us issues. So here we have this. And also I'm gonna take a bit of time and go ahead and label all of these and have them, you know, just in case if you want to come back and adjust things or if you want to share this with someone, it's a good idea and good practice to go ahead and, like, create a panel and call this, you know, pattern size and the reason why I like using panels rather than, you know, double clicking on the components. And right Changing the name is because the panels are bright and they call my attention. And also I can write more information down. So I will go like this. Hold all to make a quick copy. Okay, so let's go ahead and extreme this, uh, this and give it some thickness. So gonna go to double click here and go to extremes and which direction? I mean, there's different ways that we can pick a direction, we could either use thes surfaces themselves. And you said it's a reference to extreme perpendicular to those. Or we could go ahead and use our initial um, x Z plane. So I'm gonna do that. I'm gonna goto amplitude, so double click here and gonna amplitude on what amplitude is going to do is it's going to allow you to use of vector. So we'll use the Y Z plane, and it's gonna extreme perpendicular to that. So that's gonna be the vector, and the amplitude is gonna be Give us the ability to use a slider. So if I wanted to be a 12 inch thick pattern so I'll go here to amplitude, put it at 12 and then vector put that into the direction and then go here, plug in the surface to that base and then hide that preview. And now we have a three dimensional born oil pattern that we can go ahead and fabricate or we can put into our designs. Um, it really depends on you know where you want to take it after this, but if we actually look at it this way, there's some other things we can go ahead and do you hear Teoh to give it a little bit more , making a little bit more dynamic? Not so rigid. So right now we have the pattern, basically with really jagged edges or, like really, you know, sharp edges. So let's say if we wanted to, you know, fill it some of these and make it a little bit, you know, a little bit softer. So let's go ahead and do that in this next step. Yes, let's take this. Let's go to Space Bar and let's disable it and bring back the surface and let's play around with how we can change this pattern a little bit.
7. VORONOI OPTIONS AND ITERATIONS: so to do that, let's go ahead and we'll see that we have to regions. We have the ones that were scaled down, and we also have the original cells. So let's go back here and let's increase the Philip Radius. Let's go to 100 see what it does to our pattern. So we'll see that our pattern actually rule change accordingly. But let's see if we can fill it. The pattern on the inside, that's what you 85 So I'm gonna bring in a Slater of five. That's the Philip that I want to use and double click here and go to fill it. Philip, Sharp Curtain uh, sharp corner seven. Curb plug in the radius there, and we'll plug in our geometry right into there to see if we are able to play around a little bit with the softness of some of the corners. Better, that seems to be a little bit, uh, kind of sharp. So let's go ahead and use this curve, and I'm going to do a boundary service. And so now, instead of plugging in this that had those sharp edges I'm gonna previous hide the previa, and I'm actually going to plug in those surfaces we just created and plug that right into the B. And it will take some time because when you have rounded edges, it actually takes more time for the computer to to display. But here we have, we've got basically I just fill it in for the most part, and we created a way softer, uh, edge and basically different results for are born very pattern. So increased this lighter to 20. And I'm going to now see if by increasing the fill it radius 20 we get anything else looking any different. So, yeah, we even get softer. Um, just here. And I feel like that's ah, that's a cool, pretty cool pattern in my opinion. And so we can now come back here. We can un preview this one, and we can enable this one again. And here, let's go to the mesh qualities of top right here. Let's get high quality. And there we have created this really cool born or two d pattern that that adjust according to the curve that we have here at the bottom and we can always move that went up and down. So let me show you. I'm gonna take that curb, and I'm actually going to move it from five. If we know that the top is at 80 let's go to 75. And like I said, since we have a three dimensional pattern, it'll take a little bit more time. But there did the exact same thing by bringing it kind of down or bringing the loose pattern down and the tighter part pattern? Not so for the next few steps. What I'm gonna do is I'm going to take this. I'm gonna bake it, which is gonna be too. Go here to take a layer and go to space bar and bake. And that way I could bring it into right now, play around with the you know, some of the colors and some materials put it into a kind of rendering scene and then see what we can get us a final result. But like I said earlier, if you have any questions or if you really, uh, didn't understand some portion of it, make sure to download the script and play with it on your own, because that will help you learn how to use this program a lot better. It's basically one of those trial and error and practice things because it's a very different way of designing
8. CONCLUSION AND FINAL RESULTS: - no , - but
 DCO Graphicstudio