Transcripts
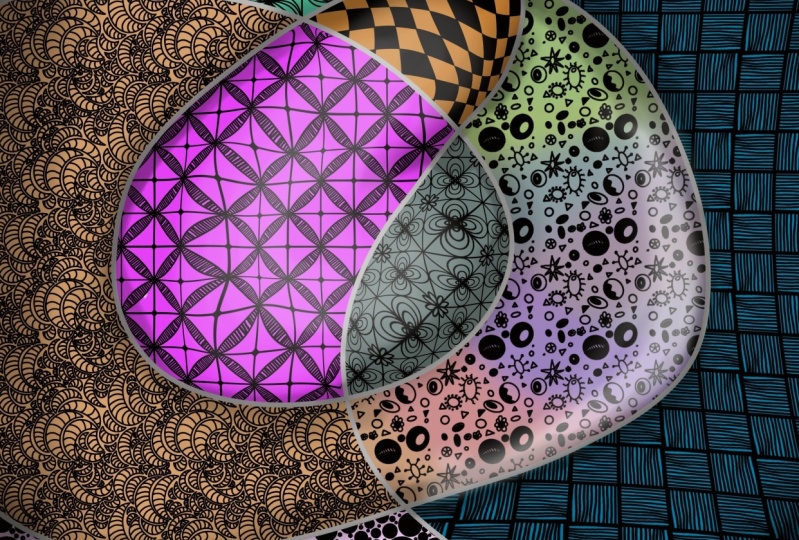
1. Introduction: I'd really like to welcome you to my latest course. This class is called RESTful doodling. How many of us getting really involved in coloring books and mindfulness. And this is just such a wonderful to be able to do. It's great for the mind, great for the soul, but it's quite hard to achieve on an iPad. And so using Procreate, I create a variety of brushes, many of which you get free to help you create a mindful illustration that is restful. You will get 18 free brushes with this course. If you go to the resources below, on a desktop version, you'll be able to upload these, download the sorry. And these are variety of ones that I've made. And then you also get for hygiene brushes. Sorry, you can't see that for etching brushes, you'll also get a shader line and a painting brush as well. As well as the freebies, I will show you how to make your own brushes. This is an example of the brush I'm making the course. This is a geometric brush. I have used symmetry guides and things like that in order to construct list1. And I will show you not only how to make the design top tips on how to make everything match up. But also I'll show you how to observe it as a pattern, how to add extra layers if you want to, things like that. Then we'll look at organic patterns and how we can make a repeating pattern really easily within procreate. And this is quite a quick process. Once you get used to it, this is completely just drawn off the top of my head. There's no pattern behind it at all. But it flows is a pattern beautifully once it's done. So we're going to turn that into a brush to and then we're going to create our own aging brushes. Now this is designed to go on a line, but you can have it however you like. Really, really simple using the symmetry brush once again. But then we create a brush from that, which is a different process to using the other ones. Next up we're going to do simple line art, and then we're going to block it in with our pattern brushes. We're going to learn how to liquefy, how to walk. We're going to learn about four techniques on how to actually get the pattern into our design. And then we're going to look at shading to give us some depth. And we're going to use the liquefy option for the, expanding the pinching and the pushing to try make, give a lot of depth to our illustration so that with the shading makes certain areas really stick out. Then we're going to learn how to add color. There are various different ways you can add color depending on how much of a traditionalist who might be. You can have the effect that you're coloring in a fine liner. The effect of coloring in and a pencil, or you can just whack the coloring completely. There is also options for shading and things like that, you know, sort of multicolored rainbow and things. Then I will show you how to do the edging like here using the edging brushes that we create along here. And also to coloring areas in color and then add a different color underneath to give a totally different feel. So last day, this is an illustration I'll use as an example at the end of how you can create really pretty illustrations from using this technique. And how I use Liquify to give a three-dimensional feel to the bubbles. And the way that I've made the tail look as if it's floating around. So liquefy really is your friend with this. So I really hope you enjoy taking my class and I really look forward to seeing what you create. I'm home really, really excited. So thank you for watching my intro. I really hope to see you soon. Bye.
2. Class project: Right onto the class project. What I would like you to do is to create a piece of art using the brushes that you have made. So this is one of the brushes that we made in the class. This isn't on the brush that we made in the class as well. And these are all brushes that are provided in your free resources. Kids doesn't have to be anything like this. You can do it in your own colors, urine shapes, it can be symmetrical, it can be completely random. It's totally up to you, but I'd love to see what you create. So don't forget to post below and let me know what you've done.
3. Making a geometric pattern brush: So now we're going to start creating our geometric brushes. So if I show you in the brush set that you get the RESTful doodles. We have a variety of different brushes that have made already. And some, such as this one is a very geometric design. There are some which are quite organic, such as this one. But first off, within a start off with a very geometric one. Like this. The actual design can be so simple, but it's amazing the effect they can have. So first things first, what we're going to do is we're going to go up and use the doodle line brush. And then we're gonna go to the wrench at the top here. We all go into select Canvas, drawing guide, edit, drawing guide, symmetry. And then we're going to go and do the quadrant option and Rotational Symmetry. And then click Done. Then we're going to draw our basic pattern. So the first thing that works best with the geometric designs, unless you will go into, be going directly into a corner, it's a good idea to draw an edge. So what I'm gonna do is I'm going to agitate and make sure that I am even in the corner like that. So to creates a bit of a framework. We go. So now I've created a bulks. And that will be very much like if you can see on this, this design, it has a bulks. This design has a bulks. You know, they all have boxes. Because it makes life a lot easier when you do a repeat pattern and it avoids the possibility of having too many mistakes. But so the next thing I'm gonna do is just, just experiment really. So I think I'm gonna go corner. I forgot to select my doodle brush again. Okay, so I'm gonna go Coolidge Corner. And if I hold the pen down, then it makes the line completely straight. And then I think I will have just because it's geometric doesn't mean say you couldn't have other shapes in it as well. Sure, I like that actually. Let's try and UFO case relief plane and around with the brushes. And seeing like say I'm using the snap functionality here. I'm making sure that we are lined up homeland middle line. By the way, it's sort of coming out from the middle. I think that might fit one more on and then that'll be it. Making sure again, my central ones along the same line. I like that. I like to wait, so zooming back in and that's really good. Okay, so we've got our design in place now. Now we want to check to see whether or not Mexico pattern. In order to do that, I am going to duplicate it, escape this case. The fact is go why tone? I had to reload the image. So actually this is a photo rather than the original image we just did. What I'm gonna do now is use making sure that the snapping its own and the uniform can stay on. What I'm gonna do is I'm going to pull it up until I've got these yellow lines. So I should have yellow line, certain orange line that way, orange line that way. I'm going to get the next one. Pull up to the corner. I'm going to make sure the same thing. I've got orange that way, orange that way. And then I am going to merge them together. Duplicate that. Merge it down and move it down. Sorry. I don't know that that's not particularly well, actually. Like it's gone off the edge slightly on I was just my eyes. Now what we could do is a little design in the middle here if you wanted to. So if I Show you how to do that. What I'm gonna do is I'm actually going to do another layer on top because of the fact that these are all pictures. And I'm going to click my doodle brush. I'm also going to put my drawing assist back on. So if you just tap on it and do Drawing Assist, it will have the same that I had on before. And I think I'm just going to do a little design. Nothing, Nothing huge. I think I want that to go in all the corners. Okay, So next I'm gonna do, is I'm going to do a mark in each of the corners like that while the drawing assist is still on, then I'm going to duplicate that. And I'm going to move it up to the top corner, making sure I've got all my lines in place. Duplicate it again. Putting up to that corner. Duplicate again, it always doing it from the original. And then duplicating it again. Like say merge to get, which is quite clever. They sort of square center, which is rather nice. I could, I could rub all of those corners off if I wanted to, if I actually like it. So the next thing I can do is group those together. Let's group all of those together. And then why can I can then use that as my entire pattern? So I am going to go to the wrench. I'm going to hit Save PNG, Save Image. And then I'm gonna go to my brushes. Now, I've just saved this original one. Okay, so our next job is to look at the brushes and the RESTful doodles brush sets that came free with this class. You'll go into look for one of the brushes. Doesn't really matter which one as long as it's not one of the line ones. So I'm just going to do this. Twisted vortex. Swipe to the left, click Duplicate, and then doped and length click on it again. So at the minute twisted vortex looks like this. We're going to change it. So we're going to, we're not going to trace the shape. We're going to change the grain. Currently that is the image that was in there. So we're going to click Edit, Import, import a photo, and then click on the photo that we want to use. Now when you are starting a new brush from scratch. So starting the whole process from scratch, the image will appear like this. You need to click it with two fingers in order to make sure that background is blacked out. And I will show you why. When we're doing it like this. The colored section. So the bit that will be whatever color you choose to draw in is the pattern. If I did it the other way round. You'll notice that the color is actually everything else other than the pattern that we drew. So the pattern we drew is the negative space. But also the ones you'll purchase is when it's small, you can't see the pattern at all. It's really, really difficult. So go back to edit. Make sure you've got the background blacked out like this. And then click Done. Now if I turn both of those off, we can have a look on New Brush is really nice. So one thing I haven't done is I haven't renamed it. So I'm just gonna go back into M, goes down to about the brush. I'm just going to rename it. So I think we'll call let floral me go, make sure you sign it. And that is your brush that you have created so that we can use that in a minute with our coloring. So next up we're going to be doing the organic brush.
4. Making an organic feel brush: All right, We're going to get only the organic brush now. So when I say organic, I mean things like sort of floral moving, completely, norm, straight lines here, things like that. Free-flowing. I don't mean like a bacon and cheese Sony. So we're going to do is go back into your brushes. We're gonna go back up to the doodle line as if you were doing something else. And we're just going to draw a little, little design. So could be anything really. But I think I'm going to do since course, in various sizes, circles and ovals. Sometimes the simplest designs really do look the best. I appreciate it doesn't look like much so far that Tomonaga. Now I think I'm going to put some circles inside. Some of them. Kinda want them to look a little bit like amoeba. So I'm going to have some wiggly lines coming out of some of them. But what Harry, all labels don't lie. Strange plankton as well. Now I haven't done one there for a reason and you will see that in a minute. Let's just do crosses in this one. You can make them very, very varied. Doesn't have to be beautiful. The idea is to be natural and organic as you convey really, you don't need to have this so hand-drawn feel about it on that a bit black. Now, everywhere where you see black is going to be color. Once you've done it. So you can play around with thickness of lines and things like that. All right. I'm just going to change color, doesn't matter what color. And I'm just going to draw a little line in every corner. Now my design is nowhere near finished, okay, but what we're going to do is we're going to shift it so we can fill in some of the blanks. So take that design and you're going to, if you go into the Layers menu, swipe left and duplicate it. Just once. Let's move through slit one move, making sure you're snapping zone. We're going to move it to the right, making sure all those lines imply the orange lines. This one, we're going to move over the other way. And if we hadn't put those corners in, what would have happened is selected right up to the edge of anything that I've drawn. So I wouldn't be able to move the whole page. It wouldn't line up. So I'm going to merge those to them. I'm going to select Video rubber and just get rid of those colored lines. For show you now is our main. If I click on the Select button, can you see here it's not selected. And what I could do, an exit, sorry. This one moves, it fits into the screen, which isn't what I wanted to show. I want the whole screen to be selected. So now what I'm going to do is go back to my black. And I'm going to do some more. So going to fill up this space. A space really don't want that one to be black in the middle. That when black in the middle, sleek and coloring adults want to get in there. I mean, they're going to be quite small scene or going to spot them particularly. All right. And I'm going to leave this one because I'm going to do that in a minute. I'm just going to do some little circles to fill it up. Okay, draw faces in whatever pattern you doing. You could be doing hots, flowers, dots, just lots and lots of little lines if you want to do is to create something that repeats so that we can tolerate in nature on there we go. Gosh, that is incredibly random. Isn't there ever done that? Think that is right. My next job is I want to make sure that patent flows this way. So I am again, going to do a little bit of color in the corners. I did a tiny bit that because I don't want it to affect that. I'm going to duplicate it. And this time I'm going to drag it down and drag the other one up. Or my lines match. So I want to merge them together. Just delete those colored bits in the corner and go back to doing any drawing. So this one I wanted to have another forbids out if you remember that I left it before. You go have a little soft fallen. By moving the head around, what we're doing is we're reducing the look of a repeat pattern. Basically we're filling up the negative space so that when it looks, when you look at it from a distance, you can't tell. Obviously that is repeat pattern. There are other types of patents you can do such as half-drop repeats and things like that. Which I will cover in another lesson. Okay, so now what I wanna do is I want to just check to see whether the pattern works and I'm happy with it. So I have gone up into the corner so we don't need to color any of the corners. I'm going to duplicate it four times, like so. And I'm actually going to turn off the original, say that I've got that as a as a backup. Going to select the selection tool. And I'm going to shrink from the corner until I get the orange lines going both ways. I find this bit the most exciting I think because I just love seeing how the pattern will look. It's often quite hard to imagine it. Until you've got three repeating. You go, there's the brush. I mean, there's the design. I'd, I'd really like that actually, it offers the opportunity to do various different bits of coloring. And it's an interesting pattern. If I wanted to change it, why can't do is turn off and go back to my original and I can move things around if I'm not happy with them, but I'm actually really happy with the spacing on that one. So I'm gonna go ahead and save that. And that is one of my organic brushes. Again, go into the pen, go into the brushes that came with the course. You can click on the tile you've just done. If you want to duplicate it, you go to the Grain, go to edit, import, import a photo. Oh, it would help if we had saved it with the dot. And on a minute. Png. I can't tell you how many brushes I've created recently. And I still get that wrong sometimes, right. Go back into the towel. You want to edit, import the photo. And we go making sure the blackout background is black. Click down for pure. Okay, so what we can do is we can increase the scale. So if you want the image to be super, super big, increase the scale if you want it. I think I wanted to sort of be bigger than the previous one, but not too big because then you won't get so much Patterson. Okay. I like that. And I need to go back in and write my information. So what am I going to call this? Plankton? Spelled that wrong anyway. It's been me I type II. And then if I just turn that off, put in an extra layer, we can test it out. Push it, I love it. It looks cool. You can also try in different colors. So as you can say, every bit that was solid is a color really like that brush. So next up we're going to do lines.
5. Making an edging brush: Right, So now we're going to try and do some lines. These, these are the lines basically what happens is when you draw it's like a brush buddy subpattern. She could say. So. Let me just change it to California. Sometimes they fare off slightly, but if you keep the brush down, what can happen is it will go in a straight line if you wanted to. So it's a great way of just experimenting during edges, two lines and things like that. So I'm just going to clear that one. And I'm going to show you how to make an ageing brush. If you go to the wrench and go to Canvas, Drawing Assist, click on that. And actually we just going to do a horizontal one for this example. And make sure the rotational symmetry is off because we want it to be an exact replica, R3, the side notes, let me show you like that. Whereas if the rotational symmetry be normed, you'd have done YouTube been drawing this way and it will just start drawing that way. Okay, so I'm gonna go back, get my doodle line. And I am just going to go such an easy one to j. And j probably lose really dull. But actually, because we've gone off at the line, at the end. Sorry. I think it'll be a really nice edge. So I'm going to save that PNG, Save Image. Go to the brush, and then suddenly you to go to one of the brushes. So this was an experiment is it will warn that she isn't included. Go, go to one of them anyway, left swipe, duplicate and then go inside. And this time instead of changing the grain, the grain is set to a solid color, or in this case the solid white. We're going to change the shape. So the shape on this one is a cycle. Go to Edit, Import, import from photos, and click the one that we want, which is this one. So remember, all the white lines are going to be the color and all the black is not going to be there. Click on Done. Now, it does look right. But as you say, it does overlap somewhat. So what we can do is we can rely on, sorry, we need to go to Stroke Path and we need to move the spacing until they close to the edge. Can you say? It looks more like it's a chain. Rather than if we went a bit further, you'll see there's more space in between them, but if you keep moving the space until there's still just touching, it's far more effective. If I just click that. And then I can show you the food to make it a little bit bigger to the size. Hagar, go into dynamics. Sorry, I had a momentary, what am I doing? Okay, so go into dynamics if you want to make it bigger and you can make it bigger. Again, say that is your doodle line. So we've now done three brushes. And our objective now is to start doodling.
6. Create a doodle and adding shadow: Right now it's time for the fun bit. We're going to create something like this. And I'm going to show you how to use Liquify and create this feeling of depth. So first off, select a 10 by 10 Canvas. You can, if you go to the plus sign here, your 10 by 10 canvas should be done here says relaxing doodle Canvas. You can just press that and up it pops. So the first thing you wanna do is you want to grab that doodle line. And we're just going to go a little bit crazy and just do a line like that. I mean, doesn't have to look exactly same as that. It can be anything. You could do, circles, squares, just let yourself go basically. And we're going to create an extra layer. I'm going to put that one on top. And I'm going to turn that one into a reference layer like site. But now comes the best-fit. So I'm going to show you two different ways of doing this. We can either gets the automatic selection tool, select an area, choose a brush SA thing. We're gonna do that funky plankton one. Just make sure that it has selected and we can fill in. Now you need to keep your pen on the cam on the surface. The entire time. I'll show you why. If you do it like that and then start another bit. Pattern resets from the point that you reconnect it. So you do need to make sure that you have the pen down constantly. So the patent doesn't reset. There we go. So that's one way to create it. Let's try this bit now. I do homage to all my layers, all my different patterns on separate layers so I can manipulate them if I want to show you another way to do it. Sorry, I don't mean to duplicate that. I'm going to add a layer. Is instead of selecting it, you guessed the brush and let's do the doodle tile. Similar brush, move them. You draw like so. And then using the automatic, you select all the pieces that are around it. Click on that layer. Click Clear. Now you go. That is actually, I would say that's probably the quickest. But what happens there is that when you remove this line, they saw she goes so the edge of the outside of the line. Whereas when you're doing this one, it selects the inside of the line. So you can't have a curved line, but as long as you've got the black line on top, it's not really a problem. So there's two ways of doing that. A thing as long as you keep doing separate layers is quite easy. So I think I'm going to do doodle vortex rooms. Here we go. Again. Slit the ribbon, select all the areas that might have a bit of that image on. Go to that layer, click player, an OTA coli outside of chastening layer. A bit more of an organic one this time. This time I'm going to select it and drawn it like that. Yeah, Good. Let's go on to another layer. Choose another. So that one is very satisfying coloring in using brushes that you know, you've created as just fab. Right? Now I'm going to show you another technique. You do need to have a lot of excess pattern for this one though. So I've sketched a new layer. And I'm going to do, I'm gonna do this one. Oh, very small. I'm gonna do here like that. And then I'm going to go up here to the little warmed click that go down to liquefy. And we have various different options here. And you can really play around with it, but I want to give it the feeling of depth. I'm actually going to push to push it. So it looks like it's going down to that point. And I think I'll pinch hit just a flat line. So it looks like it's further away. And I can expand in the middle, so it looks like it's coming towards you. Then if I select all the areas around the one I've just done, hit clear. You can see you've got some added sort of depth to that particular one. Another thing you can do is get your brush, choose which one you want, and go half that one. And I'm actually going to go quite a long way this way because I've got the edge of the thing and it's normal I can really do with that. She now think I'll choose a more angular and more geometric one so that you can see the effect. And I'm actually going to go to the selection tool here. And yeah, this selection tool here, and I'm going to click on top. And what we're gonna do is I'm actually going to push it. So the pattern follows the line. Now, obviously, I can't make the pattern. I can't drag the pattern this way because it's off the edge. And if I pull it down, as you can see this nothing there. But I caught by the way, it goes ram. So you can use liquify or you can use Walk. Don't forget to just clear all the surrounding areas like psi. And we just need these two. So I'm just going to add another two layers. I think I will do the adults in these well, in this one anyway, when no one here. So I might use more permanent one. Oh, I love the way you can make it col is very satisfying much. And just select the bits. I've gone on j. So we have our pattern, which is great. But I think I won't 12 short slightly because that's just what I'm like. So I'm going to just alter this bit, little bit. I'm going to go to liquefy. And I'm not she can trick spans that middle bit off. Decided I wanted to look like this is raised. Just make it bigger. Because I want this whole area here to look like it's a big bump. So I need to again, I need to select the surrounding areas to make sure that I haven't got any place such a woman. And right now I'm going to expand this section here. So you're going to select it, liquefy one. And I want it to be baker in the middle. I wanted to have some sort of fluidity. So it looks like it's sort of going around. Select all the areas that might possibly be on unclear that there we go. So we have this feeling of watching. I think I think it needs to be more this way because this is the height of this one. So therefore the height of this one should be in the same lice. Same with that. Okay. Let's just get rid of those. Right? The next job we can do is if we just put them together or you could group them entirely up to you at another layer. As you can say, I've still got the line separate from the patterns. I get to put this one on top and I'm going to go all the way up to the doodle shading. I'm going to alter their pasty slightly and the height still using the black. And I'm going to think about where the lowest points in my image and a base. So this is going to be quite low here. Because of this bay is meant to be quite big. It also goes down. This, this is, this is definitely doesn't matter too much if it's coin job because we can lighten it by think it was a bit too job. Let alone he is going to be quite dark as well. Well, it goes back up. And a known here as well. So the impression that I'm wanting to give is that this bit is flats. I'm Miss bit sort of pops. And if you want to blend in a bit, you can't do remember to use the same brush. So I've got to restful doodles, doodle shading, blend it a bit if he like. Really wanna get left feeling of depth. Yes, I really lie down and put a bit more depth around here, I think. And then you can play around with how intense you make the opacity. So you might want it quite low down. You might want it really, really intense. I quite like it like that. So that's it for now. Next job is coloring.
7. Colouring: Right, So we've got our design that we've created on the camera. It does that quite dark. It doesn't look quite so bad from haha, but I might just lining up sliding. Okay. So what we're going to do that as you're going to come up. We're not going to color every individual thing because that's what, unless you want to, of course. But for this, what we're going to do is we're going to add a lab, but put it right at the bottom. We're going to select our coloring brush and choose a color. Now, you could select these areas because you still have the reference zone, you could do that. But the thing that's relaxing, coloring in by hand like this. Now you could print it out and colorways crowns, pens upon. I just loved the effect of the paint underneath. If you want to, you could just go like that. That will speed it up. Or you can do it. Like I was just doing it just then. So you can put color over everything or even nothing, whatever you want to do. But you can also do additional details by hand. You may want to use the doodle line brush. This one is pressure sensitive. This coloring brush. So sort of floods it a bit like cryo-EM light paint would. So you can add your own details and remind the bigger the EJ, the brush, the main Zoom the brush, the more pixelated it will become. The idea really is to just have fun, enjoy the process of decorating it. I like the way that, that flows in that way. In fact, why could do is using this blue. I could add accents into this side. And all the time the lines, the line where that we've done is completely unaffected. So if we decided we didn't like that coloring, just turn it off. Start again, super, super easy. So I'm going to carry on with this ongoing to do a combination of block coloring, select coloring, and we'll see how we go. Okay, So last job, if you want to do, is to add some accents. So I've got my digital shading brush on. I've got white selected. And I'm just going to highlight the shape slightly. And then I'm going to reduce the opacity down. Let me go. So I'm really making the most of that area sticking out there. And they go, That's my finished VEP. I'm really, really happy with that. The next thing I'll show you is how to doodle in color.
8. Further Ideas: I have a new canvas. I'm going to select my doodle line. And again, I'm going to do some random lines. And this time I am going to make, are going to make sure that I'm on reference. I'm going to add some layers. Just put my reference lab the top. And this time what I'm gonna do is I'm going to do the colors. I'm going to do the patents, but in color. So I'm going to select the color and select an area. Then choose Pattern. And then I'm going to fill it in. Like say. And I'm going to keep doing that. Choosing a different color, choosing a different paths. In fact, because I'm using this method, I could just stay on this. I'm not going to liquefy any of this, so I'm just going to keep it on the same layer. If you are going to liquefy any of it, then obviously you need to do them on different Laius. Let x be acidic, doesn't it? Now, the thing that you can do as well is you can color underneath like we did a minute ago. Say the colors that gray, That's how about we put a color underneath. So we'll miss one. Just take off. They select what would it look like if I put green? It's all right. Go to end the wrong place there again, selected the wrong one. Green behind only can't see very well. Okay, what about a doc for the darker purple? Okay, so let's try with this green. Maybe a nice yellow behind it. Make it stand out. Pink behind this. So much. Shelby was quite cute, but I don't think it's dark enough. Let's try really light. Okay, That's quite nice. Dark, dark green behind that on. So there's a real variety of colors that you can do. You can, if you want to liquefy them, do that first before, during the color underneath like we did before. But you can you can paint in the pens, in the brushes that you've made in color, and they work out really well. I recommend that you have some sort of color palette that you work too. I mean, these are quite random, but they do clash a little bit, so yeah. Do you think about your colors a little bit? Yeah. That is painting in the colors in color, sorry, in the brushes. So once you show you a couple of examples where I've done that. This is an illustration I did a while ago, but then I colored it in using the brushes rather than I'm just playing ink. I did do pining for originally, but I liquefied the title here so you can see it's all pushing in there. And then on liquefied the scales to give it more of a three-dimensional sort of rounded look. The bubbles, I use the Liquify and expand in the center of each bubbles. So we sort of looked more three-dimensional. And I also expand slightly along the IS as well. So I was really pleased with that. Um, I loved the colors. These are the colors in my logo, so attends to quite a lot in these colors anyway. Another one that did it as an example was a little head stroke or just drew the outline of a hetro, divided it up and then colored in using the patterns. And another one I was experimenting with symmetry. And as you can say, I colored in the Patterson, but I also covered the background as well. And it looked really effective. This design here, actually, I did one pattern and then I do dive at the top of it again. And it's really lovely. So HESI and feel benefit. So that was quite on plans, but I do really like that. Also when you're working with symmetry, find if you're doing a bit the bridges, the line of symmetry, it does actually duplicate the past in a bit. So you need to watch out for that. Well, wow guys. Thank you for getting this far in the course. Thank you so much for watching. I really hope you've enjoyed it. I would love to say all the projects that you've created and the different techniques that you've used, please do let me know if there's other ways that you found to do things that you prefer. And I would really like to see the brushes that you've created as well. Don't forget to do the class project. And good luck. Thank you very much for watching. Bye.
 Jenny Cole