Transcripts
1. Introduction: Welcome to my class. I will be showing you how to create incidental aren't using nothing but procreate on an iPad. And he says I part is fine and no pencil. Because sometimes our pencils charging and we need that creative flow to get us going again. So I'm going to show you how to create these works of art with just your fingers. And we will be looking at how we create little shapes and practicing those before we start going into our main composition. We will also look at layering our compositions. So this is three compositions that we make, as well as looking at the negative space in compositions and seeing how it goes. We will be looking at angular shapes and circular shapes, and even finding shapes within our designs. But it is all completely incidental. We are not going to be able to predict the outcome of anything we do. So I really hope you enjoyed this class.
2. Getting Started: Okay, So getting started on what your need is. You'll need an iPad or any particular specification, because what you need is you need the Procreate app like this. When you get into Procreate, you have a menu and you'll find all the images that you have created. If you've created a knee, if it's the first time you're here, you'll find this section empty. And you can add campuses at the side here. Many of these ones that I have created myself. So they are, you have some pre-populated Once when you upload the app, but the rest of the ones that I've used myself or and I've deleted previous ones. Let's create a new canvas. You press this button at the top here. Now if you don't have one already, what we want to work with today is a 10 inch by 10 inch canvas. So up here it says it's working in pixels. So what we're gonna do is down here, we're going to make sure that we use the inches button. And we're going to go 10 inches. And you see it's changed to click on this one and do 10 inches there as well. 300 DPI is absolutely fine. 55 layers fine as well. I'm not going to change the color profile. All the time-lapse settings, all the canvas properties. I'm just going to leave it like that and create it. And it comes up on your screen like that. Now, you don't need a pencil. I have a pencil here. But you don't actually, you can, and you can use it if you wish to. But the idea of this is to show you something you can do creatively without the use of the pencil. Using the snap functionality on the canvas. We're going to be creating something that is sort of incidental art. It is not. You're not creating something particularly planned, okay? It's just an exercise in creativity. So you really just need your hands. Okay? So we've got procreate, iPad, procreate, hence. And then that's what we need just a minute. So let's get on with the lesson.
3. Practising shapes: Right before we get super creative, we are just going to practice a few simple techniques. I am going to select a color. Now, I'm going to select black. The plane I have chosen is adjustable curves. If I were to try to write in it. As you can see, there's quite a lot drag on it. So it's not a particularly my gel pen to use, but the reason I'm using it is because I want to show you a particular clever thing that it does. So when you use your hands in Procreate, It's never exactly, I mean, you can you can sort of draw roughly, but it never feels particularly excited because you can't see the point to which your finger touches the iPad. So it makes drawing anything precise, literally impossible, is really difficult by showing you with the pen drawing. So you can see with the point exactly where it is and where it's going to be. And you can be a lot more precise to do that with my finger. I can't I can't see it in the same way. So we're going to carry on with the using our fingers. And the first thing we're going to do is do a circle. Now, many of you, if you've used the Procreate app, you're going to find this at all. So we're gonna go round in a circle, keeping a finger press down. What happens is when we let go, it says Edit Shape. So if we click that, now we have a choice here of either eclipse or a circle. So if I press a circle, it automatically snaps into a circle size. And then we can track the circle bigger or smaller. Like Sue. Or we can have an ellipse and we can, we can alter using these little nodes. We can alter the dimensions of your lips so we can have it nearly circular. Going off I that with a circle. Once you're in a circle, you can also turn it into lips as well. If you notice it went straight from me. Show you again circle. As soon as I pulled one of the sides and it went to ellipse just up there. So it knows what you're doing basically. So anyway, that is an ellipse. If I did something like that, It's not going to be a full circle. As you can say, there's a gap. But you can still make the rest of the shape circular, but with this gap. Or you can make this shape and lips keeping the gap to move it around, you just press in the middle to rotate it. You start by pressing on the, on the line, on one of the lines like that. And when you finished, just type out of it and you can't do anything else with that now, to get rid of that double tap, double-tap, double-tap, U show you again. So that's the image we finished with. That's the image I showed you just before. As you can see, is not, it's not perfectly circular. This is what I drew when the message came up. And this was my crazy sample before that. Okay. So circles and ellipses are pretty easy. You can have them with gaps, no gaps. You can even do arcs. So I've kept my finger pressed and I've got an arc option. So I've got this option to make. It is still curved. Why? I'm I can wiggle around and do I like with it? I find it's not as controllable as I would like it today. Just really fun. And up here is a courtroom quadrilateral. I do apologize for that. So you repress the quadrilateral. What happens is it takes every line that it thinks you created and puts a little note on it. So when it was only ague, it cleverly created this arc shape for you. Whereas what is done here is it's taken sort of my new pressure points when you feel changed direction or something like that. And he boned a node in. So you can now altricial rail so it thinks is a quarter natural, so it thinks it's a shape before sides basically. And you can alter it as you wish, like that. Now, whenever you draw around, does not necessarily mean you've got a quadrilateral. So I'm just deleting this going backwards. Okay? It's just in this particular instance, we got, we drew an arc and we've got a quadrilateral. Just going back to the beginning. If I draw a curve like so, sorry, Got keep my hand on a batch or a curve like that. It didn't really know what to do with itself. So it's created a line, but if we click on Edit Shape, there are still options. So in a sense that I had a curve in it. So it's got a bit of a curve and a sense that it could turn it into a quadrilateral. But that is so unpredictable. I mean, you don't know that that is what's going to come out when you do that little mark. I mean, I did a curve and and luckily options that came out and we know for me that was completely unplanned. Okay, so let's work on straight sided shapes. So as you can say, my corners are not very straight, but if I hold it down, it snaps it into a triangle. If I edit shape, I've actually got more five options here. Okay? You won't always have these options. It really just depends on how you've drawn the shape. So triangle, what is done is it's connected up. Oh, sorry, I talk to them. Again. With the triangle. You can say how unpredictable it is. With a triangle, what it's done is it's connected up the corner for me is snapped it into shape. So now I have a triangle here and I can alter the shot size, the dimensions. I can turn it into a quadrilateral. So what it's done is it's put an extra side in basically into one of the points. Is also created a polyline. And a polyline is super useful. So it still looks at the shape. What it is, is you actually have, it's actually one line just with bends in it. As you can say. All it's done is put a node at each point so you can move it around. So that is another one that polyline is very useful. But if you're wanting a particular shape by the triangle or a square or rectangle. And then it's great to snap those into place stream and say, let's go back. And last but not least, I'm going to show you square. Look how on squarish my square is, those corners are awfully. But if I press it for long enough and edit the shape, I can turn it into a square. And it's done that magic thing where it's joined the corners up, which is great if you have a gap in it like we did with the circles earlier on, then you have a cabinet. You know, this thing is so lovely about this is that it often brings up results you don't expect. Jealous because your finger has moved in a different way. But I couldn't draw a square with my finger. I can possibly do it with the pencil, but not where my finger, not this neat. So for the first step, I want you to practice your different shapes. Okay? Tap out of it and then you practice another one. See what shapes you can create. See that I wanted it to be a hex Columbia. It's constraint into a circle. It's difficult to tell. This one. I'm hoping all turn into a polyline. And then what I can do is I can join the points up. And then I can just make it into a nice star. Well, so have a play around. And then we'll move on to step two.
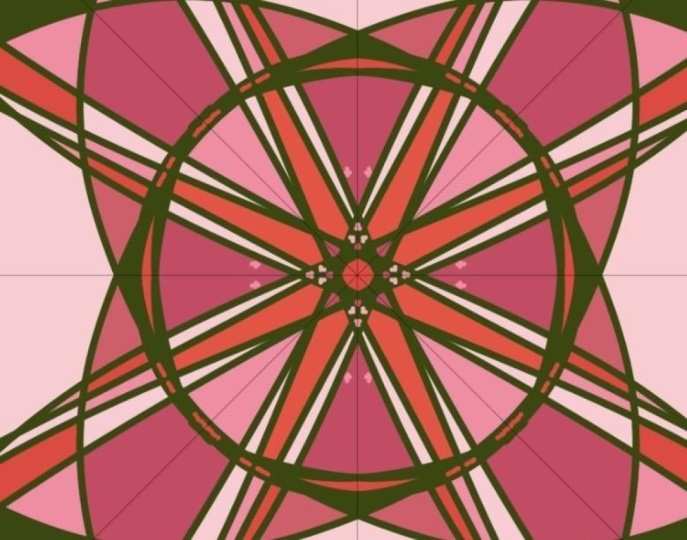
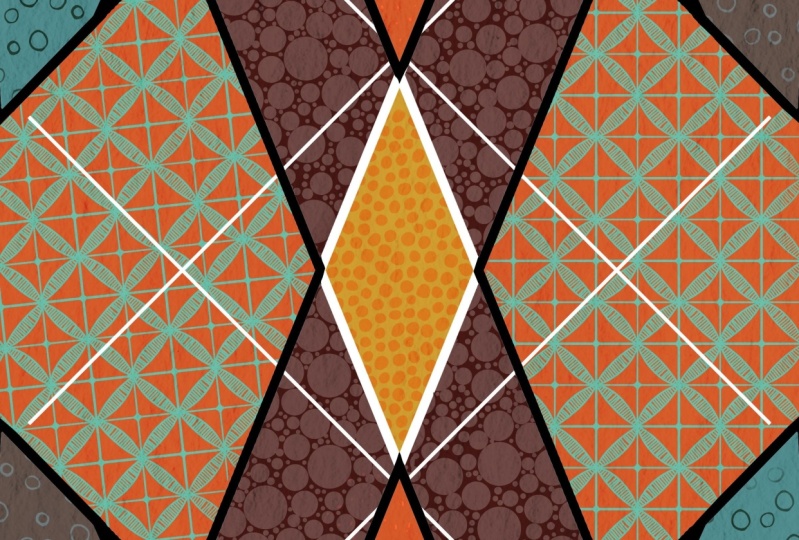
4. Creating art: Right, Okay, So next step, this is going to be the more incidental app section. So why Nietzsche shell is at the top? Click on drawing guide, edit drawing guide. And we're going to choose symmetry. Look at the options. And we've chosen radio, you could try with the other ones as well. But I find the radial gives the best results or the most varied results. I haven't put the rotational symmetry on, but we might do when in a minute that has rotational symmetry on. So it's always good to try out. I don't need to adjust the color of the lines, so I'm just gonna click Done. So now our canvas is setup. We need to choose a pen, I think I'm going to do actually is go into calligraphy and choose the Monoline, which comes with Procreate. And I'm going to use black. I want to create a sort of stained glass window effect. So let's take the first in some of the shapes that we have practiced with. So I'm going to do a circle sort of thing. And that's turned into squares. If I edit shape. I can also that you see the patterns that you can get is quite fast. I think I like that corner to be right in the nurse. And then I think we're just going to adjust that just so that it fits in the frame. So yeah, I'm going to tap it and it's out. And now I have that as a piece of art. I mean, I all I did was do a swell and I got that shape. You could be more definite and move particular lines and everything else but that in itself, I really like. Now. The other thing that's quite nice because we've got the radial symmetry on. We can color it in. So I'm going to use my jungle themed color palettes. When I drop in one section because it's on the radial symmetry. It will do every other one that is in the same like this same section but moved around. So I'm just going to randomly color a few bits. It's very therapeutic watching it fill up. There's something quite, quite lovely about it really. You've created a little piece of art. Should try again. Okay, so I'm going to turn that off. I'm going to get a black pen. I'm going to put on Assisted Drawing, Assist on here. I'm going to try different shape. Now this time we've got quite a circular. Isn't it just moves so beautifully. Doesn't say, I'm going to edit the shape and we're going to do is try and improve some of the gaps that I had a chef in March of coveted. Try and get some lines to meet out. I really like that. Now how about we do something in the middle? Make them connect up. If we're going to add a shape and just see if I can manipulate it a little bit so that I can to meet the edges. All right, It's just amazing that you can make such lovely out without using a pencil. Okay. So I've got more of an angular one and call it a circular one. So now because they're on the same layer, I can color them in. Now, if you wanted to, you could have, you could do different color combinations. By doing that, what we need to do is turn this to a reference layer. And then we need to add another layer. Let's go throwing a stone. And we're going to work on the clear layer, on the layer underneath. And you can say because we'd go up to the drawing system both and the reference on the top one. If I take the lines away, you can say it's just the color. This way you can do multiple versions with multiple colorways. So I think I'm going to have a variety of yellows in the middle. Say it looks like the center of a flower. It is on small bits. You really need to zoom in because the finger is a big area. And then I think maybe a darker petals on the outside surface, and so it's a green foliage. Now another thing you can do, yes, you could then reduce the opacity of it. So it can look a little bit more stained glossy if you want to. So you can play around with that. You could have a layer underneath, even so that you are so slowly revealing. Just kinda fun. You can also take off the lines. So you have the negative space in between if you do want the black lines, next two spaces Romanized, just be aware that you will, because you're using the the Reference System, you will get slightly pixelated lines. But yeah, so getline and see what you can take, right? So next let's have a look using different drawing assist options. So this time I'm going to turn on the rotational symmetry. This should give us more lines. When we do. So, one line now becomes eight. So if we do a shape, how's interesting. It didn't pick up on a section that, but you have eight pieces that you're moving around instead of four. So let's try with that then. So I've got circles this time. And just by moving them around, the effects you can guess or just beautiful. So I think I'm going to color in this layer. I might do, is do a layer underneath of say, a smaller pepsin that you can say behind it. So I'm not going to do reference then for this particular one. I am just going to go ahead and color it in. And I'm going to use this brain by palette. Oh, sorry, I still have my reference on this one. Sorry, that's not going to help them again. An interesting one for the orange. And then I'm going to do a layer underneath that one, you know, put my sister it back home. I am going to cats a black. And I'm going to try and mix them. So they look a little bit like leaves. Think bit of an angle like that. And if I take away this top layer, you can see I have lots and lots of ovals and I'm going to color them. And then to color them in, in green. And then I'm going to put this one back on top. And the leaves. You could also do a more interesting center. So again, if we find that black, we've got another layer. Do a squiggle, see what you get. So I've got an oval at the minute, I think rectangle maybe of temperature such input. I forgot to do the drawing assist. Okay, so let's try again saying energy a little squiggle. See what I get. Well, okay, so I've got quite a big artists. They're not sure. I really want all of that to find getting smaller. We get a very low bit full-on FHA, but let's say I can keep it all inside. So still just using my finger to create this really cool centerpiece. And again, I could put some color into, but bearing in mind the smaller the areas the heart release to fill them with the finger. But it's not impossible. You've gone as opposed. Orange, I think. We can actually turn off all these layers and have them as individual pieces. So you could have the small centerpiece when finished coloring in. You can have the main section bed or you could have the leaves underneath. All three together. All right, so what we're going to do is now tiny off and have another guy choose black. Do a squiggle, see what you get. Okay, So what we're gonna do now, have another go. We gotta make sure we got our Drawing Assist on the ladder. And we're going to have a squiggle and see what we get. Hold your finger down and keep moving until you've got design you like. Earliness in the middle. Tapping Edit Shape. And then if you want to just adjust any lines, I quite like my points to go with each other. Think. Happy with that. Passive it, and then you can come up. So it becomes quite interesting thing, I know all the different shapes make up a particular design. So Ashley, hey, we've got an octagon abuse flops going right in the middle. Well, I really hope you've enjoyed this class. I'd love to see your incidental art and what you create without using a pencil. Thank you ever so much for watching.
5. Class project: Also the class project. So what I would like you to do is create yourself a blank Canvas. Make sure it is that you have your drawing assist on and that you've created your radial symmetry. And then I'd like you to just have a squiggle and see what happens. Squiggle and hold and move it around and create and see what creation you can come up with. I would love to see what you do. Please do, apply them to the project folder and thank you so much for watching.
 Jenny Cole