Transcripts
1. Introduction: Hello As slowly com, and welcome to my comprehensive
course on creating and rendering a modern
living room in Blender. In this course, I
will be guiding you step-by-step
of each process, covering the techniques
of 3D modeling, UV mapping, texturing,
and lighting techniques. In order to make the
learning process easy and understandable. I have broken down
the course with over 40 plus video
lectures that walk you through in order to
reach this final random. Firstly, I will
import the layout and establish an
understanding regarding it. And then moving on, I'll start modeling the
room with building walls, flooring, ceiling,
windows, and so on. I will be showing the
modelling of L shaped sofa from scratch and then
modelling the coffee table, modeling the poof
and the list goes on modelling all the furniture that is visible in the render. I will be showing the process of texturing and coloring the
entire thing step-by-step. Then I will be starting to show the lighting and illumination, bringing life to the entire see, fine tuning and color
correcting the material. And if you like to have
a fluffy looking carpet, this is there, I
will be showing it. And in the end, finally, I will be showing the use of greater or post-processing
the rendered image. So what are you waiting for? Come join me now. And let's create an
amazing modern living room together using
Blender and Greta.
2. Importing the Layout: Alright, this is a
fresh new scene. It comes with these
three objects. Press a to select everything and hit the Delete
key on the keyboard. So the scene is empty. You can see the thin collection. It's all empty here. So now I will import the layout. So the first thing I will
do is go to my top view, press the Tilde key
on the keyboard, and then click on top. Now from my top view, I will press the shortcut key, Shift a on my keyboard and select and go to image
and click on Reference. I will browse to the location on the layout and load
the reference image. Now the layout is imported. So this bottom half I will
be ignoring as it is not visible in the camera you have seen in the
introduction video. We will be focusing
on the upper half. In the next lesson, I will adjust the
scale of the layout. As per the room dementia.
3. Establishing the layout's proper scale: Alright, so I know the width of the room is 580 centimetre. So I will create a reference. I will press Shift
a on the keyboard, and I will add mesh plane. So this plane over here, I will use this as
a reference guide. I will press N on my keyboard, and I will adjust the
width, the x value. And I will enter the value 580. So this is the With
reference of the room. So what I will do is
select this layout over here and press S on
the keyboard to scale. And I'll just keep
moving it around here. Okay, so maybe I
will make this 1.1, 0.19 just to keep it rounded. Okay? So this one, I can delete the reference
plane and I can rename this. I'll enter correct
the name layout. So now I have the layout
stablished to the correct scale. And we will move on to the next section,
modelling the room. And we will start by
building the walls.
4. Building the Walls: Okay, Let's have a
quick tour of the room. This black color coded
is the solid wall. All of here is the solid wall. And this is the
entrance of the room. And this opening
is for the window. Okay, Now I will add
a plane in the scene. I will press Shift
a and add a plane. I will press G and move it up. And then I will press Tab
to go into the edit mode. And I will select the vertex from this side
and move it up, aligning it. And then select these vertices, move it down and aligning
it to this wall. Then I can just move it almost
to the end of the room. And the same thing I
will do from this side, press G and I can
bring it over here. Now, if I go into my
perspective view, I need to give the
height to this wall. So I will press Tab again and go into the
Face Selection mode. Click on the face and then
I will press E, extrude. So I will extrude the
wall up to 3 m. So I will enter 303 zeros, 0.300 cm. Okay? And now I will go
back to my top view. I will press the Tilde
key and click on top. And now, since I'm
in the edit mode, I will press Tab to come
out of the edit mode. I'm in the object mode. I will duplicate the wall, Shift D to duplicate, and move the mouse and
click to accept it. And I will press R to rotate. And I will enter the value 90. Rotate this 90 degrees and press G to move it in place
somewhere here. And I will press Tab to edit. I will go into the vertex
mode and select the vertex. So to be on a safer side, I will press Z,
click on Wireframe. So I can select all of the vertices and then
press G to move it down and just align it to
the layout somewhere here. Okay? And then I will just
select and move it up slightly just
following the layout. And then I will check
in my perspective view. Okay, this is fine. I will duplicate this again. Press Shift D, and I will click on my
middle mouse button. So it will restrict to
the x-axis, the red one. And I'll just move it
in place over here. And I will go back to my top
view to align it better. And just move it back. And in order to snap, I can turn on vertex snapping. I will select the vertex. Okay? So in order to snap, as I am moving, I will press and hold
the Control key to snap. Alright, and now I'll press
the Tab key to go into the Edit mode and push
to the wireframe mode. So I can select all
of the vertices and then press G to move and
just align it to the layout. Alright, checking my
perspective view. So this side is remaining. I will continue and I'll
go back to my top view. Select this shift D to duplicate
and just move the mouse. And if I press the
middle mouse button, it will restrict the y-axis. Just keep it aligned
to the same axis. And then just click
to accept it. And then press Tab. And I will go to
the wireframe mode, select all of the vertices, and then press G
to move it down. Okay? And then I can go
back to my solid view. Select this wall over here. And same thing, press shift D. And I will press the
middle mouse button, so it is restricted to
Y axis, the green one. And then I can just position
it as per the layout. Then I'll go back to
my wireframe mode, press Tab to go
into the edit mode. And I will select all of these vertices plus
G to move it up. And then I'll just align
it here on the layout. So now what is remaining? This wall is remaining. The easy way to build this one is I will select
this wall over here. I will go to my top view, press Shift D to duplicate, and then I will bring it down. I will press the
middle mouse button. I'll bring it down in y-axis and I will just
place it over here. We have built the walls successfully and in
the next lesson, I will create the flow rate.
5. Creating the Flooring: Okay, now we will
create the fluorine. Fluorine is fairly simple. I will go into my top view, press the Tilde
key, click on top. And I will press Shift a
mesh and click on the plane. The plane is added. And I will press Tab to
go into the Edit mode. And since this is just a plain, without going into
the wireframe mode, I can click and drag and
select all of the vertices. Press G to move up and I can press on my
middle mouse button. It will restrict to
the closest Xi's, which is why the green one. And I will just hold
the Control key on my keyboard and it will snap. Okay, I will repeat
the same thing. Click and drag to select the
vertices plus G to move. And I will press the
middle mouse button, hold the Control key, and it will snap. Select these vertices. And I will press G to move and press the
middle mouse button. And I will bring
the mouse closer, hold the Control key
and it will snap. Same thing I will repeat. Click and drag to select
all of the vertices. Press G to move. Move the mouse, press
the middle mouse button. And I can hold the Control
key and it will snap. Let's take a look in
the perspective view, Alt and middle mouse button. And the flooring is complete. I will press Tab to come
out of the edit mode. And I will quickly
rename this fluorine. And I will go ahead
and rename all of these walls just to
keep it organized. So in the next lesson, we will start to build
the window frame.
6. Building the Window Frame: Alright, I'm done with renaming all the walls
and the fluorine. Now I will create the window, which is on the right-hand
side coming over here. I will add a plane. So I will press Shift a on
my keyboard mesh plane. I'll go to my top view and press G and move this
plane in this place. Over here. I will go back to my
perspective view. And now I will set the
height of the window, which I know the height
will be 230 centimeter. So I will press Tab to go into the Edit mode while
the plane is selected. And I will press E to extrude. And I will enter the value
to zero and press Enter. So this is the height reference
of my window frame. Okay? And now I will go back
to the object mode. I will press tab, I will
come out of the edit mode, and now I'm in the object mode. Now I will set the depth
of the window frame. The depth of the window frame
will be seven centimeter. I will go back to my top view. Again. I will press G to move
it in place somewhere here. And I will press Tab to
go into the edit mode, and I will press Z to switch
to the wireframe mode. And now I can select
all of the vertices, press G and bring it down. And now I can snap it. Press G to move it up. And I will snap it, hold the control key
to the wall over here. So there is no gap in between. Now, the same thing
I will do over here. And I will go in
my wireframe mode. Select all of the vertices. Now to my solid view, let me move this up
just a little bit. And now I will press G
again to move and hold Control to snap to
the vertex. Alright. So now I have the height of the window frame and I have that depth of
the window frame. Now, I need to insert this in order to create
the frame out of this. So the easy way to do it, I will press Tab to go
into the edit mode, and I will switch to the
Face Selection Mode. I will click to
select the face on this side and orbit around. Hold, shift and click to
add to the selection. So I have these two
faces selected. And now I will
press I to insert. So the inset value will
be seven centimeter. So I'll just enter the value
seven and press Enter. So the thickness and the
depth is seven centimeter. I need to create an opening
out of this selection. Easy way to do it is, while these two
phases are selected, I will go to edge and
click on bridge edge loop. When I click it, it has
created a hole out of this selection and added the phase for the
depth, as you can see. Okay, now I have
the window frame. I will press Tab to come
back to the object mode. And I would like to
fill the gap over here. So the easy way to do it, select this wall and then
press Shift D to duplicate. And then I can press the
middle mouse button. So it is restricted
to the y-axis. And now let me snap this vertex
to this vertex over here. Again, I will press G to move and press
middle mouse button. And as I come closer, I will hold the Control
key and it will snap. Now this side, I can extend press Tab to go
into the Edit mode. The face is already selected. If not, I will click
to select the face, press G to move. Press the middle mouse button. So it is restricted to Y axis, moving in a straight
line and then just hold Control to
snap to the vertex. Okay, so now my window
frame is hidden. What I can do is go
to my wireframe mode, and I will switch to the
Vertex Selection Mode. Select the bottom vertices, press G and press Z so I can
move it up and hold Control. It will snap. Now it is sitting on top of
the window frame. Okay. So I have successfully created the wall on top of
the window frame, and now I have to
add the divider. The easiest way to do it is
I will select this wall, Shift D to duplicate. Press Z. So I can move it down in the
center somewhere here and right-click that the
origin, origin to geometry. So the pivot point
is in the center. And now I know the thickness of the window frame is
seven centimeter. For this x value over here, I can set this to
seven centimeter. And for the debt, or I can do is I can
enter the value seven. And now all I need to do is press tab and I
will select all of the vertices from
the top and press G, n plus z to move it up and hold the Control key,
and it will snap. I will do the same thing. I will select the
bottom vertices and press G to move and press Z, restricted to z-axis and
hold control so I can snap and press Tab to come
out of the edit mode. The window frame is ready. In the next lesson, I will create the glass
for the window frame.
7. Creating the Window Glass: Alright, now I will create the glass for the window frame. I will add a plane, shift, a mesh plane. The plane is added. I will give thickness
to this plane. Press tab. I'll go into the Edit mode and the
phase is already selected. If not, I will press a
to select everything. There is only a single plane. Press eight to extrude, and I will enter the value one, so the thickness will be 1 m. Alright, so I will press Tab. I'll come back to
the object mode. And I will press R to rotate and press X to
rotate it along the x-axis. And I will enter the value 909t. Alright? And I will rotate
it one more time. And I will press R to
rotate and press Z. So it is rotating
along the z-axis. And I can enter the value 90. Okay? And now I can go to my top view and press G
to move this in place. Somewhere here. Okay, and now as you can see, I need to bring this up. Press G and press Z, so I can move this up and I
can hold the control key. It will snap to the
nearest vertex. And now I need to make
the adjustments so that it can fit inside
the window frame. Press tab. I will go to the wireframe mode and switch to the vertex mode. Select the vertices
on this side. And press G to move and press
the middle mouse button. So it is moving in
a straight line and hold Control. Alright? And I will do the same
thing on this side. Select all of the vertices, press G to move, middle mouse button,
hold Control to snap. And now these bottom vertices, these bottom vertices I can
select and move it down, press G and Z to move it down and hold control.
So it will snap. Let's check in the solid view. And let me check
in the top view. And I will switch to
the wireframe mode. Plus Tab. Yes, this is almost sitting
in the center of the frame. So the glass is looking fine. I can quickly rename and
enter the name glass. And for the window frame, these are two separate objects. So what I would like to do is select and then Shift-click
add to the selection. And now I need to combine these two into one
single object. So while these both are
selected, press Control J, and this will combine these two object
into single object. Now I can rename this. I will call this window frame. Alright, so in the next lesson, we will be working on to create the wall paneling on this side.
8. Creating Wall Paneling: So now I will create
the wall paneling. I'll go to my solid view. This is the wall that
I will be creating. The wall paneling. The wall is selected and I will press Tab to go
into the edit mode. And now I will press Control R. In order to add loop cuts. They move the mouse closer
to one of the edges. It gives me the indication. So now it is showing
me a single cut. So using the mouse wheel, I can increase the
number of cuts. I need one more. So in total, I need three cuts. What I can do is left-click. And it is asking me to
position it horizontally. I don't want to move it, so I'll just right-click and it will remain in the center. Okay? Now, I will switch to
the edge selection mode. And I will hold click to
select the entire edge loop. And then shift, click to add to the selection Shift and then click to add
to this selection. Now, I will use the shortcut Control B to bevel it Control B. And then as I move the mouse, I can give the width
to this bevel. So if I click that, I get the settings
panel over here, I can click to expand. And then over here I can
define the exact value. So if I enter the
value two centimeter, maybe I'll reduce
it to 1.51, 0.5. And I would like to have occurred in the center
of these bevels. All I can do is
increase the segments. And as you can see now, I have and additional code in the center of these
levels. Okay? So this is done. I will
deselect everything. And now I can Alt click to select the entire edge
loop, the center one. And then I will shift all
click add to the selection. And then again Shift Alt, click add to the selection. And now I will push these edges back so that I get a little
bit of dent the press G, and then I will press Y. So I would like to move
this back in the y-axis. And something like this. Let me open this, expand this. So how much I want to move? I will round it off to 1.6. Okay? This is done. And now I would like to
have horizontal cut. While still in the edit mode, I will press Control R and bring the mouse
closer over here. So now it is giving me the indication I will use
the mouse wheel to increase. I would like to
have just one more. And I will left-click
to accept it, and then right-click to
leave it in the center. Okay? Now, I will click to select the entire edge loop and then shift click to select
the entire edge loop, adding it to the selection. Alright, I will repeat
the same thing. Press Control V to bevel. And it remembers the
previous settings. It is giving me the cut
in the center as well. So the previous value was 1.5. I will enter 1.5. And yes, I need the cut
in the center. Yes. Now I will deselect everything and all click to select
the entire edge loop. Shift Alt, click to
add to the selection. And now I can just push it back. So press G to move and press
Y to give the direction. And just move the mouse
and click to accept. And then I can just
give the value 1.5. Okay? This is good enough. And then press Tab to come
out of the edit mode. The wall paneling is done. In the next lesson, I will be creating the ceiling.
9. Modeling the recessed Ceiling: Alright, I will begin
to model the ceiling. I will add a plane, Shift a, and select mesh plane. The plane is added. And I will go to my top view. And I will press
N on my keyboard. So I can bring up the dimension. And I can increase this
to 500, maybe 600. Okay, This is looking better. I can press Tab to go
into the edit mode. And I will switch to
the wireframe mode, press Z and click on Wireframe. And I will switch
to the vertex mode. I will select the
vertices from this side and press G to move
middle mouse button. So it is restricted to x-axis
and hold Control to snap. Okay, And then same thing. I will select the vertices G to move and then hold
Control to snap. And then the same
thing over here. Press G to move and
hold Control to snap. Same thing over here. This is a minor gap, but still I want to snap it. Okay. Yep. It is snapped. So now I would like to adjust
the height of the ceiling. I know the height of the
ceiling is 60 centimeter. Okay, So while I'm still
in the object mode, and I will quickly rename this. I will enter the name ceiling. Easy to understand. And now I would like to adjust
the height of the ceiling. The height of the ceiling
is 60 centimeter. So I will press G to move, and then I will press Z. So it is going straight
up in the z-axis. And I'll just type
in the value 260. Enter. As you can see, 260
centimeter over here. So this is the height
of the ceiling. Let's check in the solid view. And I will give some
thickness to my ceiling. So press Tab to go
into the Edit mode. I will select everything. There's a single plane, press a to select everything, and then press E to extrude. And then I'll just
bring it over here. This is the ceiling. And now I would like to create a racist
ceiling out of this. So if I go to my top view
and in my wireframe mode, let me show you this
rectangle that you see. This is indicating
the carpet dimension. Alright, I will follow
the copper dimension. And I will use this to
create my recessed ceiling. The ceiling is already
selected, as you can see. Again now, I will isolate
the ceiling and the layout. I will select the ceiling. Control. Click the layout, and go to View, local view, toggle Local view. This is to isolate. I can also use the
shortcut forward slash. So I'll just click it. And now I have just a
ceiling with the layout. I will deselect everything. Click to select the ceiling. Press tab, go into
the Edit mode. While I'm still in the
Face Selection Mode, I will click this face and then shift click to select
the face at the bottom. These two phases are selected. I will go to my top view
and in my wireframe mode, I will press I to insert
and then move the mouse. So I will bring it over here. And now I will switch
to the vertex mode. Click and drag to
select the vertices. And then press G to align the vertices to this
boundary over here. And then same thing
I will repeat. Select the vertices on this side and then press G to move and
then align it over here. And then I will select
the remaining vertices. And then press G to move
middle mouse button. So it is moving in the straight
line, just about here. Okay, so now if I go to my perspective view and
then my solid view. So this is, I will
select the face. This is the face. I will be extruding up to create the niche for
the indirect lighting. So the easy way to do
it is I will select this face and then shift
click to select this face. And come over here to edge and click on
bridge edge loops. What this will do is it
will create the hole and fill the gaps with
the faces on the side. Alright, and now what I can
do is create an edge loop. Here. I will press Control R
and then click to accept it. And then I can use the mouse
to adjust the height of it. So maybe this much is enough. Okay, I would like to select
the entire face ring. So the easy way to do it, select the edge over here, and then come to select, select loops, edge ranks. So this will select
the edge ring, all of the edges around. And now while this is selected, I can come over here, hold control and click phase. It will connote the
selection two phases. Now I would like to
extrude the lip out of it. So the easy way to
do is press a to extrude and just right-click. Newly extruded phase is
just sitting over here. In order to bring
it out equally. I will press Alt S
and move the mouse. Maybe just about here. Five centimeter,
five centimeter. Let's take a look
in the top view. Okay, so this is what
has been extruded out. Equally. This is where I will be putting my indirect lighting later on. And now I would like
to close the top. So the way I will be doing it is I will create a new plane, shift a plane, just
move it in place. And in my wireframe mode, I will switch to the edit
mode and then just move it, align it, and then just
align it quickly, G to move. Now if you see, now
you can see I'm trying to fill this gap that
will move this up. The z-axis, more of this up. And let's check in
the front view. So this much, I would
like to bring it up and then I would like to
give thickness to it. So go into the Edit mode, select the face,
press E to extrude, and then just bring it
up, maybe slightly up. So it is easier to select
later on if I would like to. Now, as you can see, I've created a recessed
ceiling where this is the lip that will be holding our indirect lighting and this is to cover up the ceiling. Okay. And now I can rename this. This will be part
of the ceiling. Okay? In the next lesson, we will create a niche that
will be hiding our curtain. Alright, let's do it
in the next lesson.
10. Creating the niche for Curtain: Alright, so now the
recessed ceiling is done. And let's exit the isolation. Go to view, local view. We can also use the
shortcut forward slash. Now we are back to
the entire thing. Okay, Now, so what
I would like to do is create a niche
for the curtain. I will select the ceiling, the ceiling as well. Shift click to add
to the selection, and then shift click
this side as well. And also I will
select the layout, just control click over here
and then I can isolate. So now all I have to do
is select this ceiling, the main ceiling, and go to my top view and
my wireframe mode, I can press Tab to Edit, go to vertex mode and select all of the vertices
and press G to move, and I will move it
just about here. Okay, Let's check in
the perspective view. While this is still
in the edit mode, I can press Control R, add a new cut, click. I can use the mouse to
adjust the position of it. Maybe this much is enough, and I will switch to
the fifth selection. Click the face, and then
I can just extruded out e to extrude and
then just bring it out. So this is how easily we have created the
niche for the curtain. Alright, so now we will move on and start modeling
the furniture.
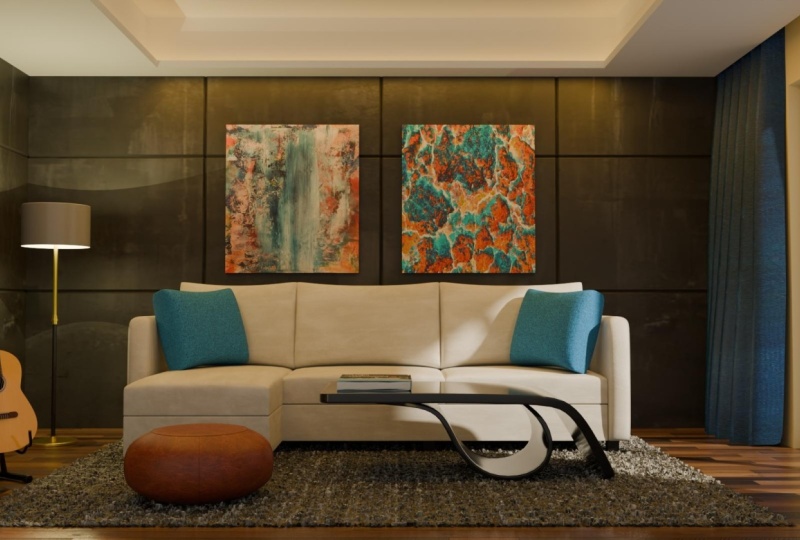
11. Modeling L-Shaped Sofa: Alright, so we will
start modelling the furniture and we will start
with the L-shaped so far. So the first thing I will do
quickly is hide the ceiling. I will select the
ceiling and shift click to select another part of the
ceiling, the recessed part. And I will press M on my keyboard to move this
to a new collection. So yes, click on new
collection and I will give a name, ceiling and press. Okay. As I scroll down, there is a new collection
called sealing. And I can just hide it. So it is easier to work with. And for the fluorine, if I press the period
key on my keyboard, I can quickly switch to the selected object and maybe I can hide the
flooring as well. So first I will be creating the back and the
side of the sofa. And this is the dimension
that I will be following. Okay, so I will go to my top
view and I will add a plane, Shift a and add a plane, press G to move it in place. And I'll just align it here. And then go into the Edit mode, switch to the vertex mode. And I can select the vertices and move it to
the entire width of the sofa. And then select these
vertices from the front side. And just move it
and aligning it to the entire width of the sofa. I will go into the Edit mode. Once again, select the face, so I will extrude this to
the height of 80 centimeter. This is the overall
height of this so far. So what I would like to do
is delete the middle part. So edit mode, press Tab
to go into the Edit mode. I'll just click the parts
that I would like to keep. So I will select this face and then shift click
to select this. And shift click to
select the backside. So all three sides are selected. So I will invert the
selection control I, and then press X
and click on faces. This way, I'm just left with the back and the
side of the sofa. And now I will come back
to the object mode. I would like to apply thickness
to the shell over here. So the easy way to do it is
come over here to modifiers. And I will add the modifier
called solely d Phi. And now I can increase
the thickness. Okay? As you can see, it is not even. So we have the
option over here to click and to make
the thickness even. And let's just drag it and
bring it closer to the, I think it is 12 centimeter
or maybe I'll just add, add one more to 13, 70 meter. So I will click this
arrow and apply. Alright, so now I have the
backside of the L-shape sofa. So now I will create
the bottom cushion. Okay, Same thing. I will create a plane, shift, a mesh plane. In my top view, I will just move it. And I will just
align it over here. And edit mode,
select the vertices, and then just align it to
the front of the sofa. And then I will, just
following the layout, I'll just bring it over here. Alright, so the leg height of this so far is ten centimeter. So I should raise both of
these ten centimeter up. So for this one I
will press G and press Z to move it
ten centimeter up. Same thing for this one. I will go into the Edit mode and just aligning the camera,
the perspective view. And then go into the
wireframe mode and then select all of
these bottom vertices, press G and Z to
move it in the z. And then I can just enter
the value ten centimeter. As you can see, ten centimeter
back to the solid view. And now I will continue working
on this bottom cushion. Ok, and now I will give
thickness to the bottom cushion. I will switch to the
Face Selection Mode, select the face
and E to extrude. And maybe 22 centimeter, I will give the thickness. Okay. And now I will
create the cushion. The seat cushion and
for the seat cushion, I will follow the layout. And as you can see
in the layout, we have three cushions. I will select this
and duplicate, Shift D to duplicate. And I will move this
up 22 centimeter, as we know, that is the height
of this bottom cushion. This is sitting
right on top of it. And now I can reduce
the thickness. The overall thickness
for this question will be 15 centimeter. What I can do is press G to move it back and
just snap it to the, to the starting location. And then I can just
move it back up. Press G to move, press z in the z direction
and just enter 15. So this way, I have reduced it to 15
centimeter thickness. And now in my vertex mode, I can select these and align it as per the
layout somewhere here. Let me go to my top view. And in my wireframe mode, I can align it easily. Press G to move. Just bring it to the
center over here. Okay? And now press Alt D, that will make a duplicate. But this is linked
to the first one, meaning any changes done to the first one will be
reflected here. So I will press X, so it is moving straight. I will just align it here. I'll just make sure
in my top view, just snap it and then
press Alt D Once again. And then just bring
it over here away. And now if I move and hold
Control, I can snap it. So any change I do will be reflected as you
can see. Alright. So now I have created the top cushion and
the bottom cushion. Same thing I will do first. So this one I can
take and duplicate. I'll go to my top view. Shift D to duplicate. Just move it over here. Click to accept and
I will rotate this, press R to rotate. You can see the pivot
point is over here. So if I am rotating, it is rotating as per
this pivot point. So let's bring this pivot point to the center of the object. Right-click Set Origin,
origin to geometry. And now you can see this dot representing the pivot point. So now if I press
R to rotate, it, it's rotating as per
the new pivot point, and I will just
enter the value 90. So I can rotate this
90 degrees and press G to move and align it better. Let me snap this over here. Alright. Let me double-check. No, this is wrong. I will just undo it. Okay, I will go back
to my top view. And now if I press G to move
and I would like to snap, I will press Shift Z. It will ignore the z value. It will not go up in the z
value or down in the z value, it will only move
in the x and y. So now if I press
hold the control key, it will snap, but it will
remain in its original value. Okay, So now let's
adjust the size of it. I'll go to the wireframe mode, press Tab to edit. And I will select these
vertices and just move it. Maybe I'll align it, snap it. And these ones,
I'll just push it back just like this,
following the layout. And let's check in
the perspective view. This is fine. Now I would like to
create the top cushion. I will press Shift D to
duplicate and press Z. So it is moving up. Bring it up first. And now if I press
G and move it down, hold control, it will snap. Alright, let's align
the thickness. Press Tab to edit. And I will select the top face. Press G to move z. So it is in the z-axis and
hold Control, it will snap. Okay, now, I will
create the legs. That is very simple. Again, I will press Shift
a and add our plane, and then let me quickly
adjust the size. Let me make it ten centimeter
thickness over all. In my top view, I can position it going
onto the wireframe mode. I just put it over here
and we'll select it. And let me give high
to this leg wide. I am still in the edit mode, press E to extrude, and then I can just
bring it up so that it is penetrating, so
there is no gap. Let's collapse the scale to one. Plus control a click on Scale. And let's center the pivot point right-click Set Origin,
origin to geometry. And now I can change
the thickness from ten centimeter
to seven centimeter. This is looking fine. And now I can, in my top view, in my object mode, I can duplicate this. I will press Alt D. So I can make this
as an instance. And then I can shift click. Both are selected alt D. Then just bring it
back over here. Alright. So this one maybe I can just
bring this to the center. Then all t Once again, and then just bring
it over here. And they again and then
bring it over here. D copy one over here,
something like this. And also d just
bring it over here. This one I think I
can move it slightly, aligning it to the front side. Alright. And then maybe I can add one
more to the center. Okay. Okay, the legs are
added to the sofa. Alright, now I will add
the backrest cushion. So I'll just select these ones. I can duplicate this, shift D, C to move it up. And let me bring the pivot
point to the center. As you can see it, it's
just floating over here. Right-click origin to geometry. And now if I take a look, right or left view and
my wireframe view. So let me rotate this to the
angle, something like this. And I can adjust the
height of it tab. And I can click this face and move it along the local axis. Press G to move
and G once again. So now it is moving in the same local axis,
somewhere here. And now I can press Alt D, So this is linked. I will move it and
then I will move it closer and hold
Control to snap it. And then I will press
Alt D one more time. Bring it out, and now
move it closer so I can snap it one
more time all day, bring it out and move it
closer and then I can snap it. Now this sofa needs additional fine tuning
that we will be doing it in the
next lesson and we will finish up
modelling the sofa.
12. Finishing L-Shaped Sofa: Alright, let's continue
working and let's add more detail to
our L-shaped sofa. I will select this back piece and let's add
subdivision to this. So first, I will right-click, bring the origin
to the center of the geometry and go into
the Edit mode press tab. And in order to add
subdivision, first, I would like to add
more loop cut so that I can hold the shape
better control or, and I can just click and
bring the mouse over here. Control R. Click. And now I can just
drag the mouse. So click to accept. Okay, so now this is good to hold the shape from both sides. Okay, Let's do the
same thing for the top and the
bottom Control R. And then just click. And then I can just move the
mouse up somewhere here. And then I will do
the same thing for the bottom Control
R and click to accept and then just
move the mouse to the bottom so that it can
hold the bottom better. Okay, let's apply the
subdivision modifier and then we can adjust
as per the shape. So click Add Modifier and then click on
subdivision surface. Okay, and let's increase
the level to two. Okay? What I can do is I can turn off these smooth display and I can only show the original cage. So if I click this, it will show me
the original cage. But if I keep this on, I can also see the end
result at the same time. So depending on what is needed, I will turn this off for now. So anytime you're done and you want to see the end result, so just come back
to the object mode, press tab and you can
see the end result. Alright. So I will click select
this entire edge loop, and let's turn on. To see the end result. I will press Control
V to add a bevel. Now we can see the end result
and we can fine tune it. So I will use my mouse wheel
to add more loop cuts. So you can see the shape better. So let's say so to loop cuts
and I will click to accept. So here I can type in
the exact value I want. Let's say ten centimeter
is good enough for now. Okay? I will repeat the same
thing on this side. I will right-click to select
the entire edge loop. Press Control B. And I can just click so I can
get the settings over here. And I remember the value
from the other side. And it is ten centimeter
with three segments. So just click it and press Tab. So this is the end
result that we have. And now we can find tune
the shape over here. Press tab, and we need to add one more loop cut that
will hold this shape. I will press Control
R and just click. And now I can bring
the mouse closer. As you can see, the
shape is getting better. So somewhere closer,
somewhere here. And now, as you can see, this is not straight. So let's go and take a
look in the top view. In the wireframe mode. As you can see, this
is going upwards. In order to make this straight, what we can do is use the
scale feature S to scale and y for the y-axis and just enter the
value zero, Enter. Now this way we have made
this loop cut straight. As you can see, the shape
is holding much better. Alright? So same thing I can
repeat over here. Control R. Click and bring it
closer over here. And now we know in order to
make it straight, S to scale. And then y, and
then press Enter. So now this is straight. In my left view wireframe mode. I can just align it
with the other side. I can just align it. So it is matching up same
distance as it is on this side. Alright, so now the
backside is complete. Now let's move on. And I will start with
this bottom cushion. So I will select it, go into the Edit mode. And let's add loop goods, Control R. Click
and bring this up. And Control R, click,
bring this down. Okay? And now we need to add, Let's isolate it first. I will press the forward slash
so I can show it better. We need loop cuts on both sides, press Control R, and then
use mouse wheel and click. I can press S to scale, and I can press X. So it is only scaling
in the x axis. So I can easily adjust it. As you can see. Now we need two more
loop cut. Control. R. Use the mouse wheel
to add to loop cuts. Click to accept. And then right-click. It is in the center. And now I can just
scale this outwards, press S to scale. And this is the y-axis,
the green color, just press Y and then
just drag it out. Something like this. Plus tab. Now I will add the subdivision modifier and just increase the level to two. As you can see, this is
looking much better. Let's press the forward slash and we are back to
the normal view. So this is looking much better. Let's do the same
thing over here. So as we know, these
all are instances. So anything I do
will be reflected. So press Tab to go
into the edit mode, and I will press Control R. Use the mouse wheel. Click to accept,
right-click to keep it in the center and scale
it in the x axis. And just bring this
out somewhere here. Okay, and then we will
do the same thing for the top and bottom Control R. Use the mouse wheel, click to accept and then right-click to keep
it in the center. And then scale it in the z
plus S to scale and then z, then just drag it out. Alright, so we need
one more here, front and the back. So in the wireframe mode, okay, I can just isolate it, press Tab to come back to the object mode and
then forward slash. So I'm in the
isolation control arm. Use the mouse will
click to accept, right-click to keep it in the center and
scale it outwards. And as you can see, this is the y-axis. So I'll just press Y and then just bring it forward,
something like this. And now I can add the subdivision modifier,
increase the level. Now, let me show you something. Press tab. Let's click this edge
loop over here and press G to move it down further in the z so it holds the
shape more tightly. And then this one, I'll click. I will bring this down further. So I get even more
smoother shape, press G and bring it down. Okay? Now this face
in the center, Let's select the
face and just push it up so I get even
more software shape. Press G and Z. As you can see the shape. Nice cushion look, that's
come out of the isolation. Okay, So these instances needs to have subdivision
modifier applied. Let's come over here. Apply the subdivision,
increase the value. Same thing over here. Apply the subdivision. Ok, so our sofa is
taking the shape. So we need to apply the same similar settings
for this side as well. Alright, so using the
similar technique, I have fine-tuned this
seat cushion over here. And we need to apply
the similar settings to the back cushion over here. I just need to work
on one cushion. The remaining are the instances. So I will press Tab control are used mouth, we'll
click, right-click, Gale in the control arm. Click, and then I can
just easily move it up central our click and I
can easily move it down. The reason I'm
doing it one by one because this is not
in straight angle. We need to add one over
here and one at the back. And let's add a
subdivision modifier and see how it looks. Subdivision modifier
increase the level. And let's add a subdivision
modifier for this as well. So we can see the
result Plus tab. And let's select
the front phase. Press G, and let's push it out. Okay? And I would like to reduce
the thickness over here. I need to switch to the
edge mode or click to select the entire edge
loop and press G, G to move it in the local axis. This way I can reduce, select this edge loop
over here. Click. Let's add manually. Shift, alt, click, shift, click. And now I'll press G, G. I can bring this down. And I think this is
looking way too much. Let's produce this
selective phase. Push it back lightly. And let's add two more
loop cuts in the center. Click. And I will scale it. Scale it in there just to give a little bit more shape
of a cushion to it. Looking much better. In order to make
this look smoother, select the object, right-click
and click on Shade Smooth. So plus tab. Go to the Face Selection. Click on this face
and push this out. Slightly old clip from the edge. And it will select
the entire face loop. And let's Control
click to de-select. So what I can do is go
into the wireframe mode and control drag to de-select
everything from the bottom. And we have only the
top part selected. And let's push it up, press G and Z, so I can just push it up. So we have more of
a rounded shape. And I would like to push
this phase out as well. Just a little bit. Select this face and
push it out. Okay? I will do the same
thing from this side. Select this face and just
push it out slightly. The next thing I will do is add some beveling to our leg piece. As we know, these
are all instances. So I'll just modify one piece. Let's take a closer
look and just go into the Edit mode a to select all of the edges and
then press Control B. And I can add
slight bevel to it. And I can manually add 0.25
and click to accept it. So this gives a slight
edge detailing to it. Alright? And then we can just right-click Shade Smooth these as well. We have completed the
modelling of the L-shape sofa, but I think this is
looking way too crowded. I think I should reduce it from three questions to two
cushions on this side. So I will be skipping the
part in order to save time. And perhaps I think I can duplicate and add
a smaller cushion. Bring this forward and rotate
this along the Z-axis. Just position it over here and scale it
down just slightly. And bring it down slightly, just a little bit. Let's adjust this
in the top view. Something like this. This needs to move in slightly. Shift D to duplicate. And middle mouse button click. And now press Control
M to mirror it. Control M, m for mirror. And now I will press X for X axis and left-click
to accept it. Now, let me just
move it in place. Just little bit penetration so it looks like it's
bending slightly. One last thing I
would like to do is reduce the height of the leg, but I will be skipping
it to save time and also encouraging you to
do it in your project. Alright, so I have adjusted
the height of the legs. Let's move on in the next lesson and I will start to model the coffee table.
13. Modeling Coffee Table: Alright, I will begin to
model the coffee table. I will select the
layout and isolated. I will again start with a plane, shift, a mesh plane. Okay, So initial values I will
add for the coffee table, the width is 150 centimeter and the depth is 80 centimeter. So this is, this is what I have that I will
be working with. I will move it in place roughly. So somewhere over here, the height will
be 45 centimeter. So I will move it by pressing
G and Z for the z-axis, and I'll just type
in the value 45. Now, I will press Tab to
go into the edit mode. And I will select this edge
over here and extrude. And I will press D. So it goes down in
the straight line. And let's bring it down
all the way back to zero. And it is going to be -45. And now this edge, I can just push it
in, push it in. And I can scale
this in slightly. This bottom edge. For this one, I will just scale it just slightly so that it follows
the shape a little bit. Now I can add a bevel
to it, so Control V. So click it, I will get
the settings and I can enter the value D. And with the segment in
the center, we're here. This is fine, so I
will accept this. Now, let's add
thickness to this mesh. Before I add thickness, I will apply the scale. The scale value becomes one. Press Control a,
and click on Scale. As you can see, the
scale value is one. And now I will add the
modifier, solid D5. I will add five centimeter
thickness to it. And then click this arrow
and click on Apply. Now, I would like to
add loop cuts to it. So Control R. Click and then bring
this up closer. Alright, I will add one more click and then
move the mouse closer. Alright, let's add the
subdivision modifier and see the result and
increase the level to two. Alright, as you can see, the shape is coming nice. Over here. This is
the original cage. So let's add one edge loop so I can reduce this roundness
that I'm getting. Press Control R, bring the
mouse closer and click. And now I can bring the mouse
closer to the boundary. Let's click somewhere here. Control R, and then I will
click and drag the mouse. So I can hold this
shape tightly. Control R, click and drag just to match
on the other side. Now, in order to
get this roundness, what I can do is
select this edge. Maybe I'll include this
selection as well. Shift click to Add and shift
click to add this as well. Same thing over here. Shift-click, Shift-click, and then one last tiny bit
over here, shift click. Okay. And now in order to
get the rounded shape, I can just scale
it inwards plus S to scale and just scale it. And so I get this
rounded shape over here. I can use this and bevel it. Click and drag and
bevel it further. Something like this. And I think this
value six is good enough for I can apply
the same thing over here. I can just click and drag. So I will select in
the wireframe mode. And now I can press
Control B. Yep. And just ended the value six. Okay. Alright, I need
to bring this up. As you can see,
it is penetrating the fluorine plus tap to edit, go into the wireframe mode. And I will switch
to the vertex mode. And then select everything and press G and Z so
I can move it up. Sitting on the floor. Nicely done. Alright, and now I can
walk on the bottom part, the support, the support that
is holding this top piece. I will again add a new plane, shift a mesh plane. I will go to the top. We'll just move it in place and scale it down
somewhere here, aligning it to the
center, bringing it here. Okay, Now I will go
to the front view. And I will push it up
somewhere over here. And I will go into
the Edit mode. In the vertex mode, I will select all of these vertices and
just start from here. In the wireframe mode, select all of the vertices
and bring it over here. Okay? I will go into my
edge selection mode. I will select this edge and
I'll start to extrude it. The easy way to
extrude is I will go to my front view
and hold control. And as I move my mouse cursor, right-click, it will extrude to the mouse pointer location. So if I bring the mouse
pointer over here, right-click and it will extrude. Right-click. Right-click,
Right-click, Right-click, and right-click. Let's take a look in there. View. As you can see, all of these edges we're extruded following
the mouse pointer. So this is another
way to extrude. And let's start to
shape this better. I'll just move it just to
get some rounded shape. And let's add a bevel, select this edge Control B. And I can bring it all the way. And then I can merge these vertices as they are
sitting on top of each other. File, select all of these
in the wireframe mode, and press M and
merge by distance. Okay? Now if I single click on the
vertex and try to move it, there is only a single
vertex, so it is merged. Okay? I can just try to just try to adjust it for the shape
is a bit more rounded. Bring this closer. Selecting the wireframe mode. So I can select all
of the vertices, adjusting the shape before applying the
subdivision modifier. Okay, now I can apply the
subdivision modifier, but before I do it, I will apply this scale
controlled a click on Scale. Now I will give thickness to it. In the wireframe mode, Let's give some thickness to it. Let me adjust this so it is sitting on top of the fluorine. And then this is fine. Now I will add solidify, change the direction
of the thickness, and I will enter the value
of thickness minus three. And I would like to
scale this inwards. Scale this inward slightly. Again, scale this inward slightly just to
follow the shape. Scale this even more. Now, let's apply this thickness. Click Apply. Now I will add
subdivision modifier. Now let's add loop cuts
to fine tune the shape. Press Tab, press Control R. And then just click ones. Bring it out closer to the edge. And then Control R. Click and drag. Any time if you feel like you want to readjust
the position of it, press Alt click to select
the entire edge loop. And then we can press G, the move tool twice g, g, and we can position
it in the local axis. So I will right-click
and press G, G and bring it more
closer to the outer edge. And I'm happy with
the results so far. I will be increasing
the level further. And let's adjust the
height of these. So let's move this
down plus G and Z. And let's bring
this up slightly. I think I can rotate this and move it in place so it
is touching it properly. I can adjust the
position of it so it is touching the fluorine
somewhere here. Okay, So now what I
will do is right-click, click on Shade Smooth, right-click and then
click on Shade Smooth. Okay? So the modelling of the
coffee table is complete. Now I can exit the isolation, press the forward slash, and in the next lesson
I will quickly adjust the size of these so far
before moving on further.
14. Quickly adjusting the Sofa: Alright, let's quickly
adjust the sofa. I will select the
back cushion shift click to add to the selection
and then Shift-click. So now these three
objects are selected. I will press tab. I'll go into my wireframe mode and just select all of
the outer vertices. And I will move it, press G and move
it in the x-axis. I think this much is enough. I will enter the value 11 centimeter is the
entire thickness. Okay, So now I will quickly
adjust the remaining ones. I will click, shift, click. These two are selected. All I need to do is move
it in the same distance in the x axis plus g and
middle mouse button click, so it is moving in the
x axis and click and just enter the
value 11, 70 meter. And now select this. The Outer Worlds
disease are already selected and I'll just
move it in place. And the same thing I
will do with this one. I think I'll just move it slightly and just
push this back. And I think this
is looking fine. This will do I will quickly
go ahead and adjust the legs. In my top. We'll move it out,
something like this. Select this one and move it up. So now the sofa is adjusted. And now in the next lesson, I will start to model the poof.
15. Modeling Pouf: Okay, Now we will begin
modelling the booth. I will select the
layout and isolate. And now I will start with
the basic shape shift a, and I will start with a circle. I will go to my top view, press G to move it. Just roughly align it
and scale it down. And now I will press tab. I'll go into the Edit mode. I need to create a face. All of these vertices
are selected. I will press F on my keyboard. So it will create a phase. And now I can extrude the face. I will press E to extrude. And I will extrude it just
about here. About 32. I will go back to the edit mode, and I will add to
loop cuts Control R. Use the mouse wheel
and click to accept. And then right-click
to leave it as is. And now I will press
the S key to scale it outwards, something like this. And then I will
scale it in the Z, press S and then press Z. So it will increase, this will increase thickness. And now this top face
and the bottom face, I would like to bring it in. So the easy way to do it is switch to the
Face Selection mode. Click the face and then Shift-click to add
to this selection. I will scale it in. So I will press S to
scale and press Shift Z. So it is only scaling in x
and y and not in the z-axis. So this is how much
I will reduce it. I will come over here and
add a subdivision modifier. And I will increase the levels. Okay? I like the
basic shape of it. But as you notice, it is getting wrinkling
effect on the top. So I will go back into
the edit mode and I will insert this face so I
can reduce the wrinkling. So while these two phases
are already selected, as you can see in
the wireframe mode. Now I will press I to insert
and click to accept it. Okay, now I'll go back
to the object mode. Alt click to select
the entire edge loop. And then I will shift Alt click to select
the entire edge loop. And then I can just scale it in slightly just to
follow the shape. Select these edges or
click, Shift, Alt, click. And I will, I will press
Control V to bevel. So I can add more
detail over here. Control V and reduce the segment by using the mouse wheel to control
the shape over here. Now I will go back to the Face Selection Mode and
then Alt click on the edge. It will select the
entire face ring. And then I can scale
it in the z. Alright, so now this is
much, much better. I'll go to the edge
selection mode and all click to select this
entire edge ring and then press P to separate the selection
and click on selection. So now if I go back to the
object mode and select this. Now this is a separate object, but this is a mesh. And now I will convert
this to a curve. As you can see, that
symbol has changed. This is indicating that it is a curve and this is
no longer a mesh. And now I can come to the
curve settings, click on it. Create thickness out of this
to expand the geometry. Come down. And under the bevel section, I can increase the depth. This will define the
thickness of this curve. So maybe 0.5. So 0.5 is the thickness, maybe reduce it to 0.4 and move it down slightly
pressed G and Z. I'll move it down slightly just to keep some
portion of it on the surface. As you can see. For the booth, I can select it right-click and shade smooth. Alright, following
the same formula, I will select the vertical edges and apply the same
thickness to it. I'll go into the Edit mode. And from the top view, I will all click, select
the entire edge loop. And then after every six edges, I will select another 1123456. Then shift. Click. I'll skip this. I will repeat this process and then let's take a
look after it's done. Okay, so the selection
is complete. So this one is a bit closer, but we will not see
it in the camera. From here it is all equal. So while this is selected, I will press P. Then
separate the selection. And now I will go back to
the object mode press tab. I will click to select this. I will press Tab to go
into the edit mode. And I would like to delete the part that is penetrating in. So in my top view, select this shift
click and drag. I can easily select
these and then just press Delete on the
keyboard and click on edges. That is deleted. And now I can right-click
convert this to occur. Now this is converted
to a curve. Now I'll go to the properties. And under the geometry,
under the bevel, we can give the same thickness as we gave it to the other one. That is 0.4. Now we
need to adjust it. The way to adjust it, I will simply scale it inwards. Scale it inverts
slightly a bit more. Alright, and now for the, for the top part,
that is coming out, all we need to do is
from the front view. In the wireframe mode, I can click and drag. I can select the top
vertices and just push it n plus G and Z to bring it down. Slightly, something like this. And now our proof is ready. Before I continue,
what I will do is merge everything
to a single object. At the moment, these
are separate pieces. I will select everything. Everything is selected. I will press Control a, and then click on Visual
Geometry to mesh. So it will convert
everything to mesh. And now I will
press Control J to combine everything
into a single object. I can right-click and
click on Shade smooth. The modelling of the proof
is complete and I will exit the isolation to position
it properly on the layout. Okay, So now also I
will rename this first. I'll call this poof. I'll go to the top view
and position it properly. Plus g, I'll just
place it over here. Okay, and then we can adjust
the position of the carpet. Once we model the carpet. In the next lesson, we will start
modeling the carpet.
16. Creating the Carpet: Alright, now I will start
to create the carpet. So I will press Shift a mesh
and I will click on plane. I'll go to my top view. Move the plane to
match the layout. I'll press Tab to go
into the edit mode. And I will switch
to the vertex mode. Select all of the vertices. I will press G to move
and I'll just align it. And then I will align the
vertices on this side as well. And for the front, I will move it out and out in a way that I can
cover the booth. Okay. I will add thickness
to the carpet. I will go into the Edit mode, switch to the Face Selection, and I will select the face. I will press E to extrude, and I will enter the value one. 1 cm is the thickness that I.
17. Modeling Floor Lamp: Alright, so now I will begin
to model the floor lamp. I will select the
layout and isolate it. Now I can work easily. I will press Shift a and I will start with
a simple circle. Let me reduce the dimension. So the diameter will
be 50 centimeter. And I will raise it to the
maximum overall height. I will press G to move it. And I will press Z. So the overall height
is 155 centimeter. Okay? I will switch to
the edge selection mode. Select all of the edges. And now I will extrude, press E to extrude. I will press the Z to move
it straight in the z-axis. And the height of the lamp shade is negative 27 centimeter. Alright. So I'll go to my
top view and I will switch to the wireframe
so I can see better. And let me bring
this in position. I'll press G to move and
I'll bring it here roughly. I'll just try to align
it in the center. Okay. I'll go back
to the solid view. And let's give thickness to it. So I'll go to the modifier and I will add a modifier,
solid d Phi. But before I do it, let's check the
scale of the object. The scale needs to be applied. So Control a and click on Scale. Now the scale value is one. Now I will click on Add Modifier and
click on Solid d phi. Okay, So this is going outwards, I will increase the thickness. On the inner side. The thickness will be 0.5. Alright? Maybe less than 0.5, 0.25. It will be negative 0.25. Yeah. Okay, So now I will continue
modeling other parts of it. Select this and duplicate, press Shift D to duplicate. And I will press Z and just
bring it down slightly. And I can remove the solid. If I modifier, I don't need it. I will reduce the radius of it. And I'll just scale it down. And maybe further. And go into the Edit mode. I'll go to the front view. I'll switch to the vertex mode. And in my wireframe view, I will select all
of the top vertices and just move it up, press G and Z, so I can move it up straight. And the bottom vertices, I will bring it
all the way down. Press G and just move
it down somewhere here. Let's take a look. Maybe I can reduce
the thickness. Furthermore, I'll press
S and scale it down. As you can see, it is uniformly scaling
it from all sides. So I don't want to scale it in the V active,
the height wise. So in order to avoid the z-axis, press the scale key, and then press Shift Z
to avoid the z-axis. And it will only scale in the
x and y, and I'll scale it. And this magic fine. Press Shift D to duplicate
and press right-click. So it stays, so it
remains in its position. And I'll just scale it outwards. Press S to scale and press Shift Z. I'm just scaling
it in x and y. And I'll bring it
out just about here. And now I can go
into the Edit mode, front view, wireframe view. And I can select the
top vertices and bring it down in the z somewhere here. And now you can see
the base is created, but it needs to have a top face. So I can press Tab to
go into the Edit mode. And then Alt click. So it can select all of the top vertices and
press F to create a face. And I can do the same
thing for the bottom, although it will not be visible. I will all click to select
all of the bottom vertices. Press F to create the face. The base of the lamp is created. And as you can see,
the scale is off. We need to apply the scale, press Control a, and
then click on Scale. Now I will go into the
edit mode and I have already selected the top
edges and bottom edges. And now I can press
Control B to bevel. So somewhere here,
this much is enough. I will select the top face. And then I will shift click. Let's hide the layout for now. I will shift click to
add to the selection. And I will press I to insert, and I will press
I one more time. So it holds the shape properly. And now I will apply the subdivision modifier and
just increase the level. And now I will apply
the shapes, mood to it. Okay? And Control R and use the mouse wheel to
increase and click to accept, right-click to leave
it in the center. And I can press S to
scale and press Z. So I can scale it in the z. And then I can just bring it closer to hold the
shape tightly. Now this is looking
much, much better. And now I will unhide the
layout. Let's take a look. And now I will add little
bit of detailing to it. So I'll select this bottom
part and duplicate it. Shift D. And I can press Z to move it up. I can scale it inwards, press S to scale. And as you can see, the pivot of this
object is way up here. So let's bring the pivot to
the center of the object. Right-click. Set the origin,
origin to geometry. Now I will try to scale
S to scale shift to z. So I'm only scaling in
x and y somewhere here. So this one again, I will bring the pivot point
to the center of the object. Right-click Set Origin,
origin to geometry. Now I will select this one
more time and duplicate it. Shift D plus z. So I can move it up straight. And I can move it up further, plus G and Z
somewhere over here. And let's go closer. Scale it inwards for
demo S to scale shift Z. I can bring it here and then I can add couple of
more detail into it. Press Tab to go
into the Edit mode. Control arm. Use the mouse wheel and click to accept
and right-click. I will switch to the
faith selection mode. I want to select the
entire face ring. I switched to the wireframe. I'll switch to the front
view. Click and drag. And now let's take a look. And now I will extrude
this outwards. I will press E to extrude. Right-click so it remains
in its original location. So the newly face is created
and it's sitting over here. So I'll press Alt S and move
the mouse just slightly. And then press E to
extrude one more time. And then again
right-click to leave the new phase, its
original location, and then bringing
it out by pressing Alt S and then move
the mouse out. Now, de-select everything
and take a look. I'll turn off the
mesh smooth effect. I can add one more
edge loop over here, press Control R, click, and then bring the mouse
closer to the outer edge. I can do the same
thing over here. Control R, click and bring
the mouse over here. And then I can add two
more loop gets over here. And then scale it upwards, bringing it closer to the edge, looking much better now. And I will be having
two different materials for this rod. So I need to separate it. I'll go to the wireframe mode, press Control R. I can bring the edge
selection over here, go to the Face Selection and
just select the top part. Go to the solid view and
just separate the selection. Press P to separate, and then click on selection. So now these two are
separate objects. And this one, I can reduce
the thickness slightly. So I will scale it S
to scale and shift Z. So I'm only scaling in
x and y just slightly. So there's a difference between the thickness of the bottom one and the top. And this one. I will extend it
further up press Tab to go into the Edit
mode wireframe view. Ally will select the
top and move it up. Press G and Z, move
it up slightly. Press Tab to go
into the Edit mode, press Control R and add two more loop cuts and right-click and then
just scale it upwards. Press S and Z. So I can just scale it to
hold the shape better. Now I will apply the
mesh to mode modifier. But before I do it, I will apply this
solidify modifier. Now I will add a
subdivision modifier. I'll increase the level and then I'll just
right-click Shade Smooth. Okay, this is looking nice. The modelling of the
floor lamp is done, and in the next lesson, I will start to model
the artwork box.
18. Modeling the Artwork Box: Alright, the scene
is coming together. Now, I will build
the artwork box. I will select the
entire sofa set. Right-click, click
on Select Objects. So the entire sofa is selected and then
Shift click and then Shift click the paneling wall,
Shift-click, Shift-click. And I'll just isolate
the scene forward slash. And now, and I will
create a simple cube. Shift a mesh Q. I'll just
scale it and move it in place. I'll go to the top view. Press G to move, and just move it in place. I will bring it
somewhere over here. Let's reduce the
thickness of it. Plus S to scale and
press Y, the green line. Somewhat like this. And just move it out. And now I will adjust
the height of it. I'll go to the front view, press G to move and z to move it up straight
somewhere here. And I will scale it in the z. And now I'll just scale
it overall uniformly. I need a bigger artwork, just positioning
it in the center of this panel over here. Okay, let's take a
look in the top view. I will adjust the vertices, go into the Edit mode, select all of the
vertices and bring this out and just snap
it to the wall. And maybe I can reduce the
thickness just a little bit. Press G, and then I can just reduce the
thickness little bit. Now the way I will be
working on this artwork, the sides will have a different finish and the front phase will
have the artwork. So I need to separate the
sides and the front page so it will be easier to apply
the finishes later on. Alright, while this
phase is selected, I will press P to separate it and then click on selection. So now if I click
it and move it, as you can see, these two
are now separate objects. I can just rename this, press the period key
on the keyboard while the mouse is in
the outlying area. So I can easily switch
to the selection. Okay, so because the sofa
selection was active, it created the new objects
within the sofa collection. So I need to move it out. I believe these two are
the ones I will Control. Click to select both of these. And just drag it out. Press the period key and yeah. Okay, so I will
quickly rename this. I will call this
art work box one. And this is going
to be Artwork one. Very simple. Okay, now I will select both of these and I will duplicate it. I'll go to the front view, Shift D to duplicate. And I'll just bring
it to the side, just roughly place
it in the center. And then I can quickly
rename it as well. So this will be
artwork to the box, will be artwork box. Okay. So the artwork is created
in the center of the room. And in the next lesson, I will start to
model the curtain.
19. Modeling the Curtain: Alright, so now I will start
modelling the curtain. I will exit the
isolation forward slash. Ok, so now as you can see, this is the indication
for the curtain. So I will use this to
model the curtain. I will select the layout. I will shift click
these two walls, and I will isolate the scene. We'll go to the top view, and I'll just zoom in to be in a better position to start
modelling the curtain. Shift a go to curve, and then click on point
for the point is created. But before I do anything, let's take a look at
settings over here. The way I work is switched
to the 3D instead of 2D. And the type I like to
work with is poly-time. So click on poly and now
I can minimize this, okay, So the point is
created at the origin. Over here. The point is selected and
we are in the edit mode. And I can press the
G to move the point. And you can see
this is the point. Let me position the
point somewhere here. I hope you can see it. Yeah, it's over here. Okay. Now, what I will do is
press E to extrude. E to extrude. E to extrude. I will continue
modeling e to extrude, and then E to Extrude. Extrude. Continue. E to extrude. One last time. E to extrude. Okay, let's take a look
in the perspective. I will convert this to a mesh. So right-click,
convert to a mesh. And now the symbol is changed to this triangle press Tab
to go into the Edit mode, I will switch to the
edge selection and select all of the edges
and press E to extrude. And I will press Z, so it moves straight up in the z axis. And let's trace this
all the way up. Press G and Z, just to move it up and
place somewhere over here. Alright, and from the bottom I think I should
read it further up. There should be a slight
gap from the fluorine. Alright, so I will
click to select all of the edges at the bottom
and then just raise it up, press G and Z to
move it straight up. I will first apply the
subdivision modifier and see the result. And then I can fine-tune it. Click on Add Modifier, and then click on
subdivision surface. Now we can see the result. I'll increase the level. I will right-click and
click on Shade Smooth. Already looking better. I will press Tab. I need to add loop cuts
to hold the shape better. But before I do it, I think I need to
exaggerate the depth. So the easy way to do it is I will select all of
the front edges, Shift-click to add
to the selection. And just push it out. In which axis?
Let's take a look. This is the x-axis. Just press G and then press X. So I can just push it
out and see the result. Okay? The result
is getting better. And I think I like it. Maybe just a little bit more. Press G and X and
just push it up. Furthermore. And now this top part
will not be visible, it will be hidden,
but still I will add a loop cut to hold
the shape better. So I will press Control
R and then just click and then move the
mouth, bring it up. Alright. Same thing for the bottom. Control. Our move the mouse, click to accept and then
just drag the mouse down. Okay? Okay, press tab and
let's see the result. Looking much better. And we can further scale
it to exaggerate it. Let's bring the pivot
point to the center, right-click set origin
to the geometry. Now I'll press S to
scale and then press X. I can exaggerate it further. Alright, So maybe
just a little bit. Okay, Now, the curtain is really looking
flat and straight. So I need to add little bit
of movement to it, okay? I will deform this curtain
to add some variation to it. I will select the curtain
and then Shift a. And I will add a lattice. So here's the lattice
in the object mode. So let me just move it in place. And I'll go to the front view. And I will expand the lettuce
to cover the curtain, bring it in the center. And I will scale it in the Z, making sure I'm in the object
mode while I'm doing this. And then press scale, and then scale it outwards. So I can encompass. Curtain completely inside of it. And let's come over here while
the lattice is selected, click on this lattice properties and I can increase
the resolution. I'll expand this
just a little bit. Resolution u, v, and w. Let's
increase the resolution. Alright. So these will be used
to modify the curtain. After this is done, I can click on the curtain. Come over here to the modifier, click and I will add a lattice modifier.
Now I will click. I can even select from the list. I will click and it is done. And now the lattice is
connected with the curtain. I will click on the lattice. I'll press Tab to go
into the edit mode. And now I can start to modify the lattice and it
will deform the curtain. Now I will start to deform it. I will select all
of these points. And I'll just push
it out slightly. I will hide the layout. For the time being. Here is the layout. Okay, so now I can
see this better. Just push it out. Same thing over here. Push it out, this
movement going on. And then I can just push it. And maybe I can make this a little bit
flatter, scale this inward. So the top part is
little bit flat. Okay, and then I will
just select all of these and then push this in, in the x plus g and x. Pushing these points out. Pushing these points out. Alright, I will exit the isolation and I
will unhide the layout. Alright, so now what I can
do is collapse the curtain. So select the curtain, control a visual geometry
to mesh this lattice. Now I can delete it.
I don't need it. And I will just duplicate
this on the other side, just to be on a safer side. Shift D to duplicate and middle mouse button click so it can move in straight line. I can just mirror
this Control M. And this is the y-axis. So I'll just press Y
mirror in the y-axis so I can adjust the position of this curtain when I create
the camera later on. Okay. So for now, I'll just leave it as is. Okay. I will unhide the ceiling. Let me take a look to adjust the position
if there is any need. Okay. So I think the artwork
needs to come down. I will select the artworks
and just move it down, press G, and just push it
down, something like this. The modelling part is complete. In the next lesson, I will
adjust the position of the central city so that it
is more centered to the room, as you can see, it
needs to be adjusted. So I will do it in
the next lesson.
20. Adjusting the position of Central Seating: Alright, can you notice the central seating area should
be centered to the room. As you can see,
there is less gap on the left-hand side and there is more gap on the right-hand side. So what I will do is I
will just hide the layout. And in my wireframe view, I will select all of these and hold Control to de-select
what I don't need. And let me just check. Yeah, this is what I have selected and this is
what I want to move. I'll just right-click
to cancel the movement. Now I can just move
it in the x-axis. I will press G to move, and press X to move
it in the x-axis. And I'll just try to center it somewhere here
and click to accept. And let's check the value. I'll make it rounded
off to 25 centimeter. Okay, So we will remember
this value, 25 centimeter. This is done. Now following
the same formula. Let's take a look
at the ceiling. The ceiling needs the
similar treatment. Alright, so I'll
just scroll down in the scene collection and I
will select the ceiling. We only have two objects. I will Control click to
select both of these. And I was just isolated. I will press the forward slash and I will go to the top view. And in my wireframe mode, both objects are selected. I will press Tab to go
into the Edit mode. And I can edit the vertices of both objects at the same time. So I will click
and drag to select the central portion and press G and press X to move it in the x-axis and I will
just enter the value 25. 25 centimeter. Yes, this is correct. And press Tab. And now I can exit
the isolation. Press the forward slash. Now everything looks
better and more centered. So now we will move on and we will start to apply
the materials.
21. Applying Material to Wall Paneling: Alright, so now I will start
to apply the material. I will select this
paneling wall over here. I will click on shading. And then I can isolate
the selection. I will press the forward slash. This is the material preview. And we do not have any material
applied at the moment. So now I can click New to
create a new material. Okay, so the new
material is created and I will rename the
material over here. I will rename this
to wall texture. Alright? And now I will be using
Node Wrangler add-on. If you haven't enabled it, you can enable it by going
to Edit Preferences. And click on Add-ons. And here just start to type W, R, and you will get
this Node Wrangler. Just click on the check mark
and it will be enabled. Once you have it enabled. And now click on this node. First click on this node, the principal P, S, D, F. Then press the
shortcut key Control T. This will give us three
nodes connected properly. And this is a texture node. So I will click Open and I will locate the texture that I
want to apply over here. Click Open. And I will select this texture, the wall texture and
click Open Image. Alright, so the texture is loaded and it is
displaying the texture, but the UE is not properly set. Okay, so what I will do is come over here to
this texture node. And instead of lead, click on box projection. And I'm still not getting it. And let's come over here
to the texture coordinate. Instead of UE connecting
to the vector, I will connect the
generated to the vector. And now you can see we're
getting the box projection. And I like it already, has it. But the mapping node
is where I can scale the texture or move the
location of the texture. E.g. I. Will increase the
size of the texture. Maybe I will make it 0.8 so that it will
increase the size. And I can adjust the position. I can hold Shift so I
can move it precisely. Something like this. Okay? And yeah, I'm happy with this. Now, I will go back
to the layout. I will click on the Layout. And now I can turn on
the material preview, press Z and click on
material preview. This is the only wall
with the material. And the rest we just
see blank, white. Okay, so in the next lesson, we will continue to apply the materials to the
rest of the walls.
22. Applying Material to rest of Walls: Alright, I will continue and
I will apply the material to the remaining wall in order to make things
a little bit easier, I will hide the
ceiling collection. So I'll just click on this eye. The ceiling is hidden. And I will focus on
this wall over here. For this one, I will be
applying a simple paint. Come over here and click
on this checkered wall. And now I can click on this
to create a new material. For the new material is
created and applied. I will quickly rename
this to wall paint. The color will be
nice, bright color. And now I will turn on
the material preview. Press Z. Click on material preview. Okay. Alright, This is fine. Now I will apply
the same material to the remaining walls. So I will select this and click the drop-down and
click on wall pane. Select this one. And then click on wall paint. And I'll continue the process and apply the same material. This one, I would like
to have a white paint. I'll create a new
material and I will call this white paint. And I'll make the
color pure white. Okay? So this one, I will apply
the same wall paint. Ok, so we can adjust the
color later on as well. But for now, I'm
happy with this. So all of the walls
are complete. In the next lesson, I will apply the material on
the window frame.
23. Applying Material to the Window Frame: Alright, let's continue. I will select the window frame. Let me try to move and check. Yeah, this is the one. Okay, so the window
frame is selected. And I'm already in this
material properties, I will click on New to
create a new material. And I will rename this quickly. Window frame. For the window frame, I will select a darker
finish or dark gray. Let me take a closer look. Even darker than this. And I will turn on metallic a little bit and reduce
the roughness. So you can take a look in the
material preview over here. So we're getting some
shine gloss over here. If I reduce further, maybe 0.25. Okay, so this is fine. In the next lesson, I will
apply the glass material.
24. Creating the Glass finish for the Window: Now I will create the glass
material for our window. I will select the glass and I will switch over
to the shading view. Click on shading, and I
will exit the isolation. Now I can see the glass. While the glass is selected, I will click on New to
create a new material. So the first thing I will do is delete the principle be FDF. And I will add Shift a, and then I will click
on Search and type in transparent be SDF, okay? And now I will add one
more node, Shift a. And in the search I
will type glossy, and I will click on
the glossy BSD F. And now I have these two nodes. And I will mix the two. And I will add a mixed shader, shift a search, and
I will type mix. And here's the mix shader. Click on it, and then
just click to accept it. And now this green dot, I will connect this
to the surface. And I will select the first one connected to
the first green dot. And this one, I will connect
it to the second slot. Okay? And now this is the factor. I will reduce this
factor all the way down to maybe 0.1, 2.4. The glossy. I want to reduce the glossiness. Just reduce the
glossiness point 0.1. Or I'll make it just zero. Okay? So what we see is
the default SDR, but we don't need
to worry about it. So the glass shader is created. And I will quickly rename the material glass
and press Enter. And now I will go
back to the layout. The window is complete. And in the next lesson, I will start to apply the
material on the floor lamp.
25. Applying Materials to Floor Lamp: Alright, I will continue and I will start to apply the
material on the slow lab. I will select the top shade and click on New to
create a new material, I will rename this. I'll call this shape. And I'll hide the
preview for now. I will give a color
to this grayish tone. And I will add a little
bit of glossiness to it. So I'll reduce the roughness. And we can check the preview. There is some glossiness to it. Okay? And for the inner part, I would like to apply
a lighter tone to it. The light will bounce
more from the inside. I will switch to the face
selection and select. I'll go back to the modifier and turn off the
show and results. So I can select easily hold the Alt and
click on the edge. So it will select the
entire face ring. Let's come back to
the material tab. I will be applying two
different materials to the same object. What I will do is
click on this plus. So it will add a new slot. I'll click New to
create a new material. And I will give it a
name, shade, inner. Okay? And this one will be
just white color. And I will click
on this assigned, but now press tab to
see the end result. Because of the
subdivision modifier, I'm getting this effect. So let's select
this part as well. So all click on this edge and it will select
the entire face ring, the upper phase three. And let's do the same
from the bottom. Shift, Alt, click on the edge, and now click on the assigned, but alright, and now I'll press Tab
to see the end result. Okay, now this is
looking much better. So the shade is
done. Let's move on. And this upper part
will be in gold finish. I will click to create
a new material, and I will call this gold. I will minimize the preview. I will pick a goldfish color. And I will reduce the roughness, increase the
metallic little bit. Okay, So we can
check the preview. And I will increase the
metallic all the way up. Okay? And we can see the
preview over here. And we will get a better preview when we are in the
rendering phase. Okay, so I will move
on to other piece. And I'll select this piece and
this will be gold as well. I'll just click on Goal. Okay, so the bottom
part over here, this will be in a darker
tone, a black finish. I'll create a new material. I'll call it black. And just make the color
black, darker tone. And I can just reduce
the roughness, increase the metallic
just a little bit. Okay. So it has some shine to it. Okay? And and this bottom piece over
here will be gold as well. Click on this checker
ball and click on gold. And this base will
be gold as well. And I'll just click on gold. Okay? So applying the materials on
the floor lamp is complete. And in the next lesson, I will start to apply the
material on the coffee table.
26. Applying Material to Coffee Table: Alright, now I will
start to apply the material on
the coffee table. For the coffee table will be in a similar darker finish that we created for
the floor lamp. So I will select
the coffee table, and then from the drop-down, I will click on
this black finish that I'm using for
the flow line. As you can see, this indicates
it is used by two users, meaning two objects are
sharing this material. So I want to make this unique. So I'll just click on it. And as you can see, it
is already unique and it has added zeros
012, the material. I'll just rename it. And I will call
this coffee table. Okay? And now I can scroll down and reduce the
roughness even further. So to have more reflectivity. And let's adjust to make
it a little bit darker. Just a little bit. Alright, and then select the bottom piece
and I'll click to apply the same
coffee table finish. Okay? I think I can make
this roughness 0.1. Okay, so the material for the
coffee table is complete. In the next lesson, I will start to apply the
material for the carpet.
27. Texturing the Carpet: Okay, now I will start
to texture the carpet. I will select the carpet. I'll press the period key, and I will rename
this to carpet. I'll create a new material, and I will rename
this to carpet. I will select this
principled shader and press the shortcut Control T. So I will get these three nodes with the
help of Node Wrangler. So on this image texture node, I will load the carpet texture. I'll click open and select
the carpet texture. Click on Open Image. And I will turn on
the material preview. Alright, so here is
the copper texture. Now I will adjust the texture coordinate and instead of UV, I will connect generated
to the vector. And from here, the
projection type, instead of flat, I
will select box. Now this is a box
projection. Over here. As you can see, I need to
reduce the texture size, the scale, the scale that
we can easily adjust, I will click and drag
and enter the value. So this will make the texture
a little bit smaller. This is acceptable. I've applied the
diffuse texture. Now I will bring in and
work on the bump map. I will duplicate this texture
node Shift D over here. Okay? And I will also connect
this vector to this vector. So I can use the same
mapping information. And this time, instead
of the diffuse, I will open and I will
select carpet height. This is a black and white image. To get the bump effect. Let me expand this window so
we have more room to work. So just click and drag. Get more room to clean
up a little bit. Now I will press, Shift
a click on Search, and I will type
bump, press Enter. This is the bump node. I will select this dot from color and connect
this to the height. Okay? And then from this normal, I will connect this to
the normal over here. And now you can see
the effect over here. This is way too much. I will reduce the strength. I will keep the
strength fairly small. So 0.25, 0.25, very
subtle effect. Now, I will duplicate this in order to create
the displacement map. And I will place it over here. Again, I will take this vector and connect this
vector over here. So I can use the
same coordinates. And yes, this is
correct, the height map. And now I will press Shift a
and search for displacement. And click to add the
displacement node. And now I will take
this color and then connect to the
height slot. Okay? And now you can see we have a displacement
slot over here. So I will bring this
node down just a little bit over here to
make the connection easier. And then take this
displacement and then connect it to the
placement over here. Okay? So this is done. In order to see the effect. We have to wait
until we get into the rendering part and
we will see the effect. Alright? But for now, I know the
scale value is way too high. So I'll just reduce it to half. 0.50, 0.05. Okay? So I will make adjustments to
this further when I get to the rendering part in terms of applying the texture
to the carpet is done. And in the next
lesson I will apply the texture to the
L-shaped so far.
28. Texturing L-Shaped Sofa: I will start to apply the
texture to the L-shape sofa. I will go to the shading tab. I will click on New to
create a new material, I will deselect first. I will just select the
single piece over here. Click New to create
the new material, I will call this sofa. And I will select this
principled shader and press the shortcut Control T. This
will give me three nodes. This one, the image
texture node. I will click on load to
load the image texture. And I will select this
well with texture. Click Open and the texture
is loaded and it is visible. But I need to adjust
the mapping of this. I haven't done any
unwrapping on this one. I will be doing a box projection on this one without
unwrapping it. Okay, so in this
image texture node, I will change this from flat to box mapping and come over
here to texture coordinate. Instead of UV, I will connect the generated
to the vector. Now you can see the texture
projection is better. Okay? This is looking nice. And I will apply the same material to the
remaining pieces of the sofa. I will click the black
and white checkered ball, and from the drop-down, I will click on sofa. I will repeat the same process. Click on sofa. Cushions will also
share the same texture. Share the same material. And I will select this
one and apply the same. So for material and
D is one as well. Click on sofa. And last piece, I think, and click on so far. Okay, So I've applied
that texture to the sofa, and let's apply a bump
map to this as well. So I'll just drag this out
and I'll expand. This window. Can work a bit better. I will select this texture node, press Shift D to duplicate it. And then I will click
to load the bump map. I will select the
bump map, click Open. And in order to use the same
mapping texture coordinate, I will connect the vector from here and connect to the
vector of this texture node. And now press Shift a. And in the third, I will type
bump to get the bump node, and then click to accept it. And the color, I will
connect it to the height. And the normal. I will
connect it to the normal. Okay, the strength is crazy, way too much. We'll reduce it. Fairly low. Point to here in the
principled shader node, I will increase the roughness. Okay? So it doesn't
have that reflection, glossiness to it. Okay. I think I can reduce
it even further. Maybe 0.0, 0.1 thick. Okay. Now I will apply the
finish for the legs. I will select one of these legs. Click New to create
a new material. And this is going to
be a dark finish. Dark black almost. And it will have slightly less roughness and
little bit of metallic. Okay. So for the cushion, I will copy the material
from the sofa and use, and make use of all
of these nodes setup. I will select the cushion. And from this dropdown, I will click on sofa. And here as you can see, it shows the number eight. That means eight objects
are using this material. Alright? In order to make this unique, just click on this number. And it will make it
unique and it will automatically give a
different name to it. I will rename this to cushion. And I have all of
these nodes already. So I will just
replace this texture. I'll click the Open
Image and I will load cushion open image. And this is applied to
the cushion over here. Same thing I will
do with this one. Select and from the drop-down, I will look for the
cushion material. Click on cushion. Okay, Applying material to the cushion and the
sofa is complete. In the next lesson, I will apply the
material on the booth.
29. Texturing the Pouf: Okay, now I will apply the
material on the proof. I will select the booth and take a look
what is happening. The poor fit with
death teaching detail. So all of these are one piece and I will apply a
leather texture to it. I'll click the New button, create a new material and
I'll call it a proof. And I will de-select
everything and just click on the
principal P, S, D, F, and press the
shortcut Control T. I will select the
image texture node and click Open to
load a texture. And then click on this leather poof and
click on Open Image. The texture is loaded. And what I need to do
is come over here. I will connect the
generated to the vector. And now I can start
to see the texture. And let me change
the projection type. And I will change it
from flat to the box. And let's see the result. Yeah, it's looking much better. Let's come over here and
I will duplicate this. Press Shift. I will
duplicate this. And what I'm trying to do is create a black and white
version of this texture. I will add a new
node, press Shift a, and then type in RAM, RAM pea color ramp. Okay, and click on this, and then just position it
and place it over here. So the color goes to the FAC. And then just get a bit
more space over here. Let me push this away. And then this vector, I will connect to the vector of the image texture to get
the same coordinates. Now this one, what
I will do is press Control Shift and then
click on this node. I can preview this node texture
and then I can adjust it. I will push this back
and push this forward. In order to get more contrast. Somewhere here. This is enough. Let's press Control Shift and click on the
principled shader. So we are back to
the normal preview. Alright. Now I will create a bump node. Shift, a search
for bomb view mp, press Enter, and just
place it over here. This color goes to the height and the normal
will connect to the normal. And the effect is
way too strong. I need to reduce it. Maybe 0.1. Very subtle. Just to get a little
bit of detailing, maybe even less than this, 0.06. Okay? So this is done. So applying the material
on the proof is complete. And in the next lesson, I will work on to apply the
finish on the fluorine.
30. Applying Material to the Flooring: Now I will start to apply
the flooring material. First. I will unhide the flooring
and I will click on shading. The flooring is
selected and I will click New to create
a new material. And I will rename
this to fluorine. Let me quickly locate
the newly created nodes. So this is the principle, be FDF that we get. While this is selected, I will press the
shortcut Control T. So I have the texture node. And I will create another
texture node, image texture. And I need one
more texture node. Okay? Alright, now I will open
to load the base texture. And I'll click on the word flooring and click
on Open Image. Okay, the scale is big
and we need to reduce it. I'll go to the
texture coordinate. I will click and drag. I will enter the value two. And let's see the result. Still big. And I'll try one more time and
let's try the number four. Yeah, this is much better. I like this one. And now I will load
the bump texture, bring it a little bit closer. I will click Open. I will load the bump map. And this is the bump map
preview that you can see. And I will create a new node called bump and
just place it over here. Connect the normal
to the normal. And the color goes
to the height. And the strength
is way too much. And also, I will connect the
vector to the vector to copy the same mapping coordinates
vector to the vector. Okay? And I will reduce
this trend to 0.1. Okay? Just a subtle effect. And for this one, this is going to be
the reflection map. So what I will do is connect
the vector to the vector. And I will click Open
to load the texture. And I will select
the reflection map and click on Open Image. Okay? And I will change the
color space to non-color. I will do the same
thing for this one. Change the color
space to non-color. Okay? And now this one, I will connect the
color to the roughness. Okay, so now this is done. And the difference between
the reflection and the bump map is let me
control shift click. So this is the bump map of black and white version and the reflection map I
will control shift click. What is happening is
the grounding is white, so it is basically
an inverted version. So what I did is I manually
highlighted all of the grounding to be
white so that the white is getting no reflection. And the darker it is, the more flexion it gets. The texture is already
giving us variation. So this is good. So the bump map, if the normal black
and white version and the reflection map is the inverted version
of the bump map. I will control shift, click to the main shader. Over here. We see the normal preview
and the flooring effect. We will see much better when we get into
the rendering part. Alright, so this is complete, and in the next lesson, I will apply the
artwork texture.
31. Applying the Artwork: Now I will apply the
material on the artwork box. I will select the artwork box. For now I can click New to create a new material
and I will rename this, and I'll call this artwork box. And this will be a darker color, something darker like this. And let's turn on the preview. And it will have a little
bit of reduced roughness. Let's take a preview. And I can reduce the
color a bit more. Okay, this is fine. I will minimize the preview. So this is the artwork box. For the other one, I will
apply the same material, click on the drop-down and
I click on the artwork box. And for this one, artwork one, I will click
to create a new material. And I will call this
artwork one. Okay? So the object name is artwork one and the material
name is artwork one. Now I will click on this base color dot and then
click on image texture. And now I can click Open to load the artwork. Artwork one. I will select it and
click Open Image. Okay, the texture is loaded. It looks like it is not
oriented correctly. So let's go into the
UV Editing Workspace. And I will turn on
the material preview. I will click on this. Let's zoom out. So this is the artwork. As you can see, this is a UV. I can just press U and
click on unwrapped. So it will automatically
fit the image. And let's flip the object. So I will go into
the object mode. I will press Control M to
mirror, and I will press Z. So in order to flip upside
down and then click it. And I think it needs to
be flipped horizontally. So, but I don't mind it as f. But I will press Control
M and then press X. And now it is
oriented correctly. And I can press N, and I can apply the scale, press Control a, and
then click on Scale. Okay, So the artwork
one is complete. But before that, you
can notice there's a little bit of
stretching over here. In order to fix this, what I can do is I can adjust
the height of the artwork. I will select both of these. And then press Tab to
go into the edit mode. And I will switch to
the vertex selection. And in my wireframe mode, I will select all of my
top worth, at least. We'll go back to the material
preview and then move it. Press G and then press Z. I'll just bring
it down slightly. For that, That's
crunching is reduced. Okay, I think this
much is enough. Let's check the value. So I will round it
off to minus nine. Okay? I'll do the same
thing for this one. I'll select this,
select both of these, Shift-click, and then press tab. I'll go into the wireframe view, select all of the top vertices, and then back to the
material preview. And then I will move it down, press G and V, and I can type minus nine. Okay, this is good. Now let's select
the artwork tool. And I'll go to the
checkered sphere. And then click New to
create a new material. And I'll rename this
to artwork tool. And I will click on
this base color dot, click on image, texture. And then I will click Open. And I will load artwork too. Okay, so let me press tab. I will select everything, press U, and then
click unwrapped. Okay. So the orientation
is not correct. With this as well. What I can do is rotate the
UV here in the UV editor -90. Okay. And just move it in place. I can just manually adjusted. Okay. I think I need to
adjust the UV from this side. Let me select the UV from
here and then just push it n, that it is sitting
right on top of it. Okay? Alright, so the
art work is complete. And in the next lesson, I will apply the
material on the ceiling.
32. Applying Material to the Ceiling: Now I will apply the
material on the ceiling. I will unhide the ceiling. Here in my thin collection, I will scroll down. And here is the collection
of the feeling. I'll click this to unhide. I will switch to the
material preview, breathy, and click
on material preview. So I have only two objects
inside the failing collection. So I'll click the first one and click on New to
create a new material. And I'll rename this and
I'll call it ceiling paint. And this one is going to
be a plain white color. And I'll scroll down, I'll increase the roughness. Now, I will select the
other ceiling part. And from the drop-down, I'll click on ceiling paint
to apply the same finish. Alright, applying the material to the ceiling is complete. Now the only thing remaining for texturing is the
curtain over here. In the next lesson, I will apply the texture to this curtain.
33. Applying Curtain Texture: Now I will start to apply
the texture on the curtain. I will select the curtain. I will press N on my keyboard. And let's check the scale value. We need to apply the scale, press Control a, and
then click on Scale. The scale value is one. Okay, So now I will switch
to the shading workspace. Let me have a better position
to work on this curtain. Now I will click to
create a new material. And I will rename this and
I'll call this curtain. I click on the principled shader and press the
shortcut Control T. So I get these nodes, and I will select
these two nodes and then just move it away. And let me reposition the
image texture node as well. And now I will click on
open to load the texture. I can see the color
of the texture, but the texture itself
is not visible. So over here, inside the
texture coordinate node, I will connect the
generated to the vector. And now I can see the texture. And I will change the
projection from flat to box, and now I can adjust
the mapping of it. Let's take a look. And I see a bit of
stretching over here. Let's try to adjust the scale. I'll start with the x. Maybe 0.2 is better. So this is looking much better. Alright, So now the curtain
needs a small bump detail. Now I will make a duplicate of this texture node and change this color space
from sRGB to non-color. Oh, these both are
sharing the same. So let me change
this back to RGB, and I'll click this
to make it unique. And now I'll change this to non-color so that they
both are different. But they're using the same
texture. This is fine. And now I will add
another node color ramp. I will connect the
color to the factor. And I will add another
node called bomb dUMP, okay, and place it over here. So this color will
be connected to the height and the normal
goals to the normal. And the strength needs to
be much, much less 0.1. But first, let's take a look. What are we doing
with this color ramp? I will press Control
Shift and click on this. And this is going to
give us a preview. But before that,
I need to connect the mapping coordinates to
this node in order to see it. So I'll click on this, connect the vector
to the vector. And now I can see the texture. So let's bring this n and bring this n
from the other side. Just to have more contrast image to create a black and
white version of it. And this is fine. And now I can just
press Control Shift and click that I get
the normal preview. Okay, so now the texturing
of this cartoon is complete. And we have successfully completed texturing
all of the objects. In the next lesson, I will add a camera and make
adjustments to it.
34. Adding and setting up the Camera: Now I will set up the
camera for our C, press Shift a, and
then click on camera. The camera is created. I will switch to the camera, press the Tilde key, and then click on View camera. Now before I do anything, I will press N on
my keyboard and then click on View
and lock the camera. Expand this and lock
the camera to view. Okay, so now I can just move around as I do in my
perspective view. So this way I can adjust
the camera easily. And let me reduce it. Press N to hide it. And let's reduce
the focal length. So I'll start with 30, maybe 27. And I'll bring the
camera down further. And just getting some
view from the window. And I can move back further. I think this wall over here, I can push it back. This wall, I can push
it back further. I'll go to my top view. And I'll just move
this wall back. Further. Switch
back to the camera. And let's reposition the camera and switch to the
material preview so I can adjust better. I'm just trying to make the carpet line
straight to the camera. I will pan more towards
the right-hand side. Move up just a little bit, maybe move back a little bit to get some view from the window. And let's zoom in. Let me turn off this locking and just zoom in so I
can have a better view. Okay, I'll turn on
the material preview. Now I will adjust the
focal lens of the camera. I will enter the value of 35 M, M. I will hold Control and
middle mouse button and drag. So I can move the mouse back. I will switch to wireframe so I can see the position
of the camera. Okay, now I will switch to
the solid view and this wall, the back wall, I will select
it and I will hide it. Alright. But I will
also disabled this from the render so that I
don't get to render this wall. This wall is blocking the view. So let me further
adjust the camera, hold control and move the
camera a little bit closer, somewhere closer to
this, maybe even closer. And I'll switch to
the material preview. And I'm happy with this. And in the next lesson I
will add the sunlight.
35. Adding Sunlight to the scene: Alright, now I will add
sunlight to the scene. I've been switched
to the top view. I'll go to the wireframe view. And I will make sure the default theme
collection is selected. Okay? So now I will press Shift a and go to light
and click on sun. Okay, so the sunlight is added. Move it, press G and
middle mouse button click. I'll just move it
out somewhere here. And I will switch
to the front view. The moment it is
pointing straight down. Let me move this up in the Z. Now I will change the direction. I will rotate this. So this is pointing
towards the room. And then I will
adjust it further. I will push to the top view. And then I will rotate this looking at this
sofa from this angle. Okay? Now let's take a
look from our camera view. And then I will start
to adjust the settings. I will press the Tilde key
and click on View camera. I will switch to render. Let's come over here. And then I will change the
render engine from EV. Two cycles. Alright? I will go back to the
sunlight properties and I will increase
the strength. I will enter the value
55 is a good value. We are getting some good light and then they're
getting thumb bounds. But the room is still dark, but this is the start. Now notice one more thing. We are getting very
sharp shadows, so we need to make this smooth. As it goes away, the shadow should
be more smoother. So for this, we need to
adjust the angle value. So I will increase this to two. As you can see over here. Maybe I'll make it five. See a drastic results. Okay, this is getting better. I think I'm happy with this. Now, let's adjust the color. I will add. I'll make it slightly warmer. Just a touch of it. Yeah, this is nice. Okay, so we're done with
the sunlight for now. And in the next lesson, I will add indirect
lighting to our ceiling.
36. Adding Indirect Lighting: Okay, I will continue
and now I will add indirect lighting
to our ceiling. So I will switch to
the rendered preview. For this is real-time rendering. This is the results so far. Before I add indirect lighting, take a look outside
the window over here. It's dark over here. So I want to give bright
background to it. Come over here to
world properties and take a look at this color. At the moment it is dark gray, I will change this color
to something brighter. So this is also giving some
light bounce to our room. Either increase this, I
need a very bright outdoor. And this is helping
our sunlight as well. So now I will come over here and start to add
the indirect light. I will switch to the
material preview to make things a
little bit faster. And I will select this
part for the ceiling, and then I will
isolate the scene. Now I can have a better look. I will switch to the solid view. This is where I will put
my indirect lighting. I will be doing this two steps. First, I will add an
emission material to it, press Tab and go
into the edit mode. And I will switch to
the Face Selection. And then I will
select these faces. Shift-click, Shift-click. All of these are selected. And then I will press
Shift D to duplicate. And now attached to my mouse
pointer, I will right-click. So it goes back to the
original location. And now I will separate this. Basically I'm extracting this, press P and then
click on selection. Now I've extracted it, tap to come out
of the edit mode, back to the object mode. And now I will select
the expected object and I reduce the width of it. I'll go to top view, press tab, and I'll switch
to the vertex mode. And I'll just drag select the outer vertices and
then scale it in slightly. And I will give a little
bit of thickness to it. Come over here. I'll click on the
Modifiers, add modifier. But before that,
I'll press Control a and then apply the scale
just to be on a safer side. Now I will add solid d Phi. D Phi is going on the inside, but I will reverse the
direction, maybe -0.2 k. This is fine. And then I will just click
on this arrow and hit Apply. And I will quickly rename this. Rename this to IND light. And for this one, I will give a new material. Click on this jacket ball. I will click this x. I will click New to create
a new material. I will rename this
indirect lighting. And then I will click
on the principal P, S, D, F shader. And change this to emission. I'll change the color
to something warmer. Let's take a look. I will exit the
isolation forward slash, or can then switch to
the rendered preview. And let's take a look. This is the result so far. And I will try to make this
a little bit more warmer. And we can see the effect. If I increase the intensity. Let's try six. In order to have a
better understanding. What I will do is come to this bold properties and I'll change the color back to
dark as it was before. Just to see the impact
of our indirect light, I'll come back to the
material properties and I'll enter the value 15. Just to see the effect. We're getting some nice indirect lighting
effect over here. But the drawback is it's
burning the entire ceiling. If I reduce the intensity, we don't get delight
bounce over here. The ceiling looks better. So as I told you before, I will do this in two stages. So for the ceiling, I will reduce the intensity
back to two maybe, so that the ceiling
is not burning. And we can clearly see the indirect illumination
effect on top of the ceiling. And in order to get the illumination for
the rest of the room, I will add additional lights. Okay, so I will switch to the material preview and
I'll switch to the top view. In the wireframe view, I will add light. But before that, I will select
the ceiling, isolate it. And I will add light, Shift a, and I will
add area light. Okay? So I will change this
from square to rectangle. So I can easily
adjust the x and y. So I reduce this and
move this in place. I will follow the position of the indirect lighting and I
will adjust the width of it. It doesn't have to be perfect. Okay, so let me adjust the
position from other view. So I will push to the front
view and raise this up. So now I have this created. I will, I will duplicate
this as an instance. So I'll press Alt D. And now it is an instance. And I will middle mouse button click and just move it
in place over here. And then I will
press all the again, bring it over here, rotate it 90 degrees, press R and press 90. And I'll just move this
up in place over here. And I'll just scale it outwards. Just positioning it roughly
doesn't have to be exact. Okay? And I will press
Alt T one more time and bring it over
here and position it. Let's take a look. So this is going to mimic
the indirect lighting. So I'll select one of these, change the color
to a warmer color. And now I will select all of these and create a
collection of lights. These four lights are selected. I will press M and move
this to a new collection. Click on new collection, and I will just
name this lights. So all of the area lights
are in one collection. Okay, so I will
exit the isolation. And let's take a look. This is much better. So let's change the background
color back to white. All right, In the next lesson, I will add light
to the floor lamp.
37. Adding Light to the Floor Lamp: Okay, Now I will add
light to the floor lamp. I will switch to the top view and switch to the
wireframe mode, Shift a and add
light, point light. And I'll press the G
to move it in place. So this is the floor Lamb. I'll just place it in the
center and adjust the height of it 5-stage to the front
view and move it up. And again, I'll just
try to position it roughly in the
center of this shape. Now go back to the camera view and turn
on the render preview. And just to make things
a little bit easier, come over here to
the render settings and turn on the noises
or for the viewport. So click on this check mark. And now the preview will be much cleaner and easier to see. Okay, So let's adjust the
light, this point light. Click on the
Properties over here. And I will increase
the intensity. Maybe I'll make it 30
and change the color. Something warmer. Warmer tone. I will increase the saturation
and just take a look. And I'll make the intensity 35. Okay, this is fine. I think I should move the floor lamp away from
the wall just a little bit. So let's take a look
from our top view. I'll switch to the wireframe
and select everything. And just move it away. And just a bit centered from
this wall and this sofa. Okay. Back to the camera. De-select everything. Alright, so adding light
to the floor lamp is done. And in the next lesson
I will take a look at how to make the
carpet look fluffy.
38. Making the Carpet Look Fluffy: Okay, Now I will work on the carpet to make
it look fluffy. I'll select the carpet, go to the shading workspace and adjust the view
a little bit so I can see the carpet better. So we have the node
setup already in place. And we need geometry
for our carpet. For this to work. I will add a
subdivision modifier, and I will switch
to the simple in order to retain the
shape of the carpet. Now I will go to the Render Settings and for the feature set
instead of supported, I will click on experimental. Okay, now, come to the
material settings over here. Scroll down. And under the displacement. Expand settings. Scroll down and here
for the displacement, if phase bump or lay, change this to
displacement and bond. And now come back to
the Modifiers tab. We can enable this
adaptive subdivision. Okay? Okay, Now there is some
movement happening. I'll increase the
scale of the carpet. So I'll just change this
back to the original. One. Way too much. I'll just change this to two and reduce the scale to 0.04. So there's some
movement happening. And then I'll go back to
the layout workspace. So adjusting the
carpet is complete. In the next lesson, I'll be making them
design adjustments. So let's take a look in the next lesson
about the changes.
39. Design Changes and Finalizing the Scene: Alright, now I will start to make them design adjustments. I will start with
this paneling wall. I will switch to the
material preview. The back wall is selected. I will click on shading to switch to the shading workspace. And here I can see the
material setup of this wall. So I'll select this and push
it back to make some room. And I want to make this
bold texture bit darker. The way I will do
it is add a node, Shift a, and type in
comma, and then click. And now I have it
highlights to white. And I can click and it will automatically connect the
input and the output. Now I will make the adjustments and I will increase this value. And type and 2.5. Now, this wall texture
is much, much darker. I'll go back to the
default layout. Okay, so this paneling
wall is done. Now the wall on the
left-hand side. What I have decided to do is I will copy the same design
on this side as well. I will select this
paneling wall, and I will select this
wall and isolate it. And now what I'm planning to
do is duplicate this ball. Press Shift D to duplicate. And now I can just move it here. In my top view, I will rotate this 90 degrees
and I'll enter negative 90. I'll position it in
my wireframe view. Press G to move. And I will just
place it over here. Push it back a bit further. Let me see if there's
any gap visible. There's no gap. Okay. And this wall I can delete
fish to the material preview. There shouldn't be any gap. In order to make sure
there is no gap, what I can do is select this wall press Tab to
go into the Edit mode. And in my wireframe view, I will select all of these phases plus e to x
drawer and just bring it out. This way. There will be no gap, there will be no
light picking n, Okay, so I will
exit the isolation. Now this is looking
much, much better. Another thing that I
would like to adjust make the light a
bit more warmer. So for the ceiling,
I will click. I'll press the period
key on the keyboard. This is the one that is having the emission material
applied to it. So I'll switch to the
rendering preview. And I wanted to make
this more warm. I'll click and increase
the saturation. I didn't create the
saturation even more. This is only affecting the
ceiling part over here. For the rest of the room. I'll take a look in a minute. So I think this much is enough. And I'll increase
the strength to 2.5. So we have more intensity. And I'll just make this 0.9. Alright. Now I will select
the area light. And these all are instances. And I'll try to
make this warmer. I'll increase the saturation. I'll type in the value 0.6. Maybe it needs more. I'll just increase and I can increase the intensity to 16. Now you can notice some of the warm light effect coming in. And now I will work
on the sunlight. I'll select the sunlight. The sunlight intensity
needs to be increased. So this trend at the
moment, it's five. I'll increase this to ten. And then when I make it ten, take a look over here. We're getting more
intense effect so that we can see clearly
the sunlight coming in. Yeah, this is
looking much better. In addition to what I've done, I have prepared some of the accessories that will
go on top of the table, and I've already prepared it. Just come and unhide it. This is the one box. So I'll just click
on this button. And now we have
some of the books and magazines on the table. And once I have put on
the sofa over here, if someone was reading it. Okay. And the flooring
is looking nice. We're getting some
nice effect on the fluorine and the wall. So overall, I'm happy with this. The color of the curtain
needs to be richer. Let's go to the
shading workspace. And this is the texture
for the curtain. Shift, a go to color. And I'll add this
hue saturation value and just click on
this connection. Okay, So let's turn
on the preview. This is getting a lot
of warm light effect. From the area lights. I'll increase the
saturation to 1.5. Yeah, I like this 1.5 value. Okay, So this is fine. So coming back to our
layout workspace. Now finally, I want to change
the texture of the cushion. I'll select the
cushion over here, and I'll go back to
the shading workspace. And here I'll turn
on the preview. Here I will replace the diffuse texture for
the base color over here. So I'll click Open Image and then I have a
new cushion texture, cushion blue click Open Image. And yeah, I like this one. Okay, So one thing I wanna do is I want to reduce
the scaling of it. What I can do is
come over here and then increase this to 1.5. Now this is better. Okay? So for the bump map, I'll use the same texture. I will click Open and
select this cushion blue. And I'll make this black
and white within blender. I'll just drag it over here. And I'll add a new
node, Shift a. And I'll type in RAM color ramp. Then when it highlights the
wide, I will click on it. It will have that
connection automatically. Now I'll just make this. I'll press Control Shift
and then click on it. I can see the image preview. And I'll try to adjust it, give it more contrast. I'll turn on material preview. Okay, so yeah, I
think this is better. This tiny little bit. This is fine. And now I can control shift. Click on this be SDF. Okay, this is fine. Back to the render preview. Okay, I'm done with the cushion. I'll switch back to
the layout workspace. Alright, so I'm happy
with this overall. Then the next lesson
I will prepare the scene to render
the final image.
40. Preparing the scene and Final Rendering: Finally, I will adjust the settings to start
the final rendering. The first thing is come over
here to the output settings. And I will make sure
this is 100 per cent. So this is the HD resolution. And then scroll down. And for the output
file extension here we can change and set
the output file format. I will select JPEG, make sure the quality
is 100 per cent. Okay, and now come over here
to render properties and make sure they D noise or
is on for the renderer. And I will also enable
path guiding that will help to distribute the
light during rendering. The rest is fine. And now, now come over here
to the scene collection. Anything that is hidden should remain also hidden
from the rendering. So I will disable the
layout from rendering. And then there was one wall
that was blocking the camera. I will turn this wall on and disable it
for the rendering. So the camera can
render the interior. And now before
hitting the render, Make sure to save the file. So if anything goes wrong, we have the file and we
can restart the render. Now I'll go to the Render
and start rendering. Click on Render Image. Now the rendering has started. Alright, so in the next lesson, when the render finishes, I will take the final image to Krita to do the final
post-processing.
41. Post Processing in Krita: Okay, so the rendering
is finished. Now I will save the image, come over here to image, and click on Save As, and then making sure the
format is what I want. Jpeg, the quality is 100%, and then I can just enter
in the name final render. And then I will
hit on Save Image. Now I will take
this image and load this image in greta and
do the final editing. Now I have loaded the
final image in Greta. So the first thing
that I will do is come over here
and click on this. This will duplicate
the current layer. I have the original
copy over here. Now I will come to
the filter settings and then go to adjustments. And then I will click
on color adjustment goes all press the
shortcut Control M. Okay? And now I will make
the adjustments. First I will add two points. And this one, I'll just bring
it over here just a bit. And this one I will just
bring it over here. We have a little
bit of as kind of a curve going on almost
to the center of this. And click Okay. And now I can play
with the opacity. I will reduce the opacity. Almost two, 55%. You can see the
before and after, just subtle effect,
maybe up to 60%. Okay? And now I will collapse this. But before I collapse it, let me first make a duplicate
of this original layer. And now click to
select this layer and press Control E so that I can merge it with
the bottom layer. Okay, so I'll hide
this original layer. So this is the one that
I will be working on. So the next thing that I
will work on is the copper. As you can see over here, there is some
repetition going on. I would like to fix this. And now I will switch
to the brush tool. And come over here, click on this brush preset, and I'll scroll down
all the way down. And I will select
this clone tool. Just click over here so that I can close the brush
selection window. And now I'll zoom in. Okay? Alright, now I
will hold control. So I can pick what I want to paint all control
and left-click. And now I can just
zoom in a little bit and left-click to just paint. Okay, then this is fine. Maybe this one I want to remove, maybe I'll take them
information from here. Hold Control,
left-click, and then just click one. Should be okay. And maybe this line over here, I want to break it. I'll take some
information from here, hold Control, and
then I'll just paint. This gives you an idea. And the next thing
I will bring in some sunlight rays,
visible rays. Let's pick another brush. Come over here. Click on this and I'll
scroll down further. So this last brush, I'll click on it and then
click somewhere here. Now, this is the one I will be using it to mimic light rays. So the first thing I will do
is create a new empty layer. Click this plus. And I'll just rename
this double-click. And I'll type in rays. And now just click once. Left-click. This is it. Now I will switch
to the move tool, and I'll start to modify this. I will press Control
T. And now I can scale this to hold Shift and
then click and drag. So I can uniformly scale
this, make it bigger. And then just position
it somewhere, and then scale it further. Okay. Now I can
just press Enter. The next thing is
to apply the blur. This is way too sharp. Come over here to filter
blur, gaussian blur. And now I will take this up. Let me move this so we can
see increase the blur. All the way closer
to 50 per cent. Maybe just a little bit less. Somewhere here. Okay. I will click Okay to accept it. Now I will position this. So press T to switch
to the Move tool. And I'll just click
and position it. And now I will rotate this press T and then
press Control T, bring them out outside. So now I get this Rotate option. So I can just click and
drag something like this. Okay, press Enter,
and I'll reduce the opacity. So reduce it. And then position it. Switch to the move tool. Just position it, reduce the opacity just
a little bit more. And increase the size. One more time. Press Control T and
just middle mouse. So I can pan. And let me just zoom
out a little bit. Then I'll hold
Shift and scale it further and press Enter. Now I can move this and adjust the
position a little bit more. So I'm happy with this, but I like this is
a bit too sharp. So what I can do is come over here to this
golf selection tool. And I will just manually select this part and apply
Gaussian blur. Now, let's see how
we can adjust this. Maybe I can just
leave it like this. So click Okay, and then press Control D
to D select. Okay. And now I can
position it further. Just about here. I'm happy with this gives a subtle effect
of sunlight coming in. Now I will give them
warm tint to it. I'll select this layer, press the shortcut Control U. And then I will press
this checkmark colorize, and now I'll take the queue. This is the heel. Drag it to get a warmer color and
increase the saturation. Way up. Maybe 80. Reduce this. Maybe just a little bit more. And reduce this. Yeah, this is fine. Now click Okay. So this is done. Now the window, I'll make a manual selection
to this window. I will hide this layer
called race for now. And I'll come to this selection. And I'll just pan and zoom. And I can just do a
manual selection. Click just where
this opening is. I'll just come over
here, make a selection. And then just click over here. Maybe I made a mistake. I can hold the Alt
and then click. I can remove this part. Okay, so the selection is done. Let me zoom out and now I
will create a new layer. Highlight this layer
and then press plus. And the color is white. And I will press Shift and backspace to fill it with white, control D to de-select. Now I will right-click this. Go to Layer Style. Now I will enable hello. So click this to enable it. And let's move this. So we can see the effect. Now I'll start to
increase the size of it. That will give some glow. I'll increase the size for
the now I can increase the spread so I can control the size a bit better,
the shape of it. Yeah, yeah, this
is better. So 53%. And I can click, Okay, we can come back
to this settings. Anyways, I'll click
Okay for now. And I'll start to
reduce the opacity. I don't want to use this
just blank white color. I just wanted to have
this glow effect. Now I will duplicate this layer. And let me hide this. This layer. I will
disable the glow effect. Click this. I'll reduce this slightly. Looks like there's some
brightness happening. And then I will turn on this
one and reduce the opacity. This is giving me
some glow effect. Okay, Let me turn on this race. So I can see this subtle
outdoor wall over here. It depends how much I
want to show outside, but the idea was to keep
the outside brighter. Okay, so let me just
position it better. Bring it in the center. And I can increase the
intensity of the race, maybe a bit more somewhere here. And I can also play with
the position of it. One final time just to see if I can find anything
better than this. I'll push this out slightly, just a little bit over here so that I get just a slight
effect over here. And then I will apply
Gaussian blur One more time. Come over here to filter
Blur, Gaussian Blur. And I'll just make it
even more smoother. So maybe 40 showed the
previous one. Click this. You can see this is
the previous one and this is the new one. It just makes it more
smoother. Click Okay. Maybe I can increase the opacity
to 50%. So this is fine. I'll quickly rename the layer. This is the globe and this
is the outdoor, okay? And this is the Render. Alright. Now I will apply
the Unsharp Mask, come over here to
filter and hands, and then click on Unsharp Mask. And the default value is fine. Just click Okay. You get a, just a subtle effect. Finally, I will reduce the saturation is a bit
too much yellow going on. The press the shortcut
key control, you. Reduce the saturation,
click and drag and very subtle, maybe -15%. So we can see the preview. This is the new one and
this is the previous one. Too much yellow going on. And this is the new one. Just a slight effect. Click, Okay, I'm
happy with this. So this is the end
of the course. I hope you learned
something useful from it. And I'm sure you
can come up with more creative ideas when
you do your own project. So keep practicing it. Don't forget to give me
your feedback and you can ask the question
regarding the course as well. And I'm looking forward
to see the rendering that you will produce
in your project. So take care and bye bye.
42. Conclusion: Congratulations on coming this far and completing the class. I hope it was useful and
informative journey. It is important to know the
tools and how it works. You don't have to copy each
and every step I take. The key is to know the tool and apply the technique
as you see fit. And the best way to hone
your skills is to practice. I highly encourage
you to get started. You are free to use your own 3D models that
you have done in the past. Get to the rendering and submit it to the
project gallery. Remember, it is not about being perfect on your
very first attempt. Keep practicing it. And don't forget to
follow me here on Skillshare and on
social media as well. This is my YouTube channel
you can subscribe and please provide your feedback regarding the class here on Skillshare. Thank you once again. Take care and bye bye.
 Syed Khuram, 3d Artist