Transcripts
1. Class Introduction: Hello, hello,
everyone, and welcome back to my brand new
Skillshare class. And in this one, we are going
to be challenging ourselves by using red pens
and markers only. And this is a great exercise to fill up your small sketchbook. And if you don't already know, my name is Ivan
Florentino Ramirez. I graduated from
Celta Fullerton, and I have experience in graphic design in
portrait drawing, watercolor, acrylic paint,
and digital illustration. And in this course,
we're gonna have fun learning with just using red tones and also with a combination
of pop culture. And what better way
than to start drawing an iconic pop culture comic
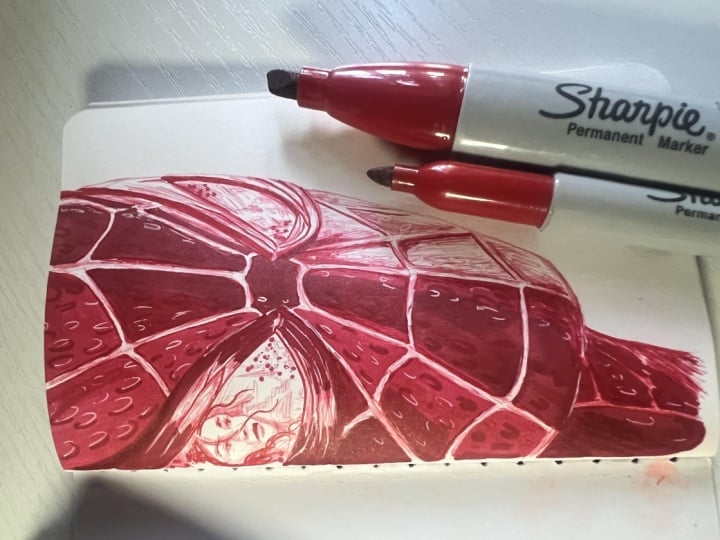
book hero than Spider-Man? We're gonna be using
the poster for the brand new Spider-Man
movie as a reference photo. I'll show you guys how to
combine both red marker and pen together to create a detailed
drawing in your sketchbook. And we don't need many
materials, your sketchbook, a few red markers and pens, and maybe a white jelly
roll pen to correct some mistakes if needed
and clean things up. So, what are you waiting for? Let's get everything
ready, and let's begin.
2. Art Materials Needed: For this red pen challenge, you do not need many materials. Here are the few
that you will need. A small sketchbook, the
one that I happen to have is only 3.5 by 5 ". It's a very tiny one, and this is the ideal size for the sketch that we will
create with Spider-Man. As for the all red materials, I happen to have a
wide Sharpie marker, a fine tipped Sharpie marker, a generic red marker, a gel style pen, and a very common
red ballpoint pen. So whichever materials
that you have with you that are red,
those will be fine. What we're trying
to accomplish for this challenge is have a
variety of hues with the red, being able to cover wide
areas with the markers, and being able to
shade in details and create a nice blend
from light to dark. And as for a very last material, if you are not able to
have one, it's okay, but any type of white
jelly roll pen. But if absolutely necessary, you can use a fine
point acrylic brush with white guash or
acrylic white paint. This is only needed in order
to clean up some areas, sharpen things up, and
correct any mistakes. And these are our materials.
3. Constructing The Head Shape: Okay, so welcome to
step number one. And we started this with
using our ballpoint pen. We have a lot of control with keeping things light
with the ballpoint pen, and it's easy to create
a very light sketch. So I section this up into
easy to follow steps, and I broke it down
into starting with the face and then the eyes because I want to reiterate that a preliminary outline sketch is the foundation
for everything else, no matter how amazing we may
be able to sketch to shade, add textures, add in color. If our proportions are in our
first phase of our drawing, everything else will
look off in the end. So what you want to do is create an oval almost to the center
on the right with the paper. For me, it's easiest to start from the top and work
all the way down. I'm creating thin
lines. I curve them. I'm keeping everything light
with very low pressure. And we're doing
this free hand and eyeballing it with
a reference photo. So as soon as you come
all the way down, curve that chin and
create that neckline. And we are creating
a three fourths view of Spider-Man face. And once you have a decent
sized shape of the head, even though the top part
isn't fully viewable, you can still create
a proportional face. So we are able to see much
more of the side profile, the eyes, the cheek
area, and the neck. And to further help us to know
where to land those eyes, divide the face in half
with a center line, keeping it very thin
and also dividing it horizontally as well so that we can know
where the nose goes. So this is our guide
so that we know where to place those giant
Spider-Man eyes. And usually we are able to
see one side of the eye, but because it is at a
different proportion, it is a little bit smaller
than one side of the eye. So just be aware that we
are drawing Spider-Man at an angle and not a
front facing view. This is a three fourths angle. Don't go too dark just yet, because we can't
technically see his nose, but those iconic big eyes are very important
for this sketch. Not only will the reflection
of the city be there, but also that of Naya's
character on the left eye. So I started with the right eye. I made a lot of
small thin lines. I curve them from the top right. That center horizontal
guide that we use. That's where the bottom
part of that eye mask goes. And this is the area where
the eyes seem to have that technology where Peter
is able to look and zoom in. There's a lot of flaps and layers to the
plastic in that eye. And also notice that
even though with Peter Parker's skin
type mask and suit, these huge eyes are not flat. They almost remind
me of those very thick sunglasses you
wear in the summer, those rounded cat eyes.
So think of it like that. It's not too thin, but it's definitely thick
enough where you can see the ridge on the
left side of the eye, perhaps a few
centimeters in depth. So I like to go back and forth. Once the right eye feels
proportional, I go to the left. And then I start
detailing one eye first. And once I know that the
proportions are ready, I can also darken a little
bit of the entire head. And also, I'm rotating my
paper so that my arms are a lot more comfortable and I'm not twisting and I'm not
hurting my wrists. And now this makes it easy for me to transition
to the left eye. And I continue with
making curve lines, putting in a bit more pressure, and also creating those details with those overlapping lines. And you have probably
already noticed normally, when constructing a
head or any face shape, the normal way when you
want to draw a portrait, we are looking for
a lot of angles, straight lines, and a
combination of curve lines. But when it comes to Spider-Man entire face, which is covered, and we're only focusing
on the eye and the eye details,
everything is curved. There's really no straight
lines at all except for when we get to the cityscape drawing on the right
side of the eye. Okay, once you've
taken your time, you create those
intricate lines on the top portion of the
lid part of the left eye, it's easy to connect
the bottom one, and it looks like
there's three stripes or three rows of
lines on both sides. This might seem a
bit complicated, so I tried breaking it
down as much as I can, and I didn't go overboard. Just think of it as three
rows or section of each eye. So now that we have
the construct of the head and both eyes finished, we can move on to
step number two.
4. Spider Web Pattern: Now, for this portion
of the tutorial, I zoomed in all the way into the reference photo
to that left eye. In the white socket
of Spider-Man Eye, you can see the
reflection of the city, and the most important thing on that side is
Zendaya's character. So just like any face
or portrait drawing, I actually started with the
right side of the shape, following the chin, the cheek, and the eye socket, and worked
my way towards the left. This way, I'm still not adding so much pressure
because this is an easy way to make
a mistake if you go in a little too detailed
and too hard at once. I worked my way to the left, continuing with their eyebrows, by adding some curved lines, starting with one
side of the eye, making sure they are symmetrical and working my way to the left. Adding an indication
for the nose and even adding a little bit of that hair that's kind of
flowing in the air. And I wanted to take
my time with the lips, that's usually the area that seems a little bit off
if I do it too quickly. So once I knew the
proportions were okay, I made the neck and continued with the
hair on the left side. We're not going too
overboard with detail, but as long as we get a rough idea of what the
character looks like, we can add a little
bit in that hair with some curved lines and at least get some kind of a quick
sketch because we will add a little bit more detail
later on in the next step. So for this portion
of the tutorial, we are drawing the
spider web pattern, and we're going
to be adding this webbing across the entire mask. So what you're going to do
is start with the center, as I'm doing right here, find the center point
between the eyes, and we're going to
work our way outward. So we're going to be adding
curved horizontal web lines. The lines should look like curved bands wrapping around
a three dimensional sphere. So as long as you
don't keep the lines straight, they won't look flat, and we're going to
make this look like a three dimensional object because we are going to be
connecting the webbing, and it should look like
shapes and patterns. So each line should
bend slightly as it follows the shape
of Spider-Man head. And as you can see in
the reference photo, those white web lines are not too thick, but
not too thin, either. We're going to be
distinguishing them as soon as we add that red marker
in the later steps. And just like you
see that I did here, I started from the middle and
worked my way all the way up and not go all around the face all at once because
that can distract you, and it can make things a
little bit too complicated. And if you need to go
over the line several times in the light motion,
you can do that, as well. As you can see, I was doing fairly light sketchy
lines in order to guide myself as I was going
down towards the chin area. So just make sure to round the areas around the
cheek, the chin, and the top of the forehead, and it almost will resemble, like, a basketball as well
because of that cloth pattern. And imagine those lines
going through and underneath the eye lens borders and those
giant eye shapes as well. And just make sure
to space the lines fairly evenly as
you do this slowly.
5. Eyes & Facial Details: So in the previous step, we took our time to create those webbings that
are somewhat thick, and they will have some shadows and highlights as we're
going to do soon. But I wanted to separate that step because I
didn't want to go too detailed and so much
pressure because we can easily make mistakes
if we did that. So in this one, I'm going
to darken all those lines. I'm going to start curving them. I'm going to add
a lot of pressure with my ballpoint pen
that I'm using right now. And because we know that the lighting in the reference photo is
coming from the right, the left side of all
of the webbing on Peter's face is going to be a bit darker than
the one on the right, except for underneath the
chin and the neck area, as I'm doing right
now, that one's going to be really
dark on the left side. So all I'm doing is overlapping my lines to create that darkness
that we need. And the same reason we waited a bit here for more detail with Zendaya's face is we're going to be adding more detail
with the markers, but just continue to
darken a bit of her hair, the flowing parts of the
bangs, the top of her head, and towards the neck area, add a little bit more
lines, darken those irises, add a little bit of eyelashes,
thicken those lips, add a little bit of
shadow on the left part of the nose and the
bridge area of the nose. And now we focus
on the cityscape, which isn't going to be too detailed. Think of
it like a shape. I'm just adding some horizontal and straight lines
to resemble a city, a little circle just to
show that it's a sun, and then working my way on
the right side as well, creating a city pattern. Just look at your
reference photo and zoom it in all
the way as you can, as much as you can on
your phone or iPad, create some reflections on the white part of
his eye by adding a few horizontal curve lines
and then just darkening up those city buildings
just a tiny bit. Because in the next step,
this is we're going to be adding and blocking in
color with those markers. The There There
6. Blocking in Color with Markers: So for this step, we are using
the color blocking method. So what this means is that
we're going to be using markers and filling
in distinct shapes or areas with the flat
solid sections of color without using
any heavy blending. So we're trying to create bold graphic and clean
artwork for the end product. So we are using the largest
marker that we have. I happen to have a Sharpie
marker with a flat tip. But whichever marker
that you have, as long as we color in those heavy reds or Spider-Man face, that
will do the job. So what we're doing first is
laying down a light base. So I started from the center
and just working my way to the left because if you pay attention to
your reference photo, the light is coming in
on the right side while the left and somewhat
middle section is going to be a
little bit darker. So what I'm doing is just
using an up and down motion, laying those lines
next to each other. And if you need to
layer them on top, you can also do that to make it a little bit darker, as well. So what you want to do is
draw in sections with light, even coats of your chosen color, and take your time by
using slow small strokes. Make sure the directions
are consistent to avoid patchiness
while the ink is wet. Now, when it dries up, you can add a second
layer for shadows. This layering technique
will create shadows, but we want to save
that for later on. So just create consistent
even lines next to each other until you want to cover almost the entire face. And I also happen to have a fine tipped Sharpie
marker, as well. And this one happens to also
be a different shade of red, which is also perfect for us because we want to
get different tones. And the best part
of all, because these are sectioned off into spider web patterns because of that web throughout
the entire mask, you can focus on each
individual patch and shape. So what you can see
is that the marker and also the generic marker
that I have, and again, you happen to have
different shades of reds, test them out and see
which ones can create a nice flow of dark
and medium reds. Because we are going to be
adding the gel pen that I happen to have as well to
outline some of the spider web. But as I continue to the left, filling in those patches,
Spider-Man is coming along. Now, mostly for the
right side, like I said, I wanted to keep
that a little bit more of the paper
white because I wanted this section to be for that gel pen and more of
our ballpoint pen later on. So what I'm doing is outlining those spiderwebs
and defining them. We're creating the
sharpness, the deep red, because if you notice
in the reference photo, those webs are also three dimensional. They're
just not flat. And I'm also outlining
the eye as well. And again, take
your time inside of those webbed patterns and making sure and
curve those lines, the more defined something
is, the cleaner it looks. Now, as long as we
have the base for our markers and just
outlining just a tiny bit, the next step will be to
blend everything together. So hold off on blending. Just make sure to create
a base layer with markers and outline a little bit with gel pen and let's get
on to the next step. M
7. Blending Markers & Pen: Now, this is the final
step towards blending and combining both the markers and the different pens
that we're using. So to continue off, we left the right side
of Spider-Man face deliberately white with some of those outlines
in the spider web, because I wanted to make sure that we did the detail with
the ballpoint pen first. Since this is where the
lighting source is coming from. While the middle towards
the left of the face, we filled it in with marker and covered all of that
up with a nice, deep rich red and a variety of reds that
we layered on top. So now everything's
going to come together. What I'm doing is
going in between every single spider
web and making those rounded oval patterns that you see if you zoom into
the reference photo. So not only are we
going to worry about making the web look a little
bit more three dimensional, a little bit deeper
because those are not flat materials
of web and also overlapping and shading in those lines to get
a nice shade of red just deep enough
so that we have a nice transition
from light to dark. So all I'm doing is
going back and forth, scribbling and
overlapping those lines. I'm using an up and down motion, and again, just
following the form. And again, also putting a little bit more pressure if needed to cover up more
of that white paper. And I'm also going underneath
the chin to fill up some of those white spider webs because it does give a nice
light pink hue, 'cause we don't want it
to be so paper white only for certain
highlight areas. So if you notice
in the neck area, just covering up that
white spider web made it seem a lot
darker than it is. And in this portion,
we are detailing that right eye because there's
a lot of detail in there, and I will be using
a combination of the ballpoint pen and the ink pen because I want those deep reds
to really pop out and show how intricate the
eye sockets look like. So I'm outlining it and also combining the variety of reds because like
we said earlier, those eyes have mechanical
parts for zooming in and out. And I'm going back and forth with a different Sharpie
marker, as well. And I'm using curved strokes and only overlapping if I
needed to make it darker. And if you notice for the
left section of the eye, I purposely left
the middle section white because that is
where the highlight is, and I will finish that off with the ballpoint pen
and the ink pen. And finally, just darken
a bit of Zandia's hair, the lips, the eyes, the nose, just ever so slightly to make it
a bit more detailed, but just don't go too overboard. And also add a few
lines here and there, darken some of those cityscapes on the right eye, as well. And this section,
we are complete. The next step, we
will be cleaning everything up and tightening things with our jelly roll pen and any other areas as needed.
8. Cleaning Up Details with White Pen: Now, for this section, this is the jelly roll or water acrylic paint
and gouache section. This is the part where we want to refine everything,
clean things up. If you have any
mistakes to cover up, this is the final step
before we are complete. Now, one of the things
that needs a lot of refining is the eyes and some of the reflections
with the highlights and also the webbing throughout. Now, if you were
really careful and you were able to keep those
webbings paper white, it's going to be a
lot easier for you. But if not, this jelly roll pen does wonders when it
comes to fine detail. And all I'm going to be
doing is curving my lines, cleaning things up, covering up areas that I feel like were
a little bit too messy. If the Sharpie marker
happened to be running and kind of bleed out
into those webbing areas, you can definitely tell where things need
to be cleaned up. Now, sometimes
jelly roll markers, you have to go through
several passes, several layers, just until you can see it, the
ink coming out. Sometimes it's
easier depending on what material you're
trying to cover on top. But one of the details that
you can definitely see in the reference photo are
these oval like patterns. So although I won't
be doing all of them, this definitely gives
it a nice texture. Now, if you do zoom into
the reference photo, you can see that those patterns also have a darker
red around them. So that's what I'm going to
be doing to finish this off with the fine tipped
Sharpie marker. Having those next to each other, a bright white highlight with a jelly roll
and a darker tone, it really gives it
a nice pattern. It brings in the realism, and it just adds that
extra dimension and pushes things a lot further by just using all things red toned. And just remember to
use it sparingly and follow where the light source is coming from in the
reference photo. And there you have it.
We are complete with this Spider-Man and Zendaya from the poster of the
new Spider-Man movie. So don't forget to
upload your project in the project
section of this class and let me know what you
think of this topic and challenge by using only
red markers and pens. Thank you so much for watching, and I will be adding more of these red only challenges
in the future. So stay tuned. Thank you
for watching and bye bye.
 IVAN RAMIREZ, Artist, Painter & Youtuber