Transcripts
1. Art Class Introduction: Hello, everyone, and welcome to my brand new
Skillshare class, where we are drawing a
snowman in a snow globe. Now, this is going to be part of my ballpoint pen only series where I draw in
my tiny sketchbook. And one of the reasons I
wanted to do this was to draw adorable holiday scene and what more than a snowman
in a snow globe. And this one is a festive
looking one. And guess what? All you need are two items a tiny sketchbook
and ballpoint pens, preferably in black or blue. And if you are brand
new to Skillshare, my name is Ivan
Florentino Ramirez. I have experience
in painting with both acrylic,
watercolor and oil. I also do a lot of
graphic design, digital painting and drawing, and also traditional drawing with graphite pencil and ink. And not only did
I provide for you a high resolution
photo of the Snowman, which you can easily download, that will be our
reference photo to use. And make sure that when you are done
finishing or drawing, to upload it in the project
section of this class. One of the reasons I
wanted to do this class was to do something
for the holidays, but also this helps improve your overall drawing skills by practicing in your
tiny sketchbook. And we all have cheap
ballpoint pens laying around the house everyday use
in both blue and black. And all of this takes
less than 20 minutes to do in just two easy steps. All we do is draw our figure
and adjust your drawing, and then we detail it
in step number two. So what are you waiting for? Get your sketchbook and pens
ready, and let's begin.
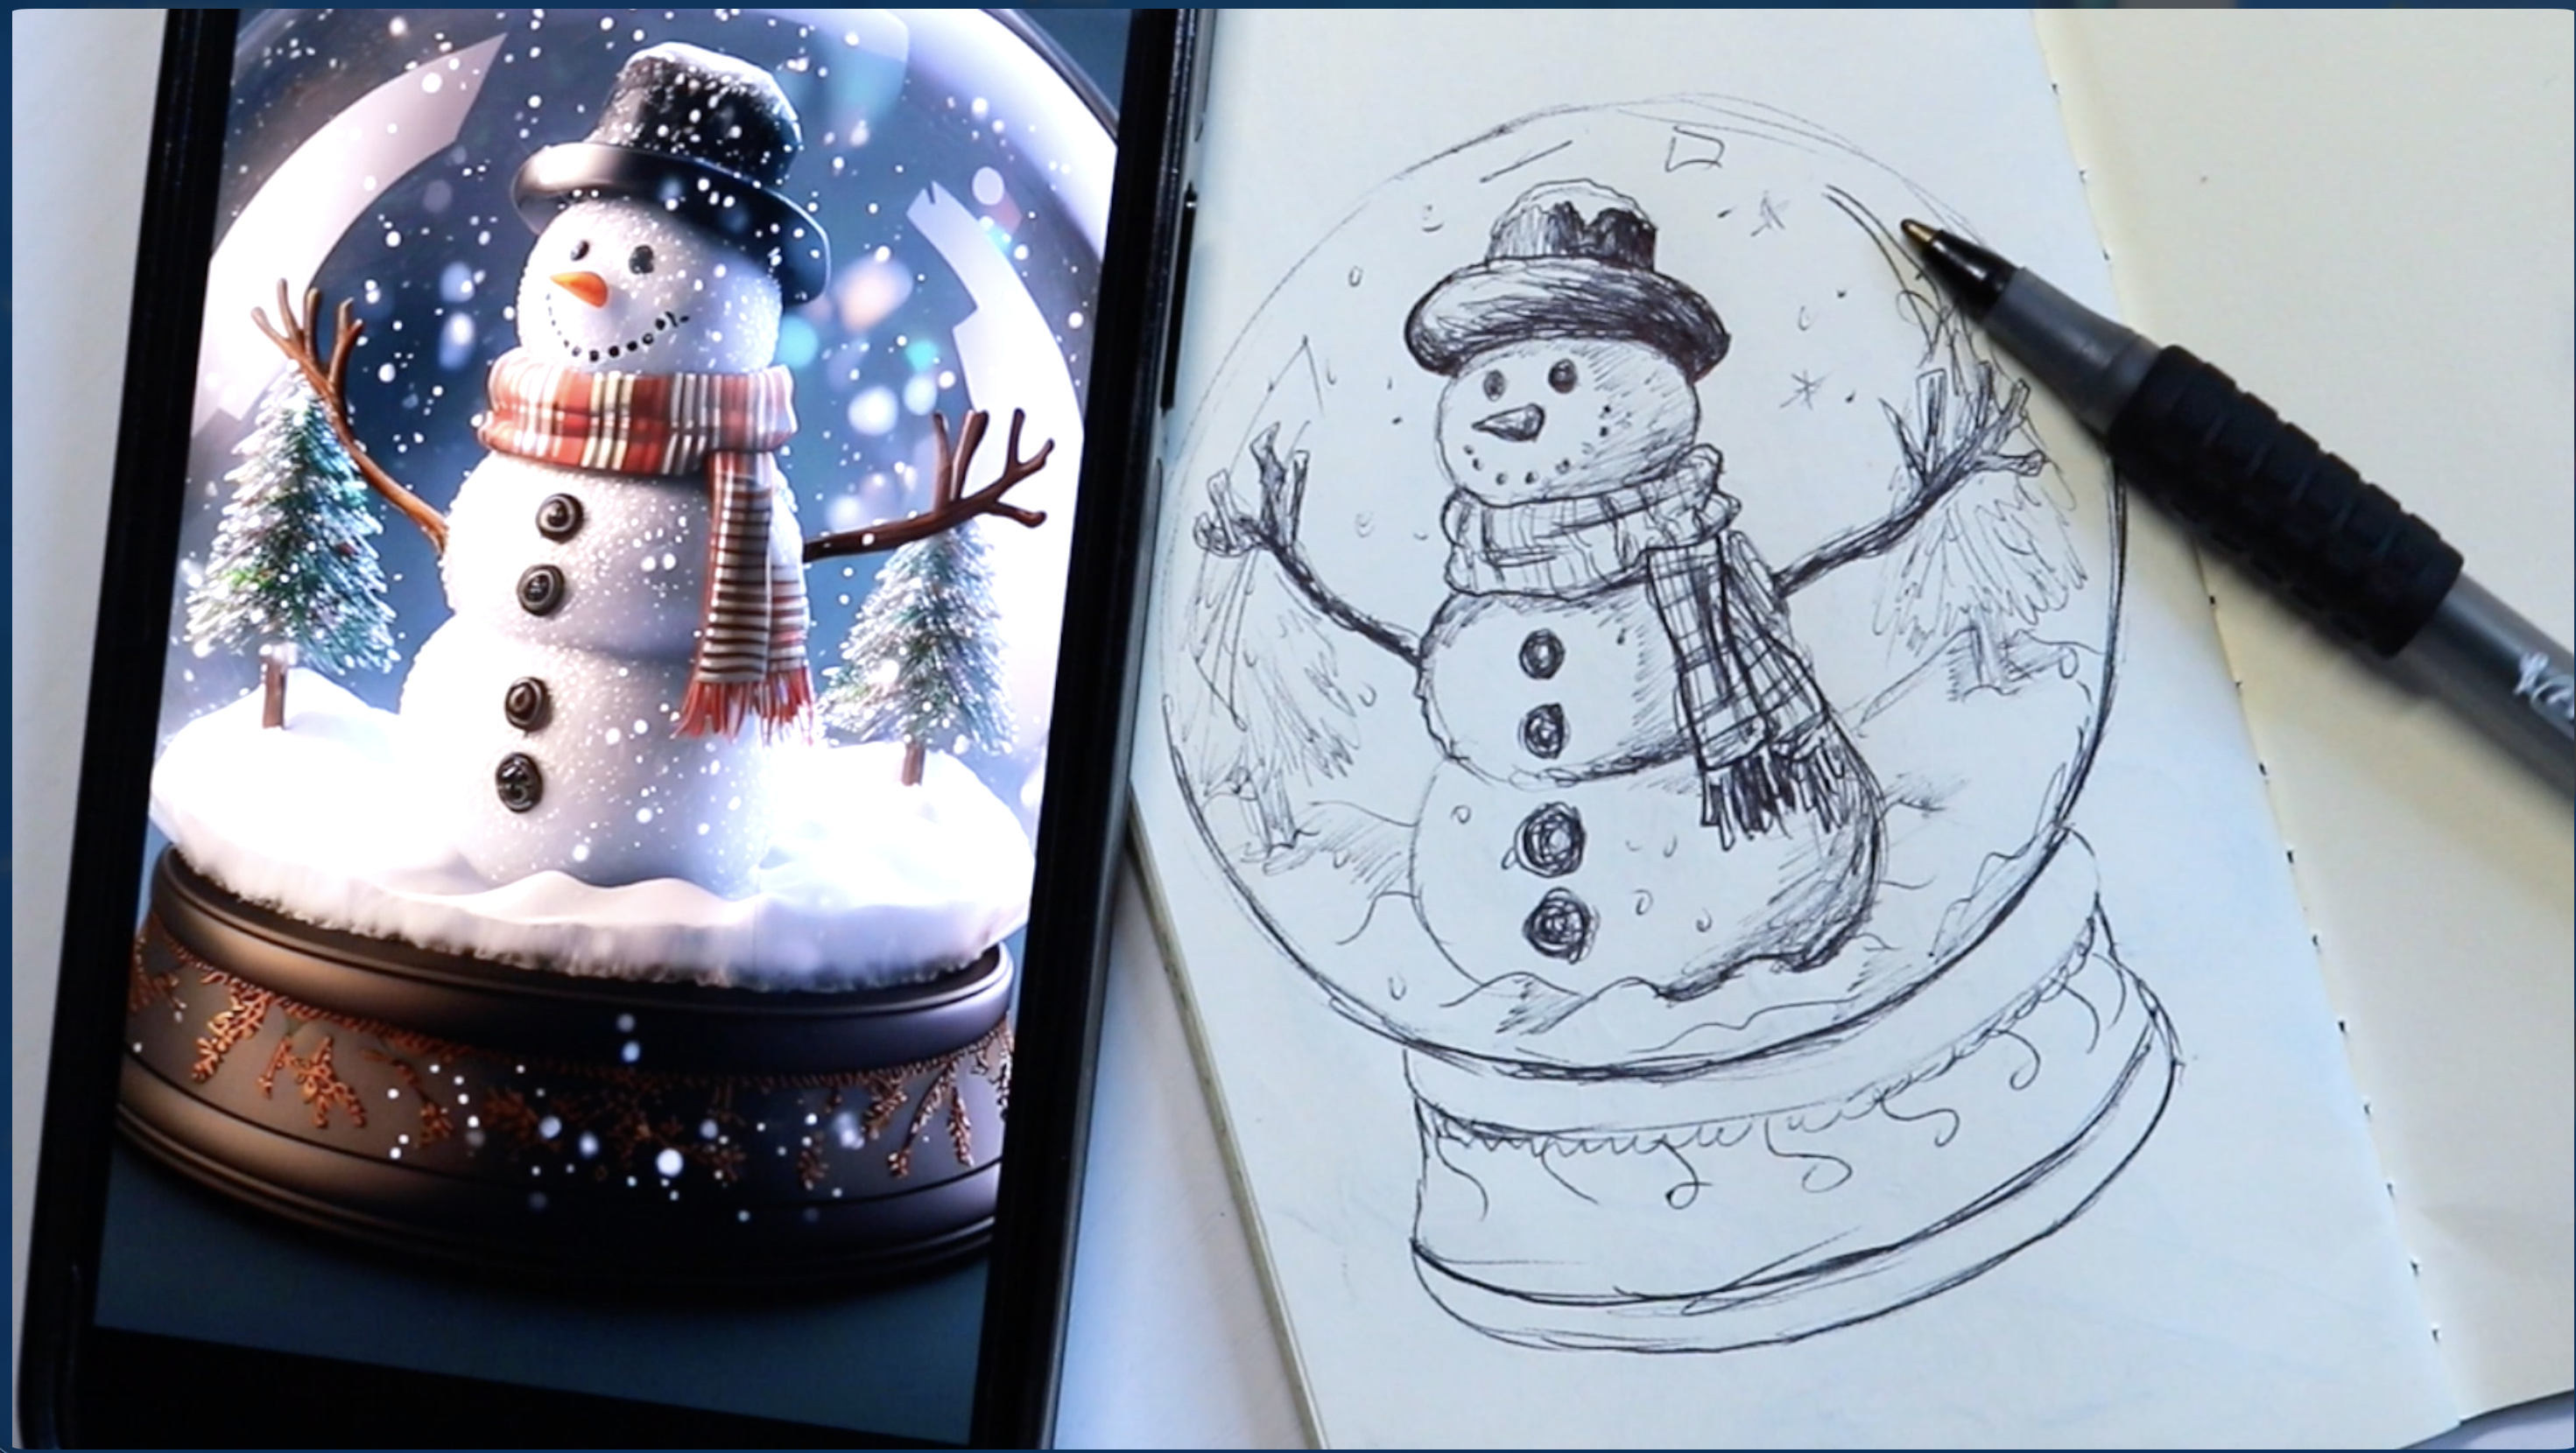
2. Ballpoint Pen Snowman Outline: Now, this adorable snowman
scene contained within the globe is made up of three snowballs, a
checkered scarf, a hat, two branches, two eyes, a carrot nose, and
a few cold buttons, and some of it for
his mouth, as well. One of the main reasons
for this type of exercise in your sketchbook
is that this is going to get you a lot more
comfortable with landing a lot more lines easily
instead of going super slow. Because we will be drawing
all of this free hand, we will not be using a
compass for our circle. Although circles can be intimidating to make
them perfectly, one technique that's my favorite is the circular motion
method in the air. We are imagining
the shape before we land those strokes onto the
piece of paper with our pen. So do this a few times with
your wrist in a motion to draw the circle and start
lightly sketching it out. Trust me, when I say this as the more and
more you do this, you'll get comfortable and they're going to look
better every time you do. So, as you can see,
when I started drawing my circle shape, I was using a ghosting
type of technique, a gesture drawing
just to kind of get a feel for where I'm
going to land my lines. So instead of going super, super slow and making a circle, I'm using my entire hand
to imagine the circle, and that's where it becomes
a lot easier to place it. And I did the same thing
with the base as well. We're not using any pencil, we're just using our pens. We'll begin with the hat. At the very top, begin with two lines for the top of the hat and an
oval for the brim, and one curve line right underneath for the
head of the snowman. The smallest part of the
snowman will be his round head. Start with two lines,
one on the left, and then one on the right, with a curve line beneath it
for the base of the scarf. Under the head circle, draw a curve line that wraps around the neck area at two scarf ends hanging down the side by drawing long, slightly
angled rectangles. Eventually, we will be
adding texture with horizontal stripes for that
flannel look that we need. The reason for these ghostly gesture lines is that we have to imagine where our shapes of the outline of
our subject will go. Same thing with our globe
and the base that we did. It's easier to imagine the shape as we do a fairly
light outline of it. This will also minimize
mistakes as well. The lighter you draw, the
easier it is to cover up later on when we go in for the full rendering with
our ballpoint pens. Now, as for the arms, from each side of
the middle circle, you're going to draw
a branch like arm. Use short jagged lines
to mimic sticks, add two or three smaller
branches at the end to serve as the fingers
and also notice me zooming in and out of my
reference photo because branches seem to be irregular in shape and size
with the width, length, and thickness of those branches that
are coming out, zoom in and out and kind of just make sure they do
look like fingers, but without going overboard. As you can see, I worked
my way out of the snowman. I added the branches. I added a bit of the snow
to the base of the snowman. I'm adding some pine trees, starting with the base and
now working on the leaves. Now I work towards
the carrot nose, the eyes, and the mouth, all made with smaller circles. Again, we're not going
into full detail just yet. But as you can see,
now I'm darkening it a bit more because I know that this is where the
proportions are actually landing and I'm comfortable
with where they are. And in the next step, we're
going to go through all of the lines with
slightly darker strokes. And because we are using pen, we cannot erase anything. We're going to embrace
the small squirt. We're going to embrace
the small quirks and line variations. With this whimsical
sketch for the holidays, I felt like a snow globe was a perfect decorative object
to use because not only does it contain a
miniature scene inside a clear liquid with a glass
surrounding it and a base? It encapsulates
the entire spirit of the holidays,
especially Christmas. And with just these
two easy steps, you're going to create
something fun while improving your skills
and pushing you a bit further while
adding a lot of details all within a
contained space as well. And we are halfway done in our two step snowman drawing. Did
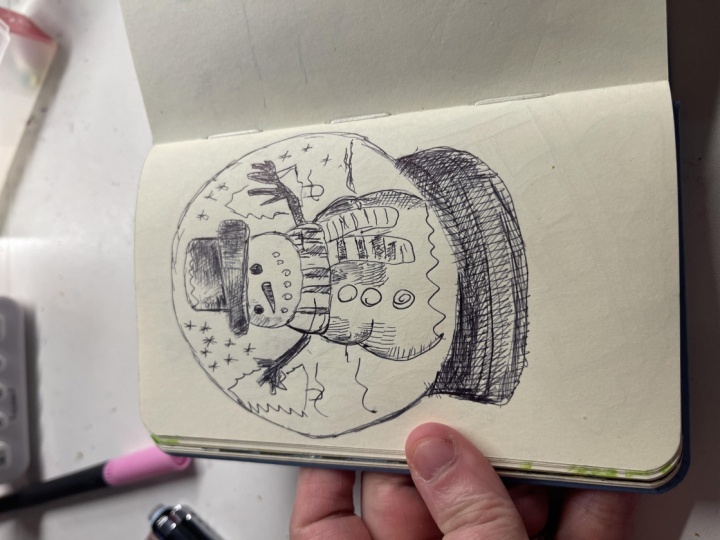
3. Ballpoint Pen Snowman Details: Okay, everyone, welcome to Step two with drawing the
snowman in a snow globe. So this is what we're
going to do for the overall look of the
ballpoint pen drawing. We are going to reinforce
all of our lines that we did in step number one and
start detailing everything. Like I said in the beginning,
we drew everything light. And now that we know where
our figure is going to be, we're confident in all of the details like
the eyes, the nose, the body, the accessories, like the branches, the
hat, and the scarf. We can start doing all
of our shadows and extra details like I am
adding in the scarf, all of those flannel
lines, if you will, also doing them lightly so I know where they're
going to go, creating vertical lines, horizontal lines,
working my way down. Thickening some lines, adding some shadows
underneath where it comes in contact with his
middle portion of his body. Again, just layering the
ballpoint pen over and over. We are drawing our
inner contour lines and the vertical and
horizontal lines on the bottom part of the
scarf and the yarn as well, that kind of hangs out
at the bottom part. We're going to leave a few of
those highlighted lines as gaps so that's part of the
paper so that can go through. And I'm just going
over some lines like you see with a scarf, and this will definitely give it depth and darkness
because as you can see, in the colored portion
of the reference photo, it's in red, white and black. Now, when it comes
to those buttons, they kind of look
like charcoals, so I just went over and over in circular forms to darken them. And I kind of left it
loose so that it does feel like there's
some highlights in there from the paper. Now, I emphasize
the bottom portion of the base of snowman, which is really round
so that there's some contact shadow with
the snow on the globe. And working my way out towards the branches on the right,
I do the same thing. I make horizontal lines or
zigzag lines back and forth to darken it because
the bottom portion of the branches are in shadow, and just the top parts, I left a little bit of the paper white because that's where the
light is hitting. Now, all of this difference
in tone is going to create that volume that we want for that three
D detailed look. Same thing around
the brim of his hat. The one that comes in contact
with the snowman's head, underneath, it is gonna
create a darker shadow. And as you can see, I'm
still curving my layering of the ink so that the part on the left is a bit lighter
because of the light, the middle, less lines because
that is the middle tone. And it does help round
out that form of the hat. It keeps it from looking flat if I were to do
everything in just black. Now, let's start adding some snowflakes
inside of the globe. Now, this you can
use tiny dots and short star like marks
around the snowman. And you can start by
making them smaller near the background and slightly
larger in the foreground. And again, this is going to
create depth and variety. And I even made some that look like stars just for
that festive look. That usually when it
comes to drawings, using a few that look like actual snowflakes
that are zoomed in, gives it that whimsical look. And I even added
that reflection on the snow globe by
making it into a shape, and it does give that
reflective glass look, as well. And usually for this last step, I'm just going through
every part of the form. I'm making some
rounded lines towards the rest and the entire
part of the snowman's body. Because our reference
photo shows that that's where
the shadows lay. So I'm just making my lines left and right,
following the form, not going overboard because
we do want this to be a white snowman with
a little bit of the gray in quotes that I get from the pens
that I were using. So the less pressure you put, it gives it that gray tone, and the harder you put,
it gives it that black. So just because we are using every day cheap ballpoint pens, that doesn't mean we can't get a variety within the gray scale. And this is part of the
exercise that we can use to push ourselves with just
pens that we have at home. And I do the same thing with
the snow on the ground, the trays that I created, and same thing with
the base, as well. So shading the globe
for that glass effect, the ballpoint pen shading, like I said, is all
about pressure control. If we use very light
hashing around the bottom edges and the lower sides of the sphere,
this is what it creates. And if you darken slightly
under the snowman to give the feeling of the
interior light as well. And if we add an
arc shaped shadow on the sides to create
the glass appearance, it'll push it out even more. The base is usually darker, as you can see, it looks
like it's made out of wood. So we're going to use
our solid hatching and cross hatching to
fill in that base. We're just layering over and over until we get
that dark effect. We're going to leave some
slight stripes across the top, the middle, and the left to suggest that it's
polished wood or ceramic. And this is where the
paper again comes in our favor as those
white highlights. Other finishing touches
that you can do is adding some shadows
under the base. We can reinforce key outlines while keeping others
soft, others hard. We can vary the line width that helps BwPointPen drawings
feel dimensional. We can add extra
snowflakes, scarf details, or just winter scenery in the background if we need
to like those trees, which I didn't go too heavy on. And yes, everyone, this is our simple two step snowman
drawing for the holidays. Now let's move on to
my final thoughts. Taking Dan did it. Pick it back Dan didn't
pick it back Denny did it. Telling B Dani didn't pick
it back Daniel did it, pack it back Day didn't
Tett Dani did it. Pick it back Dane didn't
4. My Final Thoughts: Alright, you guys, this is
the end of this lesson. This course was fun
to put together. I hope you guys enjoy this festive holiday drawing of a snowman in a snow globe. Before I leave,
just make sure to upload your sketch in the
project folder of this class. I can't wait to see what
you guys have drawn. I want to see how
many people ended up using blue pens or maybe
even black pens for this. It's really cool
to see everyone's different art
styles, and I truly, truly appreciate everyone who takes their time to
watch my classes, and please leave a review because I do take any critiques, and I love reading and
interacting with all my students. Thank you so much. I
really do appreciate it. And this will be the
last class of 2025, and I can't wait for 2026. I'm going to have a
lot more sketches, a lot more full length
over 1 hour videos, and it's going to be super fun. And once again, I do often
email all of you guys, anyone who's following me, all my students, and I do keep up to date with all of my
projects that I'm working on. Thank you guys so much
for everything and see you in the new
year. Bye bye.
 IVAN RAMIREZ, Artist, Painter & Youtuber