Transcripts
1. Course Summary & Materials: Hello, everyone. Welcome to my brand new sculpture
class number seven. And this is another class in the series that I started
with my sketchbook, and we are drawing Chu Baca. Before we get started, my name is Ivan Florentino Ramirez. I graduated from California
State University Fullerton. I have experience
with life drawing, life painting, gesture
drawing, graphic design. Simple animation, also
digital drawing and painting. And with the shorter course, going to teach you
how to use ballpoint. Now, this tiny sketchbook, this is a pocket sketchbook. This one is a tiny, tiny size. This one is only 3.5 by 5 ", and this is a perfect
size because not only are we able to dedicate
ourselves to a tiny surface, we don't have to draw
something large, and it's going to
be a quick one, especially for a fast
course like this. And just like my
previous class before, where I drew a spider monkey, and it was also
under 15 minutes, this one is going to go
all in on how to draw hair in a way where I quickly will break
down hair shapes, patterns and how to
apply strands of hair while using pop culture
as our subject matter. And even better, this course
is aimed for beginners, but anyone from intermediate to advanced artists can
participate in this class. And all you're going to need
for this is a few materials. The best part of it
all is that we only need literally three materials. We need our sketch
number two pencil for our underdrawing and several
black cheap ballpoint pens. You can also use the
dark blue ones as well. And I will be providing
a high resolution photo of our subject so that
you can follow along. So do you have your materials
ready? Let's begin.
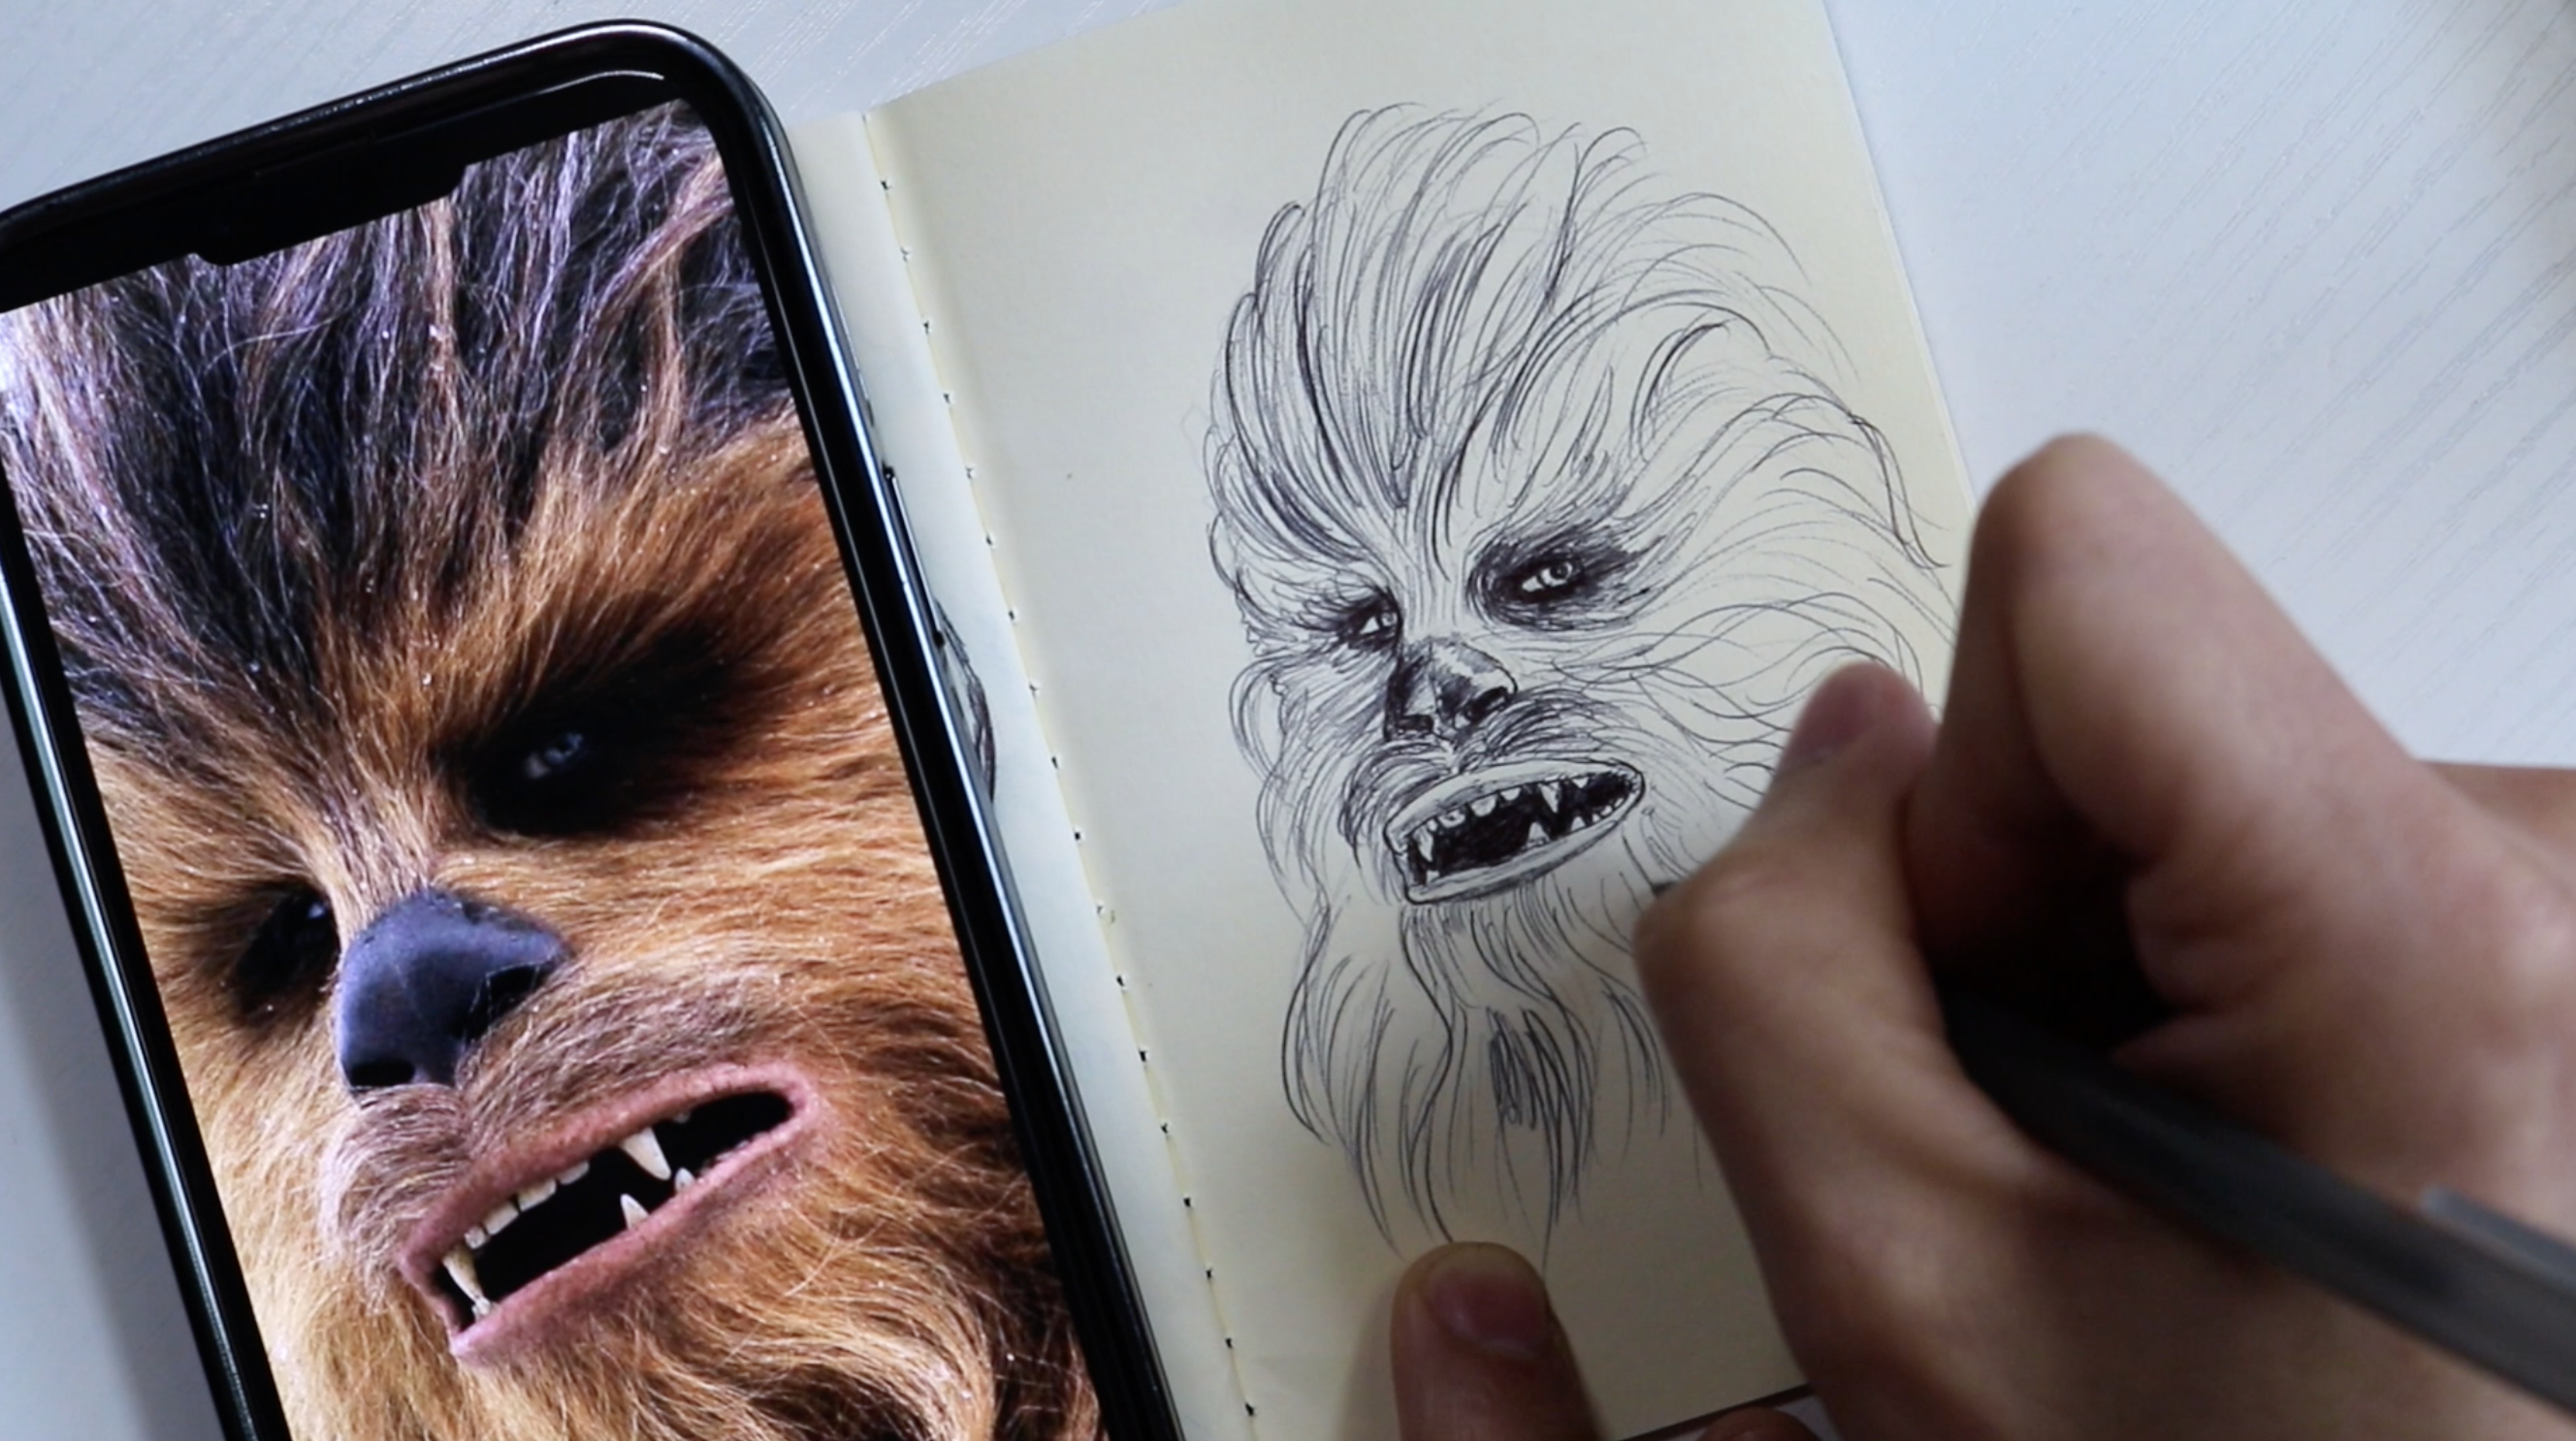
2. Chewbacca Sketchbook Drawing: So for my tiny sketchbook that
I'm almost finished with, I wanted to draw
Chubaka from Star Wars. And one of the reasons I
wanted to do so was because Jubaka is all covered in lots and lots of
hair, lots of fur. So I wanted to see
how much I can push the detail with these
cheap ballpoint pens. These are black ballpoint pens. One of them is
almost running out, so it does give it that
gray middle tone look, while the newer one is
more of a solid black, and that will help out
with those shadows under the eyes, the black nose, the mouth, and some of the dark hair on the bottom
and below his mouth. And for this course, all we
need is a small sketchbook, anything from a size 4 " by 5 " or four by seven.
Anything very small? Because again, this is going to be something
that we're going to use as a tool
to learn realism, especially drawing hair
because chubaca is literally covered in fur and lots of curly
strands of hair. This is going to help us when we do want to create something larger and when we
do want to invest time in drawing human hair, female hair, and
things like that. So all you need is a sketchbook or just draw smaller
on a piece of paper, a drafting pencil or
any light to be pencil, a few black ballpoint pens. And if you do need one, eraser. And again, I started drawing
with a drafting pencil, and it's a very light
HB drafting pencil. And this, I wanted to make sure that the proportions
were correct. So I always start off with using an under
drawing with pencil. This makes it a lot easier for less mistakes when
I'm using my pen, which can be permanent. And with your reference
vote already, I started this drawing
with the nose first because it is in the middle of the drawing, and I
worked my way out. And again, think
about it in shapes. The nose looks like a
diamond, and very lightly, I drew that diamond and started working my way into the eyes, and I started curving his very tiny eyes
and around that and worked my way down to his mouth and slowly started
creating the teeth, and without going into super details because we're thinking everything in shapes before
we start applying our ink. And if you notice
this red arrow that I provided, everything
is in shape. So what I'm leaving
solid black areas is because I'm
going to fill that in with my black bolt point pen. So you'll notice the solid
nose around the eye area and his mouth and some of the top of his hair and the
bottom of his chin, I'm going to purposely
leave that in larger shapes because
we don't need to waste our time filling
that in with pencil. And looking back
at this footage, I do apologize that there was a few parts that I completely forgot
that my battery died. So please bear with me as I
know that it kind of just jumped from one area to another,
especially with the pen. But I will be adding some
helpful examples on the top in this video just to kind
of show you how hair works. It doesn't matter if you're
using pencil or pen. But what I tend to do is draw from where the
hair is growing from. So you'll notice that I draw in a few lines
starting from the nose, working my way up and around his head and just
start curving them. So what you want
to avoid is doing completely straight
lines next to each other because that will
make the form feel flat. So, this means that
you're going to work around and curve lines, and this is going to
give it dimension and that three D look, that realistic look
that we're going for. And I'm going to emphasize this. The skull is spherical. So most hairstyles you will draw will be affected by
the skull underneath. So it's very important to think of the ball
when working on the overall value changes
when drawing strands of hair. So what we're going to do
is add volume to the hair. So this means that hair strands are grouped together into locks. So it's important to
simplify and think about the geometric shape of the
locks before adding texture. So adding texture to
the strands should not take away from the
illusion of volume. We can simplify a
lock of hair into its basic form using
three elements, the highlights, the half tones, and the shadows. So
here's an example. And again, feel free to
pause whenever you like, because this is a course of taking your time with
how you're drawing. You can always go
at your own pace. And I left a lot of helpful
arrows like you do here. These red arrows are showing you which way to curve the hair. And again, you can
always turn your paper or sketchbook to make sure
that your hand is comfortable, especially since we are
going to be curving his long strands of hair all the way around from his nose, all the way to the
top of his head. And even when we're working in his mustache and beard area, where we're creating
lines from left to right. And again, the more lines you put next to each other,
the darker it becomes. So right now I'm purposely
leaving everything fairly light because we will be going into those deeper
shadows later on. So the most important
thing in the beginning of this type of a drawing is finding where the
hair is growing. So if you check out here
in the mustache area, you can start curving
lines to the left, some to the right, and where
his lips are at the bottom, you can start curving
the lines downward. And that solid area
around the eyes, we can start slowly
darkening that because it's going to be in
complete shadow in the end. And now, because this is a monochrome black and white
sketch that we are drawing, we do have to think
about the way we're going to approach
his brown hair, which is more of a middle tone. And if we do leave some of the areas here
that I'm pointing in the red arrows as paper white to represent bright
white highlights, this is going to give
us a nice contrast to our overall finished drawing. So the more and more
I start darkening the nose around the area
of the eye, the pupil, the iris, because it does
have really tiny eyes, and also in this mouth,
it's really coming together with a nice contrast
between light and dark. And now that we have our basic
shape of his entire head, we can start drawing
more and more lines, and they can even be
quick strokes and start making everything completely
dense in those dark areas. And again, just avoid
the lines being completely straight
because you don't want it to have that flat
look in the end. And because we have our handy reference photo
right next to us, it's easier to have
it on your phone. You can zoom in and out as much as you like to get
those details that you want. And as I'm working my way towards the outer
part of his head, I'm working my way all
the way to the right. I'm still curving those lines
all the way from the nose. And just a word of advice is you don't have to draw every
single strand of hair. That is just
literally impossible. And that's why it's
important to have the entire face shaped
first because it does give the suggestion that we drew thousands and thousands of strands of hair when
we actually didn't. When we have a combination
of solid shapes, a few strands here and there, and also the way that you
thicken those strands of hair, the more pressure that you put, the thicker the strands
of hair become. The less pressure, the
thinner they become. I'm also adding
very quick strokes of lines when I do want to just cover an area really quick while still remaining
very light because, again, chubaca has
different tones of hair, which are brown, a dark brown, and more of a mocha coffee
to its entire color palette. So again, as you see right here, I'm more and more lines, and it's darkening everything. And if you want, what I'm doing is go into those areas
that are somewhat dark, and just when all
of those strands of hair start
overlapping, as well, this is going to give it that
dense and full look that very thick strands of hair
represent in a lot of animals, like certain breeds of dogs and even the mane
and tail of a horse. So take your time, and you
actually, as an artist, can choose how far you want
to push this hair detail. And lucky for us, again, leave some of that paper,
whatever tone it is. Mine happens to be
a tan sketchbook, so that's going to
help us leave some of those tones for that
white highlights that he does have in his hair, and those teeth can actually be almost the color of
the paper as well. And I'm going to emphasize this. The skull is spherical. So most hairstyles you will draw will be affected by
the skull underneath. So it's very important to think of the ball
when working on the overall value changes
when drawing strands of hair. So what we're going to do
is add volume to the hair. So it's important to
simplify and think about the geometric shape of the
locks before adding texture. So adding texture to
the strands should not take away from the
illusion of volume. We can simplify a
lock of hair into its basic form using
three elements, the highlights, the half tones, and the shadows. So
here's an example. So, what did you think of
this Chubaka sketchbook drawing and what it is to
create hair, lifelike hair. And hopefully you
will be applying this type of lesson
into your own drawings, into your own sketches
and hopefully even into a full size drawing
where you can take advantage in getting into a
lot of detail while drawing human hair or even drawing animals like dogs or
cats with lots of fur. And as an addition that you can use to do some corrections, I do have a white
jelly roll pen, or you can even use some
whiteout pens as well, just to kind of correct any huge mistakes
that you have done, but that is very optional
if you would like. So thank you guys so
much for watching and make sure to upload your drawing in the project section of this course and see you
in the next one. Bye bye.
 IVAN RAMIREZ, Artist, Painter & Youtuber