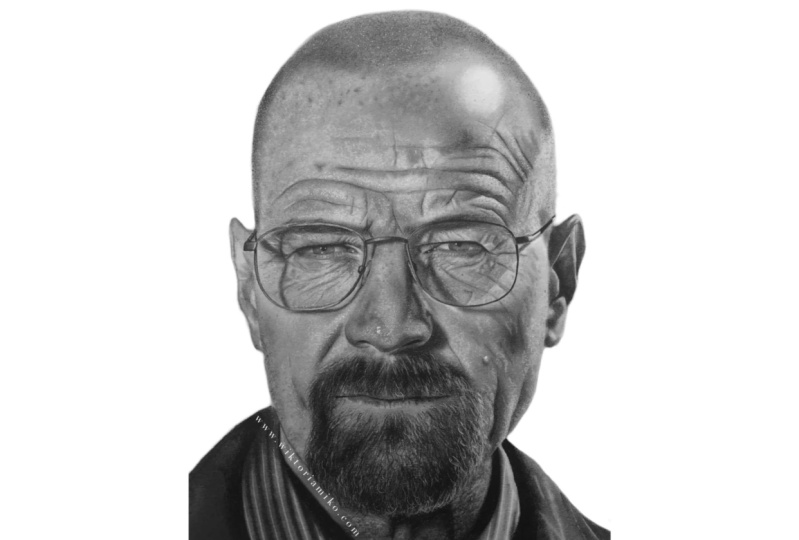
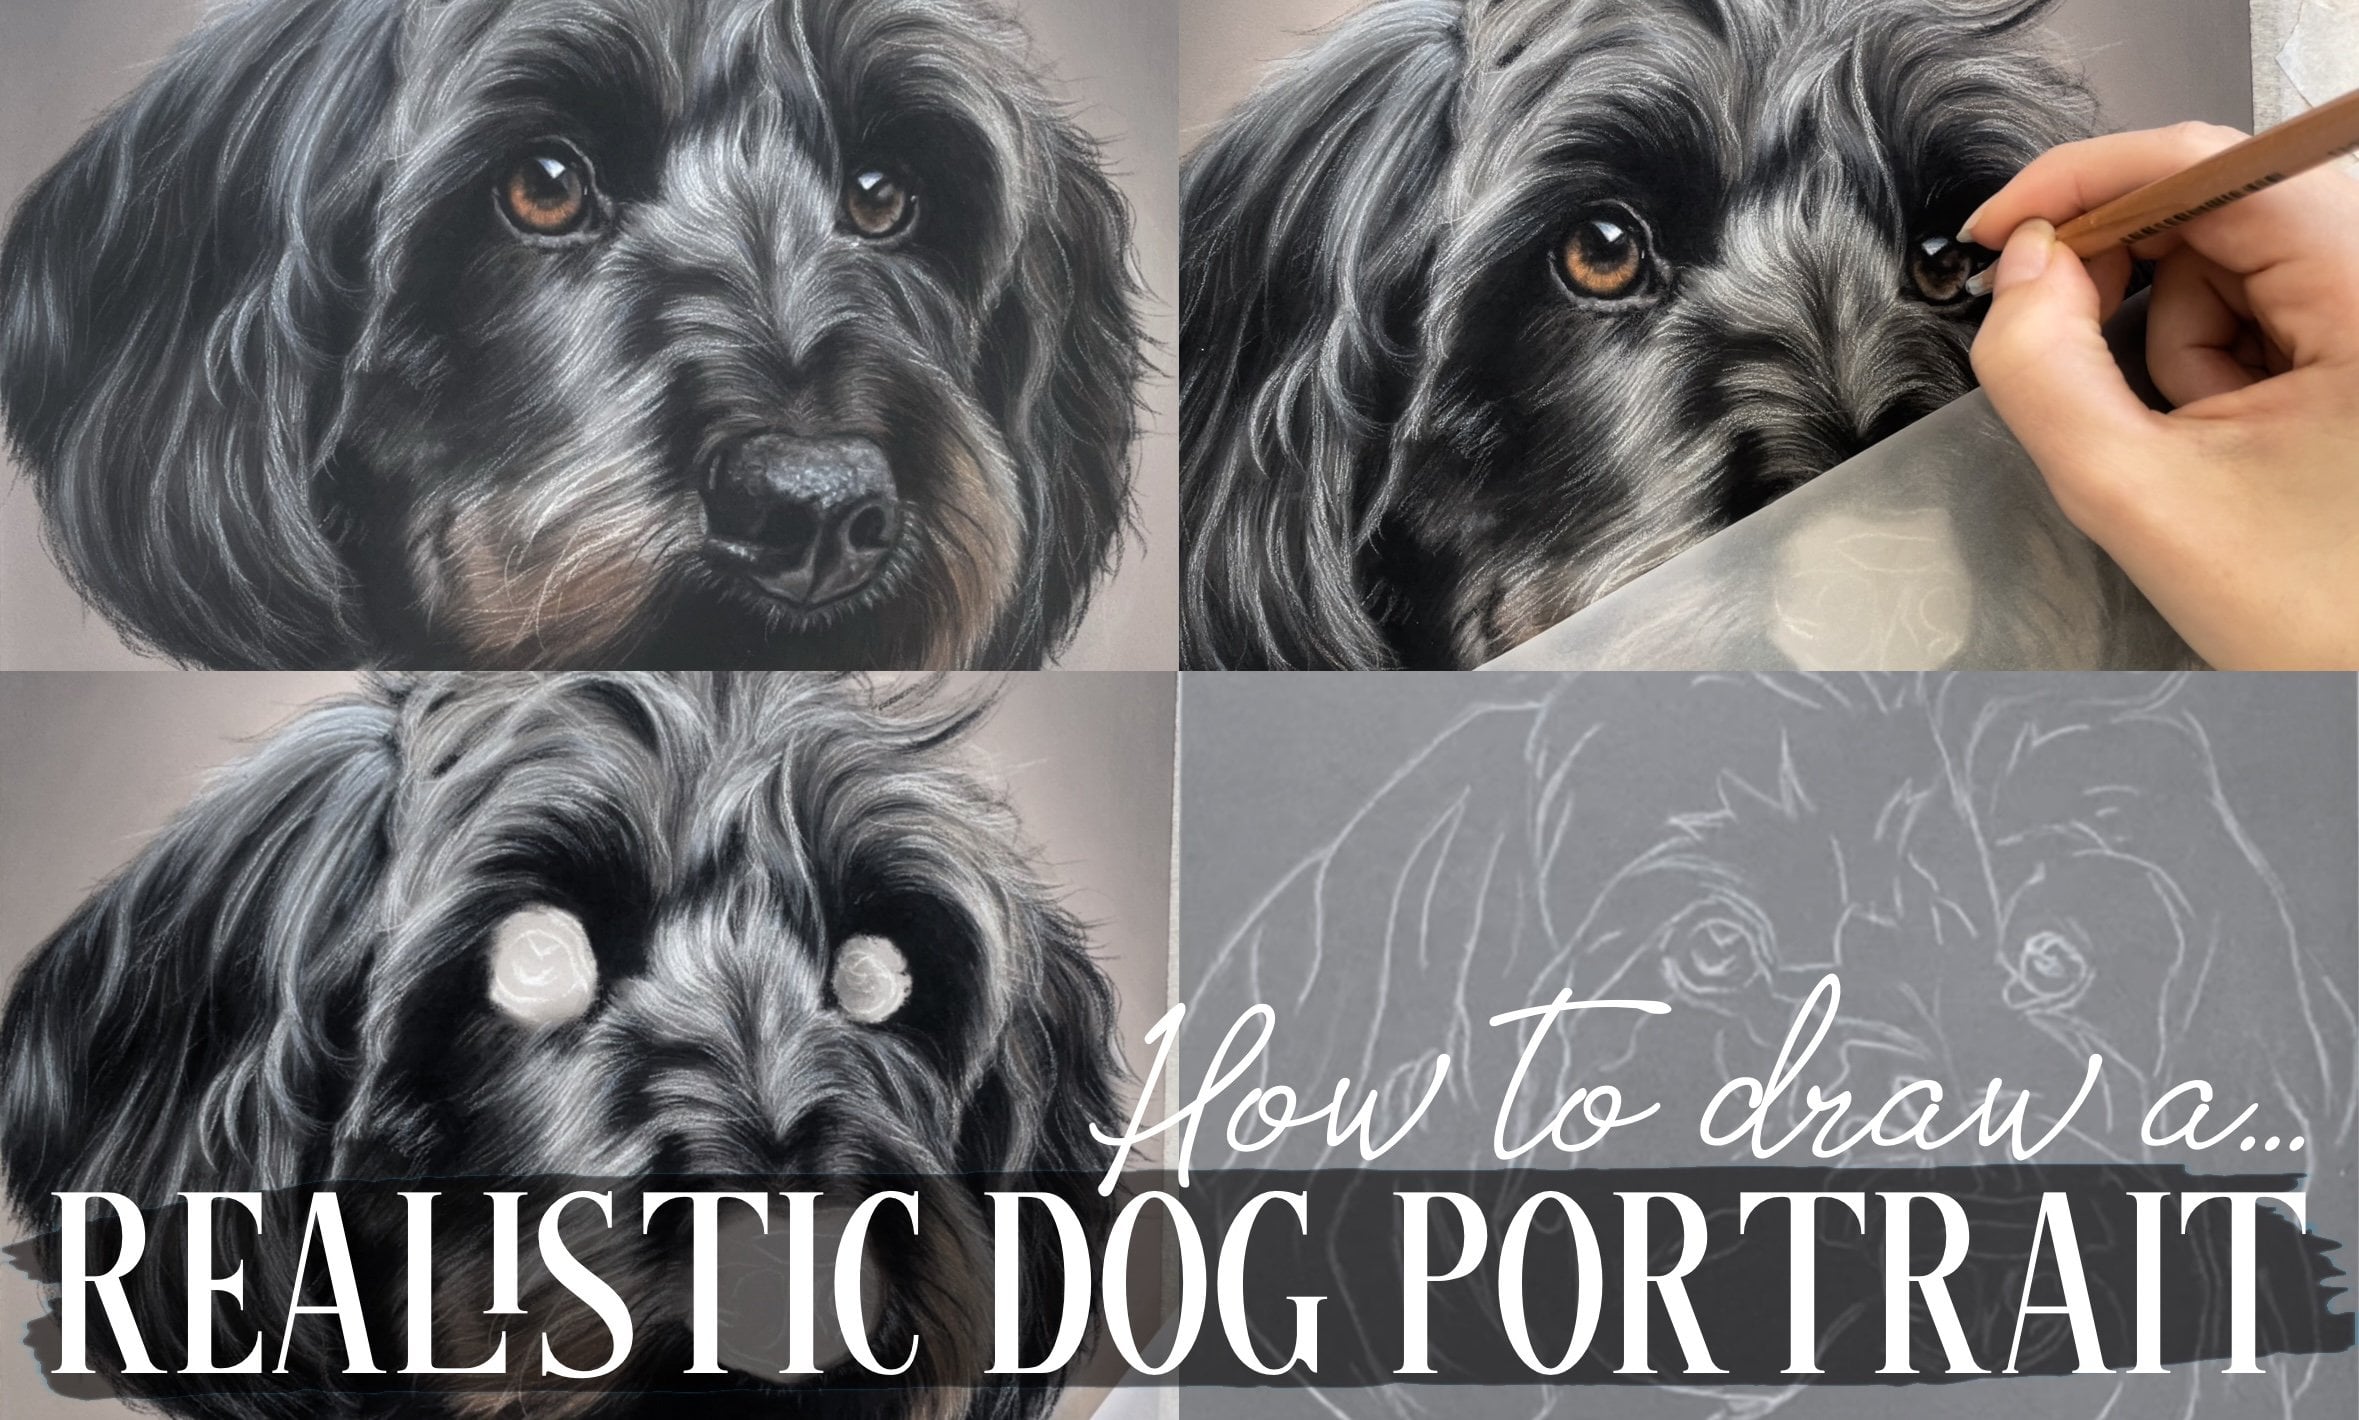
Transcripts
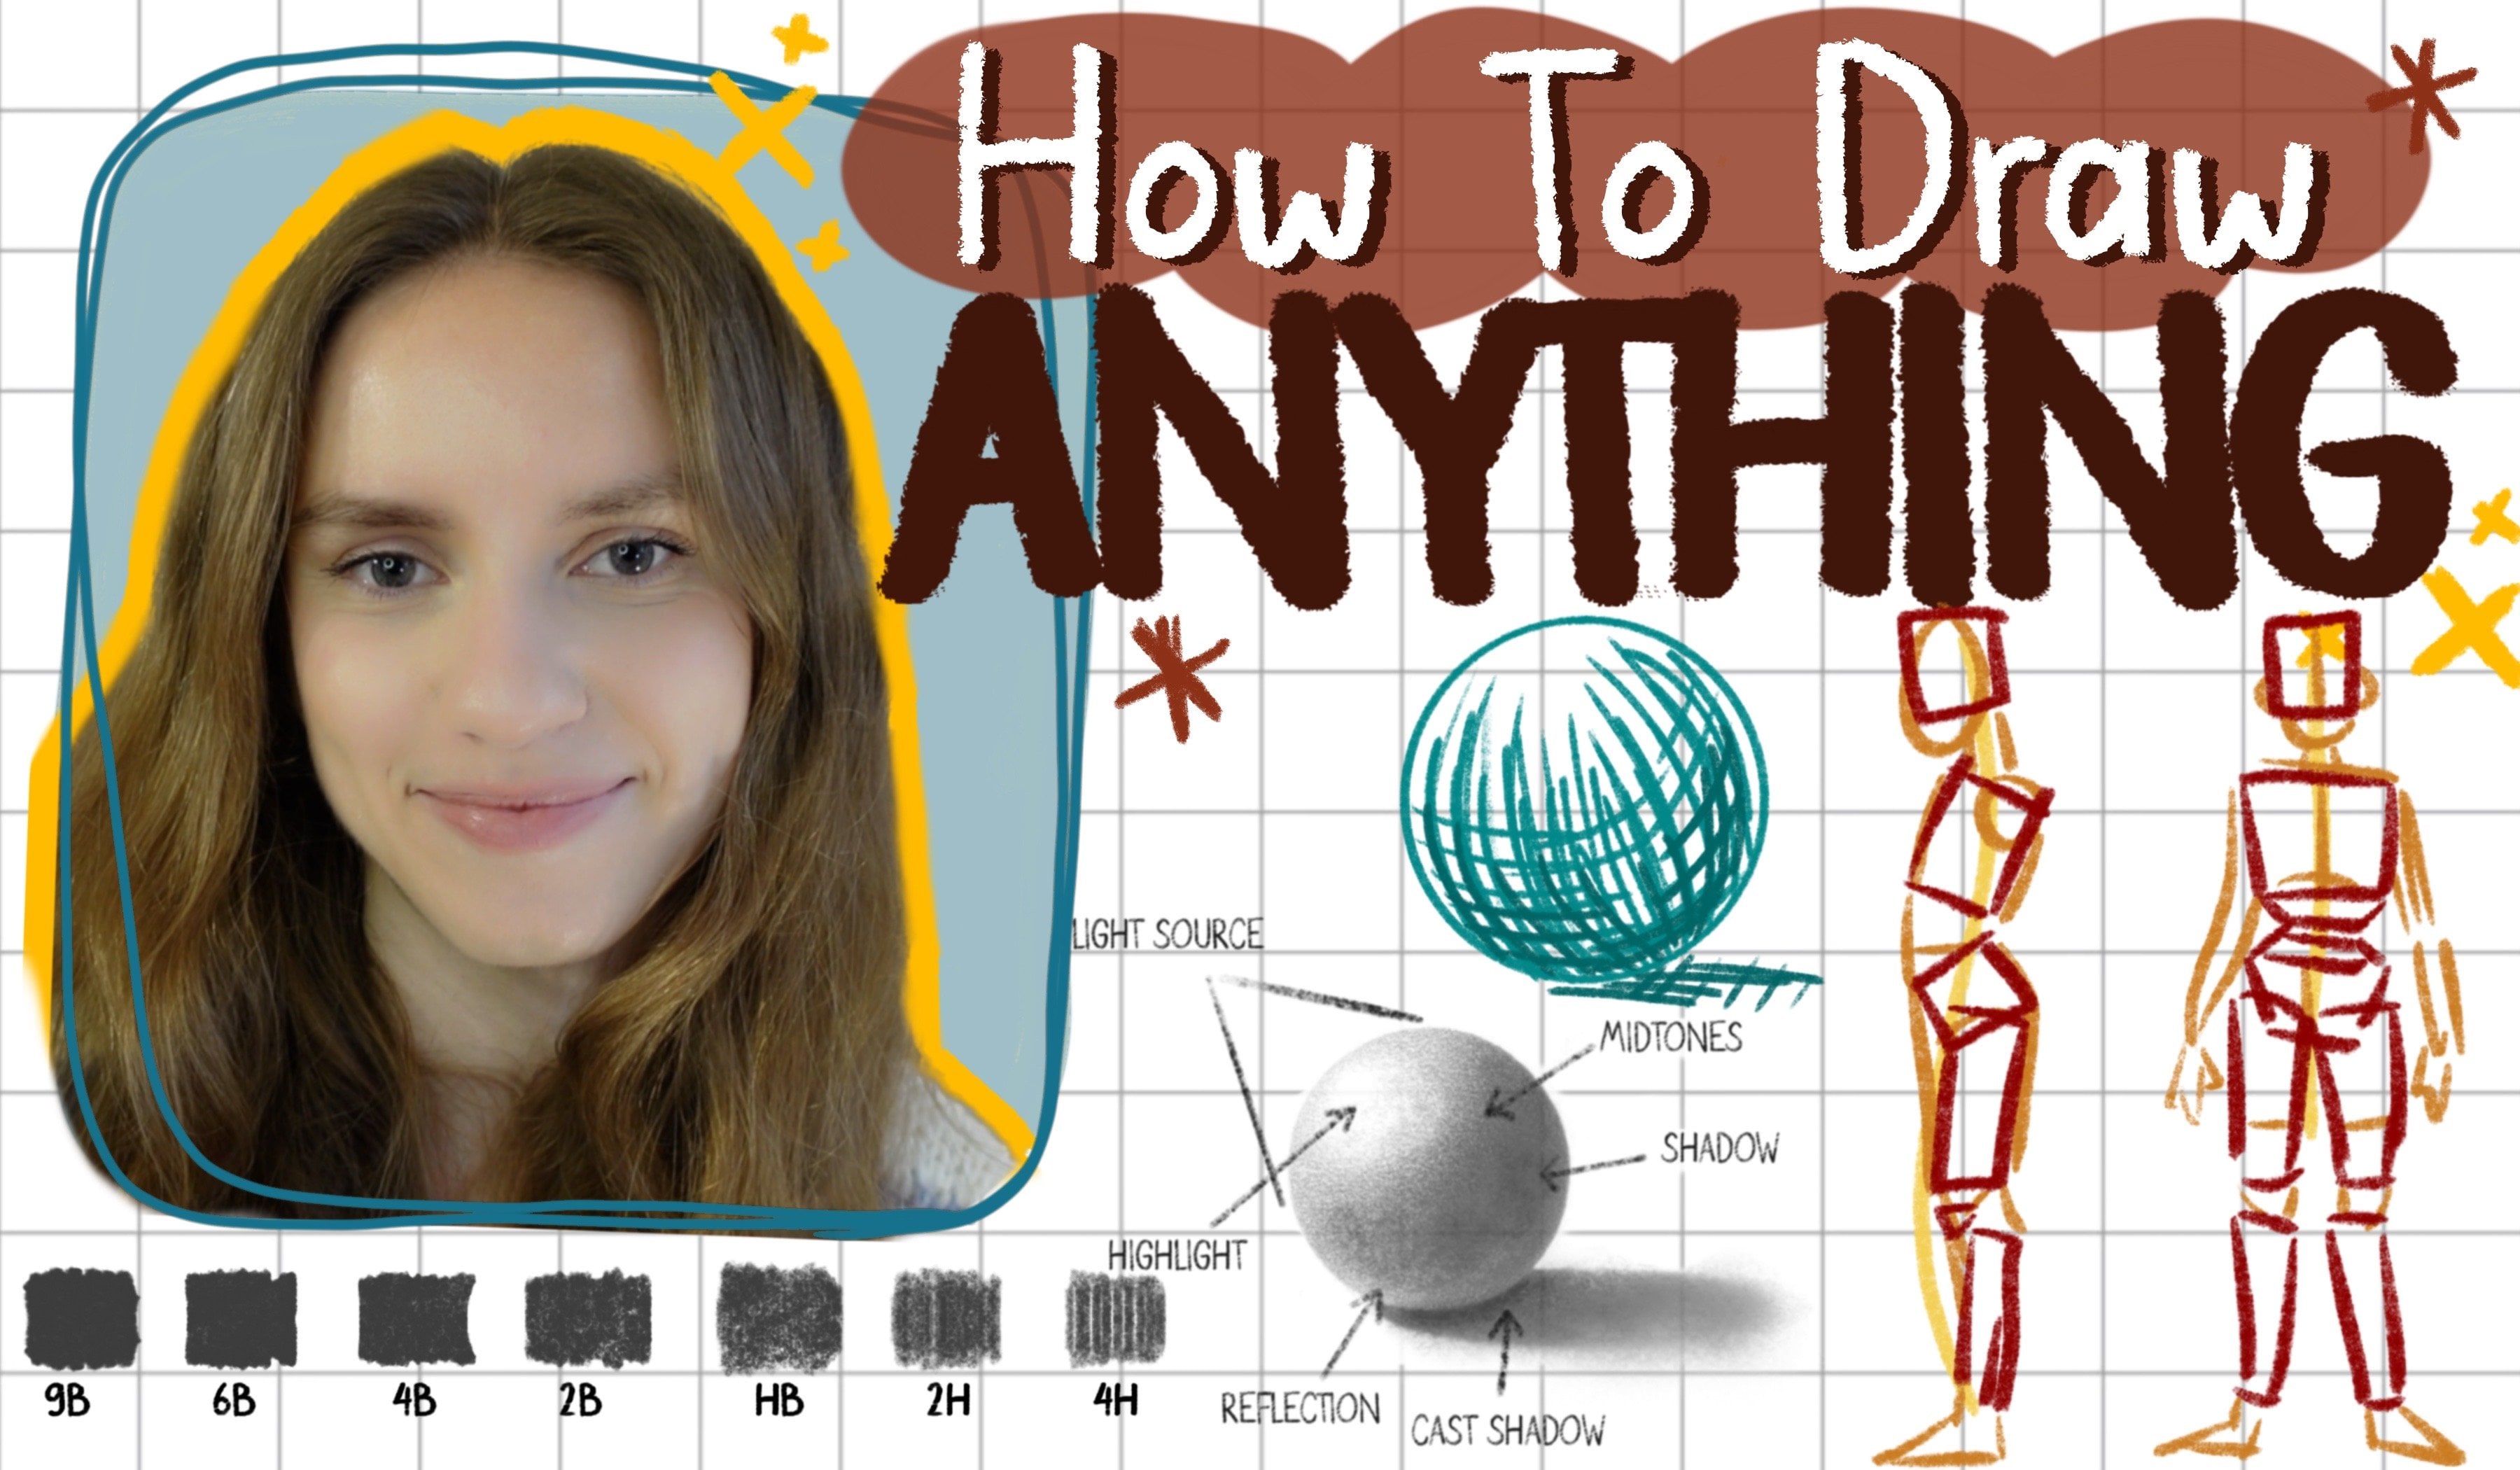
1. Welcome!: Hi students. My name
is Victoria Mico, and I am a professional
portrait artist. I love drawing everything from human faces to animals,
and even landscapes. What I do with my art
knowledge is teach. And in this course, I
would love to share the drawing process
with you as well. Drawing may seem
overwhelming at first, but when you break it down into the three steps of
creating the outlines, then the base layer,
and then the details, then creating realistic art
becomes much more doable. In lesson one, we talk about
the necessary materials. So most of these you will
already have at home, but the lesson is definitely worth watching because I have found some unique tools that you might not
have tried out before. Second lesson, we will try out all the basic techniques
on a simple sphere. This will prepare you to
layer and blend before we move on to shading the more
complicated facial features. In lesson three to six, we will complete
each facial feature. We will begin with the ears, then the nose, the mouth, and finally the eyes. Again, for each of these, we will begin with the base layer, then add our details and finish
off with the highlights. The final part of
our drawing class, we will put all of our
knowledge together and create a full face portrait. Here we will begin by
completing the outlines first, then the eyes, the nose, lips, skin, and
finally the hair. This course is laid out just as it would be with
my art students. So I've been through the
structure many times, and I assure you that it works. This class covers
everything from the beginner to
advanced concept, so I encourage artists at
all levels to join me. I am super excited to
present this class to you, so grab your pencils and let's
make some realistic art.
2. Recommended Materials: Students. So in
this first lesson, I would really love to show you all the materials that I use. So the paper that I recommend is definitely smooth drawing paper. So I definitely don't
recommend using things like mixed media paper because they
tend to be more textured. So if you have a paper
that's supposed to absorb both things like watercolor and then graphite
at the same time, that paper is going
to have texture. When you're shading
with your pencil, you're going to have that grainy white paper appear through your shading and it's going
to look a little bit uneven. So if you don't have this exact smooth
paper, that is fine. I actually really
do recommend using regular printing paper because that paper is very, very smooth. If you don't have anything, I definitely recommend using that over things like
mixed media paper. Now, I would love
to talk to you very quickly about the
pencils that I use. The one important thing
that I wanted to say about the pencils is that they come with different
numbers and letters. So usually in a
regular pencil s, you would have
something ranging from like a nine b to a nine H. So, in case you don't know what these numbers and letters mean. The letter, if it's B, it stands for black, and if
it's H, it stands for hard. The black pencils, they
tend to be, of course, darker and the lead
is a bit softer, and the H pencils, they are just going to
be thin and very light. You can almost think of it
as the harder the pencil is, the less graphite it's
going to the deposit, so it's going to be lighter. That graphite might
be a little bit harder to move because it's
just a little bit harder. Then, what the number means
is the higher the number, the higher amount of that blackness or that
hardness the pencil has. For instance, a
nine B is going to be darker and thicker
than a two B. A nine H is going to be lighter
and harder than a two H. I actually only ever use these four pencils,
even when I do my very, very complicated artwork, the most complicated portraits
that you've seen me do, I would always only really
use those four pencils. Now, the reason why I do that is because there really
isn't much difference between a five b and a six B. I tried to have a little bit of a gap
in between them all, and if I want a pencil
to be darker or lighter, I just press harder or lighter,
wherever I need to do. I'd just like to show you really quickly how each one works. Here's a nine B. I'm pressing
relatively hard here. You can see this line, it's going to be
really thick and dark. That's a nine B, and
that's my darkest pencil. Then I have a six B. Remember, a six B is going to be a little bit lighter
than a nine B. You can see that there's a
very subtle difference here. It almost looks the same. This is why I just don't
bother using something like an eight B under seven B
because it's just very similar. Then I have a two B. If I draw this, you can
see that it looks a little bit more silvery.
Here's my line. It's just much lighter. Then I have a HB. A HB is both hard and black. This is getting
really light now. Now, the HB, I really
only use for one thing. I only use this pencil
for creating outlines. If you don't have all of
these pencils, that's okay. If you're only working with
one today, that's fine, you'll just have
to be a little bit careful about how much
pressure you're applying. But if you do have a
few different pencils, then they don't have to
be these exact ones. Just try to get something
that's close by on the range. Now I would like to tell you
about the blending tools. I use a blending stump, I use Q tips, and I also like to
use a regular tissue. Now, I use each of these three different things for different purposes again. I'm going to give you a very
quick demo of each thing. The blending stump,
it's really good for blending things where you
need a lot of precision. For example, if you're blending
the eyes or the nostril, where you really need to
stay in a very small area. This is perfect for something like that because it's pointy, so it's going to give
you a lot of precision. I don't like to use the blending stump if
I'm going to be blending something like something bigger like the cheeks or the forehead, because it's just pointy, so when you're blending,
it can look quite streaky. So It's just going to not be as even as something that just has a bit more of
a surface area. That's when my Q tip comes in. So a Q tip is probably my most commonly used blending tool because it's just not as pointy. So when you're blending with it, it's going to give you more
of an airbrushed look. Okay. You see, these aren't
the best examples, but they are they
illustrate the point. You can see that this is
just a little bit smoother, a little bit more airbrushed. Then my final thing is a tissue. The tissue I like to use for
really large areas like if I'm blending the forehead or the cheeks, things like that. It's not really going to be best if you're blending
something like the eye, where you need a
lot of precision. It's good for those
really large areas. Now, I also tend
to use the tissue even after I finish
blending with a Q tip. I can sometimes go
over it just to push the graphite more into the paper and smooth things out further. Next up, the final
thing that I would love to talk to you about erases. I use only two types of erases. I have a needed eras and I
have a point pencil eraser. This is also called
a precision eras. So my needed eras
that I use a lot. I just rip off a small section and I mold it into
whatever shape I like. I like to use this for making
things like highlights. So instead of going around the highlight and not
adding any value there, I would just take it and tap wherever I want to
create a highlight. This just makes a
lot easier for us when we're adding
things like highlights, a and then I like to use a precision eraser for areas
that we need to erase, but they're just really small and we need a
lot of precision. For example, how a lot of the time when
you're drawing an eye, there would be a very precise white reflection
in the eye somewhere. This is perfect for
things like that because it's going
to give you a lot of control as to where you're
placing your highlight. But if you don't
have this tool and I imagine a lot of
people probably won't. Then I also recommend having
a regular eraser like this. You see how this has
very sharp edges. You can also use it and it's
going to work just fine. You're just going
to have to be a bit more careful so you can see exactly where you're
applying your highlights. This would be it
for the materials. I hope this was helpful
and I will see you in the next lesson where we
practice drawing the sphere.
3. Basics of Drawing : Hello, students. Here
we will warm up and practice a realistic
sketch of a sphere. This is an incredibly
important exercise because here we are covering all the
basic principles of shading, layering, blending, which
I will explain thoroughly. Definitely pay close
attention because completing this fair study will be pivotal to completing
the remaining sketches. Also, we will only be following the reference photo
loosely here. There is more of a focus
on the techniques as opposed to following the
reference with high accuracy, so don't worry to make your sphere look
identical to the photo. We begin by creating the
outlines of the sphere. For the stage, I
use a HB pencil. It's really important
that we use a light pencil for
the outlines because we don't want the
outlines to show through at the end
of the drawing. Notice that in realism, objects don't typically
have outlines, rather, we can differentiate between different elements of a scene because of the
contrast of shadows and highlights and the
texture as opposed to something like cartoons where they are usually outlined. That being said, I
always aim to create the outlines just about light
enough that I can see them. But if you feel that you
have a heavier hand and you naturally steer towards
creating darker lines, I will show you how to lighten the outlines as soon as we
are done creating them. Is spheres are actually
a little bit tricky to create because they
require evenness. You can see me creating
multiple lighter lines trying to figure out
the shape as I go. Most of these little lines
are going to be incorrect, but it helps to
visualize the lines first to see what
needs to be adjusted. Once you go all around
the circle and you feel you've arrived at
somewhat of an even circle, go ahead and reinforce the outlines that
you're happy with. This is another reason
why it helps to sketch using a light
hand and soft pressure because those incorrect
lines will be easier to erase and
we leave no mark. Now we begin shading. I start by creating a light
layer all over the shape. For this, I am using
a six B pencil, so that's not too light,
but also not too dark, so we can achieve
all the mid values. Now let's take a look
at the distribution of light and shadow
on the sphere. The source of light in the reference photo must be
coming from the top left, which makes the top
left of the sphere, and it gradually gets as it reaches the bottom
right of the sphere. Also notice that the shadow curves along with the
curvature of the sphere. The shadow is not
a straight line. This would make the
sphere appear very flat. Another important
thing to keep in mind, and I would say that this is one of the most important
things when shading is that you want to keep your pencil at a
very flat angle. You want as much of the graphite to be in contact with
the paper as possible. This will look the shadow
look the smoothest as opposed to shading with
the tip of the pencil. I also like to go over each area of the
sphere multiple times, so that's why you see
me almost scribbling. I am trying to cover as much of the white of the
paper as possible. When you are creating shadows, try to stop yourself
from pressing down on the paper too much, even for the darkest shade
on the bottom right. If you go over the shadows,
even with a light hand, it will get darker and and you have a bit more control
and precision that way. It's easier to add little by little than to add too
much and have to erase. Now, you don't have to create all the shadows
perfectly in one goal. Remember that this is
just the base layer. Here you want to focus
just on the rough shadows. We will be blending this section so the values will mix together. Therefore, it doesn't pay to be too precise at this stage. Now we are moving on to
using our nine B pencil. If you don't have a pencil as dark as this, work
with what you've got. You may just have
to press a little harder and go over your layers a couple more times to make
your shadows a little deeper. The most important
thing here is to create a smooth transition
from light to dark. You don't want to be able to see a distinct line where the
value suddenly changes. It is a sphere, so the shadow will wrap smoothly
around the shape. There are no corners,
so the transition between the values
will be very subtle. Oh. Now we are moving onto my favorite part. We are going to start blending. If you don't have a Q tip, you can just use
a blending stump, a cotton pad, or even just a regular tissue or toilet paper. When you're blending,
try to maintain the same angle you
used when shading. You want to blend with the
side of your blender to create the smoothest transition and
apply only light pressure. I choose to start with the lightest area when
blending because I don't want to carry over the darker shadows
into this area. That would even out the
whole sphere into one tone, which would appear very flat. You just keep on blending over the sphere until all
your values looks move. Now, if your sphere
looks a little bit splotchy and somewhat
uneven like mine, we can use a larger
blending tool such as a tissue to even out the sphere. I have wrapped the
tissue over my finger and we'll just blend very
lightly over the sphere. I am going to blend briefly
because I don't want to overdo it and mix together
all the shadows we worked on. Now, the inevitable
has happened. Our sphere looks relatively
flat after blending. This is perfectly okay and
sets a perfect base for us to begin refining and adding the shadows and
highlights on top. I am starting out
with a nine B here. I am focusing this in
the bottom right area where the darkest shadow is. We are essentially bringing back the depth here after
all the blending. Again, I do it gradually
to make sure that the transition from light to dark is as smooth as possible. A lso reminder to shade with
the side of your pencil, although it may
seem uncomfortable and unnatural at first, it's going to make your work
look far more realistic. I. Again, we have to blend
the shadow we've just added. This time we will try to blend
with a bit more precision. We will try to leave
this dark shadow in place as opposed to moving
it around the sphere. Feel free to use
your tissue here again to further smoove
out the darker shadow. Now is a good time to clean
up around our sphere. Use your eraser to go around
the edges of the sphere and remove the graphite that
is outside of the lines. I am using a needed
eraser for this purpose. I essentially mold
my eraser into a point so I can erase around
the outlines of precision. If you are lucky enough
to have a precision, it also comes in here to make the edges of
the sphere precise. Now, this next part
is very important, and this is where the needed
eraser is most useful. We will create the highlight or the lightest point
of the sphere. I am molding my
eraser into a ball, and what I will do is tap at the highlight area to lift
off the excess graphite. Gradually, this will reveal a very smooth highlight beneath. This eraser works so
well because it doesn't create any sharp lines like
a regular eraser would. Now, if you are using
a regular eraser here, it's very possible to also
create this highlight. You might just have
to blend around it and make it blend
with the sphere. Now, for the grand finale, we will create the cast shadow. I am first redefining the
edges of my outlines. I am using a six B pencil. We will evenly fill out
this entire shadow. Again, using the
side of the pencil, we will go over the layers again and again
until it's smooth. Now we are switching to a nine B pencil to add some depth. The process is the same here for the remainder
of the cast shadow. Once we have filled
in the shadow, we have to blend,
and after that, we must clean up
and the outlines, and then finally, we refine
and add more precise shadows. Finally, I am reinforcing the bottom of the sphere
against the cast shadow, so there is more separation. This is Albertson. Thank you
so much for following along. I hope you found the
techniques useful and that you feel excited to practice
the facial features next.
4. The Ear: Hello, artists. In this lesson, we will be practicing our first
realistic facial feature. I chose to start with the ear because first of all,
they're very fun, full of interesting
curves and shadows, but they're also not
incredibly characteristic, so we have a lot
of room for error. If we make a mistake here, it won't be particularly
noticeable, unlike if we were drawing
a feature such as the eye. The first step of the sketch will be to create the outlines. We could free hand
them and estimate where all the air outlines
are supposed to be. However, it's very
difficult to make the outlines extremely accurate
this way, even for me. To help with this, I
use a drawing grid. Essentially, the way this works, we measure the dimensions
of our reference photo. For us, the air picture
measures two by three. In that case, we will create a box within which
to draw our ear. We can draw a grid that
we measure two by 3 ", four by six, or 100 by 150. It can be as big or
as small as you want, as long as you maintain
the ratio dimensions. For this practice, let's make the error on
the smaller side and make the box 2
" wide by 3 " tall. Once you've got the
outside box down, we want to divide
the reference photo into further smaller boxes. Today we are going to divide
it into a four by four grid, so that's four boxes wide
and four boxes tall. The boxes have to be
measured evenly apart. Along the two inch width
mark half an inch, 1 " and 1.5 inch. This will give us four
evenly spread boxes. Then at the three inch height, make a mark every
0.75 of an inch. At 0.75, 1.5 and 2.25. Sometimes you have to create a titer more complicated grid, depending on how much detail
your reference photo has. So this will make a
little more sense once I show you what we will do with
this grid. So let's begin. Now that a grid is
done, it should be identical to the grid
on the reference photo. What this now allows
us to do is to see exactly where different points of the air cross the grid lines. If we start over
the top left box, the air crosses the
horizontal line really close to the outside box. Then if we look at
the vertical line, the air crosses at about
one sixth of the height. If we go to the next box, we see that the air
crosses the vertical line at about the same height
as the previous box. Maybe a tiny bit higher. Now that we have
these points done, we just connect the dots. Now, all we have to do is create the same curve we see
on the reference photo. This way, we get the outlines
of the air perfectly. We will continue to follow
this line of the air. We are now going to go down to the second row first column. I would say the air crosses the vertical line at about
one third of the width. Then for the vertical
line of the spark, it would probably be about
three quarters of the height. Now let's complete the
remainder of the line. Now we are moving onto
this line inside the ear. Along the side of the
air, it runs parallel to the outside of the air and has approximately
the same width. Inside the ear here,
it gets a little bit confusing because we have
some interesting curves. So try your best here to
get those accurately, but if it looks a little
bit of, don't worry. The ear is very
uncharacteristic, so it won't be too
noticeable in the end. Now, aside from the major lines, I also like to outline the
most significant shadows. I feel that they
give as much shape to the ear as some of
the other outlines. I would consider these
shadows most important. If you see any more shadows or highlights that you think
are important to outline, you are very welcome
to keep adding those. Now that our outlines
are complete, I hope you can see why
the grid is so useful. I hope it also makes
more sense that if you are creating a more
complicated sketch, you will need to create
more complicated grids. Anyway, now that we've got all the outlines, we
can erase the grid. While you erasing, it's also inevitable that you will
erase some of the outlines. Try to be as careful and
precise as possible. But if you erase some outlines, we will fill them in in the end. Okay. We are going
to begin shading in. This is going to be
the base layer stage, so we are not paying any
attention to the details, filling in the rough shadows. I would consider these
shadows the darkest, so I will start by
filling them in. Also note that they are not
the same darkness throughout. Here you can see how I've
numbered them from darkest, to lightest, so you want to maintain this balance
in your drawing. Just remember we are using
around a six b for this. Here you want to ensure
that you are sketching with the side of your pencil and
not with the point of it. This will ensure the
smoothest shadow. Next up, we are going to fill in the slightly lighter shadows. You can see on the screen
the areas I'm referring to. A. Finally, we will fill in the remainder of the
A using a very light hand. Again, remember,
it's much easier to do this with the
side of the pencil. Next, we have to
blend. Usually, I like to blend with a Q tip, but when the area
requires more precision, I do prefer using
my blending stump. I use it so that it's
easier to contain the shadows if
there is a brighter element over the ear next to it. I am blending with
pretty light pressure in a scribbling motion. I find that when I go over
the shadow way a few times, that's when it's blended best. Next up, we are going to blend
the remainder of the tip. You want to blend in
a very similar way as we did with the
blending stamp. If you feel that your ear
is a little bit splotchy, you can use a tissue to blend over the
entirety of the ear. The next phase of our drawing
is to create the details. Now that we have the base layer, we can go ahead and
adjust certain areas of the air so that they are identical to the
reference photo. Let's start with the
darkest shadows. I am using a nine B
for this part because I want the shadows
to be really dark. Again, since here we are
thinking about the details, we will pay a little
more attention to the features of the
shadows like their shape, and keep in mind where
the darkest parts of the shadows are as well. For example, all
of these shadows are darker towards
the right side, so we want to reflect this
in the drawing as well. Mm. Moving on to the
lighter shadows, we are using a six
B for this area. If you feel that a six
B is too dark for you, you can even go down and use
something around a four B. It all depends on
how sensitive you can be with the pressure
you apply with your pencil. If we observe this shadow, we can see that it starts to blend in with the
air on the right. We want to create a gradient, so it blends nicely. You don't want it to go suddenly from really dark
to really light. You want to integrate and blend those two values smoothly. Again, we are blending. We are being a little
more cautious here since we need to be precise at
this stage of the drawing. Again, you can just
give your drawing a little tissue treatment if you want to smooth out
the air some more. Just be gentle here
because we don't want to over blend
all the details. Now I am taking a second to clean up around the
sides of the air. Because of all the blending,
the graphite has spread, so we they needed eraser
we will do a clean up. Next, we are going to create
the highlights of the ear. The most essential tool
here is the needed eraser. I find it much easier to create the highlights by removing
the graphite from the necessary areas
as opposed to leaving those areas light throughout the drawing and
working around them. I tear off a section
of my needed eraser and I roll it into a
cylindrical shape. Now the way I use
the eraser is I tap continuously over
the highlight areas. I am looking back and
forth at the reference constantly and gradually
lifting off some graphite. Next, if you are
lucky enough to have this precision eraser,
that would be wonderful. But if you don't, you can use a regular eraser of corners. You want to softly lighten around the areas where
there are sharp highlights. I am also refining
the highlight in the center of the ear to
give it more texture. For the final step, we are going to create
some final touches. You can do this based on
what your drawing needs, not necessarily on
what mine needs since I'm sure they'll
have slight differences. But my final touches
involve things like adding depth to the center of the ear and refining
some other shadows. Mm. This would be it. Our realistic or is complete. I hope you're proud
of your sketch, and if not, that's okay. Practice makes
perfect, and we'll be practicing some more sketches
throughout the class. Thank you so much for, and I will see you in
the next lesson.
5. The Nose: Artists, now we are moving
on to drawing the nose. Again, here we will
start the grid. The grid for each drawing
will be identical. Just for the lips and the eye, it will be horizontal and for the nose and ear, it's vertical. For the nose, it will again
be 2 " wide by 3 " tall, just like with the
remaining rids. We will split it into
four by four boxes. Along the width, we will
make a mark at 0.5 inch, 1 " and 1.5 inch. Then we will split the height
of the grid into 0.5 inch, 1.5 inch and 2.25 inch. Now, like we've practiced
to complete the outline, you have to look at where
the different points of the nose cross the grid lines
on the reference photo. Since the grid we've drawn is identical to the one
on the reference, we know exactly
where the outlines of the are supposed to be. The way I approach creating the outlines is that
I first mark where the outline crosses
the grid line and ultimately connect the dots. Just keeping the curvature
of each outline in mind. I am constantly looking
back and forth at the reference photo and copying down the
outlines exactly. Okay. Now, the tricky thing about noses is that they
don't have much detail, especially at the
bridge of the nose. Now, this can be a good thing because there's
less work for us. However, it's really tricky to make those subtle
changes in value. When we are creating
the outlines, it may not be immediately
obvious where to create them or even where the
shadows begin and end. What I do, and for me, this
is a very helpful trick is I squint and I try to look for the dominant
line in the shadow. Squinting is especially useful when drawing the base layer because it gets rid of all the detail and
emphasizes the shadows. I can't explain why
it's so effective, but it really does
work, so do try it. The next step is to erase the grid line since
we've already completed all our outlines. Again, it's normal
for us to erase some of the outlines while
getting rid of the grid. So let's try to be as
careful as we can. But if we erase some
outlines, it's no big deal. We can easily add them back in. The next phase is
the base layer. Here we will fill in the entire nose with the rough shadows. An exercise I always try to do before filling in
the base layer is trying to see where the
est tones would be. Of course, the darkest would be the nostrils and the lightest would be the middle of the nose. That being said, all the
remaining areas cannot be lighter or darker than the nostrils and the
middle of the nose. Remembering this will help you retain contrast and
balance in your drawing. Now, the second the darkest area would probably be the sides of the top of the nose and around the very bottom
of the nose as well. Then we will fill
in the sides of the nose with a very light tone. Remember, we don't
have to be too precise here because
after blending, the values tend to
smudge together anyway. Also, throughout the blending, the graphite seems to
spread and darken, so make sure you don't press
too hard at this stage. I am using a six B
for these areas. I'm pressing really lightly. But if you think
you're not able to get it light enough
of the pencil, you can move down all the way
to something like a four B. It all depends on how
sensitive you can be with the pressure of
the pencil on paper. Next, we'll fill in
the lightest area. Now, here you really hardly
have any graphite at all, so press super lightly. Now we are going to blend. I am blending with a clean tip. I am blending in
a circular motion because I find that
going over and over, each area helps me achieve
the smoothest, natural blend. Now, this is a
perfect example of why it doesn't pay to
be too detailed in the first trading stage because all the values tend
to fade away anyway. So as you can see, I have
almost no controvert here at all, but that's okay. I will go over the darker
values and blend again. Now that our base layer is done, we are going to focus
on the precise shadows, highlights, and
details of the nose. We are pretty much going
over the same shadows again, though this time we want them to appear exactly as they
are on the reference. We are looking really closely at the shadows
like their shapes, directions,
intensities, and so on. As I said, the nose is a little tricky because there aren't
many details around here, so we really have to focus on those subtle shadows to make the nose appear
realistic and free. Now, you can see that
the darker valleys are now a little
bit more visible. Sometimes you have
to go back and forth between the various
drawing steps and refine. I am blending my
nostrils separately with the blending stump because
it's a little more precise. We want the area above the
nostrils to be clearly separate from the nostrils
because it's overlapping them. That being said,
we do not want to create a gradient
above the nostrils, so we are using the pointy end of a blending
stump to keep them separate. The bottom of the nostrils
does actually have a gradient, so we will blend
this region well, and this is how we create
the illusion of a hole. So I mostly focus my
detailing on the bottom of the nose to the sides
and below the rules. There is also a
horizontal shadow above the center of the nose, which if we add it, it
will make the nose a bit. Now we are going to blend again. Though this time when we blend, we really don't
want to spread the graphite around too much. We want to keep
it in place since we put so much
effort into creating all those precise details. Okay. And now we will go ahead and add any final shadows before we move on to adding
the highlights. For me, I felt that I needed
to enhance my nostrils and create more shadows alongside the sides of
the nose at the bottom. Once we end this in, we will be ready to move on
to the highlights, which happens to be
my favorite part. I Let's go ahead and work on those highlights. I think this is the
part that really brings the drawing together. The main tool here
will be needed eraser. We will mold it into
a cylindrical shape. First, we have to observe
where all the highlights are. I see one here on the
center of the nose, then alongside of the
middle of the nose, towards the side of the nose
and below the nostrils. Slowly, we will tap the
eraser over each highlight. We want to press
down very softly so we don't accidentally
erase too much. Of course, we make sure that we tap and not drag the eraser. If we tap, this will create
a really nice gradient. But if we drag, the
eraser will create a distinct shape which will not make the
highlights look natural. Okay. Once we feel that we have tapped
off enough graphite, it can appear a little
bit too prominent against the darkest
areas of the nose. A good idea here is to take a clean tip and blend
the outsides of the highlights with
the darker areas to make the transition
more subtle. I'd like to also
push the highlights in further by using a tissue. Now, if you do have your own
precision eraser, again, this will work
perfectly for creating this little texture we
see over the highlights. But if you don't have
it, that's totally okay. We can use the corner of
regular eraser instead. We are going to apply the
tiniest amount of pressure on our eraser and in
scribbling motions, we will remove the graphite
from the highlight areas. The key here is
to not overdo it. This texture is
extremely subtle, so we really hardly want
to press this eraser down. If you feel that
you've overdone it, simply blend this texture into
the paper with a clean q. For the last couple of minutes, we can add any final touches. Have a look at your sketch and try to figure out what it needs. Perhaps you need to work more on the blending or
darkening some areas. I think mine could do with emphasizing some
shadows on the bottom. This is it. Our second
facial feature is complete. I hope you found
this enjoyable and maybe even a bit
easier than the A, since now we have more practice. I will see in the next lesson where we will draw
the lips. Bye. Okay.
6. The Mouth: Students, welcome
back to the class. We are moving onto
drawing the mouth. We are going to
start with the grid. And if you've watched the
previous two classes, this will already be a
very familiar process to you because all the
grids are the same. This grid is actually
going to be horizontal. It's going to measure
3 " wide by 2 " tall. We divide this grid
into four by four. Along the bottom and top, we measure at three
quarters of an inch, 1.5 inch and two
and a quarter inch along the sides of the grid, we measure half an inch, 1 ", and 1.5 inch. The next step is to
create the outline. Now that we have
a grid in place, which is identical to the
grid in the reference photo, we can see where the
different points of the mouth cross
the grid lines. Let's begin with the
middle of the lips. We can see that
this line crosses through the grid right
down the middle. This line is actually
quite tricky to draw because it has a lot of
subtle bumps and curves, and we have to be very careful
to get these accurately to make sure that our sketch
resembles the reference photo. Okay. Okay. Next, let's deal with the top lip line. The middle of the lip is right
in the middle of the grid. Let's make a mark where
that line would cross the grid at about one
third of the height. The bottom of the lip falls
right below the lowest line, and then it crosses
the corners of the two middle boxes
almost perfectly, so that's a very easy
measure to take. Okay. Finally, we will draw
the facial hair. For now, we will create a
rough outline of the mustache and then the bit of the
hair below the lips. I am creating the outline by following the dominant
shadow of the hair area. Again, if we squint, this really helps in seeing the
dominant hair line. Now we may erase our grid and we will move on to
drawing the base layer. I am using a six B here to
fill out the main shadows. For now, we will focus just on the lips and create the
mustache in the end, so we will begin by filling
in the middle line. Next, we will fill
out the top lip and after the bottom lip. Now that we have our
basic values on, let's go ahead and add
quickly some smaller shadows. On the top lip, I see a little bit more
shadow in the corners of the lip and above the middle and they
little right at the top. On the bottom lip, I
see a shadow right below the middle and towards
the sides of the lip. Next, we will blend everything
together with a Qi. Again, I will begin by blending the lighter areas and move
towards the darker areas. Now we will begin
refining the lip. I will begin with
the darkest point, which is the line
down the middle. This line is a thicker
in the corners and it has that tiny triangular
shape in the middle, so we will create
all those details. I am still using a 60
pencil and at the top lip, we will create the
further shadows in the corners and along
the top of the lip. Also, along the bottom, we will create
further shadows in the corners and below the
opening of the mouth. It's very important that
when we're blending, we want to keep the
shadows in place as much as possible
because we don't want to over blend
because then we will lose the details that
we carefully created. Next, we will work on bringing
back some highlights. And again, squinting really helps to bring out the
shapes of these highlights. So we are going to
focus our highlights in the middle of the
top and bottom lip. If like me, you think your
highlights appear too bright, you can blend them
in with A Q tip. Next, we'll begin creating
the creases on the lips. I am using a two B
pencil for these. When we are creating
the creases, let's observe the
length angle and curve, and also pay attention to the
lines being thicker closer to the center of the lip and thinning out towards
the outside, especially at the top lip. The creases also seem
darker and deeper at the top and longer and
lighter on the bottom. Though on the bottom lip
towards the corners, the creases get
shorter and darker to. Once the lines are drawn, take your blending stump and push the creases into the lip. Okay. This next step
is very important, so we will create the
highlights around the creases. We can see a lot of
these small highlights in the center of the bottom lip. We will look closely at the
reference photo here and try to place these highlights roughly where they
are supposed to be. You don't have to copy this
one for one as long as you represent the overall
texture that is enough. I feel like I've
overdone it here, so I'm going to try to balance things out by lightening
this whole area, and we will also refine
some of the creases. Next, we will fill in the
skin around of the lips. There isn't too
much detail here, so we will fill in this
area even the blend. Now we will go over
the facial hair. I really enjoy creating them because I really like
the technique for it, so I hope you will enjoy it too. We begin by filling
in the hair regions with a six B pencil. So since our model
has dark hair, we want to create a layer here. Next, we will blend.
And when we blend, we will really try to blend
the shadows so that it mixes in with the skin areas and that there is a gradient. So I frequently
observed that something that makes the
mustaches and brows and any other facial hair
look unnatural is if they are very clearly defined and
outlined against the face. So even this shadow,
you want it to have a gradient with the
rest of the skin. You don't want it
to be almost like a painted on effect because that will look very unrealistic. So yes, make sure you
have a subtle gradient between the edge
of the hair shadow and the rest of the face. The next step to creating facial hair is to draw the
individual hair strands, Let's pay close attention here to the direction and
length of the hair. The hair is gravitating
towards the left side. It doesn't grow straight down. Also, it's longer
in the middle and shorter and towards the sides. When we create the
hair, since we already had the darker
shadow underneath, we can leave some gaps in
between the hair strokes, and this will make them look
natural and have depth. We will now repeat
the process for the moustache still
using a six B pencil. I would also like to add that
the hair strokes tend to be darker at the root and
lighter towards the ends. Also note that in some areas, the hair is a
denser than others. For example, right below
where the nose would be, the hair seems and. Mm. Now, if you look
closely at the image, you will see that there are some thinner hair strands that grow outside of the
outlines of the moustache. And this hair is
a little lighter, so we will use a two B for it. Finally, we will finish
off with some highlights, and for this, I am using
my precision eras. But if you don't have this,
you can also use a corner of a regular eras to create
some gaps between the hair. I would like to create
some more gaps here, so I will use my needed
eraser around the moustache. You don't have to do it
if you feel like you're already okay with the amount
of highlights you have. I just felt like my needed
a bit of adjusting. And I also felt that
the facial hair could have been a bit
darker in places, so I will go ahead and add
some more six B hair strokes. Okay. For the final touches, we probably have to bring
back some highlights to the lips because
when I was blending, I definitely smudged over them. So I roll my needed eraser into a precise point and I create this narrow shadow right
above the top lip. There is also a little
highlight here at the bottom, so we can add this into. Also, in this final
touches stage, sometimes the steps that
you need to take might be a little bit different to the things that I need to do. Take a look at your drawing
and see what it may need. Perhaps you already have enough highlights and you
need to darken the corners of the lips little or blend a certain
area of your sketch. I am assessing how my drawing compares to the
reference photo and trying to adjust my sketch to make it as close to the
reference as I can. This is all for the lesson.
I hope you enjoyed. I will see you in
the next class where we'll practice drawing
and I see you soon.
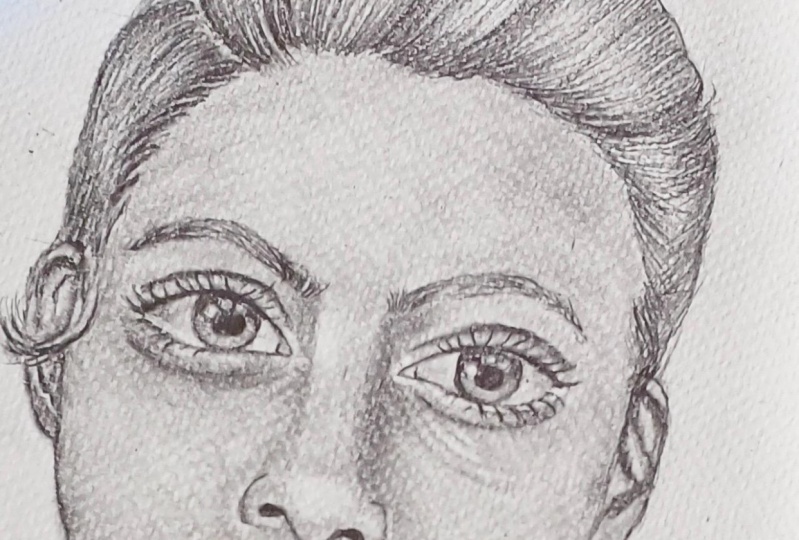
7. The Eye: Okay. Hello, students,
and welcome to the class. In this lesson, we will practice the final
feature, which is the eye. Like with the
remaining drawings, we will begin by
drawing the grid. Again, the grid is 3
" wide by 2 " tall. We separate the box
into four by four. We make a mark at 0.51 and 1.5 inch on the height and 0.75, 1.5 and 2.25 inch on the width. The exact measurements are
displayed on the screen. Now we may begin
drawing our outlines. We can see that the
eyeball is mostly inside of the third
row middle two boxes. Pay attention to
the little curves, angles and all other details. We are creating the eyes as the final feature because
of their complexity. So when something is a, it's usually more
noticeable than when we're drawing the other features
like the ear or the nose. When you're creating the pupil, a common error IC is an iris
which is fully visible. Usually the top of the iris is obstructed by the
overlapping eyelid, whereas the bottom of the iris touches the eyes water line. Next up, when you're
drawing the pupil, it's extremely important that it is exactly in the
center of the iris. You want a perfectly
even distance between all edges of
the iris and the pupil. When creating the eyebrow, I try to follow the dominant
line of the shadow. So try squinting and looking
at the reference photo. This will help to bring
out all of the shadows. Okay. Now that we've finished creating the outlines, we may erase our grid. If you happen to accidentally erase some of the outlines well, getting rid of the grid
that is towed to the ok, just take a few moments to refill the outlines
once you've finished. Now, the process for creating an eye is a little
different than the rest. So the steps are still the same though I work in sections. First, we will
complete the eyeball, then the skin around the eye, and finally the eyebrow. The eye has so much detail
that I feel like I am less likely to miss out on anything if I work in smaller sections. So we are beginning
with a nine B pencil. We will fill out the entirety of the pupil except that
round reflection. Okay. Next up, I am creating a base
layer for the iris. I am first completing
the outside ring. Try not to press
down too hard here. If we make the outside ring of the iris too dark, it
will look unnatural. I always say that
it's better to add value gradually because
you can always darken, but it's not so easy to
remove the graphite. Next, we will fill the
inside of the iris. Note here that the iris is at the top right below the eyelid and it gets
lighter as it goes down. Okay. Next, we will add just a tiny bit of
graphite onto the eyeball. Another mistake I see people make is leaving the eyeball
the color of the paper. That is not realistic. The whites of the eye
are definitely light, but they still have a very
subtle shadow on them. What we will do is make the
corners of the eyeball. This will create the
illusion of depth and show that the eyeball
is a spherical shape. We will add the tiniest
amount of graphite onto the remainder of the eye whites using extremely light pressure. Okay. Next up, we will blend
the base layer of our eye. I am using a Q tip
for the ites and a blending stump for the more precise areas
of the iris and pupil. When blending the pupil, we will try to leave
a round reflection as neat as possible. We want to leave this
perfectly white. Okay. I'd like to take advantage of the
graphite that is already on my blending stump and use
it to darken some areas. We can create the subtle
shadow underneath the eyelid and emphasize the
corners a little if we need to. Now, let's add more
details to the iris. Some details that
I can observe on the reference photo is a subtle darkness right below the eyelid, and there are also darker
spots on the bottom right of the iris and they lighter.in
the middle below the pupil. I am using a needed
eraser here to lighten towards the
bottom of the iris. I try to make this saddle. If you feel like it looks too exaggerated, you can
always blend it. Okay. Next up, I will roll the eraser
into a fine point and tap over the bottom reflection to remove the graphite
from the area. Remember this reflection is
darker than the top one, try to leave a little
bit of graphite on here. If you finish with the eyeball, let's move on to drawing
the area around it. I will begin with the lash line. This region is.
It blends in with the top of the iris and it's
very dark on the left side, and it gets much lighter
towards the inner corner. So, let's go ahead and blend out the lash line with the
precise blending stump. Now, let's turn our attention
to the little inner corner. I will try to create
this fleshy texture by first creating the darker
lines with a two pencil. Then we can create
the little highlights using the precision eraser. You can also bring
out those highlights by rolling your needed eraser into a very fine point and tapping at where
you want to lighten. We can move on to
filling in the case. This line is, as dark
as the lash line. Next, we will roughly fill
in the remainder of the eye. There is a subtle darkness on the water line right
below the eye, a diagonal shadow below the inner corner and a shadow
below the left of the eye. Next, we will blend everything
together with A Q tip. I am blending using
rounded motions. I want these shadows to
be as smooth as possible. Feel free to also use a tissue here to further smooth
out those shadows. Just be careful
around the eyeball. Now we may start refining. The crease line can definitely be a little bit more refined. There is a little shadow below the highest
point of the crease. I see there is a
very light shadow that separates the yeball
from the water line. So I am using my blending stump to add just a little
bit of value. I feel like I've made my
eyelid a little bit too dark, so I am using my needed eraser
to tap off some graphite. Next, we will work a little on the water line right
below the eye. I am only using my
blending stump. The extra graphite on this is enough to create
this very light, narrow shadow that we need. Now, if we need to, let's darken the eye crees
just a little. I am using a six B pencil
and we'll blend it in. I also felt that
the shadows above the eye could have been a
little bit more refined, so I am adding a touch of
graphite to amplify the shadows by the side of the nose and below the brow arch on the left. Okay. Now, these are the details that can really make our work look a little
bit more realistic. We will add some texture
and find details. Now, I have this
technique that I use to add texture to the skin. I essentially create
little scribbles with the precision eraser
and this gives the skin that natural
slight unevenness to it. Because we don't want the
skin to look airbrushed. We want the skin to look natural and roughen it up a little bit. I am adding some narrow
light reflections. Next, let's deal of the
shadows right below the eye. We are going to refine
this area a little bit. I think that the
shadow below the eye could also do with
a bit of darkening. We will also add a bit of darkness to the water
line and blend. Now, we are going to
create the highlights. Pay close attention to the reference photo and how it compares to your
drawings so far. I feel that mine needs a
little bit more highlights in the water line and below
the right side of the eye. Now it's time for the eyelashes. The lashes here are
actually quite short, especially the top
set of the eyelashes, so we don't have a
ton of work here. Let's observe quickly
that the lashes change direction as
you go around the eye. The curve away from the
center on both sides. Also, the eyelashes are a
little bit longer and thicker towards the outer corner and lighter and shorter
towards the inner corner. This isn't so obvious with shorter lashes like the
ones on this photo, but these things
are more apparent in longer lashes like the ones we will complete on
the final portrait. I am now blending in the lashes
with the blending stump. I want them to look a little bit softer and worked
into the paper. Okay. Now, we will complete the bottom lashes in the same way we did
with the top lashes. We are just going
back and forth here. I am adding some further detail right before the eye again. I feel that the shuttle
could be deeper, so I am adding just
another layer here. I will also add a little bit more detail where
the small lines are visible towards the side and add any necessary
highlights. Now we will go ahead and
clean up around the eye. When I was blending,
the graphite spread, so I'm wiping away with the
ray. Now it's eyebrow time. The way I draw eyebrows
is I try to fill in a base layer first and build
the individual hair on top. So I am using a six B, and I'm actually not
pressing too hard. I want to have a
very light shade in place just lighter than
the rest of the skin. We want to be able to see the hair on the
top of this layer. So we layer and blend
neatly with a Q tip. One thing that's important
is that we don't want the eyebrow to be too
sharp against the skin. You want it to be a
gradient and blend. So make sure that when
you're creating the outline, the brow isn't too
intense and there isn't too big of
a sharp contrast. I am currently adding a little bit more detail
to the brow base layer. I see it is a little darker towards the
middle and right side, so I am adding
additional graphite. Mine looks a little
bit intense right now, so I am lending in dissue. Okay. Now, here is the main
part of drawing an eyebrow. We will create the
individual hair strokes using a sharp pencil. You don't want to use
anything too dark and blunt here because we don't want the hair to appear too thick, so I am using a two B pencil. It's important here to follow
the pattern of the brow. Have a look at the direction
the hair is going in. Also, something that I observe a lot of beginners do is they create the hair really
precise against the outline. You want the hair to
go past the outline, so it looks a little bit messy,
not like it's painted on. Another thing I'm
making sure of is I'm creating the hair
thin at the root. The hair doesn't grow
out super thick and dark like the eyelashes,
keep this in mind. Now that we are done
with the fin areas, we are moving onto
a six B pencil to complete the thicker hair. I am still pressing
quite light because the six B can definitely
be quite powerful. I am really paying close attention to the
reference photo. We want this eyebrow to look as close as possible
to the picture. The main observation is that the left side of the eyebrow has a lightness to it and the hair on the right side goes upwards, so we want to reflect these
features in our sketch. A tool I really love to use for eyebrows is the
precision eraser. I like to create more highlights between the hair to make
it look more realistic. Like the brow has more texture and the skin is showing
through the hair. You can also use
a regular eraser with a precise edge to
create this effect. In the end, we are coming back
in with any final touches. I am adding some more light hair right below the brow
with a two B pencil. I am also adding some
darker hair with a six B. Keep adding layers until you
are happy with the brow. Okay. This is all for the sketch. I hope your drawing turned
out to be successful. Eyes are definitely the most difficult part of a portrait, so you should definitely
be proud of your results. In the next class, we will begin our full portrait studies,
so I will see you then.
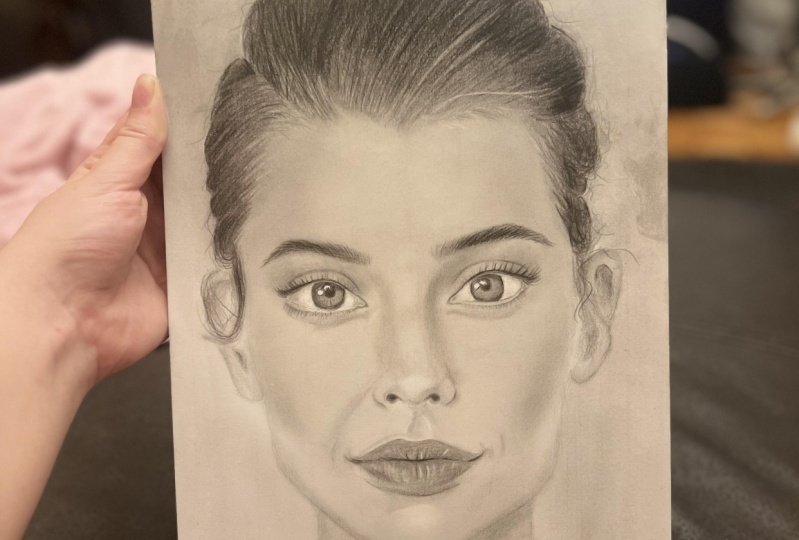
8. Full Portrait: Outlines : Hello, students,
and welcome back. In the next set of lessons, we will complete a realistic, full face portrait together. I will try to speak a little bit less here during
the completion of the full portrait because
the steps are the same as they were in
the previous lessons. In the first lesson, we will complete the
grid and outlines. If the grid is
overwhelming for you, feel free to just
trace the portrait from your screen, that
is completely okay. As you can see on the screen,
the grid measurements are 18.4 by 28 centimeters. I know that in the previous
lessons we were using inches, but because the grid
is so complicated, I felt like centimeters
is more precise. This is what we're
using for the big port. We will divide the grid
into eight by eight. Vertical lines here will
be spaced out by 2.3 centimeters and the horizontal
lines by 3.5 centimeters. Remember to keep those
lines light so that we can erase them easily once we
complete the outlines. Thank you. Next, we are going to do
something a little different. We will actually divide the middle cells
into further halves. Where most of the facial
features are concentrated, we will have more precision. We will divide the
fourth two seventh row and the sixth column. The height of each
cell will be 1.75 centimeters and the width
will be 1.15 centimeters. Next, we will complete
the outlines of the face.
9. Full Portrait: The Eyes : Welcome to the next
part of the lesson. In this lesson, follow
along as I create the eyes. I am going to complete
one e y at a time. This is a much less
overwhelming process for me. We will begin by
completing a base layer. That.
10. Full Portrait: The Nose: Students, in this lesson, we are going to create the nose. We will begin by
completing a base layer by following the most important
shadows and highlights. Essentially, we want
the whole nose region to be covered with a
layer of graphite. Once you basically
are as blended, you want to add in the details, so you can refine the
nosts and add any text and highlights on top. B.
11. Full Portrait: The Lips : Hi students, welcome to the next part of drawing
our lovely subject. In this lesson, we will
complete her lips. I always begin by filling in the dark line of the
opening of the mouth. This is an important detail and we don't want to lose
it in the base layer. This is usually my
starting point. Next, you will fill
in the base layer of the lips and also the
skin around the lips. Now we are moving
on to the details. The precision eraser is
particularly useful here, but if you don't have this tool, a regular eraser will work just fine as long as there
is a sharp edge to it. Y.
12. Full Portrait: Skin, Neck & Ears: We are moving on to
drawing the skin. Being able to blend smoothly is the key to creating
realistic skin. Now, you don't want to create shadows and highlights
that are too sharp. You want all the values
to blend seamlessly. Layering and blending with a tissue is the approach
that I recommend. Mm hmm. I would just like to show you
how you can create subtle skin texture. Skin isn't so smooth
and airbrushed. It's a little uneven and has
a delicate texture to it. What I like to do is I take my pencil eraser and you
can also use the edge of irregular eraser and very lightly scribble over the
final layer of the skin. What this will do is create
the subtle skin texture. If you overdo this and you feel like it looks too apparent, you can lightly blend over it with a tissue. A. A.
13. Full Portrait: Hair : For the final lesson
of the class, we will complete
the model's hair. Since the hair is super black, I am using a nine B pencil for the majority of the drawing. I will only be using a two
B pencil later on when we complete the flyaways and the hair around
the hair line. We will divide the hair
into three sections. We will start off the left side, then move onto the top and
end on the right side. We begin by filling out the
entirety of the hair area. From the start, we
will be creating hair strokes in the
direction of the hair. You also want to observe
the differences in value. Although the hair is
mostly super black, there are some
lighter hair strands. For those areas, you want
to press a little lighter. Once you are done, you want to blend in the direction
of the hair. Feel free to use either
a tip or a tissue. Once your hair is
nicely blended, you will go over the
hair again and repeat the process until
the hair is fly. Mm. We will be creating
the hair along the hair line with
a two B pencil. Observe the reference
photo carefully here. The hair is super light
towards the root. Notice how I am not starting
the hair at the hair line, but I'm going against the
root towards the hair line. Once the hair is
complete, we will use a two B pencil to create the
flyways around the hair. This is my favorite stage of drawing hair because it pulls everything together and makes
it look super realistic. Now, we will repeat the process
for the remainder of the. Mm hmm. Oh. Mm.
14. Final Project & Thank You: Congratulations on
completing the course. I hope that you've created
artworks that you're proud of and that you
enjoy doing with me. If you did, please consider
leaving a positive review. It would mean so much to me. If you have any questions or would like some
feedback or tips, please ask Bello and I will be more than
happy to help you. For the class project,
I would love to see any facial features or
portraits you've created. And even if you feel that
they aren't your best, I really do encourage
you to upload them because I do leave
feedback on all projects, so I can tell you how to make your artwork even
better in the future. If you are interested
in similar classes, I have a course where
we learn proportions, light and shadow, and one, two, and three
point perspective. If you are perhaps interested
in trying out soft pastels, I have so many courses such as painting animals,
landscapes, and fruit. To access those
classes and many more, please visit my
skill share profile. If you wish I am also available for private one and
one art lessons. In these private lessons, we may complete a drawing together. I can take a look at your
work and give you feedback, or you can sign up for
consistent sessions, and I will design a learning
plan for you that we will follow together to
make you a better artist. Thank you so much
for drawing with me. I really do hope that you've enjoyed and that you
learned something useful, and I cannot wait to
see your project. I really do hope to see
you in my future classes, and I wish you happy creating.
 Wiktoria, Professional portrait artist