Transcripts
1. Introduction: Painting is silent poetry, and poetry is
painting that speaks. With that said, welcome to
today's painting session. Hi, this is Arbia Sultana, an artist and an art educator. I welcome you all to a brand new painting
course of today's vibrant, rainy night painting scenery. So this course is
going to be all about the vibrant night
rain scene using gauge a medium that's
perfect for rich, bold colors and
atmospheric layers. Nighttime rain painting offers a beautiful contrast between dark shadows and
glowing highlights. And today, we will bring that contrast to
life using bright, saturated colors against
a moody backdrop. This course is made for
beginners and advanced artists. It includes all the
supplies needed and also the techniques used before we start off with the
actual painting course. This course is filled with
loads of tips and tricks on painting this beautiful
rainy shower painting. So grab your brushes, pour some tea or coffee, and let's get started with painting this
dreamy, rainy night, and I'll see you in the class. And
2. Supplies And The Techniques: So let's begin
with the materials required and the
technique session. So the materials required for this class is gauche paints. Firstly, Gauche comes
in various forms, tubes, pans, tubs,
bottles, jars. So here I'm using water
based gauche paint. So whichever gauche you have, you can go ahead and use it. And for the background, I'll be using an acrylic board. Along with that, I'll be using masking tape,
white gelpin, a jar of water, along with that, three round shaped brushes. They are of various
different sizes. One is the thinnest
and the other two, you can go ahead and select
based on your regular use. So here I'm using the
watercolor paper. This is a 300 GSM
watercolor paper. You can go ahead and use 160 plus GSM paper
for the Gauge. Along with that, you need
tissue and the mixing palette. Let's begin with the
technique section. I'll show you how to use the
Gauche consistency first, then the various
types of blending and finally with how to
paint rain shower. So let's begin with
the technique session. First, before you
start any painting, make sure that you thoroughly
wet the gauge paint, especially the
ones which come in tub form because they are dried, as you can see the cracks. So make sure you
thoroughly wet it and then mix it and finally use it. So you're wetting the
brush and then dipping the brush into the paint and starting off with the
various consistencies. As you can see, this is
the most darkest form. Since the tub was dry, I have used a wet brush. So if your gauche is
creamy consistency, then you can go ahead
and use directly. Secondly, I'm using
one wind drop. I'm dipping the brush in
water and slowly adding one wind drop two drops in it and mixing it in the mixing
palette and then using it. You can see the difference
in chain as you go. The creamy consistency
is the best one, which is neither
too opaque nor too watercolred, that
is transparent. So here are the various
consistencies of gauge, which you can use for
different techniques. So here, I'll be using the most creamiest consistency for the background
as well as to paint. So make sure that you figure out which is the creamiest
consistency. I would say it is second
and third that is creamy. So according to your tub form or according to your gauche
and the climate in your area, it depends on the consistency. So make sure that
you practice first, and then go ahead and use that consistency
for the painting. So here, let's begin
with painting a block. This is called a flat wash. Now, let's go ahead and
add two colours and make a variegated wash that is adding two colors and
blending them together. Here, the blending
technique which I'm using is paint with paint. So make sure you look carefully how I'm doing it
and go ahead and paint. So here are the two blocks, and I'm slowly adding
the top color into the bottom color and then bottom color
into the top colour. This procedure takes time. So keep on doing, but make sure you don't lift off the paper or tear the
paper while doing it. Do it gently and
smoothly if needed, add one drop or a
quarter drop of water according to
the consistency of the paint which you
have on the palette. Look how beautifully it's
transforming into one wash. Let's begin with the second one. So here, basically, I'm
again adding two colors, and then I'll be lifting off
the paint from the paper. So this is again to be done
in a more gentle form. And here for all the painting
and technique procedures, I'm using round tip brush
of three different sizes. So make sure you select them properly while
choosing to paint. One thick, one medium, and one thin stoke. And as you can see, I have just washed my brush thoroughly, and I'm just lifting the
paint from the paper. Like I'm dragging
it in one stroke. I'm not going back and forth. And every time I'm
just dipping in water, I'm just dabbing it in the tissue and then
lifting the paint off. You can see how beautifully
it's creating space. So now let's begin
with the third one. This is, again, a
blending technique where you use two colors and in between the white color
to blend them together. So the two blocks of
colors are placed. Now using a clean brush, I'll go ahead and
add white colour in between these two and
lend each of it with white color and then
together all the two colors with the help of white. You can see how I'm doing first and then go
ahead and do it. As said before, first
and white color and then blend yellow and white, then pink and white, and
then from starting yellow, white, and then pink together. So now, let me just write down so that you can
understand what is what. The first consistency of
paint is without water, and that is highly opaque. The second one is with
two drops of water, which I have blended in the
mixing palette and used. The third one is again with
some more drops of water. That is, again two
to three drops. And the second and third
is the ideal consistency, which is creamy and opaque,
not too transparent. The fourth one is a
little bit more water, which is going towards
the transparency. The fourth and fifth is completely watercolor
transparency. You can see how
much water is used. So as we progress, I keep adding 22 drops of water
and then use it on paper, so you can see the consistency which is going from
thick to transparent. Gauche is basically an
opaque watercolor medium, which has to be a bit darker
but not too transparent. So coming to the lower part, the first block is only paint. The second one is blending
with paints on paper. The third one is lifting off
the paint from the paper. The fourth one is blending paints with white
paint on the paper. That is blending two
colors with white colour. And the two techniques here used is blending
with paints on paper and blending paints
with white colour on paper. Now, let's see how
to paint the rain. The thin liner brush is a
rigor brush or you can use a thin round tip brush as well
for painting rain shower. So I'll just dip the thinnest
brush into the paint. So basically, I'm loading the paint in the brush
by rotating it so that every bristle of the brush holds the
paint thoroughly. And as you can see,
I'm holding it in a slant form and dragging it from bottom to top
in a slant line. And you can see the bottom part is having the thicker form, and then the top
part is like thin. So this is how you paint
the rain shower or rain and you can use it in
different colors as well. So if you want more
thinner than this, then go ahead and use the gelpin or the
white acrylic pen. Again, the tip should
be the thinnest one. So this was all about the technique sessions which we have seen today in this video. So I hope you enjoyed it
and learn something new. I'll see you in the
class where you will learn how to paint
the actual scenery from a night rain shower using the techniques which
you have learned here now. I will see you in
the class soon.
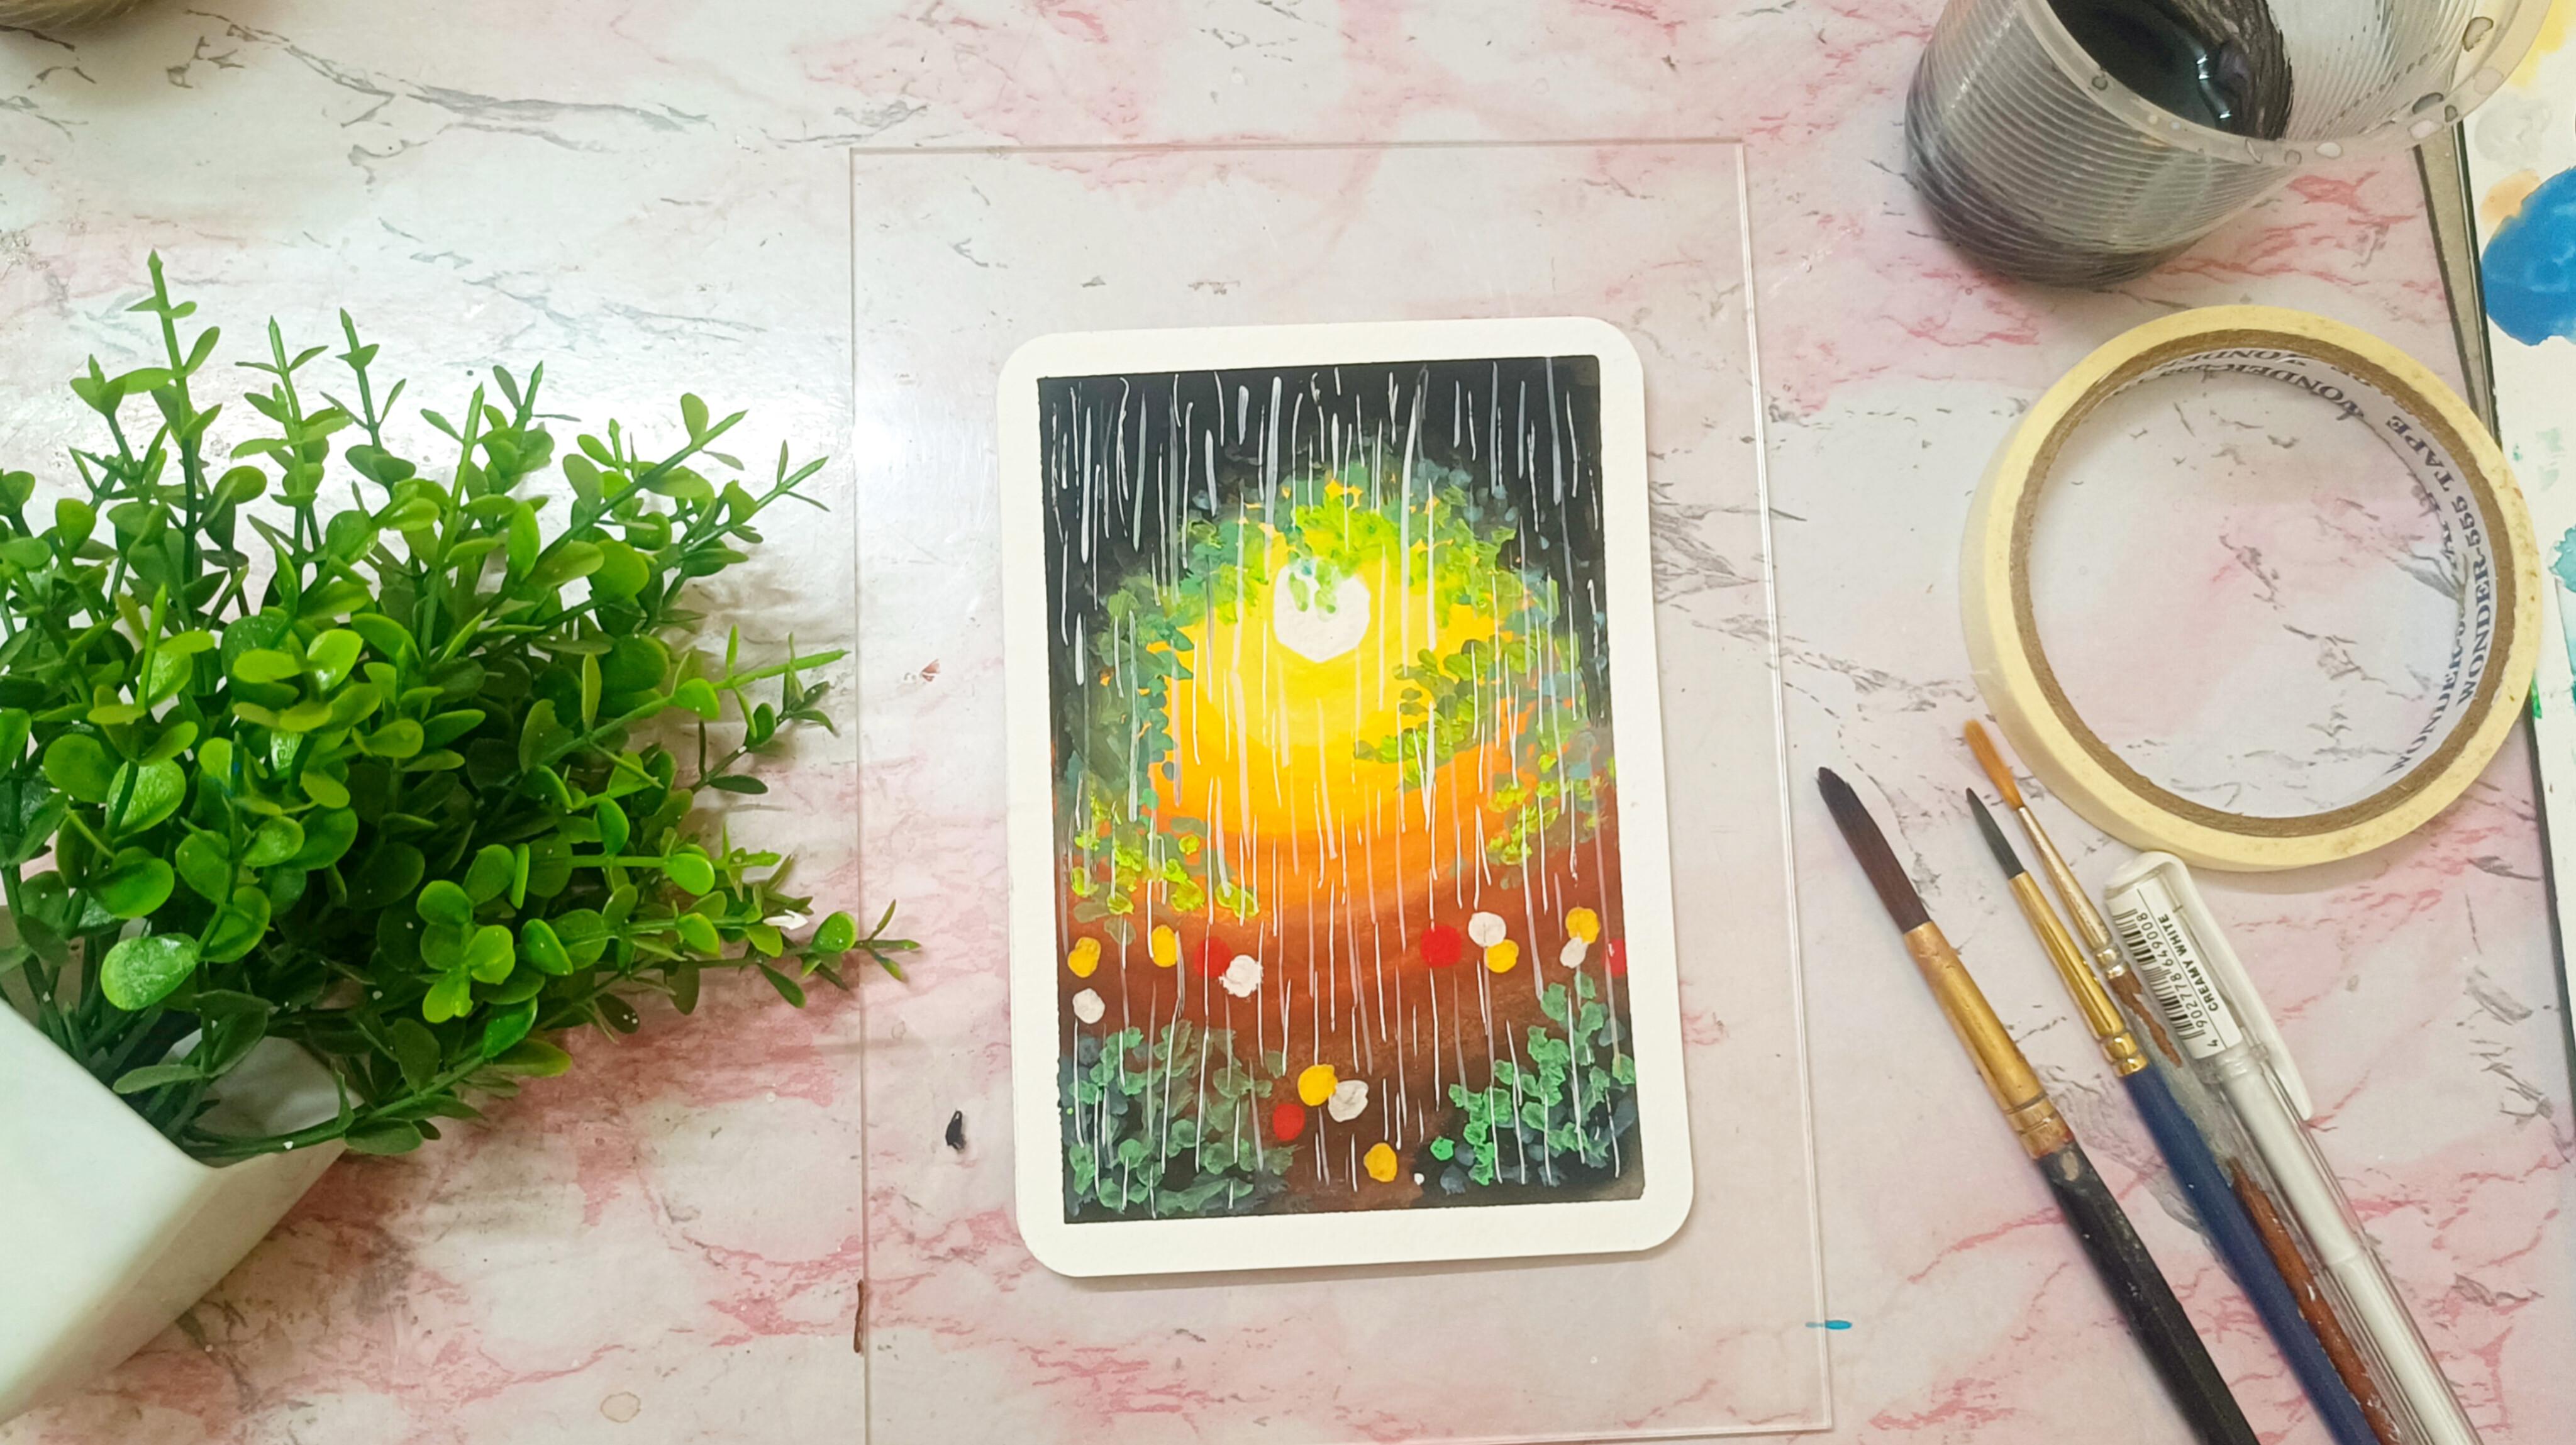
3. Background Painting: Let's begin by painting
the background first. So here I'm using a round
tip brush and going to paint round shape at the
top third part of the paper with white
colour at the center. And around which I'm going to add yellow
colo as you can see, go slowly around the white color using the same round tip
brush you can paint. If you're using a
flattened brush, be careful and do it
slowly. All right. So as we go and broad
this yellow colo, we are going to shift to
orange color later, okay? Mm So for the next color, I'm just using the yellow
and orange mixture, which is palette mixed. I have mixed the
colours in the palette. And now once I'm done with
the yellow orange mixture, I'm going to shift
with orange colour. Using the same brush, I'm going to paint whole
of the background. So this orange color
will be wider and also occupying much of
the space in the paper. And for the top part, like, I'll add some colors, but most of it will be
covered with the black. So I'm just going to be
concentrating with the second and the third part
of the paper for now. So once we are done
with the orange, we'll be shifting
with the brown color. And again, this
brown color will be occupying much more space
than the orange color. This brown color will be more of like coming down to the paper and it won't be like
in a round shape. So once we are done
adding the colors, let's go ahead and
blend them all. As you can see, yellow,
orange, and brown. All three are of
different colors. So let's blend them together
so that they look even. I'm going ahead
and blending these with the water and
also the paints. If you want, you can add
white color and blend them, but those will give you a
different shade of color. If you're very new to blending, then don't take the darker
color into the lighter, use go from lighter to darker. Once we are done
with the blending, we'll go ahead and add black
colour paint onto the paper. As you can see, I'll be leaving some space in the bottom
part at the center, and rest of it will be
covered with the black. And I'm just adding black
colour in a random motion. And you can see my brush
strokes. They are not even. Basically the brush strokes
is in round motion, and these round motions are
not even as you can see. I'm just going down oval shape and a small
round shape and then again, big round shape and then
dragging, pulling down. As you can see, these
brush strokes are just random for
filling up the space. Once we are done with
adding black color, I'll go ahead and mix some brown and black
shade together and fill up the space in between the black color on the
bottom part of the paper. You can see how one dark color
impacts the lighter one. So always go ahead from
a lighter to a darker. If you're blending it, don't
go from darker to lighter, and you can see how I'm
removing the excess color from a wet brush and
don't do it forcefully. Be gentle and use water and paints for blending
each color together. So this was it for
the background part. I'll see you in
the next part for the details of this painting.
4. Adding Details: Once we are done
adding the colors, we'll move ahead and add some green leaves around the
black color on the top part. So as you can see, I'm using a round tip brush and
dabbing the leaves. So this color is basically
emerald green mixed with some white color and also the wet part
of the black color. So on this three mixture is
giving that particular shade. Now, I'm just going
ahead and making this white color at the
center more prominent and adding here and
there white color so that the paint which
is faded away with the water is going to be
natural and looking even. Now, again, with a smaller
size roundup brush using a dabbing motion and same
mixture of green color, I'm going ahead and
adding the leaves. And you can see some of
the leaves are coming out, and that's okay because we'll be adding more green
leaves on top of it with different shades of
green for making it dense. So you can see how I'm adding the leaves first and then go ahead and paint on your paper. Look at the brush strokes. It's easy dabbing and dragging and somewhere
only dabbing. And you can use
different sizes of roundup brush for
different size of leaves. So we'll let this
dry a little bit, and we'll go ahead and mix, the same shade with
some white colour and make it like
prominent green. And again, we'll go on top of the greens which
we have added, but we'll make sure that we let the background see I mean, we are going ahead and adding the fresh shade on top
of the green color, but letting the underlying
green be shown as well. You can see I'm just
adding here and there, the new shade, but also letting the
previous shade be seen. So this is how we create the
dense look of the painting. We'll go ahead and use the same shade of green for
the lower black color part to make the dense bush same
dabbing and dragging motion. Now, we'll shift to a more
lighter green colour, that's actual shade
of green and we'll go ahead at the center
part as well with the same colour and
add some leaves and go over the actual green color which we have added as well. Look how beautiful it's
turning out to be. If you notice, white colour
is not that prominent, so making it prominent by adding yellow colour around it
and also white colour. Make sure you see me
how I'm doing it first, and then you go
ahead and paint it. Now I'll be shifting to
a neon green and going ahead and adding that
green at the corner, as well as on the inside
part of the painting. Don't judge your
painting in between. Make sure till the end
you trust your process. So now let's go
ahead and shift to a brush with red
colour, yellow colour, and white colour for
the bouquet effect, which we'll be adding
the low third part of the paper near the bushes. Small, small round shapes. Make sure all the edges of
the painting are covered, as well as I'm going
ahead and adding some black on top part of the painting and
just to make this give a bit more denser effect. After this, we'll see
you in the final part of the painting that
is rain shower.
5. Final Touches : Let's begin with
the final part of the painting that
is rain shower for. This, I'll be using a
small thin, long brush. It's again, a roundup brush. It's called a rigor brush. The brush strokes
from the rigor brush is very thin, as you can see. The alternative for this is a roundup brush, which is thin. And if you don't
have that as well, you can go ahead and use
a white gelpin which I'll show you how to use in this part of the
painting at the end, and you can see how
I'm drawing lines. You can just go ahead
and add lines like this. This replicates the
falling of the rain. Using the same brush
and white paint, I'll go ahead and cover the whole painting with
the falling of the rain. The rain showers are
not completed yet, so I'll go ahead
and show you how to use the white gelpin. So just like how you draw lines, go ahead and start adding lines, not complete line, like a broken line or small
line, but a line. So go ahead and cover as much rain shower as
possible onto the painting. This represents a heavy
rainfall, as you can see. Once you're satisfied
with the procedure, we'll go ahead and
remove the masking tape. So for removing
the masking tape, make sure that you
go and remove it in a slant manner and in a 90
degree angle, as you can see. Apart from that, you have to make sure that the
paint is covered at the edges and second thing that it is dried completely. So here is the final
look of the painting. I hope you enjoyed
the procedure. Make sure to share your reviews and your projects in
the project session. I'll see you in the
next painting class.
 Arbia Sultana, Art Educator