Transcripts
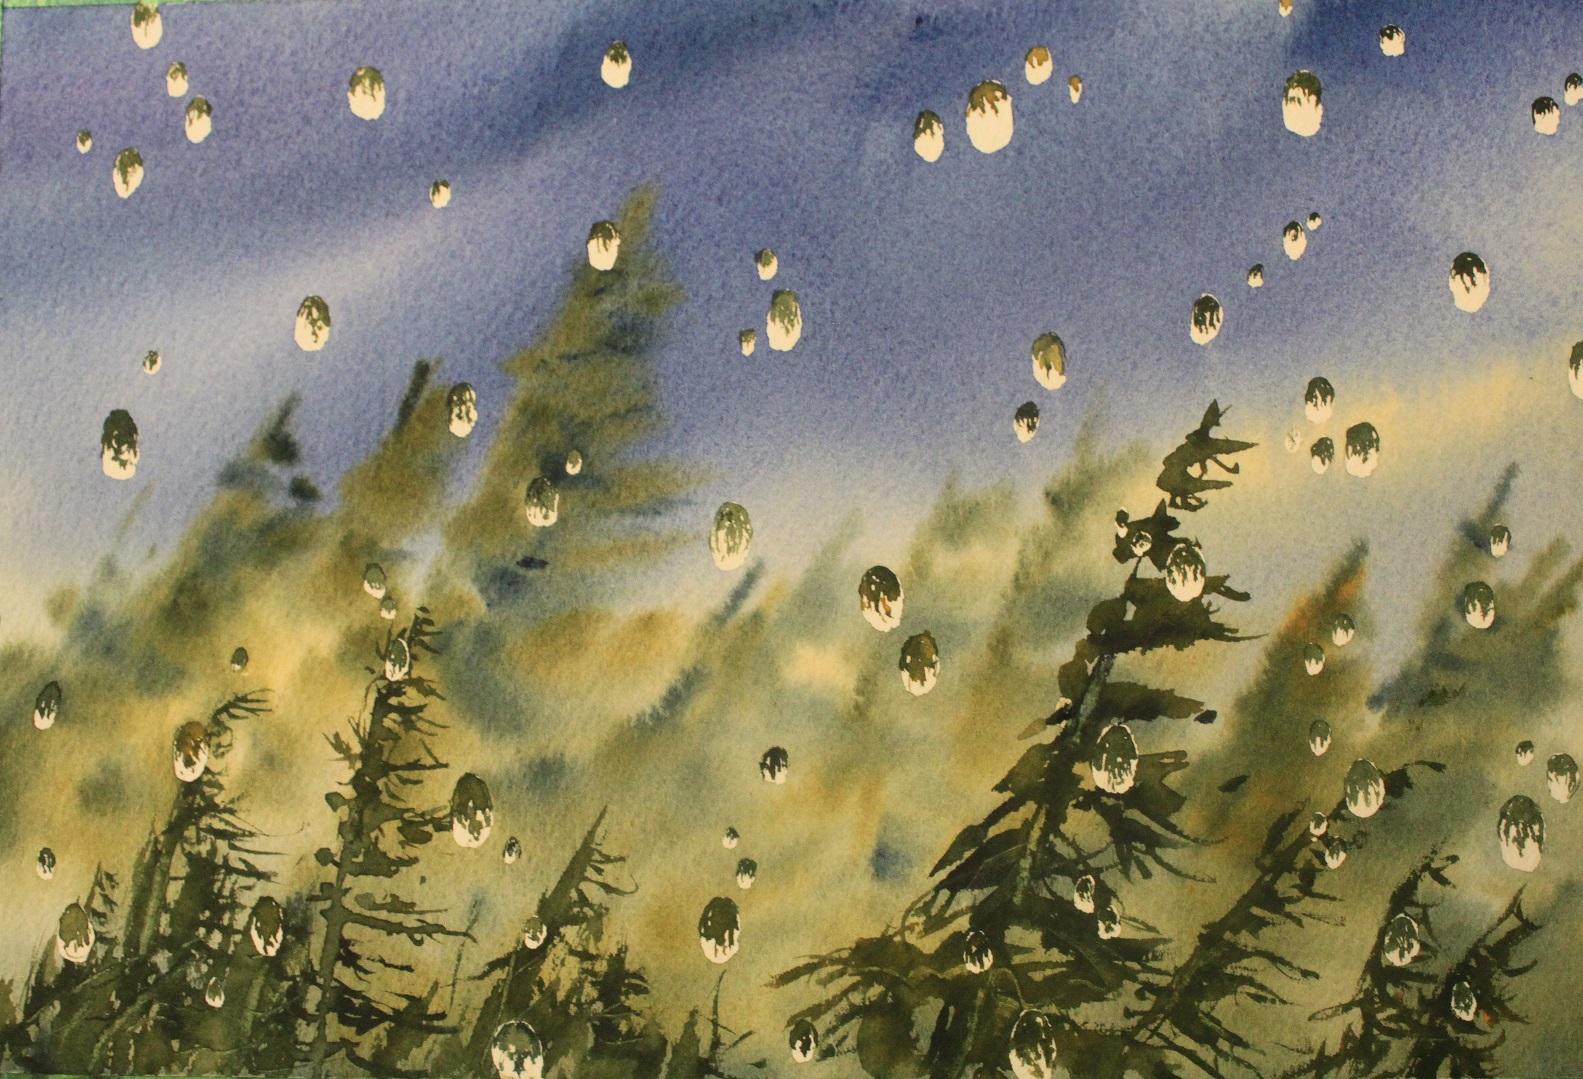
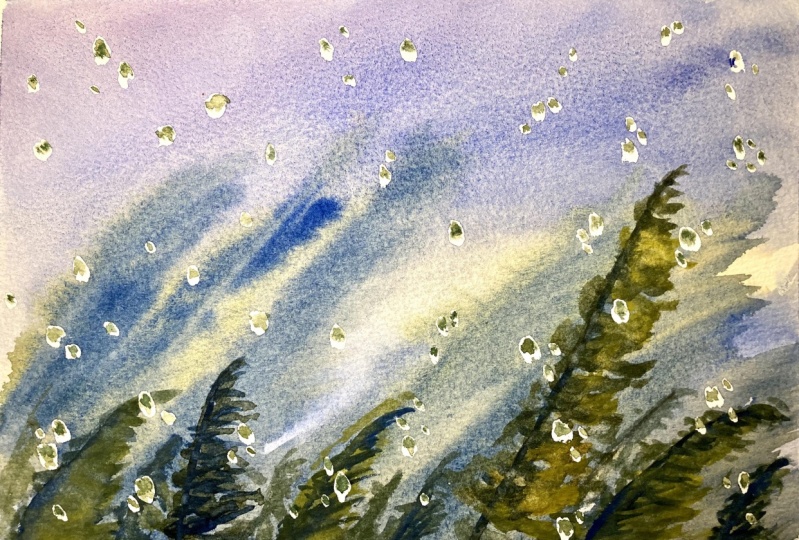
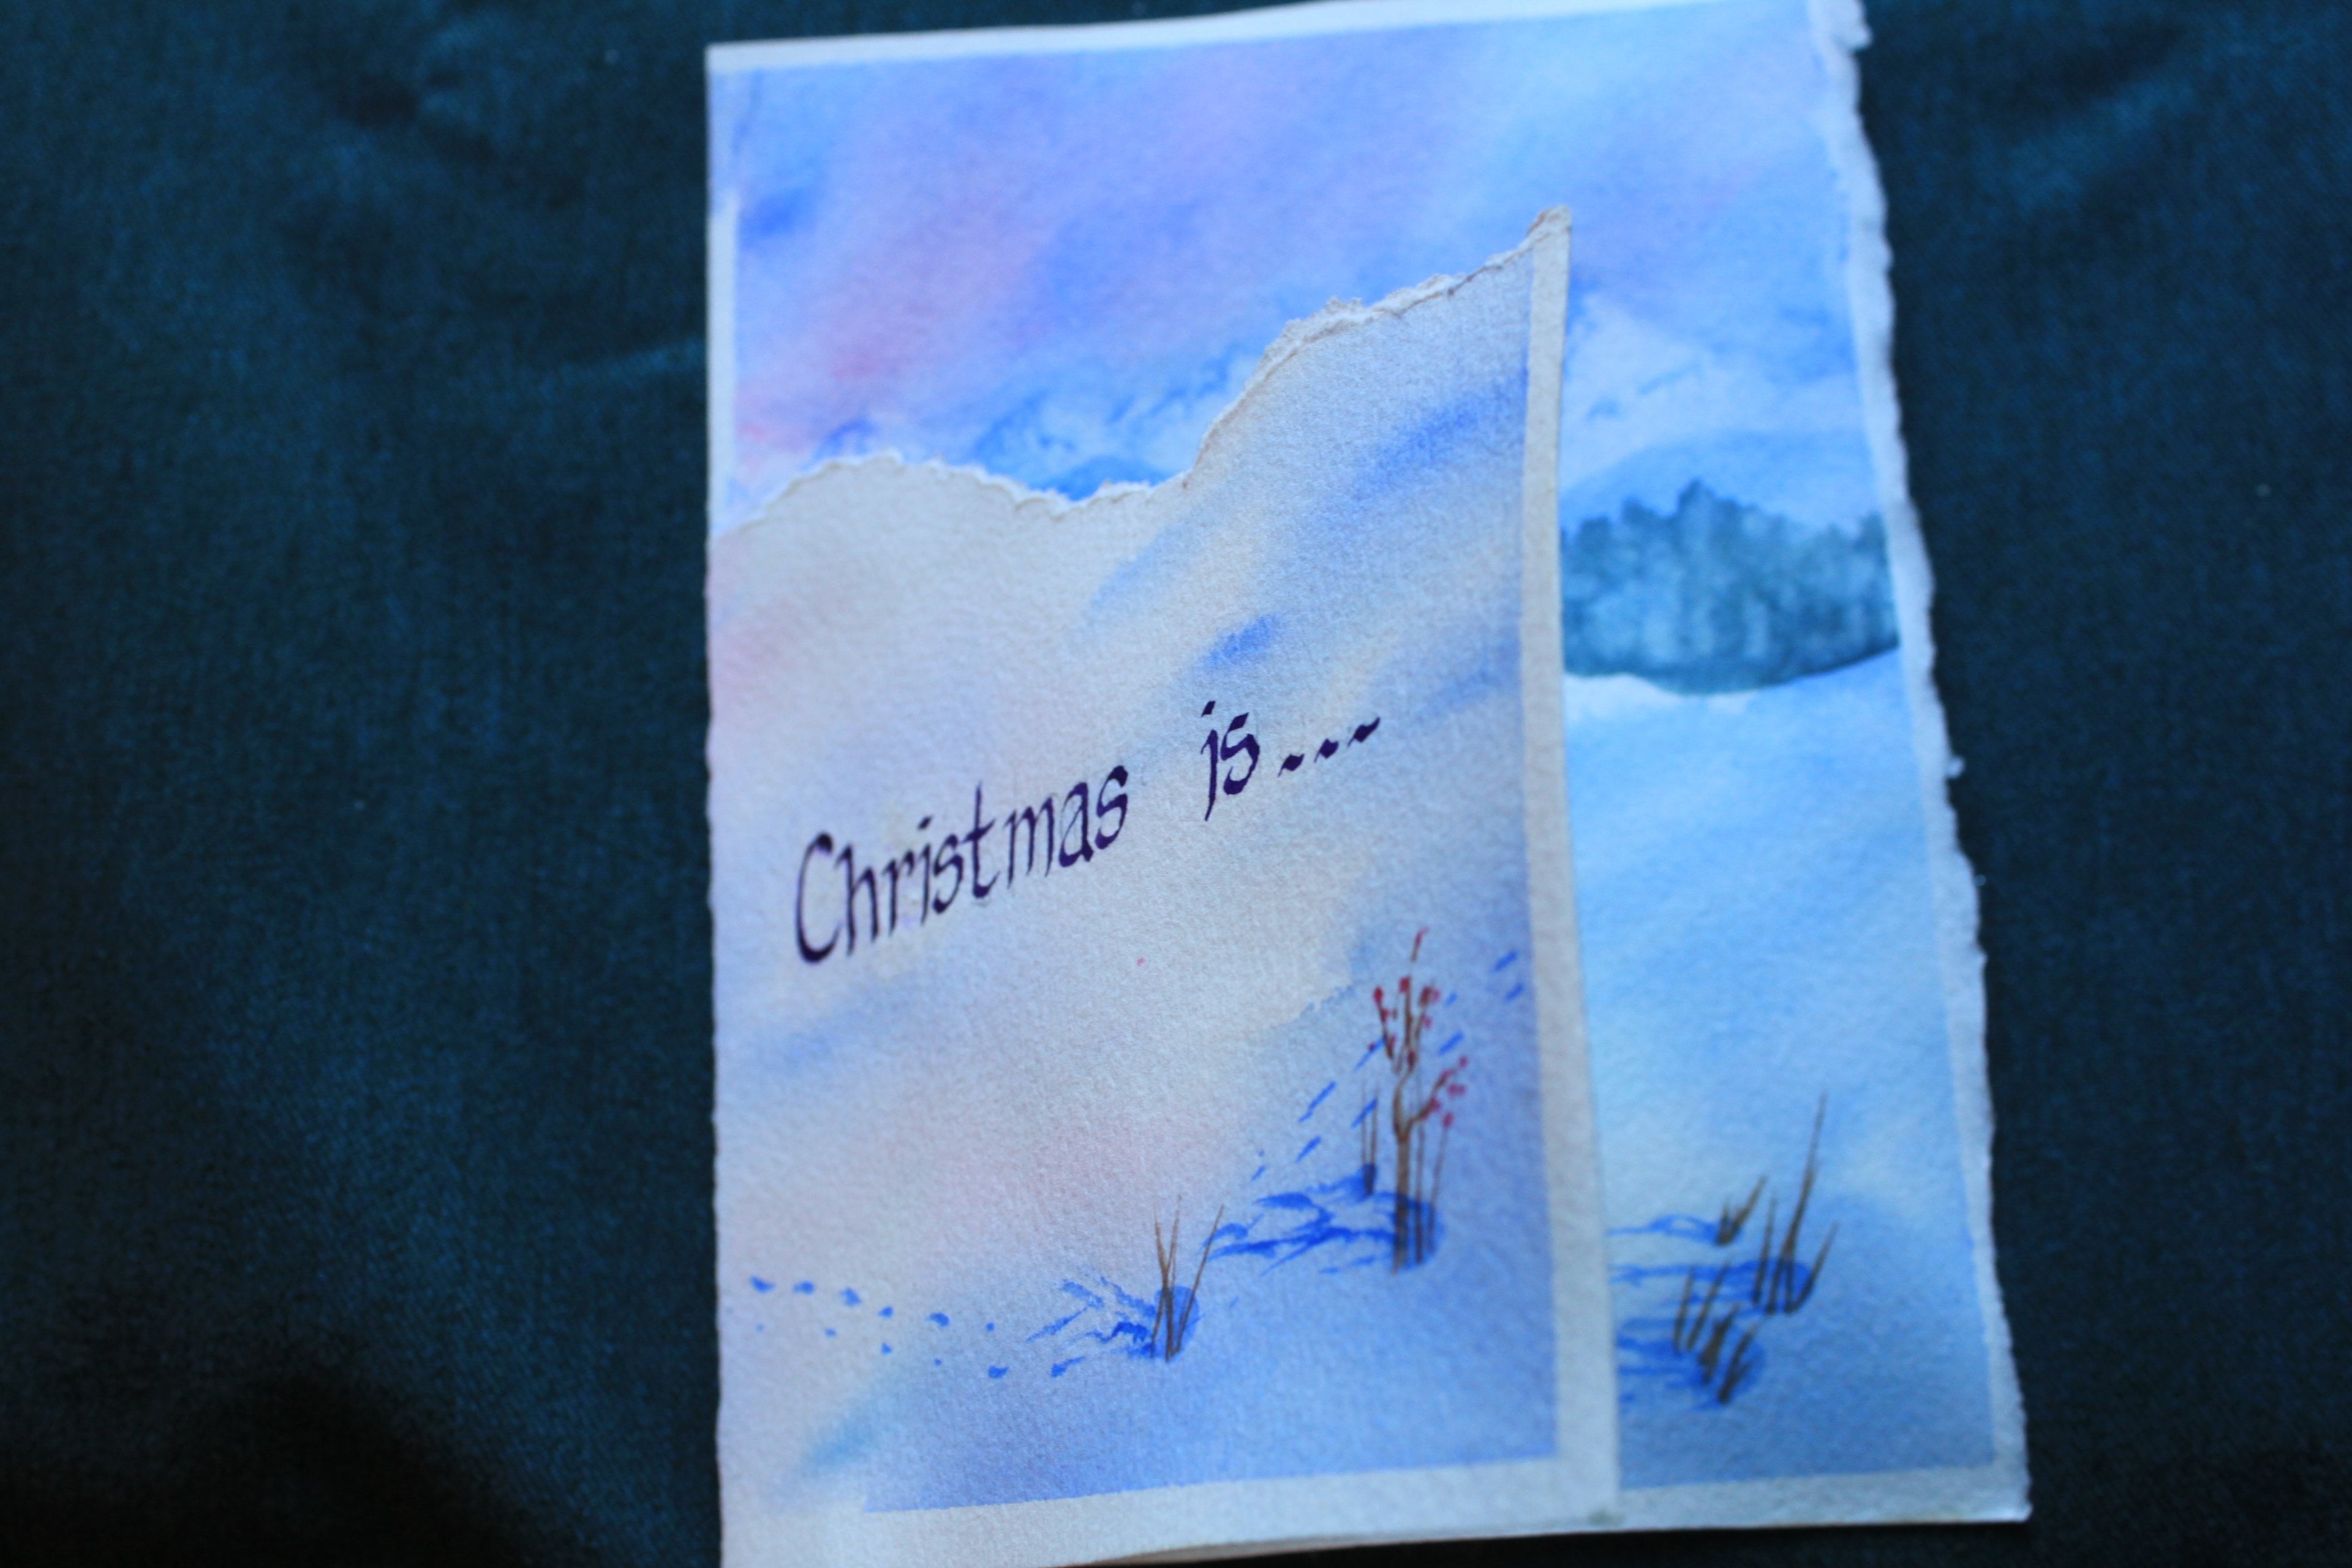
1. Introduction and Size Info: So this is some sort of Melinda, Wow, welcome to another session of experience watercolors. Today we're gonna paint raindrops on a window pane. It's awfully hot and dry here right now. So the rain, I think, would be a lovely thing to paint. It's kind of a cool technique. So I hope you'll join me. Here's the little one we're going to be working on today. Lots are raindrops and a blustery sky in the background. So let's get to the studio and get started.
2. Paper Prep and Masking: Let's talk a little bit about paper prep before we get started. So I've decided that I want a nine by 12 frame. So that's, the outer frame is going to be nine by 12. So in order to calculate the size of my image, here's my nine by 12 and I want landscape format. So 912. And but I know I'm going to want a map around there. Ok, so there's going to be a mat and my image is in the middle of the map. I want my map to be an inch and a half all the way around. So for add that inch and a half, inch and a half, That's three inches. So I need my nine to be minus three inches. So my image itself is going to be six inches wide, are high. And the same with the 12 inch and a half inch and a half. So 12 minus three is nine. So this is going to be nine inches. So nine by six is going to be my image size. Now I want to take down my paper and leave an extra little eighth of an inch around the edge just to make sure that I don't have any white showing. Once I cut my, my matt nine by six, I want it to fit over the image without any extra weight poking through. So let's just do this. And what I've done is I have my watercolor paper, take down two sides. And I'm just going to take my measuring tape. And I'm going to measure out six and about a quarter and just put a little mark there. Actually, sorry, not a quarter. 608 little mark there. And then we'll do the same this way. 98 little mark there. And nine and then I will take my tape and I'll just follow those lines, those little dots that I leave on there. Right? So then I'm ready to paint and I know when I cut my mat with a nine by six opening, this is going to be just slightly larger than that and the map will fit beautifully over top. Alright, we are ready to get started. So the first thing we need to do is mask are raindrops. Now, as I mentioned in some of my other videos, masking fluid will trash your brushes. So I've got an old bar soap here and I'm just stopping my brush right up into the pharaoh of my brush, which is this metal part. And making it a tiny bit of course first and then soap it up. And then I've put a little bit of masking fluid here on the edge of my page, excuse me. And I'm just going to start and create raindrop shapes. Now, if you feel more comfortable, you are, of course, welcome to take your pencil and draw your raindrop shapes in, gives you the option of erasing them once you've placed them, if you decide you don't like where they belong or where they are. But I prefer just go read ahead with my masking fluid and paint them on this wave because once my masking fluid dries, I can erase them off with this. If I decide I don't like any of them are placed when you're making your raindrop shapes. I like to have them not to round and bubbly looking, but rather a little bit drawn down because their water on a vertical plane. So it's pulling down a little bit and you're going to have that kind of oblong shape. Now they do come in many different shapes and sizes. And you wanna make sure you get them different distances apart and different sizes. And they don't have to be, as I said, all perfectly ovals. They come in, raindrops come in many different shapes. I really encourage you next time it rains, how I look at the raindrops on your window and just check out how they look. Trying to make these randomly spaced as possible. Some areas, more drops, other areas a little bit thinner. Just you don't want it to look like a pattern. And it is tedious and it really is. But you know, sometimes in art, you have to go through the tedious stuff in order to get the finished product that you want. My husband made a very bad joke. He said, my goodness, even the raindrops are wearing mask these days. It's bad, but I thought I'd share it with you might draw a smile on this lovely summer day. I think I'm going to call that finished, so we'll let that dry and then we're ready to paint her background.
3. Sky and Background Trees: So the first thing we're gonna do is just check to make sure our mask is dry. Just attack with the finger and if it doesn't come off on your fingertips than you know, you're okay. Alright. And then we're gonna paint this whole background wet into wet. So I'm using my one inch flat and it has a lovely chiseled edge. So I'll be able to use it also for making some distant trees. Now remember, we're working on a stormy sky idea because it's raining, there's waring drops on the window pane. So I'm just moistening the whole thing both ways. Make sure there's no Dr. patches because we want blurred. Look to it. I'm going to use some paints that a friend of mine that I met through skill share sent me Rebecca Humphreys. She has some great classes on skill share. You can just look her up if you like. But she also is such an energetic gal. She's created her own watercolors, so she sent me a few samples and they are yummy, So I'm dying to try them, this sugar maple. So I'm gonna start with a little bit of sugar maple and just run some along. Here. There we go. Then I'm going to take some of her ultra marine and she sent me, I can't use her paints for the entire painting because I do need some other colors, but I'll just start off with them anyway. So we've got some lovely which marine mix in there. This is a stormy sky We're working on. Then I love this violet, ultramarine violet that she sent. Her studio is called hmm Beck Studio. So you can look her up and as they say, you can get a liver on skill share. She's got some great classes. Excuse me. Here we go. Let's get some of these really rich darks in here. I'm going to add just a little bit of a whole B9, royal blue because I do want it a little darker up there in the sky. And the ultramarine just doesn't quake of dark enough. You know, we go nice stormy sky. Okay, now, while it's damp, we wanna do some wet into wet. So I'm going to use this lovely maple sugar again, or sorry, sugar maple. And some of my Holbein royal blue and mix. A nice deep green. Now quite dry on the brush. My it almost separates. You see, we don't want to have it so wet that when we lay it onto the water, it just blooms ever but we do want it to bloom a little bit. Okay, so I'm putting in some trees and the distance here, and they're bent over because boy, it is stormy out there. And then I'm just going to use the edge of this nice fine chisel edge. And I can just pull those branches because they're in the store. And as it gets down to the bottom here is just kind of a challenge of green and blue. Because you can, the trees all merge together and you just see various shades, but you don't see the individual treetops. And this is in the distance. We're not worried about getting too much detail. We're gonna put a foreground tree and later that will have a bit more detail on it. This is kinda like eeny meeny and Miami. So I need to do something to switch that up a bit. I think I'll put a tree. Maybe it dark one. Just kind of hanging over between those guys. Here we go. Just to mix that up a bit. Maybe make you a bit taller. This is fun because it's wet into wet and it fuzzy and does its own thing. Really nice way to paint. Little more sugar maple, little more royal blue. And let's just complete this to the edge. So we've got some really nice distant trees. I'm going to add a little moisture to this because I just want it even a bit softer than it is. So clean brush with a bit of moisture on and just softening some of these edges. And I'm going to take my royal blue again. Just a little more detail in here, but again, not a lot of detail because it will put the more detail on the foreground. This is distant, it's raining, it's misty. We don't need to put a whole bunch of detailing because we wouldn't see it. But we do want the color changes. So try to keep lots of different color changes with your blue and yellow that you're using. I know we're only using two different colors, but you can get a lot of variation in value in there. And that's what makes your painting stand out. Amongst the rest are just gonna go right up there. Make this big tall guy here. And they're all being pulled by the wind. Here we go. I think I will stop right there and let that dry.
4. Stick Trick: So this is nice and dry now and we're ready to do a little bit of more foreground detail, not a huge amount of tight detail in this painting, because the main event is our raindrops on the windowsill and we don't want to distract from that too much. In order to make those foreground trees. The big decision is where to put them, how many? I think just a few. And what I've done to help myself along as I just cut a couple of pieces of cardboard here that I had from a package. You can use twigs. Twigs work really well, but I just happened to have these handy and then we can put them down and kind of move them around and decide where we want them. Say, I don't want that like that because it's completely parallel almost directly underneath that. So that tells me know, about something like this. They're a little too parallel. Let's see how about you little guy over here? I quite like that. So then I can just take my pencil and mark where I want to put those trees. It's hard to see, but it's enough to have a little bit of a guideline. Maybe, maybe over a tiny bit, gives us a rough idea where we're going.
5. Foreground: Now you can use your big one inch flat if you like, because as again, I said, as I said before, it has a nice chiseled edge on it. Or you can move to a smaller round, whatever suits you, however comfortable you feel. Another little item I have little tool is a little cut up credit card. I'm going to be using the rounded edge of that for a bit of scraping. So I will just put it there so I have it handy and color. I'm gonna take some of my sugar maple again and a bit of the Holbein royal blue. There we go. And let's start here on the right. And I'm just going to touch, touch, touch. Use that corner tip. Just creates little branches. And once I save you find the big fat brush just to awkward by all means, go to a smaller brush, maple sugar. And I'm gonna use my brush perpendicular to the page because it allows me to get nice fine lines. Doesn't allow for the best viewing. So we'll maybe turn it a bit sideways just so you can sort of see what's going on. They're going to be longer than we thought. That's okay. We'll go right into a raindrop. Perfect. Then I can use my little scratch her. If I decide I want to add a little bit of trunk might be a bit too damp yet so but to damp yet to do that. So I'll worry about that later. And I'm gonna put another bigger tree and go back to my one inch flat. Let's get you hear big, big tree. And again, keeping the colors changing. So picking up a bit of pure yellow without cleaning my brush and know that's hard for some people. But you kind of gotta be a dirty painter sometimes. And then going right into the blue without cleaning my brush, you see how beautifully the colors, the yellow and the blue blend. That is the essence of watercolors. My friends. We need shrunk down here. I think. We can go to a smaller brush. Had a few more details. Put inherent X1. Let me be bowed to him entirely. Smaller brush. Put a more moisture moisture kitten to drive here. I think this will be dry enough now that I can scrape a little trunk in there. Just here and there. Is it a bit of a lift? This one's pretty small. Maybe it doesn't need any trunk scraped him. I think. I'm pretty happy with the way those are, but maybe it's not quite enough. I want a bit of a darker look to this. So you know what, I'm going to throw in a couple more trees down to the bottom here. Just going to use my brush sideways, not the way the bristles go sideways and just fill in little more. Damning here, feel like it's a bit empty. Here we go. And we can take our little round and a few more details. You can accomplish so much so quickly with a big fat brush. It's scary. But I think it's worth experimenting with because it just the freedom and it is amazing. So I really encourage you to play around with a big brush, things like this. Instead of spinning hours doing all those silly little details. You can add the silly details with your little brush afterwards. But use your big brush to get on the bulk of the color. I like that better, little more. Close down. No, I think I wanted even a bit higher. It's a stormy day out there. We go. We've got a few little bits here. We got to do something with we have a little maple sugar, get a bit of yellow in there. You know, sometimes I'm from British Columbia, Canada on the west coast. I get these storms happening. But within the storm there's sunshine. So you see a lot of yellow still in the trees. So that's what I'm trying to portray here. I keep going back to Rebecca's lovely sugar maple yellow and adding a bit more. Here we go. I think I will stop in peak at that and decide if I'm happy with it. Maybe a few more trucks script in there. Can use a point here and it's just a credit card that I cut up. Great for adding details. You have to wait till it's almost dry though. Otherwise, it won't separate the pigment, it will just run back in. You get a dark line instead of a lifeline. Which is okay too. It's a technique. Right now I wanted to lift pain back. We go.
6. Render Raindrops: And now it is time to remove our masking fluid. So you can use an eraser or one of these little tools. It's called a masking fluid remover. It's just kinda like like those old crepe sold shoes we used to wear anyway. And you can just very lightly rub. This is easier than using an eraser because the masking fluid sticks to this. So it's a little bit easier to use, but in a racers just fine. Please. Don't use your fingers. Ok. You can check to see that you missed anything with a clean fingers. Just run it along and you're feeling any lumps of mask that might have been left behind. Can pick them up. Stuff section here. There we go. And we have a distant Misty, stormy day and polka dots. But we're going to turn those polka dots into raindrops. So stay tuned. So now we're going to render our raindrops. But there's a couple of things that you need to know. You know, from grade six signs or whatever, how they taught us that our brains actually processes image in reverse. They hit the retina and then they revert or brain reverses them around so that we can see things right way up. Well, it sort the same with raindrops. Their reflection in your raindrop is going to be reversed. So for instance, our trees, dark trees are at the bottom. And the lighter Sky, which is a stormy sky, but no matter how stormy is guys is always got some light in it. So the light of the sky is up at the top. So when we paint her raindrops, we wanna put the reflection of the dark trees up at the top and the lighter sky at the bottom. And as we move up in the picture and get more into the sky, you're going to have less tree image and in the top and more just light Sky image. So for instance, I'm just gonna take my tree color. I've done a couple here, but I want to continue on. And I'm just going to start there and go. Dark tree image in the bottom. Sorry. The trees are in the bottom. So the dark tree images in the top of our raindrop. And just make sort of what looks like the tops of trees there. Let's do this. Big guy might clarify things a little bit or so. Here's our tree image. And it's actually going to be upside down in a raindrop. And we'll just carry on and do them all like that. Don't forget to do the odd color change. Grab a little bit of your nice yellow. Stick it in there too, because it is in the trees. So we want to be a fairly accurate representation of the colors. Here we go. Don't need a lot of moisture on your brush for this. It's very easy for it to get over wet and make a mess. I recommended a brush that points really well and then not a huge amount of water on your brush. Okay, and away we go and we're just going to work through the whole thing. And as I say, as we get towards the talk, we'll do one up here. There will be more of the light and less of the tree. And just work our way around and do all of them. Some places where there are dark against Dart, but if left a little slip of light, it may not actually be there in real life, but I'm putting it in because I think it makes a better painting. So again, right there, dark on dark little tiny slip of light. Now as we come to the end of this year, probably wishing you put little less raindrops in your picture. Because it is a lot a painting, a lot of painting upside down trees and just think you'd be an expert at painting upside down trees. Once you finish this exercise. Ok. And here we do not stand back and have a peak.
7. Finish and Hinge and Thanks: So here's our finished project, measuring slightly larger than six by nine. And we have our six by nine Matt opening. So you see it just, you can just see there how it just leaves a little bit of overlap and that will fit on there. Just like that. Just a little information about mounting watercolors. You want to hinge them from the top because a 100% cotton watercolor paper will expand and contract with the humidity in the room. And if it's taped all the way around and then you can get wrinkles. So the idea is just a hinge it from the top. I can just show you that really quickly here. I'm gonna take this hinging tape or more plast. It's acid free hinging tastes and it appeals like so. Just take a little piece of that off. And then I'm going to pull it in half. And we just take one chunk and leave it there. Don't want to handle our watercolor painting with their fingers if we can avoid it. So just keep this little contact as possible. And then here's our mat and we just layer mat on top like so. Then what I like to do is take a piece of paper, towel or tissue and just go like that. Instead of using my fist directly on the map because it might get a bit of greasy. Here we go. And then we can just pick it up, turn it over, and burnish it a little bit. There we go. And then you can put a backing on it. Acid free preferably. And there we go. We are ready to pop it into a frame. I want to thank you for taking this class with me. I hope you enjoyed it and learned a few things. And I would just love to see any of your projects uploaded. Have a great day. Okay.
 Melinda Wilde, master teacher of watercolours