Transcripts
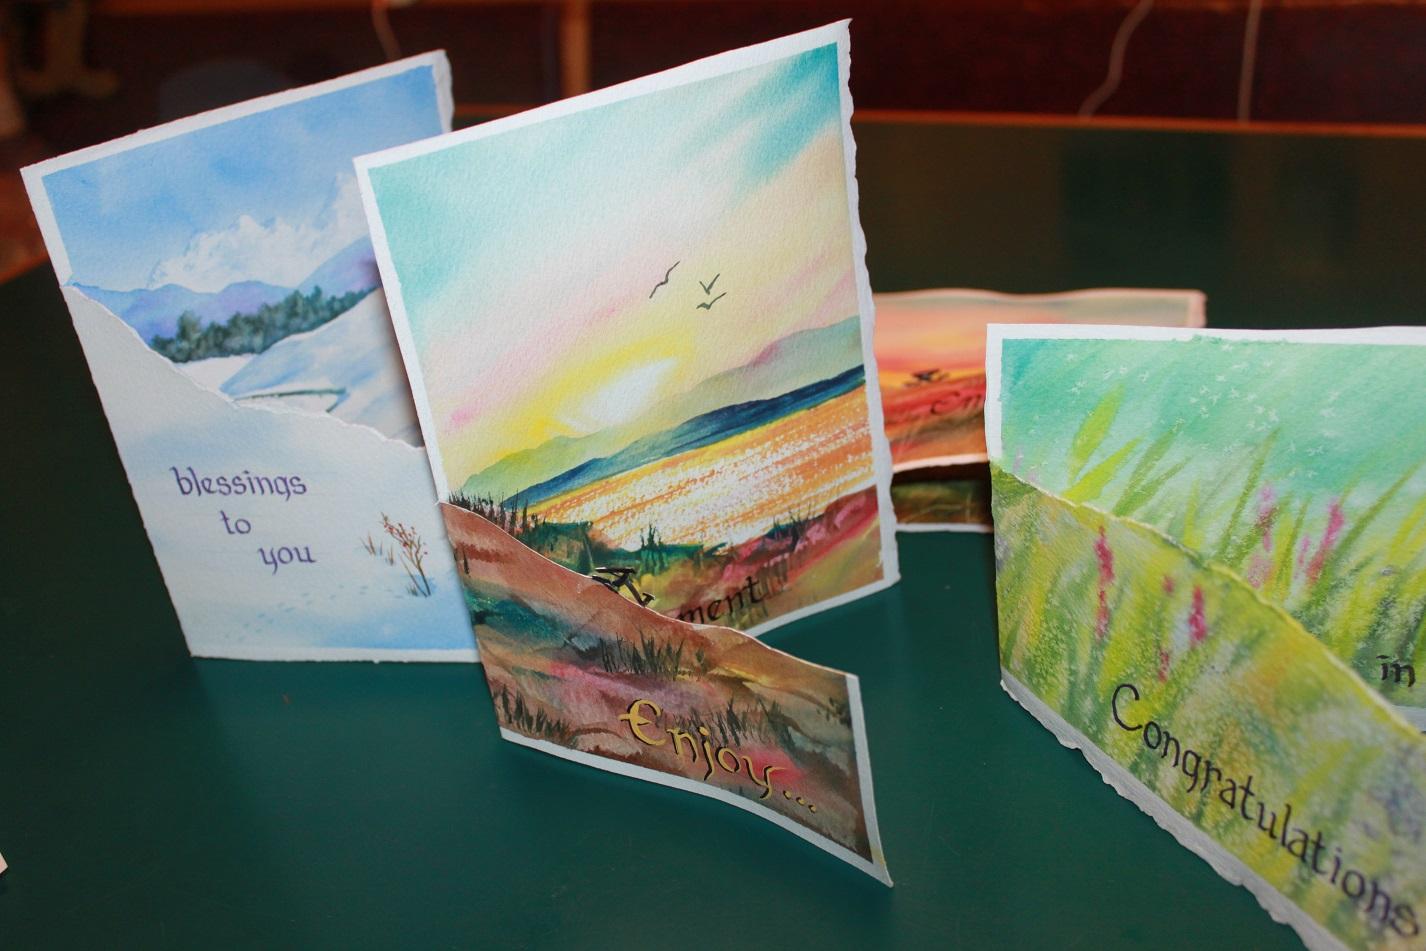
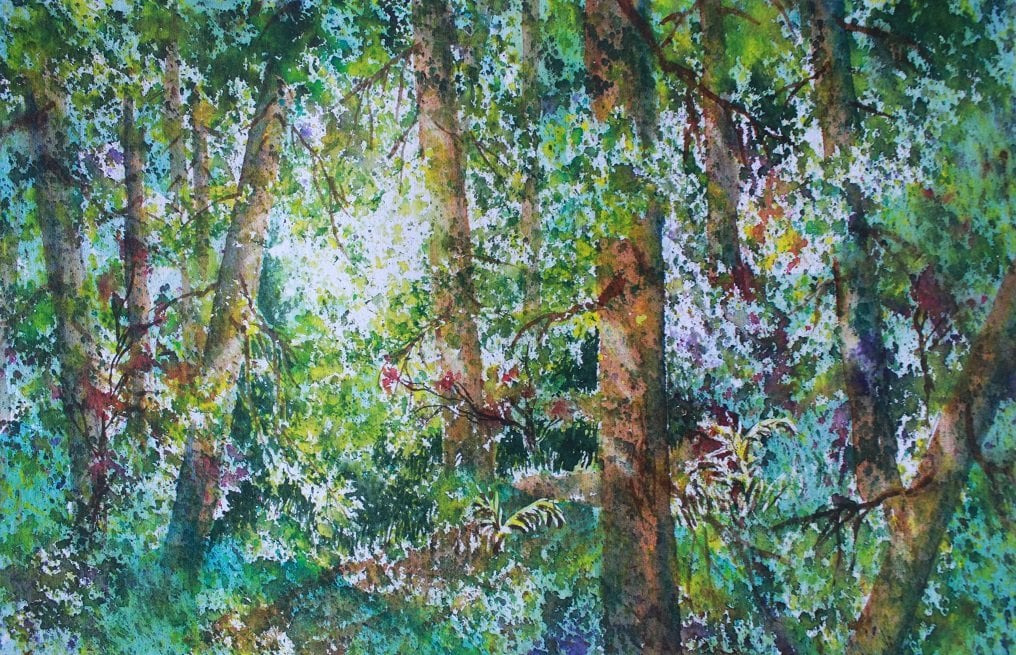
1. Introduction: Hi, I'm Melinda. While welcome to another session of experience, watercolors in this class will create two beautiful art cards that are truly gifts in themselves. So start thinking about that special someone who's gonna be the recipient of your creativity. This class is chuck full of great techniques not just for making beautiful cards, but for making beautiful paintings in her first project with a gorgeous winter scene. Wonderful for a Christmas card using a lot of techniques that air in my winter Wonderland class. So if you feel like you maybe want to take that class first before you move into making a card, that's a great idea. It's experience Watercolors, Winter Wonderland. Also included In the class We're gonna make a summer card. Many many of these techniques are also in my other skills. Should classes. I will also post a supply list some information about light and shadow, a template for a picnic table. Let's in our little card here on a case you don't want to just write on your car regularly with a pen. I'm gonna post the basic calligraphy information that you can upload this. This is all in the project section. We have so much ground to cover, so I hope you'll join me and let's get started
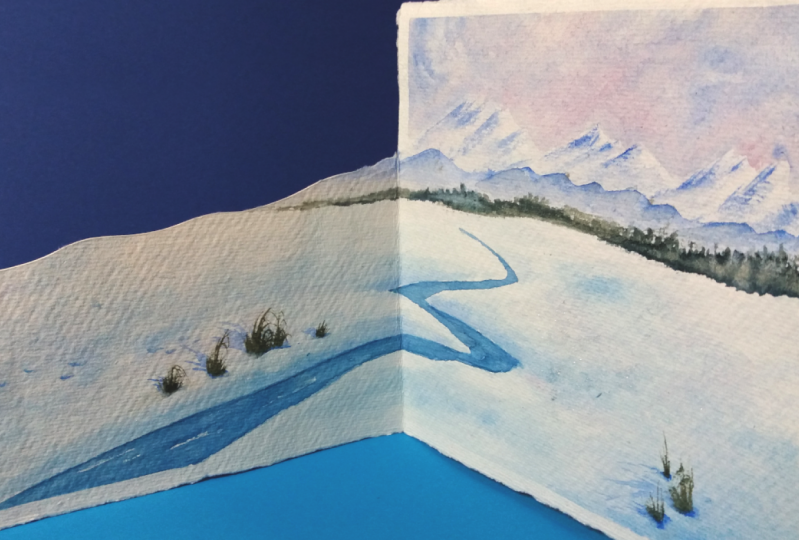
2. Preparing Your Card for Paint: So here I have 1/4 sheet of arches £140 cold press. I've taken it off of a full sheet, which I folded lightly in half and then cut it with an Exacto knife and then cut the half in half and I come up with 1/4 which is approximately 11 by 15. All right, we're going to take this quarter sheet and we're gonna fold it in half again. So let's just do that right along here. I know this is a machine edge, so I want to fold it, using that as a guide so that I make sure I get a square fooled just tat tapping this edge here because I don't want to be rubbing it with my hands and getting oils on my watercolor paper. OK, then we're going to slide, are cutting board underneath. Open this up. Now, you could do one of two things. Take your exactly night and just run it down the score that you've made if you're comfortable with that, if not, take a straight edge of some sort a square or here I've just got a little piece of plexiglass I'm going to use just remove down there, making sure we have to. Nice pieces, which will make us two cards can lay that one aside. Then let's fold this one more time. Keeping in mind this nice edge here. That's from the factory. And just gonna fooled not quite up to that edge this time. I'm gonna score it quite deeply. That is actually going to be the shape of our card. Now, if there any edges here that are a little bit uneven, that bothers you, by all means, take your straight it and straighten him out. Personally, I don't mind Was little bits of imperfection in the folding because I think it shows it was made by a human being, not a machine. So that's a little bit while we there, but I'm OK with All right. Um, actually, this is a little while we're than I want, so I am gonna just take the edge off this. Here we go. Okay. So just a sort things out. I'm going to refer to this and this, Aziz the outside, front and back, just to give you an idea. Okay, Here's the card we had made up previously. This is the outside of the front outside, back. And so this is outside front, outside, back on. Then we open it up and we have inside front and back. So opening this up inside, front and back, just for reference for when we're wandering along through this process. All right, the first thing we need to do is hold, which we've done. Then we need to get a pair of scissors, and we're just going to make this first little cut line here. Okay? Right down through the middle. You can cut this far or as short as you like. I mean, you don't want to leave two little down here, but I would say halfway or higher is just fine. So let's do that again. Slipping my cutting board underneath, grabbing likes. And I think I'm gonna go, you know, maybe a couple inches in and slicing right there, making sure we get a nice, clean break. Perfect. All right, Now, our next thing is to create this horizon line. So they're ripping. It's fairly simple. One thing I discovered is if I put a finger or thumb as I'm ripping, it just gives you a slightly need her look. So here we go. Let's rip a nice hillside on here. You could cut this with an Exacto knife as well. But again, I kind of like the idea of hand ripped. Think it looks nice. Well, keep these little pieces for color testing for just who knows what we need it for. But it's expensive paper, and I don't like to throw it out, so just keep these little bits. You never know what they'll come in handy for, okay? I just want to mention to we're gonna have this lovely tourney edge go this lovely torn edge on the inside back of our car. Turn this over doing taping. And I think if you could make your taping is need as possible, You will be the happiest you could be when you pull it off because it's going to leave a little edge along your card. This edge right along here, It's nice if it looks quite even. See, this is not even so I'm just gonna pull it up. And here we go for taping. Here. We are ready to go to paint you
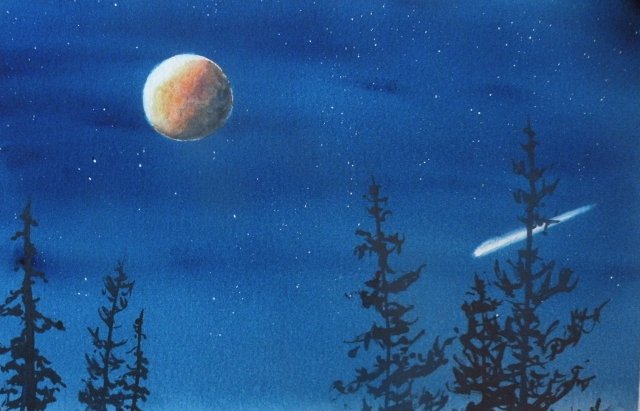
3. Painting the Front and Back of Your Winter Card: So here we are ready to go to paint. I've decided to stick with a very limited palette again. So I'm going to go with Ultra Marine and a little bit of Carmine. Now, the first thing we need to do is paint the sky, which is gonna follow this horizon line whatever shape you decide to make it into, you can draw with pencil if that makes you feel more comfortable or you could just get brave and just wet the whole sky area right down to the horizon line. This picture is going to be a snow scene. Makes a wonderful Christmas card. Here we go. What? That down? I'm gonna take a little bit of my Carmine just a tiny bit. Here we go. Just slap a little on there and cleaning up my brush, Picking up a little ultra Marine. You just put that on there. A swell right down to the horizon. We want these two to connect. Here we go. A little sharper line. I think there were, and we'll take that to the dryer. Now we've dried that with a blow dryer. Watching paint dry is not my idea of fun. So definitely get out the blow dryer. Now we're gonna paint the foreground. This, by the way, is the card front and back. I'm just going to show you if this one this is what we're painting the front of the car on the back of the card. Okay, So I'm gonna wet this all this foreground area Nice and completely wet. Try not to leave any dry patches because then you can end up with hard edges and on this particular step would want it will all nice soft edges. So starting off with our carmine again because I have some of the sky. And if we put some down here in the foreground, it'll just give it some nice color harmony. And then I'm going to grab my ultra marine and just cozy in these corners a little. What we're painting is the undulations in the snow. Because even though snow was wait, it it rules a little bit. And we want to paint the little shadow areas with him within the snow that we roll around a little bit. Yeah, I think that should be good. And you just painted right across is if this dividing line isn't even there. All right, let's go dry that now we are gonna put some details in this foreground section here, but I think, first of all, just sure finished part. I think. First of all, we'll get our background painted on the inside of the card, so we need to re tape, so way go. So now we're painting the inside front and back of our card. I'm gonna have my horizon line kind of meander along like so. So you might want to draw your line in a swell, and then we're going to paint sky again right down to the horizon line. So just like we did on the back, we're just gonna moisten the whole thing nice and evenly once again picking up our karma, Lee putting a few strokes, cleaning our brush, picking up our ultra Marine a few strokes and again right down to the horizon line. Now we're going to put in some snow capped peaks. This is a really fun thing to do. Let's get a little more color on there. So I'm gonna take a piece of paper towel, and I'm going to fold it into, like, a mountain peak shape. And while this is damp. I'm just going to tap on there and we're gonna lift out some of the pigment basically in the shape of mountain peaks. Now have to keep re folding my paper tell to make sure you get a clean spot. Because if it gets dirty and you keep tapping, you'll just end up pushing the pigment into the paper and you will not get it out. And you can make your mountains this long or short as you want, wherever you want them. Um, here we go, keeping them different distances apart. Slightly different heights makes it more interesting. See dirty. So turning it over and using the clean side. And this is not the finished product of mountain. But this is just to remove the snow on the mountains. All right, now we need to go to the dryer again. So I was a little disenchanted to notice that the segment I just filmed was a little on the fuzzy side. So I'm gonna repeat it for you here. So away we go. I've got very thin pigment on my brush and very dry, so much so that the brush will separate and then I'm going to think of light direction coming from the right. So the shading is on the left hand side of my mountain peaks and I'm gonna use the brush flat, not upright, and just slightly do what we call stumbling, which is your brushes basically hitting and missing here and there on the page. So you're not making a solid shape. You're just making it dance across the page and hit here and missed there. But mostly you wanted to hit on the shadow side of your pick of your peaks Just kind of meander along there like so here, here we go. Makes those mountain peaks pop. Next thing we're going to do is put another layer of hills in there, so I'm gonna mix up a little bit of ultra Marine little puddle of it, and then I'm gonna clean off my brush, and then I'm just gonna put a little sweep of Clearwater right along the horizon line here picking up my pigment that I've created and I'm gonna run my brush across here so the top of my brushes onto dry on the bottom is onto wet. So I get a hard edge on the top and a soft edge on the bottom, and I'm just gonna feel it in right down to the horizon line. Okay? There's something else I want to show you while this is down. That's kind of fun to do. Never take it greeny blue, A little bit of a sienna with it to make a green And then I'm gonna take a little bit of ultra Marine in there with it, just so that has color harmony with everything else we're doing. And then right along the horizon line, I'm just gonna paint that color in, and then I'm gonna just pull it up a tiny bit Or maybe just touch it with my brush to suggest treetops along here. They just adjust that okay, And it fuzz is a little bit, which gives us the idea that it's in the distance, just great. And then, while that's damp, here's a fun thing to do. Take a little clear water and just drop it in. And what it does is it separates the pigment, which gives you the idea that maybe these trees back here are a little bit frosty. So painting on Clearwater, you see how that separating the pigment And even if you don't paint the shape of trees, you can just blob on there a little bit of Clearwater, and it will separate the pigment and give the idea that these trees air frosty or at least covered in snow. Maybe they're a big dark forest in the distance, but there's some snow on those trees. Now, if it just isn't picking up enough for separating enough for you, you can take a little bit of tissue just very lightly dob where you laid the Clearwater and that will pull back the pigment and then you get even more snow on those trees in the distance. Okay, there we go. Ready for the next step. Might be fun to make a little river flowing through the front of our painting here. So I think I'll put that in first and I'm gonna use the color used for these background trees. So it was a combination of the ultra Marine mixed with a tiny bit of a turquoise and burnt sienna. Here we go. So let's take a little bit of that now. You can draw if you like. If it makes you feel more comfortable. By all means, draw in river. And the beauty of doing this is if you don't like it, you can erase it and then carry on. That's gonna put little tiny thin bit of it there. It's a little thicker as it comes towards us. Here we go. I feel that right in. All right, we need to dry that before we can create the undulations on this part. Let's divide it into let the river split it so that we're not trying to do it all at once. Let's just wet 1/2 to begin it. Can you go go with this Chuck right here, Pick up a little bit of my ultra Marine and again like we did on the back. Just cozy in the corner a little bit. Andi, Maybe create little bit of an edge on this river. May be weird, dips down into the river. There's gonna be a little bit of deeper color in the snow. And I think that that will do. Okay, let's try the other side. I think I'll just pick that up a bit to stray pee in here. So it's just smooth that a little bit. Okay, moisten this side now, picking up our ultra Marine sticking with the ultra Marine because it's the color in the sky, the majority of the mountains or an ultra marine gives our color painting much better color harmony again. Let's go a little darker down here near the edge of the river. I didn't get that very wet. I'm just gonna soften that clean, thirsty brush You and a few little undulations up in here and perhaps will put some back here by painting this darker than this. It creates a description of this little hill. See, it's called negative painting. When you're painting around your subjects, I'm actually creating this hill by painting the background around it. There we go. All right, let's dry it.
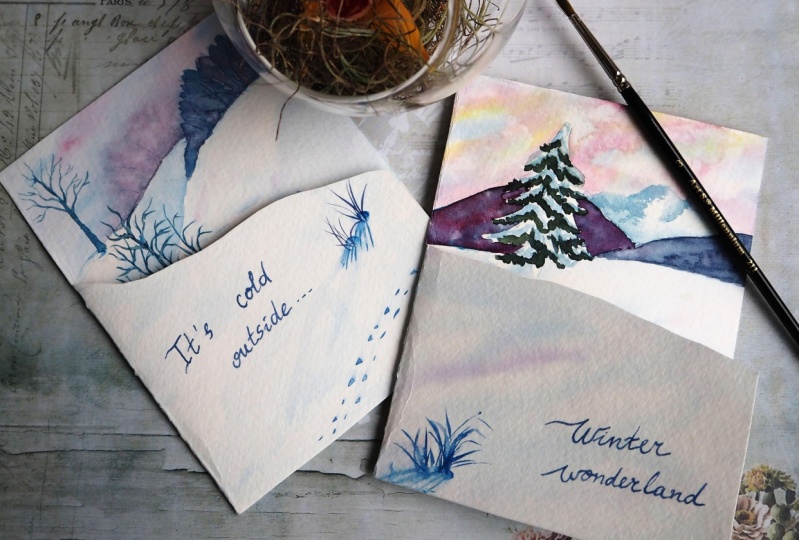
4. Details on the Winter Card: Now we're ready to do some of those details I was talking about in the foreground of our picture. Okay, I want to show you a little bit about lost and found edges, So I'm gonna do it on that little chunk that we ripped out of here. Hey, so there we go. It is common handy. So let's think about light direction in this picture or light is coming from the right. And if this is the surface of your snow, sometimes there are these little sink holes in the snow. Like so. Okay, so if this is the case, the lights coming this way, this side is going to be in light. This side is going to be in shadow. All right? Now, in order to create that with paint, first thing we'll do is take a little bit of our ultra marine again. And let's paint the shadow side of a sinkhole and cleaning my brush and making it thirsty. I'm gonna start on the clean here, and I'm gonna work into the dirtier into the paint like this so that we soften off this, okay? And sometimes you have to clean your brush and make it thirsty again. Just so you can kind of scrub out that pigment there. Let's try one more. Maybe slightly different shape. Putting the shadow side in claiming my brush. Making it thirsty on my rag would be I'll come in from this side now. Too much shadow there. Let's work this way so you can see it better And I'm gonna stop it off It's there now when that's dry I'll show you what we can do with it. We can take a little bit of our burnt Sienna. We can create some grasses poking out of those holds. So starting at the bottom, poking his way out You see how that suddenly looks like a hole in the snow Once you put the grasses in, sometimes it's hard to see what's going on until you actually get the grasses in the hole. All right, let's do some of them on our picture. I'm gonna try and zoom in a little for you here. Here we go. Okay. Taking a little bit of our ultra marine, I want to remember that we may want to put a greeting along here with some calligraphy, so I'm gonna keep it just down in the corner here. Some of these sinkholes we go, let's create one. Ideally, do them one at a time. Because then you don't have to be trying to soften edges. That might be drying on You. Okay, let's do another one here. Maybe a little tiny guy can just soften that edge. And I like the idea of threes. So I'm gonna put another one in there slightly larger, cleaning my brush, making it thirsty and softening this itch. All right, let's stick some. Perhaps over on this side, it will make a whole big cornice. So you go to get the right amount of paint. Not too much when you're doing this technique. Here we go. Let's make a whole big area here cleaning my brush, making it thirsty in your hand, working from outside of the paint, scrubbing into it. Here we go. All right, let's dry those. And then we can put on some grasses. So when you make grasses, you want to keep your brush as perpendicular to the page. So when you make grasses, you want to keep your brush perpendicular to the pages possible. So straight up and down, starting at the base of your whole. Here we go. And maybe just a couple little guys coming out of there. Watch that. Your grasses are different heights, different distances apart. And be sure to have some of them overlap. A little just looks more believable. Okay, And let's do a few over here, guys. Maybe there's a whole lot of grasses sticking out here because maybe it's a bit damp, not so frozen. Here we go, all right. And another little detail. Anything we can add or some shadows on those grasses. So the lights coming this way So these guys are gonna scramble lips. It's scramble across here, just like so. Don't worry about being absolutely perfect. Shadows are and every which way. If you look at them in nature and the light is always moving, so they're always changing. So not to worry about getting I'm absolutely perfect. These guys might meander a little bit, though, because they're in a a bit of a divot here. So maybe shadow from this guy could come up and across open across. Here we go. You. Now we need to put some of those details on the front of her piece. So let's put it up. Terminus. Over who? Look at that. Very nice. So let's put a couple of those details on the front as well. Little altering again. Leaving room for greeting here. Unless you know for sure you're not gonna put a greeting on this, then that's fine. You can put your lost and found edges wherever you like. Okay, I'm being sneaky here and doing all three at once. Here we go. Let's dry those and a few grasses in those little holes on the front here, starting at the base of her whole and pulling up the way they grow best to always make them the way they grow bottom to top. If you decide you want a little extra something, maybe you want a little bush or something in there. Or if one of your grasses gets a little too thick, you can turn it into a little shrubby, bushy thing. Here we go. And maybe that little bush have some red Berries on it just to give it a little pop on the front of your picture. Make that person you're giving it to smile and now some shadows. So back to the ultra Marine on the show a little heavier? No. That heavy, huh? Some days you just have to practice a little. Well, let the shadows under late A little bit. Could make a really long just for fun. Trying to keep my hand out of the way here so you can see what's going on. It's no making my show was any better, that's for sure. Okay, there we are. What a beautiful gift for somebody. Andi could put some on the pack if you want. Not necessary. But you can have a beautiful card. It's like a wraparound scene. I was just thinking another fun little thing to do might be to put a few funny tricks just for fun in our picture. Maybe he goes down across to the river. Let's see, We could make another little bunny coming in from this side. And then just for fun, we could have. It'll go right off the page and on to the other side of her picture. And then this could meander right along here. Yeah, maybe we're gonna go. Let's make the match. Maybe you're gonna go right along here. Here we go. Okay. Bunny. Out of the picture. It's for fun. Why not
5. Prepare Your Second Card: here we are ready to do our second project. So it's another beautiful art card designed for someone very special. And if you see here, you'll notice we've cut down a little bit further than we did on our snow scene. And this is a smooth line, not a ripped line. So I've done that with an Exacto knife around our little picnic table and up the other side . Okay, let's get started. First thing is to slider cutting board underneath. Let's grab the Exacto knife. Let us will make this fairly after it. I'm going to cut to about here. I'm just gonna put a little little mark taps on the inside. Then let's draw the topography so we know exactly where we're going and draw our little picnic table. Now I'm going to have a print out of this little picnic table in the project section. So if you're worried about drawing it for yourself, not worry, cause you can transfer it off of the print out, then you won't have to worry about doing any drawing. - And here we are ready to paint the front and the back of our art card. We just need to do are taking first, you'll notice there's one little edge here that's not quite connected. I'm not worried about that. The watercolor papers very stiff, and I think it will be just fine there. Okay, let's go to taping.
6. Summer Card Front And Back: So once again, I think we'll use a limited palate going to use a bit of gambo. She yellow and some carmine. Maybe a bit of burnt sienna. A little bit of turquoise on the sky, maybe. And the first thing to do is to paint our sky area. This is the back of our greeting card. So we can draw in the topography if you like, or just paint wet down to the horizon line. There we go. And once again, keeping it evenly moist. No dry patches. All right, let's grab some yellow and lay it in there to make it really nice break. Sun City sky. Don't be afraid of the color, for sure. Just slap it on. I'm gonna grab a tiny bit of car minus Well, a little bit of that in there. So it was nice to have a little read and they mix on your page so you get a little bit of orange in your sunset. Then I'm going to take a little bit of my greeny blue turquoise. Just bring it in from the top, cleaning my brush, making at thirsty and just softening off the transition between the blues and the yellows. I feel like I want that to be a little bit bolder. Here we go. I like that better. All right. We've got our sky for the back of our card now wiping our edges before we proceed, and then we'll do our foreground. Now, this is a little bit different in that I'm not going to wet it. Just going to jump right in with the color, starting with the yellow that I used in the background. Just slap it on, grab a little bit of the carmine again, just slapping it on their people. But I'm gonna take a bit of sienna. Put some of that I'm here and perhaps a little bit of her ultra Marine, which is the perfectly blue. Getting the colors mix on the page and covering up any weight spots. Here we go. On. The paint is quite sick on our brush. Back into the yellow. A little more water notice. I'm being kind of messy. I'm not really cleaning my brush between colors. Here we go. Let's quit thick on there. All the weights covered, and then I'm going to take a scraper and I'm going to scratch in these air. Just little cheap things you can buy at the dollar store or an art store. You can use a regular palette knife if you want, or these plastic scrapers or cut up credit card. There's many possibilities. You just need a nice straight edge so you can create some rocks and things going on in your picture. And the trick is to get a good width of it on the page. Don't do this kind of thing. So you get stripes. You want to get a good chunk of it on the page. You can scratch and make great big slabs of rock. Then I'm going to take my brush again, pick up some of that turquoise, the color in a little bit of my sienna. And again, I'm not cleaning my brush. I'm doing something very nasty to it, doing this so that it separates like that, and then I can get in here. It's very dry, and I can create some grasses, especially in the areas where we've made little chunks of rock. You can suggest some grasses in those areas where the rocks might have little separations in them, and my paint at this point is so dry that even though I'm painting onto a wet surface, it's still staying where I put it. It's not fuzzing. You see. These grasses are quite sharp. Little ones in the background, a little bit bigger ones in the fourth. There we go. And if we want to add a couple of trees in the background, by all means, let's just take that same color and using the flat edge of my brush, just going to make the trunk and then using the very tip just blubbing side to side. Now a lot of these techniques are in another video of mine landscape success for sure. And you could certainly practice in that video if you wanted. Before you come and do your card for someone special. Should we do another tree? Why not? Maybe two more. A little guy in there a little taller. There we go and just blowing side to side with the tip of that brush. Here we go. A couple little trees in the distance. Now we're ready to unt ape and work on the inside of our card. I almost forgot. We better paint her picnic table. I'm just gonna make it black because it's silhouette. Picture of the sun is behind it. So the way to make a nice rich block is at Sienna and a little bit off ultra Marine. I think it is a lovely Blackie Gray, and I'm just gonna paint that right over top of this. There we go. Okay, let that dry. So here we are, taped and ready to do the inside of our card. So the first thing to do is again to extend the lay of land, but it may be down there. Oh, I didn't want to drop off a little bit quicker, all right? And then I'll take some clear water and we're gonna pink in the sky area first. So write down All that's not very clean dio right down to where my water levels going to be in thinking about there. And then let's start the way we did in the back with a lot of yellow. And I'm going to leave a bright weight spot because I wanted to be a brilliant son, and then I'm gonna pick up some Carmine Whoops. That's a lot of Carmine. Let's just take that to a level. Then again, I'm gonna take a little bit of that turquoise to be clean on my brush. So I'm just cleaning it a little bit here, starting on bringing it in from the top, letting them slowly mixed together without hopefully making mud. No, a little too stripey. Clean, thirsty. Brush can pick that up. All right, we will wipe our edges and then take that to the blow dryer. So let's put a little bit of ocean in the background here. Gonna take my yellow again on my brush. And this time I'm going to scum bullet, which means my brushes quite dry. And I'm gonna use it flat instead of pointy. And I'm just going to start from one side and move in each other side and movie. And I'm not worried about over laughing on my land mass because this is going to be painted quite dark. So what I want to do for sure is leave those little white, sparkly bits should you be taking up a little bit and then I'm gonna add some carmine not cleaning my brush. Every time you stick your brush in the water, you end up diluting your pigment. So I like Teoh sometimes just jump from color to color without cleaning my brush. No, Not everyone likes to paint that way, but there you go. Okay, Now we've got a nice sky that reflects their ocean that reflects the color in our sky. Let's do some landmasses back here. Gonna take a thin wash of the turquoise, a little bit of the carmine. Just make a very thin bluey color and then clean up my brush, run a tiny strip of Clearwater across the base, pick up that Bluey color and mixed and work from one side into the other. Once I into the light, actually, and then the other side into the light. Here we go. And I'm cleaning out my brush, making it thirsty and pulling it through that light air. So this way I get the idea of the sun just obliterated in the shape of those hills because it's so brilliant as it comes over the edge. And I have to drive that now before we move on. You know something I just love about water colors is how the colors beneath will shine through. And you see these beautiful sky colors shining through our mountains here. And I should also mention this particular mountain technique can also be found in my experience. Watercolors, Sunrise, Sunset Glow Workshop. All right. It's also on skill ship. Let's make a landmass. It's a little bit closer. So I'm taking that turquoise color again. Can add a little more car. Mind to it, because I wanted a little bit darker. Little more intense because we're coming closer and I'm just gonna put in there we go drawing the bottom line first so that I get my horizon nice and level. And again. Let's just put some on this side and then clean our brush. Make it thirsty on our rag. Just pull it through that sunlit area. No, this gives us the idea again that the sun is just are so bright there. It's almost obliterating the shape of that hill as it comes over. Now, this looks a little cracked my horizon. So I'm gonna pull this down a little bit more. Here we go. Straighten that out. Here we go. All right. Time for some foreground. So my camera glitch doubt on me a little bit as it was painting the foreground section for you. So what I've done is I've created another background as far as we got so similar and maybe not exactly the same, but quite close. And don't start that foreground segment again for you. So onto dry paper, starting with her yellow. Just slap it on. Don't be afraid of the color. Keep it quite juicy because the juice here it is, the more time you'll have to play. I have to move fairly quickly. I don't have a lot of time to play cause I get the wood stove on in here and it is hot and things air drawing very quickly. Que have jumped into my car mind now, and I'm gonna grab some CNN. Fill in the rest of the whites. Quite sick pigment. More pigment than water. Shall we say you want a fairly thick Nothing in the grab. A bit of that turquoise is well, that went into this guy. The trick here is not to stroke from too much so that they end up muddy. I just want to let the colors mix by themselves on the page, and then we're gonna help them a little. Help them along up. So I'm just gonna make this a little bit sharper. we're gonna help them along a little bit with our with our scraper. Okay? There's a scraper. Same thing we did on the back. Start creating some rocks. Then you can also use scraper to create some grass is just pulling up on. Then we can use that same technique with the turquoise and the Sienna Really gnarly up. The brush was very, very dry. And we can just also make some dark grasses here and there can see where I place it where it's very wet. It fuzz is a lot more than over here where it's getting to be a bit drier and that's okay. Combination of both is probably a good thing. I feel like do a little more scraping there. I have a brush that is a lovely, chiseled edge. So if you happen to grab one of those when you're shopping, that's kind of a nice thing to have. You don't have to worry about a scraper. I really like you gonna just you a little bit and there we are. All we need to do now is painter a little picnic table. So again, old for marine. So the blue that we were not using in the sky and the Sienna. Let's just pain that table. There we are, time to dry and then go to details. So we removed the tape on our card. And there we have a beautiful scene for somebody special. And if we're going to add any details, might be just some Segal's. I'm going to just mix up a little bit of the dark muck that's in my palette on a fine or brush, and you see, there's a little spot there in this guy that's a great spot for a Siegel. And again, perpendicular brush gives you the finest line. And if you just think of little shallow EMS, maybe little Shelvey's and let's put three, because it's always better. I'm trying to get my brush out of the way so you can see what's going on here. It's always better have three rather than two, and maybe you could put some or maybe just one on the back, and we are there. We have another beautiful card for someone special. Next up, let's talk about the greetings for your cards, some very, very simple calligraphy to put on either of these two. Stay tuned
7. Simple Calligraphy and Thanks: So here we are ready to put some greetings on our cards. Enjoy every moment for blessings to you this Christmas and always. And here's the one you want to do today. Casey. There's nothing there. And when we're going to create a lovely greeting now, having said that, you can certainly just with your hand on a pan, just write whatever you like. Sometimes, he says, like this, there's not a lot of room or maybe feel. It's too dark to put a greeting, and it can just stand on its own. And that's absolutely fine also. But for today I want to show you just a little bit about how I would apply a greeting to this card. I am not a calligrapher. I'll just say that right up front. There's some wonderful calligraphy classes on skill share that I highly recommend you check out, but I'll just show you a few little tips and tricks that I use. First of all, um, we'll need a straight edge pencil. I'm using a very old fashioned tool. It's just a pen with ease. Insert herbal Nibs, and I'm using a C four minutes, which is just quite narrow across here. So it gives me fairly small lettering. I am using just a little cap to pour my ink into, And I've got a thing of water to throw my pan into in between on eraser to race lines. Once it's all dried and a scrap piece of paper beside me here just to make a few notes with aunt to check my brush Once I've dipped it for my pen Once I dipped it that it's not all blobby. Okay, Away we go. So the first thing we need to do is decide on the greeting we want to make. Might be something very simple. Hello? You know you love you. Whatever. Um, I'm gonna put Christmas is special, just like you. What I recommend is you write it out. It's so easy to misspell simple words when you're so concentrating on making your letters. If it's written out and right beside you, you can just check as you go along because sometimes it just you forget how to spell when you're trying to do calligraphy. Okay, so that's my first little tip. My second thing is I'm going to suggest we use our straight edge to create a bottom line. Let's see where did I want it? I think maybe I'll stick it up this high. So there's a softer line of pencil for the bottom of our letters. And then I'm putting another line just above because I don't want the top of my lower case letters to be any taller than that. And then we're ready to go to ink. So let's just take her Inc out of here, needs the cards. We don't accidentally dribble on it. I'm using kind of a violent color ink today just because I think it goes nicely with background of the card. Here we go. If I put it in the little cap here, it allows me to dip and see how far I'm dipping. If I'm trying to dip into this, I end up getting it way too deep, and then I get it all over my fingers. So that's the reason for the little cow. Okay, now I've got my Christmas is Oh, here's another thing I wanted to talk about. Christmas is quite a lot of out letters to put across there. If I make them too big and might run off the page, or maybe it won't be even. I just want to make sure I get it within this spacing. So here's a thought from work. The beginning mark. More or less The end counter letters off. 123456789 10 11 12 13 14 There's 15 here, including the space. So 15 half of 15. 123456 7.5. So what I know is thistles my half way mark. Okay, so I'm Mark. Wear my half way Mark is there. I mark where my halfway markets here very lightly. And then I begin with my pencil and I just write in the letters. Yes, clip. Little space is dr dot And then I put the letters backwards from there. There's my m t. Yes. Hi. Four beach and see this way I know for sure it's gonna fit into the space and not be way on . One side will weigh on the other side. Okay, wait, go think. Let's just keep that piece of paper handy. Did my in Cannes shaking it off a little. Just making sure it's not blob. And then away we go keeping your nib at the same angle it will automatically make for you the skinny lines and the thicker lines. There we go, Christmas ISS Now for the inside I've drawn my lines where I'm gonna put special just like you. I'm not gonna measure the mountain count because it's a large enough area with small enough writing that it doesn't matter if it's slightly one way or the other. Okay, dipping in way Go now these air dry, so it's time to erase or pencil lines. When you do your penciling, use an H B. Don't use anything that's 246 b because it's some very soft and it'll make a darker marks on your case. You want to just use a something that leaves a very soft mark on your stage, so could be easily erase later. And a nice soft pencil, not the one on the end of your story. And nice soft erase. You're not the one on the end of your pencil. You want to use a proper light colored artist eraser. Do make sure your ink is good and dry because it's not. Have it smudge on you. After all this work persons, especially just like you. I hope you enjoyed the skill share class. I hope Youll try some projects. And I told them I would love to see them ask any questions you like. I'm here for you and that Lots of advice for anything you may need to know. And I wish you a very, very merry Christmas.
 Melinda Wilde, master teacher of watercolours