Transcripts
1. Introduction: Hello, and welcome to P three in my Quilting
for beginners series. In this class, we're going
to be exploring triangles. We'll make a variety of
different triangle blocks. And I'll introduce you to some
techniques that will help ensure your triangles
are on point every time. Triangles have such
wonderful versatility and are used in so many different quilting blocks and designs. Mastering triangles will really help you level up
your quilting game. Hi. I'm Julie Rey. I'm a textile artist and quilt educator
based in Portland, Oregon in the United States. Bought my first sewing
machine in 2013, and I've been obsessed with sewing fabric
together ever since. I love exploring
line, shape, color, and technique in new ways to create modern quilt designs
that are truly unique. Maybe you're new to
sewing triangles and find them a little
bit intimidating. Or maybe you've tried
some triangle blocks, but they never seem to
line up quite right. Or perhaps you're working
towards designing your own quilt or writing
a quilt pattern and are researching some
different methods for creating triangle
blocks more efficiently. Whatever brings you here, I'll share with you some of my tips for getting perfect
triangles every time. So before beginning this class, you should have a little bit
of experience with quilting. Perhaps you've
created a quilt top or even completed
an entire quilt. You're brand new to quilting, I recommend beginning with
part one of this series, where I really help
lay the foundation of a quilt practice and walk you through piecing
together a quilt top. You'll find a link to
the previous classes in this course in the
resources section. In the resources section, you'll also find three
really useful documents. One is a mastering
triangles workbook that contains cutting charts and written instructions for each of the triangle blocks that will be constructing
in this course. There are also two
free quilt patterns available for you to
download and will offer you an opportunity
to practice making the blocks that I'll be
teaching about in this class. If you're ready to begin,
grab some fabric in your sewing machine and
join me in the next lesson. Or I'll talk about
our class project.
2. Class Project: For this class, you'll be working to construct
a quilt top that incorporates some of the
different triangle blocks that we'll be constructing
together in this course. You're welcome to
use one or both of the quilt patterns
that I've provided as a free download
with this course, or use another quilt
pattern of your choosing. If you're working in
designing your own quilt, please share that
design with us as well. Post a photograph of your
completed quilt or quilt block in the project section
of this course. In the next lesson, we'll go over some of
the materials that you'll want to gather before getting started.
I'll see you there.
3. Materials and Supplies: In this lesson, I'll go over
the different materials and supplies you'll want to gather before getting started. If you've created
a quilt before, you'll likely have
most of these on hand. First, you'll want to have
a working sewing machine. You don't need anything fancy. As long as your
sewing machine makes a basic straight stitch,
that's all you need. You'll need some
fabric to work with. I recommend quilting cotton, as this will be the
easiest to work with. If you're just
practicing the blocks, you can use two different
colors of scrap fabric. Fat quarters will work well. If you're following along
with the patterns provided in this course or with another quilt pattern
of your choosing, refer to the fabric
requirements table to ensure you have
what you need. For cutting supplies, you'll want a self
healing cutting mat, a rotary cutter, and two
sizes of acrylic rulers. I recommend a long
acrylic ruler, one that's about 6 " by 24 " for cutting with
the fabric strips, and also a square acrylic ruler. The size of the
square acrylic ruler will depend on the size of the
blocks you'd like to make. I have a 10.5 inch by 10.5 inch square ruler and a six inch
by six inch square ruler. If you're only purchasing one, choose the larger size as
you'll get more use out of it. Whatever acrylic
ruler you purchase, just make sure it has a 45
degree marking on it as this will become very useful when trimming and squaring
up our triangle blocks. For piecing your quilt
blocks together, you'll need a quarter
inch presser foot, some 50 weight cotton thread, straight pins, and
some marking tool. You could use a
water soluble pen or chalk that's designed
for marking on fabric. Or you could use something
like a hero marker or a non serrated butter knife
to create a crease mark. For pressing supplies,
you'll need an iron, preferably one that makes steam and some
surface for pressing, such as an ironing board
or a wool pressing mat. Lastly, go ahead and download the mastering triangles
workbook that I've provided, as well as any of the patterns
that you'd like to use. Go ahead and take a moment to gather all the materials
that you need. I'll meet you in
the next lesson, where I'll give you a
brief overview of all of the different triangle
blocks that we'll be constructing
together in this class.
4. Overview of Triangle Blocks: In the last lesson, we covered
all of the materials that you'll need to construct the different triangle
blocks in this course. In this lesson, I'll be
providing an overview of some of the different triangle blocks that we'll
be constructing. The half square triangle block, which is often
abbreviated as HST, is a square block consisting
of two right triangles, each of a different fabric, divided by a diagonal line. This is an extremely
versatile block because it can be rotated and arranged in so many ways to create a multitude
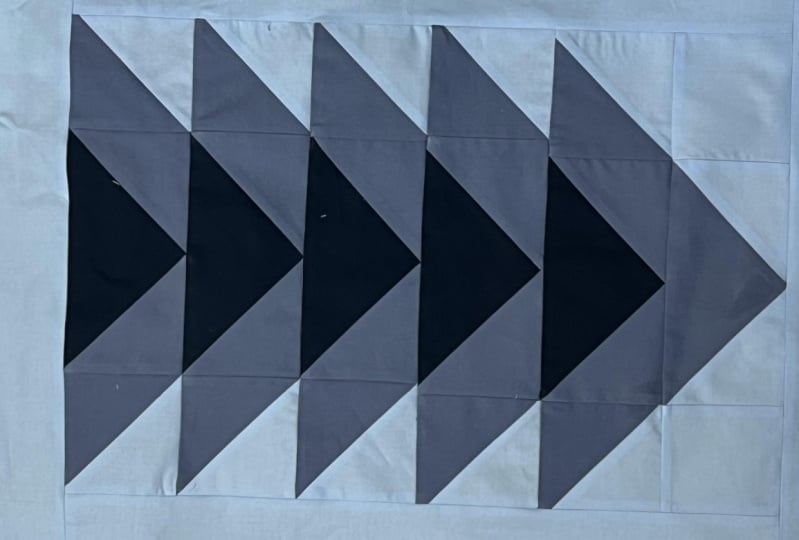
of designs. The flying geese block is
another very popular block. This block is a rectangle, that is always twice
as long as it is tall. You might notice that if you sew two half square
triangles together, it creates the same look as a flying geese with a
seam down the center. The flying geese block is a
much more efficient method for creating this design
because it eliminates the seam. Well, the square in the
square block doesn't sound like it would have
anything to do with triangles. It's actually a square block, rotated 90 degrees with a
triangle in each corner. This is commonly used as a center sub block
for many designs. Half rectangle triangles or HR Ts are not as commonly
used as the other blocks, and they can be a bit trickier
to construct in piece. They're a bit like
half square triangles, but rather than
the finished block being a square,
it's a rectangle. A diagonal line from corner to corner creates the
two triangles. A half rectangle triangle
can be any proportion, but often they're twice
as high as they are wide. There are many
traditional blocks that are constructed using triangles. For example, the saw
tooth star block is constructed from a square surrounded by four
flying geese blocks. The pin wheel is made of four half square
triangle sub blocks. Triangles are such fun
blocks to work with. My emergence quilt
pattern is created entirely from squares and
half square triangles. My Don to Dusk wall
quilt pattern was designed using half
square triangles and flying geese blocks. This lotus quilt features a square in the square
block in the center, flying geese and half
square triangles. The thistles and
thorns quilt pattern that I designed features a variation on the bare paw using half rectangle triangles. The possibilities are
virtually endless. Let's talk for a minute about what it means
when a block is finished versus unfinished.
These are two words. You'll hear me use a lot
throughout these lessons, and it's an important concept
to understand in quilting. The finished
measurements of a block. Refer to what size the block is once it's
sewn into the quilt. The unfinished size is the size of the block before
it's sewed into the quilt, and it includes the
seam allowance. Because there's a
seam allowance of a quarter inch on
every side of a block, the unfinished
measurement will almost always be a half inch larger than the
finished measurement. So for example, if you're constructing a half
square triangle that's intended to be 3 "
by 3 " in the quilt design, when you actually
create the block, you'll be creating a block with an unfinished size
of 3.5 " by 3.5 ". If that sounds confusing to you, don't think too hard about it. It'll start to make sense
as we go. I promise. Now that you have an overview of the four different
triangle blocks that we'll be working with,
let's get started. In the next lesson, I'll
show you a couple of different methods
for creating one of the most popular
blocks in quilting, the half square triangle.
5. Half Square Triangles: In this lesson, I'll
be sharing a couple of different methods for constructing
half square triangles. Half square triangles are
so wonderfully versatile. It's no wonder that it's one of the most common blocks
used in quilting. Let's begin with the
two at a time method. This method, you'll begin
with two squares of fabric, one of each color, that are
cut to be the same size. To determine what size
pieces you'll need to cut. Refer to the half
square triangle two at a time cutting chart, which is on page two of the
mastering triangles workbook. If you're following
along with me and making the manifest quilt, which is available as a
free pattern download in the resources
section of this course, we'll begin with two squares of fabric that are each 4 " by 4 ". If you're following along
with another pattern, refer to the instructions for that pattern to determine what size squares
you'll begin with. Place your two squares
of fabric together, right sides facing so that
all four raw edges meet. Then using an acrylic
ruler and a marking tool. Mark a diagonal line from
one corner to the other. Next, take your fabric to
the sewing machine and sew a quarter inch line of stitching on each side of
the diagonal line. A. Once you've sewn your
two lines of stitching, use an acrylic ruler and your rotary cutter to cut the fabric between your
two lines of stitching. That's why it helps to
have a sharp rotary cut. Then take these to your
ironing board or pressing mat and you'll press
your seams open. And there you have two
half square triangles. We still have to trim
or square these up. But let's move on to the
eight a time method, and then we'll worry
about trimming all of our half square
triangles at once. The second method allows us to create eight half square
triangles at a time. This allows for a
lot of efficiency, especially if your pattern requires a lot of a
half square triangles. For this method, we'll also begin with two
squares of fabric. To determine the size squares
you'll need to begin with, you can refer to the
half square triangle eight a time cutting chart on page three of the
mastering triangles workbook. If you're following along with the manifest quilt pattern, you'll begin with half
square triangle blocks that are 8 " by 8 ". Just like we did for the half square
triangles two at a time. We'll begin by placing
the two squares on top of each other so that
all of the raw edges meet. Using a ruler, mark two diagonal lines from corner
to corner, forming an x. Then bring your fabric to
the sewing machine and sew a quarter inch line
of stitching on each side of both
diagonal lines. Bring your fabric back
to your cutting mat. To finish our eight
half square triangles, we're going to be
making four cuts, one along each diagonal, one vertically, and
one horizontally. It's important to use your to make sure that your
cuts are straight. I generally start
with the diagonals. Being careful not to move
or shift fabric as I cut. For the vertical and
horizontal cuts, you'll want to line
up the marking on your ruler that shows half the width or the
height of the square. Since this is an
eight inch square, I have the four inch marking lined up with the
side of my square, and my cut mark will intersect the exact point where the
two diagonal cuts meet. Then I'll do the same
thing horizontally. Making sure my ruler
is perfectly square, lined up with the four inch, marking on my ruler
and making sure that the line I cut intersects
right in the center. You should end up
with eight pieces. Take each of these to
your ironing border pressing mat and
press the seam open. Trimming your half square
triangles to the proper size is super important in order to maintain accuracy
and your piecing. When you trim, you'll need to refer to the
unfinished block size. This is the size that
includes the seam allowance. My pattern indicates that
the unfinished size of these blocks is 3.5 " by 3.5 ". Line up the 45 degree mark on your square acrylic ruler with the diagonal line in the middle of your
half square triangle. Holding the ruler down firmly. Trim the top and the
side so that the block measures slightly larger than the desired unfinished size. M Then turn your block 180 degrees. Again, line up the
45 degree mark of your acrylic ruler with
the diagonal seam line. This time, make
sure the side and the bottom edges line up with the desired unfinished
measurement for your block. In my case, 3.5 " by 3.5 ", and then trim the excess
from the top and the side. And there you have a perfectly trimmed and squared up
half square triangle. Take some time to finish trimming all of your
half square triangles. If you followed
along with me and practice both of these methods, you should have ten half
square triangle blocks. Once they're done, you can
meet me in the next lesson, where we'll learn about how
to make flying geese blocks.
6. Flying Geese: In the last lesson, we constructed half square
triangle blocks, using a couple of
different methods. This lesson, I'll show you two different methods
for constructing flying geese blocks. In the first method, we'll construct a single
flying geese block. In the second method, we'll
construct four at a time. We'll begin with the
single block method for creating flying geese. For this method, you'll
begin with a fabric cut to a rectangle and two squares. You'll find the
cutting chart for the flying geese block on page four of your mastering
triangles workbook. If you're following along with me and making the
manifest quilt, you'll need a rectangle
piece that's cut to 3.5 " by 6.5 " and
23.5 inch squares. Begin by placing one of the squares on top of
the rectangle so that the short edge of the
rectangle lines up with one raw edge of the square and the top and bottom
edge is a line as well. Then using one of your
rulers and your marking pen, you're going to draw
a diagonal line from one corner of the
square to the other. Then you're going to
sew a line of stitching right along that line
that you just marked. All right. So there's
my line of stitching. I'm going to use
my acrylic ruler to trim off this excess. And I want to make
sure that I leave a quarter inch seam allowance
from the line of stitching. So I'm going to line
up my stitching with the quarter inch
mark on my acrylic ruler. And then using my rotary
cutter, I'll make my cut. Next, I'll bring this
to my pressing mat, and I'll press that seam open. Next, I'll repeat
that same process using the second
square of fabric. I'll place this fabric square on the other side
of the rectangle, making sure everything
is properly lined up. I'll use my acrylic ruler, mark to mark a diagonal
from corner to corner. Then I'll take this to my
sewing machine and sew a line of stitching right on
that line that I marked. Then using my acrylic ruler, I'll place the quarter inch mark along my line of stitching, and I'll trim off the excess, leaving a quarter
inch seam allowance. Now, as a note, this method does produce a
little bit of waste. One thing that I've done
with these leftover pieces is to sew a line of stitching a quarter inch from the end, pressing them open, and you have two half square triangles
to use for another project. Once you're done
trimming off the excess, take this to the pressing map. And press it open. And here is the finished
flying geese block. Just as a side note, if you are making the
manifest wall quilt, you'll be making two single
flying geese blocks, one with fabrics A and B, and another with fabrics B and C. For the flying geese
four to time method, you'll begin with five
squares of fabric, one large square of fabric, and four smaller squares that will end up
being the background. Determine the sizes
to cut these squares, you can refer to the cutting
chart on page five of the mastering triangles workbook or refer to the pattern
that you're using. For the manifest quilt pattern, I need a 7.5 inch square
of fabric A and four, four and a quarter inch
squares of fabric B. Place the large square
in your working area, and place two smaller squares at opposite corners
of the large square. Making sure that the
raw edges match. The smaller squares will
overlap slightly in the middle. You'll mark a diagonal line
from one corner to the other. Making sure that line intersects both the small
and the large squares. Once you've marked your line, go ahead and pin your
pieces of fabric together. I find one pin on either side of the line just helps keep
the fabric from shifting. Then you can take this
to the sewing machine and sew a line of stitching, a quarter inch from either
side of the marked line. Bring your piece back to the cutting mat and
remove your pins. Then take your
acrylic ruler and cut your two pieces apart directly between the
two lines of stitching. Then bring each of
these pieces to your pressing mat and
press the seams open. You can set one of your
pieces aside for now. Take one of your
squares and line it up with the remaining
corner of the large square. Making sure the raw edges match. Then with your acrylic ruler, you'll mark a line from one corner to another along
the line of symmetry, essentially dividing
this piece in half. You can pin the fabric in place to prevent
it from shifting. Then just as before,
take this to the sewing machine and sew a line of stitching
a quarter inch from either side of
the marked line. Remove the pins and cut these two pieces apart right in between the two
lines of stitching. Take this to the ironing board
and press the seam open. Repeat this with the other side, and you'll end up with
four flying gese blocks. Trimming or squaring up flying geese blocks can be
a little tricky, but attention and accuracy
at this step will ensure that they look perfect when sewing into your quilt. I've created a full written
tutorial for trimming flying gese blocks
that's available in the mastering triangles
workbook on page six. When trimming flying
geese blocks. I always begin by
trimming the top. We want to be sure to leave a quarter inch seam allowance
at the tip of the triangle. Otherwise, when you
sew it into the block, that tip will be cut off. Now there are a couple of points on your ruler to pay attention to to make sure your flying gese block
is squared up properly. First, line up your
45 degree mark on your ruler with one
side of your triangle. Then shift your ruler
so that the point of the triangle meets at the quarter inch
mark of your ruler. Once you have those
two markings situated, hold down your ruler firmly and trim the excess
from the top. We're going to be using this cut to square up the
rest of the block. Next, we'll trim the bottom. I'll flip my block over. I want the unfinished
size of this block to be 6.5 " long and 3.5 " tall. I'm going to line up the top edge with the 3.5
inch mark on my ruler, and then I'll trim the
excess from the bottom. Now we just have to
worry about the sides. When I trim the sides, I want to make sure that this point is exactly in
the center of the block. Since the unfinished size
of this block is 6.5 ", half of that is
three and a quarter. I'm going to line
up the point of this triangle with a three and
a quarter inch mark on my. Then I'll make sure that the
top and bottom raw edges are aligned with the
top of the ruler and the 3.5 inch
mark at the bottom, and then I'll trim the
excess from the side. I'll do the same thing
with the other side. Lining up the point
of the triangle with a three and a quarter
inch mark on my ruler. And then lining up the
top and the bottom of the block with the corresponding marks
on the ruler as well. Make sure everything
is perfectly square. Hold down my ruler firmly
and I'll trim the excess. There you have a
perfectly trimmed flying geese block with a quarter inch seam
allowance at the top and a point that's perfectly
centered between the two sides. Once you have all of
your flying geese blocks constructed and trimmed, you can meet me in
the next lesson, where we'll create the
square and a square block.
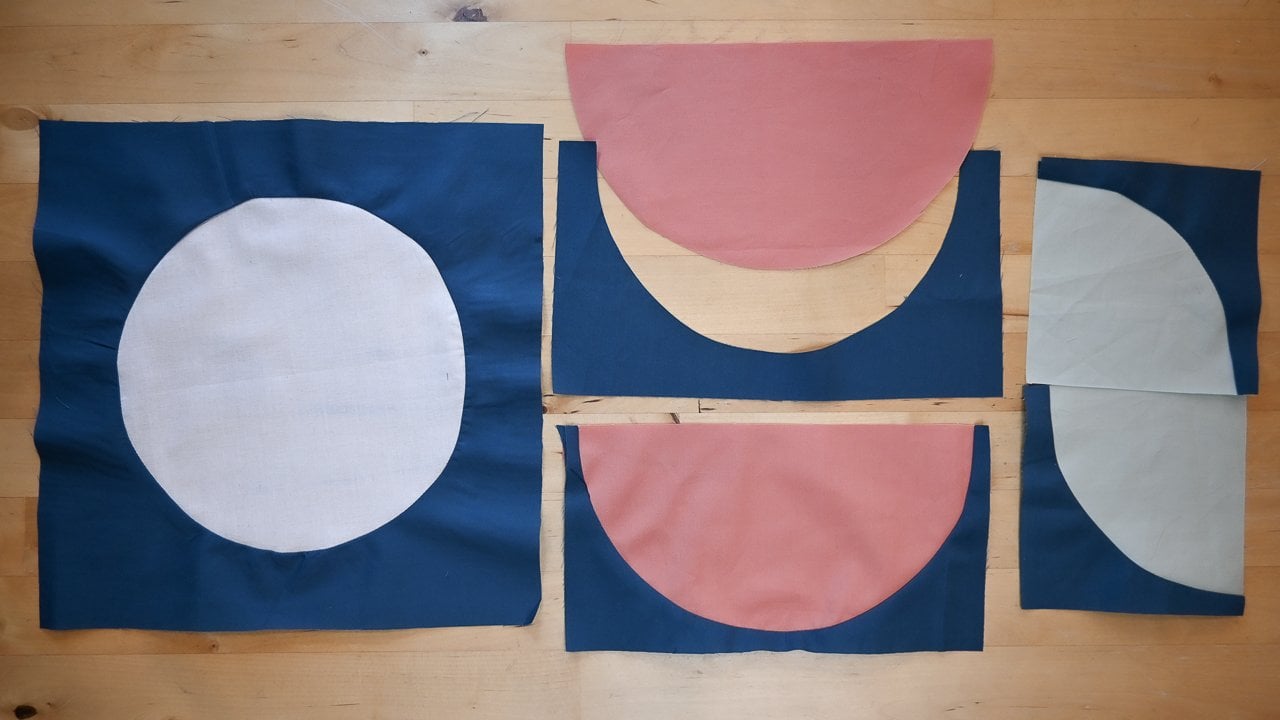
7. Square in a Square: In this lesson, we'll work to construct a quilt block
called square in a square. You most often see this
block as the center of a quilt block or
perhaps even the center of a medallion quilt. So we're going to
create a square in a square block using what's called the stitch
and flip method. So for this method, you'll need one larger square of the fabric that will
be the center fabric, and then four smaller squares. And this fabric will become the triangles that are
set in each corner. To determine the specific
measurements for this fabric, you can refer to page seven in your mastering
triangles workbook, where you'll find
the cutting chart for the square in
a square block. If you're following along with the free downloadable
star quilt block pattern, You'll need a 6.5 inch by
6.5 inch piece of fabric A, and 43.5 inch square
cuts of fabric B. We're going to begin by marking a diagonal line
from one corner to another on all four pieces
of our small squares. Using my acrylic ruler
and marking pen. I just going to mark
a diagonal line on all four of these pieces. You can set two of these aside, and we're going to place
one small square in opposite corners of the
larger square of fabric. So that the diagonal line
runs from the midpoint of one side of the large square to the midpoint of the second
side of the large square. That is, you don't want the diagonal line that you marked on the s square to match up with the corner
of the large square. Once you have those, you can go ahead and pin them in place. And then we'll
bring these over to the sewing machine and sew a line of stitching right on
that marked diagonal line. Bring your piece back
to your workspace, and we're going to trim the
excess from the corners. Line up the quarter inch mark on your acrylic ruler with the seam line that
you just stitched. And then with your
rotary cutter, trim off the excess. Repeat this with the other side. Press these two seems open. We'll then repeat that process with the other two corners. Placing one small square in each of the
remaining corners. Again, making sure that
marked diagonal line doesn't come from this corner, but rather connects one side of the square to the
other side of the square. Pinning those squares in place. Then you can bring this
to the sewing machine, sewing a line of stitching
along each marked line. You can remove your pins, trim off the excess fabric, leaving a quarter
inch seam allowance from the line of stitching. Press these two seams open. And that's it. You've created
a square in a square block. In the next lesson,
we'll work to create half rectangle triangles.
8. Half Rectangle Triangles: By now, we have quite a
collection of triangle blocks. The final block that we'll
be constructing together in this class is called the
half rectangle triangle. This is probably the
least common block that you'll find
in quilt patterns, and it has a
reputation for being a little bit trickier
than the other blocks. A half rectangle triangle
block is constructed from two right triangles
that are sewn together along the diagonal
to create a rectangle. The thing that's
the most important to pay attention to when creating a half rectangle triangle block is
the orientation. Because it's not a square, it can't be rotated
in any direction. You have to be extra mindful with how you sew
them together to make sure that your
half rectangle triangle is oriented properly. You'll see what I mean
as we get started. To make a half rectangle
triangle block, you'll begin with
two rectangles. To determine what size you'll need to cut your rectangles, you can refer to the
half rectangle triangle cutting chart on page
eight of the mastering triangles work If
you're following along with me and creating
the star block pattern, you'll need to cut
four rectangles of fabric A and four rectangles
of the background fabric. That measure 4 " by 8 ". To begin, we'll stack one
rectangle on top of the other, making sure all of the
raw edge is align. Then with a long acrylic ruler, we're going to cut
a diagonal line from one corner to the other. Now, I'm using solid fabric that doesn't have a
right or a wrong side. I don't really need to
pay attention right now as to which way I
cut the diagonal line. If however, you are using a pattern fabric that has an obvious right
side and wrong side, you'll want to pay attention to which way you cut the diagonal. You'll see what I
mean in a minute. When I'm done, I'll
have four triangles. Now to piece these together, I need to make sure that I know which way I want
the diagonal to go. Because once these
are sewn together, they can't be placed
in any direction. If I look at the diagram in the directions
of the pattern, I know that these are going
to be the points of the star. Therefore, they're going to
be reflections of each other. I want one half rectangle
triangle with the diagonal running from the
top left to the bottom, right, and I want another
half rectangle triangle with the diagonal line running in the opposite direction so that they're reflections
of each other. With these, it's important
to make sure they're oriented properly
before you sew. Because if they're
sewn the wrong way, because these are
reflections of each other, you can't simply
rotate them to get the orientation that you want.
Let's start with this one. Now that I have this
oriented properly. I'm going to flip these
two pieces right side together along this
long diagonal line. Just like that. When I do this, you'll notice that they'll
be about a quarter inch of the skinny corner sticking out here and also on this
side. That's okay. Our line of stitching is
actually going to start right at this point where
the two fabrics meet. You can go ahead and
pin this in place. As long as I'm here, I'm going to do the
same to this one, flipping these two
pieces right sides together along this
long diagonal line. I have a little skinny parts sticking out here and
down here, that's fine. It'll all work out in the end and stick a pin to
keep those in place. Now I'm going to sew a line of stitching along this long end, a quarter inch
from the raw edge. And I've brought these half
rectangle triangle blocks right over to my pressing mat. I'm gonna remove the pins
and press these seams open. Next, I'll trim these. I know I want each of these half rectangle
triangle blocks to be 3.5 " by 6.5 ". Now, we can't use our 45 degree marker on our ruler like we did for
the half square triangles, since this angle is
not for five degrees. If you're creating a
half rectangle triangle that is twice as
tall as it is wide, then these two angles
should be degrees. And 60 degrees. My acrylic ruler does have a 30 degree and
a 60 degree mark. I could use that to help me square up my half
rectangle triangle. If your ruler doesn't
have these marks, don't worry about it too much. Just do the best you
can to square up your half rectangle triangle
to the desired size. But since I do have these marks, I know that I can line this
up with the 60 degree mark on my ruler and trim it like I
would a half square triangle. And that's it. If
you haven't already, take some time to practice
constructing some of the different triangle blocks we've covered in this class, and make sure you have enough of each for whatever pattern
you're following. In the next lesson,
we'll begin to sew some of our triangle
blocks together, and I'll share with you
some of my tips and techniques for matching
points and seams.
9. Matching Seams: Now that you have all of your triangle blocks ready to go, we can begin sewing
them together. There are three
primary factors that will impact the accuracy
of your piecing, trimming or squaring up
your triangle blocks, seam allowance, and
matching seams. We've already discussed
some best practices for trimming or squaring
up your quilt blocks. You should be good to go there. When it comes to seam allowance, it's really helpful to have a quarter inch foot to make sure you have a perfect
quarter inch seam. If there's any variation
in your seam allowance, that will begin to impact
how your blocks line up. In some patterns, you
might come across something called a scant
quarter inch seam allowance. This is a seam allowance that's
just of a quarter inches. Essentially taking the width
of the thread into account. If your pattern does call for a scant quarter inch
seam allowance, think about a quarter
inch seam allowance minus the width of
a piece of thread. It can take a little
bit of time to get used to a scant quarter
inch seam allowance, but if your pattern
calls for it, it's worth practicing
because it can really make a difference in
the accuracy of your piecing. In this lesson, we're
primarily going to focus on that third factor that impacts the accuracy of your
piecing, matching seams. Learning techniques that
ensure the seams of different blocks
line up will help you achieve a flawless
looking quilt. There are two techniques that I generally use to match
points or seams. Pinning or nesting. I'll be covering both of
those in this lesson. The pinning technique is
really useful for matching up the points of say two
flying geese blocks, or if you really want to press your seams open to reduce bulk. So I'm going to begin by using the pinning technique
to help ensure all of my points and seams line up for the star
quilt block pattern. First, I've sewn together
the four pairs of half rectangle triangles that will form the
points of the star. For each of these four blocks, I've gone ahead and
pressed the seams open. I've also gone ahead
and pieced together the top and the bottom
rows of this quilt block. Now we're going to use
the pinning technique to piece together
the center row, which consists of two of the half rectangle
triangle blocks and the square in
the square block. First, lay out
these three pieces in the way that you want them
presented in the quilt top. We're going to be using
the pinning technique to match the points. Take one of your half rectangle triangle blocks and flip it over on top of the square and the square block,
right sides together. You'll then take a pin. And place it directly at the
point of one of the blocks. This point should be a quarter
inch from the raw edge. Make sure that when the pin
comes out the other side, it exits at exactly the same
point on the other triangle. You can open up your block
to check and be sure that the two points of
the triangles meet exactly and adjust if necessary. Once you're sure that the
points of the triangle are lined up on both sides
and secured with the pin, and you've checked to be sure that those
points are matching. You can go ahead and bring
it to the sewing machine. The seam line should intersect exactly where that pin
inserts into the fabric. Repeat with the other side
and press your seams open. We'll use the same technique to sew the three rows of the
quilt block together. Lay out your three rows
in the same way you want them to be arranged when your quilt block
is sewn together. We'll place pins at each of the seams and at the points
where the two triangles meet. Place two of the rows
together, right sides facing. Then beginning with
the center points, place the pin directly at the very tip of the two points
that you'd like to match. If you've trimmed
your blocks properly, this point should be exactly a quarter inch from the edge. Open up your fabric
to be sure that those two points are matching exactly where you want them to, and adjust the pin is necessary. Now, when matching the seams, you want to make sure
that the pin enters and exits exactly where
the seam line is on both the
front and the back. You'll also want to
make sure that you insert the pin a quarter
inch from the edge. This is where your line of stitching is going
to go through. You don't really
have to worry about matching the seam anywhere else, but you want to make
sure that that seam is exactly a quarter
inch from the edge. Be sure that that's
where the pin enters through the front
and exits through the back, right on that seam line. Once I have the pin
through that seam line, I like to open up my fabric to check that those two seams
are indeed matching. N, and that looks good. Once I have everything
pinned and secured, I'll take it over to
my sewing machine and sew using a quarter
inch seam allowance. Being really mindful to
make sure that my line of stitching crosses exactly where each pin inserts
into the fabric. Press your seam open, and repeat for the remaining
row of your quilt block. Even knowing and
using this technique, your seams might not come
out perfectly every time. You can always rip out your
seam and adjust as needed, or just embrace these
slight imperfections as part of the beautiful
handmade look. The second technique
that I like to use is called nesting seams. While, in general, I like
to press all of my seams open because I think it helps give the quilt top
a nice flat look. I make an exception when I want to nest my seams together. Rather than pressing
the seams open, I'll press them to one side. And when I do this in
an alternating fashion, when I place the rows of the quilt top right sides together, the seams will settle or nest right into each
other. Let's try it. I'm going to be using the
nesting seams technique to piece together the
manifest wall quilt. First, I need to sew
together all of the rows. Here, I've laid out
some of my rows in the same way that I want
them arranged in the quilt. To create the rows, I'll place these blocks
right sides together, and so using a quarter
inch seam allowance. Don't press your seams yet. We're going to press
them strategically so that they nest together. Now that I have all of
my rows sewn together. I'm going to press the seams
in an alternating fashion. For row one, I'll press
the seams to the right. For row two, I'll press
the seams to the left. Row three, I'll press
the seams to the right, and so on, alternating right and left for
every other row. I'll then take row one and row two and place
them right sides together. You'll notice right away
that because we didn't press the seams open,
they're not flat. And when we place them together, they settle right
into each other. This is what we call nesting. What I'll do is I'll
nest each seam, making sure the seam lines of each piece are flushed
against each other. Then I'll place a pin
to hold them in place. I'll do this for each
seam along the row. Once I have the row
pinned and secured, I'll bring it to
the sewing machine and sew using a quarter
inch seam allowance. Now that my rows
are sewn together, I'll bring it to
the pressing mat and press the seam open. Repeat this for
each of the rows. Because we alternated
the direction that we pressed the seams, each row should nestle
nicely into the next. Helping make sure those seams
match up beautifully. O. Take some time to
piece your triangle blocks together using these
two different techniques. You might find that you
prefer one over the other. And the next lesson, I'm
offering a bonus tutorial, where I'll show
you how to create a pillow cover out of one
of your quilt blocks.
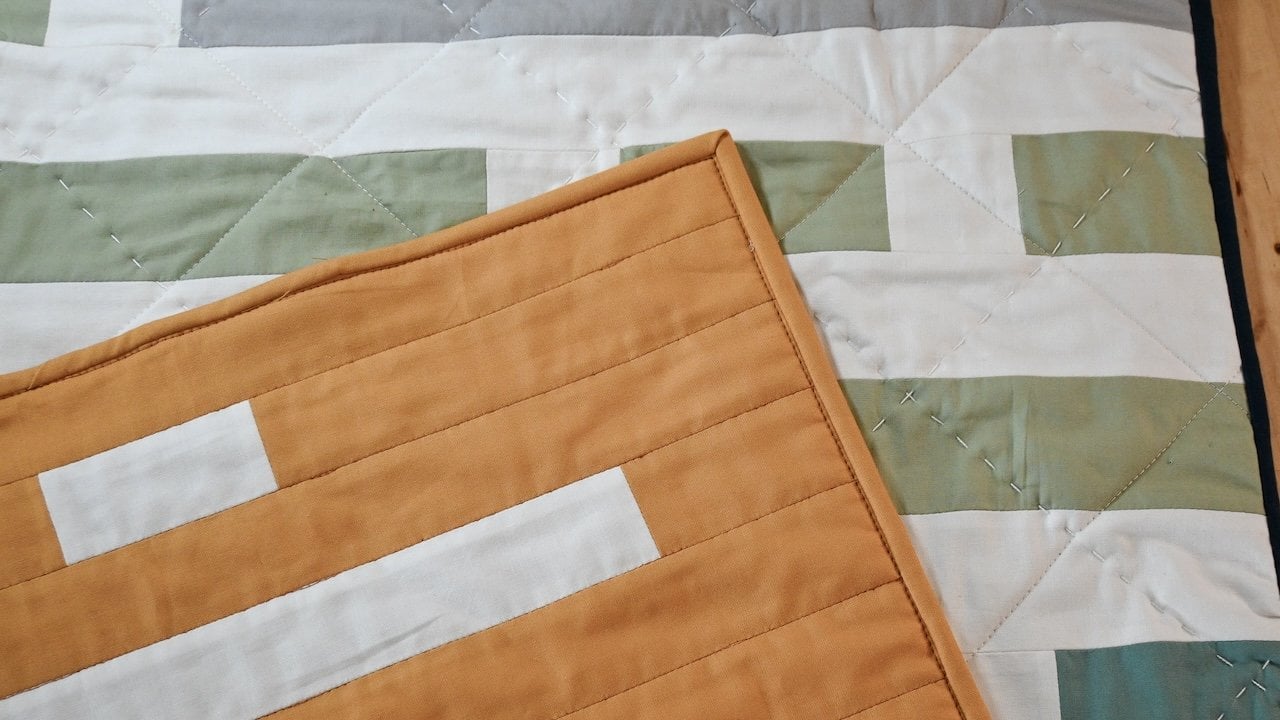
10. Pillow Cover BONUS: In this lesson, I'll
show you how to take your quilt block
and turn it into an envelope style pillow cover. For this demonstration,
I'll be using the Str quilt block
pattern that's provided as a free
download with this class. This method, however,
will work with any 18 inch by 18
inch quilt block. To turn your block
into a pillow cover. These are some of the
materials that you'll need. You'll need some
batting that's cut to approximately 24 " by 24 ". You'll need some fabric for
the back of your block, cut to the same size as
the batting 24 " by 24 ". This fabric is going to be
hidden inside the pillow, so you can use any scrap
fabric that you like. Also need two rectangles of fabric for the
back of your pillow, cut to 18.5 " by 14 ". I'll generally use
the same fabric that I used as the background
fabric in the block. Base and quilt the block
using your preferred method. If you need a refresher on
how to do any of these steps, feel free to refer to the basting and quilting lessons in part two of this series. When you've finished
quilting, square per block, trimming it to 18.5 " by 18.5 ". Next, we will he
one long edge of each of the 18.5 by
14 inch rectangles. Place one of these rectangles on your ironing
border pressing mat and fold over one of the long edges a half an
inch to the wrong side. Press along this fold. Then fold it over
another half inch to conceal the raw
edge creating a hem. Press along this fold, and pin the hem in place. Then take your piece
to the sewing machine and sew along the edge
of the first fold, securing the hem in place. Repeat this with the other 18.5 inch by 14 inch rectangle. Place your quilted pillow
top on your workspace, right side, facing up. Then take one of the
hemmed backing pieces, and place it on top, right side facing down. Aligning the long raw
edge of the heed backing piece with the top raw
edge of the quilt top. Align the sides as well. Pin or clip this piece in place. Then do the same with the
second hemmed backing piece, placing it right
side facing down, and aligning the long raw edge with the bottom edge
of your pillow top. The two backing pieces should
overlap by a few inches. Pinner clip along
the entire edge to secure the backing
pieces in place. Bring your piece to the
sewing machine and sew all around the pillow top using a quarter inch
seam allowance. I recommend backstitching
or creating a few back and forth
stitches at the points where the hemmed pieces
overlap for added security. When your entire piece is sown, clip the corners, being careful not to clip
into the stitching. Turn your piece right side out. And stuff it with a 20 inch
by 20 inch pillow insert. You're done. Join me
in the final lesson. We're all share
some final thoughts and offer some next
steps for you.
11. Final Thoughts: You've done it. At this point, you should be a master at
piecing triangles together. Or at the very least, hopefully you've learned
a few new tips and techniques to help level
up your quilting skills. Whether you've
followed along with me and made one of
the free patterns that are available
with this course or created another design, I'd love for you to
share what you've made. Take a photograph of
your finished piece and upload it into
the project section. This is a great way to share with our community what you've made and perhaps even inspire others who
are new to quilting. If you're looking for more
practice with triangles, here's a few suggestions. Perhaps use one of the
patterns offered in this course to create a
series of wall hangings, a table runner, or perhaps
even a larger scale quilt. It might also be fun to play around with some
improvisational piecing. Let your imagination run. If you loved this class, I would really appreciate
it if you left a review. This will help others
find this class, and your feedback will help me continue to create quality
classes in the future. If you're interested
in learning more about advanced
quilting techniques, be sure to follow
me on skill share. This way, you'll be the first to know when I release a
new quilting class. If you're ready for
more, check out the resources
section where I have a link to part four
of this class. In this class, we
explore piecing curves. Thank you so much for joining
me and for letting me be part of your quilting
journey. Bye bye for now.
 Juli Rae Vignola, Quilt artist, natural fabric dyer