Transcripts
1. Introduction: [MUSIC] As an artist,
showcasing your work in unique ways can really
help you stand out. If you're a surface
pattern designer, creating a quilt mock-up that features patterns
from your collection, can really show how
the patterns go together and to tell a story. Or perhaps you're a quilter, creating a quilt mock-up is a great first step to
creating a quilt pattern that's more personal
and meaningful than creating one from
a pre-written pattern. Hi, my name is Julie Ray and I'm a textile artist,
quilt pattern writer, and surface pattern
designer based in the Pacific Northwest region
of the United States. I've been quilting and designing quilt patterns for
nearly a decade. I've designed and created
quilts as personal gifts, for commissions to sell
as written patterns, and as a way to showcase my surface pattern
design collections. I created this class
because I think quilts are such a beautiful
art form and such a wonderful way to bring a design collection together
and tell a cohesive story. I love designing quilts and I wanted to share what I
know about designing quilts with you to help you accomplish whatever
your goals might be. For me, quilting provides
a creative outlet. It provides a space for
both play and precision, and it gives me the opportunity
to work with a medium, fabric, that I find
so satisfying. It also offers me the
opportunity to slow down, which is really important
in our fast-paced world. You might be wondering, why
design a quilt mock-up? There might be a
number of reasons depending on your
background and your goals. If you're a surface
pattern designer, chances are you've considered working with the
fabric industry. A quilt mock-up is the
perfect way to showcase a surface pattern design in a portfolio and to
set yourself apart. Or perhaps you're
a quilter who's interested in getting into
quilt pattern writing. Designing a unique quilt, and creating a mock-up is
an essential first step. Regardless of your reason, I hope that this course
offers the tools you need to create a quilt mock-up that will help tell your story. You may be thinking, but I don't know anything
about quilting. If that's the case no worries. Whether you're an
experienced quilter or have never in your life sown two
pieces of fabric together. I'll walk you through
the process of creating a quilt mock-up
in Adobe Illustrator. No quilting experience required. I'll take you through
the entire process, from quilting foundation
to final product, to help you bring your own
unique design to life. As a note, if you don't
have Adobe Illustrator, no worries about that either, I'll show you how to achieve the same process using
graph paper and a pencil. By the end of this course, you'll have your own quilt
mock-up that features your surface design
collection or your own custom color palette
to use in a portfolio, to share on social media, or to use as a template for
your own real-life quilts. You'll leave this class with everything you need to know to continue creating many more
quilt mock-ups in the future. I look forward to
seeing you in class.
2. Course Overview: Quilts are all
around us. They are symbols of home and comfort, often passed down as air and are beautiful
pieces of visual art. If you're a surface
pattern designer like me, a quilt mock-up is
the perfect way to show how all of your
designs go together, making it the perfect way
to showcase a collection. In the first lesson
of this course, we'll cover some of the
foundations to ensure that whether or not you have
any quilting experience, we're all on the same page. We'll cover some
quilting terminology, the anatomy of a quilt, and we'll look at a few
of the most common layout so that you can start
thinking about your design. In the next lesson, we'll open up Adobe Illustrator. I'll walk you through setting up your document and workspace. In the lessons that follow, we'll dig into some
of the tools in Adobe Illustrator and use them to create some of the most common blocks used in quilting. If you don't have
much experience with Adobe Illustrator, no worries. I'll be breaking
down the process in a beginner friendly way. In the resources section you'll find a document that lists out all of the keyboard
shortcuts that I'll be using in Adobe Illustrator. This could be a really
helpful reference especially if you're
new to the program. If you don't plan on
using Adobe Illustrator, I'll also show the same process using graph paper and a pencil. Once we've created a
collection of basic blocks, we'll dig a little bit deeper. We'll take some of those
blocks that we've created and begin to combine them
together to make new shapes. Next, we'll learn
about where to find inspiration for
your quilt design. I'll share some places
that I commonly find inspiration for my quilts and some of them
might surprise you. From there, we'll
talk about color. I'll show you how to create
a custom color palette in Adobe Illustrator. We'll talk about some
considerations for color, whether you're planning
to use solid colors or prints and patterns
in your design. From there, we'll take
everything that we've learned and create a quilt
mock-up together. I'll take you through
my process for creating a quilt mock-up and
show you some of my tips and tricks for
an efficient workflow. Finally, I'll offer some suggestions for
using your quilt mock-up. We'll talk about how to export your mock-up for optimized use, whether you're planning
to use it in a portfolio, or share it on social media, or use it for your website. I'll also share some next steps, especially if you're
interested in taking your mock-up and actually having a real quilt created from it. Throughout this
course, I'll offer some exercises that will
provide you lots of practice to develop
the skills you need to create your
own quilt mock-ups. For the class project, you'll be designing your
very own quilt mock-up either in Adobe Illustrator
or on graph paper. Your quilt mock-up might feature your surface pattern
design collection or a custom color palette that
you've created yourself. All you need to get started
is the desktop version of Adobe Illustrator and again, if you don't have
Adobe Illustrator, grab some graph
paper and a pencil. I'm so excited to see all of the designs that
you come up with. I'll see you in the next lesson.
3. Quilt Foundations: [MUSIC] In this lesson,
we'll cover some of the foundational
information related to quilting to ensure
that whether or not you have any
quilting experience, we're all on the same page. The information in
this lesson will help provide you with a
solid foundation on how quilts are typically
designed so that you can begin to think about
your own quilt design. Quilting is a method of
stitching together layers of cloth traditionally to make
a blanket or a bed covering. Although today people
make quilts for wall hangings and pillows and
a variety of other items. A quilt typically
consists of three layers. A quilt top, which is made up
of smaller pieces of fabric that had been cut
up and sewn back together to create
a unique design, a layer of batting in the
middle and a quilt back, which is typically made from
a single piece of fabric. In this class, we'll be
focusing on the quilt top as that's the design that you'll be creating for your mock-up. A quilt top is generally made up of fabric that
has been cut up into smaller pieces and
then sewn back together to create
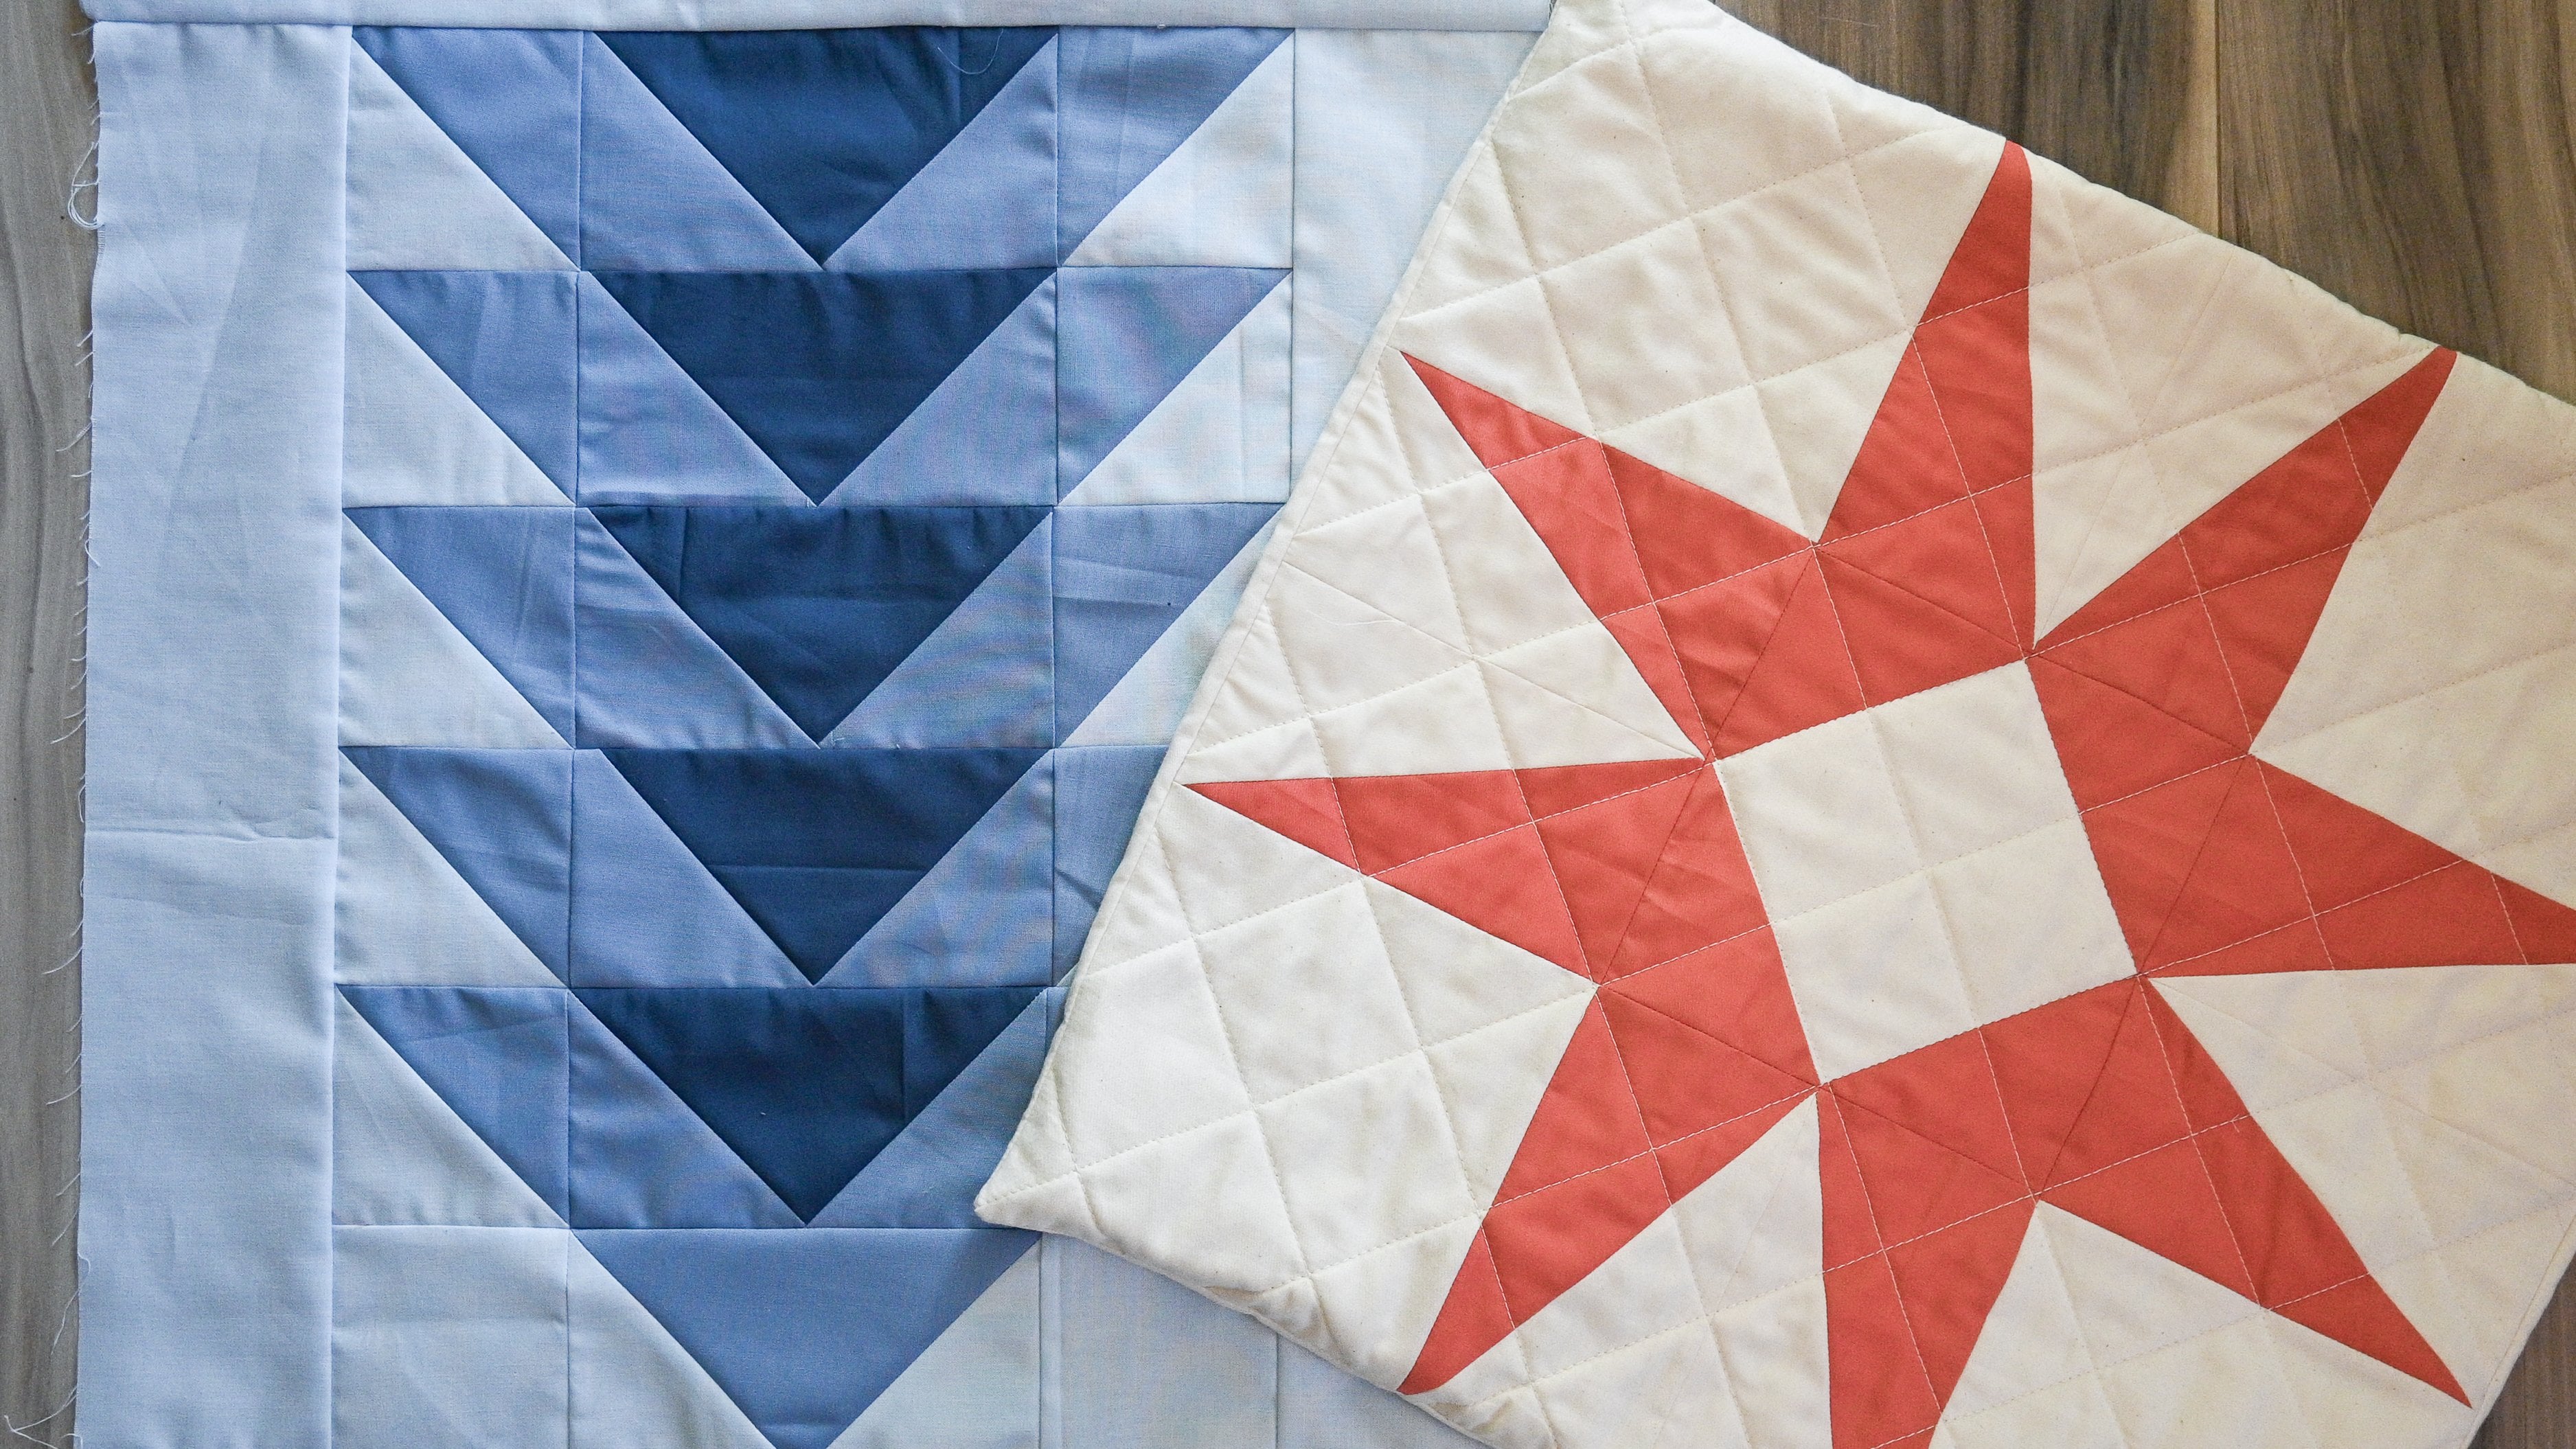
various designs. Shown here on this slide you can see three common quilt blocks, a Sawtooth Star, a Log Cabin, and a
Flying Geese block. There are so many other
quilt blocks out there and really no limit on
what block you can create. Many quilt blocks are
made up of sub-blocks, as you can see in this
Sawtooth Star example. This means that smaller
blocks are created first and then arranged
to create the main block. Let's talk about some
different common quilt layouts so
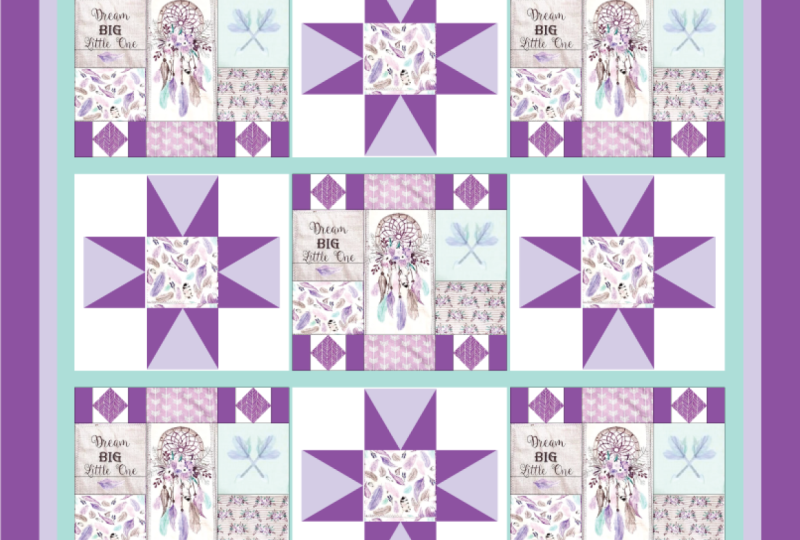
that you can be, and to think about how you might lay out your quilt mock-up. Block-based designs
are constructed from rows and columns of blocks. The block might be the same, may be repeated to
create a pattern, or they might be
different and unique, creating a more
asymmetrical look. A block-based quilt
can have stashing, which is a strip of
solid fabric between the blocks or the block might
be sown directly together. Block-based quilts are
often created on a grid, but they can also be arranged
in many creative ways. Medallion quilts
are distinct from block-based quilts as they feature a central block with the different elements
built around it. These quilts can be a
great option if there's a central element or motif that you'd really
like to highlight. There are so many other
quote layouts out there that don't fall neatly into either
of these two categories. You can choose a
block-based design or a medallion style for your mock-up if you'd like
to stay more traditional, however, you need not be
limited by these two options. Feel free to think expansively. Just as a side note,
in this course, we won't be working
with actual fabric, but we are creating a
mock-up of something that is generally
made with fabric. That being the case, you might hear me refer
to different fabric such as solids,
prints, patterns. You might also hear me
talk about repeats. Let me just take a
moment to explain what I mean by those. Solids refer to fabric that doesn't have any
pattern or print on it. It's just a solid color. A lot of quilt are made
using only solid fabrics. Prints refer to printed fabric that has some design on it. Patterns refers
to the pattern of artwork that's
printed onto fabric. This isn't to be confused
with quilt patterns, which are the written
instructions that one might follow to create a
particular quilt design. Finally, a repeat refers to the fabric swatch in Adobe
Illustrator that is designed to repeat seamlessly
in order to be printed on some substrates
such as fabric. If you're not a surface
pattern designer and you're not familiar with
what a repeat is, don't worry about it,
you'll probably be using solid colors
for your mock-up. I encourage you to stop
and take some time to explore some different
quilts in your world. Maybe you have some
quilts in your home or a quilt shop in your neighborhood
that you could visit. If you don't have access
to quilts in your area, there are so many examples of quilt that can be
found on the Internet. A quick search on a
platform like Pinteres or Instagram using a
keyword like quilts, modern quilts or
block-based quilts will provide many examples
for you to explore. The idea with this
search isn't to copy, but it's just to familiarize
yourself with all of the possibilities when it comes to creating
a quilts design. In this lesson, we covered some foundational
information about quilting, such as, what is the
quilt and what are some of the components
that make up a quilt. We also talked about some of the different layouts of
quilts that will hopefully start to get your
wheels turning as you think about the kind of
quilt you'd like to design. In the next lesson, we'll work to get our document
setup so that we're all ready to start creating.
I'll see you there.
4. Document Setup: [MUSIC]. Now that you have the big
picture of quilt design, let's get our document set up. If you don't have
Adobe Illustrator, you can follow along
with graph paper. I'm using a Rhodia
Reverse grid book. I will often sketch
a design out in paper and pencil before
moving it to the computer. The first thing we want to
do when working with paper and pencil is to
determine the scale. I'm using a pen to make it
easier to see on the video, but you're welcome
to use pencil. The first thing I'll do
is up in the corner, I will mark out one
square on the grid. The first thing I want
to do is try to decide what unit will be represented
by one square on this grid. Since none of our
practice blocks are going to be very large, we'll keep it simple and
make this one square inch. That means that each side of
the square is one inch long. Let's set up our document
in Adobe Illustrator. First we'll start a new file. You have some options here
in the right-hand panel. The first thing I want
to look at is my units. When I'm quilting, inches is the unit of measurement
that I mostly use, so I prefer to use that
in my markups as well. If you prefer, you may
also use centimeters. I'm going to click on inches, and I want to set my
artboard to be 40 inches by 40 inches which is about 100 centimeters
by 100 centimeters. This will give us a
generous workspace. The color mode, you can
choose CMYK or RGB. For now, I'm just
going to stick with CMYK then I'll hit "Create". Let's do a few more things together to set
up our workspace. You can come up to View
and click on "Show Grid." A grid is really useful
when creating quilts and quilt blocks because
it will help ensure everything
lines up properly. Then I'm going to come back to View and make sure Snap
to Grid is checked. Next, let's check the
spacing of our grid. To do that, you can come up
to Illustrator, Preferences, Guides and Grid, and
this looks good. You want to have a grid
line every one inch. If you're working
in centimeters, you can set that to
be one centimeter with two subdivisions. This will create a guideline every half inch or
half centimeter. Now it looks good so
I'll click "Okay". Next, let's set up some of the
tools that we'll be using. Come up to Window. The first one I
want is Pathfinder. If you don't have a
check to pathfinder, feel free to click on that. I will just keep that over here. Let's come back to Window and make sure
we have Transform. We'll pull this over here. Swatches we have, but if you don't have swatches, make sure you have
swatches checked as well, and I can see my
swatch panel here. The last thing we want to
make sure we have is Stroke. Stroke is checked, I've
got that down here. I have my swatches
set up here and my strokes set down
here, that looks good. For creating our quilt markups, there's a few tools that you'll want to make
sure you have. The first is the selection tool which looks like a black arrow, direct selection tool
which looks like a white arrow. The pen tool. In addition to the pen tool, you'll also want the
add anchor point and delete anchor point tools. We'll be using those to modify some of the shapes when
we're creating our blocks. The shape tool but right now mine is showing
the rectangle tool, but if I long click on it, it comes up with a few
different options, we'll be using the
shape tool a lot. A few other tools you
might find useful, especially when we get to
coloring our blocks is the eyedropper tool and
the magic wand tool. If you're not seeing some of these tools in your side panel, you can click on these three
dots and look for it here, and all you have to do is click to add it to your tool panel. Go ahead and take time to make sure your
document is set up, then you'll be all set for
the next lesson when we begin creating our quilt
blocks. I'll see you there.
5. Creating Blocks: Squares and Rectangles: Now, that you have
your document set up, you're ready to start
creating some of the basic blocks that are
commonly used in quilting. In this lesson, we'll work on creating squares and rectangles, which will be the
foundation for all of the blocks that we'll
create going forward. First of all, make
a square together using the graph paper. You'll remember that we set
our scale so that each square of the graph paper
represents one square inch. Let's make a four inch square. I would mark my beginning point and count down four units. Then over four units. That would be a
four-inch square. Let's move into
Adobe Illustrator. I'm going to come over
to the rectangle tool. If you don't see the rectangle
tool here on the sidebar, it might be hiding under
one of the other shapes. All you have to do
is long click on the shape panel and select
to the rectangle tool. The keyboard shortcut for
the rectangle tool is M. There are a couple of ways to make a square
or a rectangle. The first is just to click and drag until you have the
shape that you want. You can see that my rectangle is snapping to the grid lines, which will ensure that the
measurement of my square or rectangle is to the
inch or half-inch. Now, if you'd like
to make a square, hold the Shift key, and that will keep
your proportions constrained to a perfect square. I can see over here in
the transform panel, it tells me exactly the size of the square that I've made, so I can see I've
made an eight inch by eight inch square. The other way to create a square or rectangle is to click on the
artboard and then a dialog box will
appear where you can input the measurements of
the square that you want. Let's say I want a four inch by eight inch rectangle
and I can click "Okay". When I'm building blocks, I like to keep the
stroke at black. We'll talk about color
in a later lesson. For now, if you'd like to distinguish the
shapes by fill color, I suggest just using
the gray scale. Let's say I want to copy this exact square on the other side of the
rectangle that I've made. Again, there's a couple
of ways I can do that. The first is to
select the square, and I know it's selected because it's
highlighted in blue. Then I can go to Edit,
Copy, Edit, Paste, that will create a
copy of that square. Then I can drag it to the
location that I want. Another way is to
select the square. I can hold it and drag it and
while I'm dragging it over, I'm going to hit the Option key, and that will make a copy. Squares and rectangles
are going to form the foundation of all of the other blocks that
we're going to make. If you're still getting used to the tools in Adobe Illustrator, I suggest taking some
time to practice making some squares and
rectangles of different sizes, putting them together
and copying them. In the following lesson, we'll create the
next quilt block, the half square triangle.
I'll see you there.
6. Creating Blocks: Half Square Triangles: [MUSIC] In this lesson,
we'll learn how to make the half-square
triangle block. Let's make a half-square
triangle on the graph paper. I have my scale set to one inch. I'm going to begin by
making a four-inch square. Then to make this into
a half-square triangle, I'm going to divide the
square in half diagonally. From one corner to the next, I'll draw a line. In order to distinguish
these two shapes, I'll shade one side. To create the
half-square triangle, we're going to start
with a square. You can either make a square by clicking and dragging and
holding down the Shift key, or by clicking and typing in the measurements
that you'd like. I actually think I would like
to make mine 6 by 6 inches. I'm going to delete this
first square that I made. I have a 6 by 6 inch square. In order to make a
half-square triangle, I need to delete one of
the corner anchor points. I'm going to select the
Delete Anchor Point tool. Then I'm going to come
over and click on one of the corners to delete
that anchor point. Now, I have half of a triangle. One thing you'll notice
is while creating all of these blocks is that the
final block is always a square or a rectangle
and that's so that when a quilter is
piecing these together, they can sow them along
on the straight lines. In order to make
this into a square, I'm going to highlight
the triangle that I've made and I'm going to copy it. To do that, I'm going
to hold this shape, I'm going to drag it,
and while I drag it, I'm going to hold down the
Option key to make a copy. Then I need to rotate this. In order to rotate, you can go to Object,
Transform, Rotate. I want to rotate
this 180 degrees, so I'm going to click 180, and that flips it around to
the direction that I want. Then I can fit those together
and now I have a square. Let me undo that so I can show
you another way to rotate. In order to undo, I'm going to click Command Z. Another way to rotate this
piece is I can click on it, I can click the R
on my keyboard, which is the keyboard
shortcut for rotate, and then I see this little
blue marquee showed up. That's going to be the
point of rotation. Then I can click anywhere around the triangle and I can
begin to rotate it. Now, if I want it to rotate
a perfect 180 degrees, all I have to do is
hold the Shift key, and that will restrict the rotation to 45
degree increments. Then I can unclick, go back to my Selection tool and
then fit these together. Just like we did up
here in order to differentiate these two pieces, I'm just going to fill
one of them with a gray. Once I have this block together, I'm going
to group them. I'm going to select
both by dragging my Selection tool over them, and then I can go
to Object, Group. The keyboard shortcut for
that is Command G. Now, I can move these
as a single unit. There's a half square triangle. In the next lesson, we'll work to create
a flying geese block together. I'll see you there.
7. Creating Blocks: Flying Geese: [MUSIC] The next
block we're going to create is a flying geese block. A flying geese block is always twice as wide as it is high. If I make this four inches high, then I need to make
it eight wide. Then I'll measure down and over. Next I need to make a mark halfway between
these two corners. What I'll do is I'll mark that spot and that will guide me where to draw
the diagonal lines. Starting at this bottom corner, I'll draw a diagonal line. This is why I sometimes like
to use a straight edge. Draw that straight up and then bring it
down to this corner. Then I can shade to
distinguish that shape, and there's a
flying geese block. Let's move into
Adobe Illustrator and create a flying
geese block there. We're going to begin
with our rectangle tool. For this one I'm going to click, I want to enter my proportions. A flying geese block is always twice as wide as it is high. Let's see. I want a
flying geese block that's eight inches wide. I want to make sure
it's 4 inches high. I'm going to make this
white to begin with. In addition to this rectangle, I need two squares that are equal to the height
of this rectangle, so I'm going to select the rectangle tool
and click here again and instead of eight inches
by four inches I want two squares that are four
inches by four inches. There's one and I'm
going to make a copy. Let me zoom in a little bit. Go to view. Zoom in. That's good. [NOISE] I want to add an anchor point
at exactly the halfway mark. I like to use the squares
as a guide because I know this is eight inches long and this square is four inches, I know that the length of this is exactly half
of this distance. I'm going to line up
this square right on top and then I'm going
to select the rectangle. I'm going to come over to
the add anchor point tool. I want to add an
anchor point right here where those
lines intersect. That point should be
exactly half the distance. Now I'm going to select the Delete Anchor Point tool and I'm going to delete
these two corners, leaving behind a triangle. I'm going to give this triangle a color. Let's add a gray. Now in order to make
this block a rectangle, I'm going to add
two triangles to either side of this
larger triangle. We're going to do that
the same way that we began the half
square triangle block. Selecting one of these squares, I'll select the Delete Anchor
Point tool and I'm going to delete this point to
create a triangle. I can place that here. This is why having the snap to grid feature enabled
is super handy when you're creating quilt blocks because I don't need
to worry about it being a pixel or two
off and leaving a gap. Then I'll do the same
thing to this square. I'm going to select it, choose
the Delete Anchor Point. I'm going to delete
this Anchor Point here and fit that together and
this is a flying geese block. Just like we did with the
half square triangle, let's group this together. I can select that whole group, come up to object and
group or hit "Command G" and now I can move
this as a single unit. Let's zoom out. One handy way to
zoom out all the way as to hit "Fit Artboard" in Window or Command zero is the keyboard
shortcut for that. We have quite a little
collection of blocks we've made. In the next lesson, we'll work on making
Half Rectangle Triangles and Square in Square
blocks. I'll see you there.
8. Creating Blocks: Half Rectangle Triangles and Square in Square Blocks: [MUSIC] In this lesson, we'll work to create two blocks, the half rectangle, triangle, and the square and square block. If you're using graph paper, go ahead and follow along making these shapes as I demonstrate
them in Adobe Illustrator. The next book will create is
the half rectangle triangle. It's very similar to the
half square triangle, but instead of the final
block being a perfect square, it's going to be a rectangle. To begin, I'm going to
select the Rectangle tool. The half rectangle triangle
doesn't necessarily need to fit inside of any
particular proportions. I often create half
rectangle triangles that are twice as high
as they are wide. Let's go with four inches wide and eight inches high
and select, Okay. To create the half
rectangle triangle, we use the same process that we used to create the
half square triangle. With my rectangle selected, I'm going to choose the
Delete Anchor Point Tool and I'm going to delete one of the corner points to
create a tall right triangle. Then what I need to do
is make a copy of this, so I can do that by selecting this triangle and
dragging it over, holding down the option key. Then I need to rotate
it 180 degrees, so I'll select R on my
keyboard and rotate it, holding down the
Shift key to make sure it snaps right into place. [NOISE] Then I can move this over and join those
two together. [NOISE] Let's give, I'll
give this one a fill. Then I can group these
together up to object group and that's our next block. The next block we're
going to make is often called a
square and square. It looks like a diamond shape, just like all of
the other blocks. We're going to begin
the Rectangle Tool. For this, I want to
create a perfect square, so I'm going to hold and
drag and make sure I hold down the Shift key to keep those proportions
constrained. That looks good. If I look
over in the transform panel, I can see that I
made a square that's 10 inches by 10 inches. [NOISE] Similar to when we
made the flying geese block. What I want to do
next is I want to add an anchor point exactly halfway between each of the corners and I'm going
to do that to each side. What I like to do is to make another shape
to use as a guide. Since I know this shape is
10 inches by 10 inches. I'm going to create
another square that's half of that five
inches by five inches. I'm going to click using
the Rectangle Tool, and I'll type in five
inches by five inches. [NOISE] Let me make that white
so I don't confuse myself. I know that where
this line intersects, that's the halfway point. Using the Add Anchor Point Tool, I'm going to add
an anchor point. I forgot to select my shape, so make sure that
the square that you are adding the anchor
points to is selected. Now I can choose the select
Anchor Point Tool or add Anchor Point tool rather and I'm going to add
an anchor point here. I can move this
down, line it up. [NOISE] I'll add an anchor point here [NOISE] and I'll quickly add these last two without using the
guiding square. I have my anchor points added. Now we're going to delete the anchor
points at the corners, so using my Delete
Anchor Point Tool, I can click on each of these corners to make
a diamond shape. Now the last thing I
need to do is I need to add a triangle to each corner to make sure that my final block is
the shape of a square. The square that I made as a guide square is actually
just the size that I need. Since the distance
between this point and where the corner of my
square will be is five inches. I need to have a square that's five inches by five inches. Using my Delete Anchor
Point Tool we'll delete that anchor point to make that into a triangle and then I can fit that
triangle right there. Since this shape is exactly the same for each of these corners, I can just duplicate this.
I'm going to drag it up. Hit "R" to rotate, and hold down the
Shift key to make sure it rotates exactly
the amount that I need. Then what I can do is
I'm going to click on this triangle and then hold down the Shift key to select
this one as well. I can copy both
of these at once. These are just some of the
shortcuts that I like to use, I'm going to drag that over, hit "R" to rotate, and then I can rotate both
of these shapes together, holding down the Shift
key right into place. I'll select [NOISE]
all of these. Group them together and voila, let's zoom out so we
can see what we have. This is a square and
square or diamond block. In the next lesson, we're going to learn to
make blocks with curves. These include the inset circle, a half circle, and a quarter
circle. I'll see you there.
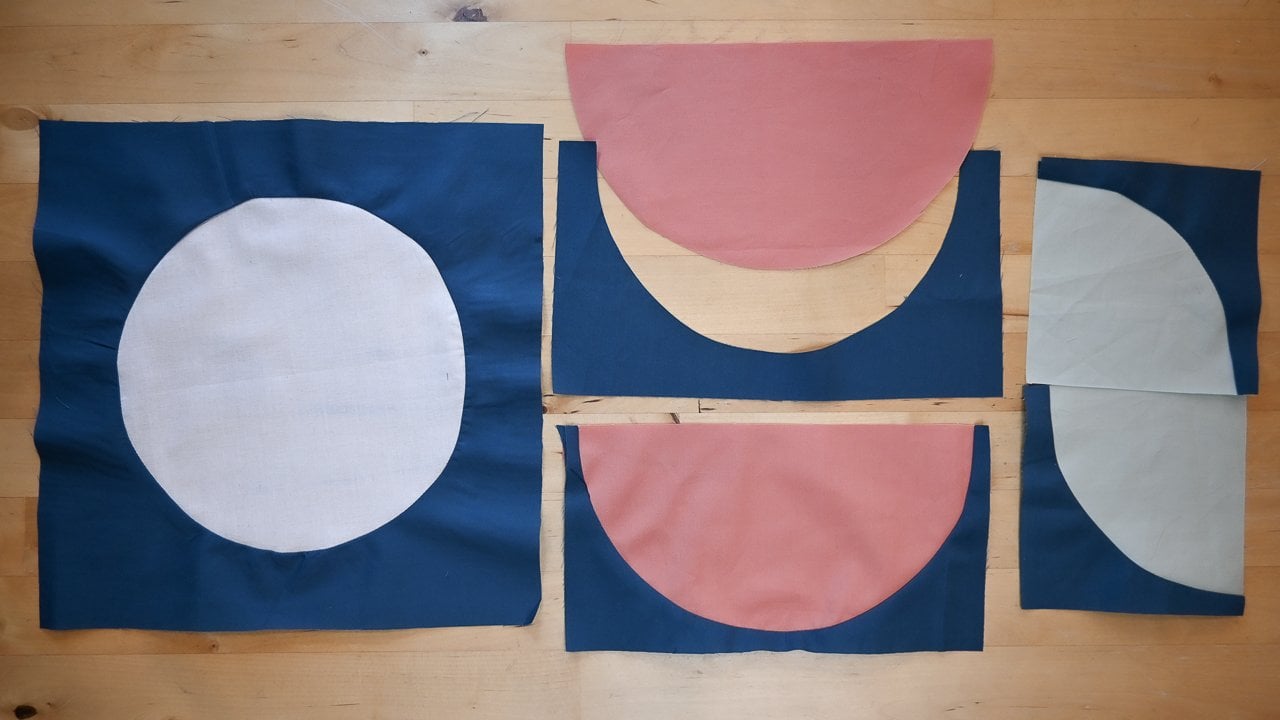
9. Creating Blocks: Curves: [MUSIC] In this
lesson, we're going to create some blocks
that have curves. These include the inset circle, the half circle, and
the quarter circle. These may seem a little
bit more complex, but they can really add a lovely variety to a quilt design. Let me show you how
I would go about making the inset
circle on graph paper. I always begin by determining the center point of the circle. If I would like to make a
circle that's 6 " in diameter, I need to count three from the center point,
that's the radius. The radius is half
of the diameter, if you remember
from school math. I'll count three from the
center point up and three down from the center point and make a little mark and then
from that center, I'll count three over, and I'll count three over
in the other direction. Now I'll connect these
four points with a curve making my circle
as even as I possibly can. You can certainly use a compass or some other tool to
make a perfect circle. But I find I don't generally
need to be that precise. Now I have the
shape of a circle, and I can go ahead and
enclose this in a square. From this point I'll
come up to the corner. For the half circle I'll
follow the same process, but I only need to
mark off three of the points because this bottom is going to be a straight edge. From the center point, I'll count up three over three to the left and
over three to the right, but I don't need to count down. Then close in, connect those with the curve. For the quarter circle, you
followed the same process, but this time you only mark two points out from the center, one over and one up or down. Now let's look at making an inset circle in
Adobe Illustrator. Even though we're
making a circle, we're still going to begin with the rectangle tool and I want to create a perfect square and I do want control over
the size of the square. I'm going to click and
let's make a square, we'll try 8 " by 8 " and
[NOISE] I'm going to zoom in. The keyboard shortcut
for zooming in is command plus, it's
a little too much. If you could, the minus,
it will zoom out. Here's my base
square, 8 " by 8 ". I want to create a circle
that fits within this square. I'm going to come over
to my "Shape Options" and I'm going to long click
and find the ellipse tool. The ellipse tool works very similarly to the rectangle tool. All I need to do is click. Since my square is 8 " by 8 ", I also want to make
my circle 8 " by 8 ". Let's give this a color just
to keep these two distinct. Now, I could just lay this on top and call this
done as a block. But I really like to
have each piece separate that way if I ever did want to take this mark-up and have
it made into a quilt. I have each piece
on its own and I can break it down into
its component parts. The easiest way to do that is to select both of these
shapes together. We're going to come up to
the "Pathfinder tool". The Pathfinder tool has lots of different options for how to combine and break apart shapes. For this particular instance, we can click on the "Divide tool" and if I select "Divide", it grouped them together. I have to right-click
and ungroup but then I can grab each of
these pieces individually. I just hit "Command Z" to undo that and let's regroup
this object group. There's an inset circle. I'm going to do "Command
Minus" to zoom out. Next, let's do a half circle. Let's begin with the same
structure that we had before. Since we're doing a half circle, we can use the same width, but we will only use
half the height. I'm going to long click on the "Ellipse" so that I can
grab the rectangle tool. I'm going to click
on my art board and this time I was still
want it 8 " long, but I only want it 4" wide. This rectangle will be my base, but I'm going to duplicate
it and I'll show you why. Then I'll come back over and
select the ellipse tool. I want to create a
circle that's still 8 " by 8 " and then we're
going to cut it in half. I'm going to select, "Okay", let's give this a color. Now we're going to
use this rectangle as a guide to cut
this circle in half. Right now this
rectangle is going behind the circle and I
want it to come in front. I can "Right Click", "Arrange", "Bring to Front". I will align this rectangle up right on top of that circle. You can already see the shape
of the half circle here. I'm going to select
both of these shapes, come back up to my "Pathfinder". The second option is
called "Minus Front". It's going to delete
everything that the front shape overlaps. That leaves me with
just a half circle. Now I can bring this
half circle over to my initial rectangle
and we'll do the same thing that we did
with this inset circle. I'm going to select
my half circle. I'm going to divide just
to ensure that each of these is broken into its
own component parts. There's my half circle. Now the quarter circle is
a very similar process. We are just going to essentially cut the half
circle in half again. For the quarter circle,
let's actually start with the circle this time. I'm going to click once
and let's make this 10 by 10 just to vary
the shape a little bit and click "Okay". Fill our circle with gray. Now, I want to cut the circle
in half and in half again. I made this circle 10 " by 10 ". I'm going to come
grab a rectangle that is 10 " wide and 5 " high. We'll give it a different color just to avoid
confusing ourselves. I'll bring this rectangle
in front and line it up in front of the circle so that I only have half of it exposed. I'll select both
of those together, come over to my "Pathfinder Window" and select
"Minus Front". That leaves me with
a half circle. Now I'm going to do that again because I want a quarter circle. I'll come over to
my rectangle tool and this time I
can make a square, that's 5 " by 5
". Make it white. You can leave it the same color, but I like to have
it a different color to avoid confusing myself. Then I'll bring
this square over, Iine it up right in front
of that half circle. Select them both. Select "Minus Front" from
the "Pathfinder Window", and I'm left with
a quarter circle. Now, the transform
panel shows me that this quarter
circle is 5 " by 5 ". That's how big I'll
make my square. I'll click 5 " by 5 ". Make that white. I'm going to send
this to the back. I'm going to "Arrange", "Send to Back" and
then I can line it up with this quarter circle. We'll group them together. There's your quarter
circle block. Before you move on
to the next lesson, make sure you pause and take some time to practice
creating all of the blocks that we've learned in this lesson and in
the previous lessons. In the download section, there is a resource
that contains all of these blocks for you
to use as a reference. Be sure to keep it on hand
for continued practice. In the next lesson, we'll take the blocks that we've created here and combine them together to see what
different shapes we can create. I'll
meet you there.
10. Combining Quilt Blocks: In the last two lessons, we worked to construct some of the most basic quilt blocks, either in Adobe Illustrator
or on graph paper. In this lesson, we'll
take those blocks and begin to combine
them together, to see what unique shapes
and designs we can create. If you're working
on graph paper, you can play in
much the same way, you don't necessarily have
the same advantage to be able to copy blocks
and rotate them. I'll often start with
pencil and paper and intuitively sketch
out some shapes before I even move
to the computer. This process really allows
your hand to guide you. I will sometimes
just with my pencil, sketch out some shapes that I have in mind and
come up with a rough plan. I'm not measuring anything here, but I have in mind a quilt that, it has half blocks like that. Now I might just start with some half square triangles and see how they come together. I'll make these
blocks fairly large. [MUSIC] Let's see what it looks
like to work with some of these blocks in
Adobe Illustrator. I might take this square
and square shape, I'm going to drag
it over and hold on option to make a copy, and then I might take my flying geese and
drag that down as well. Now, I would like my
flying geese to be the same length as this square. I'll come over to
my Transform panel, and let's make this
an even number. Next to the measurements here you'll see
this little chain. Right now it is unchecked, which means it will constrain the proportions to make sure that the width and the height
stay in equal proportion. If I click on this
and turn it off, then I can adjust the width
and the height separately, but I actually right now want to keep the proportions restrained. Let's make this a four
inch by four inch square. Now look at the flying geese. If you remember,
a flying geese is twice as long as it is high. I want this length to
be equal to the square, so let's make this
four inches wide, and because I have my
proportions restrained, it automatically changed
the height to two inches. See if we can line
these two up together. I'll make a duplicate
of this flying geese, so holding down my "Option" key, I'll drag this up. I'm going to duplicate
both of these, so I'm going to "Hold
the option" key down, as I drag these. I would like to flip
these around so that they point in the
opposite direction. I'll select both of those, hit "R" on my
keyboard for rotate, and that puts the cursor
right at the center, which is where I want it. Then I'll move these
around and I'll hold the "Shift" key so that it will rotate a perfect 180 degrees. On there, that's an
interesting shape. Let's see what else we can make. I do think I'd like a square. Let's just give
this square a gray. I think I'll grab
the quarter circle. I'm going hit "Option"
to make a copy. Let's make these the same size. Highlighting my square,
make this four inches, and we'll do the same
with this square, four inches and hit "Return." Let's put these together. I'm going to bring
another quarter circle over to this side. I'm going to try a
half square triangle. Let's bring that down here. I would like this half
square triangle to be the same size as
these other squares. Using my Transform panel, I'll make this four inches and it automatically changes
the height to four inches. Place that there,
rotate it around. I would like to change the
color of this half triangle. Since I have this
grouped together, there's a couple
of ways to do it, but what I like to do
is just "Double-click", and that brings this
into isolation mode, then I can click and
isolate this shape. Then using my Eyedropper tool, which is over here
in my tool panel, the keyboard shortcut
for that is "I", I can click on the color
that I would like it to be, "Double-click" outside to
get out of isolation mode, and then I change this to match the same color, I
turn it around. That might make a new leaf. Let's try one more. This time I think I'd like to
begin with a square again, so I'm going to grab my square, hold on the "Option"
key and drag that over. Let's try using the half
rectangle triangle. Let's make sure these
are the same size, so I'm going to
change the size of the square to a
nice easy number, let's do four inches again. This, I actually want to fit two of these
across this square. Rather than making
this four inches wide, I'll make it two inches wide. I'm going to bring
this block over here, let's line these up together. Now I would like to reflect
this over to the other side. The easiest way to
do that is to go to "Object", "Transform", "Reflect', and I would like
to reflect it vertically, I want to reflect it over itself and I want
to make a copy, so I'm going to click on "Copy." I can grab it and pull
it over to that side. You grab both of
these, not the square. I would like to bring them down, and I'm going to drag them
down holding the "Option" key. That's actually cool, it makes an arrow shape. It's not what I was going for. I'll rotate these around, and now I'd like to rotate
both of these on the sides. I'll select down four of these
half rectangle triangles, click "R" to rotate,
rotate them around. I'll hold on "Option" to make a copy and "Shift" to snap
that right into place. This made a version
of a sawtooth star using half rectangle triangles. Now if I were going to include
this in a quilt pattern, I would want to add, squares in the corners here, to make sure that my
final shape is a square. Let's do that, I'll hit
"M." I'm just going to click because I know
that this square needs to be four
inches by four inches. I can just put that
in manually here. Put that here, I
can drag it over, hit "Hold option"
to make a copy, and select both of those, drag them down, make a copy. As you can see, once you start combining these shapes together, the possibilities
are truly endless. Before moving on to
the next lesson, take some time to play around combining these blocks to
make different shapes. Here are a few exercises to help you practice combining
shapes together. See if you can recreate
the blocks shown here. Take a moment to
pause the video and take a screenshot of this slide or look in the
resources section for a document called
quilt block practice, these are available there too. Here are a few additional
blocks for you to try out. In the next lesson, we'll talk about where to find inspiration for your
quotes. I'll see you there.
11. Sourcing Inspiration: [MUSIC] In the last lesson, we learned how to create some of the most basic blocks
used in quilting, and we saw how they can be combined together in
interesting ways. Before we begin arranging these blocks to create
our final mock-up, I wanted to take some
time to talk about some different places
you might source inspiration for your design. One place you might
begin looking for inspiration is in books. There are many books
out there with examples of quilts
and quilt blocks. This is what I use
as a reference. It's called 5,500 Quilt
Blocks by Maggie Malone, and in it are
literally thousands of examples of
different quilt blocks. This is a great way
to get a sense of the different
combinations and styles of quilt blocks that
can be created. Check the sewing or
quilting section of your local bookstore or library to see what options
they might have to offer. You can also look around in your environment
for inspiration, I find lots of interesting
geometric shapes in architecture and tiles. Nature can also be looked
to for inspiration. There are so many different
abstract shapes and elements that can be pulled from nature and used in
a quilt design. If you're not feeling
particularly inspired by the architecture or natural
elements in your area, there are so many places online
where you can find ideas. Websites such as
unsplash.com offer royalty-free images and
can be a great place to find images to provide inspiration
for your quilt design. My first quilt design, the kiln quilt was inspired
by the garlands of marigolds that I encountered during my time living in India. From these photographs, I sketched some
shapes to represent the blooms and took color inspiration
from the photographs to create my mock-up. Here are a few other examples of quilts that I've designed, along with an image
that represents the inspiration for that quilt. Now it's your turn to go
out and gather inspiration. Take a walk through a park or
a city looking for shapes, colors, and moods
that inspire you. Gather three to six photos to use in the upcoming lessons. In the next lesson, I'll show you how to build
a custom color palette from a photograph that you've
taken. I'll see you there.
12. Creating Color Palettes: [MUSIC] Before we begin designing
our final quilt mockup, let's talk about color. Color can completely change
the look and feel of a quilt. Having a few different
options to play around with as you design your quilt
can be really helpful. If you're working
on graph paper, gather your preferred
color medium and swatch out a few color options
on a blank piece of paper. I'm using markers because they'll show up
better on the camera. Colored pencils are also a really great option
as our watercolor paints or any medium you have where you can access
a variety of colors. What I have here is just
a strip of white paper. I'm going to take a
few of the colors that [NOISE] I want to try out and just swatch them. [MUSIC] I can take these
and cut them out. Now I just have
five colors here. You can certainly swatch out as many as you
want to play with. I encourage you to create
a lot of swatches. If you have a little library, it will offer you a lot of
options for playing around. I like cutting them
out because I can arrange them in
different combinations, set them on top of each
other and next to each other to see how they might
interact in a quilt. There are several ways to build a color palette in
Adobe Illustrator. I'm going to show you
my process for sourcing a color palette from
a photograph that you have on hand or that you took in the previous lesson while you
were gathering inspiration. I've opened up Adobe Illustrator and I'll open a new file. For this process, we'll just use a standard letter-size
piece of paper. I'll go to Print
and select Letter, and I'll hit ''Create''. I'm in my workspace, and the first thing
I'm going to do is place my photo into my document. In order to do that, I'm
going to come up to File, Place, and that will give me access to
the files on my computer. I saved this to my desktop
and I'll click on Place. In order to place the
photo into my document, I can just click and drag. The size doesn't matter. The inspiration for
the quilt design that I have in mind is
a lotus flower. This is a photograph
I took while traveling in Sri Lanka of some lotus flowers
that have vendor was selling to give as an
offering at the site. I'm going to try to create a color palette from
this photograph. Now that we have our
photograph placed, let's set some swatches. I'm going to use
the rectangle tool. Come over, click and drag, and I'll hold down the Shift key to make
a perfect square. This doesn't have to
be a perfect square, but I like to keep
things clean and tidy. Come up to my selection tool. I want to give this a
fill but no stroke. I'll come click on
the stroke over here and give it no stroke. Let's fill it with
black for now. Then I'll duplicate
this square a few times to set my swatches. Holding down the option key, I'll move it over and I
can continue to copy this. You can also use the
keyboard shortcut command D to duplicate that last action. I can just keep hitting command D until I have the number
of swatches that I like. I might just pull this down. I don't know that I'll
need these many swatches, but this will give me
lots to work with. Now I'm going to select
this first square. With it selected, I'll come
grab the eyedropper tool. The keyboard shortcut for
the eyedropper tool is I. Then I can start clicking
around my photo, find some colors that I like. I think I'll start
with a light neutral and come back to
my selection tool to select the next square. Hit I for the eyedropper
tool and keep clicking. For this process,
I like to click around and intuitively
choose colors that I like. One shortcut to toggle between the eyedropper tool and the selection tool
is to hit "Command". If you hit command, it brings you back to the last selection tool that you used. If I hit "Command" that allows me to select
the next square, and when I release
it, it will bring me back to the eyedropper tool, it's a handy shortcut. [MUSIC] One thing I'm trying to keep in
mind as I'm selecting colors is to make sure I
have a range of values. I'm trying to make sure
I have a nice range of light values and dark values. This will help make sure
that my color palette has enough contrast. Here I'm trying to pick up a little bit darker
gold color and I'm not really able to pick
up the color that I like. What I can do is
find a color that's close and with that
square selected, come over to my fill
and double-click, and I can manually drag to find the color that I like,
something like that. [MUSIC] That looks good, I think I'll delete
this last swatch. Now that I have a
nice color palette, I want to add this to
my swatches panel. In order to do that, I'll drag to select all
of the squares. Over in my swatches panel, I'll click on the folder, and that's going to
add a new color group to my swatches library. Now, these are the
standard default colors that Adobe Illustrator
comes with. I don't think I'll be
using any of these, so I'm going to clean this up. To do that, I'll click on this folder and holding
down the Shift key, I can come and select
all of these and then come down to the little trash can that says Delete Swatch. Not just tidies up
my Swatch Library, leaving the colors
that I'll use. Now in order to use this color group and
other documents, let's save this to
our swatch library. I'll come up to these
three little bars, come to Save Swatch
Library as ASE. Let's give this a title, I'm going to title this Lotus. I have a little
notice that came up. I'm just going to click
"Okay" and that will give me access to this color group
and other documents. Let's add a bit of life to these blocks that we've created. First, I'm going to clean up my color swatch library by
selecting all of these, and then I'll import the custom color palette that I created. I'll come up to
these three bars, go to Open Swatch
Library, User Defined. The name of the
color palette that I created for this was Lotus. Then all I need
to do is click on this folder to add it
to my swatches panel. Now I have access
to these colors. I'm going to go ahead
and select some of these shapes and just begin
to throw on some color. You'll remember for a shape like this that's
grouped together, you can either
right-click and ungroup it in order to access these
shapes independently. Or alternatively, you can double-click to go into isolation mode and then
select these independently. I'm going to quickly go
ahead and throw some color on these blocks, and
you can do the same. [MUSIC] For this block, since I know I'd
like all four of these that are shaded gray
to be the same color, I can use the eyedropper tool, the keyboard shortcut
for that is I. [MUSIC] Well, I've got some
color on these blocks. Undoubtedly I'll be trying other color combinations
with these blocks, but it's nice to have
some color on them. In this lesson, we created
a custom color palette. Now you may not have
your color palette completely decided
yet, and that's okay. Having some colors to work
with will be really helpful as you begin to bring your
full quilt layout together. In the next lesson, we'll discuss some
considerations if you plan to use prints
and patterns in your quilt, I'll meet you there.
13. Using Prints and Patterns: [MUSIC] There are a
few additional things to consider if you plan to use repeat patterns or
prints for your mockup. As mentioned in a
previous lesson, pattern refers to the design
that is printed onto fabric. Many patterns consist of motifs, which are the
individual elements that make up the design. Patterns will naturally
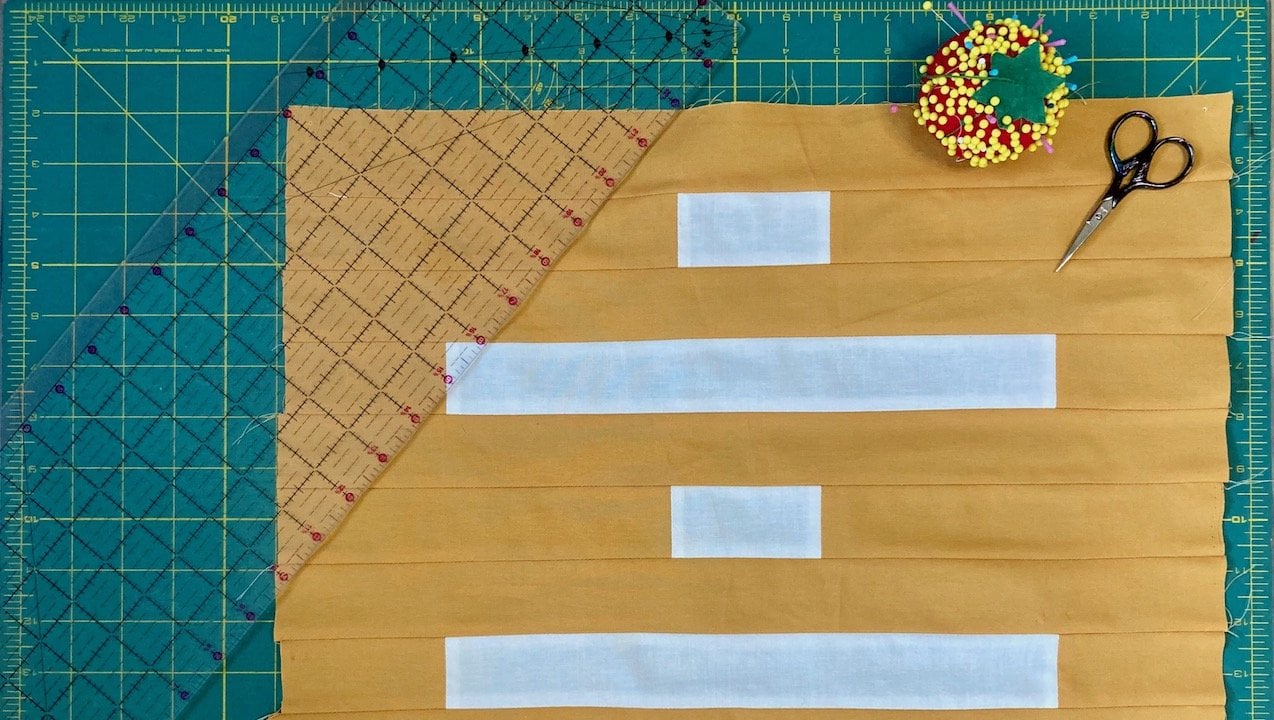
contain more than one color. This is a mockup of
a quilt I designed that features one of my
pattern collections. You can see that
although each of these prints is made
up of several colors, if I zoom out, you can see how each print
reads is almost a solid color. There's a light neutral, a light pink, a deeper
mustard yellow, and a dark gray. Zooming out on each
of your patterns to identify the primary color can help ensure that the
colors compliment each other and
offering of contrast. The size of the motifs in a pattern and the size of the quilt blocks
are important to consider especially if
you're planning to use your surface pattern design
prints and the quilt mockup. The beautiful motifs
of larger scale, more detailed prints may be lost if they're used to
cut small pieces. Consider scaling large
prints down or designing a quilt with large
blocks that will show off bigger motifs. As you design your quilt
in Adobe Illustrator, I recommend creating
it on 100% scale so that you can see how your patterns will
look in each block. Another important
consideration for using printed fabric
is the direction. Fabric can be one directional, two directional or
be considered an all over and be placed in
any direction possible. Let me show a few examples. This rainbow fabric here, I would consider
one directional. That means that there is
a right way for it to be. If it were oriented
like this, or this, or this it would be considered
sideways or upside down. This would be another
example of what I would consider a one
directional print. The motif here is consists of trees that are all
oriented in one direction. If I were to turn this
in any other direction, the motifs would appear
sideways or upside down. This is an important
consideration for quilters. When quilters are
cutting out squares to arrange in a quilt, they often want to use
their fabric efficiently. Having printed fabric
that's oriented in only one direction means
that they have to be a little bit more mindful about
how they cut their fabric. Here are a few examples of
two directional prints. This print is considered
two directional. If it's oriented this way, or this way, either way it
appears to be right side up. However, if I orient it this
way, it appears sideways. This offers a little
bit more flexibility than one directional
prints for quilters. However, is still
slightly limiting. Stripes would be
another good example of a two directional print. The best option for quilters
are all over prints. This would be an example
of an all overprint. In this design, I can orient it in any of the
four directions. It doesn't have an
obvious direction to it. Here's another good example of a fabric that could
be oriented in any direction and not appear to be upside
down or sideways. These offer quilters
the most versatility and how they cut and arrange the fabric that they
use for their blocks. Here's an example of a
piece where you can see how directionality
comes into play. In this example, there's
two squares using a one directional fabric and you can see how in the
way they're laid out, this one appears
to be upside down, whereas this one
is right side up. In this piece, we can also see
how scale comes into play. You can see here
that the fabrics that are at a larger scale. These large beautiful
motifs get cut off, whereas the ones
with smaller motifs seem to fit this scale better. Another important
consideration is balance. In a pattern collection, it's important to include coordinating prints
and blender prints, which are the smaller scale,
less detailed prints. This is especially
important for quilting. If all of the prints
are big and bold, the quilt will feel busy and the shapes will be indistinct. Balancing out the more
detailed hero prints with simpler prints can offer a place for
the eyes to rest and really allow the hero
prints to stand out. If you're planning
to use your designs from a surface pattern
design collection and you'd like to practice
adding your designs to these blocks instead
of solid colors. You can go ahead and copy and paste your design swatch tiles into the document
with your blocks and that will add them to
your swatches library. I can go ahead and delete them and then instead
of using solid colors, I can click on a shape and
fill it with a design. This will really give
you a good sense of how your designs look together and see if you need to make any adjustments
and scale or color. [MUSIC] Before you move on
to the next video, take some time to add color or patterns to the blocks
that you've created. In this lesson, we've discussed some considerations for using prints and patterns
in your quilt design. In the next lesson, I'll walk
you through my process of creating a mockup for a block based quilt. I'll see you there.
14. Final Mockup: Block Based Quilt on Graph Paper: [MUSIC] In the previous lesson, we created some custom color
palettes and worked on adding some color and pattern
to your quilt blocks. You have everything
you need now to build your own quilt mock-up. In my opinion, this
part is the most fun. I'll take you through how I
approach arranging blocks in different ways to create a layout and then invite
you to create your own. If you've been working
on graph paper, once you've arranged your
blocks in a way that you like, you can redraw the whole quilt on a single piece of paper. You may need to scale it
down so that it fits. For this block, I treated each square as if
it were one inch. That makes this block
16 inches by 16 inches. I'm envisioning this on a quilt where this block is repeated three times horizontally
and three times vertically. That means the finished size
of my quilt is going to be 16 inches times three
or 48 inches square. Now, this paper doesn't
have 48 inches across. So what I would do
on a clean piece of paper is rescale this. Rather than having this square represent one square inch, I can instead have it
represent two square inches. I'm just going to indicate that in the corner by
writing two inches. That means that
this block that's four inches by four inches, when I redraw it over here, it's only going to
occupy two squares because each square
represents two inches. Once you've determined
your scale, you can go ahead and redraw your quilt with all
of the final blocks. [MUSIC] You'll notice that when I originally
drew this block, I used half square triangles. When I redrew it here, rather than having two
half square triangles, I combined those to
make one flying block. That just eliminates
unnecessary scene. [MUSIC] When just the lines are drawn, it can be a little bit hard to envision what it will look like. That's why I like to go ahead at this point and add some color. Adding color is like magic; it really helps reveal
the shape of your quilt. Depending how you color it, you can have a completely
different quilt. [MUSIC] I ended up changing the design a little
bit from what I had originally planned. This first version that I
made just felt a little flat. It didn't flow in the
way I had envisioned. Rather than having these
blocks repeat straight across, I shifted them down. I have one here
shifted down and up. I'll maybe redraw this and play around with using a
couple of different colors. But overall, I like how
this flows much better. In the next lesson, we'll create another
block based quilt, but this time in Adobe
Illustrator. I'll see you there.
15. Final Mockup: Block Based in Illustrator: In this lesson, we'll
work together to create a block-based quilt
using Adobe Illustrator. When setting up your document
for your quilt mock-up, it's important to
consider what size you have in mind for the quilt. Quilts can range in size from an 18-inch square pillow cover to a slightly larger wall hanging all the way up to a quilt made for
a king-size bed, which is often over
100 inches wide, especially if you're
planning to use patterns from a surface pattern
design collection, it's really important
that you create your quilt mock-up,
true to size. This will give you a
true representation of what your patterns will
look like in the quilt. Let me set my units to inches. I want to create an artboard
that's 60 inches by 6 inches or approximately
150 centimeters. This is a pretty
standard measurement for a throw-sized quilt, which is what I plan
to create today. I'm going to keep my
color mode as CMYK, everything else looks good. I'll hit "Create", so next, I'll go up to View, Show Grid, and
View Snap to Grid. Then I'd like to copy
over the blocks that we created to use as a reference. I have those here, so I'll select these, come up to Edit, Copy or Command C
and edit paste. I have in mind a
block-based quilt. I'm going to be
using some patterns from a collection of mine. Let's start by cleaning
up our swatches panel. Click on these
hold down "Shift", hit the trash can to delete. I have here the designs that I'd like to use for this quilt. I'll go ahead and copy these. Edit paste, and when I paste
them into this document, they'll automatically get
added to my swatches library. Once those have been pasted
and I have the swatches here, I can go ahead and delete them. I've set my artboard to be
60 inches by 60 inches. I'm not 100 percent sure
that my final quilt will be those exact
measurements, but that's approximately
what I'm aiming for it. If I'm planning for this
to be 60 inches wide, and I'd like three blocks
that repeat across the top. Each of those blocks
would need to be approximately 20
inches 20,40, 60. I'm just holding that in
mind as I build my block. You can get really
precise and do the backwards math to figure out how large each
component needs to be. I tend to be a little bit looser and make
adjustments as I go. I'm going to start
with a square. I'll click the rectangle tool. Let's just start with something that's 2 inches by 2 inches. We're going to start
with a small square. Let's start to build this out. I'm going to copy this
block up in the corner. I'll change the
pattern design inside, so when I'm building
out a block, I tend to be very
organic about it. I sometimes have a loose idea and then make
adjustments as I go. I think I would like these
four squares surrounded on two sides by another pattern, perhaps this one again. I'm going to bring this
square over to the side. Now I'd like one that
goes across the bottom. I believe it's 4 inches. I'm going to create
a rectangle that is 2 inches tall and 4 inches wide. As I'm piecing this together, I'm really thinking about how it would go
together as a quilt. If these were squares of fabric, these two would get
sewn together first and then this would
get sewn on top of it. That's why working
in squares and rectangles is so important. Now that I have this, I can actually
delete these three, because I know this is
the one I want to have repeated on all four
sides. Let's come up. I think I'm going to use a
half rectangle triangle. Let's bring this half
rectangle triangle-down. I would like to half rectangle triangles
to fit on this edge. Coming up to my Transform panel, I can see this edge is 4 inches. That means that this
half rectangle triangle needs to be 2 inches wide. I'll make this 2 inches. Let's see, I think I'd
like to give this pattern. I have this very sparse
neutral for the background. I'm going to take
this, I'm going to make a copy and move it over. Then I would like to
reflect the surround. To do that, I'll
click "Go to Object" transform reflect the vertically is what I'm going for,
I'll click "Okay." Now I can take these, hold down the option key, move it down, R for rotate, to rotate those right there. I'm liking how
that looks and how those patterns go together. To finish this off
as a perfect square, I'm just going to add a square of the background right here. I'll click, believe it needs
to be 4 inches by 4 inches. As you practice fitting
different shapes together, you really build a nice workflow and get a good sense of the
measurements and proportions. That's the block
that I have in mind. Let's take a look at
the size of this. If I select the entire block, I met 18 inches, I was going for 20 inches, so that's pretty good. I need to add a rectangle
to fill in these gaps here, and I'll just use this
background color. This is my main block. If you'd like, you
can group your block together with all of
the elements selected. The keyboard
shortcut for that is Command G. Let's see how this looks as it's repeated for the quilt with
everything selected, I'll hold down the option
key and drag it over. It should snap right into place. Sometimes the bigger elements, they don't snap quite as well. I'll do that one more time. Now I'm going to grab
all three of these, hold down the option
key, drag them down. I'm not going to use these
reference blocks anymore, so I can go ahead
and delete those. I like how this looks, but as I look at it, I think it would be nice to have a bit of stashing to
separate the blocks. They look a little
clustered together. What I'm going to do
is delete all but one. I'm going to add a
2-inch wide rectangle here looking at my
Transform panel, I know my block is 18
inches by 8 inches. Using my rectangle tool, I'm going to make a strip that is 2 inches wide
and 8 inches high. We'll add that here. Now let's repeat this across
and see how it looks. I don't need the strip
on the other end, so I'll just take the
block and move that over. I think this bit of stashing in between the blocks
looks really nice. Let's take this set piece of slashing and we're going to
repeat it on the bottom. What I think I'd like to do
on the bottom is rather than having one long piece of stashing that goes
all the way along. I think I'll create a
small square just to add some variety and break
up that negative space. I'll hit M for the
rectangle tool, I'll make a small square
that's 2 inches by 2 inches and I'll use this for
the most contrast. Grab those, copy those
over then I'll copy this. Let's repeat this whole
thing down and see. I think I can delete this bit
of stashing on the bottom. Yeah. I like that a lot better. I like how the stashing
in-between really breaks up the space
between the blocks. You can see I kept
the stroke on. You can imagine this as being where the seams
and a quilt would be. In other words,
this would be where the two pieces of fabric
or sewn together. But now that I have
the mock-up complete, it's sometimes nice to remove
the stroke to really get a full vision of
what the quilt looks like without these
distracting lines. Let's select this all. I'll select the stroke
and give it no stroke. There we have our
block-based quilts. In the next lesson, we'll create one more
mock-up together, this time using a
medallion-style layout. I'll see you there.
16. Final Mockup: Medallion Quilt: [MUSIC] In this
lesson, we'll create another quilt mock-up together, but this time we'll use the medallion layout as the
foundation for our quilt. I have my document set up in
the same way that I did for the block-based quilt
and I copied over all of the blocks that we
created to use as a reference. Another thing I'd like
to do is delete some of these color swatches and import the color
palette I created. To do that, I can come
up to these three bars, Open Swatch Library, come down to User Defined, and I'm going to select
my lotus color palette. I'm just going to click on this folder that contains
the colors that I'd like. The last thing I'd
like to do before beginning my design
is I'd like to place my inspiration photo
nearby to use as a reference. To do that, I'll
come up to File, Place and it's this
one of the lotus. I can drag and open
my photo here. Let's begin designing. Looking at the shape
of this flower, I'm thinking that I
would like a medallion quilt layout for this, something with a center and then having some
different shapes, perhaps triangles coming
out from that center block. I'm going to start
with this one. I'm thinking about
this quilt design, I think I would like a simpler
design with larger blocks. Because of that, I'm going
to make the center block quite large, maybe go 10 inches by 10 inches. I'll make sure it's roughly
centered on the art board. I might change some
of these colors. Because this block
is grouped together, I'm going to double-click
on the center to go into isolation mode and select
just this one piece. I think we'll go with a nice orange in
the middle for now. I think I'll use a neutral off white for the background color. Double-click outside
of the shape to get out of isolation mode. I think I'm going to try my
flying geese block next. This time let's hold
down the Option key. I would like to fit my flying geese block right
on top of the center square. Since the center
square is 10 inches, I'll want this to
be 10 inches wide. I'm going to click on this little chain because I want to constrain the proportions. Let's make this 10 inches wide. That should make
it half as high. That's great. We'll
put that there. Because I have snap to grid, they should line up perfectly. I think I'm going
to copy that again. I'm holding down the Option key to bring another
one of those up. Let's reflect this down. I'm going to pull down the
Option key, bring this down. With those selected, I'll hit R to rotate, hold down the Shift key to make sure it lines up perfectly. One trick I often
use when I want to rotate something
around the center like this is I'll select all
of these blocks on top, hold down the Shift key to select these two
blocks on the bottom, I'll hit R for rotate, and then it'll begin
to bring these around, and while I do that, I'll hold down the
Option key to make a copy and Shift to
snap at 90 degrees. That's just a quick and easy
way to get the blocks on the top and the bottom
to repeat on the sides. I'm liking the shape of this. I'm envisioning these triangles
to be like the petals, and I think I want
those to be white. I could go and select each of these triangles
individually, but a shortcut is to use
the magic wand tool. The keyboard shortcut for
the magic wand tool is Y, and it's this one here. With the magic wand tool, I can click on any color
and it will select every piece in the document
that's the same color. Now, it picked up
some pieces that I don't necessarily want
to change right now. So what I can do is, with my selection tool, hold down Shift to deselect
some of these pieces that it selected that I don't
necessarily want to change. [NOISE] I might change those to, let's try this light pink. Then I'll hit Y for the magic wand tool and select
these yellow triangles. Then using my eyedropper tool, I'm going to change those
to the background color. That gives a little bit
better impression of petals radiating out
from that center. I think I'd like to add some
half square triangles next. I'd like this half
square triangle to fit here next to the
flying geese block. This flying geese block
is five inches high, so I'll make this
half square triangle five inches by five inches. Double-click to go
into isolation mode to change the color of
each of these pieces, make that a slightly
darker purple color , maybe that one. I'm not sure about that yet. We'll try that. I'll probably
end up changing that later. Let's duplicate
this a few times. I think rather than having
all of these the same color, I'm going to change one
of these to be a little bit darker just to
add some variety. That looks good.
Up in this corner, I think I'd like to add a square using the background color. I'll use the rectangle tool, make a square that's five
inches by five inches. Set it into place. Now I think I'll take
this entire section and copy it into
each of the corners. I'll grab this section, hold down the Option
key to bring it down, rotate it so that it's
oriented properly, and then I can grab both of
these sections together, hold down the Option key
and drag them over into place and then hit R
to rotate them around. I don't think I'm
going to be using any of these other blocks. I'm going to go ahead
and delete this for now to give myself a
little bit more workspace. I'm liking this design. I'm noticing that I have
a few gaps to fill in. I think I'll just
fill those with a rectangle of the
background color. [MUSIC] That's
looking really good. One thing I'm noticing
about this design is that my eye is drawn from
the center outward. I feel like it would benefit
from something perhaps in the corners to draw
the eye back in. So I think I'd like to add
something up in each corner, perhaps another half
squared triangle. So I'll grab this triangle, bring it over, hit R
to rotate it around. I think I'll change and give it the same color as
the center block. I think that will add a bit of cohesiveness to this design. [MUSIC] We could use the keyboard shortcut R
to rotate these around, but the other option
would be to reflect them. In order to reflect,
I'll come up to Object , Transform, Reflect. I'd like to reflect
them vertically and I'll click "Okay". I think the final
thing I need to add is a couple of rectangles, and I'll make these the same
color as the background. There it is my
final quilt mockup. I don't need my
reference photo anymore, so I'm going to go
ahead and delete that. As I mentioned before,
when I'm designing, I like to keep the stroke on, it helps me see
the boundaries of each of my blocks and helps me visualize where the seams will be if I were to make
this into a real quilt. But now that I have
the final design, those lines can be a
little bit distracting. So I'm going to
select all of this, come over to my stroke, give it no stroke. By removing those lines, you can really get
a good sense of what this design looks like. Your quilt mock-up
is now complete. In the next lesson, I'll discuss some options for exporting and using your quilt mockup
to share in a portfolio, on a website, or on social
media. I'll see you there.
17. Exporting for Web and Print: [MUSIC] Now that your
quilt mock-up is complete, let's export it for use in your portfolio or
in social media. Let's go ahead and export this mock-up for
sharing on Instagram. We created our quilt
mock-ups to scale. This is 50 inches by 50 inches. I don't need a document this
big for any of my purposes. I believe the ideal size
for a square post on Instagram is a 1080
pixels by 1080 pixels. I'm going to come
up to my Window, and I'm going to open
my Artboard's panel. This gives me access
to my artboard. The artboard is just this space that's defined by this line. You can think of it
like your canvas. If I double-click here, I can get access to some
details about my artboard, and I create an art board
that's 60 inches by 60 inches, which I know is way
bigger than I need. If I'm planning to export
this for Instagram, I can change this to 1080. If I type in px, for pixels, Adobe Illustrator will calculate
the conversion for me. By 1080 pixels. My artboard is now 15
inches by 15 inches. I can use those
same measurements to resize my quilt mock-up. I'll open up my Transform
panel and I'll make this 15 inches by 15 inches. If your quilt mock-up
isn't a square, if you've opted for a rectangle, all you need to do is make sure that your longest measurement, whether that's the
width or the height, is 15 inches, is the same size as the square, and then you can fill
the background with a neutral color, perhaps white. Now that I have my
quilt mock-up resized, I can come up to File, Export, Export As, and I'll title
this lotus quilt mock-up, and let's just save
this to my desktop. I generally use PNG for something I'm
uploading to the web. JPEG would work just as well. Make sure you click
on "Use Artboards". I can click "All", I
only have one artboard, and then I'll hit "Export". Since the intention
for this is to be used on a screen on Instagram, 72 PPI is sufficient. I want to make sure I
select "Art Optimized". I can keep the
background color as white and click "Okay". If you're planning to
export this for use on a website or digital portfolio, the process is very
much the same. However, if you're planning to export this for use on print, it requires a little bit
of extra consideration. Once I export this, it's going to be converted
to either a PNG or JPEG, which is a pixel-based format. That's important
because once I do that, I would no longer
be able to enlarge this image without
losing quality. It would appear pixelated. Let's say I'm planning to use this mock-up in a
print portfolio, and to the pages
of the portfolio are 10 inches by 10 inches. I know then that I'm
not going to need this image to be any
larger than 10 inches. I can safely resize this quilt mock-up to be 10
inches by 10 inches. Let's go ahead and do that. I can do the same
to my artboard. Let's come back to Window, Art boards, I will change my artboard to
be 10 inches by 10 inches. There are certainly
a few different ways to do this in Adobe Illustrator. I like to use my
artboards for exporting. It's just the way that
I'm most familiar. Let's zoom in. Now let's
go ahead and export this. I'll come up to File,
Export, Export As. Again, I'll save
this to my desktop. Let's title this Lotus
Quilt Mock-up 2. You could choose
either PNG or JPEG, either really will work fine. Let's choose JPEG this time just to see what
options come up. I want to use my Artboards,
and I'll use All, I only have one, and
I'll click "Export". We're not going to talk too
much about color mode here, but in general, if I'm planning
to use this for print, I'll use CMYK, and I'll choose RGB, if it's something I
plan to use on the web. I want to make sure the
quality is up to 10. The resolution is also
something to note. If you're planning to
use this for print, you want to keep
this at 300 PPI. If you're planning to
use this on a website or digital portfolio, you can safely choose 72 PPI. Make sure Art
Optimized is selected, and then you can click "Okay". If you've created your quilt
mock-up on graph paper, go ahead and snap a photograph, so that you can share
it with the world. In the next lesson, we'll talk about some options
if you're interested in having your mock-up made into a real quilt. I'll
see you there.
18. Fabricating Options: [MUSIC] A quilt mockup is a great way to show off your surface pattern
design collection in a portfolio or
on social media. But having a real
quilt to touch and feel will really bring
your ideas to life. Perhaps from your mockup, you'd like to make
a quilt for a gift or to honor a
special occasion or maybe you want to make a
quilt to bring with you to meet an art director
or to quilt market. How remarkable would it be to hand an art director a quilt featuring your designs so they can hold and feel
the final product? You may be wondering,
how can I go about turning my mockup
into a real quilt. You have a few
different options. If you're not interested in
making the quilt yourself, there are many talented quilters out there that work
on commissions and have the skills
and ability to take your mockup and create
a real quilt from it. The modern quilters
guild would be an excellent resource to help connect you to local
quilters in your area. I've included a link to their website in the
resources section. If you would like
to make the quilt yourself but have never quilted before and aren't sure where
to start, check back soon. I'm planning on creating a
course for beginner quilters. In that course, I'll
walk you through the entire process
from beginning to end of creating a quilt. That will help give you the
skills that you need to bring your own quilt
mockup to life. Be sure to check back.
19. Final Thoughts: [MUSIC] Congratulations.
You've done it. You've gone through
the whole process and created your very
own quilt mockup. In this course, we've learned some foundational
information about quilting. We created some of the
most common quilt blocks, talked about where to
source inspiration, created our own custom
color palettes, and taken all of that to
create a final mockup featuring our own color palette or surface pattern
design collections. Feel free to go back and
review any lesson as needed, as you continue to create
more mockups in the future. If you have any
further questions, I invite you to please ask
on the discussion page. I'm here and available
and would love to support you throughout this
process any way I can. I highly value your feedback. Leaving your review will
help others find it, and it will also
help me continue to create quality content. Don't forget to share
your final project in the project section. If you need to share your
project on social media, be sure to tag me so
that I can see and continue to spread the word of the beautiful work
you're creating. Thanks so much for joining me.
 Juli Rae Vignola, Quilt artist, natural fabric dyer