Transcripts
1. Introduction: Have you been curious about adding curved blocks
to your quilts? But it felt a little
intimidated to give them a try. Maybe you've heard that piecing curves is really difficult. And you've avoided
them up to this point. Or maybe you've tried
making a curve block, and it didn't turn out so well. Circles and curves can add such a unique and beautiful
element to a quilt design. However, they have
a reputation for being notoriously
difficult to master, and it's no wonder many
quilters avoid attempting them. Piecing curves does require
some techniques that are different than the ones used for more traditional quilt blocks. In this class, I
hope to demystify sewing curves so that you can utilize them as part
of your repertoire. Hi, I'm Julie Ray. I'm a quilt artist and online educator living
in Portland, Oregon. I bought my first
sewing machine in 2013, and I've been obsessed with sewing fabric
together ever since. I love exploring line, shape, and color in new ways to create modern quilt designs
that are truly unique. I specialize in natural
fabric dyeing and use curved piecing almost
exclusively in my current work. This class is part four in my quilting for
beginners series. In this series, I break down the entire process
of creating a quilt, beginning with the
fundamentals and progressing towards
more advanced skills. Before beginning this class, I recommend that you
have a little bit of experience with
piecing a quilt top. Ideally, you've already
completed a quilt or two. You're brand new to quilting, I recommend starting with
part one of this series. In that class, we
cover the fundamentals of quilting and learn how
to piece a quilt top. You can find a link to that in the resources section
of this class. Throughout these lessons,
we'll work to create the three most common curved
blocks found in quilting, the quarter circle,
the half circle, and the inset circle. Along with this
course, I've also provided a free quilt pattern for you to download and use. This quilt pattern will provide an opportunity to
practice the three blocks that we'll be constructing
in this class while you work towards creating
a finished project. So bring along your sewing
machine and join me as we work together to create
some beautiful curved blocks.
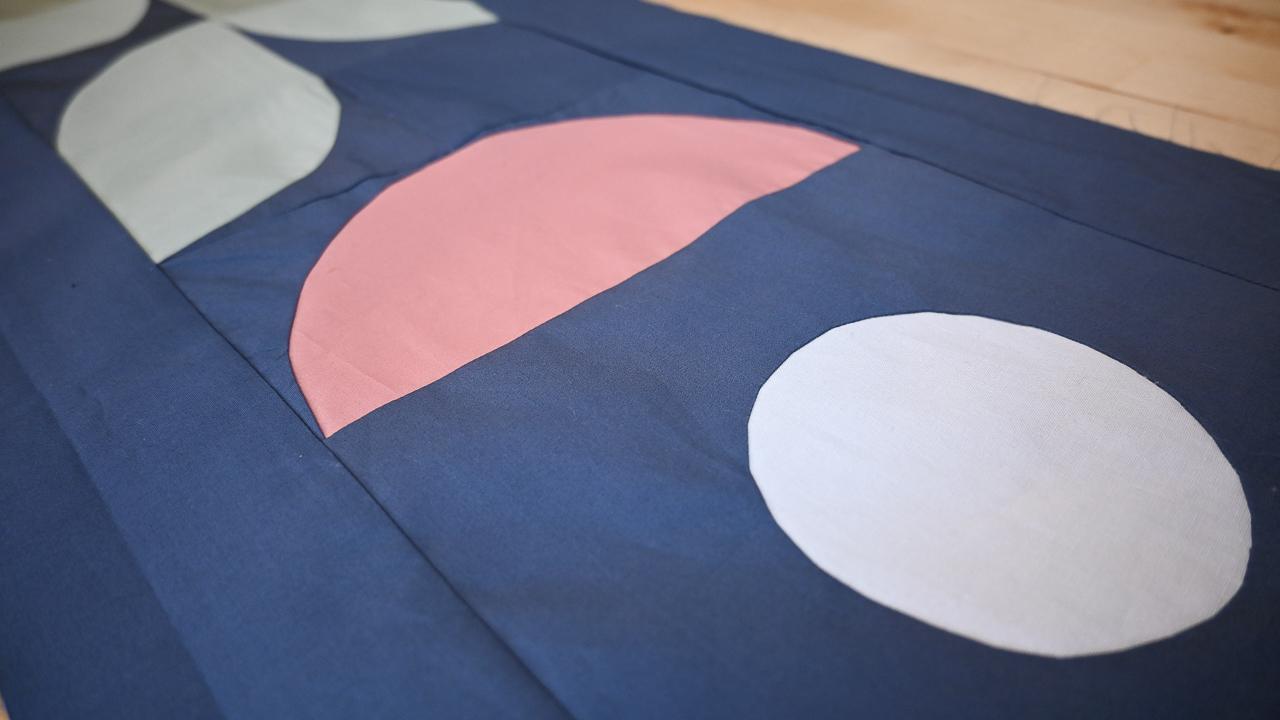
2. Class Project: In this class, we're
going to be working to construct the three
primary curved blocks, a quarter circle, a half circle, and a full circle, which is usually referred to
as an inset circle. To help us practice
these blocks, I've included a
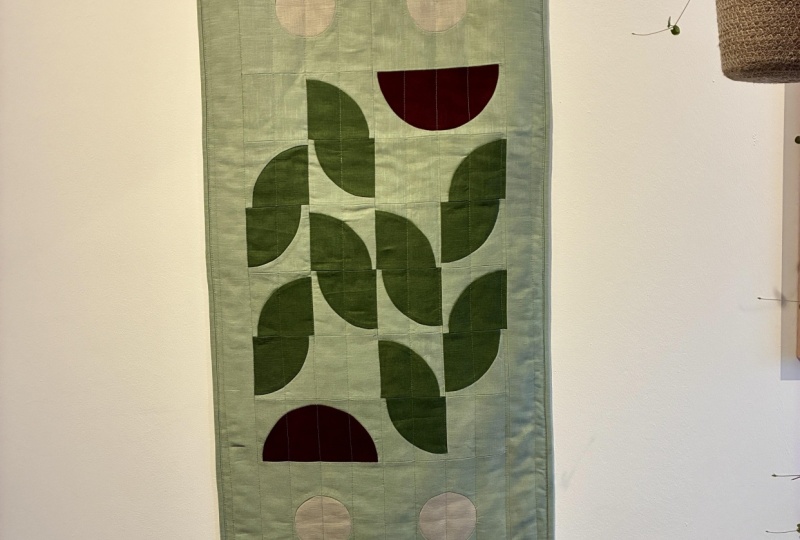
free quilt pattern called the in bloom wall quilt. Following along
with this pattern, we'll allow you to
practice all three of these blocks and work towards a beautiful
finished project. This quilt pattern also
offers some suggestions of different variations you can create based on
this quilt pattern. So feel free to scale your project as small or
as large as you like. You've completed
your quilt top or whatever project you're making
using these curved blocks, take a photograph and upload
it in the projects section. In the next lesson, I'll be going over some
of the materials and supplies you'll
need to gather for this class.
I'll see you there.
3. Materials and Supplies: In this lesson, I'm
going to go over some of the materials and supplies you'll want to gather
for this class. If you've been quilting
for a little while, you'll likely have
most of these on hand. First of all, you want to gather some of your standard
sewing notions. You want a neutro colored
thread for piecing. I like to use 50
weight cotton thread. Some sewing machine needles. You'll want to have some
straight pins on hand. You'll also want to gather
your cutting materials, a self healing cutting
mat, a rotary cutter, a pair of sharp fabric scissors, as well as a pair of
smaller thread scissors and your acrylic rulers. I have a variety of sizes. If you only purchase
one acrylic ruler, I recommend this long
one -24 " by 6 ". There's also two
different presser feet that we'll be using
in this class. The first is a quarter
inch presser foot, and this helps ensure
accurate seam allowances. You also want a zipper foot. Most sewing machines
will come standard with a quarter inch
foot and a zipper foot. If you don't have a quarter
inch foot or a zipper foot, you can find universal ones online at a pretty
reasonable price. You'll also need to gather
some pressing supplies, a hot iron, preferably
one that can produce steam and a
pressing surface. I'm using a wool pressing mat, ironing board or other pressing surface will work as well. So here's a little overview of some of the other supplies
that you'll need to gather. For the different PC techniques that I'll be teaching
in this course. In this class, I'm
going to be showing you how to create your
own curved templates. And here's a few things you'll
need to gather for that. First of all, you'll
need a card stock or a lightweight cardboard. I really like to use
an old cereal box. I find this to be
the perfect material for creating our
curved templates. You'll need a pen or a sharpie or some kind of marking tool, a scissors designed
for cutting paper. You don't want to use your
precious fabric scissors for cutting out
cardboard and a ruler. I have this plastic
school ruler. You're also welcome to use your acrylic quilting
rulers, if you like. One of the techniques
we're going to use will require freezer paper. Freezer paper can be purchased at your local grocery store, and you really want
to ensure that what you purchase
is freezer paper. Freezer paper is different from parchment paper and wax paper. Wax paper is coated
with wax on both sides, and parchment paper
isn't coated at all. Freezer paper is coated
with wax on one side, and it's matte on the other. The freezer paper that I use is designed specifically
for quilters, and this is nice because it's a little bit heavier weight, so it makes it easier to reuse. But the freezer paper
that you find in your local grocery store will work just fine for this class. You'll also want a compass. This will help us
draw perfect circles. We're going to be doing
some glue basting, and this is a
special basting glue that's designed
specifically for quilters, and I really like to use this
for glue basting because the applicator tip provides a high level of control
over how much glue you use. If you can't find
glue specifically designed for quilt pasting, you can also use an
Elmer school glue, and that will work just fine. And finally, you'll need to gather the fabric
you'd like to use. I recommend using
a quilting cotton, as this will be the
easiest to work with. If you're just practicing making some different blocks without an intended project in mind, you're welcome to just use
two contrasting colors of scrap fabric or perhaps grab
a couple of fat quarters. If you are following along
with the pattern provided in this class or using another quilt pattern
of your choosing, refer to the fabric
requirements table to ensure you have all
the fabric that you need. If you haven't
already, go ahead and download the free
resource workbook, as well as the in bloom
wall hanging quilt pattern. So take some time to gather all of the different
materials that you'll need. I'll meet you in
the next lesson. We'll I'll provide
a brief overview of the three different
curved blocks that we'll be learning
about in this class.
4. Overview of Curved Blocks: In the last lesson, we went
over all of the materials and supplies that you'll need to complete the upcoming lessons. Before we jump into creating, let's take a closer look at the three primary curved blocks, the quarter circle,
the half circle, and the inset circle. Well, the curved blocks
are not as common as the more traditional
square rectangle and triangle blocks that you
find in many quilt patterns. They can add a great
deal of variety to a design and help achieve
a more organic look. One thing to note about curves is that even though we'll
be creating circles, every curved block will be finished as a square
or a rectangle. This will allow for it to be easily sewn into
the quilt design. Quarter and inset circles
will be finished as squares, and the half circle block is generally finished
as a rectangle. Let's quickly review a
couple of terms that you may remember from high
school geometry class. Each curved block is
comprised of two pieces, a concave piece, which is the background fabric
and a convex piece. This is the piece that
makes up the inner curve. Here are a couple of
other important terms that will take a
moment to refresh. The radius of a circle
is the distance from the center point to
a point on the edge. The diameter of a circle
is twice the radius. It measures the distance of
a line from one point along the edge of a circle to another point as it passes
through the center. Piecing the two components
of a curve together, you need to take
the quarter inch seam allowance into
consideration. Therefore, the diameter
of the inner curve or the convex piece will need to be larger than the background
curve or the concave piece. This will make more
sense in the next lesson when we create our templates. If this is at all confusing or doesn't quite make
sense at this point, don't worry too much about it. Trust that it'll all come
together as we begin working. In the next lesson,
I'm going to show you how to create your
own curved template, and we'll be using these
templates to create all three of our curved
blocks. I'll meet you there.
5. Curved Templates: In this lesson, I'm going to
show you the technique that I used for creating my
own curved templates. Now, most quilt patterns
that you use will include templates for any curved blocks that are used in the quilt. However, I find creating my own curved templates
to be super useful. They not only allow you to create any sized curve you want, but they also help
you begin to wrap your mind around how
curves are constructed. I love being able to
create my own templates. It allows me to create really small circles,
really large circles. Creating your own
templates really gives you the power to create any
size curve that you like. So the first thing we
need to do is figure out what size templates we need to make for the curves
we'd like to create. For every curve, you'll
need two templates. One template for
the inner piece, which is the convex curve, and one for the background
piece or the concave curve. In order to account for the
quarter inch seam allowance, the diameter of the
background curve needs to be cut smaller than the
diameter of the inner curve. Here's the formula
for calculating the size of the two different
templates you'll need. For the outer curve
or the concave curve, you'll subtract a half inch from the desired
finished diameter. For the inner curve
or the convex curve, you will add a half inch to the desired finished diameter. So let's say, for example, you want to create
a half circle block that's 8 " in diameter. You would need to
make a template that's 7.5 " in diameter, for the outer curve
or the concave curve, that's 8 " minus a half
an inch to get 7.5 ". And you would also
need a template that measures 8.5 " in diameter or eight plus a half an inch for the inner curve
or the convex curve. For the blocks that
we're going to be creating for the
bloom quilt pattern, these are the exact
sizes that you need. So we're going to be
making two templates, one that measures 7.5 " and
one that measures 8.5 ". So to create your templates, you'll need two pieces of lightweight cardboard that are large enough for the size
curve you'd like to make. I'm using an old cereal box, and you'll also need a ruler. I'm using this school
acrylic ruler, but you can use your
quilting ruler as well. A pair of paper scissors. Do not use your fabric scissors. Cutting cardboard with
your fabric scissors will dull them. And
you don't want that. And also a pen or a pencil for marking and
labeling our template. And the first thing
you want to be sure if you are using something like a cereal box is that we have one edge
that's straight. And the way that I do that
is I'll just take my ruler, mark a straight line
across one edge, and then just take
your scissors and cut. This will be the edge that
we'll be working from. Great. Let's create
these two templates. First, I'm going to make the 8.5 inch half circle template. Putting my cardboard
flat on my workspace, I'm going to take my ruler
along the straight edge of the cardboard and I'm going to mark the diameter of my curve. In this case, 8.5 ". Since I have these weird
folds on the edges, I'm going to try to
avoid those and mark the 8.5 inch diameter
inside this flat space. So I'm gonna line that
up. Use my marking pen, and I generally use
a pencil for this. I'm using a marker to make
it easier for you to see. I'll place a mark at the zero. And then I'll place
a mark at the 8.5. Then I need to find the radius by dividing the diameter by two. 8.5 divided by two is
four and a quarter. So using my ruler, making sure it's
lined up at the zero, I'm going to make a mark at four and a quarter inches,
which is right here. This is my center point. Next, I'm going to use
this radius measurement, the four and a quarter inches to mark straight up
from the center, perpendicular to
the straight edge. So I'm going to line up here at four and a quarter inches and come up and make a mark at zero. Then keeping my
ruler centered at the halfway point along
the straight edge. I'm going to continue moving my ruler around like a clock, marking the radius all
along the curved edge. I'm keeping the four and a
quarter mark aligned right at that center point as I move
my ruler around the curve. And as you can see,
those little points, once they're all connected,
will make a nice curve. Then I just have to do
the same to this side. Lining up my four and
a quarter right with the center mark
and continuing to rotate my ruler and marking my measurements
to create the outer edge. The more points you mark, the clearer your curve
is going to appear. The next step is to
connect these points. And for this, I am going
to use a pencil just because this can take
a little maneuvering. I'll just take a
pencil and lightly connect all of those points. Once I have all those
points connected and my curve is complete,
I'm going to cut it out. This is why a lightweight
cardboard is useful. Thick cardboard can
be hard to cut out. So card stock or
lightweight cardboard generally works best. There we go. Once
I have it cut out, I can label this 8.5
inch, half circle. Now, let's repeat these steps for the second half
circle template. So for this half
circle template, I'm going to line up my ruler
with the straight edge, again, avoiding
these creased marks, and I'll begin by
marking the diameter. The diameter that I want
for this template is 7.5 ". And then I want to find
the halfway point, which would be the radius. And half of 7.5 is three
and three quarters. Then using my ruler,
I'm going to mark the radius straight up
from the center point. So I'm going to place my
three and three quarter mark right on that center
point and mark at the top. Then rotating my
ruler like a clock, I'm going to continue
to mark the radius, all the way around the
outer edge of the curve. Then I'll use my pencil to
connect all of these points, creating the outer edge of my curve, then I'll cut it out. And lastly, I'll label
this 7.5 inch half circle. You've now created the
templates that you'll need. To create nearly all of the curved blocks we'll be
constructing in this class. In the next lesson, we'll
use these templates to create a four inch quarter
circle. I'll meet you there.
6. Quarter Circle Block: Cutting and Pinning: All right, let's get started. In this lesson, we're going
to be using the templates we created in the previous lesson to create quarter circle blocks. Quarter circles are definitely
the most forgiving block, making them one of the easier
curved blocks to create, which is why we're
beginning here. A quarter circle is essentially
half of a half circle. So we'll be using half of
our half circle templates. I'm going to begin with
two squares that are about a half inch larger than
my desired unfinished size. So since I'm planning to make quarter circles that are
4.5 " by 4.5 " unfinished, I'm starting with 25 inch
by five inch squares. One will be for the inner curve, and one will be for
the background curve. Beginning with squares
that are slightly larger will allow
some trimming room, which you'll appreciate, especially when you're
just starting out. Let's begin with
the inner curve, and I'm going to use this sage
green for my inner curve. These are my two templates. If you remember from
the overview lesson, the inner curve needs to be larger than the outer curve in order to account for
the seam allowance. For the inner curve,
I'm going to be using the 8.5 inch half
circle template. I'm going to set this
template aside for now. To begin, I'm going to
align the bottom edge of my template with the
bottom edge of my fabric. And I'm going to align the
halfway mark at the top and the bottom with the
side edge of my fabric. Now, one thing to remember
is these templates don't include seam
allowances for the edges. Since this block is going to
be sewn to another block, we need to make sure
that we account for the seam allowance
on both of these edges. To do that, we're going to shift the template up a
quarter of an inch, and I can use my acrylic
ruler to measure that. And then we need to slide it
over a quarter of an inch. That ones a little harder
to get exactly precise. But I can eyeball it
and then check with my ruler to make sure that
I have quarter of an inch. Once I have that in place, I'm going to hold
the template down firmly with my non
dominant hand, and then I'll use my
dominant hand to very carefully cut along the
edge of this curve. And since this fabric is intended for the inner
portion of the curve, I can discard this
outer portion. For the in bloom pattern, you'll need eight
quarter circles. So I'm going to go ahead and cut out my seven other inner curves, and then we'll move
on to cutting out the outer portion of the curve. So I have the inner curve for all of my quarter
circle blocks cut out. I'm going to set those aside for now and move on to
the outer curve. The outer curve needs to be smaller than the outer curve again to account for
the seam allowance. I'm going to use the
smaller template, the 7.5 inch half
circle template. We're going to line this
up the exact same way that we did for the inner curve. I will line up my
template along the edge. Since we're just doing
a quarter circle, we'll use half of our half
circle template and line up the side edge with the halfway marks on
the top and the bottom. Then we'll use our
ruler to shift the template up a
quarter of an inch and over a quarter of an inch to allow for a seam allowance on the bottom edge
and the side edge. Once I have that all lined up, I will hold my
template down firmly and cut along this curve. And since for this one, I want to use the
background piece, I'm going to discard
this inner curve. I'll go ahead and cut out
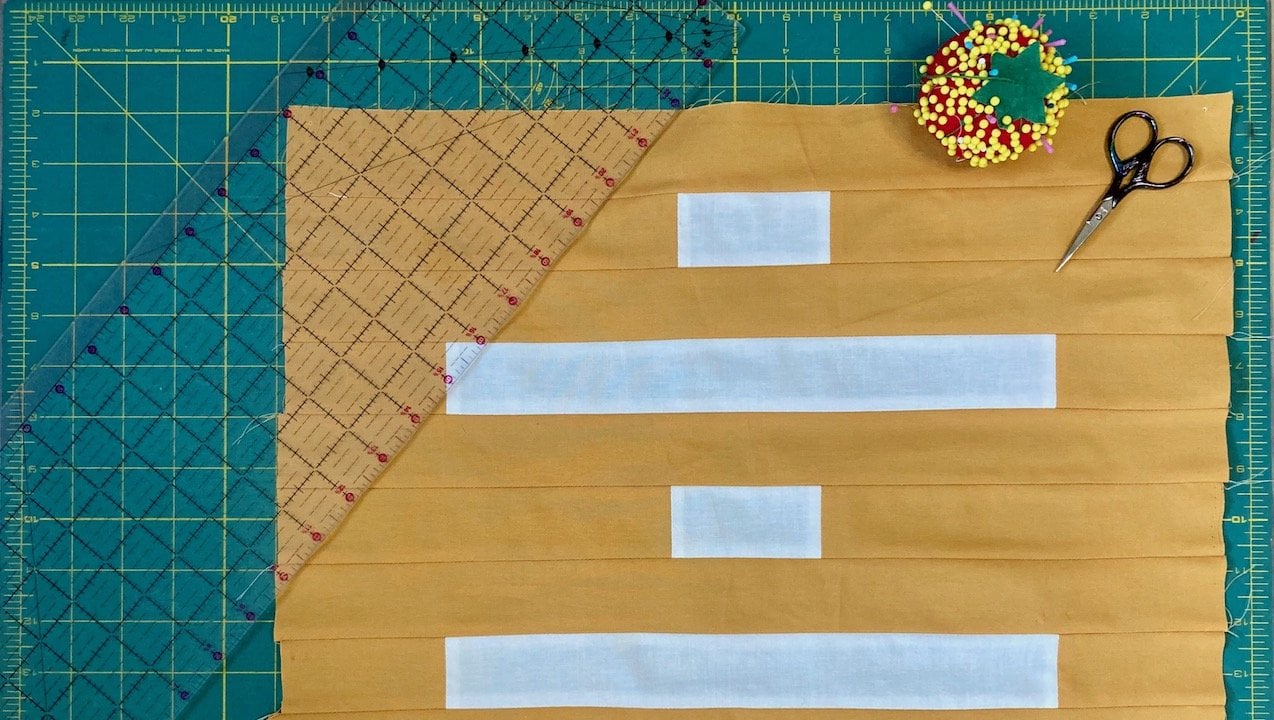
all of my background pieces. Here are a couple
of tips if you are working with printable
paper templates that maybe came with
a pattern rather than the cardboard or card stock
templates that we created. First of all, when
using these templates, you don't need to account for the quarter
inch seam allowance. On the bottom and the sides as the pattern designer will have factored those measurements in. So you can line
these templates up directly with the
edges of your fabric. Now, cutting along the paper, because it's so
thin, it's a little bit more challenging
to stay precise. So what I like to
do is I like to use an acrylic ruler as a guide. And I'll follow my
acrylic ruler all the way around the edge and very
slowly use that as a guide. To be sure that I don't cut into the paper template. All right. So here I have my inner portion and outer portion for my
quarter circle block. And you can already see how
these two will fit together. If we kind of line them up, they should overlap
about a quarter of an inch all the
way along that curve. That's a good indication
that you've done it. Right. The next step
is we're going to pin, and I always like
to mark the center. So what I'm going to do
is I'm going to take the outer curve,
match the edges. And make a little crease
right at the center point. And we can do the same
thing with the inner curve. We do a little finger press
to make a crease there. Now, we're going to pin
these right sides together, and this part takes a
little bit of trust. It might seem like
it's not going to work, but trust to that it will. I like to start at
the center point and match the center point. I have them lined up how they're going to
be sewn together. Then I'm going to
flip them right sides together right at
that center point. So I'm going to
flip this over and pin right at the place
where I marked the centers. Next, I like to pin the ends. So I'm going to go to this end. And for this, you can just
kind of follow all the way. I'm going to pin right
here and match the end. And then I'll come to this
side and do the same thing, matching the raw edges right
at the end, and I'll pin. Don't let your
fabric shift on you. And then if you like, you can add a couple
pins in between. When doing this, you'll see that as you kind of
manipulate the fabric, those raw edges will just kind of naturally line
up with each other. You want to be careful not to stretch either side
of the fabrics. Because curves are cut along the bias and
not along the grain, they're very prone
to stretching. And if either of your
fabrics becomes stretched, it will create a pucker or
creasing in your curve, and your curve won't lie as
flat as it would otherwise. So I'm going to add a
couple more pins here. And it seems a little funny. It seems a little awkward. It's definitely not
laying flat right now. But it should look
something like this. I'm gonna take this over
to my sewing machine. I'll meet you in the next lesson where we'll sew our
block together.
7. Quarter Circle Block: Sewing and Trimming: In the previous lesson, we cut out the pieces for our quarter circle blocks
and pinned them together. In this lesson, we'll work to finish our quarter
circle blocks. All right, so I have my piece
over at my sewing machine, and we'll spend a
moment getting set up. First, I'm going to install
my quarter inch presser foot. This will help us keep a
consistent seam allowance. I'm also going to set my
stitch length to 2.0. We'll place our fabric
under the machine lining up the raw curved edge with
the quarter inch marker. I like to put my needle down just to kind of
secure that in place. And I'm going to very
slowly begin sewing. Oops. You want to be sure to
remove the pins as you go. Since we are using a
shorter stitch length, there's a greater chance that your needle
could hit a pin. And the key to curves, especially when you're
starting out, is to go slow. And as you sew, you kind of want to adjust. If you notice that there's
a little tuck or a pucker, you can kind of try
to smooth it out. I'll sometimes even use a pin, sweep it underneath
just to kind of smooth out any fabric that
might be bunching up. In the end, you might
need to use a pin to kind of pull these two
pieces back together. Be sure that the rat just stay aligned all
the way to the end. Now I'm going to bring this
piece to my pressing mat. All right, so I have my bock
over at my pressing mat. And the next thing I'm
going to do is I'm going to snip inside the
seam allowance. This is something that I find helps the two
pieces lay flat. So I'm going to take just
a small thread scissors and just snip about every
quarter inch or so, all the way along
the seam allowance. Just being very careful not
to snip into my stitching. If you do that, you'll have
a hole. I've done it before. It's sad. I'm just going
to snip all the way along the edge. And then I'll press. I will almost always press
towards the background fabric, and the only exception
I make to that is if the fabric
that I've used for the inner curve is much
darker than the background. If I'm using a white background or a very light
colored background, then I'll press it
towards the center. So with my iron, being very careful to
press and not iron, then I'll flip it over
and press it again. And that looks pretty good. You can see on this edge, I have a little bit of a little place here
where it's not perfectly aligned,
but that's okay. That's why we left some
space for trimming. So we'll be able
to trim that off. And the final step before I'm finished is to trim this block. And I want the
unfinished size of this block to be 4.5 " by 4.5 ". So I'm going to line that up. And one thing I want to pay attention to
while I'm doing that is I want to ensure that I have
at least a quarter inch from the seam line here to the end of the
background fabric, and that's to allow
seam allowance for sewing the blocks together. So I'm going to line this up. 4.5 ". My 4.5 inch mark
here and 4.5 " there. I've got a quarter inch of background fabric here and
here, so that should be good. And then I can take
this and trim. And we left a very generous
amount of room for trimming. There is my first
quarter circle block. Go ahead and make a few
more quarter circle blocks. If you're creating the
in bloom wall quilt, you'll need eight
quarter circle blocks. Take some time and
finish making all of the blocks that you need before moving on to the next lesson. In the next lesson, we'll work on making a half circle block.
8. Half Circle Block: In the previous lesson, we
created quarter circle blocks, and hopefully you've
had a chance to practice at least a few and are beginning to
feel comfortable piecing the quarter
circle curve. In this lesson, we're going to move on to the half circle, which is a little
bit more challenging than the quarter circle and provides the perfect opportunity to continue practicing
your skills. We're going to be using
the same templates to create an eight
inch half circle. And rather than using pins, in this lesson, I'll introduce a technique called glue basting. Our half circle blocks, we'll begin with two rectangles. Cut, so that each side is about a half inch longer than the desired unfinished size. If you're following along with the in bloom quilt pattern, you will need five inch
by nine inch rectangles, one of fabric B, and one
of the background fabric. For the technique I'm
going to be showing you, you'll also need the templates that we created in
previous lesson, your 7.5 inch half
circle template, and your 8.5 inch
half circle template. You'll want straight pins, a rotary cutter, and I'm going to be showing you
the glue basting method. You'll want to
grab whatever glue you're using for glue basting. So I'm going to begin by
cutting out my half circles. I'll start with my
inside half circle, and I'm going to be using my larger template to account
for the seam allowance. So using my 8.5 inch
half circle template, I'm going to line up
the straight edge of the template with the long raw edge of my fabric. And since we haven't
accounted for the quarter inch
seam allowance that we'll need when we're sewing
this block to another block, we want to be sure to add a
quarter inch at the bottom. And I can do that using
my acrylic ruler. I'm just going to push
this up a quarter inch. I can use my ruler to
be sure that's exact. And we'll line it
up right there. Then holding my
template down firmly, I'll use my rotary cutter to cut around the template
and cut out my curve. Since this is the inside curve, I can discard this
outer portion. I'll set that aside. For
the background piece, I'll use the smaller template. In this case, the 7.5 inch
half circle template. And I actually want to be sure that this piece is centered. So the first thing I'm going
to do is fold this in half, matching the short edges. I'm just going to finger press just to create a center mark. I don't know if
you can see that. Just made lit a little
mark there at the center. And then I can line up
my center mark here, with the center mark
I just created. And like I did before, I'm going to line up this
long straight edge of the template with the long
raw edge of the fabric, and then I'm going to
push it up a quarter of an inch and I'll use
my ruler to measure. Make sure that's still centered, and then I will cut
out this curve. And since this is the
background piece, I'll discard this inner portion or save it for another project. Now we need to base
these together, and I'm going to be showing
you the glue basting method. The first thing I
like to do is find the center point of both the inner curve and
the background piece. To do that, I'm going
to fold this in half, matching the corners and
all of the raw edges, and just do a little finger
crease right at the top. You can also use a pin to mark that center
point if you prefer. I'll do the same thing
with the background piece, fold it in half, matching
all of the raw edges. And just finger press to
find the center point. Now, I'm going to
line these up as I want them to be arranged
in the quilt block, and right at the center point, I'm going to flip this
half circle over so that these two pieces are right sides together, just like that. And then I'm going to put a pin right at the center point. And pinning at the center
point just helps to ensure that these two
pieces stay centered. I've switched over
to my pressing mat and plugged in my iron. That's going to help the glue basting portion go a
little bit faster. As I mentioned in the
materials lesson, this one's really nice
because of this applicator, it makes it really easy to control the amount of
glue that comes out. The Elmer school glue is
another really great option. And with that, if you're having a hard time controlling the amount of glue
that comes out, if it feels like too much
is coming out at once, what I've done is just opened
up the cap and used a pin, obviously not one that
you'll use with fabric. And dipped the end of the
pin into the glue bottle and use that to apply the
glue around the raw edge. So that's an option
if you're not able to find specific
basting glue. So what I like to do is I
like to start at the pin and work my way from one side to the edge and then from the
other side to the edge. So starting here in the middle, I'm going to apply a very, very thin layer of glue, maybe just a couple of inches, very close to the raw edge. I want to be sure
that the glue I'm applying is within the
quarter inch seam allowance. So you really don't want
to add very much at all. And then I'm going to
follow along this curve. And match the raw edges, essentially gluing
those together. And I'll finger
press for a moment. And if you've used only
a little bit of glue, you shouldn't have
any seeping out. And I might just do
a little press with my iron to help aid in the drying of the
glue and setting that. And then I'm just
going to keep going. I'm going to follow all the
way along this raw edge, applying a very
thin layer of glue. Within the quarter
inch seam allowance. I'm about maybe an eighth of
an inch from the raw edge. And then I'll continue following along
matching the raw edges. And one thing you want to
be really mindful of is to not stretch or pull
either of the fabrics. Because this is cut on the bias, it's going to be
prone to stretching. You want to avoid that. Just
set that and keep going. So I've got that
side glued together. I'm going to do the
same thing over here, applying a thin layer of
glue all the way along this raw edge and matching
the two edges together. Glue basting is honestly one
of my favorite techniques. I find that it really is
useful in getting clean, accurate edges
without any pokerin. And at this point, you
can remove the pin. I usually leave it in, and
I'll take it out as I sew. Now that I have the
raw edge of the curve, glue basted together, I'm ready to take this to
the sewing machine. Alright, so I have my
quarter inch presser foot installed on my machine, and my stitch length
is set to 2.0. I like to sew with the
inside curve facing down. I find that makes
it a little bit easier to control the puckers, since it's the background fabric that's more likely to pucker. Min a line up right
here at the edge. And sew with a quarter inch seam allowance all the
way around that curve. And remember, the key to
curves is to go slowly. I usually will sew a few
stitches, stop, and adjust. If your sewing machine
has the option to end the stitch and
lift the presser foot, I find that makes
it a lot easier to kind of shift the
fabric around as needed. So, I'm back here
on my pressing mat, and the first thing I'm going
to do is snip all the way along this curved edge inside
of the seam allowance, making a snip every, I don't know, half inch or so. And then you can press your seams towards the
background fabric. And again, as I mentioned
before, if you're using, like, a white or a light
background fabric where the seam
allowance might show, then feel free to press the
seams towards the center. The last thing we
have to do with this block is bring it
to our cutting mats and trim it to the
desired unfinished size. If you're following along and making the in bloom
quilt pattern with me, we're going to trim
this to 4.5 " by 8.5 ". And to begin, I'm going to start by actually trimming
off this bottom edge. Since here I notice it
didn't quite line up. I'm just going to trim that off. The one thing I just
want to be really mindful of is to
make sure I leave at least a quarter inch
of background fabric between the edge of the
seam and the raw edge. I might begin on this side by lining up a line on my ruler with that long
raw edge at the bottom, and lining up the seam
with a quarter inch mark, and then I can trim
off this side. And then from here, I'm
going to measure 8.5 " And that leaves me a
quarter inch on that side. And then from this bottom, I'm going to measure 4.5
" and trim off the top. I always leave myself
space to trim. When sewing curves, weird
things can happen with fabric. They can shift and distort. So I always just err on the side of giving
myself a little bit of breathing room to trim excess off if things get a little bit wonky
while I'm sewing. The in bloom wall quilt pattern only requires one half circle, but I recommend pausing here and taking some time to create
a few half circles. The more comfortable you are
piecing a half circle block, the easier it's going to be
to jump into an inset circle, which is what we'll be
constructing in the next lesson.
9. Inset Circles: Glue Basting Method: In the previous lesson, we
learned how to construct a half circle block using
the glue basting method. So at this point, hopefully,
you've taken some time to create a few half
circles and are beginning to feel a little
more comfortable and confident using the
glue basting technique. In this lesson, we're
going to be constructing an inset circle using
the same technique. Inset circles are definitely the most difficult
and least forgiving of the three different
curved blocks. But go slowly and give
yourself time to practice, and I promise it
will come together. I'm going to be showing you
two different techniques for piecing inset circles. In this lesson, I'll demonstrate the glue
basting technique. And this is a technique that I generally use for
larger inset circles, ones that are 6 " in
diameter or larger. For smaller circles, I
use another technique, and I'll cover that in
the following lesson. So for the first method of
creating an inset circle, I'm going to show you, we're going to be using glue basting. This is going to be really
similar to the method that we just learned for
creating the half circle. I'll show you what it looks like when doing an inset circle. If you happen to
be following along with the Ibloom quilt pattern, you'll notice that
the inset circles in that pattern are 4 ". I'm going to make those
using Method two, which we'll learn
in the next lesson. So the sample I'm
doing right now is not going to be used in
the Ibloom quilt pattern. This is just going
to be a sample. And to demonstrate method one, I'll just continue to
use the same templates that we created in
our earlier lesson and have been using
along the way. So to begin, I cut two squares. The smaller square will
be the inside circle, and you just want
to make sure that this square is at least as large as the diameter of your larger half
circle template. You can see I have
about an eighth of an inch extra on either side. For the larger square,
you can really cut it to be any size you want. I recommend making
it at least an inch larger than the
desired finished size. For this example, I made
the larger circle about 3 " larger than the inset circle. I'll have lots of extra
room on the sides. If you know what size you want
the finished block to be, just plan to add an
extra half an inch or an inch to the
desired unfinished size. So we'll start with
the inside circle, the inside cutout, so I'll set the background
fabric aside for now. And the first thing
I want to do is fold this fabric in half. Since we're using this
half circle template, we're going to fold
this in half and cut two layers together
to get our full circle. So the first thing I'm going
to do is fold it in half. And you can do a
light finger press just to kind of give
that a nice crease. Make sure all of the
raw edges are matching. And then we can
place our template. Remember, we're
using the larger one this time since this
is the inside circle, and we're going to
line up the long straight edge of our template with the folded
edge. Of our fabric. You might have been wondering
why we didn't include a quarter inch seam allowance on the template, and this is why. When we're making
an inset circle, we don't need to leave that
quarter inch seam allowance, since this is going to end
up being a full circle, and this edge isn't going to
be sewn onto anything else. So we're going to hold
this template in place, and I'm going to trim
around my curve. And I can discard
this outer portion. And when I open this up,
I should have a perfect or a near perfect circle as perfect as we're
going to get on fabric. So I'll set this aside for now and we'll work
on the background. The background is the same idea where we're going to
fold it in half cut. We just have to be a little more intentional on the
background piece with placement to be sure that the circle we cut out of this
larger piece is centered. I'm actually going
to fold this twice. So I'm going to fold it in
half like this and I can finger press just to flatten
out that fold a little bit. Then I'm going to
fold it in half again bringing the
short edges together. And then I'm just going to
kind of fingerpress right on the corner where the
two folds match. Then I can unfold it, and you should have
a little crease mark that marks the halfway point. Then using my smaller template, since this is the inside circle, we'll use the smaller template. And I'm going to line
up my center mark on my template with that mark I just crease the center
mark of my fabric. And just like we did
with the inner circle, I'll line up this long straight
edge of the template with the folded edge of the
fabric. Hold that in place. And cut out the circle. And this should create a perfect or near perfect
circle, cut out. And since this is the
background piece, I can discard the
circle that I cut out into my scrap bin to
use for another project. Now, for the glum
basting method, the first thing we
want to do on both of our pieces is divide
this into quarters. So going to fold with a circle, it doesn't really
matter where we start. I'm going to fold it in half, and I'm going to mark
just on the two corners. And for this, I actually
do like to use pins, especially if there's little
crease marks in the fabric. It can easily get confused, and you really want
these to be precise. So I might just put a
little pin right there, and right here and open it up. Now I'm going to bring
these two points together and match them. I'll mark these
other two points, dividing my circle into four quarters. I'll
place a pin there. And I'll place a pin
here. All right. Then I'll do the same thing
with my background fabric. In this case, I'm going to bring those two straight
edges together and mark these two points then going to unfold that and
fold it the other way. Bringing these two pins to meet, making sure these
raw edges all match. All right, so now both of my pieces are divided
into quarters, and I'm going to use these as reference points as I
base these together. I'm going to start
with the top mark. And what I'm going to do is
flip the inner circle over to match these two pieces of fabric right sides together
at that top point. So flip it over. I'm going
to match right here, and then I'm going to
pin right at that point, so I can remove one of the pins and use the other one to
secure these together. Now, this is the part where
you just have to trust. It's going to feel like
it's not going to work. It's going to seem
a little wonky and crazy, but trust that it will. So next, we're going to
bring this down and connect these two together at
the next set of points. So keeping the right
sides together, I'm going to bring
these two points to match and pin them together, so I can remove one of these
pins and use the other one. To pin them together. All right. It's going to start to
look a little wonky. We're going to keep
doing the same thing going all the way
around the circle. So now we're going to find this next pin and this next pin, and we're going to keep
following along the rot edge, keeping right sides together and match right where
those two pins meet. I'll remove one of these
pins and pin that together. This last one is always
the one that's like, how in the world am
I going to do this? But if you lay it out, you can see how this
is going to go. These are pinned together
right sides together. And so this last one, we're
going to do the same. We're going to have to flip this down to match those
right sides together. Right at the point
where those pins are, remove one of the pins and
then secure these together. So once you're all done, you do something that kind
of looks like this. You can kind of see what the inset circle is
going to look like. The next step is to glue baste, just like we did with
our half circle. So I'm going to start at one
of the pins, get my glue, and I'm just going to put
a very thin layer of glue right along the rot
edge about an eighth of an inch away
from the rat edge. And I'll hold my two
layers of fabric together and finger press those as I
wait for the glue to set. For the inset circle, I
don't generally use an iron. You could. I find it to be
a little bit cumbersome. So this does take
a little bit of time because you have
to wait for the glue to set and dry before moving
on. But take your time. It will be worth it. I'll
add another thin layer of glue inside the seam and press and hold waiting
for that glue to dry. And it is such a feeling
of success when you get to the next pin and find
that it has worked. Alright, so I have one quarter
of my circle glue basted. I'm going to move on to
the next quarter and continue all the way around the circle in the same manner. I'll speed up the video.
Feel free to pause and take some time to finish glue
basting your inset circle. So I've made it back
to where I began, and now I'm going to bring this over to the sewing machine. Okay, so I'm at
my sewing machine with the quarter inch
presser foot on, and the stitch length
is set to 2.0. I like to sew with the
inset circle facing down. I find this helps
to better control any tucks that may happen
in the background fabric. For inset circles, you
can start at any point. Just be sure to begin and
end with a back stitch, which is a couple of stitches back and forth to
secure the thread. Also slowly with a quarter
inch seam allowance, stopping along the
way to smooth out any bunched up fabric and
to remove the pins as I go. When I get back to
where I started, I'll secure the thread
with a backstitch and then bring my fabric
to my pressing mat. So I'm at my pressing mat, and just as we've done with
all of our other curves, the first thing I'm going to
do is use my thread scissors to snip into the seam allowance all the way around the circle. So I have seam allowance
snipped all the way around. And because I have a
lighter background fabric, if I press the seam
towards the outside, there's a chance
that it's going to show through on my quilt,
and I don't want that. So in this case, I'm
actually going to press my seam allowance
towards the center, and this is a little bit more finicky than pressing
it to the outside, but it works out and
looks nicer in the end. So I'll just go all the
way around my circle, pressing that seam in, making sure everything
is nice and flat. Okay. And that is the glue basting method for
creating an inset circle. You can go ahead and trim this square to whatever
your desired size is. Since this was just a sample, I'm not going to worry
about that step right now. With patience in practice, I promise that inset
circles will become just as easy and natural as any other quilt block
that you create. In the next lesson,
I'm going to show you another method for creating inset circles. I'll
meet you there.
10. Inset Circles: Freezer Paper Method: In the previous lesson, I showed you the
first technique for creating inset circles using
the glue basting method. In this lesson, I'm
going to show you an alternative
technique for creating inset circles using
freezer paper. This is the technique
that I almost always use for smaller
inset circles, ones that are less
than 6 " in diameter. So for this method, we're going to be
using freezer paper. So here's a few things that
you want to collect for the freezer paper method of
creating an inset circle. First, you'll need a piece
of freezer paper that is maybe an inch or two larger than your desired circle size. I have this 8.5
by 11 inch sheet. The one thing that you'll
want to make note with freezer paper is there
is a shiny side. And there's a mapped side. The shiny side is the
side with the wax. As we're working today, you'll want to really
pay attention to which side you're working
on for the various stages. You'll want a compass or
something that will allow you to create a perfect circle
in your desired size. You'll want some
paper scissors for cutting the circle out
of your freezer paper. Also want a pair of fabric
scissors for cutting fabric, your glue that you're
using for glue basting, and I'll be using a ruler to find the measurement
on my compass. So the first thing we need
to do is create a circle, and we want to create
our markings on the freezer paper on
the non waxy side. So this is the shiny waxy side. I'm going to work
on the mat side. If you're creating the in
bloom quilt pattern with me, we're going to want four
inch inset circles. So on the freezer paper, I'm going to create
a circle that's 4 ". The way a compass works, if it's been a while
since you've used one is that one side has pencil. This one has graphite,
but has a pencil or pen, and then another point that marks the center of the circle. So the measurement between
the center point and the pen or the pencil is
the radius of the circle. Since I want a four inch circle, the radius is half of
that or the distance from the center point
to the outer edge, which is going to be 2 ". So with my compass, I'm going to use my ruler
to measure exactly 2 " from the center
to the outer edge. All right, there we go. Then I'm going to use my compass
to draw a circle. I'm going to use
my ruler just to check to see that that is indeed 4 " and that
looks perfect. Great. Next, I'm going to
cut this circle out and you can discard
the inner portion. I'm going to use my
paper scissors for this. You can just cut right
into the center of this since we're going to be discarding this inner
portion of the circle. This is something we're going to be able to reuse over and over. I
like to label this. So I'll just put right
on the edge here 4 ". I'm going to be working
on my pressing map. I have a couple of squares cut and ready to create
my inset circle. The circle that's going
to be on the inside, I cut to be about an inch larger than the
diameter of the circle. So since this is a
four inch circle, I cut a five inch by
five inch square. You're following along with me and creating the in bloom quilt, that should match what the
pattern instructions indicate. Your background square
can really be any size. It kind of depends on how large you want your block to be. If you're following along with the in bloom quilt pattern, you'll need a background
square that's 9 " by 9 ". We're going to start with
the background fabric. I'm using solid fabric, so my right and wrong
side are the same. If you are using a
patterned fabric or a fabric where there is an
obvious right and wrong side, you want to be working on the wrong side of the
fabric right now. So the first thing we need to do is find the center of this. So I'm going to fold
this in half and press. Finger press is fine, and then I'm going
to fold it again. And press and then I'm going to place the template that we created
right on the center. And when you do this, you want to be sure
that the shiny side, which is the side that has
the wax is facing down. And I'm going to center
this as best I can. If you like, you
could measure to be sure it's 2 " from the
center to the edge. I feel comfortable
eyeballing it. And then you're going
to take your iron and you're just going to
iron right over the paper. And what will happen is the wax that's on the shiny side
of the freezer paper will temporarily adhere to the fabric. So we
can lift this up. I will peel off easily, but it's stuck on there enough
for us to be able to work. So the next step is to
cut out this circle. And I want to leave about
a half inch extra fabric from the edge of the
template to the raw edge. And we're going to be
discarding that inner portion, so I can just cut, as I did before, into the middle using my fabric
scissors this time, make a little snip
in the middle. And this doesn't
have to be perfect. You can just kind of rough
cut all the way around. I and discard that
inner portion. So this extra portion is
essentially the seam allowance. It's a little more generous than the quarter inch seam allowance we generally use in quilting, and we'll trim that
down when we're done. But it's nice to have a little extra to work with
at this point. So what I'm going to do
is take my scissors, and I'm going to
snip all the way around right up to the edge. You don't want to go
past to the edge. You don't want to
snip into the paper. I like to go just a
hair from the paper. So I'm going to snip and stop. Just a hair away from
the edge of the paper. Now, for this next part, I find it helps to
have some steam. So I'm going to fill
my iron with water. But what we're gonna do is
we're going to take all of these kind of flaps, these edges, and
we're gonna press them over the edge and
towards the paper. So I'll just do a
little bit at a time, kind of finger press them down, and then with a really hot
steam iron, press those out. Just keep going all the
way around the edge, and you really want
to get the fabric as tight to the edge of
the paper as you can. That's what's going to help
create a nice clean circle. All right. And sometimes
they like to come in. The flatter you can get
them at this stage, the easier the
next step will be. And I'll even usually
turn it around just to look and make sure that looks
like a nice clean edge. We're going to take
the piece of fabric that you cut out for
the inside circle, and we're going to glue
baste it to these tabs. So what I like to do is place my inside fabric
right over the top, make sure that it completely covers the whole and the tabs. Make sure it's nice and flat. And then I'll just kind of
peel back one part at a time. And with my glue. Make a
little dot on each tab. I'll usually do five
or so at a time. Press those down.
I usually start at the folded edge
and press outward, again, just to make
sure that you have a nice tight fold
over that paper. And I'll take my
iron, kind of hold it over there for a
couple of seconds to help dry that glue, and then I'll peel
over the next corner. And you can kind of
see where it's pulling now where that's adhered. And I'll do a few more. And I'll just keep working this way all the way
around the circle until all of the tabs
are glued to my fabric. And just be sure everything looks nice and
smooth. That looks great. Once the glue has dried, you can go ahead and peel off the freezer paper very gently. Pull it off, and everything
should stay in place. Next, we're going to bring this over to the sewing machine. So I'm over at my
sewing machine. And the first thing I'm going to do is I want to switch out my quarter inch foot
for my zipper foot. Alright, so I have my
zipper foot installed. I have my stitch
length set to 1.8. You could do 1.8 or 2.0. I like a little bit shorter
stitch length for this. Sewing this takes a little
bit of getting used to. It takes a little
bit of practice. And my biggest piece of
advice is just to go slow. Go slow, take your time. So what we're doing
is we are making a stitch right in this crease right along this line
here that was created by folding these tabs over
the freezer paper. And we're using
the zipper foot to help us stay right in that seam. So I'm gonna be lining up this left side of the zipper
foot right with the seam, and that will help
guide my needle to create the stitch
right in that seam. So I'm going to get
it right up there, put my presser foot down, push my needle down
to be sure it's right in the right in the
crease at that fold. And just as I did with
the other inset circle, I want to begin and
end with a backstitch. So I'm going to do
backstitch forward and back, just forward and back just to be sure that
that's locked in. And I'm just going to
create a stitch very slowly all the way
around this circle. Be sure to take time to pause and readjust as often
as you need to. And when you get back to
the place where you began, do a little backstitch. I'm going to lock that stitch
in place and take a look. Next, I'll bring
my block over to the pressing mat. All right. So I have my piece back
at my pressing mat. The first thing I
want to do is get rid of some of this excess fabric. So I'm going to
take my scissors, and I'm just going to cut
around about a quarter inch away from my stitch line. Be careful not to cut into
your background fabric. And just as we've done with
all of our other curves, we're going to snip into
the seam allowance. Being very careful not to
cut into your stitching. And actually, I find if you are pressing your fabric
to the outside, the snipping is unnecessary since this inside piece
is already snipped, and that's the one that's
most likely to bunch. Since this piece
is flat, anyway, you can go ahead and
just press it flat. If you are pressing it to
the inside of the fabric, be sure to go ahead and snip
all the way around the edge. Oh And there is a pretty
good four inch inset circle. If you're following along with the in bloom quilt pattern, you'll want to go ahead and
trim this to 8.5 " by 8.5 ". And as you do that, just
be sure that this circle stays centered. You've done it. You've officially created all of the curved blocks
for this class. If you've been
following along to create the in bloom
wall quilt pattern, you should have all of
the main blocks that you need to piece your
quilt top together. So take some time
to finish piecing your blocks together to
complete your final quilt top. In the next lesson,
we'll wrap up our class and talk
about some next steps.
11. Final Thoughts: Well, we've arrived at
the end of the class. By now, I hope that
you find using curved blocks in your
quilts a little less intimidating and that
you've come away with some skills that help you
approach curves of confidence. Sewing curves truly opens
up a whole world of possibilities and really expands the different designs that
you'll be able to achieve. Whether you've been following
along with me and creating the in bloom wall quilt pattern or following another
pattern of your choosing, be sure to take a photograph of your final project and upload it to the project
section of this class. If you need a little
bit of guidance, helping you finish your quilt, be sure to check out part two of the quilting for
beginners series. In that class, I walk you
through the process of basting, quilting and binding, helping you create a beautiful
finished piece. If you loved this class, I would really appreciate it
if you would leave a review. Leaving a review will help
others find this class, and your feedback will
help me continue to create high quality
classes in the future. You're interested
in learning more about textile art and quilting, I encourage you to follow
me on skill share. And this will help
ensure that you're the first to know when I
release a new class. I really look forward to
seeing the beautiful work you create using the skills
you've learned in this class. Thank you so much
for letting me be part of your quilting
journey. Bye bye.
 Juli Rae Vignola, Quilt artist, natural fabric dyer