Transcripts
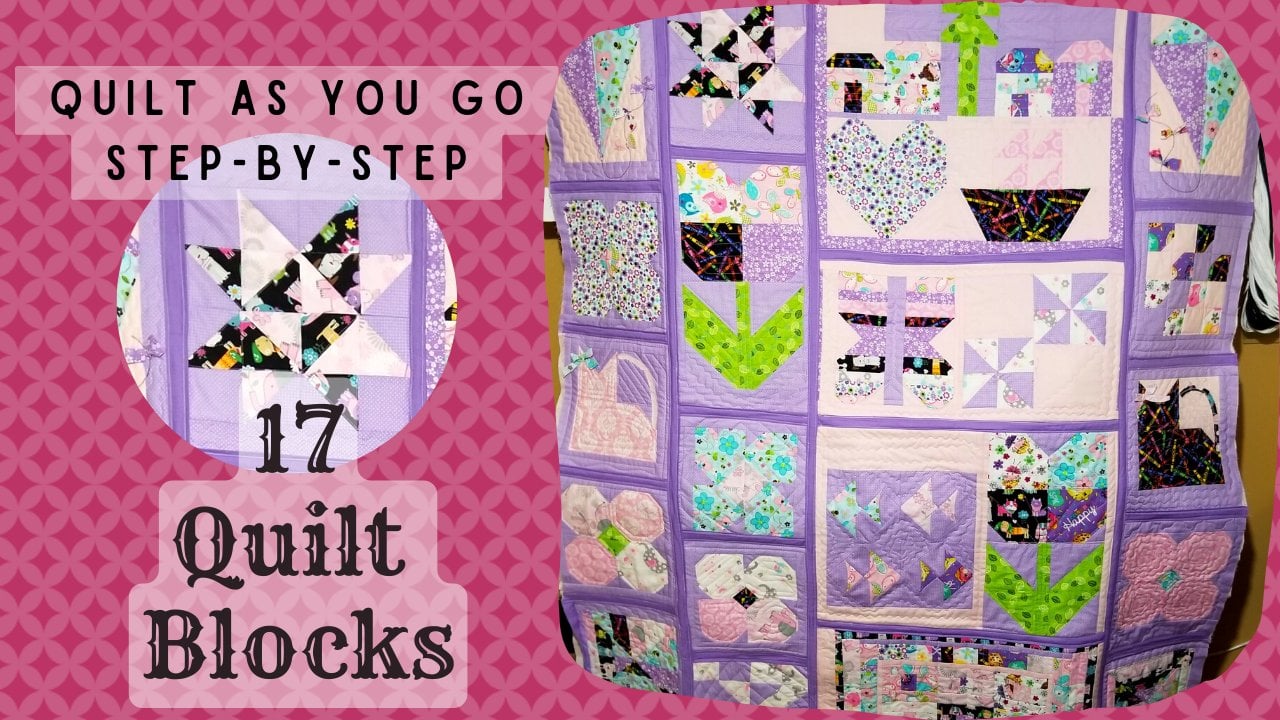
1. Intro Winter Quilt: Welcome to the quilt
making winter project. I'm Elizabeth the instructor and I designed this quilt to be a lap quilt that will fit on you if you're
sitting in a recliner, laying on a couch or just
cuddling up and keeping warm. It's small and easy to
transport around or store. For the most part, these blocks are individual themed with Christmas ornaments and items that you would commonly
see during the holidays. Now, each one of these
blocks can be used individually for
its own project. Or you can make all of them and align it and place it together
to complete this quill. It's laid out so that you
as a beginner can enjoy each and every block
and go along with me by simply using your
phone or your tablet, placing it right there with
you and following the steps. It's laid out so that
you can actually promote yourself all the way up to intermediate and if
you're professional, you won't get bored, feel
the new welcomess of renewal and remembrance of things that you may
have forgotten about. As far as supplies go, you will be using as small as 1 " all the way up to yardage. You can use pre cuts or scraps or anything
that you desire. Your choice is simply that. Make it to customize and them to whatever you have in
mind or various fabrics. It will be beautiful either way. The grand thing about
taking a course here on skill share is you have the ability to go
at your own pace. You also have the ability to speed up the video,
slow it down, or advance to another one that's more suitable
in your interest. In each one of these,
you're going to learn about tools that you may or may not have or you
may consider using them and we'll have some ideas of how they're implemented. You'll have a firm
understanding of the terminology commonly
used in quilt making. And you will gain the
confidence to move forward and advance yourself to even
more challenging levels. We will take an actual
paper pattern and convert it in to a
classic quilt block. We will also be showing
how you can take those measurements and size
them up or size them down. And then once again, you'll be able to take your projects, line them up, piece them together to have a
completed quilt toe. Thank you so much for
viewing this introduction. Let's get going on this quilt
by first introducing you to some of the tools and supplies you may need
in this journey. Just remember, a good
shot pair of scissors and a nice straight stitching
sew machine is sufficient. Although I may recommend
a rotary cutter would be faster and more efficient when
it comes to quilt making. Let's get in there. Join me in this adventure of making
the Winter Project quilt.
2. Serious Quilter Tools: The rotary cutter is
really a great tool, and using any of your straight
edge rulers is the best. There are situations where you are cutting bulks of fabric, scissors come in handy. But when you're doing quilting, do try to get used to
using a rotary cutter. You'll get a more accurate cut, and most everything is
on a straight line. This is a Fiscus 45. Millimeter blade and it
has the ability to be removed and replaced or sharpened and it
has a guide here. Is a safety guide. It also has a button
to close up the blade. Get in the habit of when
you open your blade, you want to press that button as soon as you get done
cutting and close that blade so that is not cutting you and it is out
of the cutting position. I just wanted to go
over the rotary cutter. Like I said, there
are different styles. I have several different ones. This is the one I've
been commonly using. When I push it forward,
my blade is engaged. When I press the button, it is disengaged, that blade. This is your safety guide. It keeps you from getting cut. That right there
is where it's at because when it's going against the blade
and you're pushing, that is a guide
that can actually rest against the
actual cutting ruler. You have a quarter inch
line on all of your rulers, and at your quarter inch line, lie that down on the
actual stitch itself. When you do that, anything
beyond it, you can cut off. Now you've allowed your quarter of an inch seam allowance, and I have a little wooden
press here, little roll press. This is a nice investment
to have in your arsenal. So for small things like this, you don't have to
run to the iron. And as you can see, that's
as flat as a flitter. It really does the trick. And it's just something
about little roller that does it. Check this out. Look for the one that is
a wooden roller on it. They do better.
They're smoother, and they have been
sanded down really well.
3. Tearfree Stitch Removal Easily: I'm going to take my
seam ripper and I am very gently going to remove
these background squares. I just really quickly go through there with my seam ripper and I can cut those stitches about every three or four
stitches over, I just go through
there real quick and I can pick up that little
stitch and break it. What's really cool about that is when I do that on that side, I can come on the
back side and tickle that thread up when I pull it, it's going to pull
all those loose. It's going to pull all those little threads
over to this side. And voila. That's going to free that up. All I have to do is pick those little broken
stitches out and you don't have all this trouble
and it comes out real easy. I'm going to finish
removing this square. I just go every few stitches and I will break that thread. It's just a quick
way that you can do it when you're able
to see those threads. I pick it up and I break it and you don't have to
worry about ripping your fabric when you do
this if you are able to pick that stitch and then
once you go I don't know, maybe every four or five
stitches and pick it. You can then go to the
other side and just tickle that thread up.
It's going to let go. Then when you get it tickled up, pull it and it lets go of
that square real easy. Then anything that I
have left, of course, I can just move that stitch out real quick and it does not take but seconds to get this loose and you don't
damage your fabric. You don't rip it
or get it torn or frayed up and make
it hard to use it. These intersected
whenever I sewed them. Of course, you're going
to have that anchor stitch that's going to
hold tight and sometimes just come into this side of the fabric and just pulling
it towards you to let it go. Then I'll pull on
the fabric a bit so I can get the
thread to come up to me and I don't have to dig in there and start
destroying that fabric. Sometimes you can do
a little corner brake and you can get it to let it go. There we go.
4. Candy Block 1 Quick 4 Half Square: Now, to make the candy block, cut 25 inch squares of the main fabric have elected
to make the candy width. The next thing we're going
to need is 2.5 inch squares. So what I've done is I've cut
me a long strip of fabric, the width at 2.5 " wide, and I'm going to cut 2.5 inch squares from
out of this strip. This will be for our
corners to make our candy. What we're going to do with
this is we're going to take one of our
five inch squares, and we are going to
sew one square to this corner from here to here and another on this
corner from here to here. To make it easier,
if you want to, you can use one of
your friction pins, which the ink will be
removed from an iron, but it won't be seen or cause
a problem or be visible. So you can draw a
line, and this way, it'll help you whenever you put this underneath
the sewing machine. So I just take my ruler
and a light there, and then I just draw me a
line from corner to corner. That way, when I get
to the sewing machine, I can see it a whole lot easier, and then I can just
sew a quarter of an inch down the
center on that line. Another thing that I do
that speeds up the job is I sew another line stay a quarter of an inch away because we'll need
that seam allowance. Also me another seam here. This will develop these little miniature half
quarter inch squares, and I can use them either in the binding or perhaps
on another smaller job. But those will already be made. And then that way, all
I have to do is sew directly on that line when I
get to the sewing machine. I'll sew right down on the line. This will give me
my seam allowance, and I can sew on
that line as well. So now we've sewn our line, and I went ahead and
sewn this side too. We're going to cut this live
in a quarter inch allowance, that's real easy because we
already created that line. All we have to do now is beside this right on
that quarter inch, I've got over my line and allow that quarter
inch seam allowance, and there we have
this little square. Let's go to the iron
and we're going to iron and press these back. So now we have the body
of our candy made. The next step is we need to cut a five inch square of
our background fabric, and we need another five inch
square of our main fabric. And what we're going
to do, we're going to lay these right sides together because we need our
end wrappers for our candy, and this is how we're going
to make our end wrappers, sew them both together
all the way around. The next thing we
want to do is we want to cut this square. The first cut we're
going to make is diagonal from corner to corner. Then we're going to
do the same here. We're going to cut it this direction from corner to corner. Just line up your ruler
from corner to corner. Now we have four. Before we take these to the ironing board
and press them open, we want to square them up. So now we have all
four pressed open. So this is what
we're looking for. We need this square
to be at 3 ", and they are perfectly
at three inch. Here's our three inch mark. Here's our three inch mark. I say three inch square. You really wanted to get rid of these little dog ears, you can. We now have our body
made that is 5 " square. And we have our two half
quarter square triangles. These are our ends. So when we put this together, this will be our wrappers. We need strips on each side
of our five inch square. We already know it's 5 ". The width because we
need to allow for the seam allowance from here to this distance,
we need a half inch. We already know it's
3 " wide or blocks. We need to cut this
strip 3.5 " by 5 " long. So what I'll do now is
go to the zone machine and on each side of this block, I am going to sew this to this side and this
one to this side. Now we have those pressed open. Now we need to create our fabric lengths for
the width of our block. That's real easy to measure too. We know that we need our
half inch seam allowance, and now we know that the length
of this are five plus or three so now we have a
7.5 inch length here. Well, we have to have a
half inch seam allowance, and that is going to put us at the eight inch
mark of fabric, and I can sew my block
to the end of it, and you're going
to attach those, and this is how you're
going to build your block. Now, these are a little bit wider because of the
allowance that I had not thought about until I begin putting my block together. I can square that up once
I've attached these, I can cut that off. We need these two points
to intersect perfect. We need the point of that tip to intersect
perfectly with this. When you go to sew
it at the machine, you want to nest those seams
together and make sure that you have them lined up and attach this to the
bottom and this one, we want to attach to the top. If you want to put a pin there just to keep it from
shifting, you can. It's a little square
up our block. A lot of times I will
line mine up on my mat. It makes it just as easy
and my main concern is my half quarter square
and centering this, making sure it intersections
with my lines. The same here. You
can check that and that seems to be
intersecting just perfectly. This is off just a hair, but not enough to hurt, and that may end up being
the case with you going to go right up beside
and make sure all that. Is even, and I'm going to do the same on this side,
and I will turn it. And now I know that all
that looks pretty good. So now, once again, I want to make sure that
anything that looks out of shape comes off 'cause I'm squaring
this block to 9.5.
5. Square Up How to: Now we have four. Before we take these to the ironing board
and press them open, we want to square them up. If you have a ruler that perhaps does the
easy flying geese, you can see there is a line
here at the 2.5 inch mark. If I lay this
underneath this ruler, you can very easily see
that even allows for the seam allowance and that
one looks pretty good. It's right on that
2.5 inch line mark. If I moved it up to
the two inch mark, which is the seam allowance, can see there's just a
little bit of an edge there. But I need this to line
up so that the triangle itself is showing 2.5 inch mark. The other way you
can do it is if you have the lock block ruler, if you look right here where
the 2.5 inch area lines up, you will get the same reading. If you slide that triangle up, this triangle is perfect. There's nothing wrong with it, at the 2.5 inch and
the 2.5 inch mark. There's the smallest
tiniest mound. Check this one as well
with the lock block ruler. And we're doing this
before we iron it open. We have just a little
bit here on this side, and there might be a small
amount on that side. Just hair line. So not even enough to
really bother with.
6. Gift Box Block 2 Flying Geese: This block is called the present
block or the gift block. We're going to start
off with a ten inch square or you can have
four, five inch squares. Going to sub cut this into
5 " right down the middle and we are going to turn this in to four, five inch squares. That is why I said, If
you have pre cuts or if you have yardage,
this is really, really simple and you can quickly just turn your en
inch square into four, five inch squares, and this is going to make
the gift itself. The next thing we need to cut is the ribbon that will
run in the center, an inch and a half of
whatever you choose to be your tie for your
ribbon and your bow. Out of this strip
for the ribbon, the very first bits of ribbon that we're
going to need is, of course, 5 " long. We need two of the inch and a half strips that are 5 " long. Where this ribbon is going to
go is right down the side. The first thing I'm going to
do is put the right sides together and sew this
right down here, do the same for this one. Now we want to go to the ironing board
and press that back. Now that we have
that side song on, we want to go back to the
sewing machine and we want to sew these on to the other side. Press this seam to
where it folds inward. The reason being
is by doing that, it tucks those seams inside. This particular block
would change in size and we want to keep it this certain size that we're going for. Plus, it will help
this stripe to show up even better when we do that. As I was saying, if you
were to press one side, inward and one side outward, it would change the
size of this block. To make sure that this
block stays straight, even, shows up more of the band of this ribbon and does not change in the size
with each other. If we just press
those scenes inward, it will keep it squared and also keep it in line with what
we are trying to achieve. And we want to show off that beautiful
ribbon for our gift. Now we need to create
our strip here. That's really easy.
All you have to do is basically measure
the two together, and as you can see,
it is 10 " long. We need an inch and a
half strip that is 10 " long because that's the
size of our block now. Take it back to the machine and first I'm going to
sew on this side. Again, when you press, you want to press
this open so that your fold and seam is underneath it and being tucked inward
before we sew this one on. That's looking really nice
tucked in right there. Now let's add this side on. Then when we press this, we want to press
this seam inward. We have those tucked in the middle and that will
show off that ribbon. That is looking just
absolutely beautiful. We have all of our
seams tucked in, laying nice and flat as a
flitter that's the whole idea. Sometimes just taking
that time to press that, it makes a world of difference, especially when you
want to show up a very narrow piece of fabric. We need two, 2.5 inch squares. This is going to make our
bow a top of our present. I have my two pieces there. Now I got to have a
4.5 inch long piece, at least one of my background. We're basically going
to make a flying geese, but this is going
to be the easiest flying geese you have ever seen. This is how we're
going to do it. Make it very, very easy. First, we are going to lay one square to sew from
corner to corner. Only focused on that one. And it is easier to take
a kind ink pen and draw a line from corner to corner so that you
can sew on that line. That'll help keep you straight when you're
at the machine. If you do as I do, I take that same square, and from that line, I lay my mark on that line, and I measure over a half And I draw another line. The reason being is these make
miniature little squares. These are excellent
for putting on your binding or scrap squares. You can make all these
little orphan squares and sew them together,
making them into another. So when I go to the machine, I will sew from this
corner to this corner, and then I will sew that as well so that
when I cut it off, I have a finished
miniature square. You only want to do
this side first because these two will end
up overlapping. And as you can see how I'm seeing how the fabric
is flowing there, you have the stripes
coming this way. So when I do this one, I will make sure that
the stripes are flowing in that same direction and they'll almost
match each other. Take and draw our line. Now, when you do this
side for this side, we're going to sew
this one first. When you do this side, we want to sew from here, down from this corner to the next corner.
Makes it easier. Mark that and once again, I will make my half
inch mark over further. Go ahead and draw that so that piece is already
marked for me to sew it on. Same song, and I went ahead and did that one so I can get
my little mini square. And super simple, I just take and I put it on my
quarter inch measurement. And I just cut that off. You could do it with
a pair of scissors. There's no plain signs to it. Iron this back before
we go to this square. There's my little mini
square I spoke of. I'll put it in my pile with my other ones as I
make this quilt. And now we can move
on to this one. Now remember why I said this
one when you sew it on, is going to overlap this one. That's why we can only
do one at a time. Once again, I will go ahead and pin that into place
so it doesn't slip on me and just
make sure you line it up and write down that scene. I'm going to measure that
quarter of an inch over. I just place my quarter inch
line on my song line at that back now we can iron this open easiest flying
geese you have ever done. Pressed it open, there is a beautiful, perfect flying geese. Well, if we center
this in the center of our block and we know
this was 10 " across, everyone's is going
to be different. That's why it's important
to measure this because if your seam allowance is more than a quarter or
it's a scant quarter, then you would have to
cut this ribbon strip longer and so forth
the same way up here. Now we know this one is 4.5 ". So even if I just make
it easier by vision, I can see that that right there
is two and three quarter, and then this one
right here is three. The simple math on that, we can cut a 2.5 inch by 3.5 inch for each side of this block of our
background fabric. I have two pieces of 2.5 by
3.5 inch background fabric. I need to sew to
each side of my bow. Press mine outward on
this particular one to attach this to
the top of prism. Now, we're not quite done because we want to
square this up. Even though it looks beautiful, we might have some wonkiness because of these pieces
having to be done apart. Also, when you press this one, make sure that you
press that towards the dark color, the gift itself. You want this to
press down this away. It does make a difference
and that's why you may have to square it up depending on the softness of your fabric. And how well it presses. When you are looking
at your bow, center the bow seems will be easier lined up and that will
give you a center point. Then as you look down here
at the rest of your block, you can see what might be going which way and
shifting and so forth. That just gives you a
center point to focus on. Down here at the
bottom, same way, square up with the edge, either a half or a whole, I'm going to take off
that whole bottom. That way, it looks
nice and squared up. For this block, we have a
finished block, 11.5 by ten. You can take every one
of these blocks and just take one block and
finish the whole quilt, or you can do each
one of these in this quilt long series of
making the winner quilt.
7. Tree Block 3 Resize Anysize: For the tree block,
we're going to start out with this ten by
ten inch square. We're going to turn
it over on the back. Begin with, we want
to come down on our fabric 3 " and we're
just going to place a mark. This is the friction pin. It erases with heat, but no one's going to see this. This is our five inch mark in the very center of our fabric
is over here on the side, on each side of our square, we're going to put the side of our ruler to the 0.5 inch point. We're going to move
it over 1.5 " in. So from the corner, we're
going to come over 1.5 ". The way that you can
tell is just line up the corner of
that 1.5 inch mark. So if you come in 1.5 ", at the very side of that and put the very top point right where we made
our five inch mark. We're going to draw a line, create our angles for
the size of our tree and we're going to do the same thing on the opposite side. You want to make sure that
we come in 1.5 inch mark. Right here, if we come in
to this point, this is 1 ", that's a half inch and lining our ruler up with that 1.5 inch. I usually just pick a line on the ruler in that vicinity
and put it there, and then I bring my side
of my ruler up to the tip. Now I'm at the 1.5
" in on this side. Once again, I want to draw
a line down the side, meeting those two points, and that has our tree. Now all we have to do is go up here and
line line back up. Real simply, we're just
going to go straight across here and you can save that
piece out of our way. Then we're going to do
the same thing here. We're going to actually cut
the marks that we made. Going to cut that off and
get our tree design out. It's just easy to show you
with the lines already drawn. Well, we get our triangle shape from out of our ten inch square. We want to make sure that
we cut right on that line. Because when we do
our backing fabric, we're going to do
the same thing. We have our extra pieces here. We can use those
for something else, as I've selected white
as my background fabric. What's really great about this is you can lay
your fabric down. We have our triangle and we
line it up with the edge, and we are going to
actually cut this piece to match our tree because
that will be our sew lines. At this point, we
want to go 1 " above. So on the original ten
inch we measured 7 ". We took 3 " off the top. So with this ten inch, we're only going to take
2 " off of this piece. So we're going to come down up here and we're going to
leave that inch above, make sure you're
good and lined up because we only get one
opportunity to do this. Take that 2 " off at the top. Now we have our
fabric over here. Next thing we do on this is
we do the very same thing. We're going to find. We're going to come
down 1 " from the top, find our center of
this piece of fabric. You can fold this in
half if you like. This one way is just
as easy as the other. I'm going to make a mark
on that five inch line, and we're going to come
in 1.5 " as before. But this time, when we come
in that inch and a half, we're going to cut
the whole length. We just need that
center point mark at our five inch point. We're going to come in 1.5
" and we're going to cut. We're going to do the
same thing on this side. We need to save that piece. We're going to come in 1.5 ", and you can turn
that until you see that one, and there's your half. Now we have our two side pieces. Now, this is what
we're going to do. We have our tree, and if these pieces were
here just like that, so it's simple and easy to do. When you do your tree, the mistake that I
made and I forgot to mention to you until I
began sewing it down. You shorter cut side, the one that you have
a tip sewn off of, when you cut it, you've got one that's a
straight edge and you'll have one that
just goes off to a nip. You want to sew
this side on first, when you do that, it's
going to lie down for you. And then when you sew the
straight edge side over it, it's going to come
out like this. I'm going to make that
correction on mine, and I wanted to make sure
that I shared it with you. When I cut this, we cut
the left side first, which was a straight edge, and we cut the right side, which is the one with a
little bit of a nip to it. You want to sew your nipped edge on first because you've
got to slide it down and make sure it meets down
here and then stitch it down and it will overlap
that short side. So now I have pressed that
back down like it should be, and I can now take this
side and stitch it back. And when I do, I want to go
all the way out to the top. I want to follow
that stitching all the way to the top and
then press it over. Now, when you do that correctly, you'll barely even have
anything up there. Matter of fact, when you
lay that block down, you can barely see anything up there at the top and it
just makes it smooth. So this is now sung correctly, and we need to create
a trunk and we also need to allow for a
half inch seam allowance. You can find the
center of your tree by using your ruler and
finding the middle point, and we can see that
it is 3 " this way, so it'd be 3 " this way. That means the width of
our tree is 6 " wide. We also know that we have
these seams on the side. The whole width
here is 9 " long. Right now we need to decide on how big of a trunk we need. So if the middle point of our tree is 3 " to
the middle point, and we want the trunk to
be fairly noticeable, and we're going to have a
half inch seam allowance on each side of it, and we'll need a half
inch seam allowance for this top edge. So let's cut a 2.5 inch
square for our tree trunk. We know the whole width of
this block is 9 " long. We just need to add
the difference. If we have basically an inch and a half left
because we've already allowed for the seam allowances and we know that this is 9 ", that would put us at the seven and three
quarters of an inch. Well, we have to
divide that in half, we got to have a three and
three quarter inch piece here and a three and three
quarter inch piece here. That is 2.5 " wide. If you want to
just cut them at 4 " and then you can
square these up, that sometimes is the
better resort to make it easier for you and you
don't have to think it out. We're going to sew a strip down this side and a strip
down this side. I'm going to press these seams towards the dark
side inward on this. So now I press that
inward and that is a very robust
trunk for the tree, and I'm just centering my trunk. And if you want to, you can
place your block on your mat. You know this piece is 9 " and you can find
the center of that. You can eyeball it
or you can be exact. Whichever one works for you, I usually pretty
much eyeball it. I have a sense of where
it looks like it should be and I can see how
much is overhanging. Now I'm going to go
to the machine and I'm going to sew
all the way across. For this particular one, because these seams
are pressed inward, I do not want this to shift during the time in
which I am going to sew it because the fabric
is soft and press and these may stretch when I'm feeding that
through the machine. I do not want to
pull those seams. Open to keep them planted. You can put a few pins. If you feel like these
will open up or push out or pull out and get wonky,
that parts on down. Also, if you're concerned about this overhang peeking through, this would be the
time to trim that off before you take it
to the sewing machine. That's looking really
nice and I'm going to press that open and I will press this towards the tree
to keep those tucked in. Now we need to square
up this block. We're just going to clean
that edge up over there. And then the same over here. It's really good up top. That's just fine for whenever I tie this into my actual quilt. When we measure this block, we have a finished
block of 8.5 by 9.5. You can make several of those. You can take this one block and create an entire
quilt with it and make all of your trees different sizes and
different colors.
8. Candy Jar Block 4 Small Looks Big: Now, in the wintertime,
it is suitable to make a cookie jar to go
with our winter quilt. So the cookie jar,
we are going to cut a five by ten inch
piece of fabric. That way, it depicts
a one quart jar, 5 " by 10 " long
piece of fabric. This is going to be the
body of the actual jar. So in order to make this
jar come full form, I need some inch and
a half Tim fabric. By an inch and a half squares, we'll need four of those. Now we have four little
snowball pieces. We're basically going to
lay one on each corner of our square and just lay it from corner to corner
and draw a line. A lot of times when
it's this ball, you can eyeball it
on your machine, but just in case it only takes
a moment to draw a line, I will go ahead and pin them
into place and draw my line. It's just so easy to
follow that line. For me, it's a lot easier, and it shows you which
direction to go in case you're watching the video
and sewing along with me and it keeps us
from getting confused. That way, if we do get vertical, we have a roadmap to go by
and this makes it so simple, just a moment to do it. Please that then once again, this one is going
this direction. That way we make sure that our angles are no longer
a challenge to us. We take the math
out of the equation right on that line will sew
directly down on that line. So now we've got the song
at our angles and we can cut that difference off
before we iron this back. We want to press those back. We want to allow that quarter
of an inch seam allowance. What I do is I use my ruler. This is a quarter of an
inch shading on this side, and all I have to do is
lay those little crosses right on that line and then cut right
down the side of it. It's just that little
smidge coming off there because the rest
of it is going to be tucked into our quilt. Now, let's go to the iron
and press these back. We have our jar made and
we've got it snowball. Now we need to create
a lid for our jar. Now we know that
our block here is 5 " wide. That's simple math. We need this piece to be
an inch and a half tall, because we did our snowballs at an inch and a half versus
an inch and a quarter, we can see right here that our body of our jar
is shown to be 2 ". The thing we have to bear
in mind is we need to drop down at least a quarter
of an inch to see that width into our
block here and then measure how much body is showing because when
you sew your lid on, you are going to be coming in a quarter of an
inch seam allowance. That is really going
to show off what your lid is going to
look like to extend a quarter of an inch beyond these snowballed shoulders
to truly look like a lid. If we measure that
3 " in length, if you wanted to ensure that it does look a
little bit bigger, you could do a 3.5
inch in length. Do your side background as
an inch and a half squares, and this needs to be
an inch and a half with 3.5 inch
section out of this. Already have our
three inch piece. We sew on our background
pieces that are inch and a half by inch and a
half squares or pressed. These were the same as inward. That way, the black
is really showing off and I've got my
background fabric. We just need to attach it, so we're going to go back to the sew machine
and we're going to attach our lid and just sew
straight across the top. Press that seam towards
the body of the jar. That turned out pretty good. Square up my block to
make sure five by ten. And anything that's
kind of wonky and hanging over
from the strips, sometimes when your
fabric gets soft from the pressing and using, you can get little
bits of these pieces, a little bit of fray, and
this side looks pretty good.
9. Endless Possibilities Piecing: So there we have our five
by ten inch jar block. And if we want to, we could add another little
block to the side here. We had some leftover squares, and we could probably put something over
here on the side, maybe like little candy stripes or little candies,
different things. You could make a shape. I love my little half
squares because you can do so much with them. And so that would
look like some candy maybe on the side of the jar. And then you could
add background fabric to the top in the side. I have the candy pieces and you could just change them
up anyway you want.
10. Quilt Whispers Orphan Blocks 5: Now we've got our candy
jar made or cookie jar. Let's make some
miniature candies. I have a three inch wide strip of the same fabric that's
going into the body of my jar. I need 23 by three inch squares, and this is really
going to be great. As we did our candies before, we need that point of that little half square
triangle coming in. These half squares
came off the top of when we made the bow for the present gift and also the candy
wrapper from before. If you needed to make this, if you had not made that block
and you need to make this, this is a two by two inch
half square triangle. You could just cut
a two inch fabric and a two inch white square
and sew them together, and then you can cut that. Since I have these leftover, I'm going to tie them in to this and make this into a candy. But what I have to
do is I need to snowball the corners of
this and that's real easy. I need to cut four inch
and a half squares, cut some inch and a
half squares out of. This is a cut off from
making the tree block. The reason why I'm doing
an inch and a half this is a three inch
by three inch square. If I use an inch and a half, then that's half of the width of these
pieces of our square, and that's where I'm
getting that number from. We are going to snowball
each side of this square. The way that we will do that we're going to go in this way. We're going to do that line, once again, drawing my
line from side to side. And over here the same way. I'm going to draw that line, and I'll do the same to
that square up there. So I'm just showing
you what I'm doing. Drawing a line. And I do this so that I don't even have to worry about it when
I get the machine, and just put it under
there and sew it. Let me go to the
machine and sew on that line for both squares. I just lay my quarter of an inch on the actual line
so that it's over and I cut that little
edge off and do the same on all sides. I go to the ironing board
and press these open. Little candies. Bodies made. We need that half
inch seam allowance that we need to put
sides on our block. So since this is 2
" wide, once again, we need this to be 2 " wide, but we need to allow
our seam allowance. So we're going to
cut a 2.5 inch by three inch long piece to
be sewn to the sides. And we need to cut four of
those. Background fabric. This is a 2.5 inch wide strip, and I need four pieces
that are 3 " long. I've got two folded
it here so I can cut two at a time
off of this strip. These are our sides
for our candy. Let's go to sewing machine, and we will say one
down that side, and then the other on this side, and we'll repeat the
same on this candy. All right. I have my side sewn on and press back and I did put the seams
inward towards the body, and there will be extra on
this when we square it up. For the time being,
we've got our bodies, and we've got our side
pieces, or background pieces. The way this is going
to work is we need our wrapper at the
opposing ends. We know that our
little wrappers are 2 " wide and 2 " tall. We need the difference
in our length, so it's real easy to measure all you have
to do is we know that's going to be
attached in a corner and if you needed to to
make it easy on you, you could just pretend
that that one was there. What we are measuring is from
this corner to that corner, then we have to add on a half
of an inch seam allowance. At this point, that's
one, two, three, four, and a half plus
another half would be five. We need a five inch piece that is two inch
inches long attached. We need four
background strips to match our little wrappers. Now we need to go and attach a candy box to
each one of these. Now remember, it might be a little bit extra wide
depending on how you have square triangles came out and that's simply okay, we're just matching it up to the fabrics that we have because this is how this is
going to play out. This will be up here. So we need to attach those two, and this one will be
pointing in here, so we need to attach these two. And then on this one, we have the same thing going on. We have a strip and then our candy wrapper, and
here's the other strip. Once again, we'll go
to the sewing machine, and we're going to sew this
little square or rectangle. I have those sewn on, take them to the ironing board
and press them open. Okay, so now we have
our piece attached, and now we need to
sew these two our candy. Remember, you
want to make sure that that point and this
point line up together. Since we pressed
this one inward, and we pressed this one outward, those seams will
nest up perfectly, and this will take the
math and the worry out. See how those seams are
just nesting together. You got this one going this way and you got this one going
this way. If you just lay it in there and
rub it a little bit. They will nest up perfectly
and you'll have no slippage. We want those to come
together because that's what makes that wrapper to
that candy look perfect. We'll sew that down to this side and we'll do
this one the same way. Our candies are looking absolutely adorable and we
need to square them up. I'm going to allow the actual
squares to be my guide. This one looks a
little bit wonky, but sometimes that
happens because, well, those were made from
a larger block. I'm just going to square
this up by laying my ruler there and that's
going against that one square. Then this side over here, I can compensate for later, but I'm going to pretend that that square made it
all the way over here. I can cut off the difference on this block to square it up. When I make that one
is already over there, if I need to, I can
compensate for that later. I think it will be fine
because it's an eighth of an inch and I have an
eighth of an inch here, and my quarter of an inch
sewing seam allowance should take care of that. This way, my block is
good and cleaned up. Our block here are one candy, so we have an exact
measurement here. 5.5 by 5.5 and that's
perfect block, and we're going to do
this one the same way. What I'll do is once I square
up the other candy block, I'll place these candy blocks here and you can turn them this way or you can
turn them this way. It's really up to you. Let me square up this one,
we'll give it another look. So now I've squared up my two blocks and I've
laid it beside my jar and the squares here are almost as big
as the jar, per se. They actually are. But by the time these are
sewn together, there will be a
slight difference. Here are ways that
you can fix that. Number one, you can
put a very small, minute strip in there that is so tiny to connect these together. Or you can go ahead and sew these two blocks
together and you could add something
to the bottom if you wanted to or the top
and the third choice. You could even trim down your jar and attach it
your candy to the side. Those are choices you can make. Now, for me, when I look
at this and I evaluate it, it will be just as easy for me to attach a small
strip down here. If there's anything left, I can cut it off. I took my 2.5 inch
strip and I just sewed it to the bottom and
just left it attached. A lot of times that is easier and as you can see, there's just a slight difference because
the way they are termed, 2.5 inch piece, even
with this block, I can take that quarter off and that will just square
it up all at the same time. Here's our extra
that we had sewn. Here's our candy jar, and I am going to sew these two pieces together
before I trim it off. So I'm going to take this
to the sewing machine, and I'm going to sew
write down this sin. I press this open and I press
that seam towards the body, towards the dark
side of that jar. Look how gorgeous this looks. Now, all I have to do is
cut off the difference, and I know that I have to do that even with the
bottom edge of this jar. Cookie candy jar block was already squared
up before we started. Now I can just square
it up with this piece, lay my ruler right across
the bottom edge of my jar. We are ironing these
beautiful cotton fabrics. We get a little bit of stretch getting our blocks made, and so they might
look a little wonky, but it all works out when
you squared up the block. I just look really
nice. Look at that. We have our beautiful
okie candy jar quart size with two candies in addition, made from our half
square triangles made from our previous blocks
that we've already made, and that's how you can utilize that and it really just starts telling you what it wants to be. Your quilt actually tells
you which way to go with it and depicts on what is
going to turn out to be. Every time you have these little scrap pieces and
you can look at it and go, Wow, what can I do with this? The candy block that we
made in our first block of this winter quilt depicted that we would have these little
blocks left over from it. By doing that present block it depicted that we had these two little blocks
leftover from it together, the four of those with a little bit of the
body of our jar made two beautiful candies that attached to the jar
and it just complements, well, this is the candy
from the candy jar, just by having done the
two previous blocks.
11. Sewing Machine Block 6 By Measure: The next block is
the sew machine. This is what you're
going to be needing. You'll need to pick out
a fabric for your sew machine 2.5 inch wide strip, and it needs to be at
least 19.5 " long. A 2.5 inch strip of your
background fabric, 19.5 ". You'll need a small amount
of 1.5 inch strip to 3.5 by 3.5 inch square
of your background. A small amount of black fabric, 2.5 " long, by 1 " wide, and the same with your
background fabric. This will make needle. Create our needle
1 " by 2.5 inch, strip of black, and a one by 2.5 inch strip of
white for two strips. Now, this is what is really significant and you have to sew it this way for
it to come out right. We're going to lay
our black down. We're going to take
our white strip, follow what I'm doing,
and we're going to lay it sideways. Like that. The way we need to sew
this is we are going to create a diagonal
line from right to left. We're going to start in the
upper corner and we're going to sew down to the
lower left corner. That way, our angle is correct
whenever we get this song. But this line gives
you an area of guys. Let's go to the
machine and let's sew from the upper right
to our lower left. There we are our T tiny little lines on
from right to left. Also minimize your stitch
to 2 millimeters versus 2.5 because this is so tiny that way that makes sure those threads stay in there good and snug. All we have to do is cut
this little corner off. You have a quarter inch
line on all of your rulers, and at your quarter inch line, lie that down on the
actual stitch itself. When you do that, anything
beyond it, you can cut off. Now you've allowed your quarter of an inch seam allowance. Now, this is what's
really clever about this. We're just going
to push that back and you can finger press
it, and as you can see, mine is slightly off and
a little bit over on problem we'll take that up whenever we add our
other pieces on. Since we have our needle made, see our little
angle going there. We need this piece
itself to measure 3.5. We want to cut off any
difference that we have here and just make sure
that is good and pull back. Now, we need to
make sure that our 3.5 " is coming from the top. N all of the black in this. We have our 3.5
inch long needle. We just need to start adding
our other pieces to it. Now there is a system
to which side you put what in order for your
needle to look correctly, A 1.5 inch wide strip
that is 3.5 " long. This will be sewn to the
left side of the needle. Now there is no harm if you make your sewing machine
going the opposite way, if you follow the
instructions I'm giving you, your machine is going
to sit like this. But if you do it
the opposite way, don't sweat it, you can make your machine going to the right. We're going to sew this 3.5 inch strip onto this
side of our needle. That's looking really
good. Now we need to add a 3.5 inch square onto the
right side of our needle. So our 3.5 inch
background fabric, we're going to attach to
this side of our needle. Now that's looking really good. When you go to the
iron this time, make sure that you allow these, they're going to
naturally just open up on this particular needle
because it's so small, we want to allow that. We want to press these seams open just like they're
naturally flowing. That won't change very much. It wants to wing out
anyway and that's what we want so that we
see all of that needle. So for the very top part above to start
building the body, we're going to
take the fabric we selected for our sew
machine and we're going to cut 2.5 inch
by five inch piece. Let's attach that to the top to the machine
and sew that down. So we've got that pressed back, always pressed towards the
dark side, as our scene. And the next piece
we're going to cut is going to
go down the side. 2.5 by 5.5 ". If yours turns out to be
a little bit smaller, like mine actually
turned out to be 4.5 because of my
seam allowances, concerned, all you have to do is lay it against your
ruler and measure it. And here we have 5.5 ". That is the length once
this piece is added on. So that's how we know to
cut that 12.5 by 5.5. And this time,
when we take it to the sew machine because our
sew machines going this way. So we want to lay
this down and sew it down the right
side of our piece. That's looking fantastic. Let's press this open, pressing towards the doors. Yes. I'm going to add a
background piece on this side. This piece, we can cut out
of our 2.5 inch strip, 2.5 inch by 5.5 inch
background fabric. Now let's go to the machine. We're going to lay
this right side together and stitch
down this side. Our sewing machine is really shaping up and
looking beautiful. So now let's measure our length. So here's our strip.
And naturally, we're going to take
it to the machine, right sides together, and
I'm going to sew that down. So let's press this back towards the dark side and
see how it looks. Look at that. Isn't
that precious? Oh, my goodness.
That is adorable. As I said before, every
one of these quilt blocks, if you wanted to
make an entire quilt with the actual block, it would be just beautiful. Have a finished block here that is seven by nine per
the instructions. Mine actually finished out to be a little bit
smaller than that. The height of my block here is seven and a quarter and it's actually eight and a
quarter inches long. I yours turns out that
size, no worries.
12. Customized Blocks: Now to finish up our
sewing machine block, we need to put a little
crank arm over here. All you're going to need for that is an inch and a half by 2.5 inch piece of fabric and your background fabric
being the same size. And we're just going
to take these tuning machine and sew them together. And this will equal
2.5 " in width in order to attach this and make
it fall where we desire. We need an inch and a half by 2.5 inch piece to sew above it. And then we need
a that's going to put our dial for our
crank in that location. And this is depicting that your block is coming
out the same as mine. But down below it,
we will need by 2.5 inch wide piece to attach, and that will be sewn together. So let's cut that out. Okay? That will go above it, and we'll sew that
together and attach it. And we will just attach this to the bottom
and sew across there. And now all we have to
do is take it to sew machine and attach our
crank to the side. Now, if you want to
add a spool up here, when we did the
ugly sweater block, we had all of these
little mini squares. And one way that we
can do this is since these half square
triangles are already cut, we can take two of them and turn them into,
say, an hourglass. And the way we do that
is we take the color and we lay the color opposite of
each other. We've got that. And what we want to do is with our colors laying
opposite of each other. We want to sew from
corner corner. And if it's easier,
you can draw a line. Now, if you draw a line, one thing that you
can do on this sew down that line and then
cut off this difference. Okay? So I've saw
right in the center. Now, I want to show you
this before you decide which side you want to cut off and depending
on your colors, open it up and see
what it looks like. See if this is the side
that you favor with these colors or is it
this side that you favor? And then that way, you'll
know which side to cut. Because I know that these
little tiny fabrics will literally disappear
whenever I go to sew this. I'm probably going to select
this side right here. That's just something
that you can consider whenever you
make one of these. I'm going to lay my quarter of an inch seam allowance
on there right on that song line as we have the others and I'm going
to cut off the difference. Then that way, I now
can press this open. Now I've got that pressed open. And one thing I want
to share with you when you do this hour glass one, press this seam open on it. And when you do that, it will put less bulk in the fabric because you already have one that's folded over. And then your new seam, press it open, and it
will lie a lot flatter. That way you won't have
this puffed up place. Now, mine measures an inch and three quarter square.
That's what I have. What I will do is I am wanting my per se spool to
be in this area, which is in this 2.5 inch
area of the other fabric. Because of this odd number, I'm going to round
it off to 1.5. I'm going to pretend
that this is 1.5 inch square and
the same up there. We already know that
this is 2.5 " wide. We need a 2.5 inch by 1.5 inch piece to go
on the right side. The difference that we will
need is just basically, as we've been doing before, we can take our ruler, I'm going to allow my
half inch seam allowance on this side and
measure to this side. I know that I need
a seven inch by 1.5 inch strip for this
side of my sewing machine. Go ahead and square up my
little square in order to get that inch and a half
that I am trying to achieve. And I'll cut off that little bit of difference
so that when I sew this on, I won't be struggling
with keeping myself vertically,
and I'll do the same. I'll just turn around
my little spool. Quarter can really
truly throw you off when you're trying to
do something this small. But I'm just adding more
character and detail. Remember, you do not have to do this part of
the sew machine. You could opt to skip by this. So now I have these two pieces, and I need a 7.5 inch by 1.5 inch strip to
go down the other. And we want this hourglass, which is our spool of
thread to be up and down. That way, it truly looks
like a spool of thread. You can light this way because some machines do have their
thread flowing sideways. We're going to sew
our 2.5 inch by one half inch strip
to one side of it, and press it back, and then
we're going to sew our 1.5 by seven inch strip to the other
side and press it back. Now that just looks
plum adorable. And I know that when
we attach our others, we're going to just have
a very small spool. But for the time being, we want to line these
two scenes up. As you notice, I press
this one outward and this one outward so that
when I get to these scenes, I can lay that over it and
it will nest perfectly. Now we just need to attach that. Well, our little sum machine
just looks adorable. So let's square off this
extra piece that I had here. I'll just center it on my mat. And I do know that my machine did turn out a
little bit shorter, and that is all due
to my song themes, and yours may, as well. And that's simply okay. Happens whenever you're doing certain things and
don't worry about it. Do not even let
it be a big deal. And at this point, we have a ten inch
by eight inch. So really, that's going to
be somewhere around 10.5, maybe 10 ", and at least 8.5. Mine did end up shorter, and I will actually
trim mine two exactly. Inches. And there again,
this is where whenever you're sewing seams together
and you got small pieces, as well as the measurements. And depending on
your seam allowance, if you did a scan or if you
did an entire quarter will cause differences in
your block sometimes, and that is okay. You have the math
and you know how to measure of laying
your ruler up there and allowing
your seam allowances by adding the half inch on, and then you know
the difference. Because if you already know your measurements here and you're doing something different and deviating as we did
with the spool, you just have to remember that half inch seam
allowance on each side. Then you can attach it without stressing and
fighting with sizes. So if you have squared
up your sew machine, yours may be 10.5 to 11 " wide, and it could possibly
be up to 8.5 " tall. That makes a nice block. Now we have a
sewing machine with our crank and our spool.
13. Snowballing Pro Wreath Block 7: A reef. And what's unique
about the reef is you can use all 2.5 inch wide
strip of fabric, or you can take one
single ten inch square of fabric because the very first strip are
2.5 " wide by 9 " long. So I'll cut those first, and I can trim those
up once I have them cut two pieces
that are 5 " long, that are 2.5 " wide. I want to cut a single
2.5 inch strip. Remember, cut once. Measure twice at one, two, three, four, five. That seems a little bit scary, but we have a 2.5 inch piece left here because I
will need four squares. And if I use the rest of
it on something else, that will be fine, too. So now we have four
little squares here. Because we are doing the reef, we need to cut a piece that is going to serve as
the bow up top. However, you want to decide on what your bow
color is going to be. I've decided on the red and white stripe that
I've used before. This has to be
22.5 inch squares, and I'm measuring to see
how wide this fabric is. And with these, we're going
to move a little bit quicker. And then that way, you
can see that you really can use a 2.5 inch strip of fabric or you can use ten inch square and get most of
your cuts out of it. For the very center to begin our waf is our
background fabric, and that's what makes
this reef block different is you will actually begin
with your background fabric. 25 inch squares. One will be the
center of the reef, what we begin with
the background, and we will build out from
this background fabric. The next one, we are going
to cut this into four, so we will have four,
2.5 inch squares. We have our four,
2.5 inch squares. Now we're ready to start
making our reef block. Start making our reef,
we need to snowball in our four corners with
our 1.5 inch square. So we are going to put our right sides together
on these four corners, and we're going to
snowball those, and this will blend
in to our reef. What I always recommend is go ahead and put your
ruler on there and draw a line so that you are snowballing in
the right direction. So we need this one
to go from left to right on both the
top and the bottom. I basically just lay my
ruler there and I put me a small mark that way
when I get to the machine, it's a lot easier to follow. And the same thing
here, we're going to go from right to bottom left. And if you pre mark those, it helps you to keep
your vertical mind straight so that you don't
get off on your lines, and all you have to do is
sew right down on that line. Now, this one is rather small because it's an
inch and a half square. When you got to your
sewing machine, you can minimize your stitch to a two millimeter
versus a 2.5. Stick. That is really, really helpful and
beneficial when you're doing these really
small little pieces, helps tack them in so they don't stretch out as
far and they stay in place. Okay, so we have sewn
directly down on our line. And remember, when
you get your ruler, go to your quarter
inch mark and lay that quarter inch
mark directly down on your seam and then
that way you ensure that you've allowed that quarter of an inch seam allowance, cut off the difference
and you'll go around to all four sides and once
you have those cut off, you need to press them
open and outward. That's looking pretty snazzy, and we have those
pressed backwards. Create our bob. Let's set this piece aside. This is our main body piece, and we're going to bring
forth our two pieces that are 2.5 inch squares that we
selected for our bow, and we're going to take
our main body fabric that is the 2.5 inch
wide by 5 " long. We are once again going to make the easiest flying
geese in the world. This is fast and easy. It's real important that
we select one at a time. Here's another thing
to bear in mind. Whichever way if you have a striped fabric such
as what I am using, you need to decide
which direction you want it to flow
if you want it to move vertically or if you
desire to flow horizontally. Now, one way that
you can do that is you can go ahead and
you can press this. Put a little roll on that, that can also serve as your sew line whenever
you snowball this on. Can stage your bow and see which direction
you want those flowing. It's got the bows
stripes running in a horizontal manner to where
the stripes are flowing and Direction. And this is just
a way that you can stage it. Take and lay fabric down, and we want to do
these one at a time. Most of the time, these
overlap when you're doing pretty much
like a flying geese. And I will draw my line on here and I'll sew
this one on first. And since I know that I want my stripes running
in this direction, while I have this
one lined down here, I'm going to go ahead
and put my line on it, and that will just keep
my right brain from getting vertically challenged by having my mark there already. While we have this here because
this is a larger piece, take advantage of it and
use your half inch mark, lay your half inch mark
line that we created, and we're going to
draw another line. When we get to the
sewing machine, we are going to sew
directly down on this line and on this
line. So we have that one. And let's go ahead and
lay it back here with our cuarven inch seam allowance right directly on that seam. We're going to just cut off
this side that we've already given a quarter
inch seam allowance because we measured
a half inch over. Now we can press this
open and press this open. That's looking pretty snazzy
here is our little mini one. We can put that
aside and save it. Now we need to add this one, sometimes whenever you're
doing these, it overlaps. That's why you want to
do one set at a time, it takes the guesswork out
of making your flying geese and it definitely reduces stress and any kind
of difficulty. What's wonderful about this is even though that's going
to intersect right there, when you get to your
sewing machine, you might be better off to
begin at this end that doesn't have fabric towards you and I'm going to sew down
on these two lines. Again, using our
quarter inch mark right on that seam allowance. That looks just beautiful. I'm very pleased with how
that flying geese looks. And as you can see, even with those seams overlapping,
they are perfect. No problem at all. Easiest, most stress free flying geese
you can ever make. Let's bring forth
this original piece that has our background in it, and we're going to
go ahead and sew this putting right sides together and sew
straight across. That looks good. What
we want to do now is we want to iron this
towards the dark side. When we set it down, we want to press this upward so that that seam so that darker fabric is not reflecting
underneath my white. We can now sew other five inch by 2.5
inch piece to the bottom. We're just going to lay that
there and sew right down. I've attached and
press this down. Have these at 9 " that
will be going up the side. But to truly make this
look like a reef, we need to snowball
in our corners. So we're going to
bring forth our 42.5 inch squares that
are a background fabric. And what we need to do on each piece is we have got
to place one at the top, right sides together,
and we're going to also put a piece down
here at the bottom. You can actually snowball
these in the same direction because one is
going to be turned this way and the other one's
going to be turned this way. Keep our vertical mind, our right creative mind
from getting messed up, we're going to snowball
these in one at a time. This side needs to go from
left to right, bottom. Once again, I'm going to go over a half an inch
seam allowance and draw a line because
I can make that into a small half
square triangle. This one is going to go from the upper right to the
lower left. Draw me a line. Remember I told you this side, we're going to be
turning to the left. You can actually lay these lines down identical to what
we have on this side. It will work the same way. Now, this is where we
have to pay attention. If you turn this, this is going to be folded
back, and there's your line. So you see what's happening
there. I will not matter. You can do them identical or you can lay them just
the way they're going to go to the reef
because whenever we sew that and we press that back, this side will be
attached to the left, this side will be
attached to the right. So we have these song, and we're going to do the same thing as we
have done before. We're going to allow
quarter of an inch seam by laying our quarant marking
on the actual song line, trim off our little squares. We can move rather fast on
this because now we're getting pretty good at doing become commonplace
and we're used to it. We've done it a few times. We can press those
backs when we go to our iron after we
get these cut off. These are looking really, really nice, very
easy snowballed. The larger the better, right? And here's our four
little mini half squares. And this will be neat for some other projects or
maybe even this quilt. So we'll set these aside. Now the easy part comes. We just basically now have to
add these on to the sides. So we just need to sew and attach these putting our
right side together. We'll see how well we did. Here is our adorable little
quilt block of our reef now we just basically
need to square this up and make it less
wonky looking. With all the song parts, sometimes they get a
little bit warped looking. I basically am using
my mate to find a square of this and I
want to even as possible. I want to center this
point of the reef, the bow because
that's really truly the center of this
particular block. Anything beyond that point what I will take off
because once again, I am centering this based on my bow and I want to do the same thing
to the bottom here. Once again, I'm
going to find me. I'm going to center my bow on
this line here and it's so important to square
these up when you are freshly making them. That way you can see what you should or
shouldn't take off. Then that way, if you
need to square it up and make it smaller
or larger and see that right there
to me is preferably to come off rather than to stay on because it's a quarter
and not quite a half, and that would make a
huge difference whenever I go to set my blocks in
the finished block here, 8.5 by 8.5 inch. These can be taken, changed up, made
with different bows, and even different fabric, and you can make an entire quilt just out of this one block.
14. How to Make Quick 8 Half Square Triangles: We are going to make some quick eight can make them
really, really fast, one of the same fabric
to adjoin to each one of my five inch squares so that you can see we want our
right side facings. We want these to be a
little bit smaller. We're actually going to do eight on each one of these
and this is how you do it. We are first going
to lay our ruler here and draw a line through
the center diagonally from and we are going
to sew a seam on each side of that line when
we take it to the machine. And uniquely enough,
when we do this, the way that we cut it, it will turn into
eight half triangles. So once again, I'm
doing the same thing. I'm doing that to
both of these sets. This will give you some
color differential, and you will have some that
will have both those colors. So we're going to
go to the machine and we're going to sew a quarter and on each side of these lines, you can place your foot beside this line and so
that quarter inch seam, flip it around and
come back down. You'll do the same thing on that side and the same
thing to this square. All right, so that you
can see this up close. You can see my
stitching pattern is a quarter of an inch on
each side of that line. Now, the easiest way to do this is you're going
to use your rule, and we're going to cut this first cut we're going to make is right down
through the center, the halfway mark of this square. Since this is 5 ", you can use your
ruler and go over 2.5 " and you know you're in the center, we're
going to cut it. First, this direction. Now we're going to
turn it and we're going to cut it right
down the center. The next cut we're
going to do is diagonal as we drew our line. Right through the
intersections there, and then we're going
to do the same thing this direction on the diagonal, and this is going to create for us eight half square triangles. They just call the quick
eight because you end up with eight of these beautiful
half square triangles. Now, let's go to
the ironing board, and let's press these open, pressing towards the dark side. You'll do the other
square the very same way. Now we have all of our
triangles iron open, and they are just beautiful. You can see all these
contrasting colors you got to silver and gold going in
these particular fabric.
15. Fast Square Up 4 n 1 Tool: Here's the trick. You can
use these just as they are. The other thing is this
tool right here is a half square four and
one triangle ruler, read it really well and
see it really good. It has all of your
half measurements. It has your whole
measurements and your half measurements
in the same ruler. It also has the
line that we drew. You can actually use
this little slit here, lay it on the center
of your square, and you can draw the line. There are more than one way to use this particular triangle. You generally want to square your triangles up
when they're closed, but with this ruler, you
can do them open or close, and I will show you right
here, it has the lines. You could do it
while it's closed or you can do it while it's open. That's what's unique about this particular
squaring triangle is that you have the potential
to do it both ways. Now, when you square up, this is the thing you
got to keep in mind. If I measure this square, just like it is and
discounting the dog ear, I am showing that that is a one and almost two inch square. It's about an inch
and a half and it's actually over that mark, so you can decide if you want to take that
difference off or not. If you're squaring these
up to an inch and a half, then you can actually
do that open or closed, and it's quite easy to follow. If I do this in the
closed position, what I'm looking for
when I put it on my square up ruler is we have our seam line and we can see
our threads through this. If we put that on
the inch and a half, seam line. You can see these
little dots, little dashes. That's the actual sew line. You can see the overage
on these little squares, and that is what you
would be cutting. You always put the seam line on the line indicating the
size that you are we're after the inch and a half
and we would line that up and we would cut off
anything over that mark, which is what I'm going to do to square up each one
of these squares. I'm not going to do
all of them on camera, but to give you the idea so that you see I'm lining
that ruler up. Anything that's over
that point once I put that dash onto that seam line is what I would be cutting off. So I'm going to make sure that my triangle is good and under that mark that my seam line is lined up before I cut it at all. This also has the grips on it so it does not
slide around and squaring up this many small little squares
and then trimmed we'll cut the dog ears off
of it, right there again, with it open, you
can see that it is at the 1.5 mark on the ruler. Now that triangle is completely squared up
to an inch and a half. You can trim those
little dog ears off. I do because it just
makes it easier. I can see which one I have done and I can move on to
all of them really quick.
16. Ornament Block 8 Pro Level Up: I Ornament block. Now
we have our quick ads all squared up and our
doll gears are removed. We need two rows of
these. For example, Bn. You can lay them out any
direction you want to go. You have to determine that. We need two rows that
are four across. And like I said, you can play
with these and shape them and design them to go any direction you want because
this is your ornament. You may want some kind of pattern running to
make them really, really neat looking and
change it up and use some of one block and some
of another and come up with all kinds of
different patterns may see in your unique
ornament that you build, and you can kind of lay them out and see which
way you want to go. So the idea here is
you can deviate and make different designs and get different flows
going with it, the other four that
you have leftover of each of your squares
making a total of eight. This can give you option to
make two ornament blocks. The great thing about half
quarter square triangles is you can make all kinds of they become more
and more beautiful and sophisticated with
each time you lay them out and you'll just
find yourself putting these little things
together into puzzles and really
playing with them. I'll go to the machine and I
want to sew these together. Yes, you'll have to do
them one at a time. But what you can do is if you take your cutting
ruler and le them out just as you have
them mat here on the map and then transport
them over to your machine. That way, they stay in order
and you don't get mixed up. This just makes a really
easy carrying tray so that we keep
everything in order. I'm going to sew
together and I'll one tip that I wanted
to share with you when you press your blocks open. If the top ones, iron those to the left the ones on the bottom,
iron to the right. Seams will nest
together. I'll show you. When you have them
pressed that way, now I have all
four sewn together and they are flowing
to the left. One on the bottom, I have them pressed going to this will keep any kind of fabric pile going on and
it actually will keep this from shifting whenever you go to put these two together without any issue because
all these things will just nest together. All your blocks are
squared up and they are pressed and equal in space. Now I can go to the
machine and sew those together and they are
just nested just perfectly. Here we are. We have all
eight of them sewn together. And as you can see, these seams are just as flat as a flitter. And by pressing them that way, you don't have all
this fabric piling, and it makes it
really easy to quilt them and put together
your block of brise. So sometimes,
pressing your fabrics the right direction
is essential to the outcome of a really
nice sized block and everything
really looking good. Now, by laying this on
my mat, take my ruler. So we have a six and
a quarter on this. So we need to cut our
fabric on the sides here to make this a little bit longer before we add our top. And I think that will
give it a nicer finish. So our blocks added
together are 3.5 inch. Cut two pieces that are 2 " by 3.5 " long to
go on each side. I'm just going to add min on and then trim
off the difference. So we want to lay
these right size together and sew
one to each side. I've attached the fabric
onto those little blocks. I'm going to cut
off this difference before I press that open, and I'm going to
line it up using this line as my guide together. So if yours is a little
wonky, that's simply normal. And these extra pieces
we can use in our scrap. Press this open and see
what we've got. It's iron and by measurement,
it looks like we have 9 " by adding that on. And that's exactly what
I was going for. 9 ". Cut a strip of fabric to the
top and to the bottom that is 2.5 " wide by 9 " long. So now let's go to the machine. Let's sew this one
to the bottom, and let's sew this
one to the top. Looks really, really nice. So here are four and once again, and we're just going to
draw a line from corner to corner on these squares so that when we're
at the machine, we don't even have
to think about it. We can just sew right
down that line. We're going to lay
our square up top, and we're going to sew
from corner to corner, starting at the upper right
down to the lower left. On this side, we will
do the opposite. We will start at the upper left and sew down to the right. And you can use a pin to just keep those there until
you get to the machine. This one, we will
do the opposite. We will sew from the
left down to the right. We will make sure that we sew our square from the upper
right to the lower left. And it's always best
to lay this out before you get to the
machine and look at it and just give it a look over and make sure that it looks like the angles are
going in the right direction for your snowball. Corners snowball. We're going to take our ruler, we are going to lay our
quarter of an inch marking right on top of that seam and allow that quarter of
an inch seam allowance. Cut off that little bit, and we'll do that
all four corners. I only take a second, but make sure you
allow that quarter of an inch seam allowance.
So let's press those our ornament block is
looking really nice. To complete our ornament, we need to put a hanger up here. And if we measure
these distance, we know that this is 9 " long. To make this look right, we need at least inch and
a half by 3.5 " long. I've selected black. Gray or silver would
look good as the hanger. We need to cut these pieces of our background fabric
an inch and a half by three and a quarter inches
long is attached one to the left and one to the right and press that open.
Created our top. We can attach this to the
top of our ornament now. So I'm just going to
go to the machine, place these two together, and I'm going to sew my top. To create a little
bit more definition and hanger uptop here, and we've already measured it. I have this little piece that is the stripe to make it look
like a ribbon or a hanger, an inch and a half by 1 ". I'm going to leave that
length on it. I can trim it. Two background pieces for
either side at an inch and a half by 4.5 " piece
for our hanger. You could do that in black or you could do
that in a stripe, maybe some leftover pieces. Everything gets used.
Nothing goes to waste. I'm going to sew one to each
side of this 1.5 inch strip. So my little topper is
looking really cute. I'm going to trim off that little bit. It's overhung there. Sometimes it's
easier to hang on to that little strip and just trim off the difference and attach this to the
top of my ornament, right size together, and sew right across
the top of that. So I'm going to leave
this block at the 9.5 by 8.5 " size. It's just a beautiful
ornament block. It really turned out good. I think adding an
extra one of these into the quilt would be a
grand idea then that we had all of our leftover
half quarter inch triangles and you can make a
different block with those. That's just another
way to get two of these ornament blocks and
use all of your squares.
17. Ornament Block 9 Use Quick 8 HST: Since we now know what all our cuts are for
the ornament block, let's make another
ornament block. The pattern I
elected this time is to put the colors
on the outside, and these ornament pieces will be attached on the
outer extremity. That way, the pattern is really, really popping in the center. So I'm going to
sew this first row together and this
second row together. And remember, you can use your
cutting ruler as the tray to transport your squares over to the sew machine
to keep them in order. And then that way is just really easy so that you
don't get mixed up. Just as before, when
I did my top row, I had told you and
encouraged you to press those all to
the left at the top. The top is flowing to
the left and then to press your seams to the
bottom to the right. That way, when you go
to sew these down, these seams will nest
together. Any problem. You can just line
those up because those have already been squared lays down when it goes
under the machine. That looks really nice. As you can see, all that
is just pressed down, very flat, very nice, and that keeps from
the fabric piling up. Just light down and it goes
through my quilt machine to spine and I have no problem
now the side pieces here, they are two inch by 3.5 inch, which is the length of
these blocks sewn together because they're
inch and a half and whenever they were
sewn together, they ended up being
a 3.5 inch section. We did two inch wide by
3.5 inch long strip. These have not been sized down, but as I did before, I will sew one to this side, and then I will sew the
other one to this side. Once I sewn them on, I will trim that off. I've got those sewn on, and
before I iron them open, I'm going to cut off anything
beyond that line and just making sure
it's lined up on my mat here, smooth transition. So this is just what was left over where I had
sewn that piece on. Hang on to all your square. That looks fantastic. So here is another thing
that I want to point out. If you notice my ornaments on this particular fabric
are flowing downward. You want to pay
attention to that. Now, these in the square
is going to give it some definition
and some contrast because of that flowing, but it's not enough
to even be notable. I am noticing it
because it's small in this production and I
can show really easily. But it doesn't take away
from the form or anything. But on these, this
would show up very loudly and proudly if it
was not laid out correctly. Pay attention to the flow
your pattern on your fabric. On the small half
quarter triangles, they're only an inch and a
half and once sewn together, there's not a whole lot. We really want
these colors flow. That's just something
to also be aware of. This one is, of course, these stripes and
they're very bright, and if you stare
at them too long, they'll mess with your eye. As you see, there's
just a little bit of difference hanging over,
and that's no problem. There again, we have that
opportunity to square up. W I is when this is
going on and I know these are the exact cuts and measurements of
the previous one. I'm going to use this as my
ruling length, which is 9 ". Then that way, this one can
stand any kind of trim off. But before I trim it, I will use that squaring it up at the end once I put
everything together. So unless it's confusing for me, I'll leave it as it is until
I get to that final step. Now, I'm just going to
eyeball this and center it. I can sew that top
down across there, and I'm going to do
this one the same way. Now I'm going to sew top and the bottom on those pieces on, and I just want
to make sure it's staying in that nine inch mark, and this line is straight. And now I can find
my balancing part, and I'm just going to take
off that little bit of edge that's line over here from
that previous fabric. And then the same over here. I can actually use my
striped fabric as my guide. Snowballed are squares
into the corners. These are 1.5 inch squares, and I am able to lie them there, and we are going to draw a line on them because when I get
to the sewing machine, I do not even have
to think about it. My brain does not
have to calculate. I can actually just
sew down the line. And when I lay them
on the ornament, it helps me to be able to see which way they need to flow. You can basically draw a
line on each one of them and then place them on the
fabric if that's easier. Whatever your brain can do and if you become
vertically challenged, this is an easy way to
do it so that you can see it and you don't even
have to think about it. You can actually go, Oh, yes, that goes that way and
this one will go this way. That just keeps me
in the straight, keeps my brain thinking
in the right direction. I'll just put a pin
there just long enough to hold it until I can
get to the machine. We're going to use
our quarter inch mark and we're going to
lay that actually on the seam line so that
we ensure that we allow that quarter
inch seam allowance. When we iron our corners back, press our nice little
squares into place. Now it is really starting to
take our top here is that a 3.5 inch by inch and a half was the perfect
fit for the center. But we needed our side pieces, so we had to cut
those at 3.5 as well, and 1.5 " tall for both sides. So I already have those cut, and of course, I'll
go to the machine. I'll sew one on one side, and then now I'll
have to move that down the way and sew the
other one to the other side. Topper is now 9 ", and I'm just going
to attach it to the very top of the
ornament, sew that across. I meant to also say this. As you know, these are
our center squares, and if you're worried about
centering that piece, let's say yours
might be a little extra long and you need to
trim it off or something. Just consider the lines here is being lined up in the center
area to those two squares. You can just even
if you slide it up slightly with your hands
and then flip it over, it's pretty much going
to be in the center. But that's just a way that you can use the lines of
barrier that you already have as your center and
then you have it in the middle this ornament is coming together
really, really fast. Now remember, you do have
this little sway going, but it doesn't affect
your sew line at all. Just keep it straight as you possibly can because
of those small pieces. So the next smaller piece
that's the challenge is 1 " by 1.5 inch strip, and on each side of it, we need to sew a 1.5 inch by
4.5 inch background piece. I'll attach these to
the little 1 " piece. Attached to the slimmer pieces, I just take my ruler
and trim it off. Like I said, sometimes just that little scrap piece
of fabric can be helpful to leave it a little bit long ever go to put it on there, just so you don't have
any trouble with it. So machines will eat
that little tiny piece, and have a little length
on it when it goes in the machine helps versus her. Hey, girl to the top here. So I'll put those right sides together and sew that strip on. Here we have our ornament block. It is just gorgeous. Even with the stripes and the
pattern is enough to keep it from bothering the eyes and making your eyes
twitch back and forth. Now I'm just going to see if
this means squaring up any. We have our nine by 8.5
inch ornament block. When you actually take some of that width off of this block, it actually enhances it and complements it makes
it look better. It doesn't look so
oblong and stretched. It looks more square and
boxed like a true ornament.
18. Block 10 Music Note Pattern Corrections: So you should have a total
of 13 pieces cut out. Whenever you pre
cut your fabrics, you can label them with
a number or a letter. Sometimes when you're just
doing a single block, you can do them by size, and I have all of
mine stacked as they are in width
or length by size. Then I have my main fabrics and I know I'm going to
start with this one, so I'll set these aside. The first thing that we need
to do is some prep work. Because these will
have angle and are going to be
used as a snowball, but they're actually
going to have part of the flare we're going
to go ahead and pre draw a line to
simplify this so that when we get ready to
snowball these onto the pieces, we'll already have
our line drawn. Basically, we only want to draw that angle from one
side to the other, and we're just going
to draw a line from corner to corner on
all of these squares. That way, when we join
it to the fabric, we're going to be snowballing. We'll already have
our line to sew upon, and it just moves that
along a lot faster, and this just helps
us from really, truly being less confused and not angrily challenged whenever we get to the sew machine. That prep work done in advance. For the note block, have to prepare this to be
the note itself. We are going to need three
of our 1.5 inch squares. We're going to need
our main body piece, which is 3.5 by 4.5. You want to make
sure that the 4.5 is running horizontal and the
3.5 is running vertical. We're going to lay one in
the lower right hand corner. This is going to
make our note form, and we're going to
go ahead and pin it in place right sized together because we've already drawn
our lines on our squares. The next one is going to be in the lower left hand corner, and the next one is going to be in the upper left hand corner. When we do the Make sure
they're turned correctly. This one is turned
correctly. This one is not. I need this one to
where it is flowing, be sewn from the upper right
handcorn to the lower left. This one be sewn from the
upper left to the lower right. Start at the upper right
and sew to the lower left. Just another note, make sure that when you sew this
little square on, you minimize your sewing stitch. To 2 millimeters. The
shorter the stitch, the better this will harness
in place and keep it from getting off track with
you and be more precise. Use my quarter of
an inch marking. Lay that directly down
on the actual sewn line, and that will give
1 " seam allowance. Cut off the difference. Do
that to all three corners, and it only takes a jiffy. You can use a pair of
scissors if you like. It works just the same. Get to the ironing board
and press these back. That looks pretty sharp. H our body already snowball. Let's go ahead and
do our next prepping since we're already
working with squares. You want to bring down your 1.5 inch by three inch pieces, and this one is
super easy as well. All we have to do
on these because we have our line drawn
already is we're going to lay that 1.5 inch square on the right side
of those strips, and we need that line to flow from the upper left hand corner to the lower right hand corner. That's exactly the
way we are going to snowball the very sides
of this piece of fabric, and we're just this till
we get it to the machine, and so right down
on our draw line. Now, we've accomplished that. Once again, we're going to
do the same thing and pay attention that you lay these down so you don't
get turned around, you don't get confused
and cut the wrong half. We need to cut this upper half. So what I do is I turn them to where they are
kind of facing me. I once again lay that quarter of an inch mark
right on that scene line, and I cut off the difference. And then I do the
same thing over here, and then I will
press these open. We'll have our little flares
for our music note made. Those look really nice. And remember, the
key is to press. Instead of ironing, you want to heat set your stitches that lets those be absorbed by the fabric by sinking in
because it's cotton fabric, cotton thread,
helps those fibers spread out, and then they relax. Then push that back and
set the iron down on it. And that way you get
these nice press. And the next step
that we're going to do is we're going
to start building out these pieces because all we have to do is take the
inch and a half by three inch long background we are going to sew
these three together. That's real simple.
I'll take and put these right sides together and I will stitch that one down. I will press it open, and then I will lay this
one right sides together, and sew it down. We want to do it so that these flares ones at the top
and ones at the bottom. When you go to press this open, press these going up
the ones on the right, we're going to press
anything on the left, we're going to press down
and that will just help if any seams come together and meet each other,
they will nestle. Things start really
speeding up now. We want to bring down
our three by 5.5 inch background strip and we want to attach these pieces to it. We're just going to
put these right sides together and stitch across here. That completes our
left side and you want to press all these
seams flowing upward. Now the next step is we are
going to finish out our body, and this is super simple because we only have these
three pieces left. We're going to take
our by 3.5 inch piece. We're going to sew it on to the left side of
our music notes. Right sides together, and
we'll sew right down the side. Then with this longer piece, which is our five by 5.5, we are going to
take our 1.5 inch strip by 5.5 " and
we're going to attach it to the right side of this square and sew it
right down the side there. Press this side open. This is our five by 5.5 inch and this one is our two by inch. And laying them here,
I can easily see that the original pattern instruction is off half of an
inch right here. This is a whole half an inch. So in the original cuttings where we pre cut
these ahead of time, we can reduce this
particular cut here to an inch and a half
wide by 3.5 " long, and it would button up just
perfect equal to this size. I did verify the pattern, and we cut ours directly
by that pattern, and as you can see, is all of a half inch different.
But no worries. What we're going to do
is we're going to go ahead and attach these
two pieces together. We can cut off any extra
when we square our block. For the time being, we just
need to sew across that line. That is a change we
will make in our cut, and I will change that
to reflect 1.5 by 3.5. We have to do now is sew
this strip to this side, we're just going to lay
those right sides together and sew right down
the side there. Another thing is with my
seams running up this way, I will start sewing
it under the machine. I will actually take my fabric
and light that away and sew it down with this so that
way the stay pressed down, go right up under
that needle just as smooth as can be
with no problem. Music note turned down
absolutely beautiful. At this point, I have centered
my music note on my map, and I am squaring it up. The best way to square
it up is to find you a center on
your map and lay it there and turn it and make any adjustments so
that it's sitting straight and looks
in proportion. That's how you
discover something. You will be following a pattern
and then you'll find that the actual block on one
measurement might be off. Then that way, as
we work it out, we know we can make that
change in the final cut. That is a great way
of equaling this out. At this point, we have
an eight inch wide by 8.5 " tall block
for the music.
19. Whole Note Inspired Piecing Bl 11: To make a whole music note to predecess after we've
made our half note. All you'll need is
your background fabric and then select a fabric that is of a solid
color that's going to be the body of your
actual music note. To begin our full note block, we're going to do our prep
work because we've got to snowball in three of the
corner these squares. So we have our inch and a half. We're going to draw a
diagonal line on each one of these squares and
just select one side, and from corner to corner, take your ruler, light there, and you can draw your line, and it takes the
guessword out of it, and your eyes don't
even have to think, they can just focus, and you're going to
sew on that line. One will go here
and be sewn from the upper right hand corner to the lower left hand corner. You'll do the same on
this note as well. You'll just draw your line, and that will keep
you from being angrily challenged
whenever you go to sew, and you'll already
have those in place. Things to note. Whenever
you go to the machine, reduce your sewing stitch to
2 millimeters versus 2.5. That'll help harness this
stitch into place and less probability of it pulling loose while
you're working with it. Also, it helps you
to be a little more accurate in sewing your line. So when you place
your foot down, you can center it and just
stitch right on the line. It will flow a whole lot faster and just
putting the pin in there so that you can transport it from the cutting
mat to the machine, anything to lessen the stress. This just speeds things up. With our snowballs in place, before we press them open, we're going to put our
quarter of an inch onto that seam and
lay it right on the seam line and just cut off the difference before
we press these open. That way, our seam allowance
is already allowed. So now we need to build out the center of our music notes. And we have our 1.5 by 3.5 inch strips of our actual main color and one of our background. We're going to sew
these three together, put our right see together,
and sew this one, and then we will take this one, sew it to the other side, and press it open. And that will be
our center bars. To get this set of bars, the right amount of distance between the notes that
will be down here, we need to add another 1.5 by 3.5 inch strip to
the bottom here. Let's attach this
inch and a half strip and to sew it two right sets together,
stitch across there. Now when you create
these middle bars, make sure that you press these up so that way anything
on the right of this, if it has a seam,
you can press it down and anything on the
left, you can press down. Now we need to attach
1.5 inch wide. By 4.5 inch strip because
this section is 4.5 " long. So I'm going to take
it to the machine, and I'm going to lay these
right sides together, and I'm going to attach that. So we've connected one side
of the arm for our note, and this one on
the right will go here because our
block here is 3.5 ", and the space difference
is a 1 " opening, half inch seam allowance, so an inch and a half. 3.5 and listen to that
when we do our quilting. So I am going to lay
these right sides together and stitch down the
side here and press it back. So this is looking excellent. Now we can attach the right side of the whole note to our bars. So we're just going
to go to the machine. We're going to put
these right sides together and stitch across here. Now I've got that press down. It's looking really, really
good on the right side. So down here at the bottom, we need to add an inch and
a half 4.5 inch strip. I attach this to the
bottom side of my block, and then I will trim
off the difference once I've attached this. I've sewn that on,
and there again, when you've got your fabrics and they're shifting and so forth, that is exactly half an inch, but it never hurts to somehow just sew it on and then
trim off that little bit. I can press this open, and that should finish up
our right side of our note. To do the left side
of our music note, we will need a background piece that is 2.5 " by 5.5 " long. We will need a main fabric
that is 1.5 " wide, by 5.5 " long, and then of course, we'll
have our music note. We need to go to the machine, and we need to sew this
5.5 inch by 1.5 inch to the right side of our
2.5 inch by 5.5 inch strip. So we'll just sew right
down the side here. Now that we have
that pressed open, we can now attach our
note to the bottom of it, and we'll just lay
these right sides together and sew them
right across there. So now the final step is to lay these two pieces together and sew right down the
side, attaching them. We did a fantastic job of making our very own
full music note. This was without a pattern
and we just basically used our first half note as a map to go by that helped establish the outer boundaries and helped us to make
our own music note. Now we just need to square
up our music note block. And get a final measure. We have a 7.5 inch by
8.5 inch tall block, and we're just going
to square up anything that looks awkward or
out of place there. And as you can see
on the back here, this more narrow type of seams, we press inward and lay them in close so that that whole
piece will show off. You'll get more exposure of it. Then as you can see, all
of these were pressed upward and these were pressed
downward on the left side. Then that way, if
you do happen to have any seams that intersect, they will nestle
up nice and it'll keep your block from
getting swishy, swashi or crooked
or full music note.
20. Envelope Block 12 Quick Makes: The envelope block. And this is a simple
block to make. You're going to love it.
We're going to make a couple. You will need five inch
squares to make your envelope. You will need one that's
going to serve as the fly and one that's
going to serve as the body. Because one square is going to get us four
half square triangles, when we sew these two together, we will have three of
one and one of another. So in other words, we
want to make two sets. Well, all we're going to do is take these 25 inch squares. So laying our right
sides facing each other. We're going to sew all the way around both
of these squares. To make or small have
square triangles. We have a seam all the way
around the outer perimeter. I have my rotating mat
here. This is a FISCs. You can usually find these at Walmart and different
places or online. We're going to cut them
from corner to corner. I'm just laying my ruler
here from corner to corner, using my rotary cutter, and I'm just going
straight across. I'm going to now
turn this and do the same thing to the other
side corner to corner. Now we have four
half square triangle and I will do this one the same. Now, before we press these open because we are using
this in our quilt. We're going to square these up. We want them squared up to 3 ". Now, if you are doing that, you can, of course,
use your ruler, and you can just light there at your three inch mark and
square it up that away. You see here, this one
is almost a quarter of an inch over being 3 "
squared up by the ruler. So, of course, you would
just line up your ruler. You could cut those sides,
and then of course, you would turn your square and
do this side the same way. Lay it in your three by three mark and cut
off the difference. If you have a square up ruler, you would use the 2.5 inch mark. You do have it where
you can open them up and square them up on
the three inch mark. When you do it on the fold, you're going to be going by these white triangles over here. You're going to follow
the dotted line. This 2.5 inch mark is where I
would be lining mine up to. When you do it folded, you accomplish all four
sides at one time, and it's just easier. That's why having a square
up tool is very handy. Now when you have it
folded, remember, you're going to go by the white dotted line
all on that triangle. So you would just
slide this seam, your seam line right there, up to the 2.5 inch mark
when it's laying down, and you'll be able to trim all four sides at one
time because it's folded. And then as far as the dog ears, trim those off as
you're going along. And when I do that, I
know that one has been squared up and I can move
along really, really quick. So there's two ways
that you can square up these to 3 " open to lay out seams on your rulers so that you do not have to even
think about it. So if that is a seam that
you're using the most common, then you would just place
this tape on there, and it just helps
that to show up more and you can put these on your rulers whenever
you're using them. You can put it right on the line or you can just cover the line. When you're looking at
it, you can see it a lot better and they
have different colors. When you use this tape, you do want to trim it off
next to the ruler itself. You don't want to have that
extra folded over per se. You'd be much better
off to make sure that it's trimmed up to the
size of your actual ruler. Then that way you can easily find the seam line that
you're working on. Square triangle
squared up to 3 ". This is how you
want to lay them. You're going to take two
and bring them together. Depending on which
color you're going for. Now, I'm going to
turn this one to where that dark is the showy. You're going to add a third one, and now you have your envelope. And the neat thing is, you're
going to turn this one the opposite way as though
the envelope is open. And then, of course,
you can make a secondary because we did
our matching fabric, and you can do the opposite. You can put the lighter color
in towards you and then use the dark one as the flap coming in and the
other one going outward. Then you have two
different envelopes, and you can do a mix and match or make additional
ones simply by selecting either a
background color with a very prominent color that you want to show up or like I did, selecting two separate
fabric to put together. And every time you sew the two, five inch squares together
and cut them on a diagonal, you're going to end up with four half square triangles and you can make
several envelope. We have two made that
will go in our quilt. We need to make one more and before we go any
further on these, we want to sew these together. So we'll take the top ones
and sew and the bottom ones. So whenever you iron these, we're going to press this
seam open to the left, and we're going to press
this seam open to the right. The reason why is when we
bring these two together, these seams will nest together
right here in the center, and you'll get no
argument with it going underneath
that sewing machine, and it'll make it easy when
you go to quilting it, you won't have this fabric pile with these two
facing each other, also across here and press open. Now our envelopes are just
looking absolutely beautiful. And when these have a background fabric
going around them, they will really, really pop and you'll see them even better. So if you just lay them singly, you can see how
gorgeous they are.
21. Place on POINT Block Panel: I've made an extra envelope with these two on the right side
and one on the left side, and they're going to
be laying sideways. I wanted to place
this one on point, exactly a five and a quarter
square with this block. We want to put it on point, and that is easy to accomplish. Take one of our background
fabrics that are 5 " wide. Need two of them
because we need to put sides on all four
sides of this block. Take five inch square. This is what you got
to keep in mind. This is five and a quarter. Whenever you measure
the halfway mark of a five inch square, which is what we began with, it's going to be 7 " stretch. Take two of these
are going to cut them on the diagonal and
turn them into four. Laying my ruler from
corner to corner. Now we four pieces. You want to do two sides first because the
others will overlap. To make this easier, we have a center point on
this particular block. Sometimes that is not the case when you're doing
certain blocks, but to make it easier, we're just going to handfold
and finger press that so that we have this
little crease and we can line it up right
here on the side, and we're going to
stitch that down. Need to do the
other side as well, let me show you this one, you can actually see that
it is centered and that that crease is laying right in the center point
of the block. But if it were not and you
did not have that crease, you could fold
fingerpress it just like we're doing
these triangles, and you can also do this. Whenever you're laying it on
there and you look at it, you'll see this
perfect square form right there in the center
where those two intersect. You know you have it centered and that it's
where it needs to be. So let's sew these sides down. I have those pressed open. As you can see, we're
going to have overlap, and that's exactly what we want. It's important that
we have that overlap. Let's take our other two
and we are also going to fold them and give them a
little bit of a finger press, find our center, and we're
going to line that up. When we sew these on, we want them to overlap our previous ones and
they'll go right over that edge to just
sew all the way across and you'll do
the same on this side. Remember, if you're looking for that intersection of
that perfect square and knowing that you're
right in the center because we have this seam
running in the center, we can easily lay it in
there and it lines up. Let's sew both these sides on. Now before we move forward, let's go ahead and clip
off these dog ear. You don't have to,
but I think it looks a lot neater and
it takes that pile and just lessens how much is stuck under there and
just clip those off. You can use your scissors
or your rotary cutter. Now let's press these open. And here we are.
It looks perfect, and it's just beautiful. This can real quickly make this five and a quarter square
now an eight inch square, if I'm not mistaken, let's measure it real
quick and find out. Yes, we have 8 " and this, of course, is 8 ". Now we do need to square
this up because we're going to be attaching
the other blocks to it. When we measure that out,
we know we need an inch and a half by 5.5 inch strips. We need to cut four of
those and attach those to the top and bottom
of these outer squares. We can now just sew one to the
top and one to the bottom. Be mindful of which way
your envelope is turned and making sure that you have your envelope turned the
direction you want it to go. I know this one's
going to be on my left and I want it angled
towards the left, and this one will
be on my right and I want it angle
towards the right. So I know to sew my pieces on the top and bottom of them
the way that they are laying. All right, so we have our side
sewn on and pressed open, and it's the matter of
attaching this to each side. So I'll take it to
the machine and I will place my right
one and sew it down, and then of course, I'll do
my left and sew it down. We now have our first
horizontal panel, and they basically call
them panels because, well, we have more than
one block sewn to it, and it's by 18 inch long. Panel. Once it goes
over half a yard, you might as well
call it a panel. You do have the option of doing the little envelope
block separately or doing them on point for 8 " and mixing and matching and moving them about inside of your quilt.
22. Convert Paper Pattern to Traditional Blk: Always have a camera. We have to have our
camera ready and I'm super excited to share
this pattern with you because it is originally a paper pieced
machine wilt pattern. The main piece of fabric, there is a 3.5 inch square
is this centerpiece that is the shutter
of the camera is going to depict how
large this pattern gets. I say as a paper piece pattern, this is the original
paper piecing pattern. You would generally
print these off, and then you would sew your fabric in order using
a little bit of glue, you turn it upside down
to sew the stitches. But I'm going to show
you how we're going to make the old fashioned
quilt block way. And if we do it
right, our camera should turn out about this size. As you can see, the shutter is the significant part
of this pattern. And I'm going to show
you how we can duplicate this using whatever
fabric we've decided on. The great thing is you're
going to find that a lot of these pieces are small
enough to be scrap pieces, and so you can use some of your cutoffs that we've
done in the previous block. Right here with my
3.5 inch square. I know that I've
got to snowball in all four corners of this square
to make a octagon shape, so to get our eight side to form the shutter
of our camera. And I just have a
scrap piece here because I want to
show you how you can look at a picture and determine how much of an area
we need to cover. If we only have a
3.5 inch area and we really need this to look
like a camera shutter, then we've got to measure and decide how big of
a snowball block. Now, this is going
to be tedious and the most difficult part of
it is the entire block. So I want you to
hang onto your hat and know that you're being
challenged and you can do it. I have confidence in
you. I know you can. Now, if I only use a 1 " and I'm starting with a 1 " because I want to show
you the difference. If I snowball with 1
" piece of fabric, the way that you can
determine that by looking is you're going
to take your ruler, and you're going to
find your 1 " over, and you're going to find the 1 " down, and you line it up. That is how big of an area a 1 " square is going to
cover if you snowball it in. As you can see, that's only
leaving an inch and a half opening here because when you go to this side, once again, if we're just laying it
from the 1 " to the 1 ", that is all the area we're
going to cover of that corner, and that will give us
a 1.5 inch opening. That means we also have to duplicate that on
all four corners. This is how much
it's going to cover, and that again is
going to give us a 1.5 inch opening because
we're dealing with a square. If we did this at
an inch and a half, this is what you are looking at. Here's our 1.5 and
here's our 1.5 mark. So if I line that up from the
1.5 over to the 1.5 down, it's taking up that
much of an area. That snowball will take
that whole corner. As you can see, by
the time you did that on this side at 1.5 ", you're going to have this
little bitty half inch opening, and that's not
going to look very much like a shutter to a camera. It's just not going
to form right. So we have to
reduce that to 1 ". This is how you can decide how much of a
snowball when you're working from a photo and trying to guestimate,
how would that look? Your scrap fabric pieces or cutoffs are excellent
for positioning and staging so that you can do your measuring and determine
where to go from there. I had looked at the
photograph and depicted that at least a 3.5 inch
square was used in the center because of
the shutter being good and round and having enough sew
area to snowball the side, even though it is a paper
photo quilt pattern. Are really, really tiny, but we can do it
because it is so small. Now when we go to
the sew machine, we are going to set our stitch
pattern at two millimeter. A smaller stitch will ensure
that these little pieces will stay anchored as we
build out this block. We're just going to lower and lessen the size
of our stitch. Now, I use a pen to mark mine so that when
I get to the machine, all I have to do
is sew on the line and it keeps me from
getting vertically upside down or
challenging to say the least and just draw you a
small line from corner to just place a pin there long
enough to hold that fabric. Let's go to the
machine and let's sew directly on that line we drew. Our stitch down little squares, and it was a breeze. I had no problem whatsoever sewing those down
because I had a little pen. Once I got a couple of
stitches anchored in there, I slid my pen out and I
was able to follow that Got to still allow a quarter
of an inch seam lamp. This is my quarter of
an inch on this ruler. And what I do is I lay
that quarter of an inch marking directly
on my seam line. I can see it underneath,
and it is all but just a little nick of
fabric coming off there. Now we need to press these open. And when I say press, push that back and then set
your iron on it. Rather than taking the
iron and pulling on it, just press it back with your fingers and then
set the iron down on it. If you happen to have one of these little roll presses,
these work just fine. You don't even have to iron it a lot of times when you use
this little roll press. As you can see, you
can real easily with the roll press,
press those open. Our next step is
pretty simple because we know this is 3.5 " long, but the width here
is going to be 1.5 " wide that we are going
to attach on both sides. We need two pieces that are
1.5 inch wide by 3.5 " long. Make sure that when you
are using your rulers, whatever rulers you begin
with on that block, use those rulers only throughout the build of your block because it will change from
ruler to ruler. So it's really important
to bear that in mind on your tools and equipment
that whatever you begin with, make sure that's what
you use the whole time. I will keep you from really, truly making a lot of mistake and the measurements will come out like
they're supposed to. Take right side facing
and sew this one onto the right side and do the same here with this piece,
right sides together. So on the left side. Press towards the dark side and then do the same over here. Now the next step is we need
an inch and a half wide by 5.5 " long for the
top and for the bottom. That is simple easy math because all you have
to do is count it on your cutting mat or you can use your ruler and
light across there, whichever is easy
for you to read, we already know that we used an inch and a half strip here, we're going to use
the same fabric to do our top and our bottom. Now I have my 5.5 inch pieces, and I'm going to take it
to the sewing machine, and I'm going to
attach this one to the top and this
one to the bottom. Now that is just looking
absolutely gorgeous. So now we are really
truly going to start taking form in
developing this camera. We can see that they
changed up the color of the body in the upper part
to make it look more like, but vintage and nostalgia back in the 50s and
60s type of camera, got to snowball in these
four corners to complete building out the body of the actual camera and
completing the shutter area. Two pieces for the top to snowball and two pieces
for the bottom snowball. And on this one, as you can see, they did black and they
did gray for the original. And we are once again going
to take measurements to determine how big these
four snowballs need to be. Based on the photograph,
when I look at it, I already see that it
goes over top of the piece of fabric we have here, and it goes just over the corner of this
fabric right here. I know that right here where
these two lines intersect, that that has to
come over this piece of fabric at least a
quarter of an inch, and that is a
proper depiction in this photograph
that I need to cut my square at least an inch and a quarter or at
this measurement, and then to give me my
seam allowance grace, I need an inch and a half. So these four squares
will need to be 1.5 inch squares to snowball
in these four side. I'll show you what I mean. As I was showing you before, and I'm going to zoom this up. Whenever you take your ruler and you just lay it on
your math inch, it is not going to cross these two intersected
pieces of fabric. If I move that in
by inch and a half, I have now crossed over and intersected these two pieces
of fabric right here, this seam by a
quarter of an inch for the top of a
different color, and two inch and a half
squares for the bottom. Use scrap fabric. Just know that when you're
looking over your scraps, if you do two different colors, you're going to stay
with that through this whole section up here
and you're going to stay with that through this
whole section down here and make sure
that you look and see what you have if you're
using scrap pieces or if you're using
yardage or pre cups. This is a great pattern to use. Going to draw a line
corner to corner so we don't get angrily
challenged at the machine. That's these two pieces, and I know that I'm going
to stay with that color for the bottom
half of my camera. And we're going to go
to the sew machine. We're going to sew directly down on that line
and once again, reduce your stitch to two millimeter when you're doing something small like that, and I'll just help to anchor that little piece of fabric
down a lot better for you. Lay our ruler on our
sew line and allow a quarter of an inch
seam allowance and trim off the difference.
Press these open. And once again, press them. If you iron them, you're
pulling the fabric. We don't want to do that.
We want to just lay that back and set the iron down
on it to press it backwards. The facing of our camera
standing now really good now. Now, some ideas is if you have fussy cut a photograph
or picture or printed on fabric or you maybe want to do iron on transfer to put a photograph or a picture or something that you'd
like there, even a saying. It looks like we need
to add this 14 A next. Order to square off and get
our height of our camera. So now we're building upward, and we need to do
our piece here. That looks like a 1 " piece by the finish here to
get it this height, say, a 1 " piece, the width of this
5.5 inch square. This is the width of our block because you can see
the width of a 1.5. This is what our 1.5 looks like. And so we can already
see that that's a lot narrower than
an inch and a half. I do have this 1 " strip, and that wouldn't look
too bad on this camera. Now, it might change the
personality of that block, and that's where you can make some decisions what you
want to put across the top. Either way, you have to decide. This, you're going to use
a scant quarter inch seam. You do not want to do an
entire full quarter inch. If you do, there's
really not going to be nothing left of this. It'll be a half an inch, and by the time you add
another piece of fabric to it, it won't even be visible. So do a scant quarter inch
seam on that piece of fabric. I'm just trimming off that
little difference now that I've sewn that 1 " strip
onto the top here. I'll press that back
and see what we have. That looks really cute,
really, really cute. Now, my guestimate is
the reason why they put that little 1 " strip of
fabric across the top there is to make this 6 " and make measuring and
adding pieces to it a lot easier during the building of this
paper pieced block. So if I take this
ruler right here, it is exactly 6 ". Now they're building
out the cap here. And that's the easy
way is to keep going up till you get to that limit
and then add the sides. Cut an inch and a half by 5.5
inch wide strip to go here. Go to the machine and
attach this piece, and that's where we need to put. Anything that's part
of the body down here, match up here, or you can go with a different
color altogether. It's your camera,
do as you like. Then since they are already blending in the
background pieces, I know that I need to cut 21.5 inch squares to
snowball this block in. That's this one and
this one because we need the width of the
existing strip and we need it to go far enough
out that it looks like this hood so I went ahead
and sewed that strip on. Now I have my 1.5 inch squares that are my
background fabric, and I've already
drawn a line from corner to corner so
that you can see how that needs to be done in order to create the
hood of our camera. And that's something
to bear in mind as you build this out, you'll
be able to look at. Is a more complex block because we are doing this from a sheet or a paper pattern that you do paper piecing
on a machine with. And we are also using very small blocks to snowball
in to create our shapes. Additionally, we are
discovering how we can measure and determine
how much of a snowball is needed
for each section. As it is, it's a more
complex pattern, and that just makes it easier for you to adjust to doing that. So let's snowball these in. We're going to go to
the machine, and we're going to sew directly down on that drawn line on a
quarter inch seam allowance. Remember, lessen your stitch to two millimeter when you're doing something small like that. Keep the fabric
anchored in place. Well, lay our quarter
inch seam allowance on our seam line now, don't always trust your drawn
line if it's not exact, but your seam line. Cut off the difference. Now we're going
to start building our side. This is really easy. I want to show you
how easy this is. As you see here in
the photograph, this piece of fabric, intersects in the
corner right here. That's on both sides. We know the dark
pieces are going to be the length of this
point to the bottom. If I lay my ruler there
and I measure that, that's 4 " of our darker fabric that is
making part of the body. Now, the upper part on the right side is
going to change color. We need to pick a color
for the flashbll. The right side is going to get a little more
complicated because we need a half inch seam allowance and a half inch seam allowance. This is what we're
going to do. We know that this area is 4 ". From here to here. If we look at the picture, we know this area where
it's coming together here is an inch and a
half. That's pretty easy. We know that to get
to this corner, where the flash bulb
is an inch and a half. All we need is the difference
between these two sections, which should be 2 " or so. It is from the corner
to this corner. Yes, we have a
half inch up here. We need a 4.5 inch strip, a two inch background
fabric or the white, whichever we choose
for this section. And then we need an
inch and a half piece for our flash bulb. So if we allow that
stitch allowance, we'll have our 4.5 here, we'll have our two inch here, and we'll have our
inch and a half here, and it should come out right. I will measure twice to be sure. So now I've cut out my pieces. Remember, these are 2 " wide. This one's 4.5 " long. This is 2 " by two inch square, and this one is a
1.5 by two inch. I'm going to sew these together. I am going to do a scant
quarter inch seam allowance. I'll sew this one first, and then once I put it together, I will then attach this one
to the top of it, and so how smart are we have our seven inch strip that
we need to attach here. As you notice, I press
these downward because I have wider fabric
in a downward flow. When I press these, I press these upward in the
center of the block. That way, if there
happened to be any kind of stitching
that needs to nest up such as this intersection
and this intersection, along with this intersection, they should nest together real easily and I'll be able
to sew straight down. Now let's focus on the left side of our camera now that we've got our right side built out. As you can see, our measurements
for the left side of our camera are identical to
the ones on our right side. We need a 4.5 by two
inch of our dark fabric, a two inch by two inch piece
for upper camera fabric, and then 1.5 by two
background fabric. Just in case you did
yours the opposite, it still will look beautiful. You could have your flash
on the opposite side and put your background
fabric on the right side. As before, we're just going
to sew these three together. Now, once again, I
press those scenes down should nest up just
right on this side. Camera truly looks
like a camera. I cut two pieces to
go down the sides. This is 7 " long and I'm going to cut it an
inch and a half wide. We will sew these
one on this side, sew right down and we'll
attach this one to this side. Now all we have to do is add a 2.5 inch strip
that's 10.5 " long. We need to cut two of those, one for the top,
one for the bottom. Easy measurement, 10.5 mark. As before, we'll attach to the top. Well attach this one right down
here at the bottom. Block, all of 10.5 "
wide and 11 " long.
23. Advance Skills Use Scrap Fabrics Orphan Sq: The next block is the mug block. As you see, I have a variation of fabrics here because you want your mug to be colorful and decorative and go along
with the winter holiday. This is excellent to use
a lot of your cutoffs and excess scrap strips
that are still large but beneficial and
have that variety of colors. You can also narrate
a shape out of half quarter inch squares or model something that
you like a picture. Maybe you're using
a print that has a photo on it that you
wish to fuzzy cut, and this is an excellent
block to do that with. Let's get started
making the mug block, you will be using
a great deal of 1.5 inch strips in
this particular block. The very first thing we want to make is the handle for our mug. To make the handle, we
need to pick one of our fabrics and you can use two like I'm going to
or you can use one. We have our upper
part, or lower part, and then the handle that
we put our hand upon. Looking at the original pattern which was put out
by moda fabrics, handle, the actual part
that you're holding onto is an inch and a half
wide by 3.5 " long. 1.5 by 2.5, I need two of those one for the top
and one for the bottom. So now we have these. Now we need some
background fabric to go with this handle. There again, it will
be a 3.5 inch trip. Anytime you're building a block, try to stay with
one large ruler and one small ruler throughout
that entire block. You don't want to change
out this ruler if that's the one you've been
using as your guide cut. Same with this if that's
the one you've been using. It's really, really important. Now we need 21.5 inch squares, one for here and one for here. There again, staying with
the same rulers that you selected when you
begin your blocks so important because it
will change just the same as if you were to use a different so foot
with your sew machine. It's very wise to stay
with the same one. This is how this is
going to work to go ahead and snowball this piece, our top, and our bottom. As we've been practicing before, on this lower piece, the angle needs to go from the upper right hand corner to the lower left hand corner. If you do this
opposite by accident, it's not going to hurt a thing because you could just
turn it upside down, fabric where you have
patterns that are flowing in a certain
direction such as this one, flowing in the
horizontal direction and I have my top doing
the very same thing. This block up here will go
the opposite direction. It will be snowballed
from corner to corner, starting in the upper
left hand corner and going to the lower
right hand corner. I always put a mark there so that I can see
it when I get to the sew machine and
it keeps me from getting turned around and I do not have to think about it. I know just by looking at it exactly which way I
need to sew that line. Now while I'm at
the sew machine, I'm going to sew a seam directly down on that drawn line
for both these pieces. While I'm at the machine, I'm going to go ahead
and attach this 3.5 inch sewing down
the left side of it. Before I iron those open, I want to allow my quarter of an inch seam allowance
and cut off that extra. On my particular ruler, I have a shading with
a little X mark. I can lay those little xs right down on that seam line and that ensures that I have allowed a quarter inch seam allowance so that when I press this open, it gives me plenty of fabric. Remember, when you sew these little bitty snowballs
onto piece of fabric, minimize your stitch
down to 2 millimeters. So as you can see,
those stitches are a little bit
closer together. I've got it on 2 millimeters versus my standard
2.5 millimeter. It keeps them
together a lot better because the stitches are closer
and a little bit tighter. So I'm going to go to the
iron and press these open. It is really starting to come together very, very quickly. Naturally, we have our top
piece, or bottom piece, and we are just going
to go to the machine, and we are going
to sew these and attach them to our
little handle here. We're going to press
these open and then we'll be able to move
on to the next step. Let's begin building our mug and getting it layered
up and then that way, we can come back to our handle. So here is the trick to
building this block. The center piece of the mug
is 6.5 " long by 4.5 " tall. And these pieces, I may have
to sew some together or add another fabric and then cut out the size to get it
that particular size. That being said, there are
leftovers that we had. These are three inch half quarter triangle squares
from our present block. Those could be used, and then that way you
can make up the 4.5 inch difference in that
center. That is one idea. We also had these really
small inch and a half, half quarter triangles leftover
from the reef project, and these could be used
to make the center. That is where you can
really, truly get inventive. As I look at my fabrics, I'm deciding this piece
says that I have leftover, they are at different measurement
and I can really easily lay this on my map and see
exactly how long it is. Then I can go, Oh, I need a 6.5 inch piece, or I can cut me a new piece
to make it the size I need. The bottom line is the mass of the mug height with all fabrics this calling for is
basically going to be 8.5 " tall and you
can make it work. Then that way I
can use up some of my scrap pieces and I don't
have cut any more fabric, I can try and use up some
of the scraps I've got. Now I have almost the
height that I needed. Now, I can stop now or
I can continue to add, and I think I want
to add because by the time I sew all
this together, I am still going to be
2 " shy on my height, and I want to make sure
I've got that tied in. I also now have two
same allowances. They are half inch E. Given that the original one
had three colors, that's already been
equivalented for. Once again, I can select another fabric or I
can match this one. So here are my choices. I have the squares that I
can actually sew together. I have six of them, and I'm going to make me a design and see what I
get when I do that. It's just another way of
tying in all of these unique, beautiful pieces
that's already been created and lined out and
see how we can use them. I sewed that together, and
then I press this part open on your small pieces
in the center like that where you're just needing
a little bit of grace. They're going to
naturally flap open, so it's just best to go
ahead and press them open. And then, of course, these
things I press to one side. Is looking pretty
sharp and it's going to work great in the mix here. This is how I'm
going to assemble this and see what
kind of difference we have our goal on this is to
get the mug at 8.5 inch. I'm going to do a
scant seam line, and scant means it's not quite a quarter and it's
just under a quarter. And then sometimes you just
end up with what they call that it gives you that little
bit of extra that you need. And sew all these strips
together and press them open. Remember, press
towards the dark side. So as you press, press
up all the fabric, I am a 1 " exactly from
having an 8.5 inch. I am going to add
a piece of fabric. Now, in the original
pattern, this distance, all these fabrics added together were 8.5. And use your ruler. You've got to use
your ruler and you've got to keep your
measurements in mind. Here's my mug really stacking
up and looking great. Another thing I want
to share with you is when you press your seams, the small little blocks
that I had sewn together, press them one seam
down, one seam up. That will take bulk out of the fabric piling
and then press these upward so that
will make it a lot smoother and a lot better.
Off the difference here. The next move that we
need to make here is building out our
background fabric and attaching our handle. So to give our mug
more definition, we need two inch
and a half squares that we are going to
snowball on these corners. We're also going to need
a background strip to go a top of our handle that is going to be an inch
and a half by 2.5. Because I know what lies
ahead on this pattern, I'm going to go ahead and
tell you that you need two more of these inch
and a half squares. And we need our inch
and a half by 2.5 inch. That is going to be sewn to the very top of our mug handle. So we'll do that while
we're at the machine. And then on these, in the
practice of these blocks, we are going to snowball in the bottom corners of our mug. Once again, but from
being anglly challenged, we're going to lay our
rule and we're going to draw our sew line
onto the square. We'll go from the upper
right hand to the lower left and on
the opposite side, dark in the upper left and we will sew down to
the lower right. Take, cut 2.5 inch
by 2.5 inch square. We have this 2.5 inch block that's going to be
sewn to the bottom. So while I'm at the
sewing machine, I'm going to attach
this 2.5 inch square to the bottom
of the handle, and that will have
four sewing tasks ready once I get
over to the machine. On our snowball, we
want to lay our line right on that sew line
and allow that quarter Seam, and we'll have
our snowball done. And I do that to both sides. Press these seams open. And then, of course,
on the mug handle, we need to press
these open as well. So this is looking fantastic. We are spot on with our
margins and our lengths. This is an 8.5 inch mug build. And here is our
handle put together with our background fabric
at the top and the bottom, 8.5, and now this one. And now we can just
attach and sew this down. I am most pleased with how
my mug is looking thus far. And the pattern is
calling for a 2.5 inch wide strip on this side
that is 8.5 " long. Let's go to the machine, and let's sew this
background piece over here. Cut this piece down here. They did an inch and a
half square on each side. A 8.5 inch section here with
a 1.5 inch square snowball. I had you to go ahead and cut two inch and a half squares, and now we need two more. We also need to select a piece of fabric that we
want to be the saucer. Now I have my 8.5 inch by 1.5 inch strip, are going to snow
ball the corners. To keep us from being
angly challenged, we're going to draw our
lines from corner to corner and sew down
on that direct line. On the right side,
we're going to sew from the upper right hand corner to the lower left hand corner, and then on the left
side over here, we're going to sew from
the upper left hand corner to the lower right hand corner. Before we do it, let's go ahead
and cut two more squares. We need those to be an inch and a half because those
will be at the bottom. Let's take these to the machine. Now, again, we're going to
allow that quarter inch seam. I've got my markings there. I lay it right on that seam, and I cut off the difference. So let me press that open. I'm going to sew this square
onto this side of the block, and I'm going to
press this side open, and I'm going to sew this
square to this side. Alright? I've created my saucer, and now I'm going to attach
it to the bottom of the mug. Excellent. This looks fantastic. So let's move to the next step, which is working on
the top up here. There is some background fabric and the stem goes
through the center, so we need to make these
little tiny blocks, and then we can
add the background fabric to each side of it. To create the steam
going above the mug, these are 2.5 inch. And what we'll need is
some background fabric with this as well. We're just going to
take and sew quarter of an inch seam sew all the
way around this square. We're going to do that too
two of these pieces to sew all the way around
these two squares. What we're going to do is
we're gonna cut a diagonal from corner to corner we've sewn this square
all the way around. As you can see, it's
not perfectly even, and that's simply okay. And we are just going to cut a diagonal line cut from corner to corner,
both directions. Do this one, and we
did the other side. This should make us some
really, really small squares. Want to do the same
thing to this one. We only need five, but in order to make
this easier for you to do and take the stress
and work out of it, we are going to do the quick half quarter
square triangles out of a 2.5 inch square. As you can see, they're
very, very small, and that's exactly
what I was trying to go for is this
little bitty square, and we are not going to worry
about squaring these up. We are going to simply
press all of these open and we want to snip
off these dog ears. We do not want those in our way. They will pose a problem and make it a little
more confusing. A lot of times
these are so small, you can literally press these
open with your fingers. But if you have a
little roll press, you can make these really flat, but they don't take a
lot of effort to get them opened up and I'll
do the rest the same way. And here is what we want to do. We need to pick five out. And using your
ruler or your mat, try to find five that
really and truly are as close in size to
each other as possible. You want to try to
lay them together. So there's two that I
have that are almost the exact same size because some of them will be
wonky like this one, and I can tell it's
a little bit bigger. So I do not want that one,
and that's what I mean. Out of eight that we made, we have five that match
really close in size. Now, here's what's really neat. This is how you make the
steam for your coffee. There we have our steam rope. Sew these together just as
they are laid out here. I want to use my ruler as
my little carrying tray so that I do not get these
out of order or messed up. All five of those sewn together, and here is the excellent news. I did a scant quarter
inch sew line on that. It looks even more like eight of a scene on each one of those. This equivalented to exactly
what I was going for a 5.5 inch if I lay my ruler
on there, exactly 5.5 ". I came up with using the 2.5 squares and just making quick half quarter
inch square triangles, and it worked out perfectly. I'm going to take
these little squares. These can be used
for another project, and this is going to be
centered above our mug. We need to 5.5 inch tall, by five and a quarter inch wide, sometimes it's
better to just cut these a little bit
bigger because you're tying in this
smaller piece and it being an odd size of 1.5 ". And with the
background pieces cut, I'm going to sew my little
strip into the center, and then I will add the other
one onto the other side. By the time you sew press those seams outward. That's the way they're
going to want to fall because it's so small, going to want to just flare
out to just press them out versus trying to press them one way and it gets that wave to it. It's really cool.
And here we go. We are exactly on the
mark. We did a great job. That direction is
the way I want it. I want that steam piece to
come directly out of the cup, right sides together,
and sew them together. Look how beautiful
that turned out. That is an absolutely
gorgeous block, our prettiest one thus far, and this block is 10.5 " wide, and it is our largest
one yet, 14.5 " tall. I'm going to use
what I have left and show you how you can
tie that in in any of your scrap pieces to make all the other pieces and make it work and still get the
same measurements, the same height because
by the time you follow winter quilt long series, you will have many
cuts of fabric if you are using fabric by
the yard such as I am. This is a way for you to use up your scrap pieces and put them into your quilt and
bring all those colors and contrasts together
of the other blocks. The mug was one of those. It was the perfect block to do that with and make it unique. Customize it just for
you and let it really, really be a part of your quilt. Now you have a new method and you've learned a new trick
on how you can get a very, very small square of
an inch and a half by sewing 2.5 inch squares together and cutting
on four ways to make half quarter square triangles and make them very, very small. That is another
way that you have learned and advanced
your skills in quilting and know that there is more than one way that you
can make your quilt squares without having to do
flying geese or cutting pieces and trying to sew on angle, make them
all at one time.
24. Scrap Strips Advance Skills Ugly Sweater: The next quilt block
we're going to do is the national ugly
Christmas sweater. Now, it doesn't necessarily
have to be ugly, but this is a time
when you want to grab all of your strips that you cut, all of your strips of fabric. If you don't, I'm going to
be giving you measurements. This is the idea. All of your strips need to be no less than 1 "
wide and 4 " long. You will be using them, and we're going to
create some strip sets to make the sleeves
and then the body. You will also need your
background fabric. This is just a great time for
scrap buster, and if not, it's a way to combine
all the fabrics you may have selected that you
want to make into your quilt. To build out my sets, I pretty much go
ahead and put all of the same fabric into one
pile. Far as my strips. Then that way, I can easily
grab them and make my set. You will either need one
continuous length of fabric that is 8 " long because
you're going to be making a left sleeve
and a right sleeve. In order for our left sleeve and our right sleeve to come
out somewhat right, we need to match our
strip sets. Their sizes. I'm going to go with 4.5 "
long and I'm going to select two strips that are 1 " wide and two strips that
are inch and a half wide, and the same down here
for the other sleeve. If you want to do them all
the same color, that is okay. I'm going to make my left
sleeve and my right sleeve different colors because it's my ugly Christmas sweater and you can make it
the way you want. However, just bear
in mind if you do your strips 1 " or 1.5 inch, you need to have
the same amount in the first set as you
do in the second set. I will sew all of
these together, and then I can cut it down. It doesn't matter what
order they're in. You can have the 1.5
next to each other, the one inches next
to each other. You build it out the
way that you want to. The idea is you want four strips and they
need to match in height. Now I have my set sewn together. I want these to be 3.5 " tall
and that's what they are. What I'm going to do is
I'm going to cut off the difference from
my strip sets. I have both of them
line here and I can easily just go straight up
and do them at the same time. You can save these pieces
and you could even undo the stitches if you needed
them for another project. Now we have our strip sets. Just make sure that you've
got it squared up and it's at least 3.5 " to 4 " by 3.5 ". Now we need to cut some
background fabric. We're going to need,
2.5 inch squares. What we're going to do with
these is snowball these and make it at an angle so
they truly look like sleeves. Now, there's a certain
way you have to sew these in order for
it to come out right. Because one of these
sleeves is going to be your left sleeve and the other one is going
to be the right sleeve. If you are using
the same fabric to make both of your strip
sets, that's wonderful too. Now, this is what
we've got to do. We've got to do these one at a time in order for
it to come out right. What we need to do is on
one of the strip sets, we're going to sew an angle from the upper right to
the lower left. I'm just drawing a line. You can use your
friction ink pen or any ink pen to
mark that line. This one is an erasable
friction ink pen. The heat from an iron will
actually take off the ink. You can buy these in any of your office supply departments of any store and drug stores
included. The opposite set. We are going to sew a
square the opposite direction from the upper
left to the lower right, and we're going to place it on the right side of the fabric. This one, you notice
is on the left side, and this one is on
the right side. It's important that
we lay these out and do them one at a time because
the fabrics will overlap. We want to take our half
inch measurement on our ruler and we're going to
lay it on that drawn line, and we're going to
draw another line. What we're doing here
is we're creating a bonus of a small as we
have in previous ones. You'll get this little
mini half square triangle. That's what we'll do is while
we're at the sew machine, we can go ahead
and achieve that. Once again, I'm
going to lay my half inch measurement
over because we need a quarter inch seam allowance and then on the other
little half square, we also need a quarter
inch seam allowance. Now we can draw directly on the fabric and when we get to
the sew machine, sew directly on those lines. Now that I've got the sewn on, we're going to take
our ruler again. This time we're going to use our quarter of an
inch measurement and we're going to
lay it directly on the actual sown line, and we're going to cut
off that little square, and we will iron these back. We'll press them open. Once again, lay that quarter
of an inch marking on the actual sewn line and
cut off the little square. Let's go to the ironing
board and press these open. So here we have our angles already on, and this
is looking good. Here's our little mini squares. We can put those aside and
use them for another project. Now, looking at our pieces here, as we saw them correctly, yes, we have because remember, one is going to be
the left sleeve and one is going to
be the right sleeve. Now you can see how
it's taken form. That makes it easy to
put this square on for you so that you don't get confused. This is what
we're going to do. We're going to lay another
2.5 inch square of our background fabric in the left corner and one
in the right corner. Now you can see how
it's coming together. Once again, we're going
to take our pen and we're going to draw a line
from corner to corner. This really truly
speeds things up and it sure makes it helpful when
we're at the sew machine. I'm going to go
half inch over and mark another line so that I can get my
little mini square, and I'm going to do
the same to this. I'm going to draw a line
from corner to corner. Then I'm going to go to the
sew machine and I'm going to sew directly on that drawn line. We've got our sleeves made. Now we need to make the
body of our sweater. You're going to love this
because it works the same way. We are going to select
various pieces of our strips. We're going to build
out our sweater. The idea here is
these pieces for the sweater need to be
at least 5 " in length. You can build it out some strips together and figure out
exactly how many we need. We just need to make sure
that we measure these and check to make sure that
they're at least 5 " long. So if you're running
into what I am where you've got all these
different pieces of fabric, you want to use them all, then bear in mind that every time you attach two
pieces together, you're going to discount
a half an inch. If you're going
for 6 " in height, just know that every time
you sew a seam together, reduce it by half an inch and then you'll get
taller and taller. Once I iron and pressed this open and trimmed
off that black, I found that I'm actually
right in a good area. It is hitten at 7.5 ", and I think that's going
to serve me really well. Basically, trim this down. Square that up before I
go any further so that my measurements for my
background fabric are not off. They are where they're
supposed to be. As you can see, I've got just a little
bit of overhang there, and that just comes from doing the scant quarter inch when
you sew your strips together. You can do a full quarter inch, which is what I did on this one. I'm going to bring my sleeves
and look here what we have. Look how neat this looks. That just looks in
direct proportion. What's grand about this is we'll have to
put a neck on it. We are going to do a 3.5 inch section for the
neck of our sweater. If we use our
cutting mat here and we count down and you
can use your roller, whichever is best for you. We need four more inches plus a half an inch seam allowance. This piece, we need to cut here a background
fabric needs to be 4 " wide by 4.5 " long. We need two pieces, one
for the right side, and one for the left side. So here's my background pieces. These are 4 " wide, about 4.5 " long, all I have to do now is
go to the sew machine, put these right sides
together and sew this one, right sides together, and sew. You know what our next step is. We're going to sew this
one to the right side, and then we're going to sew
this one to the left side. Let's press this back
and see what we've got. Ugly Christmas sweater is quite beautiful and looking
absolutely charming. This landed exactly where I truly desired it and I didn't
even plan it that way. That just naturally happened. That's the wonderful
thing about quilting. You'll have these gentle
little surprises. And even the black, the way that black turned
out at the top, I love it. Was not even planned. I just sewed those
strips together and seeing what was
going to happen. All right, so now we need to create our neck of our sweater. The distance that we have of all this song together before we square it up is at the 11.5
inch mark as far as width. I've selected my piece
that's going to be my neck and I have my
background fabrics. All we're going to do is we
are going to sew one piece of background fabric to each
side and the press open. So now that I have my neck piece on and my background fabrics, I am basically going to
sew this to the top. Then we can square it up and
trim off anything extra. I am just centering
that and I have my markings on my mat up here. I know that's 5 " and therefore, I know that these
seams need to be lined up with the little
markings up here. If you are trying
to center yours, just line up the seams. There's your 5 ", 5 ", then this piece is 3.5, so we can already
see that it's 3.5. We know that that's going to be a half inch bearing if we've got it turned over
backwards on each side, when we put this on two, we can line up the pieces of that cut piece on the same
inside markings there. That way we know it is centered. It may not look centered, but it is centered. Now if we want to keep
that from going anywhere, can pin it and transport
it to the machine. If you want to check yourself, just lean it back. You can easily see
it is in the center. So let's press it open
and see what we've got. That is absolutely gorgeous. I am so, so pleased. I love my sweater, and I
would wear this if I had one. Now, we're going to center this. Once again, we're going to use our seam lines to
line up on our mat, and we are going to trim off any difference that
is overhanging, including if you did like I did and used pieces
from a square. Blocks will already be squared, and we will not even
have to redo that. 11.5 " wide, and we
have 8.5 " tall. That is our ugly
Christmas sweater, which turned out
quite beautiful. Now you have a guide, and you can make several
of these sweaters.
25. Modify Block Full Sleeves Ugly Sweater: The next thing you'll need
is all of your strips, your cutoffs from making the other blocks.
Now here's the rule. No less than 4 " long, that's the shortest that
you can get away with, and all of your strips need
to be a minimum of 1 " wide. That will take care
of it. You can do a variation or you can
use all in one length you'll see as we progress and go along and
we're going to create some strip sets to make the
sleeves and then the body. You will also need your
background fabric. This is just a great time for
scrap buster, and if not, it's a way to combine
all the fabrics you may have selected that you
want to make into your quilt. Let's get started. In order for our left sleeve and
our right sleeve to come out somewhat right, we need to match our strip
sets in their sizes. I'm going to go with 4.5 "
long and I'm going to select two strips that are 1 " wide and two strips that
are inch and a half. And the same down here
for the other sleeve. If you want to do them all
the same color, that is okay. I'm going to make my left
sleeve and my right sleeve different colors because it's my ugly Christmas sweater and you can make it
the way you want. However, just bear in mind, if you do your strips
1 " or 1.5 inch, need to have the same amount in the first set as you
do in the second set. I will sew all of
these together, and then I can cut it down. It doesn't matter what
order they're in. You can have the 1.5
next to each other, the one inches next
to each other. You build it out the
way that you want to. The idea is you want four
strips and they need to match in height. Now I have
my set sewn together. I want these to be 3.5 " tall
and that's what they are. What I'm going to do is
I'm going to cut off the difference from
my strip sets. I have both of them
line here and I can easily just go straight up
and do them at the same time. You can save these pieces
and you could even undo the stitches if you needed
them for another project. Now we have our strip sets. Just make sure that
you've got it squared up to 4 " by 3.5 ", making two sets, making each sleeve at least
3.5 " in height. The next thing we want to
do is we want to bring down 22 inch squares and
our 22.5 inch squares. Let's do our 2.5
inch squares first. You have to really, truly use your mind and be focused
whenever you do this. The first thing I
want to do though is on these squares on
these 2.5 inch squares, I'm going to use my ruler and I'm going to line
it up from corner to corner and I'm going to draw a line that will
be my seam line. I'm using my friction
erasable pen. You can use any ink pen,
this won't show up. But if you were worried
about leaving a mark the friction ink pens can be found in your office
supply department. It has to be the erasable kind, and just the heat from your
iron will erase the line. If you're using it on white, I do warn because it can
leave a bit of a residue. Now, these 2.5 inch squares, because I know that
I can get a bonus, I'm going to measure a half inch over from that marked line, and I'm going to
draw another line. Now, I'll show you what's
going to happen with that. Let's do this one the same
way corner to corner, and then we'll put
the extra line a half inch over and lay your half inch mark
on the drawn line, and that gives a quarter
of an inch seam allowance. Or both. Now, this is what I'm talking about when you
have to truly focus. You're going to place one of these squares in
the lower corner of your block and you're
going to sew from the upper right to the
lower left on both of them. You're going to do the
opposite on the other square. You're going to turn
your fabric and you're going to put it in
the lower corner because these are going to be the
sleeves and you're going to sew a line from the lower corner to the upper and the same here. On the song line. What we're going to do is take our ruler and we're going to lay that quarter of an
inch mark on your ruler. We're going to lay it directly
down on that song line. That will allow a quarter
inch allowance over here. What you get is this bonus of a half quarter
square triangle and we will end up with these
little bonus squares we can have for this project
or another project, and you can press those open. Let's cut this one
off and then we can go to the ironing
board and press them. Once again, I'm
going to lay my half inch measurement
over because we need a quarter inch seam allowance and then on the other
little half square, we also need a quarter
inch seam allowance. When we get to the sew machine, se directly on those lines. Now that I've got the sonn on, we're going to take
our ruler again. This time we're going to use our quarter of an
inch measurement and we're going to
lay it directly on the actual song line, and we're going to cut
off that little square. So here we have our angles already on, and this
is looking good. Now, looking at our pieces here, as we saw them correctly. Yes, we have because remember, one is going to be
the left sleeve and one is going to
be the right sleeve. Now you can see how
it's taking form. These are looking
really, really nice. Now we want to bring down
our two inch squares. Once again, let's
take our ink pen and our ruler and let's draw a line from corner to
corner on these squares. On these, because we have to be aware of how this is working. This is actually going to be flowing on the right
side of the sweater. This one is going to be on
the left side of the sweater. So we're turning them this way. Now you're starting to see
your sleeve take form. You two inch squares
that we draw the line on and we are once again going
to snowball the corner. It's going to put
that little square there and sew it from
corner to corner. Will not be a lot of fabric
leftover from this cutoff, putting a pin there
to keep that in place until I get to the
machine with it and we are going to sew directly on that line as we
did the first ones. As we did before,
we're going to lay our quarter of an inch
marking directly on that seam line and cut off the difference because we need that quarter of an
inch seam allowance. So now let's press this
open and see what we have. Ta da, we have our sleeves. We have our left sleeve, and we have our right sleeves. That's just looking beautiful. And the way you want
your sleeves to run is the 2.5 inch square is
going to go upward. So when you look at the sleeves, lie them this way with the two inch square corner in the side and let the
sleeves run vertical. So we are really truly going
to put it to the challenge. We're going to create our
very own unique sweater to where our sleeves
are coming back in. So here we are, this looks
fantastic now, doesn't it? All we have to do now is
attach these to each side, and then we can reattach
it to the body. But before I do that,
let me just go over this to be sure that you
acknowledge our two inch square, this is a two inch square. The 2.5 inch is on the outside. Once again, same over here, two inch square and our 2.5 inch is on the outside of
our background fabric. That's what we are going by and that's what
we're matching up. Now, before I attach
the body back, it is important to press
this out and make sure that those things are pressed out the same as you would
any other time. I'm going to press those.
Then when I get done, I'm going to simply lay
that over and sew it down. As you can see, it is exactly the right length
with no problem at all. Do not think I could
be any more pleased. It is absolutely beautiful, as I have pictured
it in my mind. The very same size
as the one before, 11 by 8.5 ". Pretty
nice sweater. You could do a whole quilt, maybe some with only
the half sleeve and others with a full
sleeve. You got two ways
26. Strip Spool Star Surprise: Great for your scrap busters and turning them in to
something really beautiful. To make the very
first strip set, you're going to need
a 2.5 inch wide strip and 21.5 inch
background strips. Remember, these need to
be at least 9 " long, on this first set, we're going to take it to
the sewing machine. We are going to attach
a background piece to the top and a background
strip to the bottom. Let's press this open. When you do these seams, you want to press
these backwards, keeping them pressed outward. This looks fantastic.
If we did this right, this should be 4.5 ". Yes, it is. We have 4.5 ". Let's set this one aside,
we'll come back to it. Our next strip set, we want to sew 21.5
inch wide strips to a center background
strip that is 2.5 " wide, wide by 9 " long
and we are going to attach this one to
the upper side of our strip and sew it down when I attach it to the bottom
side and sew it down. When we do this one, we want to press our
seams towards the white. I know that's unusual,
but on this one, we're going to press
those seams in towards the white versus outward. Now if we did this right,
this should be 4.5 " as well, and there we have it. We have a 4.5 inch tall. The next step we're going
to do is really easy. We're going to take these
two and we're going to put them together and we're actually going to
sew them together. We're going to sew
the upper half and the lower half, 9 " long. The reason why we pressed
it the way we did is so that our seams
will nest up together. When you lay your
pieces together, you can see that this seam and this seam are
going to nest up really good to each other and you should be able to get
a really even sew. There again, those two are
nested up real nice together. It just snugs it up and you
don't get any shifting. Now that we've got our set
sewn together or 4.5 " tall, and what we're going to do is
we're going to measure over 4.5 so that we can cut
them into squares. We're going to cut
the first one out, and that should
leave us another 4.5 " exactly 4.5. That's perfect. Now that we have
these sewn together, we're going to take them
back to the machine, and we're going to sew on
each side of this square. We're going to sew put a seam
on both sides on each one. Now we have two blocks made. This is where the magic happens. We're going to cut these
from corner to corner. We're just going to lay
our ruler on here from one corner to the other and we're going to cut a diagonal. We're going to turn around
and we're going to do a cut on the diagonal on the
opposite direction. Now we have those four. We're going to do the same thing to this block, corner to corner, make sure you got your
ruler good and lined up and cut that one. And then keep them together. This is where a good rotating
mat can come in handy. But if we just practice
a little bit of control, we can do it on the
mat and we're going to cut that right there
on the diagonal. Now let's take these to
the iron board and press them open and see how
beautiful they are. Now we have our
blocks ironed open, and here is where part
of the magic happens. You can see it with these, but we need to make another set just so you can see it more. But I will show you if we
take our blocks and we turn, say the small point inward, these is the pieces that
have the small point. And then we have the ones with the larger point and we
turn them on the outside. Yes, you see the hourglass, but you also see the spool
that's happening right here. If we turn these, you
can see it even more. We're going to turn
this just like that. Now we have this hourglass
but spool effect going on, and you can see that
little spool show up here and you can see
the spool there. Now, if you do
them the opposite, you get a strong
effect with seeing the handle seer or the top of the spool and you can put them
together this way. There's so many ways
you can turn them and you're going to get a
different effect every time. Now we have this hourglass or spool that's going on there
because you can see the tops. Then if we make a secondary set, you will see how laying
these out that certain way, it makes a star
with all the points and these multiple
spools going on. We're going to make
a secondary set. Once again, we're going to
make two more strip sets. We need one of our main fabrics and two of our 1.5 inch strips. Main fabric being
a 2.5 inch strip, and we're going to attach one to the top and one to the bottom, on the other we're going to duplicate the very same thing. We're going to take a 1.5 inch strip these need to
be at least 9 " long. Of our main fabric, and we're going to use 12.5 inch strip of our
background fabric. We're going to take
these to the machine, attach them one to the top, and the other down
at the bottom. Ahead and press these open. Now remember, on this one, you want to press the seams
outward and on this one, you want to press
the seams inward. Then that way they nest up really nice because once again, we're going to put these
together and we see that those seams will just nest up perfectly and that will keep it from getting
all wonky on you. And we'll sew these
together on both sides. We've got those sewn together. I did not check before, but I'm pretty sure that we have these at 4.5 ". Yes, we do. That means we're going to cut this nine inch section in half. We need to cut these
at 4.5 " over. That will be the center
cut these in half. We need to take them back
to the sewing machine. We're going to sew on each side. So now we got both
sides sewn and I've got my fiscers rotating mat.
This is the small one. This comes in real handy for the next task that
we're going to do. We're going to lay our
roller from corner to corner as we did before to cut
from corner to corner. We're going to rotate this and we're going to
do the same thing. We're going to lay
our roller down, and we're going to cut
from corner to corner, and that's going to create
four half square triangles, and we'll do the same
thing to the next block, and we'll take them
to the ironing board and press them open. Once you decide how you
want yours laid out, it's real important
to square it up. It may just be the
slightest amount, but with your cotton
fabrics and pressing them and these being pressed so many times
in different ways, you may have some
pulls or it looks wonky and stretchy looking, and that's really normal
and you'll just have these really small fractions of pieces that might hang off the sides, really, really small. That way, if you square it up 9.5 by 9.5 inch square,
and there we go. Really nice block, and
it's just beautiful. We have all of our spools.
27. Outro Winter Quilt: Congratulations. We've arrived at the end of the course that you have completed on the
Winter Project quilt making. Along the way, I know that
you have gained confidence. You have a firm understanding
of the terminology. You know all about the tools, and you have the ability now to proceed with any theme, fabric, or method you would like in
order to make a quilt that is Christmas theme and lots of variety of different
blocks you can make. Now, as a beginner, your
adventure has just begun in this time lasting
treasure and heirloom. Trade and skill. As an intermediate, you're just seeking data and gathering more data and ideas for future projects as well
as practicing projects. As a professional,
you so love it, you're just seeking
for more to do. I've enjoyed having
you as a student. I've enjoyed the projects
you've submitted and the community chat
is always there for you to ask questions
and learn tips and tidbits that you may have
discovered along your journey. I offer more courses right
here on skill share. You can check them
out right here on the profile and perhaps
there's another project that you would enjoy
having me to show you and I would love to
have you as a student. Don't forget to give feedback. That lit Skillshare know
that I am conveying the information well and
the course is digestible, understandable, and fun to be. That encourages other people
who may be reading some of the reviews and deciding on what course they
would like to take. I'm Elizabeth, the instructor here and I've enjoyed
having you as a student. Congratulations. Until the
next skill share course, well, I'll be quilting.
 Elizabeth Morgan, Dandly Yours