Transcripts
1. Quilting 101 Make to Scale: Can someone were basic, so in knowledge and a basic so machine actually Quill. The answer is yes. Welcome to quilting 101. I'm Elizabeth, your instructor. This is make to scale using the quilt is you go method. Each lesson in this course is laid out that mass they have to build your confidence and teach you more and more basics about quilting. Am we are using a standard sewing machine and standards. So in stage with each lesson, you will have a completed project. And by the end of this course, we will take all of those projects and put them together for a finished quilt into a single piece. And this teaches you how you can take your standard quilt block and you can band it with a batting and a backing. Now we're going to use my method which is called easy measure math. And this is where I teach you how you can scale up a blog or scale it down. Design your project, and use your creative mind to create any finished quilt, sars that you desire, whether it's small or large, the choices FG, you can even take one of these projects vanished and make it into an individual piece simply to you. I want you to expand your creative man. I want you to be able to see the finished and completed productivity and practice and each one of these lessons, step-by-step in this course, take your view and device along with you so that you can follow along with me and make your finished project. Be sure to submit it and include it in the class project. So back and see the progress that you are making. You do have the ability to keep it private if you so desire, but I encourage you to display it perfectly so we can encourage each other. So let's get started.
2. Tools & Equipment: Tools and equipment or MS have. So let's go over our list of items that we're going to need on our journey and adventure in quilting. The first thing we're looking at here is the friction ink pen or a sharpie marker. Additionally, you'll need a rotary cutter. This gives me straight edges is main now surgical steel. Please be very careful with this. And it will glad Ron, along the age of an acrylic ruler. Of course, you'll need a good pair of sharp scissors always a minute. And when you're selecting your ruler, consider a four by 14, if not longer and wider, and you'll want a small one is, well, these acrylic rulers can see through dark fabrics and light fabrics. Cutting mat is extremely important. And the bigger, the better. Let's go over some unique items. These safety pins have a curvature animal designed to go through your top quilt batting and back in at the same time. Of course, you'll need a steam iron so you press all of your flocks open and a good surface. So here's an investment you really need. This is a walking good. You attach it in place of your standard sewing foot, is designed the same way that the way that this works is it simultaneously feeds all layers through the machine at the same time using the feed dogs. Next up, let's look at our three at 50 way. A 100 percent cotton thread is a mess, especially if you're making a quail for the longevity and a lifetime. A 2.5 millimeter stage is your stitch length. And this will be halfway between your 23 homing standard dial. So machine, your DRE, which is your standard selling food. And this machine holds a low shank. So you will be using AMP for the majority of the time. Look for the letter J on your sewing for your sewing machine and read your manual. This is designed half aunt wide. These are your feed dogs that we spoke about. We'll go over more of that later on. Make sure your machine is getting claim. Let's get started.
3. Fabric & Color Match Hack Lesson 1: So the question is, how much fabric do I need and how do our determine what matches and what doesn't. You may want to select Background yardage of at least a solid color and print fabric. One or the other, will be the better choice for your background. How do you determine your color value? What you're going to do is grab that smart phone of your snap your photograph. And then you're going to go to your photo editor. Select the black and white. This will give you the gray scale and the color contrast and value so you can match your fabrics with your dark brands and your lights. What is more vivid and one is more light. I would select at least four to eight prints back core is a good place to start and make sure you have at least two yards of background fabric. Solids are always based.
4. Quarter Inch Seam Allowance Lesson 2: Setting up our machine properly will ensure we have great quilting. So this is our 2.5 millimeter stitch length. Is this pretty standard for all quilting no matter what machine you have, follow your owner's manual. And it's pretty common sense between the 23 on a dao, say it, but they're all standard. You'll also be using your J fit. Your J press or fit is pretty standard for our low shank. So machines is indicated with the letter J on the actual presser fit embossed into the middle. I'm going to run a couple of scenes here. It is essential for you to understand a quarter of an inch seam allowance. I also know that no matter what machine you have, if you use the same machine and you lay the edge of your presser foot against the previous scene. If you use a ruler, you will see you have a core of an inch seam allowance. Every person will so differently than another. So as essential to use the same so machine saying foods and saying measurements, lay in your roller, you see the quarter-inch same for great quilting. You need to understand this quarter of an inch seam allowance by putting your fit there, which is a half inch wide. And you can measure from the center mark in the middle of that. And you place your needle in the area from the left or the right is going to be a quarter of an inch on both sides of that scene. You can refer to this video over and over. If you lose your setting. Let's get started.
5. Plan Project As You Go Lesson 3: It's now time to start planning our quail. So grabbing a piece of paper because I know there's blocks you selected that you really want to implement into your creation and design. This is a way to get a general idea and map it out with a little bit of planning is important. You're not going for artists, you're just trying to figure out placement. This also helps when you start really putting together, re-size it, and figuring out where everything needs to go. Just like putting a puzzle together. And my student go with this with creativity and fun to patterns are like, I don't care if you're pinning the quilt together, following the pattern to the letter t, our clothing. No, two are alike. There will always be added in modifications and changes you'll have to make. So be excited in your creation, have fun with it. This is why I taught you odd size block, so you know how to put it together.
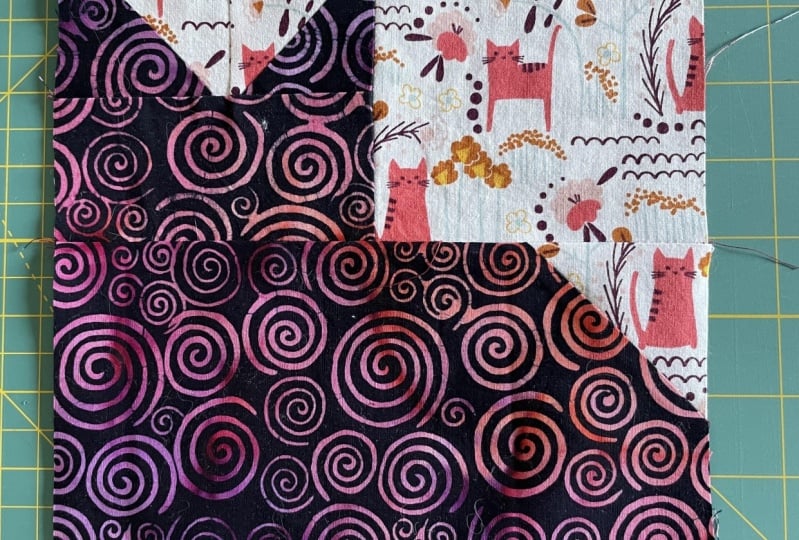
6. Cat Block Cutting Lesson 4: So here's our layout and we're gonna do this one together. So let's first take our ten inch print and cut it in half, placed the one-piece aside and bring your family about 10 forward. And let's cut it in half and make 25 inch squares. Now once we cut this in half, we're going to place one aside. And we're going to focus on cutting this and 2.52 by five inch sections. So we're just going to call it the 5.5 in half. Now let's bring our background 10 inch piece and cut it in half. Place the other one Assad and bring your fan by Tim forward. Now cut to 2.5 inch pieces. So you should have 2.52 bath AB and 15 inch piece. Now bring those 2.5 by five inch pieces forward unless cut those in half. And this has gone create for 2.5 inch squares. And then the time BM, we're going to take these two and we need to draw a line from corner to corner. I've added an additional land because we can actually get a tiny block square out of the US if we lie. So we're going to put one at the upper right-hand corner. And the diagonal is going to go from top to fall right? Once you say that, if you put the extra stitching there, you can cut on the drawn line as you see here. And that not only forms the tail of our kitty cat block, but it also gives us an extra little mini square. Now press that open. Now we have our kitty cat body. So let's work on making his ears. We're going to take those 2.5 aunt squares that we drew the line from the center point to the far left and center point to the far right. So our stitch line on our covariate seam allowance. And now we're going to cut off the difference. Once again up at an extra stage so I can have an extra little square. We're going to press that open. Now once we do this, bring it back to our cutting mat. We're going to cut this directly in half for 2.5 inch squares. Now this will be his ears. Now bring in the other 2.5 inch by five inch piece forward. We're going to say one to the left and one to the right. You'll need to sew them together and then say your 2.5 inch to your fat. Now we have you see it says list, square this up and trim off any difference making it even. So we have our body now and now we have to see it. We need to do our background fabric. So we're going to use the kitty cats head. And we're going to cut our five inch square to fear, to be the very same size. So that means we're just cutting off that little bit of half an inch at the top or say, you'll lay them together and measurable. Now we're going to say these two pieces together, connecting on the left side. Only. Now it's time to size up our bottom piece so we can finish our kitty cat. So we're going to use our top half to determine how long our body needs to be and cut off the difference. Now we can take in so our body to our hippies and I'll say has, its background, will be doing more with this block later ONE, bring it back to your mat and square it. Now you'll only shave off a slight bit and your square will be eight by 8.5 inches, vanished.
7. PinWheel Block Make Half Sq Lesson 5: Now we have our cut layout for our pinwheel block. So let's begin by taking our two tn inch squares. One should be your background and one will be your preamp for your main pour your block, lay them face to face right sides together. So a quarter of an inch from the edge, all the way around this entire square. This is where I told you that cutting is key to quilting. So we're going to do a diagonal. So eggs from corner to corner, both directions. This will create for half squares, pressed them to the dark side. This will lay it smith and be very nice and even and flat. So you're going to place your PM wheel assembly just as you see. Fold those two together. And so those now when you take them to the iron and bored, I want you to press the ones on the left word and the ones on the right downward. If you do that, you will nest them together as you see here for a grade. So down the center. And they'll laugh, laugh, they conform. Be sure to trim your ages and square up your block. So let's make too many pinwheels identically, the same way. Take your two pieces of fabric and face them right sides together. So a quarter of an inch from the age, all the way around. An axis, right through the center corner to corner. This will create your four have squares. Press them open, pressing towards your darker fabric, or most of the time your background fabric. This will help them to lie flat, nice and even when you assemble your PM, we'll watch carefully how I have shaped and turned, and get the squares just right. So your pinwheels turn out correctly when you go to say these together. And you take them to your iron and bore, be sure to press the ones own little F word and the ones on the right downward. That way this seems will nest together in the center. Then. So allowing a quarter of an inch seam allowance. This will give your square a perfect flatness to it. Now this show off a new cool too. This is called the log blog ruler. And the way this is designed is there's a shaded age in the center of that dips down and it fits perfectly corner to corner. When you slab this is going to give you your perfect measurement for this particular square. We're going for 4.5. When you slap this, you can tram two sides. And when you slam it down, you'll trim two sides. If you're planning on being an advocate quilter. This is a great tool to invest in. Otherwise, stick to your common quilting ruler. So let's measure 4.5 downward, 4.5 vertical. This is perfect. Voila. Now we have three blocks, pinwheels.
8. Submit Project Q & A Section: So as you begin your lessons and complete each wanting your projects, I want to show you a few things to utilize. One, take advantage of the stamp master layer by utilizing the poles and play button. This way you can take your view and device along the way to ask me questions and get involved in the discussions, as well as upload your completed project after each lesson. Let me give you a rendition. Down below you see project description. To the right side, you see Create Project. When you click on this, you have the ability to upload the image that any questions or details and comments. You do have the option to delay their private lives to a public bus, encourage each other, and make sure that you click Publish. So let's get back to our next project.
9. Spinning Pinwheel Block Puzzle Lesson 5: To demonstrate the tree magic is in the cutting when you make quilting, work on to create a pinwheel in the previous video. Now we need to lay our ruler in the center to one side to determine the halfway point. Because we're going to be making some cuts here to make this block even more unique into a spinning pinwheel. You can use a secondary ruler so that you can figure out what is the tree width from your center to the edge. You know where the middle, the US. And we're gonna make some unique cuts here with a rotary cutter. Now first we're going to divide that in half on one side and make horizontal cuts here. Then we're going to make a single vertical on the right and a single vertical curve on the left. Once we've completed this, you'll see how many unique it's going to become. As you shift your pieces back and forth, changing them around, you're going to get a different block each time you make a change. And this is a way for you to play with your fabrics and your blocks, just like a puzzle. As you shift these around, my purple is my background fabric in is going to take on a life of its own and become whole unique quilt block. So now I believe I've decided quite how I want these to look. I won't my perfectly be predominant and a won't my legs to the left and right spanning. And voila, we have a unique spanning pinwheel. So the way you want to say this is go all the way across in each section. So in your pieces together one at a time to each other. Once you've completed that, bring your block back to your cutting mat. Place the center saying on a line to determine the very center of your block and then began cutting off the difference to square up your blog. Now, each one of us have a different machine, different method of sewing or so and allowance. So your blogs may be different sizes. Man came out to be 10 inch baton and spanning PM wheel.
10. Snap Shot What to Expect: This is a snapshot to show you how all of this is going to come together. Simple and easy. As you've already done a few of your blogs and made some, you're getting a feel and an idea as you graduate and learn more and more about each block that you're making. You're also probably deciding which blocks you really want to include in the SaaS quilt. You decided to D If you are fallen this project, this is a commission baby Quill I was hired to do to make for my great niece. The blocks I have selected is to give you an array and teach you more and more with each single project. As you complete them and submit them to me, I'll be able to see that you are getting the information and understanding the cutting diagram and able to follow the lessons one by one so that you understand what to expect. Right now, focus on completing your blocks one by one. And then we will get into sizing them up and putting them all together.
11. Heart Quilt Block Sew Diagonal 6: So here's our cutting layout for our heart block. Remember you'll need a background fabric and I solid fabric that you're going to use as your main print for your blog. I've select this beautiful floral. Take that 10 inch square and cut it in half. Now we have a 2, 5 inch by 10 inch sections. We're going to take one of these and cut it in half to form 25 inch squares. Now bring forth your 2.5 inch squares. There should be four. You watch right here. I have drawn a line diagonal from corner to corner. This is significant because this is our actual solar n. Now note where you want to place these and how you wish to place them from the center to the left. And then the one on the right is going to be from the center to the right. This will form the arch of our h4. Be sure to so directly on that line. Don't be shy. Use a 2.5 millimeters stage, which is standard when you do quilting. So you're going to cut off the excess. And if he did as are the ED and I do suggest this pitch you an extra stitch line in there and in between them, but it makes sure that you allow a quarter of an inch seam allowance. So it will preserve the integrity of your block. If you aren't these open, you'll have some meaning blocks. Now press open the arches to your heart. Here's these little blocks, synthesis on for another project. Bring forth your five inch square. Now this is a background, so I'm going to show you bring your file about TMP scored. Take your five inch square and fold it in half, press it down when your fingers, this will create a crease. This is significant. This is an actual cut line. I'm laying it against the floral fabric just for the fact that you can see it better against this board. I'm using my friction erasable marker and I'm putting a cut line. When you cut this in 1.5 triangle will be sold to the left, the other to the right. Now you want to cut off the difference and you won't allow that quarter of an inch seam allowance that prevents any Ramblin and protects the integrity of your blocks. You're going to press that ape and which makes the bottom of the heart bring your 25 minutes squares for work for your arch. And we want to say those together. Then you won't do so your bottom on to Dave's, to form your block is really important to trim and square of the block at this point and make it a complete square. This will make it easier to size it up or size of nail. But I do want you to preserve the arches so you should get a easy non-binary block. And voila, you have now made your heart wall square.
12. Kite Block Sewing Angles Lesson 7: So here's our layout. To make too quiet blocks, we have two prints and one background square. You may need another background square. But let's put these three together on top of each other. Unless cut on right through the middle making to five inch by inch pieces. Put one section aside. Now let's just bring those three back. And for the time being in, sit your prints aside and lists. Use our background fabric. Now watch closely work on to actually divide it in half that we're going to draw a line there because that's going to be our coastline. The end from corner to corner, draw a diagonal line to the center. Now place all three of these stacked together. This speeds up your process of cutting and gives you a little more accuracy to EEG. So using your rotary cutter, cut it in half. Now here's where it may get just a tad bit tricky. Sat, two of the plants Assad, use them both the background fabrics, the solid pink in this demonstration, and place a background fabric on each of your plans. Now that drawn line work onto so a quarter of an inch seam allowance on each side event drawn line. You can see how I've shown you here. The stitching beside up on each side of the drawing line, although ID and also so on the drawing line, place it under your machine. And remember, just sew it down one side, flip it around, pitch your fit on the drawn line. And so down again, that should give you a quarter of an inch seam allowance as demonstrated earlier. So here we can see that it's sewn on both sides. Now when we bring it to our cutting mat, we can lay our roller from corner to corner and cut it down the center. That's going to give us two halves. And when we press these open at the iron, pressing towards the darker fabric, that will keep the same on the inside so it's not so visible. When you are in these plant, you're going to have your half squares. You should have a total of four. We're only going to need one of each color for the upper portion of our kite. Now let's work on the lower part. This is a little tricky, but you guys are up for the challenge on now you can do it. So you're going to draw a diagonal line from corner to corner. The fab, TMJ piece of fabric, you'll need two pieces. Now watch very, very closely. These have to be Pian a certain way. And what makes them really, really neat is you are going to create two of the bottom half of your chi by doing it just this way. So the idea here is when you draw this an angle, one is going to go to the upper left. One will go to the lower right. Place a pin in it on that drawn lamb, which is going to be your stitching God. Now, we're going to do it the same on the other one. That's going to create. As for bottom pieces, we'll select one of each brand and say them together. So when you take these two, this ONE machine there now pn correctly, you're going to say a quarter of an inch seam allowance on each side of that drawn line. Place your fit on the line and letter, just so write down layer, flip it around, do the same thing. You're going to cut along the line, you drew, press them, open. Mp, your kite together, this small laptop, the larger the bottom. Be sure to square up your block.
13. Easy Flower Block Sm Sq Lesson 8: Okay, we renamed as that easy Daisy and here's our cut layout. So we made some changes in the upper right-hand corner on each one of your fovea and squares, you're going to place your 1 and 3 quadrant square in your upper left corner. You're going to add a to Int square. I also in the left, bottom and right bottom jaw line diagonally from corner to corner. That will be your stitch line using your standard straight stitch at 2.5 millimeters stitch right on the line you drew on the back of your squares. Allow a quarter of an inch seam allowance and just trim off the excess. I have my scissors handy by my machine, so I just snipped them all. Once you've done that, you want to press these open. Now I've left this part of the video again to demonstrate how to press those back very well so that they lay very flat. Now, when you go to assemble this particular blog, the one and three-quarter inch square is the center of your flower. Now I'm going to tell you a little tidbit trick. So these two together, when you take them to the iron and board on the left side, press those seams down and on the right side press days. What the neat thing about this is, it will allow those scenes to Nas together perfectly. It will glad right under your machine and make almost a perfect square it well, I'll say keep your center in the center. Be sure to trim up your block, squaring it up. And this particular flower blog should be non-bananas. Square block.
14. Dizzy Daisy Block Extra Sq Lesson 9: Here's our cut layout for our DC Daisy block, and now you're up for the challenge. These are used in a little bit smaller bits of fabric bound now you can do it. So in your upper right-hand corner, you're going to place the 1.5 and square it in your lower left and right-hand corner, you're going to place your two inch square. Pay particularly close attention to the so line. You're going to be slow. So in from the center to the four corner, they'll keep you on track. Remember, this is your actual stitch line. Place, a 2.5 millimeters straight stage. You can use smaller if you like, is easier if you go slow and just stitched directly on that drawn line. And it'll come together just gently. Take a pair of scissors and snip off the difference. Make sure you leave your quarter of an inch seam allowance. And it's real easy to go through all three of those and just snip off that different. Now I'm using the actual easy flower blog to iron open the corners there to demonstrate how you need to press this open. Now and our daisy, daisy, the inch and a half square, is going in the center. And the other two are on the left and the right. And as you see how they're placed. So those together then sewn down the center. Be sure to trim off and square up your block to a non Bannon and Daisy, Daisy blob.
15. Boat Block Measure Side Lesson 10: Here's our block layout and you'll notice here that we are actually using a template. But I've got your shortcuts who stick around. We're going to take the 2.55 inch by inch pieces and lay or have hexene on top of it. This is a really cool to say if you don't own when you can go over 2.5 inches, gone, 1.5 aunt up on a 10 inch piece by piece. And create those angles, your sale to create a hexene for this boat block. Now we've got our two pieces care. We have our background and we have our solid, which is our print for our actual boat. Now we need to cut that in half. Now it still 10 inches at the bottom so you can use your five inch mark. Now we need to so our sides on, so we're at the same time creating bottom and attach on our background to this particular part. You'll notice how I laid those angles and make sure UPN I'll just so they don't shift. And you're going to say those down. Once you've sewn up, sit, you're saying and they impress them open. Now, I don't want you to be nervous about this because sometimes, whenever you are so in at an angle, it gets a little wonky. See right here that gap instantly. Okay, we're going to trim that off later. So let's move on to our five inch squares. We need to make our 4.5 squares. So you're going to sew a quarter of an inch seam allowance all the way around the outside. These two pieces, make sure that your background and your print fabric or laying face to face, say the insides are in and the outsides are cut from corner to corner based ways. This will create your 4.5 squares and press those open. Now these are our actual chi, flag areas are, are rather our sale for our baked. And these need to be cut down to three inch squares. So it's real important that you do all four pieces. Make an old three by three inch. Sometimes you use an, a larger roller is not so easy and it's more cumbersome. So if you have a smaller one, which is that my small ruler, that makes it easier to trim these little squares. So we're going to assemble these as you see here. And you're going to say those together. Now once you've on your little squares together and you press them open, we now have our bottom. And we have our little square here with all of our sales own it. Now we need to find the halfway mark on our boat bottom because we need to do a little more measuring. So I'm just finger precedent here to get a crease for the center of folded in half. Now found my center. Lay your ruler backup there and figure out on which side helmets you need on the other side, on the 43 quarter inches on my right side, MLF side then need to say to this square because that's allowing my half inch seam allowance. So I'm going to take Mar far Batesian background that we had left favorable maker, the T&E edge and a half. And I have 24 by three quarter inch pieces. And you're going to attach one on the left and one on the right. And as you can see, I take them to the machine, sew them down, and I just flip it around and go down the other side. You can make this block really, really quick in the quilt looks fabulous if you just make an entire quilt when Nathan bit sale based on it is beautiful. I've made on myself. You attach your top to bottom. And on this particular quilt, not only did square of this block occur additional fabric off of it because I wanted to stay in range. So if you square it and you found that you really need to take a little more off or you want to offset these boats in your quilt. They look fantastic. When it's finished. I had an 8.5 by 12 inch block.
16. Fish Block Topstitch Fold Lesson 11: Here's our current layout for a fish block. And we can't well have a boat block without fish block. But this is going to teach you how to say, I'll point and make him blocks on point. So that 13 quarter inch square, you're going to place it onto the 2.5 inch squares in the upper right-hand corner. Draw a line if you need to using your eraser marker and from corner to corner. So directly on that line. Now allow your quarter of an inch seam allowance and cut off the difference. This is going to create our fans for our fish. So we're going to press those open. Now we're going to bring down 1.52 inch square of our print. This is our fish AND we need to fold it in half. And we're going to pin it to the left corner, center it and peanut, because this row age will be closed up in the scenes. So Assemble, as you see here, a 2.5 inch square in the top and the Europeans and then your little tail. And you're going to, so these halves together, make sure when you press these ape and the ones on the left, you press the same work. The ones on the right press you're saying damn work, and therefore they'll Nas together really well. Now close this same. And so it together. Now we need to tops ditch our little tail fan. And this just kind of graduate She to do inside them a little more. That gives customization to your blog and b, and I'll point, so take those four inch squares, we're going to cut those in half because we need four triangles. And this is a block that's basically sewn on point. Now the landed to simply lay your triangle on one side and make sure that the tip of it is in line with your center saying, is that sample. Now you're going to do the other side of the same way. And so those damn. The other two remaining. You will do identical, leave the same way, line it up with the center saying, and then stitch them nail. Once you do that and you press it open, you'll need to trim it all in. It will only take a smidge off of this square. Once you do all four sides, you should have a completed six inch square voila fish block live.
17. Bow Tie Bone Block Mini Matter Lesson 12: Here's our cut layout for Ibotta block. And yes, you've just graduated to an even smaller square to use. But it's not sophisticated. This blog actually has two names. It can be the bowtie block or the doggy bone block. So we're going to take it little bitty tiny 1.5 and square that in the upper right-hand corner of our 2.5 inch square. And we're going to draw a line from corner to corner. We're going to stitch directly on that line. Once you've done that, of course, you're going to trim off the difference and let's assemble it. Now we have our other 2.5 inch squares lists. So these down. Once you do make sure that you've pressed the ones on the left and the ones on the right down, that way, the seams will Nas together as we've done before. Close that same up and square up your blog, trim off any difference to make it even and nice and clean. When you're done, you'll probably have a 4.5 inch square block. This is a fun bug to make it.
18. Tulip Block Easy Eights lesson 13: Here's our cat layout for our tulip block. This is a very interesting blog because it makes a really large block and it's super fun. So let's draw a line from corner to corner on a 2.5 inch background squares. Pay particularly close attention. You're going to have to sewn into the upper right and to Psalm into the lower left. Pay attention to your fabrics. Which way is the flowing, and that will help you determine where you need, place your background squares. If that's not an issue, then you can So just in one side and terminal as you may. So we're going to place two with the background For squares in the center and the others left and right. We're going to say these together. Make sure that when you say these together, that you press the ones on the left down, press upward and the ones on the right press downward. That way they'll Nas together. Trim off the difference. Now we've made our tulip talk. We need to make leaves and a stem for our two. You're going to love this. This is called the easy eight. You actually make 8.5 square at one time. Draw your lamb from corner to corner. This is our stitching line and this is that cool tool. The friction PM that you always see me use. Now is a risible with H0 that you can draw with regular ink is not going to hurt anything. And this cool ruler is a four by 14 for both light and dark fabrics. It's my favorite and I use it for everything. So let us place right sides together. When you take this to this own machine, might want to put a P in there just so that shift, we're going to sew a quarter of an inch seam on each side and they've drawn lands. Once we do that, we're going to cut it a unique way to create our 8.5 squares. So as you can see here, I literally put one edge of my outfit on that drawn line. And I put my needle down and I just soma straight stitch. I'll flip it around. And I do the same thing. I place the edge of my outfit on the homeland and I stitch all the way down. I flip it around and I do the other one. This is a little bit different than the four PAM squares we've done before. That's what makes this unique, is because you're actually selling from corner to corner. You're allowing that quarter inch seam allowance and you're able to create 8.5 squares. So see here where I've sewn on each side of that line a quarter of an inch seam allowance. So let's take it to the cutting mat. We're going to cut from corner to corner on the drawn line. Be careful not to catch are other stitches. Then we're also going to cut a vertical, cut through the center and a horizontal through the center. And voila, look here, easy aids. Have squares. Press those open, pressing to the darker fabric. Now we can assemble these to create our panels and our stamp for our tulip. You'll cut you a 1.5 inch by the length, which is about 8.5 inch stria, There's going to be your stamp. So the ones on the way up, press up one's own right? Press down. So your steam to it and press the Stam seems inward. That way you've got no bulking. There's no risen and it lays really flat and smooth in your quill. Trim off the bottom. Measure it. See here, I'm showing you the measurements. Now we're going to attach our tulip bulb to the top voila. None inch by secreting their phenotype, big blob.
19. Heart Path Block Cut to Size Lesson 14: So here we have our cut diagram for our heart path Blog. This particular block grabbed your tangent square, cut it into four squares. This blot would demonstrate that not all blogs are equal Li appearing, and therefore, you have to go with the flow. So you're going to pick a center and a background fabric, draw your line from corner to corner. This will actually be the lamb that you saw on. Place, that one color for the center on the bottom right and your background on the bottom left canal. The difference for each one of these, we are currently forming the outer back ground of the path of our heart and the tip of our heart. Now once you press these open, you'll bring them back to your cutting mat. And we want to make sure that we learn this up and cut it down through the center in half. When you cut this block and half create YouTube towels. One when the background and one with the center. And just keep them lined up for the time being. Next, we're gonna take the teeny tiny 1.5 inch square blocks we could, and we need to for each sad, this is creating the arch of our heart. Additionally, with the background fabric to make it really pop and stand out. Once again, draw your line from corner to corner. This makes, so in this little tiny square a breeze. You can also decrease the length of your stitch to two millimeters. Now, as you can see here, it's real simple to grab a pair of scissors, allow your quarter of an inch seam allowance and just snip off the excess. Once you press these particular pieces open, you will see how the arch of your heart is forming the pieces back together, so them in the center. Now once you've done that, bring them back to your cutting mat and let's assemble them. This is where you will see that one is turned correctly, the other one is turned opposite and assembly him just as this because you see that the purple is your background fabric on the outside. And then you've picked a center to make it stand out in a path. And when you sum them together, you see right here where it's going to be a little off. That's simply okay. Just say your pieces together. Press them open. And I'm going to show you how we are going to correct that. You can try a line in the square at the most time is too wonky and it just simply is going to still be off. Now you see how the squares, not even while we're only going to trim off the difference in the center. Once you've done that, sew them together, remember to press the ones on the left up. And you're seeing on the right, Daniel, that way they'll nest together. Now just square up your block. And as you see, it's a very attractive blog, is a perfect little heart path and everything balanced. Just great. Man measured 8.5 by eight inch heart path Blog.
20. Lemon Star Block Perfect Sq Lesson 15: So here's our cat diagram for the limb and heart, or the limo ne French that came to America and re-named shortened limb and star. Pay close attention. You're gonna take your background fabrics and place one of your print fabrics to each one of those background fabrics. Then you're gonna take by print fabrics and pit them face-to-face. With right sides together. You're going to sew a quarter inch seam allowance around the entire outside. We are once again going to be making the 4.5 squares. So once again, get your roller, your rotary cutter, and cut from corner to corner diagonally and form your 4.5 squares. Now, as you can see here, when we press these open, we're gonna do a little bit extra own a store. Its particular, it has to be precise and I'm going to show you a short way to do that. So now we've got them alka and we've gotten pressed and lay down into piles that match each one of your squares. For this particular block needs to measure three inches each. It is going to take you a moment to square them all, but it's very necessary. So let's show off some cool tools. This is a self-healing, rotating mat and it is excellent for the small squares that you may be cut in a law, especially if you're doing a lot of stars. The star block is everyone's absolute favorite blog. If you were to ask people what is their favorite quilt block, non-additive, we'll select the star because it is represented by every state and all over the world and represents so many things. So is a beautiful, beautiful blog to make and it's still my favorite. Now you need to assemble your squares. And we're going to do each four sections gently say that you can grasp and see the uniqueness in each one of these four squares. Of course, you want to chain so them because there's meaning of them. So this is a little tip that I use. When I put the two together, I put a pin on the side, it needs to be solved. And then that way when I get to this old machine, a pivot fit down from a Korean seam allowance and I can just chain so I don't even raise the bid up. I just store, settle in and let the feed dogs feed those thesis underneath. As you see, I've sung them in sections of four. And then you will say those together. But pay close attention to the center. When we bring this back. If you look at the center, you'll notice that opposing are the black and opposing are the paint. When you square this, you will have a beautiful Tn ant lemon store block.
21. Lil House Block Scrapes Count Lesson 16: Here's our diagram for the little house block. Now this is a little bit tasty because we have several pieces of fabric. So be sure to utilize the Pauls. And pause this video so that you can see the coats they are being used as I've got them labeled. Now this is really neat because you can make a whole quill and different size houses. The idea here is to try and make them balance. So if you're making multiple little houses, you'll be able to match them up and make them unique and give them NAEP, different color roofs and Windows. Now, as you can see here, two small squares in the center. And that's because the window is offset on purpose. And I do make a few changes to the roof. See here where the window is offset, that's done on purpose. With the roof. You see me putting a rectangular size, square and draw Milan corner, corner for my cytosine. But you will later see that when I bring it back to the cutting mat. And actually Kurt, that top piece, Dale and I am criminal facades. And did that for a better effect due to my background fabric match so closely the print fabric for this little house. Now once you put these three together, you can now So I'll 3. And that will be beautiful. And you can just make your houses and be really, really creative and color outside of the lands where there's, when you square your little house Walker is 4.5 inches by 4.5 inches for man. And in the quilt on Add a tree.
22. Square in a Square Block Resizing Lesson 17: I want to share with you the square and a square block. This is really unique. So we have an assortment of different fabrics. Now. Take a five-minute square and cut 1.5 inch strips, two of them, and then you'll have a two inch strip leftover. Now, work on on, uh, take the two in strip and work when to cut it down to two inch. And you'll get two of those and you'll have a small piece of waste left over. Now take the two int, blogs and side-by-side, and selecting one of your assorted blogs of a different color to pin in the center. What makes the square and a square block unique is that you could actually make these like window boxes. And you can pick something different, each center, even match. So you could use this with all the wonderful, creative, unique printed fabric we have these days. And really make some psychedelic are some very modern excentric blogs using this particular quilt block. Now this measured four by four and three-quarters. As you can see, I made a large array, a big assortment, and there were a total of six of those. So now I'm going to teach you a little bit about resize and blogs. When you have something like this that you really want to show off and make it unique. You can take your leftover fabrics or you can cut an assortment of strips and attach them to the sides and continually building this out. And I've seen quilts made using just this block. They are so incredibly unique and beautiful. They're just breathtaking. And as you can see, I've built this one out and made it larger and larger. And then of course, you definitely want to square this block up and trim off any excess. But if you need fillers or you want to use leftover scraps of fabric. This is the block for me and it's just beautiful.
23. Butterfly Stripe Block Scrap Buster Lesson 18: So now I'm going to show you the strip butterfly block. You're going to love this because it is a great scrap Bestor. And with all the blocks that we've made, we probably have a great assortment of leftover strips and they're all different sizes, different links. So the idea here is to find all your longer strips. And we want to kind of arrange them and assemble them and get them close to matching since we're making a butterfly. Now these are some shorter strips. So if that be what you have, then that's what you use. I have these at about a nine inch length. And so the RDA is I'm trying to find an assortment of all the ACC and get as much fabric is possible at the same link. And as you see me working here, take them one at a time and trying to build these layers of strips. Now as you sew them on, you want to assemble them to match each other. Because that's what's going to make the butterfly come together. And as you see here, I have tick and Sony's together. You won't to iron them all in the same direction. That way you do not lose any length. And now I'm just trying to build up to where I can get them plentiful because our need these strips once they are sewn together to be at least four and three-quarters, five inches tall and at least four inches wide. Now, I'm just kinda squareness up and tremble myself. Now, I'm decided to cut them into four inches wide and about five inches long. That way I had enough to make my butterfly. Now Grandview, some 2.5 inch squares, you're going to need four of them. Now pay attention. You're going to place one in the upper left, one in the lower right. And on the top one, you're going to do the opposite just in case you happen to make those strips are mere difference at but matching in color. The ADEA is your top match and your bottoms match. As you see, we have sown that 2.5 feet squared and in each of the opposing corners. And now we're getting them to Matt, see how the upper strips are a variation of each other and the lower strips or a variation of each other. But the right size. Now once you So these together, make sure you press the left ones and the right when it's down. That means you're going to measure it and you're going to a 2-inch wide strip that is the same length as your two squares. They're sewn together. This makes your butterfly's body. Now we've got these wings, we've got his body. Now we need to give some deviation in this box, it truly looks like a butterfly. So get us strip that's at least four inches long and you can cut it into two, two-inch squares days in the far right and the far left. Draw your line from corner to corner. That sure. So LAN, this is going to make it truly looks like a butterfly and take this squareness away from this blog. Now once you've solved those on, give your quarter of an inch seam allowance and snip off the difference. And then you're going to press this open. You're going to be so impressed with the US. This butterfly strip block is beautiful. You can use standard prints to make the same butterfly. But why not both those scraps up and use it make a Nabataean Latvians butterfly.
24. Stripe Block Every Piece Lesson 19: This is the every single cut off strip block. This particular arrangement is 10 inches tall by 20 inches long. And you want to divide that in half and make them into two t and h squares. Now this technique was designed by three deeds in Arizona, known as the three deeds technique. As you can see, we are cutting diagonal from corner to corner to create four separate triangles. And the reason why you want variations is each pattern will come out uniquely different. I have used batik fabrics and made an entire 3D wheel, which is absolutely beautiful. My nephew, as well as my brother-in-law loved the quill. I love the fabrics were hand dad. And they are unique and all different. So as you can see here, you can change these triangles at rail. But it's real important that once you so those triangles back together on their angles, you square it up. By the time you get done, it should be around non square block two of them. This isn't great. Scrapped Lester.
25. Planning Quilt Even Up Blocks How to L20: It's now time to start planning our query. So grab your piece of paper because I know there's blocks you selected that you really want to implement into your creation and design. This is a way to get a general idea and map it out with a little bit of planning is important. You're not going for artists, you're just trying to figure out placement. This also helps when you start really put it together, resizing it and figuring out where everything needs to go. Just like putting a puzzle together at my student. Go with this with creativity and fun. No, two patterns are like, I don't care if you're pinning the quilt together, following the pattern to the letter t, our clothing. No, two are alike. There will always be edited, modifications and changes you'll have to make. So be excited in your creation, have fun with it. This is why I taught you odd size blocks, so you know how to put it together. Okay, So we have mapped out our quill and we bundled them and mark this right with a clip. And I know that all of these are going be on the right side. And I did a rough sketch one our first laid out my cogwheel and just kinda get Via how you want it to look and what will be placed where. So the first thing we wanna do is we want to take our sheet, flip it over. And, and the first thing I want to do is I'm gonna take this bundle and I have these arranged in the order they're going to come vertical. So I want to measure each one of these blogs and record their exact size. So now I've recorded each one of my blocks and I'm done just a simple listing which each one is in the width and the length. And what I wanna do at this point is I want to determine which block is the widest, which is the manage in comparison to the rest of them. So I won't found why does one I also want to see which is my longest one, which is the chi at 13 inches. And what the idea here is, is I need to get all of my blogs at least the same width. And I want to balance them and proportion. The example being if I have this strip block, which is non anti-A, and then this blue block is rating to be a and a quarter inches wide. Then I need to get them balanced on the this block to be as wide as this block. How we ever, because I do not want this to stand down and loop. So I won't to add some width on to this block. So my stashing around it will all be corresponding with each other because of the way a mapping, the quilt Dow. So what I'll do is I will probably add or determine what I want to add on the sides here. At this point, I believe I want to add an inch on each side of this block. Additionally, the sagging in-between these two, I want to add some space is whale. We will do the same math on the cat and the flower, thus making them TM inches each block. Once we have all of these differences made, including the side, we can then say them together. You want to take your notes and out beside of them, make the same count as you did for your other corresponding blogs. This one is a Angela's. We made a half inch seam allowance and we need it to be 10 inches wide. We are not concerned with the lamp just yet. We only want to concern ourselves with attaching pieces to each side of the block to make them all equally and whip. Now we can simply cut our background strips that we plan to attach to each side to these and make two each for each block.
26. Easy Measure Math Sashing Magic L21: So once you've decided how wide you want each one-year bogs and match them. I decided I wanted all my vlogs be T and inches wide. Now, the way you have to do your math is basically the largest block is four hours with gays and determined, I won't least btn inches each. And because there is a half inch seam allowance, because you have a quarter only original block, quarter of an inch on your stria, you already know you're going to have to add a half an inch since this particular block was non inches wide. And I want to make it into a tannins blog and knew that I was going to need a half inch on each side. So that was one inch. And I needed the strips on each side to be equal. And with that would be a half inch on each side. So I had to cut a one ant strip for each side of this blog. Once I attached it, that decreased it back down to a TAM and Schwab. And if there happened to be walking as or anything that got all alkyd very easily square. My blog as these blogs transition and this chi, blog was eight inches wide by 13 inches long. And the same thing there because it was eight inches. I wanted to edge on each side, so that was an automatic two inches. I had a half inch seam allowance on each side. That was another inch. So that was three inches. My strips the answer and a half each attach one to the left and one to the rye. That MAY this block, 10 inches is whale. Before attach my blogs, I am going to be doing quill as you go to these blogs to show you how you can pre quilt each one of your blogs and then assemble your quilt. This way. If you do not have x as two along arm quilter or ability to mail it, or you want to keep it within a certain budget. You can do this yourself, right on your home machine. And you'll be able to attach these blocks if you are following along with this particular script and taking this quilt along with me.
27. Extend the Length Problem Solving L22: So the next step is to attach this tree up to the upper and the lower at each block. So now I have all my strips attached to the top of each one of the blocks and the bottom does not. And those that will be leading to the next block will have a strip on their top and one on their bottom as well. This will be my last block at the bottom. So I need to attach a strip down here at the bottom. But I wanted to show you what is resulting say for once I have measured all the blocks in lane, see how long the quilt is and if it is reaching my primary goal at how long and TM for this quilt to be and the size of it? Based on the request. If I wanted to, I could literally take my tablet that has all of my measurements on it. And basically add an edge to each one of the lance and add them together. And that will tell me how long my first vertical ray on the right-hand side of my quilt is and then I can determine if that's long enough and if it is hitting my regional. We'll go at the labyrinth and desired length and width of this quilt. Once again, I will just simply add them together. See what the lamp is, see if it's close to my primary goal. And if I need to, I can add additional stashing to each block to make up the difference, to get me to the primary goal or my lamp go. The DOM desiring, say based on a single stria in-between, each block is basically going to give me very, very close to my goal. That remember, I will be detecting a half inch seam allowance between each of the blocks. So what you'll need to do is detect how many are attached. In the easy way to do that is this is the first block. There will be a same between this one and your second one that's a half an inch. There will be a same between yet and the next. So on and so forth and so on and so forth. So entitle, if I have a half inch between each one of these blogs, That's two inches in title. But then basically, I would judge that from my title. And that's going to put me pretty close to my goal of the Atlanta, my quill because I'm planning on adding a header at the top, a header border, and also a bottom border. So this bitmap footer sagging Emma header section. And with those two together, that's definitely going to piddling RY on my goal. So now I've added my strip on to the top. I've measured and allowed my seam allowance between each block if I leave them as they are without putting a divisional strip on the bottom of each block to see if it's reaching my goal. And it is not. So to make up for the difference, I will be adding a 2.5 inch strip in between each block and attaching them. So that will make a difference that I need to get my quill as long as that made it add a 2.5 inch tree up to each age of each block.
28. Midrow Sm Lg Easy Measure Math L23: It's time to connect our big blocks and our small blogs together. Exemplifying the mid row section, we're going to line up the centers of both these blocks. This will help us to do our ED measure map. We're simply going to allow them, they are facade of each other. And we're going to measure the distance to make them both same insides and linked. So we're going to use foramen and smashing to the sod will be used in our background fabrics to attach, framing and sagging to the left side, the middle, and the far right. Ruler out there. Take your measurements. Make sure you allow for your half inch seam allowance on both sides everywhere you connect to seeing, catch your pieces and trim off any difference, just in case you need to always square them up. Now you can measure the whole side and that will determine how much you need to cut to connect the larger square to the smaller blog. And voila is all coming together. It's really that sample. Sampling is the magic impeding your seams together. Imbalance in your blocks.
29. Preparing Blocks to Quilt Lesson 24: So it's time to prepare to quilt. We have our backing fabric here. We also have our piece of batting and we have our quilt block. Note that I'm pit on the screen. You can pause this at any time. And I'll go ahead and recap my backing squares and the unjust right? How large they are in the center somewhere. This will not be seen on the other side. So you want to place your backing fabric, face nail. You're going to layer it with your cotton batting. Make sure it's good and Smith, no wrinkles. And then you're going to center your block on top. Now it's layered. And check the back. I always flip it over, make sure there's no wrinkles or ripples lane in there, keeping everything snag. And as you can see right here, the Batting is a half inch, shorter from width and length and the backing is longer. So straight bands are not a good choice. Safety pins are a good choice. Or the quilting safety pions, they have a curve in them. Now you're going to see me play the piano all the way through the top, the batting and the backing in the center here. This is very temporary cause I just need it to hold in place to show you what's going on. So you can see the peahens all the way through. All right, so you move your safety pins to the outer perimeters, your sides, and your corners. If you have it in the center, is really going to hold you up when you go to Quilt it. But just so you get the general idea and this just secures everything and make sure it's snag and not shifting and will be cooling outward from inside the block. So let's do this again. Make sure you're backing is one inch water and one inch longer than your quilt walk. You'll place it face nail. Next, you'll bring your batting and make sure it's one inch shorter and one inch shorter in length. And we up your block as well, is course it's going to be more soluble when you're backing. You're going to place your blog centered. You're going to pin it in the corners, check the backs, made it out, and make sure everything looks great. Once again, pitcher backing down your batting and then you'll place your blog. Just pause this video and go back and look. And you will see the notes at the top and the bottom stating how long the backing needs to be, how long the battery needs to be. And now it's time to quill.
30. Quilt As You Go The Walking Foot L25: His town to prepare to quilt and assemble your machine for quilting is timed. Install the walking food. You'll remove that pn and replace it. Make sure you've created your machine will feed the way a 100 percent cotton thread. And this is what your foot will look like. The walking that has an arm on it that goes around your natal pn and you will be replacing your whole assembly. So let's look at some of these stitches. The straight stage or zigzag is awesome. I happen to have a serpentine stage and I'm going to use it. Now I've laughed the sound of this noise, the walking fifth makes when you're quilting with it on purpose. This is completely normal. It has a lot of ports and they are maven along with the feed dogs and doing this consistently with the needle movement. So, so to the age of your blog, you're then going to raise your need, your food. I keep my needle down. If you have that option, leave the needle in place so it stays exactly where you left in your presser foot back down. So a small distance right there at the age of the block, I generally do the presser foot or walking through that. And then I began again, go straight down. There is no need to get in a hurry. The wall can fit. We'll keep it with a male of speed that you're going go to the edge again, raise the presser foot, lever, the needle nail, and get the distance of the width of your welcome to turn it again, set it back down and start again. I wanted you to see me do this whole side of this section, which is the background fabric above the chi and atrium out the chi also will show you how I added tails and some little bows with the scrap fabric. But I wanted you to see what you can expect. Place the presser foot down and ask so then make sure you remove your safety pin. So it's now in your way what the safety pins D is key, the bagging, the batting, and the quilt blog from shifting. You have a quilting space of Chapter 3, 5, and even six inches. I use a 100 percent cotton baton and quilting. It gives it a design and unique look, but it's really truly designed to keep the batting from bunching. And I've heard period in years of usage, batting adds suppleness, solvers and warm. And this is what you can expect it to look like. You may put your further apart or closer together. It's really a personal choice. Be creative. Select this digit is the straight zigzag and moving around, it looks beautiful.
31. Quilting Personality Detail Projects L26: So being creative with your blogs, you can add details like this tail on this kitty cat and the base on the ears. You can sink and fan male or female. Maybe about the code of the bag. You can also take the kite, add a zigzag gland along with little scrap fabric into Bayes to make the tail of your kind. Perhaps use your straight state to make an eco stage around your heart. The heart looks really, really need. And as you can see, this really easy detail, the detail, you can use the straight lines around the cabinet takes into weight it. And once again, adding that value can give it more detail. Be creative with your stitches on your cell machine. Explore them and say What are you can create. Here's some waves on the baked. And then here we can use a straight-line stage, just using our regular walking or are selling bit. Here's another way to explore different fabrics for the background. As you can see, the detail can be just as beautiful on the backside of your coil as on the front. You can easily make out all of the designs and project. She did. The Bowser flat, the chi, and even the pinwheels. Explore your stitches on your machine. The creative with your quoting, the sky is the limit. And brown, your creativity, man.
32. Attaching Blocks Assembly Lesson27: So now it's time to begin assembling our blocks together. This is a vertical row and the reason why you put the extra fabric is attached the blogs using the backing fabric. So this is an assembled vertical ray. And what we're going to be doing is work on to take the backing fabric. And on the mad row, we're going to do the same thing. And you'll see how this is all quilted and put together. And I've assembled this mid ray. So what we wanna do is we've got it laid out here and we've got our vertical rays assembled. And we're going to place the backend fabrics face-to-face, get them lambda. And there'll be even aisle way across. And that's that extra fabric. Weka. We're going to play some under our machine and we're just going to say our quarter of an inch seam allowance all the way down. And when we get to the end of our row, I want to show you a few things that you can, uh, same are going to occur so that you're not worried. See how we have a difference here. This happens because we're running it under R, So machine with a standard so in stage and it pulls up the feed dogs be the underneath the bottom fabric quicker than a Tom. That's simply okay. Because when we fix our bounding pieces, it'll all come together. Now one thing that you can look for is right here on this particular block. You can see that when I did the carbonate seam allowance, it actually stitched onto the actual block. And that's simply okay. Because the way we're gonna do our bonding, now that we're done our pieces together is going to work out fine. So the first thing we want to do before we do that is take it to the art board. And usually you're saying moles delay to one side or the other ticket under the age of your blog. And I usually go across there with my fingers and just do a little bit of a funny Glynn and just making sure everything's bland, flat. And right here, see how we'll want to go one way or the other. And I let it determine it at least go on one particular way. Now see how that block is overlapping the other, that it's okay to just press it down using your steam on your arm. And you'll have some overlaps. That's to be expected. Don't sweat it. We're going to fix it right. Now. Once we've stained it down, we've got it lam flat. The next thing that's coming up in the next video is work on to prepare our bonding and close up all the seams.
33. Binding Closing Seams Lesson 28: It's now time to cut our bonding. So Kurt 1.5 inch strips, you'll need cerebral. We're going to make a very long rho bar attaching them together. This will take our quilt blocks together. So this is a cool tool. This is a heart him ruler and has the ability to be ironed on without damage. We're going to earn over a half inch seam on one side of this strip and just use your press and iron if you do not have him roller, just do a half inch on one side of your strap. Roll it up on a piece of cardboard. This will make it really, really easy in handy at so machine. Do it loosely. I'm right handed. So I did one side. We're going to attach the bonding and close up the saints and bond are Quill. At the same time. We're going to lay our bounding here. And we're going to use a quarter of an inch seam allowance. Lay the raw edge of the bounding next to the end of the block. And so it from one end to the other. When you get to the other side, you're going to cut off the difference. Cut it at the end of your block. No need to waste your bonding folded over token and that edge that we stained they own and work on to say this down. So it from one side to the other side. Now we want to put a top stitch on that lower edge we attached. This will give it a nice clean finish. Viola. Nice, even clean, professional aging. And this is what I promised to you. Promised you I would teach you how to quickly as you go. Congratulations student. You have just finished attaching all of your bonding to each one of your blocks. Keep going. Do each one of your blogs this very same way. And once you have your vertical rows done, you can then attach them to each other. Place the bounding the very same way. Pions are good here for an extra set of hands, top stitch. And you can do the edge of your quilt the same way.
34. Closing Quilt Miter Corners Binding L29: Listen apically is a breeze. We're going to use our existing bonding that we used on our query before placing it on a roll age, right sides facing each other. You can attach your binding to the backside of your coil or the front side of your quill. Is this how you miter your corner? Take your bonding and create like a phone type format. This is monitoring the corners. If you pay attention very closely, you're going to bring your bonding all the way to the age and kind of make a phone there. The TNT is Congress short head. So all the way to at least quarter inch from the edge of your project. And we'll leave your needle down and turn the corner. You're going to take the minor corner and flip it back towards the back of the nail nail and began sewing your bonding down. This is a successful minor Former male. You can see you have a quarter of an inch from the edge. So simply flip the corner inward and flip your binding over the edge there. I'm going to give you a better shot here is hard to do it. Open the camera that it nearly folds itself. You have the option here, selling this dam or hands away, and so on Is Beautiful. Use your cotton thread or maybe you want to track the COD hands, psalm 3, it so it just really takes itself, can say it's your foot back down and continue selling a ramp. So the next step we're gonna do is I'm going to show you how to make continuous bonding. So attention your bounding, you're going to decrease we make we need to leave a great deal at least three inches or batter for yeah. The reason being is we got to pull it up here and we're going to turn sideways and one vertical. And we're going to draw a line from corner to corner. The width of the stria, No matter what this strip you're using is always with the stria. You're right sides together. And then once you get one squared and one vertical, you're going to follow the drawn line and stitch it damn canal, the difference. And once you do, you're going to have it to Dan, continuous bonding. And it'll just took right in there, flip it over, continue. So in a rail or hands in which a Ricci's congratulations data, you just now learn algebra and your projects.
35. Finishing Its A Wrap: Congratulations statement. We have now completed all of our projects assembled and made our coil. You can be more creative by adding details to your cat as well as to the guide. And be sure to collect folly. So you'll be notified of new courses and classes on Skillshare.
 Elizabeth Morgan, Dandly Yours