Transcripts
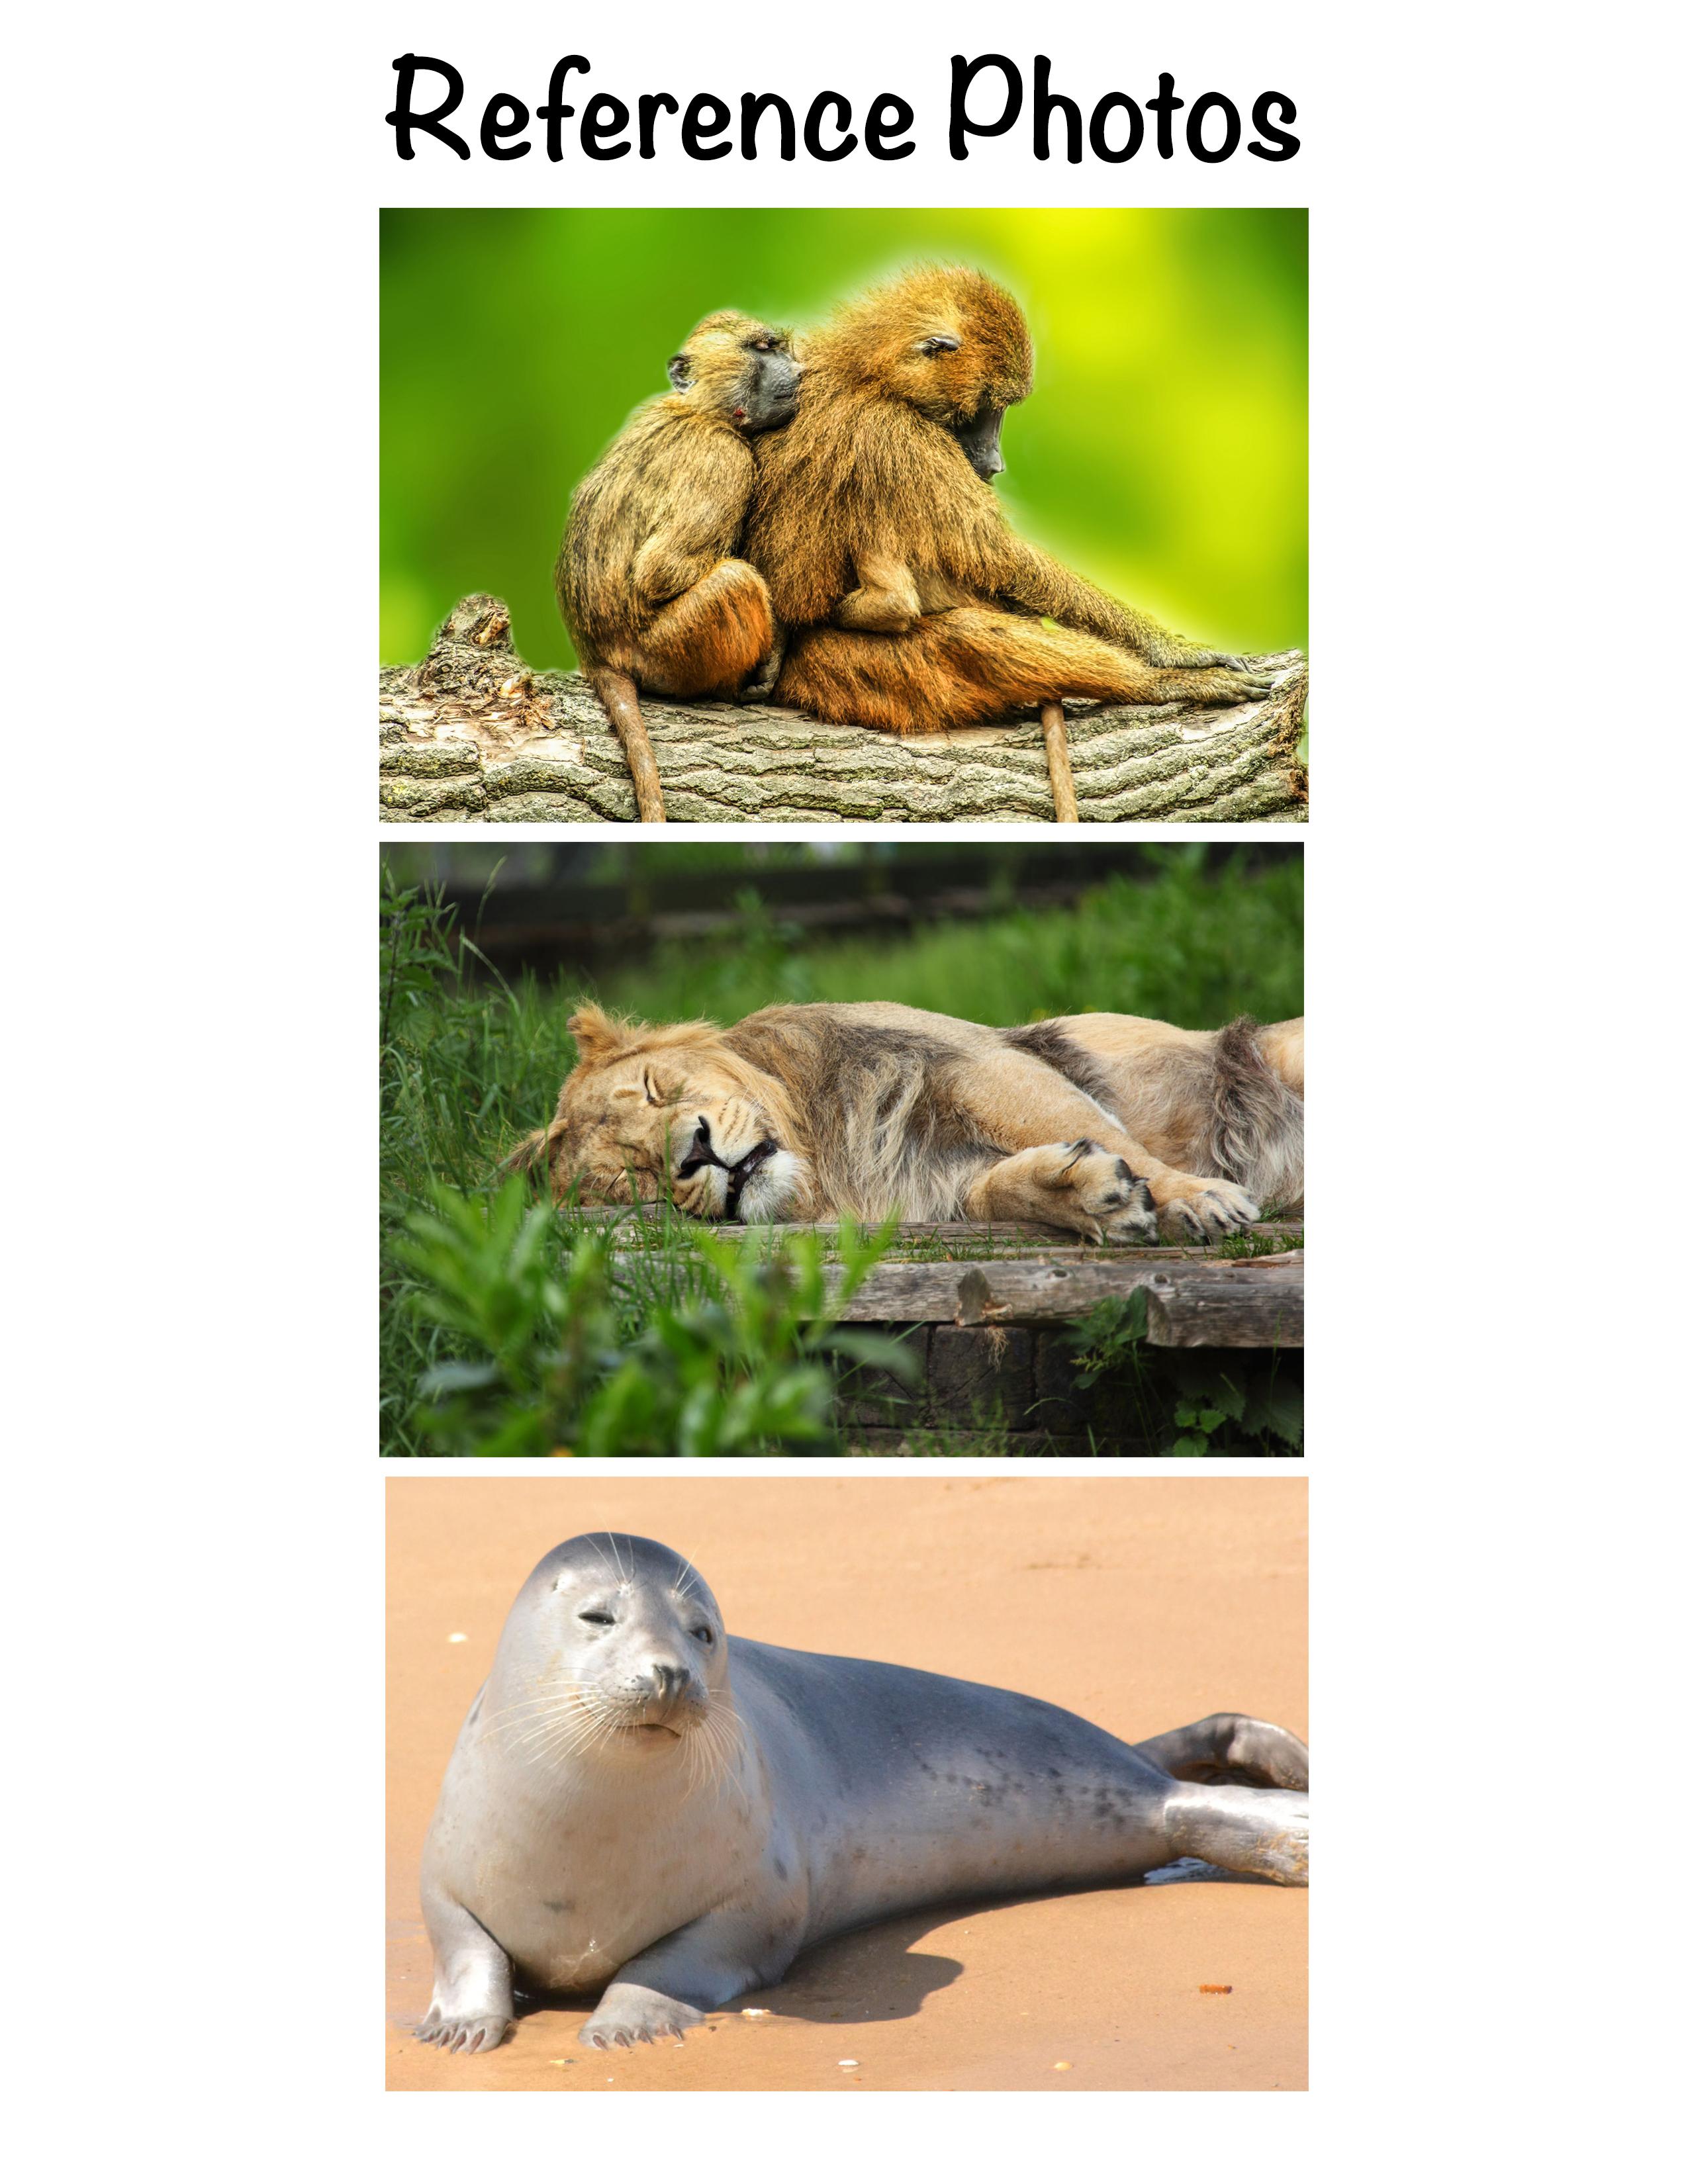
1. Welcome to Class!: Hello. How are you? My name is Andy Villon. I'm a fine artist. Welcome to the class. Today we'll be doing some practice sketching or thumbnail sketching
of three animals, a baboon, a lion, and a seal. We'll be using very
loose lines and loose gestures to get
very soft and flowy line. My goal for this
class is for you to draw in a very loose way, very loose lines,
making the drawing look more natural,
and being fast. I don't want you to take too
much time for each drawing. Just have fun. And don't
think about it too much. Don't overthink each line. And do the best that you can. I've attached the
photo references in the projects and resources
tab below this video. And when you're done, I
would love for you to share your project with us
here on Skillshare. I know I would love to see it, and many other students would be thrilled to admire your work. So without further ado, let's start with
our first drawing.
2. Materials: Okay, So in this
video we'll be going over the materials
and start off. I mentioned the paper. Now this is what I use
for this class and really isn't important what
kind of paper you use. I'm just giving you a heads up of what are we using breath as long as you have some kind
of paper that is fine. But I'm using Strathmore, Bristol board smooth
surface, £100. And my paper is 11 by
14 inches in size. Again, this isn't
necessary for you to have, but it is what are we using? I like it because
it is very white. I really like this
type of grain per second item will
need is a pencil. So this is my graphite pencil. I like using mechanical
pencils because they are easy. You don't have to sharpen them. They're easy to get the data. And this is the
one I'll be using. And again, it really doesn't matter if you're using
regular pencils. If we have a, B, HB, or age, any of those are fine in that range,
I would recommend. Make sure to have your
pencil nice and sharp. Final material is this blue
pencil car civilian blue. And we'll be using it for
some of our third layers. Then we'll be adding
will be going over first with our graphite pencil. And then we'll be going over it again with our civilian blue. And this brand that I'm
using is Prismacolor. I imagine many of you have this and it is pretty standard. So if you don't have this
exact brand and that's fine. Prismacolor, fabric,
Estelle Karen Nash, Darwin's, any of
those are great. The final item or need is a red console that
says Scarlett late. And it's the red
I've chosen that it appears it's not too bright
red and it's not too dark. It's just right in the middle. And that's what I'll be using. If you don't have a read
and you want to use another color like
green or something. We just wanted to have a
nice distinction between the blue and the other car or if
you don't have blue and red. And that's fine. He used two colors that are
distinguishable. That's why I'm using graphite, a blue and a red. All right, so that concludes
the materials section.
3. Warm Up: All right, welcome to this quick warm-up that
we'll be doing. How are we using my scarlet
lake colored pencil read? And we're just gonna do a
few more months to loosen up our wrist and to
learn a few shapes. First, always start out by
drawing some quick circles. Or just starting with
pressing very lightly. And you'll see in
this course that so many shapes will come
in very handy in your drawing conscious going in and finding one nor have
this circle has ever saying that these
basic shapes come in very handy when trying animals and people and other things. Even though they're very simple, they're very important to learn and to be able to draw
well and draw fast. So our first is a circle or
draw a bit of a bigger one. Now, we see that we're messy or not
neat and organized. We're just trying
to get something down and establish
term basic shape. So even though I have this messiness around
here, that's okay. We can erase that
later if we need to. Now I'll do a few ovals
are starting to build up. We start by varying
being very loose. And then as we start
increasing our pressure, we start defining what
a shame really is. And then we'll do what I like
to call a curved triangle. Triangle, but it
has curved sides. Again, a very loose just
like an oval and circles. And finally we will draw
some squares or try them in a more square shape and then some will make
more rectangular. And some also I'll
make as a bit of a perfect rectangle or a curved square. Okay, so there's
our warm-up sketch that we just had to do. In the next video, we'll be starting on
drawing our animals.
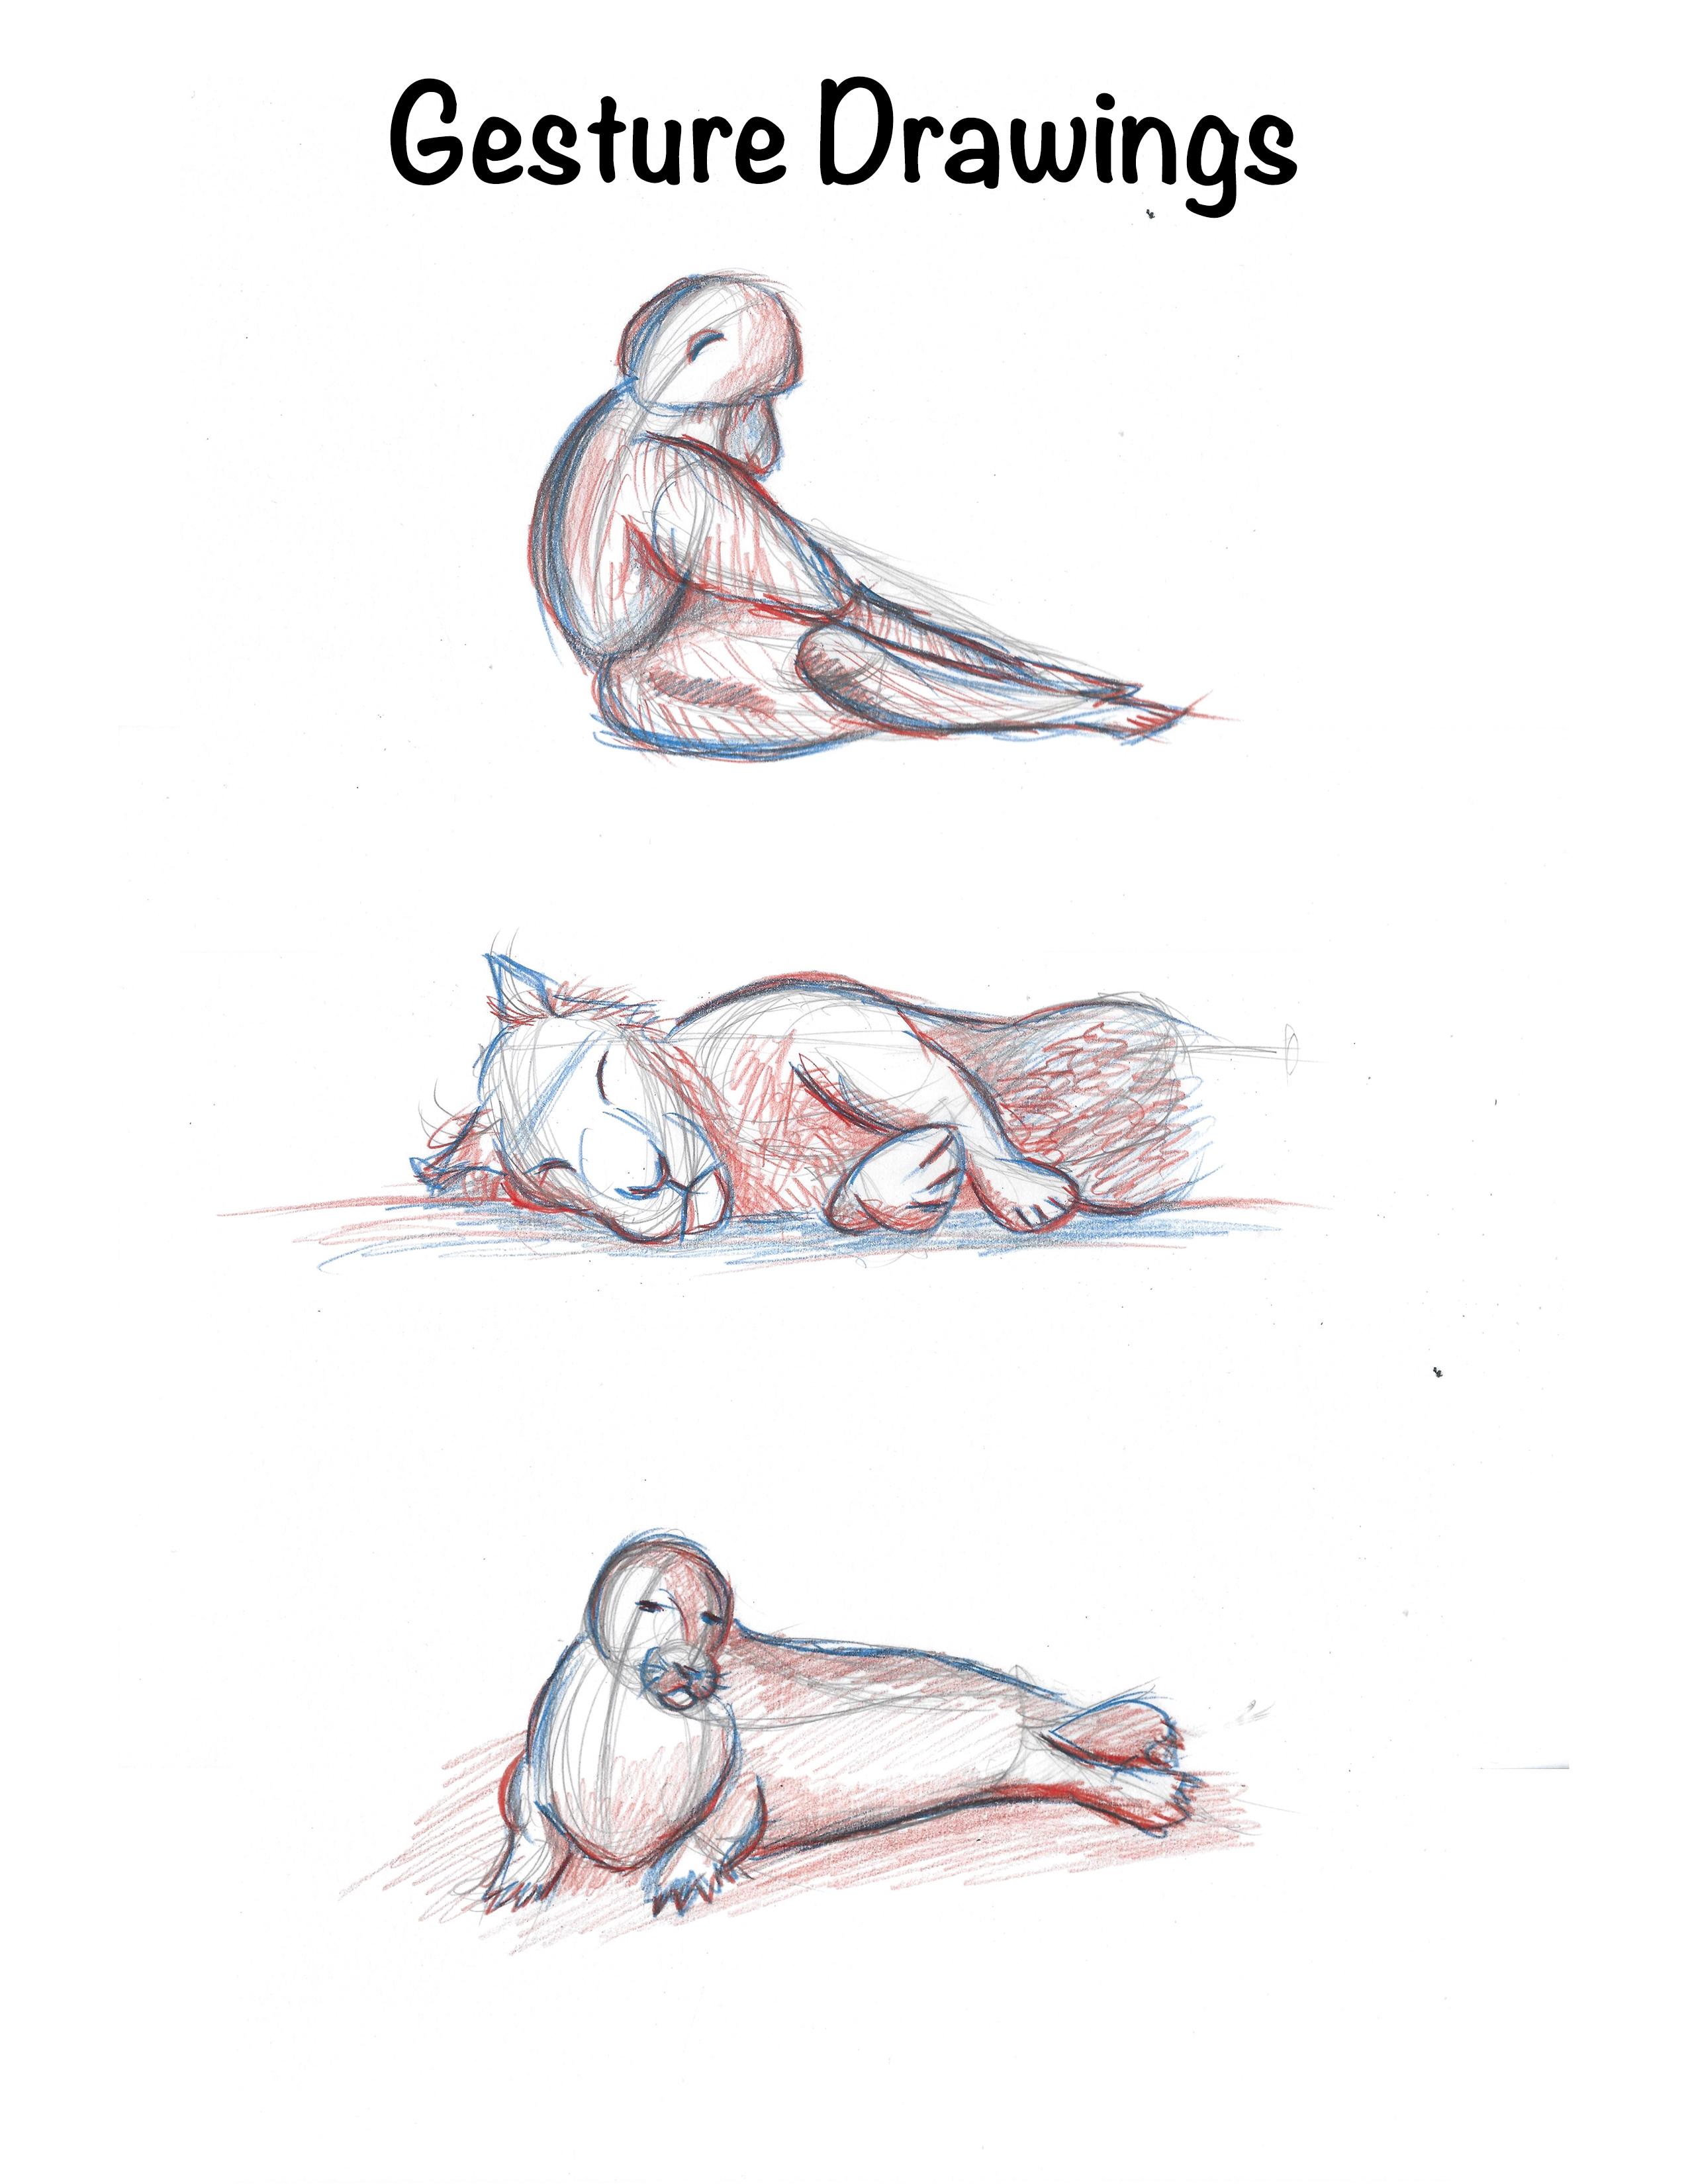
4. Baboon Gesture Part 1: All right, Welcome to
the first lesson here, and we'll be starting
out by working on our first image of a baboon. So the key when drawing using this method is we want
to capture the gesture, gesture or the flow. Think of how water flows
through some names. So picture the water or energy or anything for
going through this animal. This helps us establish, first of all, the
size, the height, how big it is, how wide it is, and we're getting very
quick and basic lines down. So as you see over
here to the side, I've provided the
reference image that we're working from. So we're going to start
drawing our moon. And first, we want to
imagine a line going from the head all the way through
and curving around the body, picturing that nice
curve and arch the back. And then it turns red in here and through the
legs and forward. And I'm doing this a bit slower than I would
usually do it. So you can see the
method I'm using. So here we have our initial establishment of the height of the
animal and then how far out its legs take. This can always be
edited later on as we continue to
develop our drawing. So then we'll add in
where the shoulders are about here by drawing
a little swivel. Just suddenly very
simple and quick way then we won't have
the arms flailing forward and meeting the end
of the legs around here. So this is our first
initial establishment, the first basic lines
that we add down. Now we'll return and start
adding more details. Are going to start
adding the head, thinking about
ovals and circles. And this is the method I
want you to learn today. We went to imagine the head
as a basic circle or oval. And again, we're using these very fast fluid lines just to map out where
exactly the head is. And then we'll have the chest. The body has another basic oval down in here. And then we'll start
having in their legs. And we can imagine the legs
has tombs are basic curves, squares or rectangles
if you will, than they get smaller and
thinner as I come out here. Again, we're not going
for total realism. We're just trying to get
something down on our paper. We would have the knee
coming out a bit here. And don't worry if you're
drawing looks a bit messy. At that stage,
messy is expected. So the knee is sticking
out right around here. We can continue to
develop this arm, noticing it comes down to about the knee and
then it turns, this is our second
pass on the arm. And then we can start having a second oval for the nose
just to get something down. Then I'll add a
bit of thickness. You want to think of the arms, especially the upper arm, has a bit of a triangle coming off and the
shoulder in here, it kind of has a
triangular formation and then it gets thinner, similar to how the
knee or the leg. I mean, how it gets thinner
as it goes further down. Alright, so that concludes our initial lines that we wanted to get down our gesture drawing. So in the next video, we'll continue and we'll
add a few more details. Alright, see you then.
5. Baboon Gesture Part 2: Okay, For the second pass, and I'm going to use a
blue Prismacolor pencil. And what I'm gonna do is start
finding some of the edges, some of the details in the face. He could say this
is our third pass. We went in first with
our initial range, our initial gesture drawing, establishing where the body was, where it was on our paper, how big it was. And then we went
on a second pass, having a few more details, figuring out size with the arm, the head, the chest
and legs, and so on. Now we're going to
go in and start carving and really defining
some of our details. Having a back of the head
will start out with that. We noticed the head is nice
and circular up in here. And the nose is a bit pointy. Band, comes off for the
neck and froze down. It's behind the baby
monkey and this one. But we're not going to draw him. We have a bit of curve a fat, I believe, right in here. And then the hips and butt area are located in this vicinity. We have a bit of a
fold of skin was for, you could say right in here. And then arm comes and
the froze over that. While adding a bit of
details for the head. We also know that our leg
is coming out from under this arm and then we have
our knee right in here. Our lower leg comes off of this upper part and the sand
flows over to the right. Again, I'm using very
long strokes that flow. And then we have our
foot comes out of it, a bit of a triangle shape for the foot and then
for the lower arm. And we would have
something very similar. And then we have another
triangle for the hand. We might even picking
up some English arm. Just tell her so much. I'm going to go in here and extend back a bit more outwards, have it curve even more. We notice this top of the head pushes out a little bit right in
here and sticks out. And then our shoulder and here. And then I'm going to move
this but buttocks bad ways. Have it curve down
here, flowing downward. Alright, so that's
our third pass that we've just finished. And the next one will
be going out and add even more details in
using a red color. And then we'll be really detailing it, having
more shadows, more definitions and rho really, we would see our
monkey come to life. See you on the next one.
6. Baboon Gesture Part 3: Okay, so now we can go in and start to finding
some of the details. We can add in the ear. The ear is about
right in the middle. We have a small curve for the
ear about a crescent moon, and then another one
and joining it like so. We can define some other firm right in here by
adding little zigzags. There are details
are for our lines, write it on this range. I'll go in and teach him
some wireless mouse area. Adding a bit of shadowing here. Finding more where the head is by blending the
two colors together, the blue and then red. I would like to indicate
the direction of my for and which way it's going. Fine. Bit more of
that shoulder up an ear and bring
it down that arm. Queen. Notice the elbow
is right around in here. We can define that a bit more. We might even add a bit of shadowing around in here
by adding some more red, because this is where
there's folds of the skin and the hair. So we'll just go in lightly
and blend in our red. There's a bit of a Muslim
ban writing down in here. So we didn't go in. It
forms almost an S shape. So just have that and then
fan it out a little bit. I'm coming back in and finding
some other leg a bit more. At finding this knee. We're going to add
a bit of a shadow right here for this knee. Knee comes down a ways
and then curves up. And then around here we throw into the foot
and we'll have our toes that when they change my drawing,
there were lines. And then we need to
finish drawing in this hand and arm here. I'm going to do one
final thing by adding a bit of shadowing
happened here, just around the head, right in this area. And now what I'm doing
is I'm comparing between my reference photo and
between the drawing. I have tea towels I need to fix. I'm going to go in
here and we would have been more or less
arm, the shoulder. Hello, she'll bring down
some of this foreign hear over and over that arm. And just went indicate some of the flow gesture of the hair. The leg, It's a bit thinner and flows more with the
leg down the vein versus over here in
this area it was going down and offer the leg
because of its weight. Arm has hairs coming
around it and over it. I'm going to go right back
here with my blue and red. And this here is a robot and a blend the red and the blue together to
form a bit of a shadow. Chance to vote at night. Okay. How do something
similar on the nose? Just to tone it down a bit. And I'll turn down this
area around the waist. And you may be
wondering why I didn't include this piece
right in here. Now what you see in
the reference image, and that's because
I believe it is a baby that snowboard
in there and I just wanted to focus on the adult
is quite dated and bestowed that little porch or arm that we see sticking out
right around in here. Alright, so that concludes
our first gesture, animal drawing with our monkey. Alright. See you
on the next one.
7. Lion Gesture Part 1: All right, So again, now we see our line over here, our model, and we'll
be working from, and we're going to
start the drawing. Again. I'm using my
graphite pencil. First. We went and
things went wrong. Linear drawing and the way
the animals throwing over from basically left
to right or right to left and is very wrong. So we'll start by just, again align to establish
from Larry's head starts around here to where
the body and over this way. So now that we got that
first line established, now we can go in
and add the head. So we're just had a
quick oval for the head. We can notice the arms, their bid down the body, and this one forms a triangle. So we'll just add in a big mood, rounded triangle for one pole. And that's the first part. This is the first of our poll, and then we have another arm
that comes and pins behind it and flows out over here, just establishing some
simple lines, right? And then we have the waste, but that's further down in
photo where we can't see. So with that we're
struggling to find new period with
the silhouette of the lion kinda forming where
the chest is around in here. Thinking about our
ovals are big shapes. And then we would have our
pelvis down in this vicinity. That's why I'm having a bit of a two port two
bones is going on. And then we can indicate
where the ears are. I think I'll bring this down a little bit more
and I'll just draw some lines for the head hairs and I'll just try and
General Heinz for the ears. Just kidding me. An
idea of where they are. Okay, so that's our
first pass of our line. You saw I was very quick, only about two or
three minutes to do. And now we'll move on
to the third pass.
8. Lion Gesture Part 2: Okay, so now we're
working with our blue and we'll start to finding
where some things are, markers are on the
head, for example, I'm going to go ahead and go
in and out of it as a chain, just where I think it is. And then the mouth is a bit
of a Y underneath the chin. Very quick motions. The nose comes out of
that like another why? It's all following
the same angle. Same angle of the nose, mouth, nose, and chin. When we have better with
their cheeks right in there, we can draw in the forehead, just a quick indication of
where the forehead is flowing. The nose comes around. And then right in here
we have our eyes. And the face around. This side is a bit squashed because it's laying on its side. Quick motion for the top of the head and then
our hairs forming these triangles right along the same lines that I
drew the years ago. I'm going to try
and put as a firm, not too much, we don't
want to get carried away. I'll add it and
they sent her ear. And then we can
define a bit more of that body up and through here, this bulge of the hips is a bit lower than the first
one over here. We have this round big
Paul read it here. We want it to be very prominent. Quits her toast down. Paul kind of forward
and goes up under him. I was his arm right in here. And then we can define this other Paul and her
hair a bit more, be sure to add in the toes. And then this big muscle
right here, the curves down. And then we see it
extending over this way. And then we can add
in a bit of the body right here where to find
that more later on. And if we look at how
wide the bodies here, we know that it comes
out riding around. Here. We're looking at
our reference photo. So we'll have an opposite
curve for the hips, although it is washed
down a bit by the ground. So we're just going to go in and lightly sand and a bit infer. Alright, so that's
our second pass, establishing our line with
our blue colored pencil.
9. Lion Gesture Part 3: Alright, so we're gonna go
ahead and use a red pen. So now we're just going to
go in here and add a bit of further begin with not
too much of the main. Just say that I'm in here to give it a bit of an indication, we can even darken
up her eyes a bit more by some bindings
in blue and the red. And I think I'll do the same
for the nose and mouth. However, on this side of
the nose right in here, that shake and prevalent
hour and a bit more. And finding where it is. How should we have this
flow down a bit more? It's crashing into the
side of the ground. So it's kind of flat
right in there. Can we ever hear that? Again? Bumping into the ground? We have our firm right
in there mounted up. We can even add in some further indications
around the chest, scribbles and some zigzag lines. Just to give you an idea
of where the firm is. I'll go in and add a bit of
a shadow around in his car. We went in to find
more of these toes. Again, all this is a very quick, quick steady fancy
onto the same. And on this, they
ran it on here. I'm building up a bit of
a shadow right in here, having it out of the car. And then I'll go in
for the tummy area and hips area and add a bit
of shadow and there. But it's ribose for
some of the tummy hair. Pretty sure. Our shadow, it is well defined in here. Nice and big skin, her arms and back. I'll add a bit more red, a red under the
challenges to add a nice division between
the chin and the body. And there'll be about it. I'll just add a quick indication of where the ground and I1 is. So we aren't trying to figure
out what's happening here. Adding a bit of a shadow
right under the body, right under this part
of the face till since they gave it an indication that there's a shadow here. All right. So there's
our Ryan laying down, resting nine harder
or mini sketch, our gesture drawing
and initial sketch. So this is again, a great steady rate, warmer upper, that
gets us started. Alright, I'll see you
in the next video.
10. Seal Gesture Part 1: Alright, so in this
final example, we'll be working
with this picture of a seal and more stretched
out without graphite pencil. And we won't do as we're
looking at a thrill First, we can divide this into two
nines or two ways and froze. It starts out by flowing through the body in
a vertical fashion. And i'm, I know that the
spine curves around, but for our sake, we'll
have it come off of there. And then we would have
flippers kinda ran in here. Knows he might say
is around there. I hadn't really ever do back
flippers here, forming a y. So this is our initial gesture. Very quick, fast, very filling. Next row, start defining
the shape of the head, which again is an oval and a nose embodiment Novocain
right around there. Mainland fatten up this oval, make it more of a struggle. Make it even have one big oval for this part of the
body in the front. And then one wrong tapering off, would it stops around here. What I might do is I might trim this and this is what you might see when you're working. First establish what do
you think is the length? And then come back
and say, well, that's two or that's too big. So I need to go back
and we can make this sale and drawing
a bit shorter. And again, we would have
our y for the flippers.
11. Seal Gesture Part 2: Alright, now we're
going to go in with her blue and start adding
some more details. So we'll start by
defining side over here. Where this flipper is. We noticed that this
right-hand February I swore up and jump
more spread out. Then it flows back again. Somebody here knows how
Android around in there. And then my hand go ahead and
define the nose and mouth. Comes up and around here, it's a rather fat heads
but froze around. And then right in
here we have eyes. We have all this flap down here, rho cosine and grows
out back flipper. And then up here it's
a bit more lumpy as it flows over the bounds. And then we have the
back for temporary, which we are not able to
see as well back here, but estimate what it looks like. This one kinda turns
out and flows around. Okay, so that is our
third pass where our blue colored pencil defining some more
of the details.
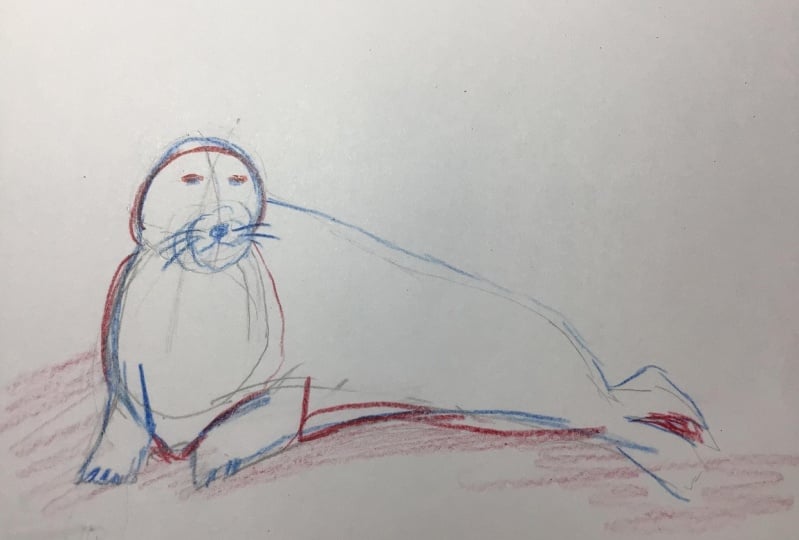
12. Seal Gesture Part 3: Okay, so I'm starting
with my red now. I'm going to add a bit of
shadowing and find some of these curves and a bit of an indication of shadow around
in here under this part. I can go in and
taping this mouse, adding a bit more
and hadn't been a shadow around this
part of the cheek. And I'll go in and darken the eyes by combining
the red and blue. And a bit of a shadow and shading wherever the
side of the face. Write it on here over the nose. Between the eyes. Define the edge of this flipper by adding a
bit more shadow in here. As far as our red in
there and put more. I'm going to deepen the shadow, write it on here, and have a bit of
a curvature to it. I had a bit of red up here
just to tone down as white. And then I'll step over
here and that's fine. Some of these back flippers, although we didn't have a good
idea what they look like. And finish it off, I'll add a bit of a
tone of red right along this edge to indicate that
there's a bit of a shadow. Just to give it an idea that there's ground and her there. Okay, Now final thing
we'll do is we'll take our console and we'll go in. And now this occurs to assume. All right, so there's
our finished seal. Again, we're not going
for a 100% accuracy. We're just going for quick dry, quick sketch to get ideas down, to get a good steady down. Let's turn now to be wrong and tedious
unless you wanted to. But this is a good practice
for drawing not just animals, but also people, cars, anything you can think of.
13. Thanks for Watching!: Thank you so much for watching. I really hope you enjoyed this class and we're able
to learn something from it. Please feel free to post a
picture of your drawing below this class so that
all of us here on Sco chair can see what you did. If you have any questions, don't hesitate to start a discussion in the discussions
tab below this video, and I will be happy to
answer your questions. Well, if you would
like to support me, please check out my website at www.andartitude.com
And feel free to visit me on Instagram and
Facebook where you can see daily updates of my artwork
at Andy's attitude. Stick around here on
Skillshare and follow me because in the coming weeks I will be uploading
more classes. That's been it for now. I hope you have a wonderful day. See you in the next class.
 Andy Villon, Fine Artist