Transcripts
1. Fall is Here!: Maybe you're someone
that has always wanted to create your own
pumpkin decorations, but you never really
knew where to start. In this class, I'll provide comprehensive step
by step guidance, encouraging you to explore
all the possibilities first, and then I'll help you choose the decoration method that
aligns best with who you are. To begin, you'll learn the basics of fallowing
out your pumpkins. I'll teach you efficient
ways to do it and a few essential
disinfecting tips to make them last longer. Focusing mainly on painting
and carving techniques, you'll have the
opportunity to choose one or combine both methods. This will enable you to use one single pumpkin in
many creative ways, allowing you to save
time and money. In case we haven't
crossed paths yet, my name is Floama. I'm an illustrator and
surface pattern designer that also loves exploring
all crafts imaginable. We'll explore many styles. Understanding that
decoration during the fall doesn't have
to be only spooky, but it can be, in fact, elegant, cozy, and cute. Although if you are into spooky, and a horror fan like me, you will not want to miss the Halloween special
I made for you. I'll teach you how to combine all methods covered
in this class, bring them together to craft many variations of the
classic Jacko Lantern, and then added bonus of diorama scenes to wow
your family and friends. In case you don't feel comfortable
starting from scratch, you'll have access
to my templates in the resources section for
both carving and painting, and I'll also be
teaching you how to transfer them onto
your pumpkin surface. So if you're ready to carve out some
creative time with me, I'll see you in class.
2. Your Pumpkin Project: For your class project, you'll be sharing a picture of at least one pumpkin
decorated by you. And don't worry, no advanced skills are required for this. You only need to have
the desire to create. So if you're someone
with a creative spirit, this class will be
perfect for you. Together, we'll design a
plan so that you can choose the creative direction
that will make you the most excited and
the most comfortable. We'll start by covering
the basics on how to carve a pumpkin and how to get it all wrapped up so that we
can work on it later on. However, if carving isn't
really your cup of tea, you'll be delighted to know that painting is going to
be our second method. Whether you prefer
to give your pumpkin a different color than
its traditional orange, or you want to create a captivating pattern using
markers directly on it, we'll cover all
possibilities and explore countless
ideas together. Finally, as I mentioned before, we'll save the best for last with a glowing
Halloween special. So if you're a
fan, get ready for an unforgettable and
magical experience. In each lesson, I'll specifically
talk about the tools that you'll need and all the alternatives
that you can use, emphasizing the importance of safety when handling
sharp tools. Additionally, I've
included my own tools that are featured in this class in the resources
section in case you want to get them yourself
for your own project. There, you'll also find
the templates that you can use if you need a bit of help
with the initial designs. So if you're ready,
I'll see you in the next video where we'll dive in and get
ready to harvest.
3. Pumpkin Hunt Plan: I have to admit, I tend to get overly excited around
this time of year because when I was a kid I didn't
have the chance to experience all the frenzy
around Fol decor and Halloween. Having moved to
the USA recently, I find myself in a state
of childlike wonder, discovering all the
enchanting aspects of this season for
the very first time. You may already have an idea
of what you want to create, or maybe you're open
to all possibilities. In either case, let's write down a few notes before we
go pumpkin hunting, so that we can be a bit more intentional about our search. So let me walk you through my thought process as we plan our pumpkin
journey together. I'll teach you how to decide which pumpkins you
may want to get. The first thing we're
going to decide is which method we're
more interested in. Is it carving, is it
painting, or perhaps both? Additionally, let's
consider whether we're aiming for cute
decor exclusively, or are we also into the idea of creating something
spooky for Halloween? The next decision involves
size and quantity. Do we envision our
pumpkin to be displayed outdoors and to be
visible from a distance? In that case, it should be on
the medium to larger side. Keep in mind, this also means that it'll most likely be heavy. For this same reason, whether it's indoors
or outdoors, try to think if you have
any designated spot where you won't need
to move it frequently. But if that's not what
you're going for, maybe are you
leaning more towards a cute pumpkin that you
can just place on a shelf, the kitchen counter,
or your desk, and maybe you just want to
relocate it as you please. If that's the case, then a
smaller one would work better. Another question that
you can ask yourself is, do you want to work
with only one pumpkin, or are you considering
a group of them maybe to add more variety? Now, here's a bit of
a reassurance step. Remember, these choices
are not set in stone. There may be a lot of back and forth and that's
perfectly normal, especially if this is your first time attempting
to the core Pumpkin taking note is something we're doing to
help us stay organized, but it's good for our ideas
to evolve as we move forward, especially when we actually go see the pumpkins
in real life. And allowing ourselves
this flexibility is a very important
step of the process. For now, we'll just relax, write down whatever comes to mind and we'll go from there. Now let's talk a little
bit about color. As I was telling you before, moving to the
Northeast of the US. Introduced me to a
deep appreciation for the vibrant
colors of the fall. That's why my advice is to try to get inspired by the beauty that each of these
natural elements offers. Take advantage of it. Consider selecting pumpkins with uniquely colorful
patterns for carving. Draw inspiration from
the majestic foliage in transition when thinking of a color palette for
our painting lesson. Now let's think of where we're
going to get our pumpkins. Of course, the first
thing that comes to mind is grocery
stores, right? I mean, oftentimes that's
the most convenient option. These pumpkins will
be typically suitable for our needs and come
at a standard price. But I have to say, all pale
in comparison to the ones you'll find when exploring local farms or pumpkin patches. And this leads me
to the next step, which is leave
room for surprise. Every single year,
I force myself to leave enough room
for surprise because I know that there will always be better options than what
I imagined or expected. Having said that,
experience demands that I teach you a few
things to watch out for. First of all, shape, the shape of your
pumpkin is going to be different depending on
where you get it from. If you're getting them
from local farms, you'll likely found the rounder
and better looking ones, which I personally prefer. On the other hand,
grocery store pumpkins tend to have a longer shape. I believe this is due to the
way they're transported. Maybe they get all bunched
up in a truck and this potentially gets them somewhat
squashed, if you will. However, a flatter and
longer shape can be used to your advantage if
you prefer to add lettering or a continuous
pattern to your design. Another thing to watch
out for is cuts. Check your pumpkins for
knee piercing holes, openings or scratches
on their surface. Any damage can service
an entry point for bacteria and make
them start rotting. The next thing to
keep in mind is that pumpkins may come with a bit
of texture on their skin. Be mindful particularly of
the presence of calluses. You may be able to work around them if you're carving them, but if you're planning
to paint them, try to opt for pumpkins with the smoothest surface
you can find. Now let's expand a bit on rotting risk because this
is pretty important. As I brought to your
attention earlier, cuts and holds are the primary
culprits for fast decay. But here are a few
more things to consider As a rule of thumb, it's important to examine
the stem for signs of mold. If it's already moldy, it's best to avoid that pumpkin as we would be starting
off on the wrong foot. Right grocery store pumpkins
may be more susceptible to cuts and anything that's displayed outdoors can
be exposed to rain, which may in turn result in rotting soon after you
bring your pumpkins home. If all of the other things
on this list, check out. The only thing remaining
to ensure and determine whether your pumpkin will last
is checking for firmness. Now we have more than
enough information to go pumpkin hunting
right Before you go, take a moment to gather any
final thoughts or ideas. But remember, leave
enough room for surprise. I'll see you at
the pumpkin patch.
4. Harvest: In this lesson, we'll
go pumpkin hunting and we're going to
learn how to select the proper ones for each goal. Well, I do have a few big ones that are very
traditional looking. Let me show you some of
the smaller ones to ignite your creativity and give you some inspiration before
you go on your own search. I'm no pumpkin expert, but it's important to
remember that the world of pumpkins extends far beyond
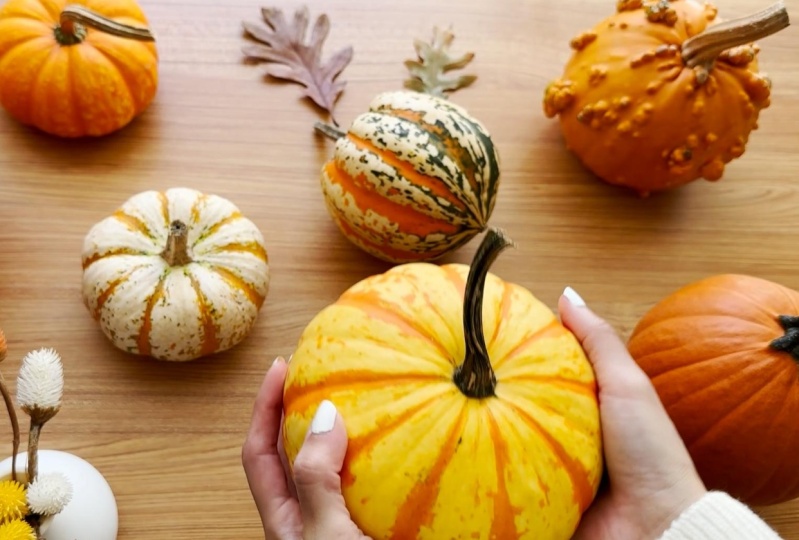
the classic orange types. Take a look at this one. This is a pumpkin that's
very compact and round. As you can see, it features a very unique yellow
and orange pattern. This in itself pushes me to choose it for our
carving lesson. I obviously would not want to waste it by covering
it with paint right besides its surface wouldn't really work
for that purpose. See, it has a few
calluses here and there. My plan is to just carve this out when you're going
for your own pumpkins. Don't forget about
squashes and gourds. I stumbled upon this one at a pumpkin patch in a local farm. As you may be aware by now, I'll always encourage
my students to choose the most unique options to start with beautiful
looking pattern. But not the typical round shape, which means it won't
naturally stay still. As you can see, when I place
it down, it rocks a bit. We'll need to carve it in a way that complements
its unusual shape. This is a very typical
looking pumpkin, ideal for both
carving and painting, thanks to its smooth surface. I think I'll save this one
for a mini jacko lantern. I may try to remove this little texture
that it came with. I see that it's
perfectly round on one side and someone
flatter on the other. I could even contemplate
the idea of carving side A and painting side
B to cover that texture. All right, here's a
personal favorite. Take a look at all these
odd looking warts. This is unquestionably
Halloween. Must be, don't you think? I mean, just look at it. It even has some callouses
which I could try to remove, but quite frankly,
in my opinion, that only adds to
its spooky nature. Of course, I'm going to
save this one for carving, besides imagine trying to
paint over all these words. It would take forever, so we're keeping it as is, preserving its natural colors. Here I have more pumpkins with naturally
captivating patterns, something you don't
see every day. I may even use them as
the core and keep them just the way that they are if they turn out to be
too small for carving. Another feature to be
on the lookout for is those curly stems reminiscent
of Cinderellas, pumpkins. But the closest thing
I could find to that was this
gracefully arched stem. Unfortunately, for
the most part, the rest of the stems looked
pre, featureless and short. Finally, take a look at this. I found this one at
another local farm. This is by far the most
peculiar one I've ever seen. I mean, what even is it is it a pumpkin or a giant mushroom? I could even imagine transforming it into
a miniature house, despite the stem getting a bit messed up during
the right home. And despite the farmer thinking that it was the
ugliest looking one, I couldn't help but bring it
home About that car ride. You can learn from my mistakes. Make sure you place your
pumpkins in a bag, a box, or secure them in
a spot where they won't tip over or roll around. If you toss them in your trunk, the odds of them tumbling
around and potentially damaging their stems are
going to be pretty high. And this can unfortunately
lead them to rot fast, which is the last
thing that we want. Now that we have sorted
all of our pumpkins, we're going to move
on to the next step, Getting them all prepped up, that means disinfecting
and cleaning them. Join me in the next video where we'll tackle these
tasks together.
5. Prep & Disinfect: It's time to freshen
up our pumpkins and get them prepped
for the next stage. While this step might not
be the most exciting one, it shouldn't take too long, and it will ensure our
pumpkins last longer. For this segment, you
have a few choices. You can always use a damp rag or paper towel
to clean your pumpkin, but I'm going to be using a hot and go outside to do this, since I've got a
decent amount of them. A small brush or an old toothbrush could
come in really handy for those nooks and crannies where
dirt can hide, disinfect. We'll prepare a water
and bleach solution. If you happen to prefer
alternatives to bleach, you can explore solutions
using vinegar or peppermint. While I have not personally
tested them myself, there are plenty of
online resources that may be worth trying. It may go without saying. But please remember this. It is essential to be cautious
with your clothing and any surfaces your pumpkin touches when you're working
with this solution. Right after I came back
from my harvesting quest, my pumpkins looked like this. Pumpkins that come from
farms will typically carry more dirt compared to their
grocery store counterparts. But regardless of their origin, both types will have a lot of contaminants on their surface
that we cannot even see. Plus the grocery store ones may even have labels
you have to get rid of. Since we'll be either
carving or painting them, our hands will always be in
close contact with them. Let's make sure we end up with a thoroughly clean surface. Once I'm done washing
off all the dirt, I'll let my pumpkins
air dry for a while or gently pat them dry with
a lint free rag or towel. Next, we'll proceed to
disinfect the skin. As I mentioned earlier, I've prepared the solution
in this spray bottle with one liter of water and a
four teaspoon of bleach. Of course, you can adjust the proportions to half
the amount or less if you're only disinfecting one single pumpkin
because of the bleach, I suggest wearing
gloves for this step. We'll spray the entire
surface and let it sit for about
two to 3 minutes, depending on where you
intend to put your pumpkin. Next, you may choose to
rinse the bleach off, as I did, and allow it to air
dry or gently pad it dry. As a general piece of advice, until it's time to display them. You should store your
pumpkins in a cool, dark place indoors to keep them clean and safe
from pests or animals. It's essential to prevent
bacterial growth, that's our main enemy. Be sure to save the
solution in this bottle for later because we'll be using it again in the carving lesson. Okay, now that the most
boring part is sober, we're going to move on to the
next video where I'll teach you how to make a few
simple sketches that will help you achieve
greater clarity in your project you see while
cleaning our pumpkins. We also have the opportunity to observe them more in detail, perhaps familiarizing
ourselves with our canvases in new ideas. So let's start bringing
them to life in the next lesson as we wrap up the planning
stages of our class.
6. Sketching: In this lesson, our ideas
will become shapes. Our first approach
involved taking notes, and now it's important
to keep them close as we attempt to visualize them and bring them to
the next level. As you're probably aware, you can find so many templates online on how to
carve a pumpkin. In the resources section, I included my own templates that you can use exclusively
for this class. But if you're here
and you know me, you know that I'm not
going to push you, but I'm definitely
going to encourage you to create your
own unique design. Given that this
doesn't have to be hard or super detailed at all. I think that by giving you a few tips on how
to get started. We can find enough
inspiration to carve out a unique looking pumpkin that you'll have created
fully from scratch. And then you can
proudly show it around, knowing that it's your
very own creation. In order to do that,
we're going to sketch out a few ideas before
we get our hands. As I said before,
nothing is final yet. So let your mind wander. We'll hold off on
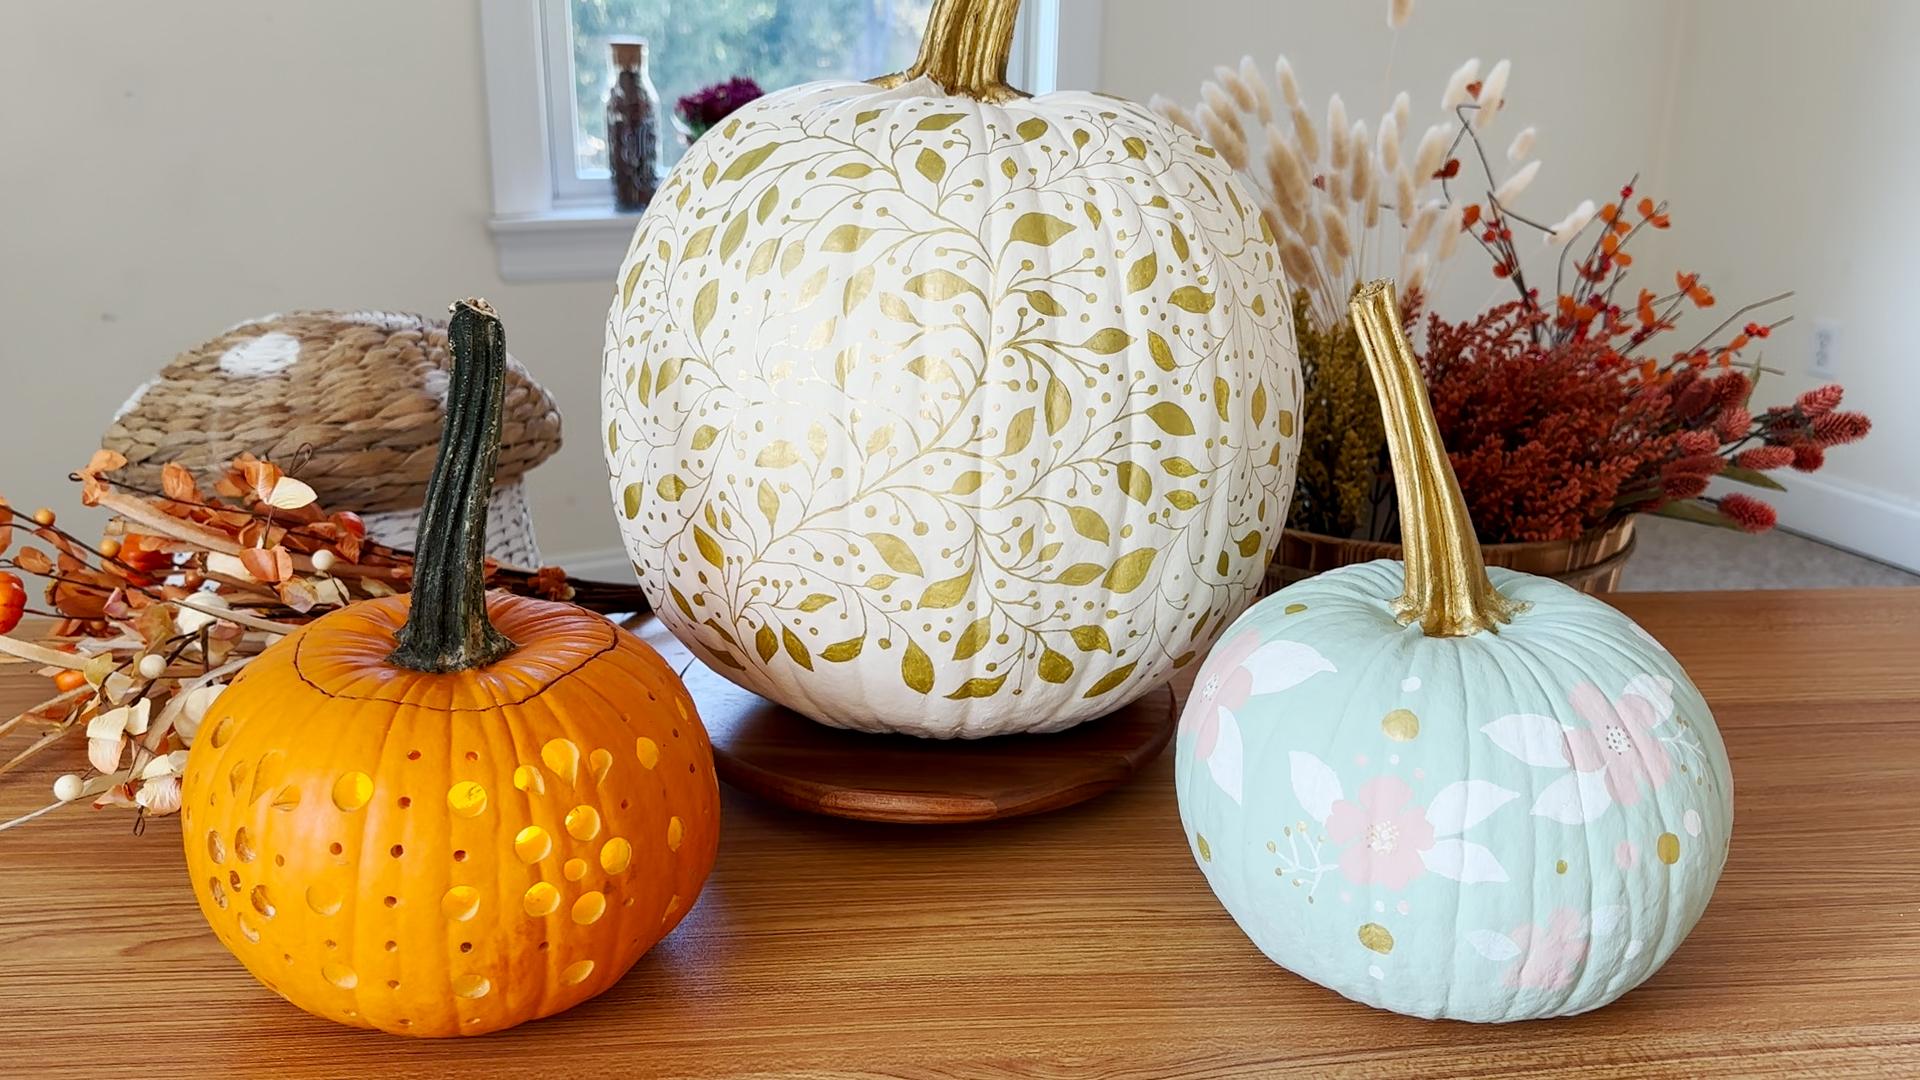
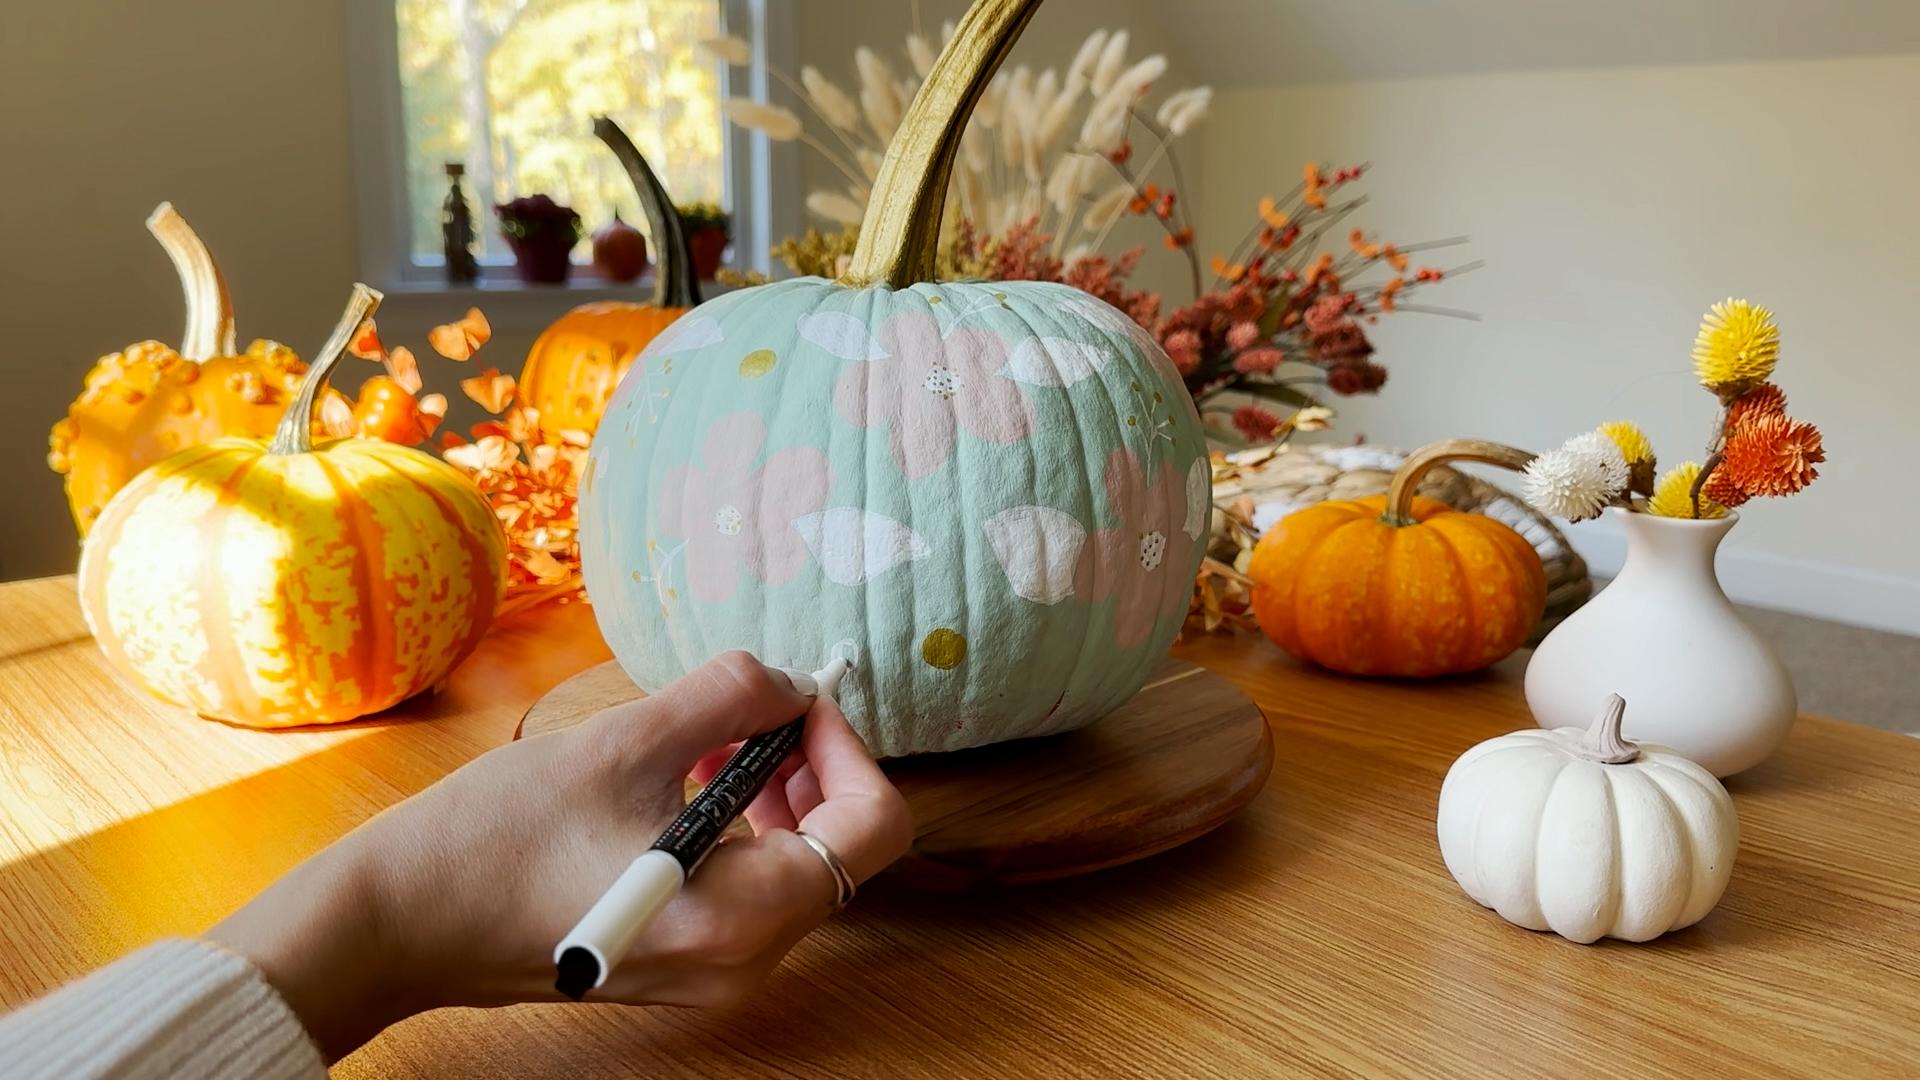
any final decisions for a little while longer. I envisioned painting one of my pumpkins with some florals, branches, and wholesome
fall elements. And I would also love
for another one of my big pumpkins to showcase
an elegant pattern. For a simpler rendition, we can gather leaves and use them as our very own template. If the leaves appear too
delicate to work with directly, you can consider scanning them or taking a picture
and printing them out. I'll teach you how
to transfer them and create an adorable
pattern on the spot. In fact, in an effort
to be resourceful, I'm going to make my
elegant looking pumpkin have a side B that
looks like this. Now, if you dare to
try free styling, but you also want
to keep it simple, we can choose a smaller pumpkin and paint big flowers on it. For carving, we can try a
small to medium sized pumpkin, creating holes of
different sizes, and maybe even try incorporating free hand shapes that
look like petals. When we get to the
carving lesson, I'll show you the
specific tools I plan on using for this
particular design. However, you may be able to
simply use your drill for it. Now, for the Halloween
special, in my notes, I wrote that I will set aside two large pumpkins and
a few smaller ones. After the inevitable back and forth that I was
talking about before, I now know I definitely want
to also paint one of them. I plan to start with a bold
Halloween lettering in the middle and create a spooky yet enduring pattern
all around it. I'm thinking ghosts, mushrooms, leaves, baths, and any other details
that I can come up with. However, my advice is to always
keep your pattern simple. Select a few motifs, tops, four or five, and then repeat them
over and over again to avoid overwhelming
the design with noise. We'll have a template for the lettering that I'll
teach you how to transfer. But for the pattern, I'll
be crafting it free style. And I want to encourage
you to try to do the same. I want to see what comes
from your own creativity. Then again, to make the most of both sides of one pumpkin, we're going to be creating a diorama on the opposite
side of the pattern. For this, I'll make
an opening with slightly irregular
edges on one side. As long as it's big, you can try whichever
shape you want. You just need to make it large
enough for your arms and hands to be able to work comfortably in the
core of your pumpkin. In case you've never
heard the term before, a diorama is a model representing a scene
with three D figures, so you can let your imagination run wild, but don't worry. We'll be going more into detail about it in the
Halloween special. For my diorama, I
want to add a ghost, a couple of smaller
painted pumpkins with some lettering and a
traditional Jacko lantern. And for an extra eerie touch, I might even incorporate a
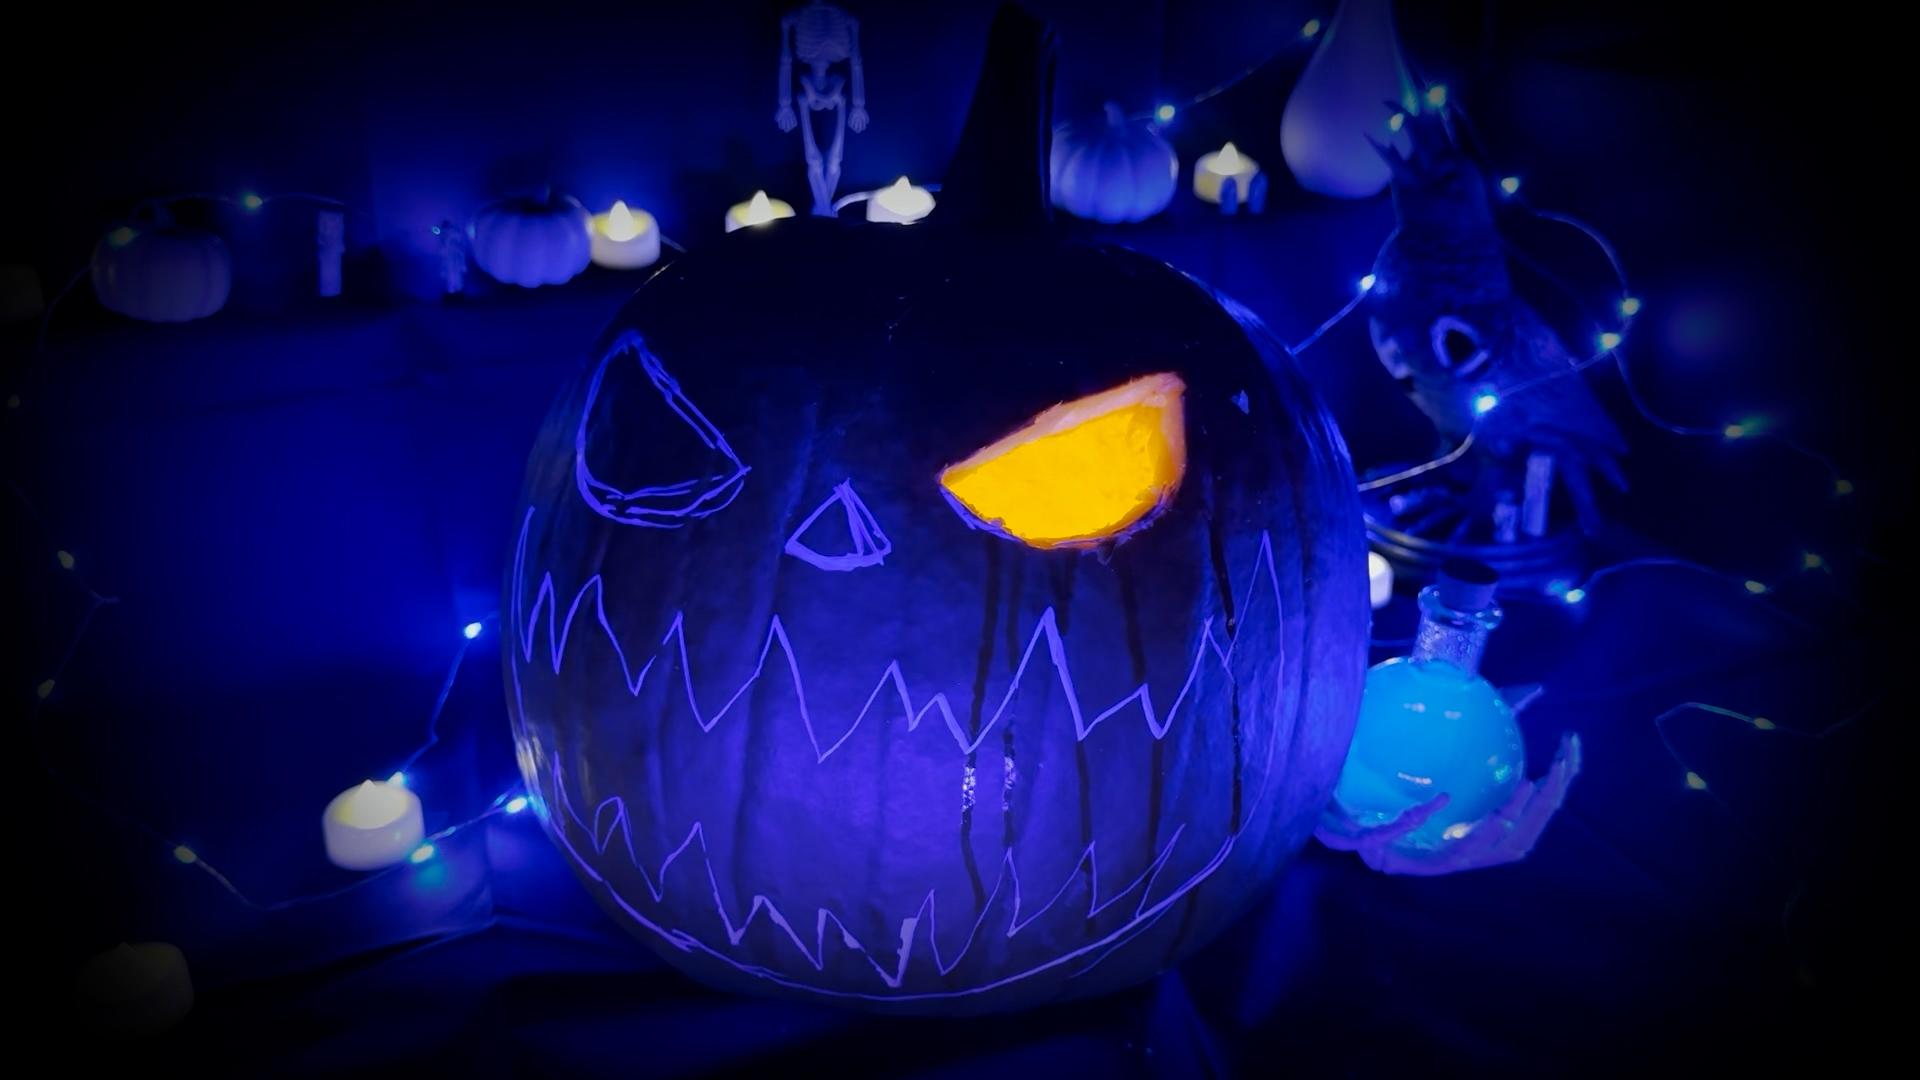
spider web in one corner. And last but not least, I must save one big pumpkin to craft the spookiest Jaco
lantern imaginable. I am picturing big, menacing eyes and a
white, toothy grin. Let's not forget
to add a few notes about the color palette
we're imagining. For the painted
Halloween pumpkin, I'll be using neon
colored acrylic markers, bringing my beloved
UV light into the picture to help me enhance
the florescent effect. I don't know if you're aware, but I'm obsessed with
glow in the dark art. This one with the florals can have a light sage background. The flowers can be pink, and the leaves can be white. Given that I aim for an
elegant look with this one, I imagine it having an
off white background with intricate golden leaves
and winding branches. The leaves on the beautiful, classic orange pumpkin
can also be white, creating a strikingly
bright contrast. Al right, this is the
fantastic way to start. Now we have a clear picture of how many pumpkins
will be decorating. I'll gather the pumpkins
I designated for carving and set them aside
for our next lesson, where we'll finally
get our hands dirty. Get ready to learn
the first step on how to carve your pumpkins.
I'll see you there.
7. Hollowing Out: In this lesson, I'll walk you through
different techniques to approach the very first
step in the carving process, hollowing out our pumpkins. Before we begin, this is an obligatory disclaimer as we'll be working
with sharp tools. Now let's quickly go over the tools you might
need for this lesson. There are kits
available for purchase designed specifically
for carving pumpkins. I got this one for
our class which includes many different carving
tools and they're sturdy. The most important tools are the double sided saw
and the scooper. When shopping for tools online, be sure to avoid flimsy
ones or those that aren't stainless steel since
they won't be very durable and might even
break as you're using them. However, there's absolutely
no need to buy anything new. The first time that I
hollowed out a pumpkin, I simply used a kitchen knife, a large spoon, and
an ice cream scoop. Because you're keeping a
bowl or trash bag nearby, depending on whether
you intend to save or discard the pumpkin
guts and seeds. Finally, it may
be helpful to use a pencil or acrylic
marker to draw a guiding path before
committing to any cuts. Just as a quick reminder, there's a PDF in the
resources section where all these
tools are listed. Okay, the first step is
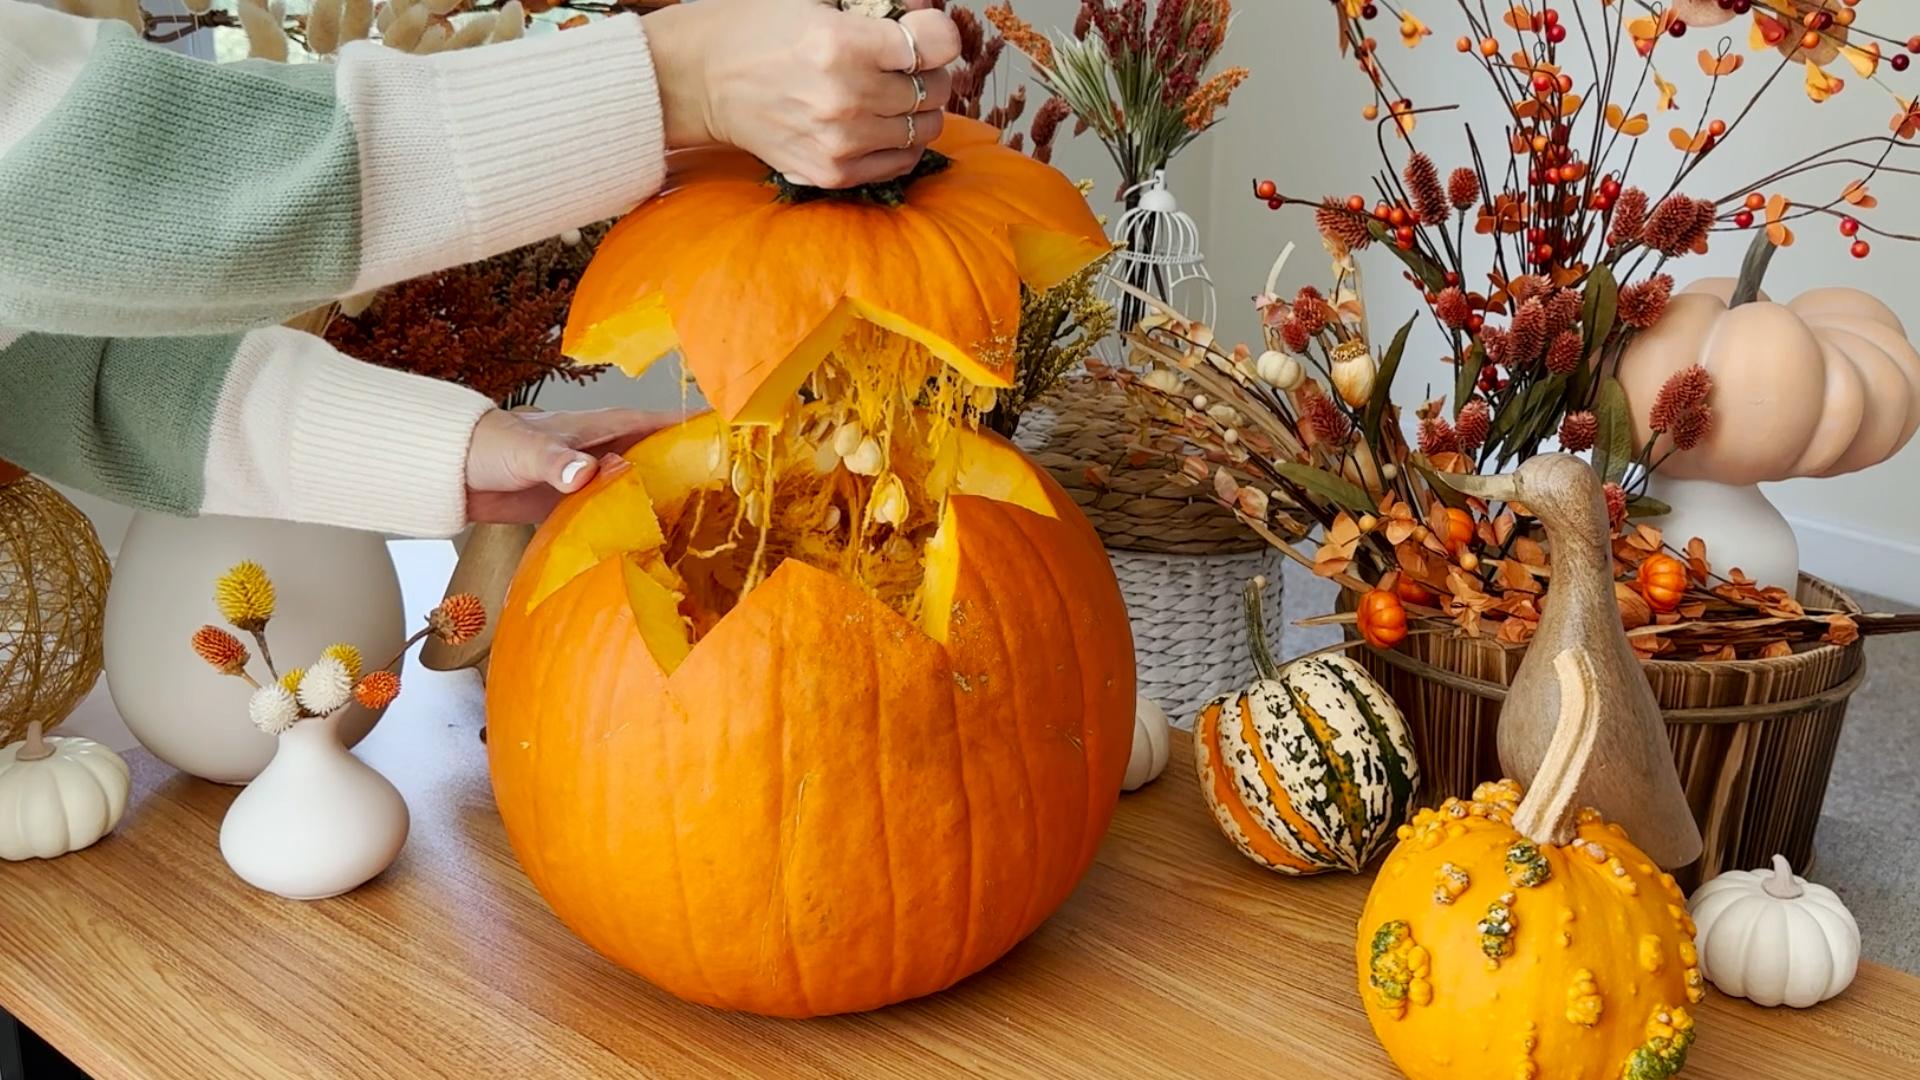
cutting out the lid. Let's take this first
approach as an opportunity to familiarize ourselves with the tools and how they feel. Before we carve
the actual design. The lid for my cute lantern
design will be circular. You'll want to make your lid
big enough to have space for your hands to move when
hollowing out the cuts. But at the same time, not huge because you want the pumpkin to preserve
its shape and structure. Plus, we don't want to take up too much space on the front where our actual design will be. To make this task easier, we can mark the path first so that we have a guide
to follow as we cut. This will also help you to get a sense of how your pumpkin slid will look before
making any final decisions. If we don't like it, we can
simply raise and start over. It's best to avoid
permanent markers, but if you use one later, I'll show you a way
to wipe it off. For now, I recommend
using either a pencil, a regular pen, or
ideally if you have one, and acrylic paint marker. Like me, I always like using hobby knives
to start creating my cutting paths gently and
work on detailed areas. I poke it, as you can see, little by little, avoiding any
possible sliding later on. Its blade won't be long enough to cut through
the pumpkins wall. That is when we'll move
on to the next tool. Be extra cautious when
using a hobby knife, as they are among the sharpest
tools you'll ever find. The safest way to attempt
this task is to use either a back and forth or up
and down motion like a saw. Regardless of the tool
that you're using, this technique will give
you better control over your cuts and minimizes
the risk of sliding, which can be more hazardous. Above all, always
take your time. This is the kind of craft where rushing won't yield
the best results. Patience definitely will keep a rag or towel nearby in
order to clean up any liquid that comes out of the
pumpkin as you're cutting for deeper
cuts in my pumpkin, if I don't have a saw, I gently position my knife in the path I previously
cut with my hobby knife. Once I'm sure the tip
is correctly aligned, I slowly push down. This will ensure that the knife goes in the desired direction. The small sauce
included in carving kits can be one of the
safest tools to use. They offer more
control due to their steady up and down
motion during cutting, reducing the risk of slipping
to practically zero. You should still always keep your hand on the opposite
side of your cutting path. It's a rule I cannot
stress enough. We should now attempt
to remove the lid, grab the stem, and
start pulling. If it won't come
off or seems stuck, make sure you have
cut all the way around the lid and
through the pumpkin wall. Depending on how
you make the cuts, especially if your path is more complex or involves
sharp turns like mine, you might not have gone all the way through or reached the tips. Carefully retrace your
cuts and attempt to gently pull again until it comes free For the diorama where I don't have a
step to pull from, I'm going to use a
knife or even the back of a spoon as a lever or pry bar to help myself open it up and be able to separate
this piece from the pumpkin. You can refine your cuts
after removing the lid. For example, the doorway
of my diorama pumpkin has a few rough areas that can be smoothed out using
my hobby knife. At this stage, since their
front will be exposed, it's a good idea to spend
some time refining the edges. Now, I'm going to set the
lit aside for a moment and guide you
through the process of hollowing out your pumpkin. I'm not even exaggerating
when I say that. The first time I attempted
to hollow out a pumpkin, it was the lengthiest
and most tedious part of the entire process because
I did it 100% by hand. Can you believe that?
Not to mention, my arms weren't too
thrilled about it. With time, I learned
a valuable tip that makes this task 1
million times easier. You can use a hand
blender to loosen up the pumpkin guts
before you remove them. To do this, we'll
switch things up a bit, and in my case, I'll be heading outdoors as it can
get a little messy. Keeping your hands safe, start blending the
pumpkin center and the areas all around the walls
as thoroughly as possible. I decided to work
outdoors for this, to prevent any pumpkin bits from flying all over the place. Additionally, I
recommend wearing comfortable clothing
that you don't mind getting stained
for this same reason. Once that's done, it's time to get a scooper or a big spoon, in order to properly
hollow your pumpkin out. For larger ones,
take your time and scoop out all the
contents gradually. If it's a smaller pumpkin, you can simply turn it
over and allow most of the loose interior
to fall into a bowl, making more room
to keep hollowing. Essentially, you'll
want to remove any bits that look a bit like
a darker shade of orange, that are mushy and soft. We basically have
to keep scraping the inner walls until
they appear pale and dry. Don't forget to also scrape
off the lids bottom. After you're all done with
the hollowing process, it's time to disinfect
your pumpkin again. As we did earlier, every time you make a new cut, I advise you to scrape
off anything that became loose or remains hanging
and disinfect once more. This method has
proven to be the most effective for me when trying
to keep my pumpkins fresh. Making them last as
long as possible. Now it's time to finally unlock the joy of carving
your pumpkin design. Join me in the next video as we continue exploring
this wonderful craft.
8. Carving Craze: All right, now for
the actual carving. Finally, in this lesson, I'll teach you one of
the methods for turning a pumpkin into a
true work of art. These are the tools
that I'll be using. We have this set
of hole cutters, oftentimes used for
pottery or clay. And the tool to remove the pumpkin beds that make
it stuck inside the cutters. For this, I'll use a tool
that came in a nail art set. But whatever you can find to use for the same purpose is fine, but avoid short objects to
prevent accidental cuts. Alternatively, you can
achieve similar results, carving your pumpkin
using an electric drill. I know that not
everyone's cup of tea is a scary jacko lantern. The first design we're
going to attempt to carve together is an
adorable looking one. You might be wondering, how
on Earth do I create this? Well, the great
thing about dots or holes is that when alone, they are among the simplest
shapes you can think of. But when they come together, they can create a
stunning effect, especially when the
pumpkin is lit. Now let's think of it this way. Our canvas is a pumpkin, right? Even though it
presents a challenge, because its surface isn't flat, there's a very clear advantage. It comes with a natural grid. You see these
ridges and grooves. We should definitely
leverage them. We're going to start
working along this groove. You can choose to go ahead
and start carving with me, or if you prefer, use a marker first to
create a carving guide. Whichever option makes you
feel the most comfortable, pay close attention
to my technique as I gently insert the tool using
a slow circular motion, almost as if I'm screwing in the tool rather than
pushing it in directly. We'll alternate between
small and medium sized dots. Ideally, keeping the spacing
between them consistent. It doesn't have to be exact, but it's better to have
them a bit farther apart than a bit too
close. For this reason. When doing this for
the first time, it may be preferable to make all your markings first
and have a path to follow. This gives you the flexibility to change whatever
doesn't look right. If you feel like your
pumpkin isn't stable enough or it keeps
shifting while you work, you can place rocks
or some weight inside of it to keep it steady. You can use a supportive base. Okay. Next we'll imagine
a line along this ridge, the left of our carved path. I'm going to make
it a cute column of uniformly tiny holes. I think this will give our
pumpkin an elegant touch. Now I want to mix it up and
add a flower to our time. We'll begin by creating
a central circle, then use the medium hole maker to mark circular
shapes all around it. Take note of how I'm holding the cutter as
perpendicularly as possible against the pumpkin to ensure
the circles are precise and carved inward and not
diagonally or to the side. This will make it easier
for us to achieve a more polished outcome later. Place a candle inside
our carved pumpkin. We'll enjoy fully illuminated
circles preventing any unintended view of the interior walls or any
obstruction in the holes. Now with the tiny cutter, I'll add delicate accents
resembling polka dots, sprinkling them all around. As you can tell, my
method for carving this design is a
result of making conscious decisions
and following a structured approach that
I'm developing as I go, rather than randomly adding
dots wherever I please. As you can see, these
rules are very simple. But the most important thing
is that they're intentional. You don't know what to add next. Sometimes jumping ahead
to a predictable step gives you the time to find inspiration to
solve your problem. As I'm framing our flower
with a new column, I'm allowing the
design to guide me. Revealing empty areas that need my attention and determining the best shapes to fill them. Allow me to share two
crucial tips to keep in mind when you're
working on your pumpkin. Be careful with the spacing
between cuts and holes. Giving your shapes some
breathing room is key. If you carve them too close, you might accidentally merge them or create larger
holes than you intended. While there are
certainly ways to rethink and fix your design, it's still good practice to
space your shapes apart. For a cleaner and
more polished look, be mindful of what needs to
stay and what needs to go. Depending on how
intricate your design is, some things may become
tricky to distinguish. My advice is to somehow try
to mark what's positive. In other words, what
should stay so that you only carve out what's
negative or what should go. All right, now it's time
to decide what to add. Next I find the shape of this cutter very interesting
having this angled edge. It inspires me to take things up a notch and create a few
petals in this area, but I can't really mark
them well this way. The way that I can
recreate the shape is by cutting the pointed end of the petals with my hobby knife. And then complete the shape by carving a hole the usual
way with the cutter. Some safety tips. When using sharp tools, always above all things, prioritize the possibility of messing up your pumpkin as it is fixable over jeopardizing
the integrity of your hands. You see whenever you're
cutting or carving something, the resistance suffered
by the material, whether it's wood or in
this case a pumpkin, can be highly unpredictable. Even when we think we can control where the
cutting tool stops. Most often than not,
it won't stop exactly where we aim to be 100% safe, we must always place our hand on the opposite side
of the cutting path. These more intricate
shapes will demand a bit more time
when you're trying to remove the carved remnants. Fortunately, my pumpkin
is fairly small, which allows me to keep readjusting its position
when I need to, and even push the excess bits out from the inside
when they get stuck. I know these petals are a bit
more challenging to make. Feel free to skip
them if you prefer. I just felt like adding
a bit of a twist to the design by going
free hand for a minute. Remember, whatever shapes
you decide to add, you can always draw the
outline first with a marker. To make things
easier for yourself, we'll keep alternating
between columns with either simple shapes or
more involved motifs. Before you know it, our
pumpkin will be fully carved. As you can see,
establishing a method and setting some basic guidelines,
like in this case, focusing on the groups
and ridges to tackle one column at a time made our
task way more manageable. We simply broke it
down into steps. And that design that may have seemed out of reach
in the very beginning of the lesson now became something that you can
definitely tackle. Now it's time to disinfect
our carved pumpkin. First, remember to
scoop out whatever fell from the walls
into the pumpkin and refine whatever
is hanging inside the cuts or clogging the
holes, Scrape everything out. When the pumpkin
looks pale and dry, we'll spray our water
and bleach solution inside and on the surface. Paying special attention to
the holes we just carved. Let the solution sit for 5 minutes and allow
it to air dry, or you can also pat it dry. This time we won't rinse off the solution as we want the
bleach to work its magic. By the way, if you're planning on leaving your
pumpkin outdoors, there are many
things to consider. One, it's advised to not leave in full sunshine or
freezing temperatures. Two, keep it from getting wet. Three, keep it out of
reach of curious animals. As you might be in for
an unexpected surprise, look at what happened to my Jack O' Lantern a
few years back. Plus, if you definitely want your pumpkin to be in
good shape for Halloween, you should not do this
to far in advance. In fact, you may want to
consider revisiting this lesson the day before Halloween to ensure that your pumpkin
is as fresh as possible. Depending on how well you
follow the preservation steps. Once it's carved, it'll
last for up to a week. But more realistically,
in my experience, they tend to last for about
three to five days tops. Now that we've mastered
the art of carving, let's move on to the next video, where we'll immerse
ourselves in the world of pumpkin painting.
I'll see you there.
9. Simply Painting: Now, if you hate the idea
of carving, scooping, hollowing out, and the whole
mess that comes with it, this option is for you. This way we can get a bit more
involved with the designs, since these pumpkins
should last a lot longer than the carved ones. On the flip side, if you loved our carving lesson and can't
wait to dive in further, you can take your pumpkin
to the next level by incorporating some of the painting techniques
I'll be teaching you. Here are the tools we'll need
for our painting lessons. Acrylic paint, all
types of brushes, a pencil, transfer paper sealer, which is optional,
and gathered leaves. We're going to explore
three design options in the upcoming lessons that
cater to all skill levels. It just so happens that my pumpkin got damaged
on the right home. First I'm going to
teach you how to fix the damaged stem in case
this happens to you too. I found the broken
pieces and simply used Gorilla glue to
put them back in place, making sure to cover the cuts. In most cases,
they'll just dry out. But just to be safe, I sprayed my stem with our water and bleach
solution and let it air dry. A couple minutes, I've decided to start with
this extra large pumpkin. I found it happens
to weigh 21 pounds. Can you believe that
considering its size, I thought that
painting it might be a more convenient
approach compared to the heavy lifting
that carving it would involve to make the
most out of it, I'll be giving it two sides. Side A will feature
a more simple, yet adorable design inspired by autumn leaves that I gathered
during my morning walks. And I'll save side B for a more elegant and
sophisticated look. Some people advised to use a eiler before and after
painting your pumpkin. This becomes
particularly important if you plan on
displaying it outdoors. I, unfortunately,
could only find eilers that had toxic chemicals. I prefer to forego using them. Let's start by applying a single coat of the
background color on side B. This way we can let it dry while working on side A
and save some time. We'll need to apply a
couple of coats at least, but let's still make sure that the first one covers
as much as possible. We're skipping painting
the stem for now, because as we tinker with a
pumpkin and shift around, we'll need a dry spot to hold onto while everything
else dries. For now, we're going to avoid working on the very bottom of our pumpkin to prevent
any smudging we do. The paint may come
off while we're working with all the
shifting around and whatnot. This first design has been thoughtfully tailored
for beginners. I specifically included
a template for your convenience in
the resources section. But as I always say, I
want to encourage you to instill your very own
ideas into your creation. Let me show you how in this class I'll be demonstrated
my preferred method, which involves using
transfer paper. For this specific design, we'll use gathered leaves. But since they can
be quite delicate, I'll scan them first instead of using them directly as stencils. You don't need any design
software to do this. Simply arrange the
leaves directly in your scanner or in a plain white sheet of
paper for good contrast. Scan them or take a picture, then you can print out
the image a few times, alternating between
regular and smaller sizes. This will create a whimsical and eye catching pattern
for your pumpkin. Now we'll bring it
to life on the spot. Allow me to guide you
through this step by step. First, we'll cut out one of our printed leaves
and a piece of transfer paper that's slightly larger to check which side
is supposed to face down. Run your finger
across the paper. The side that leaves
some residue is the one meant to be placed
against your pumpkin. We're going to use some tape
to secure this in place. Next, we'll tape one of our
printed leaves on top of it. I'm going to use my mechanical
pencil for this transfer, but a pen may work even better. Depending on the surface
of your pumpkin. Some lines may fail to
transfer completely. But this looks like a
clear enough outline for us to be able to paint. I chose this spot
deliberately with the purpose of covering up
this texture on my pumpkin. Take a minute to
observe yours and determine where you can
apply a similar approach. Now let's see which
leaves we can use next. We're going to be selecting
some of the smaller ones. And start arranging
them in a way such that the leaves float
together in harmony, creating a pleasant
composition to look at. You can follow my
lead this time. As I show you how to
put this together, exploring the rules
of composition and the delicate balance of
negative space will be a common theme throughout this class and we'll explore it from many
different angles. Dots always help be filling the gaps that may emerge
as I'm adding more leaves. But notice how I'm still very mindful of the
spacing among them. We can start painting now. Typically, I recommend
starting with a marker or a fine
tipped brush to take care of your outlines first and then proceed
to filling your shapes. Oftentimes, it's tempting to
just fill them in As you go, feel free to follow the approach that's more appealing to you. The smaller leaves
may pose a bit of a challenge and demand
extra patience. But with the right mindset, the shapes I chose
for this design are overall quite
manageable to paint. Once you've applied the initial
code to all these shapes, let them dry for approximately
ten to 15 minutes or until they feel
right to the touch. After that, we'll carefully
give them a second coat. If you notice that
the bottom layer is being removed as you
resume painting, it's best to let it
dry for a bit longer. Now, we're going to allow
our second coat to dry. I only needed to apply
two coats to mine, but feel free to add as
many as you believe are necessary to achieve
a uniform color. We're going to continue to add a few more leaves using
our transfer paper. As you can probably tell,
I'm repeating them. But the way that I'm adding some variety is by changing
their orientation. Here I'm going to free hand
an additional element, a little branch with fruits. I've noticed at the end of this leaf ended up too
close to my branch, I'm going to wipe
off part of it. Oftentimes, this
is why I choose to alternate between
transferring and painting. It helps me better visualize the areas that require
balance in my pattern. Outlines alone cannot possibly
reveal the final contrast. I can only identify those issues once my shapes are
completely filled in. As you transferred their leaves, you may have inadvertently lost some of the features
that make them unique. You can take a moment to
look at the outline of your leaves more closely and
identify these features. By doing so, you'll be able to recreate some of your lost
details in your pattern. It's steps like these
that are essential for infusing your creation with
a touch of personality. This, in turn, will
set them apart from the rest using brushes with either longer or finer
tips for the outlines, allowing me to proceed with a slower, more
meticulous approach. When it comes to
filling in the shapes, I opt for brushes
with wider flat tips, which enable me to
pick up my pace. This leaf type is one of my
favorites during my walks. I always find delight in seeing them scattered
on the ground, forming a carpet
underneath my feet that seems to have come from a
magical world of illustration. So we'll continue
painting our motives until we completely cover
this half of our pumpkin. Once our pumpkin is
fully dry all around, we can apply one final coat, gradually covering the bottom of side B until the orange
is barely visible, but no need to obsess too much trying to
completely hide it, as this part of the
pumpkin is typically not in view while
allowing that to. We're going to work
on pumpkin number two in the next video.
10. Freestyle Painting: In this lesson, we'll explore the art of freestyling
our pumpkin embracing creativity and using only a few basic
motifs and shapes. For mine, I'll be using
acrylic paint for the background and acrylic
markers for the shapes. Let's kick things off by
working on the background. I chose this gorgeous
light stage, one of my all time
favorite shades. In my color palettes, it's hard for me to not use it. Your choice of paint will
be entirely up to you, but I always go with matt. It imparts a warm and cozy aesthetic to
anything you create. Glossy finishes,
oftentimes remind me of mass produced items, but remember it's all about
your personal preference. I'll allow this first
code to dry for about 30 to 60 minutes before
applying the second one. You can repeat this
process as many times as you need to achieve a
fully opaque background. Be sure to let it
dry between codes. That's why I love working on multiple projects
at the same time. I never have to wait
before I know it, the background will be dry for me to move on
to the next step. We'll start with a
simple gold dot. I very much enjoy how much control markers give
me when drawing my shapes. But you can, of course, feel free to use brushes
if you prefer. The notes I added to my sketches say that apart from
the light sage, I'll be using gold, pink, and white
for this pumpkin. Remember, limited palettes
will always be more impactful. Next, I'm going to start drawing the first flower using my pink marker right
below this dot. We're going to embrace
our freestyle approach, but that doesn't mean that we shouldn't follow any
rules or guides. We still count with the
pumpkins natural grid as a very helpful reference. From here, I'm going
to add some leaves on both sides of the flower
using a white marker. As I go, I'll add dots where I think there are empty space
that requires my attention. Why not create a small
branch down here? Then we can also include some gold accents
where we see fit. Still following
the vertical line provided by the Pumpkins Ridge, I'll add another gold dot here and scatter a few
white ones strategically. My goal is to not make
this design super busy. Let's add the next flower
way to the side and closer to the top to make the structure of our
pattern more dynamic. As you can see, I
always start with the central flowers and then I add leaves and
branches around it. These are some
basic rules that I set for myself on the spot. You can call them excuses. They make it easier to create a pattern that's
pleasing to the eye. You see our eyes naturally
seek order within complexity. This is what distinguishes a well designed composition from a simple and
structured sketch. Well, we're free
styling our creation and not adhering to any
predefined template. We're still making a
deliberate set of choices. By intentionally
using specific shapes and placing them
in specific spots. This will ensure your work
of art remains cohesive. But you can, of course,
give yourself permission to diversify one or two of
your rules like I did here, adding a pink dot alongside
the golden white ones. Once you've got the hang
of your own process, you can take it a step further
by introducing layers, making your workflow
even more efficient. First, we can draw all of the pink flowers all
around the pumpkin. Positioning them
higher or lower. Create an engaging composition. But remember to leave enough
space for the leaves. White comes next as
our second layer, and that means leaves, branches, and the central
elements of our flowers. Our third layer will be gold. We're going to draw
all of our dots. At this point, we can step back and see
the bigger picture. Understanding where we
can find empty spaces, that needs some attention. This, for instance, is a
great example of that. This area is so empty, I've decided to
add another flower to keep the pattern
flowing consistently. These are part of
our negative space and it's crucial to give
them some consideration. Don't get me wrong,
this is very much not mean covering every
single blank spot, but rather focusing
on the areas that are noticeably emptier when viewing
the entire composition. What catches your eye then? I'll just intuitively
add polka dots all around where my eye
thinks there's an anomaly, but I won't overdo
it after that. When we feel there's a
good balance between positive and negative
space will be all done. Now is the right time to add
some color to your stem. I decided to stay true to my initial notes and
painted mine gold. Crafting a well
balanced composition is a skill that takes
some time to master. If you need any
help, please don't hesitate to reach out in
the discussion section. I'm here to help.
If you're ready, I'll see you in the
next video where we'll work on site B of
our larger pumpkin, giving it a very intricate
and elegant look.
11. Intricate Painting: All right, this
design is going to be significantly more intricate compared to
the previous ones. Don't worry if it seems
a bit out of reach. This lesson is primarily
designed for advanced students, but you're always
welcome to join. You can follow along and adapt the steps to your skill
level or simply have fun. We'll continue with our
freestyle approach, but the good thing
is that we'll start by sketching our
paths with a pencil. This way the process will
become way more manageable. It serves as a helpful guide before we introduce any paint. After allowing the background
color codes to dry, we're going to
attempt to sketch out a pattern filled with
winding branches, leaves and fruits inspired
by the wind of the fall. To begin, I'm going to draw
an organic and winding line, letting my hand take the lead. At the end of this line, I'm going to add a delicate
leaf just below it. I'll introduce a few small
branches with fruits. From this point, I can extend the new path upwards
and end it with another leaf and keep
branching out left and right. Alternated between
leaves, branches, and fruits wherever I see fit here. My mechanical pencil messed up, it scratched the
acrylic paint a bit. I'm going to grab a small
brush to touch it up. If at any point something
doesn't look right to you, you can apply this same method, given that using an eraser can be a bit challenging
with acrylics. As I mentioned before,
I'm following a set of very simple rules to maintain
cohesion in my pattern. As I go, I keep
negative spacing, check striving to maintain the spacing between
new shapes consistent. I think I'm happy with
what I have so far and I'm eager to introduce a bit
more contrast to my design. I'll move on to painting it. I'll be using a
very fine brush to carefully trace my lines
with gold acrylic paint. As I had pointed out in my, a thinner brush is an excellent choice for
outlining intricate shapes. And afterwards filling them in with color becomes a breeze. It's a good idea to
paint from left to right to avoid any
unintentional smudging. Or from right to left if you're left handed, as the case may be. I would like to try
one little thing over here and I'm going to use
my light stage color, potentially giving my
pumpkin a dual shade. Don't be afraid
to grant yourself some flexibility because
worst case scenario, you can always paint over it. As I started working
on this design, I was using brushes
while waiting for my gold acrylic
marker to arrive. But upon its arrival, I decided to switch to markers for a linear
design such as mine. Markers offer a way more comfortable and
convenient approach. It's all about
considering the nature of your design and what is
more fitting for you. For instance, if
your design features larger shapes brushes may
be the better choice. I'm retracing over the
gold areas I previously painted because the shade of my marker is
slightly different. Occasionally I've
decided to place my pumpkin on its side to
make myself more comfortable, as this can be a bit of
a time consuming task. Because the back of this
pumpkin is painted. I place the cloth to work as a cushion between the
table and the pumpkin. While the paint is, of
course, dry by now, I still want it to protect
it because it's not sealed. In my case, it can potentially be scratched
off very easily. Take your time as you
cover all of your shapes, I hope you'll find this
process as therapeutic as I do now is the right time to
add some color to your stem. In the end, I made the deliberate choice to
give up on the light stage. I maintained an
all gold design to achieve a consistently
elegant aesthetic. It's so nice to try
things out and grant your creativity the freedom for that back and
forth exploration. I keep mentioning testing different approaches
and seeing what works and what
doesn't for yourself, will ultimately lead
to better results. At the end of the day, that's
the best way to learn. At this point, I'll
start painting freehand, as I have already established the logic that works
well for my pattern. Now I simply have to extend
it and expand it sideways. There you have it. Our
pumpkin is all done. We turned it from
a simple pumpkin into a remarkable work of art. You now have the flexibility
to put it on display, alternating between sides
depending on your mood. Maybe side for whimsical days
and sight for fancier ones. Whether you choose side for the daylight and side
B for the evening, the choice is entirely yours. Before diving into
our next adventure, let me share a little
secret with you. If you know me from social media and you've seen my style, you might be
surprised when I tell you that I'm a fan
of horror movies. For many, it remains
a mystery how I'm able to both love the
charming world of cute illustrations
while harboring such a deep fascination for
the dark realm of horror. If you're a true
Halloween fan like me, I'll see you in
the next video for a truly spine chilling lesson.
12. Halloween Special: In the shadows and whispers
of the spellbound chamber. We're about to embark on a
chilling journey together. Whether you're a true
or fan like me or just dipping your toes into the
dark waters of the unsettling, I bid you a dreadfully
warm welcome as we carve our own finished
slice of Halloween magic. As we delve into this
haunting Halloween special, we shall immerse ourselves
in the realm of horrors, untold carving, pumpkins that will invoke shivers in the bravest of souls. Gather your courage for our journey into
the abyss begins. Now flipping through the book of
Halloween secrets, I found the perfect recipe
to commence our request. As we ease into the shadows
of this wicked ride, our first stop will involve carving a traditional
jacko lantern. All right, let me adjust
my voice for this. We'll be using a
small pumpkin and a carving tool set. You
know the drill here. First we'll outline
the path for our lid. I like making my jacko
lantern lids spiky. Next we'll select a saw. You'll notice that the one that I'm using is a double saw. The tip makes it
easy to position your tool precisely where
you want to begin cutting. Then you can simply hold down the pumpkin by the
top and cut slowly, employing a gentle
up and down motion while keeping the safety
of your hands in check. Then with the scooper, we'll scrape the walls
hollow in the pumpkin out. As we did earlier, we
won't count with a lot of room to work this time due to the smaller
size of our pumpkin. This, on the flip side, means the process
won't be as time consuming after
completing each step in a hollowing out process, including cleaning
and disinfecting it, we'll attempt a standard
jack o' lantern design using an acrylic marker. I'll start drawing the ice
in a triangular shape. This way I'm using this marker because it allows me to refine my design until I'm satisfied. I can even retrace and
overlap some lines, knowing that I can easily
wipe them all off later. Now we'll shape the nose
and craft a big smile. Let me add a few teeth now. To be honest with you, I'm not entirely satisfied with
the way that it looks. Let's give it a second try. The beauty of drawing first
is that it allows us to reconsider our design before
making any permanent cuts. I'll take a damp rag, slightly moistened with water, and I'll start all over. Okay, now let's do
the smile first, perhaps this is a
better approach. Remember, it doesn't
have to look perfect. This is a preliminary sketch. Again, use as many lines as you need and wipe off the
ones that you don't like. As I finalize my lines, I'll identify the ones
that will serve as my cutting guides and
make them thicker. Next, I'll experiment with
the tools that came in the carving set originally. I thought that these tools
would give me smoother cuts, but at the end of the day, it turns out that the saw offers both better control
and precision. I'm going to cut carefully
along the marked lines, then I can push out the
eye from the inside here, I'm just marking the
boundaries of the eye shape. Then with the saw, I'll follow the white outlines
from dot to dot. This eye came out no problem. All right, Next, the nose, I had to shift my a bit of path in order to place
it between the eyes. As for the mouth, same deal. I'll just be a bit more patient because there are a lot of
directional changes involved. However, as you can see, I'm always cutting away
from my other hand. You can of course, position
the pumpkin however you want to help achieve the most comfortable and safest
position for you. Bear in mind, you may need to go over the paths a few times. If it becomes easier for you, you can even cut it in pieces. Finally, we'll push it out. Don't worry if it doesn't
come out in a single piece, we will no longer need it. So we can just discard it. There are only a couple
of things left to do now, wipe off the marker
residue using a rag. And use the carving tool to
get rid of some parts of the inner walls that may be still visible from the outside. We want these holes
to be cleared up in order to have a spookier and
brighter lantern later on. As usual, don't forget to
scrape off every bit of remaining inner walls and pulp that may have come free
during the carving process. Additionally, spray the inside with your water and
bleach solution. Now that we have
accomplished endeavor, our next stop in this strain
of terror will be taking your carving skills up and
notch to a whole new level. It's finally time for the most terrifying chapter in my book of Halloween secrets. Crafting the most spine chilling Jack o'
Lantern imaginable. Let us channel that
childlike wonder, the peculiar fondness for the eerie sounds that
haunt our nights. You already know
how to get started. Allow me to share a
few chilling tales as I begin to craft
the spooky pumpkin. One of the first
images that springs to mind is Cobot Crane and
the Headless Horseman. As a child, I watched the
cartoon version over and over, and could even recite
the dialogues. If you had told my younger
self that as an adult, I would live not too far away from the actual Sleepy Hollow, I would not have believed you. Why not draw inspiration from
that wicked pumpkin that the headless horseman clutched as he rode his spectral horse? I also intend to make this chaco lantern as sinisterly toothy as possible as a tribute to the ghostly echo of
a late night terror, the likes of which will send
shivers down your spine. I woke up heart pounding, drenched in cold sweat. To this day, I vividly recall every single detail in
that ominous dream, I entered the room where my
family and I kept our books. The air thickened with
dread as I hesitated, paralyzed with fear, I did not want to take
another step into the room. Then without warning, I saw the very penny wise jump
at me from the shadows, then darkness pitch black. As I slowly turned my head to the right,
shaking with horror, my eyes fell upon what
I was dreading to see in the corner of the room, on the floor, skeletal
figure with hair. With panic, I realized this was my very own outcome
in the physical world. This could only mean that
the person who was observing the petrifying scene
from the other side of the room was in fact me, but in spectral form. Now, the mere memory of it all left me sleepless for
many haunting nights to come. Did I just make my
pumpkin cry with my scary tail after
prying the eyes off? It looks like our Jacko lantern has a personality already. I'm using my hobby knife, as I did before, to start
marking shallower cuts. And then I'll move on
to the kitchen knife. I've discovered
that by puncturing the start and finish
points of each path first, it's easier to control
the length of your cut. Take a look at how I
sharpen the teeth, crafting them slowly
and always safely. Notice how my other
hand is holding down the pumpkin and nowhere
near the cutting tool. This will take some time
because the pumpkin size is substantial and the walls
are thicker than usual. That's why I transition to using my serrated
knife directly. Now remember to place your knife as perpendicularly as possible against
your pumpkin. Afterward, I gently apply an
up and down sawing motion, working on one tooth at a time. If it helps, you can put
your pumpkin on its back. As you do this, allow yourself to make the cuts straighter than your initial drawing later. You can polish them into shape using your hobby
knife if you wish. All right. It's time
to wipe the ink of those teeth and carefully
go over your cuts, ensuring you've reached
all the corners. Now for the big moment, let's reveal that big,
glowing, toothy smile. Congratulations. Now you
have the skills to make a spine chilling Jago
lantern all by yourself. You can make it glow by placing tea lights or battery
operated candles inside. These options are
much better than real candles for many
reasons. They are safer. They last longer and
they can be brighter without sacrificing the flickering ambience
that candles provide. You can get the ones
that offer that effect. Using these alternatives will help you preserve your
pumpkin better as real flames can potentially cause it to deteriorate
from the inside. Now let's get back on our spooky ride down
these erie tracks. Our next stop involves a hauntingly painted pumpkin
that glows in the dark.
13. Glow & Paint: Welcome to our Painting
in the Dark Quest. In this lesson, we'll be
exploring how to make our pumpkin glow even
brighter in the dark. For this demonstration,
I'll be working on side of the pumpkin I previously carved for
our upcoming Am scenes which you'll find
in the next video. First, let's go a bit over
the use of transfer paper. I'll be transferring the word Halloween onto the center of my pumpkin using a
custom lettering piece I've designed exclusively
for this class. You can find it in the resources
section to follow along. These steps will be pretty similar to our first
painting lesson. Let's review them in case
you skipped that one. To help visualizing the
placement of your design, you can quickly estimate the
templates position like so. Visually, we'll start
by cutting a piece of transfer paper that's roughly
the same size as our ward. A bit larger would be best. Just make sure the side of the transfer paper that will be against the pumpkin contains
the transferring dust. We'll secure it to the
pumpkin using painters tape, placing it somewhere
in the center. We'll take our template on
top of the transfer paper. Feel free to reposition it until you're satisfied
with its placement. Next we'll use a ballpoint pen
to trace over each letter. We'll want a round or tip to avoid accidentally piercing
through the paper. Trace one letter at a time. Making sure to cover
the entire surface of each letter,
especially the outlines. It's important to find
the right balance between gentle and firm pressure
during this process. If we're too gentle,
it won't transfer. Before you begin,
I recommend trying this out with a small
random shape in a different area of the
pumpkin in order to gauge the pressure required
for a successful transfer. Few things are more
disappointing than discovering that many areas
didn't transfer well, once you remove the template, it's also not advisable to
peek behind it while you work, as even the slightest shift
can ruin your progress. Okay, now let's see
how this turned out. It's looking pretty good. Don't be too concerned about the residue powder
around the letters. This is perfectly normal. We can carefully wipe
off around it as much as possible using
a lint free rag. After using tracing paper
to transfer our template, we don't want our design
to be easily wiped off. Our next step will be to
actually paint these letters. We're going to use a white
acrylic paint marker this time to trace
silver Halloween. If you happen to stray
off course, no worries. You can make corrections using a tip toothpick or
as I'm doing here, a mechanical pencil with
the lead retracted. Do you remember when
my pencil messed up the background of
my elegant pumpkin? Well, now it's helping me
refine my letters. Go figure. Now our central
design is complete. Next we're going to free hand a spooky yet endearing pattern, embellish our artwork as
per my initial notes, I'm going to go with
a few basic shapes and place them in repetition, strategically around
my lettering. I'm starting with a ghost here, taking the opportunity
to fill this gap between H and L. Keeping
negative space in check. Notice I'm leaving some breathing room between
shapes though. Okay, let's give this
neon orange a try now. Why not make a pumpkin
for our next motif? This will nicely address the gap To the right
of the letter L, I'll come back to give it a face once the
paint fully dries. Next, I'm adding a cloud
shape above the pumpkin that will work as the background
for a spooky expression. Later on, I want to add
a maple leaf right here. Okay? I think we can start
repeating some shapes now. I'm going to add another ghost. When everything
dries, I'll tackle the second layer for all the
shapes that we have so far. I needed to make
my pumpkin motif slightly larger to accommodate
it smile properly. This is one of the
reasons why it's so important to leave some
room between shapes, not only for aesthetics, but also for these
practical adjustments. For my initial attempt, I used a Sharpie, but it lacked the contrast
that I was seeking. I switched to a
black acrylic marker in case of any drips. You can also use a Q tip
to wipe off the excess. This black acrylic marker, unfortunately, dripped
too much paint at once. Ultimately, I found that my heart tip brush pen was
the right tool for the job. This inspired me to add
a new motif, a bat. Frankly, I'm not loving
the placement of my motif. This is an excellent
opportunity for me to show you how to remove permanent
ink from your pumpkin. As I promised earlier, in the world of free styling, it's perfectly normal to
encounter moments of hesitation, requiring some flexibility
in our creative process. It may be necessary
to take a few steps back and make adjustments
along the way. However, permanent ink isn't as forgiving as
we'd like it to be. I attempted to erase it
using rubbing alcohol, but on this particular
surface, it didn't work. The only thing that did the trick was nail
polish remover. As you can see, there's no
longer a trace of my bat. Now, let's give
it a second shot. All right, this looks better, but I still believe
it stands out too much in contrast with
the rest of the shapes, I'm going to move on
to something else. I'll create a leaf using
a different color. I insist when you get
stuck with something, and it won't work
right off the bat, if you will, it's best to
jump ahead and revisit later. After doing that, I
feel more comfortable adding a different version
of my motif right over here. Next, I want to add a mushroom
all the way over here. And then I'll continue to add
shapes around my lettering, including our good
old friends polka dots to start balancing
out negative space. All right. Lights off, It's time to reveal
how it turned out. As you can see, I stuck with
just a handful of motives. Occasionally varying
their colors and giving different expressions to my
Jack O' Lanterns and ghosts. Now we need to make our Halloween lettering
the protagonist here, I'll either retrace
it with glow in the dark acrylic paint or simply use one
of my neon markers. You'll always hear in my
classes that employing a limited color palette
and a select set of motifs will make your
design more cohesive and impactful for my ghosts. I'm going to be
opting for the paint. I like that it provides
a slight texture, creating a more subdued
yet interesting glow. You might notice some
residual pigment in my close up shots. The downside of UV light, that it will make every single
particle stand out more. However, when you display
your pumpkin at home, these details will be
barely noticeable. We have our glowing pumpkin, it's time to turn it around and shift our focus to
the hollow back. Join me again as
we transition to the next and final stop in
our goose bumps ride there. I'll be showing you
how to delve into the fascinating art of dioramas.
14. Die-orama Town: Welcome to Diorama Town,
Your final destination. We'll be creating two
different scenes to give your guests the creeps
for this adventure. We have already
prepared our pumpkin by painting side A and carving
the window for side B. During our hollowing out lesson, I decided to create the
big entrance to my diorama capitalizing on a few
surface imperfections I wanted to remove. Another thing that helped
me decide where to cut was the fact that this side of the pumpkin was
surprisingly flat, which conveniently works
great for this purpose. As a result, our pumpkin
may end up looking rounder. In the end, the important thing was to cut out a big shape. It can be simple without
any particular path. It could be as simple as
a circle or a rectangle. But for a more
captivating outcome, I'd suggest an irregular
ghul like form. Think of it as the entrance
to a cave of wonders. You could even get
more creative and craft the outline
of a house castle, or perhaps a leaf, maybe
something that's melting. The possibilities are boundless. It only needs to be
large so that we can be comfortable crafting a
scene inside the pumpkin. Don't forget, it's important for you to follow all the steps described in the
hollowing out lesson before we create our diorama. This includes
meticulously scraping off the inner walls and ensuring your pumpkin is
properly disinfected. While this step is
entirely optional, if you happen to have the
full piece of your doorway, consider adding some
spooky words to it. I'm going to go with
the classic and use my neon acrylic
paint markers again, for a spontaneous
and haunting touch. This is supposed to be
only a fast scribble because I'm not planning on
displaying it for too long. Anyway, the point will
be to use it to keep our diorama from being seen
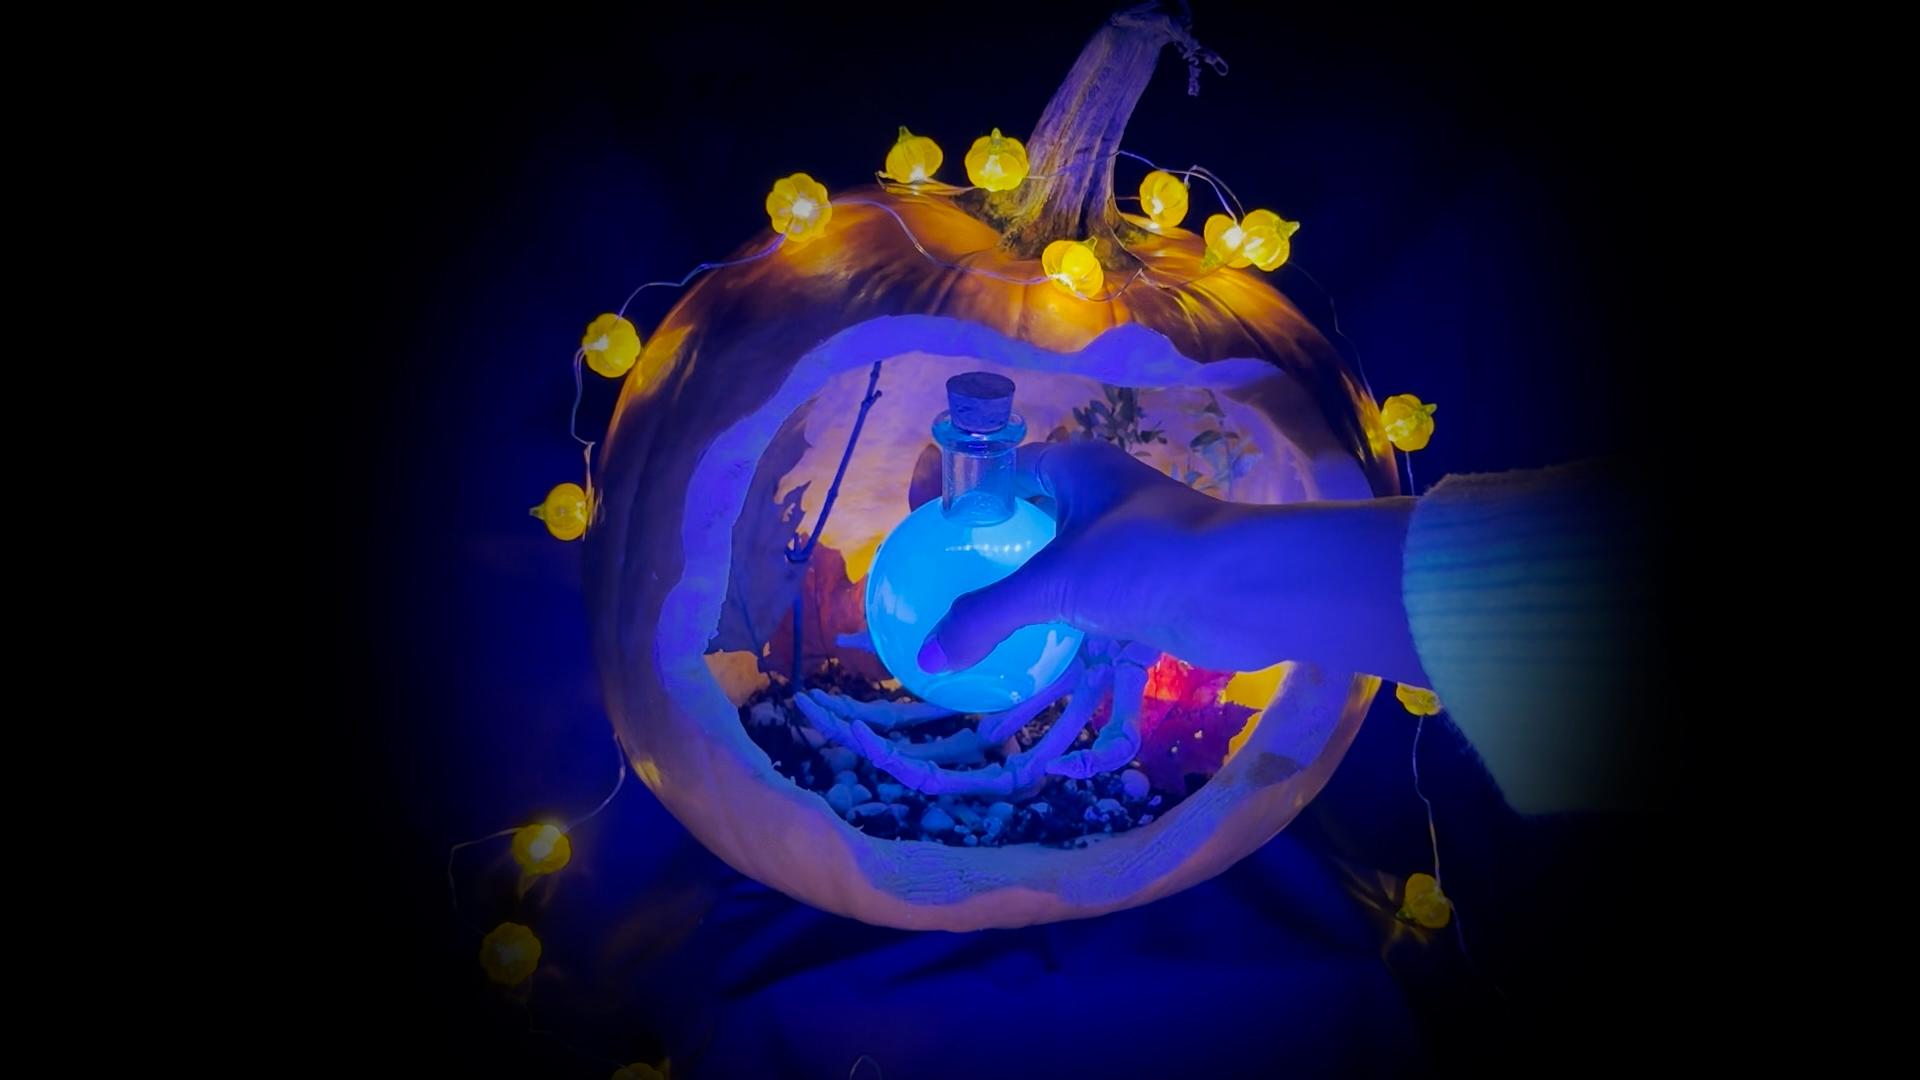
before the big reveal. Now for the actual scene, here's our first option. I didn't sketch this one out, but it spontaneously
came to me as a thought as our
class progressed. To start, we'll cover the
floor with soil and pebbles. I had some old potting
mix available because I recently repotted some
of my house plants. Next I'll place some
gathered branches and leaves to make the
background a little more interesting experiment
as much as you want with your elements until you're satisfied
with our placement. At this point, adding
a tea light may be a helpful thing to do before it gets too crowded in there. Notice how I tucked my
lights behind some leaves, concealing them for a more
visually appealing touch. Finally, a couple of Halloween props I got
from a big box store, Creepy Skeleton hand,
and a small round flask. You might be wondering
why it glows though. Well, when my obsession with
glow in the dark art began, I learned which materials
react to UV light. My husband was the
one that taught me something really fascinating. Tonic water is fluorescent. In other words, this means that under the right conditions, it has a unique ability to glow. Apparently, this is due to the presence of a
chemical called quinine. Therefore, you can create a very cool effect for
your decorations only using tonic water and UV
lights if you are into this. Another thing that you
can try is invisible ink. Okay, let's move on to our
second shiver inducing scene. This one will be inspired
by my initial sketch. I'm going to keep
the ground as it is, but I'll mix things up by
applying black acrylic paint to the walls using a sponge
for better coverage. At this point, I'll
introduce a white rag into the picture and place a couple
of T lights underneath it. It could also be a cheesecloth. Frankly, any piece of fabric you have lying
around the house will do. Let's add a simple
face to it now, using acrylic paint
to turn it into a ghost to accompany
the Erie atmosphere. I'm including a
tiny pumpkin that I've decorated with
a playful blue, using neon markers for
an extra spooky touch. I'm bringing in a
little skeleton prop for a bit of variation. I want to give the
scene a chillier vibe. I'm going to add some blue
fairy lights inside to provide an appealing contrast
with our warmer tea lights. Now you have a full set of unique Halloween
decorations to display. I'm sure your guests will be impressed even though the
scenes are quite simple. To make notice, I used
very few elements. We have to consider.
Everything we do will be very temporary because we're
using a real pumpkin. For a more involved project, consider using an
artificial one. I'm pleased to
inform you we have reached the end of our
blood chilling ride. Until next time,
May your dreams be filled with a haunting
essence of our sinister art.
15. Gourd Bye!: I'm so proud of you for completing this pumpkin
journey with me, and I'm truly grateful for your decision to be
part of my class. After learning how to
plan, choose, carve paint, and tackle a wide range of options on how to make
your pumpkins adorable, elegant, and even spooky. I'm confident that you'll have an amazing project
to share with us. I would love to see how your creativity unfolds
and what you come up with. You can use my project
as a model to follow when you're ready to share
yours in the project gallery. If you happen to share
it on social media, don't forget to tag me at Fly Fama so that I can like it and share
it in my stories. And now it's time for
that final reflection that I always share
with you my students. Before we go our ways. I have to admit as a kid, I did not like fall at all. To me, it was pretty dull
and just a great season. But when I moved to the
Northeast of the US, I was impressed to find out how many things the season
actually had to offer. There's even something
poetic about the leaves falling,
the way they sway, how they gently transition
from lush green into a fiery gradient
of colors that's warm and comforting slowly. And then all of a
sudden, every year, I find myself feeling as though I've stepped into an
enchanting fairy tale. As I look around, leaves dance gracefully
through the air, creating a vibrant colorful path on the ground as they fall. This is the season of the soul. The changing leaves communicate the idea of adapting
to transformation. They serve as a reminder
that the end of a chapter doesn't have
to be a sad thing. I want to thank you for taking
the time to join my class. I hope I'll see you
in the next one. And if you found it valuable, it would mean the world to me. If you could share
your thoughts in a review and let me know
what you've gained from it. Feel free to reach out in the discussion
section if you have any doubts or would
like any feedback. I'm here to support you. If you would like
to stay in touch, you can follow me on social
media at Floria here on skill share and also join my newsletter community to hear about my upcoming classes. If you happen to be
interested in drawing, I'd love for you to join my other skillshare
class on how to create a unique house illustration
in procreate there, among many other things, I talk about composition,
negative space, and other helpful
tips on how to make an illustration as uniquely
yours as possible. I wish you all the best in your creative journey and
I hope to see you soon.
 Flori Fama, Illustrator & Surface Pattern Designer