Transcripts
1. Intro Video - Photoshop Professional Beauty Retouching: Hey guys, and welcome to Photoshop, master of portrait retouching one or two, the ultimate guide, I'm solely art. And in this quick intro video, I'm going to take you through my creative process in portrait and beauty retouching. We start by doing some planning. Then we go for cleanup. Then we do some dodge and burning. Then we'll start our spatial and secret of frequency and suppression. Then we do some liquefying. Now it's time to fix the teeth. Then we draw the eyes. We also draw the eyelashes and eyebrows. Then we fix an colorize the lips. Now it's time to colorizing bandage tape. We finishing the portrait by adding some highlights and doing some generic color. Now it's time to create a new effect for a background. Now it's time for combining, finalizing and sharpening damage. And at the end, I'm just going to show you how to create your photo pop for Instagram and social media. By the end of this course, you will be able to start ending money from your Photoshop retouching skills. And I will answer all of your questions until you get your first job. A promise after you're purchasing, don't forget to leave a comment so that it inspires me to create more and more amazing videos. All right, let's get started.
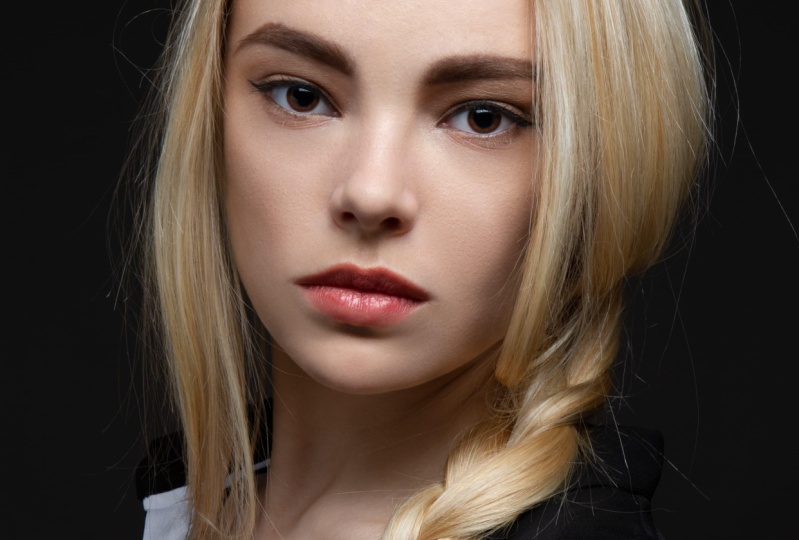
2. How to Do Planning Before Start Retouching: All right, let's open the image on camera. I'm just going to take this off. And for now, make sure you click on this link. So the depth is 16 bits and this is check. It's going to open the image as a Smart Object. Click Okay. And Open Object. Now we have the image, could recommend J to duplicate it. And now let's add some exposure of it camera, just double-click here. Icu. Now click on Basic. Zoom in a bit to see before and after. Just check this one. Hold down space. Go to the left, bring up the exposure a bit. Right there. Nice. Now let's add some texture. Let's add some clarity. Let's see before and after, right, Very cool. Click. Okay. Now we need to do some planning. Let's add a new layer. Call this plan. Press B on your keyboard, and let's make this color red. And this one blue. For the start, we do some cleanup. What is clean up? So we're fixing their hair. You have the remove this one from here. We have some spot we have to remove to remove this little spots and blemishes. I'm going to find just some blemishes and we have to remove them. Small little detail that we all need. And here iss here. See fixing the here, Here, here. All right, here. All right. Now we have to fix this area of the clean is part. You have to clean this part as well. So I'm just going to zoom back and see what else. This one should be removed, remove, remove. This one should come to the center. And let's switch plus x is blue. But an x-bar for Dodge and Burn. Just going to be dodge and burn. Dodge and burn. The area is little different shades of color. This is black and this is why we have to fix it. I remembered this area and this area with Dodge and Burn. Let's switch these areas of blemish. You have to fix. I'm burning. Burning, burn. Remember? Right. After that we do some frequency separation. We add some color, we fix the hair, the eyes, and step-by-step, we go until we finish and recreate something magical.
3. How to Clean The Face with Healing Brush Tool: All right, The plan is cool. Now we know what to do for this starts. Let's create a new layer. I'm just going to call this clean up z. Let's zoom in. Let's put this on a default press D on your keyboard for default color. Now, for a start, I'm just going to go to healing brush. Let's zoom in. And you see we can see it properly. We need to help layer. So let's go to Adjustment Layer. Create a black and white. Print the red to the left, the yellow to the right. Now you see, we can see the blemishes better, c of z. Now, we can see these areas. And I'm just going to go back to clean up. Zoom in a bit, not too much, just a bit. Press J to go back to healing brush. So anytime I press J is healing brush. So I'm just going to hold Alt and click. And this part, I'm just going to zoom in a bit more. J again, hold down Alt and click around this area. You see. Simply sample an area next to it and just go over the part that you don't really like. So I'm following this shadow lines here, go here, sample from here, paste here, sample from here, paste here, sample from here, copy it here. That's all we do actually see. Sampled from here and paste here. Keep holding Alt and click here, paste here of copy from here, I'll copy from here to here. You see the technique. It's super simple. If you see it doesn't work. You have to be make sure the sample he is on current and below guys, not just the current layer. Why we put it on current and below, it means a current as empty. We copied from the below. Write simple. And let's see, I'm holding Alt and fixing this part. Alt, clicking this part. Debit here a bit there. And just quickly, I'm just going to hold down Alt and just copy. And fixed, just messy areas. Square here. And the rest is just going to be fixed with frequency and separation and also dodge and burning. Just going to show you how easily we can clean up. First. This is just going to be the part of cleanup as well. All right, Here we go. See how easy is that. Just find a spot and try to clean that up. Right? So anytime there is a hair and the face, we use the same thing if we use the healing brush, but if the hair is. And here the part that really matter to use this Spot Healing brush like this. That's the trick. So I'm just going to go back on Healing Brush. And here we go, bowling or ALT next to it and paint over here. But before that, the zoom in a bit and fix the ice.
4. Clean the Eyes with Healing Brush Tool: Right? Plus j again, but this time we want to remove this dark area, right? So let's go to the mode and put it on Lighten. Lighten. It means that just lighten the dark part. So I'm just going to hold Alt, select from here. And that's it. Simply brushing over the dark parts and move into our parts easily. See how cool is that. This is exactly what we want, right? To remove the dark part. The cool thing about Photoshop is you have to understand the basic. And when you really understand it, you can do anything. So the blend mode is going to help us with this iss. And you can easily remove the dark parts. And the ice. Simple, right? Let's go to the other eyes or down Alt and click here. But we cannot remove this part because it's already lightened. Just remove these areas. You know, you go for this one, it doesn't work already. Light. Come back and remove these areas first. This little spot here as well. Any dark parts first? Easy, right, hold on Alt and click this part. I'm just going to bring it back to normal or not old and select this area and the altar again and remove these parts. Make sure the brush is a small yet. All right, let's go back to hey.
5. Remove the Extra Hair on Face with Healing Brush Tool: Make sure your healing brush is selected. The brush is a bit larger. Hold down Alt and click next to it guys. Here we go. See it simple. Make sure is the same area. And very gently with a carefully just going to paint over these areas till I get a perfect match. Nice, right? Nice and simple. Sometimes I do like this. I keep brushing and same area. It's a very important. It's going to pick up the same light. Nice. That's our c. I'm just going to go to three times until I get a perfect match with the dodge and burning, we're going to fix everything very easily. So don't worry. Just tried to remove the hair first. The rest. It's going to be fixed with other techniques. So the cleanup is the most important thing in Photoshop. When we do the clean up perfectly. It's going to save us a ton of time in future, especially with colorizing and frequency and separation, and also dodge and burning. Because if you don't have a proper cleanups, it takes a lot of time it that part and in that time to fix them, Believe me, in future is just gonna find out. Right? Let's fix this part first. Press S on your keyboard for Clone Stamp tool and hold down Alt pickup the same line, follow the lines from here to here. From here, hold down Alt, click off, click, See. I'm exactly following the lines. And trying to fix this part. Is it? How cool is that? Try to follow the lines, but sometimes it's not going to work, but it's okay because it's very, we try our best to make that happen. Because at the end this texture doesn't show really. So it cool. Here as well. Clean up. Just copy this area. And I'm just going to hold down Alt C to G times the halt is just going to show that's the old part that I'm just going to keep clicking. Control Z to go back and fix this area. Here. Nice. Now let's keep going. Be plus j again with healing brush. See how easily we are fixing these parts. Now from this dark side. Here you go. Here as well. So it's kinda cool and it's going to be easy, right? The only thing that matters is the time. You have to just put on some music and enjoying this can make it look big year. Simply the bigger part and blending better. Same thing here. Try to blending perfectly in x-ray. And it's easy as well. And these parts, Let's clean them up. And just make sure you have to pick up the same texture from the same area. Just go over 23 times until you get the perfect results. Sometimes it's just doesn't work with just one time. Say 23 times. I get something that I really want. Nice, cool. Here we go. What else do we have? Now? Let's turn that off. The black and white. And let's go for a hair from the outside.
6. Clean The Hair with Clone Stamp Tool: Let's go to polygon, a lasso tool. Click on this little icon here and make sure guide this is rasterize. I mean, right now I did the rasterization. But if it's a smart filter, is not going to right-click and make sure it's a rasterized which can click and select these areas. Remove the here. Simply. Here we go, right-click. Make sure the failure is E15 principle K plus S on your keyboard for Clone Stamp Tool, hold down Alt and paint. And these areas. See how easy and how cool is that Command or Control D. Again, Clone and just this part as well. This party CISM have line over that zooming, pick up Polygon Lasso Tool. Click and let's go over these areas as well. Let's calculate that. Here we go. Right-click fit F5, okay, press S on your keyboard, pick up some color from here and paint it over here. Doesn't matter, we're just gonna do the same. Good recommend d. Now, let's bring back this up and see the lines as well. Make sure you come to the clean up again. Press J, make sure the spot healing brush is selected right now and slowly go over these areas until we clean these small little inhalers. Say, you have to do a perfect selection. Just going to go over them two or three times until we get a perfect match. Actually doesn't really here, but we try our best to do a proper cleanup. See, That's it. Let's come here. Do the cleanup here, here, and here as well. Let's go to the other part. Make sure here we do have some. Here we go as well. See how easy is that? Simply we are removing the hair. How cool is that, guys? It's all about the techniques and the tools, which tools you have to use when exactly in Photoshop. That's all the matters. And here we're done actually. We deface. Let's come here and fix these parts.
7. How Copy and Clean with Clone Stamp Tool : Pretend that off and come to this part, this pickup, your Elliptical Marquee Tool. I'm just going to come back to this layer. Just select around this sign. Right-click. Feather should be 10. Press, Okay, now Command or Control J to copy it, right? So let's turn this off and come back to this layer. First, we have to make a selection around this area. We don't want to get out of this. So pick up your polygon lasso to click and select around these areas. The area that we are going to do, the cloning. Right-click, make sure the fill is 10. Press Okay. Press S on your keyboard, hold down Alt and just simply copy and remove these parts. So now old and keep doing. All right, All the yen and let's remove this one called from this angle and then Alt. Click here. There is a lot of bright and dark spot here. So how to fix them? Go to your healing brush, make it a bit larger. Hold down Alt and just simply go over them. It's going to blend the colors together. And that's going to make them perfect. Say I call it that. That's all due to match the colors, Command or Control D, and that's the 10 days, um, make sure the layer is selected. Drag this to this area to match this line. And you see there is a bit of lines here. I can add some layer mask it, press B on my keyboard, and just make sure the flow is low over this area to blend them together. And then we're just going to add some color so it's just going to match perfectly. All right, Now it's time to do some clean up. And we're going to click on this cleanup guys, right? And Control Shift Alt E. And to make a new layer, I'm just going to call this cleanup. And to save space, we don't need this to really just going to remove this. And I'm just going to call this one help to remember it better.
8. How to Do Dodge and Burning: All right. Now it's time for dodge and burning is do some clean up. I'm just going to bring this down below the cleanup fire. Just click on top and a cleanup file and press Command or Control J to duplicate it, Let's call this bilayer, right, cool. Now let's go to Filter Convert for Smart Filter. So we added a smart filter because if you were to go to filter blur and Gaussian blur, which is going to come back and change it. So put it on two and just Press. Okay. I'm just going to explain later why we just created the bilayer. Just going to click on the links icon to make it cleaner. Now, check this off for now. And let's create a layer for Dodge and Burn. So how we do that? Click on an adjustment layer. Let's go to solid color. Just pick up the green. It doesn't matter as long as it doesn't have a saturation degrees. Okay. Now press Okay. Put the gray on color, color. It means no saturation. Little bit zooming. Z to zoom in a bit. All right, cool. This is a proper black and white for the dodge and burning. Now, let's go to adjust malaria in and add. The curve is create S-curve. So we bring up the highlights, bring down the shadows, so we can see the spot that we're going to do data members. Now hold down Control and press Command or Control G to group them. I'm just going to call this help. Now again, turn that off, click and Blair. Come to adjustment layer, create a curve. Bring it up a bit, make it brighter. We call this dodge. For Dutch. We just increase the light. That's all we do, maybe a bit more. Now, my Control J to duplicate the Dodge, call this Bern. Bern being down the light. If you turn that off, you see what I mean. So the light is a bit lower. But for Dodge is brighter. Now, click on the Layer Mask and press Control Delete to fill it black again, click on the layer mask will burn Control Delete, and we flip it black. It means we don't have it. It doesn't exist right now. So the brush with a white brush, we're just going to reveal that. I'm just going to hold down control and click here press Command or Ctrl G to group it. I'm just going to call this Dodge and Burn. Now, why we are created dipolar one. I'm just going to activate this one. They help layer. Now I'm just going to zoom in. You see there's a lot of small little details like these black and white. Anywhere is black. We're just going to color it. The Dutch. We're just going to brighten that up. That part. This part should be brighten this part. And there is a lot of small little Excel and detail and just kinda distracting. But if you Blair that we're just going to see the spots and I'm just going to fix this part. We don't care about small little detail anymore. See? So to be more forecast, that's why we are doing this. All right, cool. So let's click on the dodge. And we don't zoom in too much guys for this one. Because sometimes when we are Zooming, we do a lot of extra small letter detailed. And when we zoom back we see, wow, we overdo it. So we don't wanna do that. Just click on dodge, press B on your keyboard. Make sure the flow is 1%. Capacity a 100 percent, and did right-click, make sure deprive size is small. So for each area is going to pick up the right size. Now, I'm just gonna, I'm undercharge with 1% flow and the foreground color is white. So I'm just going to go over in this area, but before that, just right-click and make sure the hardness is at 0, guys. Alright. Then just keep going. I'm just going to brighten that up. That's all I do. Just make sure the car is kind of match doing right now. Jd SAP for after, simply remove the dark side under the arm. That's all we're just gonna do, guys. Brighten the dark parts and vice versa. The darken, the brighter and brighter darker. Here. Make sure everything is some looking for some smaller spot guide like this one. And like this one, this one as well. I'm just going to get closer a bit. I'm just going to remove this with frequency separation. So this spot is a bit dark, right? So we have to dodge it. This part, this part as well. I'm just going to zoom back to should they get too close again and to try to fix it. Now, let's go to Layer and click on the curve. Bring this down. See, now we can see it better. The dark and bright side. Come back to dodge, press P on your keyboard. Let's try to match some, some of these areas. This part should be burned. And I'm just going to go over the bright side and Burnet to match it with the color next to it. This area, this area. Let's go back to dodge. Just going to go over these areas. Bright and the dark side. I see what else is coming here. You see these lines guys. Press B again, make it smaller and just go over until we remove these lines. Now let's go back to curve. Bring the shadows up. Now we can see more of this. You can dodge and let's remove this. I'm just going to go over and these lines. See how simple is that. Let's come to this area called the care-of. Bring that up and go to dodge again. These spots here also see, make it better. Is part C, all these parts. How easy it is you are fixing these things. I'm just going to keep some of that parts and until the next step for frequency and suppression, then we can fix them. Here we go. Plus b again, and this part with depression bit larger. And this area needs some dodging. So the tune back. It's the before and after it off. And dodging guys, dodging and burning. So we tried to make the column maybe here, it's a bit bright. I'm just going to go to burn. Press B on my keyboard, Mickey bit larger and this area, press, Let's go to dodge and pretend this area. All right, that's the trick. So in this course, I'm just going to show you what is Dodge and Burn. And when we are exactly going to use it, what is the time that use frequency separation? Some people don't use a frequency and suppression. They just do dodge and burning. That's why I spent a lot of time on simple little things like this one and everything to dodge it out and takes lot of time. But in this course, I'm just going to show everything. That's why I'm just going to leave behind some of these spots until we go to frequency and separation. And then we just tried to fix it, right? Cool. Instead of the top layer and the layer one as well, Let's zoom in a bit. Let's see what is before and after. Look out the smallest that everything or ICU. That was the dodge and burning guys. And let's go for frequency separation.
9. Create Help Layer for Frequency Separation: All right, Now it's time for frequency and suppression. So let's create a new layer at the top, press Control Shift Alt E. So we call be a version of our image. Now, let's zoom in a bit. Let's call this low frequency or low F dash. Call this color because you're just going to separate the color from the texture. Press Control or Command J. Let's call this height f high-frequency. And texture. This is just going to keep the texture. This layer is just keep the color. Now, turn that off. Click the low EF a color. Let's go to Filter Noise and median. The median should be between nine and 14. Right now I'm just going to keep it at 12. You see? We don't see the texture, but we see the lines. So that's what we want to see the lines. We don't see the texture. So it means it's okay. Now, let's click under high F. Now. Hi, If texture is selected, Let's go to image. Apply image. Make sure the layer is low, F layer below it. The lending is an add, inverts the scale to offset 0, right? So remember eating layer is layer below it. Blending and add inverted mixes, check escaped to offset 0. Press Okay. And the normal should be on Linear Light, hold down control. Click select both of them. Command or Control G to group them. We call this F s Frequency Separation. How we know it's correct because if I turn this off, should be no difference between layer below it and FS. You know, there is a lot of special things going on. But still combining these two layer, the color and texture, if I turn that off, is the same thing as the layer below it. Or I could, this was for 16 bit image. It means the image that we got it from camera. If you take a photo with your camera and photo is wrong, it's going to be 16 bits. And this is the way that we apply image for a 16-bit. But what if our image was 8-bit? It means normal image with a camera, with an iPhone or whatever, just can drag an image. Normal image is 8-bit, is here, 8-bit, and here is 16-bit. So how we do this Command or Control J is called this low F Command Control J again, let's call this high F. Again, turn it off, come to low EF, filter noise and median. Let's keep it at 12, as long as you see the line. No texture, okay. Click on high F, Then it on Image. Apply. Image layer should be layer below. It means low EF blending is on subtract 4 8 bit image scale to offset one to eight. Now press OK. Again, blending is on linear lines. I'm just going to select both of them Command or Control G to group them, call this F s. Right now should be no different between this one and delete lowered. It means is correct. So as long as we have these two, the process is the same. So I'm just going to come back here. The same process with this one. Right? Now. We need the help layer. Again. I'm just going to bring it up, put it at the top. If I can bring it, put it on a term, right, CPU and 10 is on, but makes sure open it up, go to the curve, bring down the shadows a bit. So we see more specific line. This is what we want for our blending.
10. How to Use Mixer Brush for Frequency Separation: Now, I'm just gonna go to Frequency Separation, tend to high F. Check this, check it off. Let's go too low. If color press B on your keyboard and come to mixer brush, right? Shows the mixer brush tool. Make sure this is off. It means it's transparent. Everything is unsteady with 30 load mix and flow is unsteady. And this 10, this is 0, this is unchecked. If you have a different setting on your mixer brush, make sure you come here and reset the two. If you reset the tool, everything is just going to come back to the normal, right? And this is the way it works. I'm just going to come here and slowly with the mixer brush and come and gradually combine the dark and bright side together. That's all we do. We combine the bright side to the dark side, but gradually. So you see this area is dark. You have to gradually combine this with the surrounding areas. For example, this one is no specific line anymore. We're going to combine this and we kind of shaping and painting, but carefully. So gradually removing the harsh line and kind of mixing the colors together. That's only do. We're not going to change the shape of the face of course, but the disk method, we get a better result. And we also can change a bit and hold the texture the way that we want. Like this. There's a lot of things we can do with this method and it's perfect. And it's easy. Just going to come close and slowly go back and forth. Make sure the color are mixed. And that's all. Let's go to z and z again. If we go too far, that's why we go from left to right means white to black. White to black. If I come back from black to white, It's going to be like this Control Z. That's why we have to be careful which one we click in first, if I click on the bright side, going to the dark side, I have to go back and forth. For this. I'm just going to create a better shape for the nose. This is the way it works. Go back in again and gradually, this is too dark. Gradually mixing the black and white. So there is no harsh edges. That's all guys. That's the technique. And as I said, if you're setting is different, make sure you reset your brush or any tools that it doesn't work properly. You see how easy and cool is that? Zoom back a bit because we overdo things. That's all. So we have to avoid that with zooming back. Now it's gradually done. Rnas control Z. I did too much. Should have to be very, very carefully because I'm not trying to change the shape to focus on. And the part that are not mad. You see there is a lot of messy things. But let's check it at the end. From black to white to black. Gradually mixing colors, guys. Very gently, you it is 30. Be careful. Just watch it. Alright, see that gradually be getting better and better. So let's see before, after, and after that we're just going to fix this part. So turn that off this layer and see, cool is that see before, after beat frequency. This is V doubt frequent suppression and this is with frequency separation. See how cool is that? Now, let's turn on the LPAR again. And for now, this part I can see click on the curve, bring up the shadows. Now ten buff. The texture. Go to low EF. And right now we can just shape the face properly. That's why we using this technique. We don't use the Gaussian blur technique. And at the end, everything is gradual. Guys. See no harsh line should be found in this technique. Everything is gradual. Good, removing the harsh line. And we go forward. Ooh, that's it. Turns out the head layer. Then under high F. And very, very interesting guys. Let's come back to this part again. Turn that off. And let's go here. Just remember, go over everything in all the skins. Don't say this is the hand. I don't need it. It's okay, but trust me at the end, you just going to show it. So make sure you go over all of these guys and make it proper to make flow with all the process. I mean all the image, right, cool. Thing that off. We don't need it. The texture. Now let's zoom in.
11. How to Use Clone Stamp Tool for Frequency Separation: Now we are under texture. Press S on your keyboard for clonus them to make sure the sample is on current layer, opacity, 100 percent, 100 percent. And a slowly guys, I'm just gonna zoom in for this one. Again for coordinate stamp tool, make it small. Because very slowly, I'm just going to come here and copy from the exact same size. I mean, the exact same area. And remove the small little detail. But I'm going to remove the texture. I mean, I'm trying to keep the texture, but remove a small little dots in C and make the area the same. This small little bumpy skin texture are not really nice. So that's why we are trying to remove them. But the texture is intact. We don't really removing anything because the texture is totally separated. That's why I'm using climates down to it. We don't use the clone stamp tool which is going to affect the texture. And now these eerie, let's fix it very gradually from next week guys is slowly and gradually. This area at these spots. Here we go. Here. See these small little dots. We're going to fix all of them guys. And these dots here, these areas. Now, let's come back to the left part of the face. See very gradually I'm just going to combine the textures together from the same area. Very nice. Cool. I'm just going to keeping the texture but C diff phase, the other part. This is a very gradually. Sometimes you don't notice. But we are working really. But various small little detail guys. Each time. Step. We're interesting, we'll see dies in the under the eyes are totally fine. Now these areas I'm just going to select Next to it is clean around the lips. A little bumpy areas here, and the small little holes that is just going to show. That's why we fixing all of these things is very nice. You have to be patient with this technique. Because as you see, the result is amazing. Just look at it. Some people keep this line, but for this part, I don't really like it because it's just going to be look like a fantasy image. This is very nice. And most of the parts are right now Done. We need some perfectionism is some small little details that we think we can make it better. So we work on those smaller things. And sometimes some people say it's enough. But I'm looking for something really flawless. And when you look at it, is it wow, I mean, it should be something like this. When it's something wow. It's something magical. That's why we keep working until we get that. Guys. If you really love the duties. And the result is see that the mean is going to be amazing. We know is going to be amazing. We're just going to work hard to make it perfect that we just put on some music. And enjoy. Mean, just, really just enjoy what you do. I mean, how cool is that I create is to create something like this. And for me I really, really enjoy this. It's very cool. It is time, it takes time, but I get it every single cells in my body. And I equator. Especially when you put on some music, It's like you're in air. And in future. We definitely go for lot of cool stuff, I mean, for photo manipulation and a lot of other stuff as well. And I'm sure it's just going to enjoy case. All the courses and all the videos. How cool is that? Just take a look at it. Just look at it. And you guys enjoyed this. All right. Let's turn off without frequencies suppression and VDD, frequency and separation. Let's come here. Let's fix some of this part. Let's open up the frequency. High-frequency S. A small little things that you can fix. Here we go. And how easy is that? Slowly? I'm sure you guys are enjoying this. Too. Very interesting. It's gonna come back and clean this part as well. Very nice. Cu is this part a bit? I believe that's it. Maybe make this part I can make it work and this goes back and forth until you get something perfect. I believe this is the perfect Frequency Separation just here. Just so going back, we have some leather spot here. So we can work on that to press S and small detail, maybe. This is up to you guys and until you can just go back and forth until you see something is totally perfect. You have to really work on these things. Just disappear but themselves. I mean, is your work your job? You have the time and effort and deliver something plus something inspiring. Always remember that. All right.
12. How to Use Liquify : All right, Now we've finished our frequency and suppression. It's time for liquefy. So how we do it? Click at the top and create a new layer. Now, I'm just going to bring that up, put it at the top. All right, so the nucleus is at the top. Hold Control Shift Alt E. All right, and I'm just going to call this liquify. Now, let's go to Filter and click on liquefied Control Plus to zoom in a bit and it's fine. I'm to click on this AI, Artificial Intelligent actually. So just going to understand where is the nose, the lips, and the cheekbones, and all around the face. So for now, here, I'm just going to come at this closer. The jaw line, I'm just going to bring that up. C, just going to click here and bring that up a bit. Maybe down a bit, a little. And from right to left, hold it, drag it to the left. Now, this little for the ellipse, I'm just going to click here and drag it to the right, make it a bit longer. And for the nose, museum, make it a bit smaller. And the rest will just click on this little icon that you see here. I'm just going to kill it just here in the center. Once or two times, right? That's cool. The rest, I'm just going to go to this hand icon and Control Plus to zoom in. Make sure just going to make it play around with this. To make it a bit circle. I mean, it should be careful and not alter, make it a bit larger. Maybe played this area. Hold it, push it to the side. Playing around with this. It's kinda fun. And I'm just going to show you the process. All right, I think this is very cool and perfect. And maybe the lips, upper lips should be up a bit. Right? Very nice. And when we finished, just going to drag this down and see the before and after and check, preview and press OK. Right. I see this area is a bit too harsh guys. All right, so how we can fix this? Remember DEJ number. Sometimes we have to go back and do some dodge and burning again. So I'm just going to come here, create a curve layer, drag this up a bit. But for this one, we do need the burn, just needed Dutch. I'm just going to click here down Control, Delete to fill it with black. Press B on my keyboard for brush. Make it a bit larger. Right-click and harness is 0. And guys, very subtle, just going to bring down to 1% very slowly. Just going to paint over this until I get something better. Say painting and a black areas. So we don't need to do cloners them to a lot of other stuff. All we do is come back, see how software give me these areas, debit. This area's nice, right? Let's see, before and after. Before. It's dark. Now. It's brighter until 0. Now it's not harsh anymore. All right, Now it's time to go and fix the teeth.
13. Whiten Teeth in Photoshop: All right, Now it's time to go and fix the teeth. Let's zoom in a bit. The Z on your keyboard, drag to the right and see how we can fix the teeth. Just create a new layer. I'm just going to call this. Press B on your keyboard. Make sure the flow is on a 100 percent opacity, 100 percent. The foreground color is totally white. And make sure your brush size bit larger. And brush just slowly paint over. And teeth. Just don't go outside. Try to be inside the lips. That's what we do. Right? Now. Just double-click here. Make sure you're in Blend. If hold down Alt or Option. Just one click on this arrow and drag it to the right. Now it's separated, right? Drag it to the right until you see a natural teeth. Now, press Okay. Let's zoom in a bit more. Till it on a new layer. Go and pick up your polygonal lasso tool guys now and just start selecting these areas. Look just selecting around the teeth. Backspace to go back. Try to be exact and precise. Here. Nice. And slowly. Cool. We are almost done. And that's it. We're done I, to become a color, exact same current press B again and start painting guys. Please Command or Control D to deselect the selection. Now, again, create a new layer, press Z and new keyboard and zoom in a bit. Press B again. Make sure this foreground color is totally white. Make your brush smaller and slowly start to add some lines here for the highlights. All right, That's all. Double-click again here. Hold on, Alt. Split these two arrows and drag it to the right to blend in with the teeth. So exactly we just going to bring up the shadows. Let's go to Filter blur and Gaussian blur. It's going to be something like this. A bit more maybe. Yes. Cool. Again, create another layer. Press B on your keyboard. Make sure your brush size a bit larger, more, and just paint over this area base. There's a double-click here again. Hold on Alt. Drag this arrow to the right. Okay? Filter. Blur and Gaussian blur. Circle is that. Now, as you saw, there are some areas that are affected. I'm just going to add a layer mask to it. Press B on your keyboard and try to clean those area the case. That's trying to go and click into those areas. So it's exactly like the T's are on the lips, right? And how cool is that? Now? Hold down shift and select the teeth. Command Control G to group them. Now I'm just going to call these teeth. Let x2 map. And how cool is that? If this is too much, you can go in and select this one, this one, and this one and bring down the opacity. Just going to zoom back to see if it's natural. And it's very cool guys. Right now, we are done with the teeth.
14. Draw Eyes in Photoshop: Now it's time to zoom in and fixed eyes. Now, let's zoom in a bit. So let's fix the eyes. So how we do that? Actually it's very easy to fix the eyes. Let's go to Adjustment Layer and click on Curves. Just drag this slider to the right. Right. It's enough CPU. Now, make sure the mask is selected, Control Delete to fill it in black. Now press B on your keyboard. Make sure the foreground color is white. And slowly I'm just going to zoom in a bit. Press BHN and make your brush smaller. And just to something like this. The area between the eyes, that's all right. All you do, let him do the squiggly things in just something like that. Trust me, it's going to be perfect. So GDP gap between this and the eyes. All right? Something like this. Now, the two megabit to see the both eyes, let's go to filter blur and Gaussian blur. And just take a look at this pixel to the right until we just match the eyes. And kind of blending together a bit more or ICU. Now, let's create another adjustment layer and curve. Again. Drag this from top to the left. Right, Control or Command Delete. Let's zoom in a bit. Press B on your keyboard. Make the brush very small. Maybe two. And do some lines guys. Just a small little lines. Cu come to this side. Hello again. Now, click on this icon to bring up the curve and drag this to the left a bit more to make the eyes brighter. Again, go to Filter. But you have the comeback to this layer. We can use this feather as well. I mean, there's no difference between this failure and the Blair one is the same. So we might use this one, this, this time. Let's go to this one and 18, this is a bit too much. Press B on your keyboard, switch to X. This is black and I'm just going to paint that back. Pain that back between. So create more lines. And just take a look at this one guys. And I'm just going to hold Shift, click here, Command or Control G to group it. I'm just going to call this highs. It's not finished yet, but I'm just going to show what's going on before and after, before and after. All right, Now let's zoom it. Go to this one, the first one, press B on your keyboard. Switch the x, and let's draw something. Some more. Switch the x. And this is nice too. Maybe we can just add a bit of this x. Okay, cool. Now if we take a look at it, it's going to be something very cool right? Now. If you press Command or Control J again, let's see what happens. Just make this brighter. But right now I'm just going to play around with this one and bring it down. Very, very nice. If this is too much content that off for this one is okay, but for the semester much recent press V on my keyboard and x. And just go over this. Just the right side. You see we are playing around until we get the perfect eye color, an image. Now, for the colorizing the eyes, just go to Adjustment Layer, click on hue and saturation. Just drag the slider to left and right. Right now I'm just going to keep it on green for now. And Alt Delete to fill it with black. Let's zoom in a bit. Press B on your keyboard. Make sure the foreground color is white. Make the brush size is very small. And slowly start painting on the eyes. That's all. Very slowly. Just concentrated. Don't go outside and don't paint on this highlight. I guess the smaller. See if we can paint on this area. Very cool. Now let's go to this side and do the same thing with this. I, alright, see how cool is that? How easy is that? Just paint and the eyes and come up with a different color. All right, cool. Now, let's zoom back a bit. Bring down the saturation, bring down the lighten. And lightness is down. Now it can just play around with this until I get the perfect color match. For now, it's fine. In future. If you want to change anything. We're just going to come back and getting any hue and play around with this. And anytime we need it, right now everything is ready for the final colorizing. Now, let's go and fix this area, divide the area, click on a new layer and just make sure the foreground color is white. Press B on your keyboard and slowly with a small brush, I'm just gonna go around this area and just paint white. That's all we do is just paint white and make sure everything is inside this area. We don't want to go outside very carefully. Let's zoom up a bit so I make sure my process a bit larger. Slowly. I'm just going to paint on this area. Now, the same thing here. Make the brush size is smaller. Keko. And here we go. Same thing here. I'm just going to paint it with white. That's all you do guys. That's it. And then the easy part, just double-click on the right side of the layer. And let's go to Blend. If an underlying layer hold down Alt and drag this slider right now it's going to be divided. Drag it exactly to the right. Now, let's zoom back a bit. Control Command Minus. If it's too much, we're just going to play around with the opacity. Just going to come here, just bring to the left side until this isn't nothing. It means we have done nothing. Now. Slowly and gradually, I'm just going to drag it to the right until I'm satisfied with the brightness of the color. So we don't want to make it to white. Now, I guess around 50. It's perfect. I'm just going to press. Okay. And everything is inside this folder. Guys, see before and after. See how easily we have changed their eye color.
15. Draw Eyelashes for Portrait: All right, Now it's time to go for eyelashes. Let's zoom in a bit to see exactly what's going to, you know, it's very messy is not right now. We have to make it right. How to do it? Create a new layer and group it. Control command G. Call this eyelashes. I go. Now click on this layer, press beat, then go to Window. Click on brush setting and price-setting. If using a pen pressure tablet, make sure the shape dynamic is active and put it on pen pressure. The first one is brush tip shape. This one spacing flip y1 hardness should be 0. Then the shape dynamic pen pressure, control temperature. This is off transfer. Pen pressure at the top one, temperature is on the control here. The bottom one is off. And click on buildup. Omit. Make sure you have this setting. If it doesn't work right, Right-click and receptive tool. And again, sometimes you have done a lot of stuff and change it and it is not going to work right? So, so make sure you reset the brush first, then come back to brush setting and do the sitting as I said. All right, but if you're using just mouse, make sure everything is an f8 not paid version. That's all. It's going to be an fade for the mouse. So let's go back. Right-click, make sure the brush size is to harness is 0. And it's going to zoom in a bit with B again. And slowly, just guys, I'm just going to follow these lines. And yeah, it's right. You're going to draw the eyelashes with temperature or the mouse. And trust me, it's very easy. You don't need to use a lot of different eyelash brushes. And I'm just going to follow the direction of the default eyelashes. And we finish these areas, guys. I'm just going to go up a bit. Nice. Easy is that it's not very difficult. And for bottom one is going to click here. And this, take this very slowly and very gently, is like a curve. Is not that straight, so it's going to be like this, like this. And here. When we draw a small one, tried to make it put some larger one as well. The point is to make it more pop. Let's zoom back and see the right and the left. Here we have a lot of mean. Maybe it's a little messy. So if oppression B for brush, again, I'm just going to draw and I'm just going to go a bit higher. So let's fix this area. I'm just going to press B for my brush. And these areas, I think we can add some more eyelashes. Icu. Let's come to the left one. And the same thing. Press R on your keyboard and I'm handed press V again. So now I'm just going to draw better with that. R. I'm just rotating the whole Canvas. So this way, I can see it better than I can work my pen pressure tablet. Much better. You see how easy? I'm just going to following the direction of the default eyelashes and letting mom, Let's press Command Z. This is too much here. Shouldn't be to eat more. To make it look natural. Recognize guys. I'm sure you guys are enjoying too, so because it's very easy. Press R on your keyboard and click on Reset. Now c plus b again. Just follow the directions. Carefully. Press Control Z. If I go to four. Very nice. Here, maybe a bit. This area. Let's go back. See, now, it's much better. And you want to make it simple. And we tried to make it better. We don't want to do something crazy and see before and after, before, after. Now. For the next lesson, we're just going to fix the hybrids.
16. Final Retouching and Sharpening the image: Alright, let's go for a finalizing and sharpening damage. So right now if you have done the neon effect, but I can see there are some here here, and we have to get rid of them. I'm just going to click on Polygon Lasso tool. Just come here. Select these areas and that's all right-click Feather 10 percent. You have to select illegal file press S. And for clone stamp tool, I'm just going to clone these areas. All right, I'm going to Control D. Let's go back to neon effect. Command or Control 0. Clicking the Neolithic and go to Adjustment Layer, click on Selective Color. Selective Color. Let's come to read a bit. Make the cyan to the lived. We increase the red parts and the yellow part 4. We get more pinkish. Let's go to black. And let's go to the right side a bit to make sure the images pop and yellow. This can bring this left a bit. Nice. So yeah, we're just going to play around with it until I get a perfect match. And it's blue back to red again. Bring this down. I'll bring this to the left. Very nice. Now. Plus B on your keyboard and just do some pop, pop, pop the image to the face. I'm just going to bring back the quality and the sharpness. See, this is going to be our color matches it before, after. Now the colors don't match with damage. Now let's do some sharpening. How we do it. Create a new layer and Control Shift Alt E, right? And just going to put all the image in one top layer. Now let's go to Select and Move tool first. Let's go to Filter. Are there and click on high-pass. High-pass is a bit lower around three, I guess, or 2.9. Press Okay. And put the normal on overlay. If there's amin, just going to see how sharp is going to get without it. With the eyes. How cool is that? But the thing is, we don't need this to be sharpened all of the places, we just need it to be sharp in some areas and hold down Alt and click on this mask. So we're just going to remove the sharpening parts. Press B on your keyboard and make the brush smaller. Switch to white. And just go over the eyes, the lips, or this little area, right? In this area. Then this area. Let's go back. I have rows. And you see how cool is that? Ndb it here. Now let's go to Adjustment Layer. Let's add a curve and bring up the highlight of the image. A bit. Now, Control Delete to fill it with mask. Press B on your keyboard. And let's go inside. And we're just going to brighten the eyes, lips. And just some pop guys. It's going to be some pop in some areas for pumping the image. That's all it is. Now it's time to make it ready for Instagram and social media.
17. How to Draw and Fix Eyebrows in Digital Painting: Now it's time to fix the eyebrows. Let's press Z on your keyboard and zoom in. And let's start the fibrous method. The fibrous and lifting method. It's very cool in makeup. Let's do something different and something very cool. All right, let's create a new layer. Press Control or Command G to group it. A collared ouroboros, select the layer, and we have this same brush. So press B on your keyboard. Let's zoom in a bit. And let's try to do this. And zoom back because we are too close. We are doing the fibrous method and the lifting. The lifting is gross. It's like Sharp going up. So let's first just fill this extra spaces here. You have some empty spaces, right? So we tried to fill it with eyebrows and with the lines. Then we go back and forth until we fix it. So I'm just going to go up. How cool is that guys? See? It's kinda fun actually, that we can do any kind of makeup. You see that? Nice and cool. Right there, right time is very cool. Now try to do the left one plus R on your keyboard and I'm just going to switch it. Dissuade, think I can do better. And I just want to see this one as well. Because B on your keyboard and let's try to do something. Qu, same thing, right? Command Z. If I go too far, Let's go back. It's too much, I guess. And don't worry if you do something wrong, we can erase it later. So just keep doing. All right Our again and reset the view. Wow, so cool. How good is that? Big? I think this is very, very interesting and very cool, right? We have done the eyebrows and listen, we go for lips.
18. How to Select and Change Lips Color: In this lesson, we are going to fix the lips, press Z on your keyboard and zoom in a bit. Let's just going to close this press P for pen tool guys. And let's zoom in a bit more. Just one click here, and click here and drag. Hold down Alt. Click here, click here and drag them all. And click here. One click here and drag. I'll click, click and drag. Click, click and drag. Now. Right now, just right-click and make a selection. Make sure the feather radius until now we have to exclude this part as well. Just go to Polygon Lasso Tool. Hold down shift, click, and let's select the inside to separate it from the outside. All right, nice right-click and make sure this failure also is to click. Okay. Now let's go to your adjustment layer and click on hue and saturation. We have to invert this layer mask, hold down control, and click on AI control. I just going to inverse the selection. Play around with this. Now. This is just going to affect it gets some back a bit and play around with the saturation. Play around with the hue, any color, we can just add. Now I'm just looking for something reddish or minus 2s. Okay? Now let's bring up the lightness around, I guess, guess 50. You see, how cool is that? You see around side is little orangeish. Just control click on this one. Inverse the selection. Let's go to select an inverse, the selection. Press B and your brush. And let's press Control Z switch. This should be black and it's going to go around and just clean those orange areas. Now, press Control or Command D, and now it's perfect. Now easily we have fixed the lips, but you see, if I turn this off, This lot of highlights here, each, we don't have them here. Just double-click here. Just going to bring up the blend. If hold down Alt and drag this slider to the left to bring back those highlights. And let's all press. Okay. Let's make it more a bit. Go to Adjustment Layer, click on a curve, drag this up a bit. Click on the layer mask. Alt, Delete to fill it with black. Press B on your keyboard for brush. Make sure the flow is nine or maybe less, 5%. Slowly. Just go over it, make sure this is white. So we divide a repaint on black. And those areas. And also these areas. Right? Now it's very, very cool and very interesting. All right, now let's group these two together. Command or Control G to group them. We call this lips. In the next lesson, we're going to fix an colorize this bandage tape.
19. Use Hue and Saturation to Change Bandage Tape Color: Now it's time to colorize the bandage tape. Press Z on your keyboard and just zoom in a bit. Let's go for selection. Just pick up the polygonal lasso tool. Just click here. Click here. Here. This part is press backspace to go back. And let's make sure we have a perfect selection. Again, click here, click here, click there. See these parts. Maybe we need to do it like this. This way. Here we go. Make sure this part is following the exact same pattern and line as the bandage tape. Alright, then we finish the selection. Just go to your adjustment layer and click on hue and saturation. Now simply drag the left and right and that's it. But how to fix it, how to make it proper color. Let's do megabit. And let's bring down the brightness. Bring up the saturation. And let's play around with this color to make it something like red. But as you see this, bring this down a bit. We have to see some texture, and right now we don't see texture. Just double-click on the right side. And this layer hold down Alt and click to separate this letter arrow and bring it to the left. So the bright color just kinda showing true. I think this is cool. Now press Okay. Now let's play around with this saturation and all the colors the same. Now, let's bring up the saturation to a 100 percent. Make sure the lightness down a bit. Now we are getting what you're doing. You have to make it look natural. Pop, pop. All right, cool. Now, press Command Control G to group it. Let's call this Band-Aid tape and close it before and after alkalis that. The next thing is a colorizing and fixing the hair.
20. Select and Change The Hair Color: Now it's time to colorize and fix the hair. So how we do it, it's just going to zoom in a bit presented and just zoom in. Let's select the hair with Polygon Lasso Tool, which can click here and just click. Just simple clicks. That's only do. This is one of the easiest way of selecting things. Put these here is the easiest one. All right. Just keep going. Take your time. Be patient. Just make sure you cover all the hair. And that's the key part. When you're done, just right-click and feather it and put it on 10. Right? Now. We're going to colorize the hair with a curve. So let's go to Adjustment Layer and click on the curve. Right now. Now just command or control G to group it. Just click on this mask, drag it and put it in the group. Editing under this group, it's just going to be affected by this mask, is just going to be inside this mask. Right? Now. Let's go and add other parts to this mask as well. Here we go. Just going to just click until the hair. Now let's go to the Layer Mask. Now we have to add the selection to this mask as well. But before that we have to right-click on this and federate this one to press OK. And now press Control Delete to fill this mask to see if the mask is affected or not. Hold down Alt and click on this layer mask, you see we have these two altogether and click Command Control D. Right now. I want to show you the concept. Let's colorize this part then we go for the other parts as well. Go back to the curve. The concept of this is this. If I double-click on this, imagine we are going to make the hair red. Put this red color. What is the read? R is 255, green is 0, blue is 0. So the red is to 55. Its maximum. Green is 0. There is no, there is no green and no blue. And this is the concept with the curve. Let's go to our red channel. We are in the care. Bring up the red. Right now. This is red coat. Again, go to green channel, bring down the green. Now it's more red. Again, the blue pin down the blue Z now is total red. So this is the concept we're working with now, which could bring this up a bit green. I'm just going to bring this up as well. The same angle going make it like something like orangeish for now, later we can change it as well. And then bring it down a bit. Make it look like this. Now, let's select the layer mask. Let's put an, a fixed other parts. Now I'm just going to click here, click here, click here. We're going to add these areas to our mask as well. Right-click Feather. Make sure it's 10. K. Control Delete, you feel this and you see the car is changing. Let's go to other parts, especially these areas. Click here. I'm going to select all of these. So we'll just following these lines around the hair and be trying to colorize the hair. It's easy, right? The care of adjustment. It's easier to colorize, but you have to know the cutter theory. And color theory is going to be easy if you don't know. Just as I said, go to Color Palette, click on a color and see color number, then you can come back and guess it on there. All right. Now, right-click Feather, It's 10. Control Delete. And the law. Let's come back here. Click here. And let's come back here and it's better. Go. And that's it guys. How is it that you just gonna do some selection does all within BEC is space. I can go back. If I do a mistake. You can always go back. Make sure you right-click Feather 10, country delete. So now we have to zoom in and see which parts are a bit sharp and out-of-control like this. You have something on hand plus B, makes sure the brush is smaller. So now it's black. And I can paint this here and make sure the pressure is smaller and easily campaign this back butt. Make sure the flow is a 100 percent. So you paint much faster. I'm just going to go around and see if something is missing or something is wrong here. This x and add the paint is because this is part of here. And zoom back a bit. And everything is cool but here it's coming to the bandage. Just going to fix that up. Nice. Here we go. Coming to the bandage as well. And I think it's cool. Perfect. Okay. We can also fix this small little hair as well. If I come here making new layer. Let's go to a spot healing brush, which is going to show you if you see something like this, I'm just going to drag a line on top of these hair and we can fix every single hair here. No problem. Easily. I think it's natural and sometimes you just going to keep it. But if you really like, especially this one, Let's press R and just rotate this. Press B for press J. J. And slowly I'm just going to come. And sometimes you have to tell Photoshop in this lines I'm just removing. So just going to guess it and It's going to be more perfect or not national origin and set the view. And here we go. So for now I'm just going to keep it and everything is cool and natural, I guess. Let's fix this part. You see there's a lot of small little hair flying here that doesn't match this color. So I have to fix it. Actually, it's very easy. Let's come to the top. Make sure you pick up the Polygonal Lasso Tool. I'm just going to select start from here. These areas Adjustment Layer, and click on care outside the group. Now, Let's go to red channel again and bring that up until you see the color is kinda match this area. But the shirt is just affected as well, right? So how would you fix it? It's very easy, actually. Just double-click here. Make sure the blend, if on this layer, hold down Alt and drag it and spit L2 and drag this to the left. Right now, this one I'm just contract is the left as well. Look at this. How easily fix this. But the shirt is still affected, but there's a really quick way to fix that. All right, so I click, Okay, come to this mask layer. Press B on your keyboard. Hold down Alt and right-click and drag. Bring down the flow to 14 percent. I'm just going to paint over this. I'm just going to just click eyes, click and drag. See here and here. And there is actually no before, after, before, after. Nobody is just going to understand that this fly hair is that the color doesn't match, actually is totally matched right now. All right, Now, let's click on this group. Control G to group it. I'm just going to call this hair. And the easily we fix the hair. So the cool thing about this process is later, we can change the hair color, the lips color, and everything. Because all these bar inside these folders, and it's easy to.
21. Color Grading in Retouching : Alright, now let's add some highlights to the face. Let's go to Adjustment Layer and click on curve. And from the highlight, just click and drag up a bit. That's cool. Make sure the layer mask is selected. Click Control Delete to fill it the black. Press B on your keyboard. Make sure the flow is 5%. And just very gently. Start painting over these areas. See the light is coming from the left side. That's why we adding some light. This left areas as well as this part. Okay, Cool. Now see the before and after. We added some dimension to the image. Now let's come here and just click right. Cool. Now we are going for general color. So what degenerate current? Let's go to Adjustment Layer and click on selective color. The selective color is so cool. Now we are on red channel. It means anything is red is going to be affected. So let's drag the red is cyan part in red channel, the left a bit. And I'm just going to play around with this until you get something very interesting and very cool things. Something pinkish, right? And this is nice. This is cool. Now, let's go to neutral. And neutral, you just can play around with the magenta a bit. Maybe low, up much black, bit, cyan, bit to the right or to the left, maybe minus 10. Now let's go to black. To black. It's so cool. Drag the yellow to lift a bit to make it blueish. Cyan to write the bit. And the NO. So just going to keep it this way. And in the next lesson, we're just going to create the neon part for the background. Then just going to come back and combine all the colors together to get something very inspiring.
22. How to Create Neon Effect in Photoshop: All right, Now it's time to create the cool new mnemonic for our background. But before that, let's click this hold down control and click on this control G to group. It is called these general color. All right, now, create a new layer and Control Delete to make it black. Again, create another layer. Press B on your keyboard. Alt, right-click, make the brush smaller until in this size is cool. And I'm just going to make sure the flow is a 100 percent opacity, a 100 percent bring down the ruler. If you don't see the ruler, press Control R and drag it down until here. I'm just going to click once, hold down shift, and click again. Now, let's select the move tool. We don't need the ruler. Now this layer is selected. Double-click underside layer is they're just going to come up, click on the outer glow. And this is going to be our setting guys. Opacity is 49, spread is on 17. Look, if track to the right is going to be a little realistic, just pick it down around 17. We get the size. Make it smaller and larger. So this is cool. Range is going to be 78 to be exactly look like a globe, like a fluorescent glow. Now, the first color is going to be Read. Write for the Color Overlay. Click on this one, red color and leave it here. Just press OK. And we'll drag this to the top, hold down Alt and alone shift and copy it. And I'm just gonna do this for five times 45. Hold Shift, click here. And make sure it is all the level. I'm just going to put it at the center for now. Now, let's go to the second one. This one, double-click here. Your SON make this orange outer glow. Click here, drag this up. This orange color overlay. Orange. And that's cool. Because okay, the second one, we're just going to make this yellow double-click. Outer glow. The color. It should be yellow. Click Okay. The same thing. Yellowish. All right. The next one just going to be cyan, I guess. I was a glue. Let's make this, say here. Something like this. It's cool. Okay. Carlo, alle, the same thing. This go around to see. So yeah. As well. And the last one is going to be blue, outer glow. This kind of blue. Right? And hello. Again. This is going to do an OK. Now we have our known. Make sure we click at the top, hold down, shift, click again, Command or Control G to group it. It's called this neon effect. Now, before we do anything, just press Command or Control J and T. Hold down shift and rotate it. Press Enter, click and the blue one, drag it to the left. Hold down control and click four plus V. Click and come here. Again, hold down shift, click at the top and make sure they are given. Now. This noon copy, I'm just going to drag it down below the Neon 1 and bring down the opacity. Right. Now. See the new effect. I'm just going to press Command or Control G and drag it down below three of them past noon. New copy, which is the capacity is lower, and another copy. This garbage is going to be blur. So, but we cannot Blair the folder. You have to right-click and convert it to smart object. All right, now let's go to Filter. Blur, Gaussian Blur. Bring it all the way to the end and press Okay. Now, let's go zoom back a bit. Control T. If you press Control T, you're just going to remove the Blair just temporarily and hold down Alt and make it larger. Just going to bring it to the center. Press. Okay. Now it's just going to bring back the Layer, right? That's good. Now, let's turn off this one, the black one. Now, hold down control and select each one of them, the three of them. Click under Blending Mode and put it on, Lighten. Right? Press Command or Control G to group it. Let's call this group neon. Now, let's turn that off for now, because we have to select the person for now. So click the liquefy this image. Let's go to this object selection tool is cool because we just going to select object, that's all we do. Automatically just going to select the object for us, which can zoom in a bit. This is a bit messy. Just going to fix these parts. Polygon lasso tool. I'm holding down Alt and click on this to fix this area. For these alien as well. I'm just going to add these areas, so I'm just going to hold down plus guys, the rest is okay to write Chrome. Now let's come back and tell the neon effect. But this should be going inside a bit. Because when the edges are affected, we have some glow at the edge, right? We call this rim lights. So how we do that? This could to select and modify and Contract. Contract before. Just gonna go in, right, cool. Now, let's open that up. Click on New and effect and click a mask. But now it's inversed. Command Control I to inverse the selection. Now hold down Alt and drag this to new and effect hold down Alt and drag these two Neil copy to exactly. Now, we have this kind of cool effect. Still, the effect can go inside a bit more, right? So let's click on the selection. Because selection is outside this time. Let's go to select, modify, and expand. Expandable for scanning, go inside a bit, right-click, add some failure also. Okay, now press Control Delete. And this one, control delete. This one again, Control Delete, press Command or Control D, C. Now, look at the edges are much softer and very nice. See, the light is gradually coming to this rim light. How cool is that? Right? Now, select this one. Did neon copy to mean the background, the player plus B on your keyboard, hold the ALT and make the brush size larger. Press X to switch that. The flow should be low. And I'm just going to add some light. I'm just going to bring sunlight with, because the light is coming from that direction light it just going to affect the phase also, but the flow is too much. And get down. Look to process which should be smaller. Z should be like the effect is coming through, is affecting the hair, the hand. And this part, not too much. Go back a bit. And this from these areas coming through as well. We have to think like the light is coming through and from which area, from which angle. Then we can create something. Very cool, interesting. Z decay, right? Because x again and just clean up this area. We want this to be totally clean. Alright? Now we done with amazing new defect in an export, you just going to create some selective color again and combine all the color to get something extraordinary.
23. Final Retouching and Sharpening the image: All right, let's go for a finalizing and sharpening damage. So right now if you have done the neon effect, but I can see there are some here here, and we have to get rid of them. I'm just going to click on Polygon Lasso tool. Just come here. Select these areas and that's all right-click Feather 10 percent. You have to select the legal file press S. And for clone stamp tool, I'm just going to clone these areas. All right, I'm going to Control D. Let's go back to neon effect. Command or Control 0. Click on the New Effect and go to Adjustment Layer, click on Selective Color. Selective Color. Let's come to read a bit. Make the cyan to the left. We increase the red parts and the yellow part 4, we get more pinkish. Let's go to black. And let's go to the right side a bit to make sure the images pop and yellow. This can bring this left a bit. Nice. Say yeah, there's just going to play around with it until I get a perfect color match. And it's blue back to red again. Bring this down. I'll bring this to the left. Very nice. Now. Plus B on your keyboard and just do some pop, pop, pop the image to the face. I'm just going to bring back quality and the sharpness. See, this is going to be our color matches it before, after. Now the colors don't match with damage. Now let's do some sharpening. How we do it. Create a new layer and Control Shift Alt E, right? And just going to put all the image in one top layer. Now let's go to Select and Move tool first. Let's go to Filter. Are there and click on high-pass. High-pass is a bit lower around three, I guess, or 2.9. Press Okay. And put the normal on overlay. If there's amin, just going to see how sharp is going to get without it. With the eyes. How cool is that? But the thing is, we don't need this to be sharpened all of the places, we just need it to be sharp in some areas and hold down Alt and click on this mask. So we're just going to remove the sharpening parts. Press B on your keyboard and make the brush smaller. Switch to white. And just go over the eyes, the lips, or this little area, right? In this area. Then this area. Let's go back. I have rows. And you see how cool is that? Now let's go to the adjustment layer. Let's add a curve and bring up the highlight of the image. A bit. Now, Control Delete to fill it with mask. Press B on your keyboard and let's go inside. And we're just going to write in the eyes, lips. And just some pop guys. It's going to be some pop in some areas for pumping the image. That's all it is. Now it's time to make it ready for Instagram and social media.
24. How to Make Any Photo Pop For Social Media: All right, Now it's time to make this ready for Instagram post. So how we do it? The first thing we do is we go to File Export and click on Export As or the shortcut is Alt Shift Control W. Now, you're going to export this to here. Click Save. Now let's drag the image and put it in Photoshop. So we have one single imagery. Press C on your keyboard. Now, click on ratio. Put it on for four by five. Let's switch it to this angle. This is going to be much better for our Instagram, which could track the image and bring it to the center. Or maybe this area would be nice to. Delight is in the center. And here we go. Now, let's make the image smaller, which can hold down Alt. And make it here. Again. Pick up. Again, just going to adjust it. And here is cool actually lies. I'm just going to press OK. Now, zoom in a bit. Now let's make the image pop for Instagram. Click on the Adjustment Layer, go to vibrance, drag away brands to write a bit. And this saturation tried as well. Maybe a bit more or ICU. Now, press Control, Delete, command Delete to flip the black. Now press B on your keyboard. Pick the brush smaller. We do white brush guys. Please connect just one click. Click. Just going to add some Click to pop the image actually knows a bit here. Some areas that, that area it doesn't work. Michigan, I think. And just the two or three times and two, I get a perfect and pop image. Right back. The focus should be on the face. Connect down to 0 to see it. How cool is that? I hope you guys enjoyed this video as much as I did. And I hope you guys learned something. And we have done a lot of work. And Let's see, and let's go back to the original image and see before and after is come here, hold down Alt and click. This was before, and this is the after. Before. And after. Now it's time for you guys to go out there and create something inspiring.
25. 23 Photography Behind the Scene: Hi. This is an interesting trend.
 Soli Art, Content Creator | Digital Artist