Transcripts
1. Intro Video Photoshop Master Class: First bar. We just got it in the Lighting
and we go for Perspective. How to Select Subject
minimum, maximum Channels, Blend if Color Range,
deaths, clipping, mask, depths, Color
Matching, Shadow lighting. Then we have to
Projects in putting a Baby and a
different backdrops. Then Composite the
photograph that we took in a studio bride and put it
in a different location. Learn how to Composite multiple images at Create up In The Air photo
manipulation. Now it's time to show you how the Compositing
Golden secret works. The next Projects is
ballerina and a Snake. Within how to use
Glow Effect and finish it with two
final projects. Batman and do
2. How to Match the Light in Any photos: What is light matching? Which is the first step of the compositing Golden Circle. We always tried to find our background first guys. Or sometimes we should have a subject. We hated her background and we tried to change it. So how we do it, We always check for four things, which is called quality for matching background will have a subject. We always check for quality. What is quality? Is intensity, hardness or softness in direction and color? I explained here, tried to find your Packer first and then shoot as close as possible to that background. Just copy the light direction, intensity, heart or softness and color. For example. We do have these background and look at the light direction guys. It's coming from this angle. Now, if we want to take a shot of our subject, the direction should be the same angle with the same intensity. It means the amount of light that create these shadows should be the same. And we get these cheat sheets. This is the light coming from this angle. This angle. If I actually have to put this above all of these here. And so I can see it is the light direction is 45 flesh down, it means direction from this angle, we get the shadows. It's very harsh and the intensity of light is too much. You see, it's very high. We get the intensity. How we know it, the intensity is high or low. We look at the amount of light and the face and the darkness of the shadow. D sharp, it's very dark and sharp edges. And look at this one, the shadow edges and still it's dark. And this one low-intensity, Almost there is no shadows. It means it's like cloudy area. This one is like a sunny day. And this is the intensity of light. Let's talk about this one. Hard or softness. Heart. Always look at the shadows. And we know that it's harsh light because the shadows are very short, sharp edges, dark. The soft light Almost there is no shadows and it's kinda flat. Here. Look at the nose area, the neck area, rickety shadow around the neck. And this is how we find out what is the harsh and what is the soft light, soft light. There is no shadows. Harsh like there is very harsh and dark shadows. So the matching two subjects, we always check for the direction. We check for the quality, which means intensity, hardness, how much light we have, what is the direction, what is the color? If they collect doesn't match. It's okay guys. It's easily. I can add a color balance. For example, this one has a bit of blue. So I add some blue, cyan, add cyan. And this is, I can just create the same color as my background. So for these two image, this one goes to this background. This one has a soft light. It doesn't work for this background. This is why we check the light matching. First. Let's go and do some real example. Imagine we have this beautiful lady, B2C and amazing shot, but she doesn't like the background. So we have to change it. So how we do it, I show you my process. I go to Google and go to this website, pixels.com and search for beach. Because my background's about Beach, I'm looking for intensity, the direction of the arrows. The intensity is set, the direction, the color, the software hardness of the light on the face. Let's see which backend can find everything. For example, this one is kind of match, right? It's better background and I remove this person the shadows. It's almost the same. In this image. Design is exactly above our subject, but we don't see any other shadows. So, which means we can use this image. So let's go find another image. I downloaded this one. Click this one to download. Let's go for this one. The light is from the back, the shadows, it doesn't work. This one it doesn't work. It's kind of sunrise or sunset. And you don't have much light. This one it doesn't work. What about this one? The shadows is the same direction, so I can download this one to the intensity of light is the same. It's better background. Download this one as well. So I downloaded before these two images, I added to my picture. In case of light matching, it's perfect. So which background is better for our image? And what else is important? The perspective is important, which is our next lesson. So in the first lesson, we find out or light matching. So first try to find your background. And if we couldn't find a background, it was a case like this one. You should follow our subject. We don't like the background. We go to website, we search for it. We tried to find an image that it just in case of quality is totally match with our environment. Actually, this makes our life easier guy. That's why we do it. We don't want to put a soft light picture to very harsh and intensity light picture is going to create a lot of mess. And at the end, it doesn't feel right. But if we follow this process, guys, I promise you, you can create amazing composite by the end of this course. All right, let's go to the second step. Perspective.
3. Find Perspective or Horizon Line in any Photo: Alright, in this video, you will learn the most important thing in compositing, which is perspective. In compositing, you can make everything right, like shadows, colors, saturations. But if the perspective is, you know, something is not right about this image, right? Take a look. You know, it's like this car doesn't belong to this image. Why is that? Before we get to this point, Let's go back and see what is exactly perspective. For matching the perspective. We take the horizon line, camera angle, and focal lengths. So let me explain. Take a look at this image and take a look here. What is the horizon line? Well, basically, the horizon line is where the world ends. You see at the end of the ocean. Like here. At the end of the ocean, you see a line which connects the end of the sea or the ocean to this guy. And you just see a line. That's the horizon line. Or here. This is the horizon line. Here. This is our horizon line here, here. So what are differences? We always check the horizon line and the angle of the camera. If you can raise tilt up, the horizon line would be at the bottom of your frame. And if the cameras tilt down, then the horizon line going to be at the top of your frame. But this one is in the middle. It means the camera is at the middle of this person. Here, is at the bottom, here at the top of the head of this person. That's why the horizon line is different. So if we are going to composite to image together, the horizon line and the camera angle should be the same. That's why in this image knotting it works. Let me explain and find the horizon line graph, these two image. How we can find the horizon up this one, see where the world ends. Here we go. I'm just going to click on the line tool and make this field read the way 20 is going to create a line here. Bring this here. Here, the world ends. That's the horizon line of this image. What about this car? Have to find the horizon line of this car. I'm just going to click on the C on the keyboard and click and drag this to the left. Press Enter, click on the line. I'm just going to guys, I'm just going to follow these two lines. Look this and this. When these two connect together, the point that these two glides are connecting, it's called a vanishing point. Let me go back here and show you. The vanishing point is when the two lines, which we call them conversion lines, connects to each other, it creates something called a vanishing point. So we follow the lines. When they reach together. We create a line which we call it a horizon line. The care. We follow the lines from left and right. This point is connecting all the lines because the vanishing point, we create a line here like this. And this is for horizon line. Just to be great. Now, what about if we take a photo of a building that it doesn't look like this. This is one-point perspective. It means every line is connecting in 1. What about this one? This is 2 perspective. It means we are at the edge of the building, so we have to, let me bring down the weight. Means we follow these lines. And we also follow these lines. And here is our horizon line. Exactly like this two line. You follow these lines. We follow these buildings lines. The point they connect, it's called horizon line, which is this one. Then we know that this image has a horizon line. And exactly here with the camera tilts up. Now we don't have to find perspective. Let's go back here and finish this. So take this off. Let's create a line like this. Again. Just going to come here, which is going to follow these two lines here. Again from the top of the tire to here. Alright? At this point, which can create a new layer. Or I can go to these lines and create this one. Now, I do have a horizon line up this image. It's going to click at this and the car and go up. You have to match these two. But still, it doesn't work because this camera angle is still up. This camera angle is tilts down. The original image. And horizon line is here and is contagious up. So the camera is still down, the horizon line is above the subject. That's why these photographs, it doesn't match. You get this car, for example. I'm just going to bring this up. The horizon line is here, is still up. That's why these two images are never going to work together. Great. What about these two images, guys? We would have the same car and we also have a background. At to find out. Again, It's going to click here. We'll quickly now we know that the horizon line, it's around here. Alright, cool. Which can click or control, click on the shape to bring guest here. Right now matching. Let me just click on the shape, makes sure all down Shift. Again, drag it up. This is the exact same price and line of this image. Don't need this one again. Now, to select the car, press W new keyboard and make sure this layer is selected. And click on Select Subject is going to automatically set it, God, but we also need the shadows. I'm just going to come here and click on polygon, a lasso tool, hold down Shift. And I'm trying to click and click here. Click here. We're going to add the shadows. Come here again. I'm just clicking that anymore. Well nano space, come here. We'll now shift, shift. Just going to come here with no problem. Space bar. When the signal is showed up, just click again. Now I have added the shadows as well. And I'm just going to click on the mask. Immediately. You see one thing, these photos are totally matched. Why? Because in both images, we have the same horizon line and the camera or teeth up. We get these two. At first it was this image. The camera again is tilt up from the ground. See the camera's pointing here exactly. At the horizon line. The car was the same. If I hold down shift and click here, see the camera angle is tilt up and the horizon line is here as well. Hold down, Shift again and click. That's why if I remove this attendees on these two image, okay, to totally match. We can also control T and bring this here at this horizontal line, guys, just completely at the horizon line. Now I can scale this up, still, match perfectly. And this is the most important part. In every composite. This is the best thing that you guys, Keller. Just match the angle, match the horizon line, and you're good to go.
4. Match Perspective In Compositing Project: Let's go to another example. What about if we take a photo of this person and there is no horizon line is in this studio. We probably would have guessed that. I'm just going to guess that and you have to see a lot of image guys. And probably I'm just going to guess it's around here. Can we put this image to this image because we have the same horizon line. Almost. Probably. Horizon line should be around here towards the ends. See that? Because the camera is from above, from the shoulder is pointing here. So go back to this one and drag this one to this image. And let's try this. Press W on your keyboard as a subject. Click on the Mask and press V on your keyboard and try to see it's totally match. And it's going to be realistic. If we put this image to this image, the only thing that it doesn't work, It's lighting. The light in original image is coming from is like a sunrise. We don't have a backlight, but this one we have a different light direction. That's why I recommend the two image together. It's possible, but it's a lot of work. You have to select all the highlights and dim it down, make it darker. It's a lot of hard work to match these two image together, but as possible, because the perspective is right. Now, let's go back and recap. Looking at this image for example. So we follow the lines one-point perspective, we create the horizon line. We also see the quality of light. It's soft light, the direction of the light it's above, above, but it's soft, it's cloudy. The color is called difficult lanes is wide angle lens. We check this in every single image. Now, if we want to bring a person to this image, we want to take all of this again and again again. That's why we can't have a perfect match. C on my keyboard. Bring this back. And let's do more example our perspective. Just going to kick this off. Let's bring other images guys to this photograph. What about this image? Does it work? Let me check. The horizon line should be here. Just gonna put this here. Well, it doesn't work. Why? Because the camera here is T of down, it's way above the subject. But here it's around the face. So we can't boot disk image together. It's going to be very hard and at the end is not going to be a realistic as trust me. All right, let's go to this image. Well, this is probably work. Why we get the horizon line. It's exactly here. And I'm just going to match these two lines together now and I just match then this off. And let me do one thing. Pressing W on your keyboard, select subject. Now click on the Layer Mask. Now we can't see, but it can be done. You see, it's realistic. But in case of light, it doesn't work. But in case of perspective, it's working. We can fix the light. I don't recommend use this image, but in case of light, we can use this image if we have two. So the perspective was matching. What about this image? This image? It was here. It was originally this image, but this horizon line. And I just selected the subject. And you see the horizon line is around the shoulder. That's why it's not going to work. You see some of the images and some of the background that we are going to match, it is not going to work. That's why I'm using this image as a reference to show you. Sometimes we should use this background. We have to look for other backgrounds. We have to look for either images to match. And that's the basic of perspective. Now you guys are really comfortable to find two images. Look at the angles and the horizon line. And you can easily match them and also check the lights to be exactly precise. In the next lesson of compositing Golden Circle, we go and learn all kinds of masking, right? Let's go for it.
5. Best Way to Select Subject and Add Hair: All right, We're in section 3, masking. Let's see how we can select a subject and work with brushes. Let's get this image. Press F on your keyboard guys until you can move your artwork around. It's going to hold down Alt, scroll with mouse and zoom in a bit. Let's see how we can cut out here professionally to do that by pressing W on your keyboard. Now, click on Select Subject. Photoshop automatically is going to select the subject perfectly. Now let's select on, Select and Mask. Here, we do have something called Refine Edge. Make sure your brushes is very small, not large, a small. Just slowly go over this one, make sure this is active and I'm just going to slowly go over the edges. For this area in the middle is going to make it the various model down Alt option. Right-click with my mouse and drag to left or right to make your brush size is smaller or larger. Here I'm just going to drag over the white area. That's all I'm just going to do. Just call the white areas. Here we go. Yes, well, here it's very simple. Here, below here as well. But for this part, I'm just gonna hold on Alt, right-click and drag to write and just go over this part as well. Now, Stevie, of lot of problems. You see, we have a lot of small little white areas around our hair. The best thing we can do is increase the contrast and not this much, right? Let's go back. Is loaded. Drag this slider to the right to see the white are going away. But it's still in this case is not going to work guys. I mean, I'm just gonna increase the contrast. And if I use the Shift Edge, I'm losing my hair. And this is not something that I really want. So what to do? I'm just going to bring back this group 0. The contrast is going back and definitely Square back as well. Let's come down, put your output two new layer with layer mask always. And remember that setting Chicana pass. Okay? And let me show something that's just double-click on the layer mask. For fixing the age in the view panel, we can put it on onion skin by default to see the background. But the best way to fix it or see everything is put it on black so we can see everything properly. This is something I really wanted to cover in this lesson. So let's go back and press Cancel. Now, we are in this level, so how to fix the part that are wide and is not perfect. And I'm just going to show you a trick, press Command or Control G to group this, call these hair. Now, click on the Layer Mask and drag it and put it on the folder. So anything we do, you just going to be just inside this hair. Let me show you. Is going to add a new layer. Press P on your keyboard, make Duflo a 100 percent, and C is just inside this. Anything I do. Now, Let's call this layer color. Let's zoom in a bit. Hold on Alt to select the color next to this area and just paint over, make sure a 100 percent of Asiana plus c just easily. I'm just going to Let's use the same color. It doesn't matter for now. Again, here. Here we go. Very nice. You see, I'm just going to really easily go there. Back. That's all guys. Let's go back here. So I'm just going to add to this, press E for eraser to spray this area, press B. And for now put the normal in blending mode to Multiply. Make sure the opacity is a very low. In around 70. It's fine. Now, let's see before and after. For, after. How cool is that? So we fix the hair, but sometimes we have a lot of broken hairs here and we don't want that. So how to fix it? The only way to fix it is with brush or draw it. That's all we do as a professional researcher. So let's see how we can fix it. So click on this layer, add a new layer on top of it. I'm just going to call this extra hair. This extra here are exactly behind the subject risk and press B, C is just going to be behind the subject. So press B on your keyboard again, right-click, you see this little icon. Just click on that and click on Import brushes. Select the Sony art realistic hair brushes, and click on load. At the bottom. You see this. But we don't want to have access from here, which is getting outside. Go to Window and make sure your brush sitting and brushes are active. Just click on them. You just gonna see them here. In your brushes. If you click, you can see solid realistic hair brushes. Open it up. I have a lot of hair here. Let me just drag this up so you guys can see exactly what we see. We have a lot of realistic hair here guys. Based on your hair and your model, just look for the best option, the best brush for your subject. For example, for me, I guess this is cool. But before that I'm just going to click on the brush setting may store in. I mean, brush tip shape. Spacing should be on 0. Can right-click and drag this up, make sure your brushes peak. But what about the direction? After fixed direction as well? I'm just gonna open this up. You can easily play around with this until I get the perfect direction. Now, I'm just going to track this and put it here below exactly the person. Now, click and pick up the hair color and slowly see what I want. I want this little area to just jump out. I mean, how cool is that? So control Z back. Selected color, tried to pick it. Same color, guys. So very important. This part. Here we go. Same color. We have Melissa. Nice. Well, here we go. I'm just see that this area, I'm just going to do cool color, very light color for these areas. Here we go. Let's zoom back. Is have a space here. Make the brush larger. Too much this. Now then open this up. And let's try and create a new layer for this. Click on this one, make sure brush size is very large. I'm just going to click here. Pick a darker color. Here we go. Pick a color. If it doesn't work, it means your flow is very low. See this small little detail and I'm just going to double-click. Make it very realistic. Gaia transmit, cooler, realistic. And I'm trying to just add multiple different color in the same area so it makes it really realistic. That's all we did, and that's all it is. Now, the next part is, let's go back to this hair and combine these two together. Go to general color, click on soft round brush. Bring down your flow. And just, I'm just going to get closed. You guys can see very slowly. I'm just going to come over this and try to match these two together. How cool is that? Is the less, if it is not right, I'm just gonna go back here. Sometimes you see these lines. So from this layer or this layer and layer mask. And just clean this up. Sometimes I have to go back again and click on this delete here. Go back here, here. And here we go. Higher flow. This is the process that we repeat all the time, guys. So you guys can really see. And it's very natural. Again, just going to add a layer, mask it as well, and just go around with this. Let's go back to brushes, round brush, flow very low. And just matching these areas together guys. Sometimes I really remove some of some part of the old image to just make it better. The composite is coming much there in these areas. And asked that so see, when working in these areas and just coming back here and just creating a new layer here and just adding the same thing. The annoying part it is always, it doesn't remember the setting after always go back and just, that's all we can do. Solution. Just going to click here, bring back the flow. And I can use these different settings and different brushes, but Messina keep looping this so you guys can, can know exactly how it works. See I'm just going to add different light and different setting. And so that's why I'm just going to combine all of these together so you guys can exactly see what's going on. See how cool is that. And also I can go back and pick up different. You see this one larger and a new layer. Go back to brush settings. See It is. Go back here. Click here and add this kind of hair and cool areas around my artboard. And sometimes I go here, top of this, create a new layer as well. Can these areas and just select and just paint. And you can just put some add some hair to face to make it more realistic. I see, yeah. And just bring down the opacity is it's going to be really, really cool. I'm just going to add any mask. Let's go back to brushes, soft round brush, and just remove some of this part. See this one as well. And layer mask. So it's too much. Sometimes I can just go around and just play around it until I could really, really perfectly here. So that's the concept. You have to play around with this until you get something perfect Lemons of the like. I'm just going to put all of these in one group. Turned off. I mean, something like this or something like it's, I mean, you can play around with these areas and that the point of this lesson was to show you how we can create hair for our subject. And you can go and play around with it until you get something like this. And we add a lot of hair here, it can just come back here. Press B on your keyboard, make sure become two brushes. Going up, soft round brush. Let's go back. I'm just going to paint over and I mean, that's why, I mean, I can play around with it until I get a perfect match. Tau symbol is that and how cool is that? And at the end, on top of everything, I can put some color lookup for compositing. And to make it look realistic is going to play around with it until I get something really, really cool. And if anyone see these images, trust me, no one knows that it's fake. Everybody thinks that it was there. Actually. I can also play around with the background. Here. If I go and add some care and make it a bit darker, it's going to be really, really fun to see how we created these hair. Actually. I can print out this layer. Well, it wasn't part of the lesson, but I really want to show you how we can just match two subjects together. Now you know how to select the subject, how to use brushes, and how to create hair for your model.
6. Why use MIN & MAX & LASSO & Pen Tools: All right, masking section 2, we're just going to work on minimum, maximum and see how to use pen and lasso for professional masking. We're just going to press Control Tab or Command Tab to go to the next tab. Let's see how we can select this guy and fix some of the problem. So click on this little icon here, hold down control and click on new layer. So the lady just going to be blue. The original layer, press Alt or Option Delete. To fill it black. Select the original guy and press W on your keyboard, and click on Select Subject. We have two options. You can use Select Subject or I can use remove background. Let's see how we can use a remote background risk and press Command or Control D to deselect the selection. Now click on Remove Background, presume your Q1, and let's zoom in to see some of the problem. You see we have a highlight here. We also have a line and the edge. You have a line and the edge, which is probably that a good idea to have them. And we get the ears, the selection is not perfect, is crazy. It doesn't work at all. But first of all, before we fix the selection, let's see how we can fix these edges. Make sure your Layer Mask is selected. Let's go to filter other minimum. And minimum. By default, you have to put it on one. Alright? Let's see if the one is going to work. I'm just going to go around and see if, if I put it on one. Every line is equilibrium. Bit maybe too. What if I put this and 20? Let's see what happened. The guy is going to be thinner and thinner. At least our mask. See this, I was going to be minimum. You just going to make our guy thinner and thinner. So I'm just gonna put in them to, to remove all these edges and highlights around the head and face and the body because the light was coming from the background. Now press Okay. Now we know how to remove the edges. Now, the other scenario is our main source of light is coming from the back of the sky. And in this scenario we need lots of age line actually. So we have to go to Filter, go to Other, and go to maximum and add some light. And edges may be three or maybe six. Take a look if I press okay and, uh, go back, look, take a look at this. It's like the main source of light is coming from the back and we have some light around the edges. And it makes perfect. So based on our scenario, we can add lights or we can remove the light from the edges. That is what minimum, maximum does, right? But the other thing is how we can fix this issue. I mean, this ragged edges selection and it's crazy. Let's press Command or Control Z to go back to fix them. We have two other option guys. I'm going to remove this layer mask but in a trash. Yes, delete it. Let's go back here. Press P on your keyboard for pen to professional people most of the time, 90% of the time use pen tool. Yes. It takes time, but it's accurate. It's perfect for advertising for everything. So just click, click and hold and drag. Hold down Alt or Option. Click on this corner again, click and drag other option here. And that's all we do. Click and drag. Alter option. That way we do it. How simple is that? If I hold down command and control, I can drag this to the corner. And again, fix this and hold down Alt or Option. Click here and keep going. At when I am done. For example, I'm just going to finish this line very quickly. Imagine I'm just going to select these parts. And I also need other part as well. The neck. I'm holding down Shift and clicking and adding to this area. Click and drag. I'm just gonna do it quickly to show you guys how it works. Now, when I'm done, I have to go to path. Double-click on this, and I'm just going to call it 01. If we want to add more selection, we have to create a new layer in the path area and add the hand to it. And call this 002. Why? Because the layer I'm just going to come back, hold down control and click on the mask and get the selection hold down control and get the selection. Then induce areas. I can do whatever I want in case of coloring, changing lies and everything. So that's why we do that. We're just going to press Command or Control D to deselect it, go back to layer. So the first option of selection was path and the best option. What about the other selection? We have lasso. If you have a pen and you're really comfortable with your pen and vacuum tablet, it can just go around the subject and do something like this. Right now, I am not using my Wacom tablet. That's why I'm using mouse to show you guys how it's done. Command or Control D to de-select it. Let's go back to the Lasso. Click and hold and use polygon lesser. I can also use this one as well. Look, I'm just going to go around this and just quickly select click, click, click. This is also a very fast and n most of the time I'm using lesser tool. But for a small little area, like for example, if I'm going to select these areas, I definitely use lasso tool. Now it's perfect. But if I'm going around this guy, see what happened. Imagine I'm selecting all of these areas. Again. I'm going to come here, again, go here, but accidentally, I double-click, I'm done. There is no back. There is no way I can fix this. I have to start from beginning guys. That's the problem with lasso tool. It's good for some of the smaller areas and it's fast. Look like this. But for professional reasons and professional way, it's a slow pen tool, but you get fast. I mean, if you click here and you click here again, hold down Alt or Option click, you really can get fast and disguise and it's just going to work perfectly. If you get used to it on the Alt. It can be fast, but trust me, it's a very accurate. You can fix it. We can go back to your path anytime. And again, fix it, hold down control and drag this left, right, and continue whatever you want.
7. How Use MIN MAX Very Fast: Again, I'm just going to hold down Control or Command and click on this altar Option, Delete to flip it lag, click and is there a guy? Remove is not that little. Well, it's huge. Now let's see. We have this line of light's coming from the back. We have to fix it is good to filter other minimum. But in two and when it's done. But still, if you have lots of jagged edges, which we have to fix them on the VDD pen tool. So you guys have to get used to it, guys, if you want to do professional things and professional advertising for billboard, the only way of selection is spent on, right? Now guys know everything about minimum, maximum pen tool and when to use a lesser. Let's go to the next section, which is channels and blend. If.
8. Why Use Channels and Blend if: All right, masking section three channels and blend. If press Command or Control tab. Come here. I want to replace this sky, but the point is to show you how channels and blend if works actually. So this layer, the layer below it is this guy. I just want to replace this sky. We delay upload. Right? Now. Let's go to channels looking for contrast in red, green, and blue. Which one has more contrast between black and white? Well, actually is blue, right? More contrast. It means if I hold down control and click on blue, I'm going to select just the white area and a bit of this black area. Now click on RGB. Let's go back to layer and the top layer, I'm just going to press our mask, but I have the inverted, inverted selection. Now this guy is replaced. But you see these areas a bit noisy, which we could fix it and channels, but I want to show you how. Let's go back to my Control D. Let's go back to channels 1. I'm an blue, I have to create a new layer. I'm just going to copy this blue channels and press Command or Control L for level. Drag this to write to make it totally black. The black, this white area to left. Now we have total black and white. Now, going to control. Click on this icon here, I get a perfect selection. Let's remove this below needed. Let's come back to RGB and layer. Now click on Layer Mask inverted. Now we are perfect solution. But it was a lot of work to do, right? So when we use channels is exactly like this. It simple. What about Blend? If the same concept, we're going to remove, this mask is deleted. For Blend If just double-click on this area. Now, you know the concept right? And channels, the blue one was more contrasty. It's critical RGB. Let's go back to layers. Double-click on this area. Now we are in Layer Style and blend. If area we can choose the blue channel. Actually the right side, the blue one is white, the left is black. Which one was black? Trees were black. The sky where white. Now, if I drag this to the right, I'm telling it remove the black, but we want to remove the white. Now, the points are a bit ACGME at the edge, we have some white to remove them, hold on Alt and click to split this icon. Now drag it to the left to gradually remove the white area. Blend If is helpful in every scenario in compositing. Trust me. Now you know the concepts with this area and how we work and remove items and underlying layer how it works. I show you later in the real project, but the concept, removing do black, removing the white and you see how it works. Now press Okay. Now we are perfectly sky. In the next session, we're just going to learn how to work with color range.
9. How to Select Any Color with Color Range : Masking section for color age. And at the end, I'll show you how to create shortcuts for some of the tools that we are using a lot in Photoshop. This complex command control tab. To go to the section, we have an image and we're just going to change the dress color of this woman. If a good to hear saturation and drag this hue to the left and right. Saturation, left and right. Everything is going to change because the color is everywhere. I mean, the yellow color, right? There's no way I can change this, even if I remove this. Plus W on your keyboard, click on Select Subject. And again, if I go to Adjustment layer here and saturation, drag this to left and right is still, everything is changing and it's not going to work properly. So how we can change this color to everything as quick as possible and also perfect. Now, let's go to Select and choose the color range. But before we do that, you have to do the same thing. Press W on your keyboard, select subject. Right? Now. Click on Lasso Tool, hold down Alt and just click on Lasso Tool hold down Alt and just go around this area. One this, and also, you know, one of these areas. That's all they do, right? So week 4, lose selection. It means it's not perfect, but it's okay. Now let's go to Select and click on Color Range. How does this work? Just pick up the eyedropper and click on the area that you want to change the color. Pick up the plus sign and add selection here, here, and here as well. Here. And I think is cool. Right? Click OK. Now let's go to Adjustment Layer. Click on here and saturation. And if you click on this icon here and come here, hold down control. You can change the hue. Command or Control. I mean, easily you can change to any color, the left and to the right. How cool is that? I think I like this color. You see easily, we can change any color as quick as possible and it doesn't affect this grass as well and anything else.
10. Work Faster by Creating Shortcuts : Do we need to always go to select and find a color range? Now, we can create a shortcut for that. What about adding this to a smart object? I mean, press Command or Control J. Right-click and rasterize it. Most of the photos that we were working on our asteroid, it means it's not a smart objects, so we have to right-click and make it Convert to Smart Object. So if we add any filter later on, we can come back and fix it. Now I'm just going to show you how to add shortcuts to anything. Let's go to edit keyboard shortcuts. And basically by default is on tool, but we want to put it on Application menu. Let's go to Layer and coming down to find the smart object. Here we go. If I click here, I can click on Control Alt Shift O. I'm just going to add this to a smart object. It just going to show the sign because I already added. So what about this one and click Control, Alt Shift something, you can add anything to it. I'm just going to remove this. So just click on something that you want to have shortcut on it and use your keyboard to create a shortcut. Then press, Okay. Now if I come back here and I press Control Shift Alt O, I have my smart object and call is that. What about the select is the same way. Let's go to edit. Keyboard shortcuts. Select, find the color range. And for color range, I'm just going to find our contour shifts. Are you just going to bring up the color range? Click, Okay. Now if I press Control Shift Alt are the color range popup just can show up. How cool is that? This is something that we always do to make our composite as fast as possible. We don't want to waste a lot of time. So that was the color range and how to use shortcuts.
11. How to Create Depth in Your Composite: All right, Now we'll go for a Section 4 and 5, clipping mask, color matching and depth. Right? Before you go for clipping mask and current matching, I'm just going to explain what did the apps or atmospheric perspective. I tried to make it simple. This subject that are closest to us have more contrast and details. You see that, right? We get these trees and the trees are here, are far from us. We get more brightness, less saturation, Let's color. And as we get further, it's almost nothing. I mean, it's all bright. There is no color and no saturation. So to show you guys what happened is just going to click here. Just if we click on these trees, look, the brightness is 15 percent, but the same thing here is 52. And look again. Brightest is nine, saturation is high. And look at the color is here, right? Is the cholera is highly saturated and we get the same color. It should be the same tree, it right here, the color of the trees get brighter. And what about in the back is much brighter. So sometimes in compositing, we have to fake objects as it gets further.
12. How to Select Any Subject Fast: Alright, now let's go and do it in real example. Here we go. We have a castle. I want to put it in this environment. Look, this is the castle. I'm just going to cut it out and put it on this rocks. Right? I'm just going to get closer to control T. Alter option. Drag it from the center to make it larger, press Enter. You can zoom in a bit to select this. The easiest way is going to object selection, to select around the subject. And photoshop automatically just going to select it. And it's not that bad. Just this part. Just gonna go to lasso tool, shift. Much lower than all to de-select these birds. Hold down shift to add. These parts. Can be more from this side. Right? Now let's go ahead and click on the Layer Mask. I think it's a bit too large, so which covers cannot control the t, make it a bit smaller. By the way, in case of perspective and horizon line, these two images are totally magic lies here. And yet it's the horizon line as well. So both of them are in the same horizon line.
13. Match Depth With Color Overlay For Close Objects: So for compositing, we always need a healthier What is held there. This could the adjustment layer go to solid color, make it 50 percent gray. Okay, go to Blending Mode and put it on color. So it will remove the color. We just see the contrast and look how contrast in this image. We get the dark part, the shadow part from this image, from the castle and the rocks. It's much darker. That's why it doesn't view, right? So the standards are, come to the castle. And here the right just double-click. Now. Here, click on a color overlay. Here, just click on the color palette. Look for the brightest side beneath this image. So I'm looking for the brightest part in this image, just close to it. All right, That's enough. Now, drag it up, make it totally crazy. Now. We're just going to zoom in so you guys can see. I'm going to bring this back until these two images goes together. Look in case of shadows and highlights. Just take a look here in case of lights are getting totally match press. Okay, now let's go to this layer mask is B on your keyboard and right-click look for in a dry media brushes. Click on the first one. On an Alter option. Right-click drag to the right. And with the flow of 38, I'm just going to match these two images together. But try to make it as close as possible and more realistic. All right, See how easy is that we fix the contrast between two images. And the images are blend together easily and perfectly. Here we go. This part there to match. How cool is that? Nice? Take a look. If I close this and you see in case you're lighting the match. So what we can do, just take a look at here. The shadows here are a bit brighter than here. So what we can do, Let's go to Adjustment Layer, click on curve. But if I move the curve up and down, it is going to affect everything. But I just need this care of the effects on the castle. That's why we learn the clipping mask hold down alter option. Put your mouse between these two lines and just click. Now the care of it is going to affect the castle. So from the mid-tone, I'm just going to drag this down a bit to match this shadows. And again from the shadow point, because contract is down a bit. Now, take a look. We are just crazily matching the shadows between two images. And now what I am going back, you see that it should be actually contrasted because look at the rocks are really contrast there as well. So now in case of lighting and the shadows color, DR. match, maybe I just can bring this up a bit. Coo. So I'm playing around with the shadows. In case of shadows from everywhere should be matched from this image and this image. All right, this is cool. What else? I'm going to create another curves adjustment layer. You can curve. Look from the right side, the red color is coming in, but we don't have any red color here. So what we can do is add in red. Let's go to the red channel. And from the highlight, I'm just going to drag this up. But again, if we want to discover just effect on the castle, I should hold down alter option. Put my mouse here and click. And this is just going to be under castle. Still much. Control. Z. Let's go to red again and bring this down a bit, maybe a bit, touch very slowly. And take a look. How realistic and cool is that.
14. Match Depth For Far Away Objects: Now, hold down Shift and click in the castle here. Can I control G to group it and just call this 01 product Control J to duplicate it, I'm just going to call the 002 and drag the castle embedded here. Command Control T. Other option, make it smaller. Just put it here. Now, just gonna go inside. It can the layer mask with B for brush. And let's match these as much as I can to make it more realistic. Which is closer. Don't be lazy. And try to do the right thing. All right? Now sometimes you just wanna do it fast, but it's better to do it in a way that gets perfect. All right. Now, as it gets further, it should be feeling like having deaf. So how to do depth? Click on Color Overlay. So you guys can see it here. Click on this color. I'm just going to pick up the brightest color here, which is this one. Now, let's zoom in a bit. And I'm just going to match the two shadows, the darkness of the shadows or ICU. And it gets for, so the further it gets, the saturation is going to be less as well. So I'm just gonna go to Adjustment Layer, click on hue and saturation and breakdown. This saturation as well. And let's get inside. Let's make it black and white thing it's matching. Let's come here. Let's drag this down a bit. Shadow, bring it up that much. And try to do my best to just match this. Icu. 10 is off and take a look. Now still has a bit of saturation. So what we do, I'm just gonna go back to this color overlay guys and play around with it. Look, if I zoom in, if I tracked opacity to the right, properly, I can get something pair. Let's go back to hue and saturation. Pink up to the light, the bit and saturation make it less saturated. Now take a look. It's much better. Now, let me just go to Control J 03. And we're just going to make it much further. In this one, you guys can really see what's going to happen. Maybe a smaller. Here we go. Let's get again, the mass must be in your keyboard and clean this area. All right, cool. Too much, I guess. Right. All right. We're just going to fix this part as well. Now again, double-click on the color, overlay. Color. I'm just going to pick up the brightest color here. Okay? Now, play around with this until the colors and combining together perfectly. Here we go. Let's go back and take a look. This is how we can easily match the subjects. Vdi clipping mask with colors and a lot of stuff. Now you guys know how to do clipping mask, how to color match it, and how to create depths. But still, we don't know about shadows, lighting and color grading. Something that makes this image amazing. All right, let's go to the next lesson.
15. How to Create Shadow, lighting and Color Grading Fast: Alright, now let's go for a Section 6, shadows, lighting, and color grading. I'm just going to do a very, very difficult situation. We have this kind of lighting, totally bright and sunny light to the very dark and just very small little light coming from left and right. I don't really recommend to do this, but I'm just going to show you the compositing golden Silicon works perfectly. And let's try to do this kind of competition. So from the start, I'm just going to find the horizon line. I'm just going to click on Line to defeat should be a red, should be fine, is fine. We're going to create a line from here to here, just follow the directions. And also these lines, Qu and here is the horizon line is going to remove these two are just going to keep it here. Let's open the ballerina girl. And it's finite horizon line for these as well. Click here. It's going to follow the lines. And photo this window line, this corner. Coup here is the horizon line. Let's remove these two. Now. I'm just going to select a ballerina Gail and the shape and match it here. Press Command or Control T. Put this pivot point on the line, Alt or Option and Shift. Make it small, firm the center, and make it a bit larger. Press Enter. Now we don't need the shapes. Just drag and drop it. Trash can. And here we go. Now the horizon line is totally match. So press W on your keyboard, select on the Select Subject. Now, click on Layer Mask. Here we go. As I start from the start, before we do the shadows, let's fix the light. Alright. Now let's go to Adjustment Layer Gilligan curve. For this one, I'm just going to bring down the midtone and the shadows because the shadows are so dark. But before that, hold on Alt or Option and kilobit to the ballerina. So we call this clipping mask. You just learned that from the mid-tone. Drag this down. And let's add a bit of highlights. It's fine. All right, now we added some contrast, but it's a bit reddish. Let's go to RGB channel and click on Blue. Opposite blue, it's yellow. So drag the blue down from the highlight. Now, we trying to match the light and how cool is that? It's good to adjustment layer. Click on Curves, auto option, make sure it's clip mask that is carer. And drag this up. Add more saturation first. All right, cool. And now measure the mask is selected, cannot control our two mascot, press B. And we flow a very 27 is fine. Slowly. Just add more. Contrast to this guy. Nice. What about the legs? Let's try and create another care of layer. Drag this down from the center. Make sure we all learn Alton object, angular mastitis girl. That's fine. All right. Now it's fine. It's okay. Maybe a bit more, something like this. Again, command control are the mascot, press B. And very gently, very slowly. I'm just going to drag this up. The bottom is more and Larry slowly. But as we zoom in, I see the H here. I show you how to fix it. Click on the ballerina girl. Let's go to Filter other and minimum. Let's put a two or one and it's fixed. Now, remove the edges. Now we have this. Let's go back to the curve and play around with the press B on your keyboard. Let's add more light here. Also. Add some shadows to the leg. To make more sense and decide. Alright, cool. Now we almost matched the light from the top. What about the shadows? Let's create a new layer. It's called the shadows. So just remember guys, always drag the shadows below the subjects. And as the rule that zooming, press B on your keyboard, I'm holding down Alt and picking a color. Maybe this brownish color near the girl, this is going to be the shell. And just right-click and drag this up. See this corner, I'm just gonna drag it up like this. You see? For creating shadows, we need something like this. Make it a various small and just double tap to do types. With the flow of 27 or 30% is making Teddy Just double-tap to three times. Here we go. Make it smaller. Tamil tabs to three times. Now, hold on Alt option. Right-click, drag it to the right, make it another tab. We can enter data gradually. I'm just going to add to it. This is going to be lit up more tab. What tab? Smaller here. You see that, right? This is actually what we do. I'm just going to come back here and see. It's exactly like a standing, but we have a shadow, a big girl here. So it means I have to make this brush larger. Just click some this area to make a shadow look like this. But as we clicking yes, something happening, we have to put this on, multiply. Does the multiply it just dark and dark and everything. The shadows is exactly on top of the texture. So just double-click on the shadows and hold down Alt or Option. Click and this law hanger and just remove this. We're just going to bring back some of the texture from this area. Thank you again. See now is more natural, but the color of this and the color up this egg doesn't match. Clicking new layer, hold on Alt or option and just kill him into the shadow. Press B on your keyboard, right-click we only this, I'm just gonna make this until like this and pick up a color like this one and slowly go over this area. Just paint over it and put it on a screen. You would in an edge, can you see what's going to happen, right? I mean, the color now is totally match. We can add more shadows to it, guys. I'm just going to make nineties. Go to shadows and make it larger around the person. Should be more shadows. And that's what we need, guys. And then you look at it from the bag. I mean, you think that mean, well, it's perfect. I'm just going to come back on this layer. I'm just going to call this color. I'm just going to pick a color from here, bright color. I'm just going to paint this this area. And it's getting better and better. Now, we have done the lighting, we have done the shadows. And let's go for calibrating. What is color grading? There is a lot of way to adding color grading, guys, the best way is let's go to Adjustment Layer and put a color lookup to it, which is going to go to this area. But it on something that it affects all the picture as a one. I'm just going to hold down my mouse here and scroll down to see which affects is better. I believe this one is perfect. So we have light from design. Light from this angle is bouncing to the legs and the shadows are totally match. And this is a very simple composite but perfect and visited very quickly. Let me bring back the image again. Guys. We just matched this girl from different lighting, from daylight to exactly night and very, very hard single lights. And you see the compositing Golden Circle works perfectly. Just a step-by-step mash the light. And actually we didn't try to match the light. The light doesn't match at all. But still if you did the rest properly, you can match even the light perfectly. So guys, really, congratulations, I'm so excited. Now it's time to do some practice. Practice these eight sessions, then go for projects.
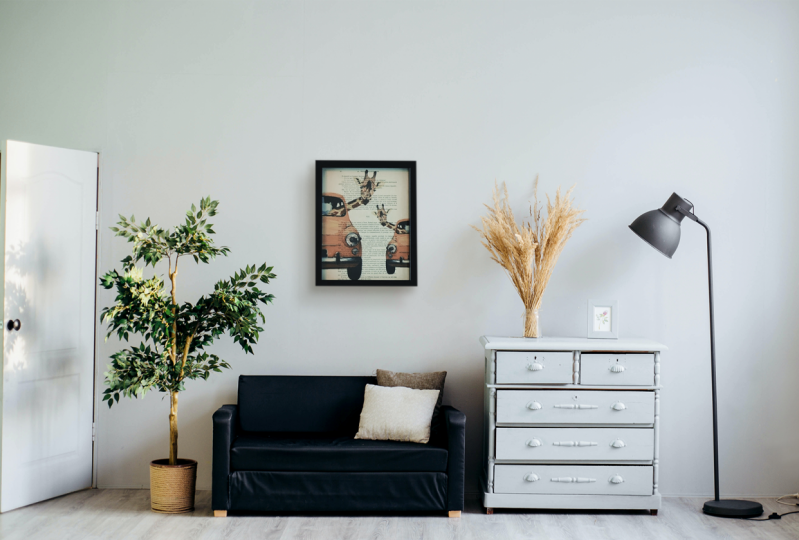
16. How to Hang a Photo Frame On Any Wall Easily: Congratulation guys, you are in the first project of compositing golden circle. Alright, now let's do the first project. The first project, it's very easy, but it is a lot of tips and tricks that you guys have to learn. We have to image. We totally different color tone. This is reddish or pinkish, and this one is greenish and bluish. So it will be very hard to just separate this frame and put it on another wall. All right. How do we do it and how we can create such a thing. So I don't need this one. I'm just going to remove these two. Now I have this one. All these furrows or downloaded from Pixels website. So the credit goes to because websites actually. So I'm just going to double-click here and call this frame first. You're going to get closer and pick up my Polygonal Lasso Tool and click around this area case very quickly. And given them, I'm clicking on the Layer Mask. Now. Come here and press Command or Control T, hold down Alt or Option, and Shift and scale it up. I'm just gonna put it here, right here. Maybe a bit smaller. Here we go. Click Okay. I'm just going to close them. The first thing that we just going to fix is the edges. If you click on the mask and bring up the feather, EBIT is now the edges are soft. That too much enough. See before and after. Here. And here. That's all in it. Its scope. We know the colors are different, but how do we match them? We need the help layer. Let's go to Adjustment Layer and click on Solid Color, dragging to the left and put it on 50 percent brightness. We call this 50 percent gray. And put it on luminosity. Luminosity gives us a color map of what is visible, but we don't see it clearly. To see it better, I'm just going to adjustment. Let's go hue and saturation and drag the saturation to the end. Now we see the colors are different. We have purplish frame. This is black, right? Butt should be exactly like the area around it, which is bluish and cyan. So we have to remove this purple and this lot of red inside. So how do we do it? Misko, hold down control and click on this press Command or Control G to group it. I'm just going to call this help. Now, let's turn this off. Click under frame is called an adjustment layer and click and care. In curve, we have three channels, red, green, blue. Now, we have to know the opposite of red, green, and blue. To help you guys. I'm just gonna go to Adjustment Layer and click on Color Balance. So the opposite of red is cyan. So it means if I am going to decrease the red, I have to drag it to the left are insomnia. If our picture like here has a lot of purple, it means I have to go to the green. So this is just for help. And I'm just gonna go to curve. Go to green. Why green? Because the opposite is magenta, which is going to decrease the magenta color. So I'm just going to go to care again. But before we do anything, guys, it means if I drag this up and down, it can affect everything. But press Control Z, I have to affect this only on this frame layer. I'm just gonna hold down Alt and clipping mask. We have two options here. I can use this for giving mask or I can come here, hold down Alt and click here off on. Now, this curve you just effect on the layer below it, which is our frame. Desktop is confusing. Now, Let's go to green channel, which if we increase, it means we are adding green to it. If it decreases, it means we are adding purple. Controversy. It has too much purple, so it means we have to add green to it. But how do we do it from where? Let's click on this hand icon and click on the purple area. Right. Now. It's here with the help of the arrow key on your keyboard. And press the up arrow until we get something like just blew. Not totally green guys, not this one. Maybe this, we can go back and forth right. Now. What else do we have? We have the drag it down a bit. Still, be our purple. Let's go up. Let's do lose that one. What else do we have here? We have too much red. Let's go to read. And here we go, click here in this area. Drag it down. Qu. We drag this down until you see the surrounding area as are matching our blend together. And this is exactly what we need to do. Let's see if I turn this off before, after. So it means the color are getting closer and matching with the background. So let's turn off the healthier. You see a lot of red around this area. This is because of the image itself. It has a lot of orange to it. So we can bring this down, how it's good to adjustment layer, go to hue and saturation and drag the saturation down. But before that, we have to clip it again to the frame. Drag this down a bit. So by dragging the saturation, we can have a feeling when going back, we can have a feeling that which part are matching. I believe. Here is perfect. All right, cool. If you flee, there is a lot of red in it. No problem. Go to care. Go to red. Here. Drag it down slowly. But make sure the healthier it is active. We don't want to lose track of these areas, or even we have a lot of green here. Let's go to green. I can drag it down. This is better. Again, much better. Let's see before I refer, How cool is that? So sometimes if you go to green, blue and different channels and drag this down, just going to affect the red part. So go back and forests and just coming back from this area, I'm just going to take a look at it as well. This is totally matching. But still something is missing, which is shadows. Simply double-click on the frame. And, but before that, let's see what is the best shadows that it's just going to be match with this frame. Maybe this frame. So here is 230 dog. And look at these shadows here that we have on the ground. What else? This is too much. We cannot count on this because the Redfin, these are empty so it doesn't feel right. Or Here we go. This area is going to be exactly like these shadows. So just double-click here. Click and drop shadow. And let's click on this color area, which is going to be wide or black water them most of the time are black, but we need the exact same color from this area. Just click. Click. Okay. Now I'm just going to add it distance to it. We have to kind of show arrows, guys, the first shadows, which is going to be a bit larger. Just going to add shadows. I'm just going to be mouse and just going to track this to the left. Now, the edge are still very sharp to soften it. Track the size to the right. All right, this is cool. Now, we need another shadows for this edges. Just click on the plus sign. Go to drop shadow. Again, we need a darker one. Just click on this area. Click Okay. Now to see you guys exactly what I'm doing. I'm just going to drag up the opacity. Just going to bring this back a bit. And the size should be back and control plus just going to zoom in so you guys can see exactly what I'm doing. You see at the very edge, if we have a very sharp shadows most of the time. Exactly something like this, not this sharp. B is going to track the size a bit and drag the opacity down, play around with the size and distance. Something like this. It more of a size. Again, more capacity. Just going to play around with it. See which one is more solid and more realistic. Just going to go back, see how cool is that guys. We have created a perfect shadow, but maybe we shouldn't have shadows around these corners, should it goes inside of it. Secular here. Which one is it? Is this one. So this one, I'm just going to drag this to the right, to the left actually. Say they don't have shadows here, may be a bit closer to this. Now. Very, very nice. Just going press Okay. But sometimes you seek IS the shadows are created at our top as well, but we don't need it. It should come down a bit. So I'm just going to double-click here. Again, click on this one to find it, this one. And with the arrow key, I'm just going to come down until I don't see anything or I can use my mouse, it's just a much faster. Something like this. Okay. So I'm gonna go back and guys take a look at it. If you guys think it's still, it's a very sharp, easily go back to shadows. Bring down the opacity. And now guys take a look at it. The cool thing about it is I can drag this up, down, right, left, and it's going to totally match. Take a look at this image. It's beautiful. At the end of each project, you guys have to do some practice. I have a lot of photos from pixels.com, the website, and go inside these images and tried to combine two follows. For example, if I bring this image and let's go back and cut of this image and put it here and try to match the color. So after trying to match these two for a frame together, if you guys have any problem or issues, just let me know and we tried to fix it together.
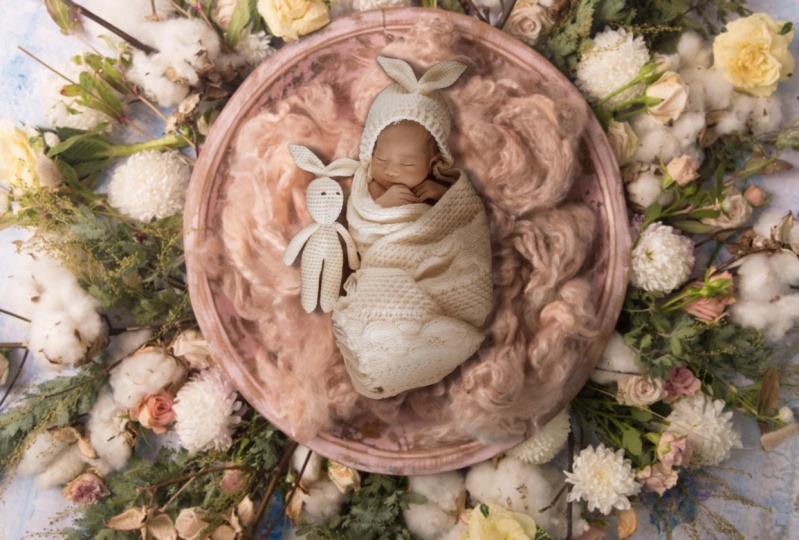
17. How to Use Original Shadow to Add a Baby to a Backdrop: All right, we are in project to project 2 has two parts. Into parts. We use different methods for adding a baby to the backdrop. The first one, we use the same shadow from the baby. Look at this one. This one, this image which is going to be composite to another image, this backdrop. But we're just going to use the same shadows of the baby, the previous image, this image and put it on this one. But for this image, see the before. I'm just going to totally remove a surrounding area and Twitter remove the shadows, and create our own channels and put it on this image. So how do we do it? It's actually very simple. Let's go to your images. There's a lot of images, guys, please practice a lot. So by the end of these two projects, do a lot of practicing and just send me your photos and your artwork. I'm just gonna give you some tips and hints so you guys can get more professional. All right, let's go back. For first image. I'm just going to use this backdrop. And let's go back and bring this to this image as well. Hold on Alt or Option and Shift. Make it smaller. Thank you again. Tends off first or at take a look. The light is coming from the left, sorry, top-left. What about this image? The light coming from this ankles because the shadows are here. So I'm just going to flip it back ground. Press Command, Control T, right-click and horizontal. Press Enter. Click on the solid earth, I mean the image and bladder control tee drag it. The light is coming from this angle, the shadows exactly here. So it means the light direction is exactly here. It into, now bring down the opacity. So see which area which is going to match two beak alter option and make it a bit smaller. I think this is going to be perfect. Increase the opacity, right? The first thing we do is just going to select this cute little baby plus W on your keyboard. Select Subject. Cool is gonna get close a bit. Use my Lasso Tool hold Shift to add this beautiful nose. Hold down Alt or Option to just remove this area. This area. Here we go. Remove this a as well. Allow shift again at these parts to the image. Just going to get closer. Just going to remove this area will now shift to add to it. Alt or Option. And Alt option. Cool. Here you go. It's fine here. Hold down Shift again. Alt. I'm using mouse by day, so I'm not using pen. Don't worry. If you guys don't have a back on tablet. No need to have actually, it's much easier with mouse. For using Lasso tool actually is easier to use vacuum tablet. But since I'm just going to be fair, so I'm just using my mouse. So we did a very rough and good selection. We're going to click on the Mask button here. So the first thing we do, guys, is in matching the color, how do we do it? Simple to the adjustment layer, and they help Layer Solid Color, 50 percent gray. Discard put this 50. Okay, Let's put it on luminosity to make it more obvious, I'm just going to use my UN saturation and bring up the saturation to the top. So you have lot of bluish purplish. We have the magic, exactly the background. See, let's put this together. Group at Microsoft, just going to call this help. And it's off. When it is Khalid doesn't match, is bluish. We have to make it exactly look like this. So how do we do it? Turn the head layer, come here, go to Adjustment layer, activate care. Click on the hand, click on the yellow to green. If we go and increase the green, but make sure click on this Clipping Mask button. So it just going to be active and the layer below it. Now, it's good to read. Click here. Add more red. Now, take a look. We are combining the two image together. Still has blue to it. Let's go to blue. Killed again the blue. And I'm using my arrow key. As you see, still has a bit of, let's add more red to it. See what's going to happen. Right now is kind of combining two images together seen now, turn off the layer of anon. Alright, I think the color is matched actually. Then we go for the light at the end. So fix the light. But take a look at before, after, before and after. Now, click and a baby layer and press Command or Control J to duplicate it and 10 is off. We're just going to keep this for selection. Now, click on the top layer, make sure the mask is selected. Press B on your keyboard with the 50 percent flow. Now reject. Slowly. Go over the edges. Say. All right, Very cool. So here we go more because we have more shadows here. Nice. Let's get closer. You have to clean this up. This area has not clean actually. So what do E2 is? Using? Alt Delete to remove this can ultimately movies, but CB have a lot of C When we see dark lines around the subject, the best way to fix it, guys, I've shown you before, is when we have a Smart Object, the modify, it doesn't work. We have to use another method which is a filter. Are there and minimal. So put the minimum on to and really move these sharp edges or we can put it in one. Take a look. Before. And after is the, how cool is that we clean is areas. Click, Okay. Nice. I can fix this care which areas are ICU? Now? Our baby and the lines are okay now, we need some shadows here as well. Plus B on your keyboard. Make it very small and go around these edges case. We need these shadows. Nice. Now this can make it larger. Bring down the flow, maybe 8%, and various lower limit is going to go over these areas. All right, Cool, very nice. Can these areas a bit right? How can fix this area? You see there is a lot of yellowish do it right. We just need the shadows of this area. So we should this is selected, switch it to black. And with the flow of maybe two. Hold down control and click on the selection. That's why we kept that layer to use this selection. Now, go to select an inverse it, so we can work the outside area without effecting the insight. Now, slowly, I'm going over the highlight because the highlights are a bit yellowish. See, and I'm keeping these shadows are the I9 means I'm removing the highlights and keeping the shadows. Very nice. How cool is that? Take a look. Just going to make sure. Now I'm removing the yellow part. Here we go. Can the color from the highlight. Right? Now, for this part, we looked at the method. And this part, or I could press Command or Control D. All right, Now here is kind of okay, right? And the color, it's still the shadows or greenish. So how can we fix it? Let's create a new layer here, right? And make sure it's not clipping mask for them all to deactivated. When we deactivate this one is going to be the accurate to the curve. So we have to drag this down the curve or the old and just kilobit to this layer. Cool. Now we have this layer one, we're just going to call this color. We are going to add the brownish, share all of this area to these shadows. So these two shadows should be matched. How do we do it? Press B on your keyboard, Alt and click on this shadows. And very gently with the flawed 20 percent over these areas. Right? Exactly this area. So it means these two areas. Nice. Smaller. All right, Cool. Nice. All right. Now double-click here. So I'm just going to drag this to the left so you guys can see. We're just going to add the color to the shadows and the highlights or down Alt, click and highlight area. Drag this down with holding down Alt or option, we can separate this, certainly drag it to the left. So we see the highlights and the shadows is going to be the same color as here. Look at the before and after, before, after. Now, if you think it's too much, you can drag this to the left. But I believe this is looking. Now take a look at the before and after, before and after. How cool is that? Now, the cover is merged, the shadows are matched and we are okay for now. So simply we fix this baby and we added become positive area, the environment. Now I'm just going to get closer. If you believe this is too much, you can go inside. Click here and slowly I can remove these areas very gently, very gently. Smaller. Take a look. Now see how cool and realistic is that. Now you see the light is coming from this direction. So it means this area should be brighter, right? So let's adjustment there, click and curve and drag this up a bit. All right, cool. Drag it out. Now, drag this down Alt to clip. It. Just did a baby Command, Control I to inverse the selection. Press V on your keyboard. Make sure the foreground color is white. And slowly and gently go over the top of this head of this big. So it means the light is coming from this angle. Right now we're matching more norepi baby to this image, right? How cool is that? Right in every part. So let's go now to finish it up, Let's go to Adjustment layer and color lookup. And let's put it on refugee EteRNA 250 D and drag the opacity down until you feel is perfect. I believe this is very cool and this is very interesting guys. See how cool is that? Just go Control G to group it. Take look. It was nothing here. It was this baby. And now look what we have, right? This was the first parts.
18. How to Create Shadow and Color Grade to Add A Baby to A Backdrop: Let's go to the second one. Second one is this one. We're just going to totally remove the person and prettier. All right, let's go to the part two. For the part two, we have two images. Let's use the backdrop seven. Put it here, auto option Tab to go back and pick up this one and drag it and put it here. All right, Let's drag down the opacity to see exactly how we can manage this camera controls T, Alt or Option, Shift. Alright. Interview somebody in like this and drag it up capacity, the light directions coming from this angle, but here both sides has shadow, so it means the light is coming from the top, so it doesn't matter. We can create the light. And I'll add more light to the left side of the face of this baby. That would be very simple. Alright. See, the size is okay. Or ICU W on your keyboard. Click on Select Subject. Let's see what Photoshop can do. All right, the left, the right part is okay. Now here we go. Let's pick up the Lasso tool, I think is the fastest here. So in this one, we're just going to remove it to Teddy from the background and use our own shadows. Again. Let's use Quick Selection Tool at work's done. All right, iPad. That bad at all. I'm Kim holding Alt or Option guys. If you see the minus, it means I am holding Alt or Option. If you see a plus, it means I'm using and holding Shift, holding down Alt. It's still Easy-peasy. Go. Here we go. I'm kinda I keep holding all the guys. All right. Not that bad. Maybe these parts are very small. All right. Now, to separate it from the background, click on the Mask. Let's drag it up. If we go, we have to fix this area as well. Make sure the mask is selected. Use your Lasso Tool and go around this area with mouse. Here we go. Control Delete to remove it and my Control D. Now, the first thing we have to fix it, this black line around the baby. It's easy because we have it. Smart object. We can use Select modify so you have to go to filter other minimum. Let's put it on one. Let see if we can remove it now. Let's put in to yes, if I put it in to our can remove the black line around the baby. Click. Okay. Now it's very nice to these parts. And Control Delete. If I do that, I see this sharp edges to fix it. I can use Blair, right? Nice. What about these parts, guys? The same using a polygon lasso tool. Just going to click these areas. So the selection is very important guys. So again, control deletes and you see the sharp edges that make sure you click on the layer and layer. It. Simply Blair these areas. What about these parts? Use the Lasso tool is much be because it's quicker. So I'm just going to here. Here you go. Nice. Control, delete. Use the player. There. It usually we are learning a lot of technique eyes and these techniques are very helpful. Okay, Next projects. These parts again. All right, let's go. Now. First let's fix the light and create the help layer. Let's go to Adjustment Layer Solid Color. Make sure is 50 percent gray. Okay, put your luminosity. Now let's add hue and saturation. Drag up the saturation, shift, click command G. And we call this help. We have a lot of yellowish and greenish just means, hey, come here. A curve. If a Goto blue pickup, the hand click on the blue and we have the drag these down. But it's affecting the old images folder on all the clipping mask to this layer below it. Now the green part is, okay. Let's go to red. Click on the hand here and drag that up so we can add more orange to our image. You see that? Then it's off. This current. The wild should be exactly exactly. I mean, exactly look like this or one. Or this one. Right? This is orange. This orange, we have the labor of purple. So it means we have to go to green, click on the purple, drag digging up. Let's go back to red. The red bump. Now you see the two images are two recombining. Let's see what is going on. Alright, Very interesting. It's the before and after, before and after the color is totally match. What about the shadows? The shadows now. Now let's double-click here. Drag this to the left, or let's try a plus Michael drop plus the zoom-in. Drag this to the left. Now, the first, we can have two shadows, actually different shadows. I'm just going to pick a color from this shadows here or from here. Look, bring back the side distance. Now, let's add a distance to it. The first one should be. So the light is coming from this direction. So it means the shadow direction are exactly from this way. But edges are too sharp. Let's increase the size. Good. The off on, Not bad. Let's go to the second shadow, the same color. This back distance back. Capacity high. Because a distance, something like this, okay. Increase the size a bit until I get a very cool realistic shadow. I think, I believe this is cool. Click, Okay. Very nice. Or act. Sometimes we don't need shadows here guys, or here. I mean, beyond the shadows here. So how do you fix these things? I mean, it's not flexible when I'm in a drop shadows, I can cannot really move the shadows much. I mean, I can use these shadows. I can drag it down, something like this. But sometimes I have to just manage. And all right, Now, if the light is coming from this direction, we shouldn't have a shadow here. So double-click on this drop shadow. Let's click and the second one is this one. And just drag it down a bit mouse or here. Cu All right, now this is realistic and I'm really enjoying working on this. What about the light? The light is coming from this direction and you see there's a lot of light here. Simple. Let's go above this curve. I just mean they're Anglican curve. Well then all ang clipping mask. Increase the light. Yeah, that's cool. Now, Command Control I to inverse the selection. Now, press V on your keyboard. Make sure the foreground color is white. And pretty slowly bring down the flow. And very slowly. I'm just going to come over this area and make this area brighter. And also this area. Right now the light is correct as well, assuming and back. And I see that is shadows here. I don't need it. The shadows here, we don't need these shadows. How to fix it? I'm going to show you a crazy technique. Just right-click and the f x naught here. If you right-click here, just going to give you these options. But if you right-click and the FX, just gonna give you a create layers, click on this. We're just going to separate the two shadows that we have. Right now. We have to separate its shadows from this layer. Now, let's see and find this shadow. Is it this one? No, Is it this one? Yes. Click on this control T, right-click and warp it. We do Barb. I'm just going to remove this from this area and drag it down. And how cool is that? Remove from this area. This area, nice. You see that this is exactly what we do as a professional. And this area should have shadows. That's why we separated this. And you can now take a look at it. If you think the shadow is too much, you can always go back and you can drag the shadow down or it can increase it here, can decrease the shadows. And I believe on 80 percent opacity, it's perfect. When I see before and after. Let me just like goto j and this one drag this down. And all to bring back IS curve and also this one as well. Just going to group all these together. Can I control G to see before and after? This was the first beer store, it, you see the color tends off and take a look at this one guys. It's totally match and it's perfect. But at the end, we always add some color grading. The easiest way is good adjustment layer and put a color lookup on top of it. Again, let's call it Fugees eternal 250 d, which is one of the best jagged opacity down to around maybe 30 percent. Now, before and after, and see how realistic it is. All right, guys, let's get to your homework. You see a lot of images. Just see which one is matching. Use one of these beautiful backdrops and add these babies to these backdrops. You have any questions, just let me know. I'm just gonna help you guide through this process until you get professional.
19. Bride Project - How to Match Perspective: Alright, in this project we have some photos of different rights. And the bride, a couple and from Brian, let's see which one can match with this image. First, I'm just going to click on Line tool and find the horizon line of this image is going to go here and just follow these lines. Here. We got it exactly. It's here. The horizon line. We don't need we don't need these two and just drag it and put it on trashcan. Now, the first one is the winning one. Let me just contract this up. Or cool. Let's can click on this one. The horizon line, it's around here, right here. And if I press Command or Control T and put this here, hold down Alt or Option and Shift drag it up. Drag it to the right and press Okay. Because W on your keyboard select subject. Now getting under Layer Mask, we have this image, but something is missing guys, you know, the horizon line here alone shift click. It's here, right? But in this hemorrhage, the horizon line should be around this area, around the legs and the hips. C. And if I press Command or Control T and drag this up and down, what I'm going to do is not going to be filled, right? So this image is not going to be matching. Something is missing about this image. All right, what about next image? This couple Find the Horizon, horizon line. It's around here, roughly. Command or Control T. Drag it up. Again. I'm just going to put it here. And still is not going to be matching guys. You don't believe me, plus w select subject. Click on the layer mask. And here we go. You see the counter is here, but it's like your leg measured. And when the head of this guides around this area and is that going to be matched? Even if I drag it and make it larger, steel still live. Does the horizon line is here and again, I put it there or there means something is missing. Still something doesn't work. And I'm just going to remove this as well. Still. I guess the the head and drag up and down. Nothing, nothing works. Now I'm just going to remove this image as well. What about this one? The horizon line is should be correct. It's around here, right? So this is cool, I guess, because the horizon line is around here. Suppose W on my keyboard, select subject, click on the layer mask. All right, cool. Now let's press Command or Control R to activate the rulers. I'm just gonna put it here. Here we go. I'm just going to drag this up so you guys can do exactly as I do. It's going to put this here or now. I know. I'm just going to make it around this area or down Alt, Option and Shift. And here we go. I believe This is totally perfect, right? I don't need the shape in the horizon line. I don't need the ruler. Cannot control, are to remove the ruler as well. I'm just going to leave it around here, guys. And maybe we can drag it to the left a bit to be the center. And it's cool.
20. How to Do Color Matching: Now, the first thing we do, it's adding a help layer. This would Adjustment Layer, Solid Color. Drag it to the left, around 50. Okay, put it on luminosity. So when we can see the color, adjustment layer, hue and saturation at saturation so we can see the color better. All right, cool. Hold on, Shift click Command or Control G to group it. I'm just going to call this help. All right, cool. Now, you see this area. The white dress is contained is offer a moment. Mean the white area. I mean, there's two saloon. I mean, the first alone is this white. We focusing on this white because the model is around this area and not that area. That area has a lot of window. That Windows makes the white whiter, but we don't have a lot of window here. So the color of the wall should be exactly the color of this skirt, right? So content is on C, This area is orangeish. It means the blue become orange. I'm just going to come here. Good. Adjustment layer, Selective Color. And click on this icon here to add clip mask. If you want to know how I add this color palette here is for you guys, this color wheel. If you go to Window and click on the Color, just going to appear. If you don't see the color, we'll go to this little icon here and click on calorie. This is for you guys to see the opposite color. It means if I'm clicking on this selective color, I have a lot of blue, so I want to reduce blue. What do I do? First of all, I'm just going to go to neutral color. If equity neutral color. And I want to reduce the blue, it means I reduce the cyan. Opposite of cyan is red. It means if I go back, I'm at a red. Magenta. Opposite is greening. If I reduce the magenta, I'm going around to match these two subjects. I mean the model, just call this model. And the background should be the same color. All right, I'm just gonna go back to the selective color, yellow. I'm adding yellow, still impact reducing cyan. See how cool is that? Let's go to white color. The white has still a bit of blue to it. So reduced Lu, I'm adding more red means the collagen matching around if I want to see it before you go further, tear on the help. Turn off the head layer so you see the color is getting matched. Now, we're just gonna go back here. I'm just gonna go back to black. And let's go back here. Play around with magenta and yellow. Let's see the before and after. It's too much press Control Z to go back 10 to help layer off and on. I believe this is cool. I mean, have the same color as around it. Maybe if I go back and maybe I can add a bit of green into it, Let's go back to neutral color. Maybe a bit much, much better. And the magenta and the ego, see, I'm playing around with it guys. Have nice. So just take a look at it. The colors are totally match. Z is the same color tone with the surrounding area, right? How to make it better? Easy. Now, below the selective color, I, a layer automatically just going to be clipping mask. I'm just going to call this color press B on your keyboard. Now, just take a look at these shadows. It's almost purplish, blackish. But we get these shadows. It's brownish, holding Alt and clicking on these areas guys, the darkest brownish color maybe misguided to the shadows because it's clipping mask. If I just do this bit the floor, a 100 percent opacity, 100 percent. Just to look at this one, I'm just going to look for something like this. Look or something like this. See, I'm looking for the best color match. I believe this is cool. Now, if I double-click here guys, and hold on Alt and click on the other line layer and keep him holding Alt and drag this to the left. This makes my shadows the same color as these shadows. Just take a look. Look how cool is that and how easy is that. If I drag this as well, see, Very nice. I'm just going to us again. Click on the Mask, press B, and I'm just going to remove it from these areas. And v, the flow of 30 percent EBIT, right? Cool. You see the color matching. Nice. Very nice. Now this area is totally match.
21. Create Realistic Shadows: Now, let's leave this area for now and go for gyros. The shadow is exactly below the model. I'm just going to blow the model layer. Here. Add a layer using call this shadow. Hold Command and Control and click on the model layer. Right. Now, I'm exactly on the shadow layer. Hold down Alt or Option and press Delete on your keyboard, command Control D, press Command or Control T. Reverse this to the bar. We are going to create the shadow. Right-click and Gilligan distorts. Zoom in a bit. I'm just going to put this here, is here as well. And here you can see the guys from here is getting larger, the head is bigger. So it means I'm just going to drag this to the left, to the right. Just if you want to see the light direction and the shadow direction, just take a look at this curve. The direction is this way, but this woman, the direction is this way. So it means the light is coming from a different angle in this area. But take a look at this woman, or take a look at this woman. The direction of the leg is straight. So we tried to keep this straight as well. And just make this a bit bigger, the head. Just going to match this exactly this day here and here as well. Very nice. Press Enter. Now, click into any keyboard. Everything is perfect, but we don't see the back ground, right? We don't see the floor. Just put this on multiplier. Now the problem source. And as you see, it's too sharp for this area. I'm just going to bring down the opacity. So it is much better. For now. Now. You see the edges are too sharp and here the shadows are shadows and sit it gradually is getting disappears or how to do it. I'm just going to drag this up for now, the opacity to see what's going to mean a 100 percent for now. Now, listening moves on this part. So I'm just going to add a layer mass that is B on your keyboard. Floor should be a 100 percent. And I'm just going to remove this area. For now. We will do two times because we just going to use gradients. I'm just going to show you what we do. So plus G on your keyboard or LAN controller Command and click on this shadow. And let's go to Basic here. Okay, measured the first one is selected. And drag up, hold down, Shift and drag up. Rareness. Mac control D to deselect it again, plus b. Let's go and remove these areas. Right, So cool. So everything is okay, but the problem is this sharp edges. So first, we have to fix this before we go for shallow depth of field and just create a blurry area for the shadow. So the first thing we have to do is create a blur shadow. So how do we do it? Just right-click and this shadow layer and convert to a smart object. Now let's go to Filter, Blur Gallery, and click on Fill Color. It's very easy to create these kind of shadow guide. I'm just going to show you a very cool trick here. Just click different. Just click exactly like me. And I'm just going to click here. Click here, see the shadow exactly like here. Look more blurred this area. And again more blurred this area. See how cool is that guys? As well as either. It's very nice, very gradual and very realistic. Now press Okay. Because it's a smart object. Anytime we want, we can come back and fix it again. Just, we can just double-click on this blur Gallery and go to fix it again. The shadows it just one time shadow. We need three times shadow, it means I'm just going to press Command J for now. Control or command J to duplicate this layer. Now I'm just going to create a layer mask. Press B on my keyboard. Bring down the flow. And slowly I'm just going to go over this area. Nice. Maybe a bit more here. Right? Now I'm just going to ask him adequate for J again. This, let's click on the mask that is B on your keyboard, and let's do it again. Remove these areas. Now, let's go inside this P on your keyboard. For a 100%. Here we go. The only shadows and the sides. That's why you have to remove this TB supernational. Now, a very literal and that is loaded. I'm just going to bring down the opacity. Click on this one, bring down the opacity. Click on this one, bring down the opacity. Look. Again, I'm just going to get it in this form. Bring up capacity. This one bring up capacity. So this is exactly how we play around with the shadows. To be exactly like this. I'm just going to go back and forth. This epitope more Exactly exactly the shadow that we need and we want, right? So what about adress? The bottom of dress is should be a bit darker. So below this color, I'm just going to create a curve and bring down the whitish area. And also a shadow area. Something like this. Maybe is very nice. All right, cool. Maybe we need these duties to three times. All right, this is cool. Now, Command or Control, I. Press B on your keyboard. X to white flow, very little, maybe 38. Now. Very gradually. Slowly. And take a look at it, guys. I mean, how cool is that? I mean, you can easily match the colors with the surrounding area because we don't have much light from this side, right? That's why it shouldn't be too bright. Maybe if we just overdo it, we can bring down the opacity until we satisfy an ICU. At the bottom. I believe it can be more. Right? Let's create another curve. Bring down, up exactly something like this. Control RI plus b. Here we go. Just till you get, in this case, it's beautiful.
22. Create Lighting & Blurring the Background: Now the shadows are almost fine and the model is great, but still something missing. Just come here above the color. Good adjustment layer. Again, go to care if I bring up the light, bring down the shadows a bit. A bit. Mostly the light cannot control. I. Now, let's go an inside press B on your keyboard with the white at the top and flow of a 29 percent. I'm just going to go around this area. I'm just going to click around this area near you. You can add some light is coming from the back, maybe from this angle here. This makes it much more believable guys, that from this area, the light is coming inside. This is cool. And I see before, after, before, after. This is March believable. But there's a problem guys. See, there is a black halo around this model. If I come back here and click on the model and now Command or Control and click on the model. Select, modify, and contract by one. Let's go inside. It's how we can fix this case. But we have to inverse it. If you want to get rid of this area, select an inverse selection, Gillick and the model plus B on your keyboard. Now, it measured this is x and the flow of a 100 percent. Now we are removing these halo. Just take a look. Look how easy you can fix this area. Look. Zoom in a bit, make sure it's black and just go around these areas so we don't see these black lines. I could come up Control D, the de-selected. Let's come to this area. As it is shadows, it doesn't feel right, right. Let's find it. The color executive declared and bring down the opacity until we get a proper look. And so we forgot, or maybe we did. But at the end sometimes happens if you press 0 on your keyboard, you just going to automatically bring up the opacity. Now, this is totally fine and this is totally perfect and everything is matching, guys. So what else we can do? And what about the shadows? Is it right? I believe the shadows are right from this angle and this side, but about the Tres, we can play around with the dress and still is up to us to make it perfect. Let's come here. And again, analytic curve. Bring down the shadows a bit. But make sure it's below this color, so it's below the color, so it's going to be totally merge. I believe. Just take a look at this one. It's properly done because you have more dark areas TO didn't match. And it's cool. And it isn't perfect. All right, This is matching as well. Look, if you think it's too much, I still can bring down the opacity. Now take a look at this one. Now we are done up a composite and this model is exactly, is in this place. There is going to come here and blurred the background because it's too sharp. You can see at the end of this. So let's go click on the background command Control J to duplicate it, I'm just going to call the BJ background and right-click Convert to Smart Object. Let's go to Filter Blur, Gallery. And tilt shift is the best thing for background. So drag this down. Drag this up. So it means from here, it's just going to be blurred. Cool. And I'm just gonna click, you see the rotation, hold down Shift and drag it to the left and drag it here. So it means from here it's just going to be blurred. Again one more time. See the quotation things and hold down shift and rotate it, drag it here. So it means from here just going to be the rotation. Right? Now, I'm just going to press. Okay, or let's bring down the blur. Make it less. We get more should be something like this. And make it less should be something like this. With 14 is enough. Okay. It's totally up to you. Now. Just take a look at it, guys. It's exactly on the spot and it just sticking to the area. Go up above Selective Color, alanine color. Now we'll learn Control Alt, Shift E or Command Option Shift E to copy all the layers into one layer at the top. Now we can do some color grading. Let's go to Filter. Good. Before that, make sure right-click and convert to a smart object. Let's go to Filter, camera Raw Filter. Let's go to Effect and track the vignette to the left. So we can add a bit of vignetting. See, this is the mediating, but not too much. So the tension is just going to be under model and the bride is the profile. Click on a color, click on Browse. Now the magic happens. There's a lot of presets in Photoshop automatically, so it can go to artistic, just going to zoom in a bit so you guys can see exactly what we're doing. Just take a look at this guy. This little cout beautifully is that I'm just going to click on the artistic fire and press. Okay. Now delegate. Now take a look at this. Again. She can press Command or Control J to duplicate it. Let's go to Filter and camera filter. We can add more pressure to it. It's good to profile, color browse. And let's get the mother. Again. Just look at this beautiful stuff. Let's go to vintage. It's totally up to you now. So you can create whatever you want, guys. Seo queries that mean I love all of them. And it's hard to choose. Oregon, you choose this woman digits 09, and come here and drag down the opacity. So combine these two together, is going to be something crazy. Just take a look at it, guys. So now you learn how to match anything, especially any kind of bride and groom or varying things from the studio lighting to the environments. And you're at the end. If anybody take a look at this image, just going to believe it. And this is the important message of this course. Now it's time for practicing. I provide an image called practice in this bright projects. Just click on it. Just add this bright exactly to this background, exactly something like this. So remove this model and add it to this background. So after you finish this practice, you can continue and go to the next project and make sure you send this practice to me. I'm just gonna give you some feedback so you guys know exactly where you are and how you guys are progressing.
23. Up In The Air Project - How to do Selections & Cloning: All right, let's put it up in the air project and images. And images. If you have an image called City, just drag it and drop it into Photoshop. Now. Just a lock this by clicking on it just once. And then just get a zoom back a bit and bring this down a bit. Because I want to put this here. Now, click on rectangle marquee tool and select around here something like this. Right-click and Free Transform and drag this up. That's all. It is increased the Sky Plus Command or Control D to de-select. All right, this is cool. I wanna put this in this area so I can move this up and down. I have enough space, I guess. Right? This is nice. Now, let's come back to the folder and let's bring down that house image. Inter. Let's go inside and we need to do some cleanup. Click on Polygonal Lasso tool. We're just going to use this a lot. And the shortcut keyboard is L on your keyboard. Just going to zoom in a bit and click around here. And just follow these lines. Down here. You can zoom in. So I can see better. This area here. Yeah. So back a bit here. Here. Here. And it's gonna go quick. And I'm just going to go up to the right of, right. And I think I am done. Now. I'm using click on the mask. Still have something here, so let's look better. Selection. Click here to this area. Press Control, delete, command, Delete. Just fill this, this black area. So this is cool. Fairness selection. All right, we need to do some cleanup in this area and you have to clone this. And this, put this in the folder, select this house and click on the folder layer is going to call this house. You have to be organized. So everything is just going to be this. Let's drag this and put it under the folder house. Clicking New Layer, just going to call this clone. Come back here, click in this area, click here. Again, click on here. This area. Here. Press S on your keyboard. Make sure the current and below is selected. I'm just going to hold down Alt or Option and click around here and follow these lines to remove these predatory branches. Okay, cool. Again this year. Just be careful and do it very slowly. Then need to rush. This is the part that you have to be focus. All right? I'm holding Alt or option and just put it on following the lines and clean this up. Let's come here. Again. Here. Maybe here. We don't need this. And say, let's go back and down Control and select around these areas that better. Can you just going to click here. Maybe this area is much better. And I'm just going to remove this dirty area as well. All right. This is cool guys. Set off. Now. We have to clean this mess. I mean, this area controlled and come here. Or this area is selected. We always do this. Trick is select the area so we don't go outside, press S and a keyboard. Good here. Put it here and just clean this. Very easy by about these shadows. So you have the very precise one is that from the right to live and the one is from up to down. So we fixed it. What about this part beneath the shadows? So we're just going to click around here to here. So all the time, It's going to put this year scenario is the same. Again, I'm just going to click here. Here. So very nice. Nice. Yeah, I'm just going to click here and drag this down. So a mess this up. Can we have to be careful? We have to very careful. Nice. Again, control. And that's all Mac control D to deselect. Let's go inside again. Let's do this part again. But you're going to lesser to S on your keyboard and very slowly. See also an option. I click and drag. I'm going to Control D into the selection. So now you know how to select an area and how people actually use this method to fix anything, guys, fix anything, exactly. And how quickly is that? So you guys don't scare to use a stamp tool. Because now you know the trick. Most of us, the professional literature and fundamental period later, an animator use clone a lot in everything. Just find the proper line. And from here, and come down. Proper line. Just much still. Come down. So we can fix everything very quickly. Need to do this. Again, gets the line is not a straight. Come I got to leave these elected. How cool is that? And how fast is that? Again, one more time, just going to come in. Which is going to come around here. Here. Nice. All right, Good press S on your keyboard. And I can just follow the lines from here. Because now I'm inside and I can just do whatever I want. Maybe try these from these part. Again. Put here nice and more time. One more time. On this area. I'm I going to do these electron. Let's go inside. You guys see how easily, and I'll quickly, we are cloning and fixing anything that is wrong with this image. And we do the cleanup. And that's the trick. What about here? Let's do the cleanup. S. Timeless, going to click around here. And the green are collagen or D to de-select. Now, disport, I'm just going to remove this. So I don't like it. It's kind of distracting. Let's keyboard. Click from here to here, here to here, to here. Nice above area and dice. I just leave this as it is. First, let's fix this area. The hard part here is for cloning. Here, right? Go Control D. Let's fix this part S here. I'm sure you guys just gambling then how quickly we can fix anything with clone is them to fill in this method. And it's really easy actually. Just going to put it here. Nicely done. What about this one? Is, Here we go. I got a D. What about this part? Let me just fix everything first to the clean up, then we go for global industries. Very quickly. Again. If you guys know exactly what I'm doing, just do the fast forward for yourself and buy there is a process. And when you know the technique, it's going to be easy actually. Then you know exactly what I'm doing. All right? Very, very easy and very interesting. Kinda Control D to abort. This part's just going to click in this area. This is the trick, so we'll do the cleanup. And actually, I don't like these areas. I believe I can do a better job. We just copying this area to this area, cloning as S on your keyboard, make it a smaller bit. Put it here exactly. Come here. And just go to the right. Now, come back again here. Put it exactly we have around this area. And then how easy or how cool is that? You just need to fix these areas are just going to come back to this later. Again. Nice space on your keyboard. Let's come here and do the same process. I don't like these areas. I'm just going to copy it from here. But I like it. I'm just going to copy it from this area. All right, cool. Now one more time and more time. Nicely done. Can I control D to de-select? Let's do the cleanup for these areas. First. These parts from here to here S on your keyboard, again. Coming here and do the cleanup. We have enough space to fix this up. Very nice. I'm going to de-select it. What about this part? Is going to come to this area. Again. Is this small alter option and just matching this, we are repairing the house actually free of charge. We only can I control it with Photoshop. Cool is that we don't get paid for these guys. All right, So S or Control D. Right. Finish that up. Again. Come to this area. Here. We need to fix that as well as S and D. I mean, this is a very cool I guess. Still have the houses. It was unclean at all. I mean, guys, please do some cleaning. Sometimes. We just clean the house for these guys. They should thank us. Data. So thank Photoshop. So how easily or control D? And then finally, now let's do some cleanup. I'm just gonna go to the mask and go to this area. Again, polygon lasso tool is in one easy-peasy. I'm just going to go to the inside. You're going to see we don't want to see the trees. Come back on to delete my control D to de-select it. And let's go inside. It can go Control D. Just select the corners. Can control D or Control D da qin. What are these parts? I want to make this air somethin like this. To make it better. I'm going to select this area. I'm in a better way, right, for this, again, we're going to do Control D. That's it. This is the window park or Control D. Let's go back. Cool. All right, very interesting. Everything is perfect and I'm just going to clean this mess as well. I believe I can do a better job. Kumar, see the corners of this house stood upright. We can just leave it like this if you have to declare it. So let's go back to clone. Option click and just clean is mess. Cannot control the end. That's it. Now, let's go to the house. And we have to make this a bit smaller than what it is. And it would clone mysql image these two together. Everything is okay right now I'm just going to right-click and convert this to a smart object. I'm just going to call this house right now. Now, what about this size? I'm just going to come out Control T is a smart objects, so P is no problem. I can make this thing is smaller. I'm just going to pick it a bit smaller. I believe this is very cool. I'm just going to leave it here. To the right. We're just going to use my arrow key and make it a bit center. She smaller. Maybe this right. I believe this is cool. This is going to be fine. Maybe it left, right.
24. Fastest Way to Do Colorizing: Now, what about the coloring? We need to do some coloring. Just going to add a new layer is going to coloring call c. So it means color. And the color empowered should be very unique and precise. So pick up your polygonal lasso tool again and select this part or the Alt or Option, and just do the clipping mask and clip it to the house. Now press B for your brush. Let's pick up a cool color, maybe. Yellow or a bit. Orange-ish. Is FA, is F5, a 105. Click Okay, and measure the flow in a 100 percent and just do the coloring. Just go to Blend Mode and putting on color. Bring down the opacity. Right? This is cool for now because the sun is going to come later. So that's why we're doing this. And you're going to click here and add a new layer which is going to be clipped by itself, CAN click and see a new keyboard. But about the insight, again, I'm just going to do this selection for this part is B on your keyboard. And for this part may be a bit darker. Go to color, and drag the opacity down. Control D to de-select it. Now, what about these area at the bottom? Don't worry about it. F2 part here, here. And here. Add a new layer, just going to call this ca can press B on your keyboard and maybe a bit darker. Leave it and color. Drag down the opacity control V. What about this part's easy. Again. Alright, cool. One more time. I'm just going to call this C plus B on your keyboard. And this time it should be more dark. And here you go. Leave it on. Color. Current control D to D, select it. Now bring down the opacity. So now we have a harmony. All just, let's see if we can do this Command or Control E and now put it on color. So everything is same as before. And we save space.
25. Selection With Pen tool and Adding the Rope: All right, Now we did the coloring. So let's go and bring the rope. Let's go back to let's go to your folder. Now. Read the else we did the coloring cell and let's close this up. Let's go to let's go and bring the rope. Go to folder, drag, disrobe and drop it here. I'm just going to make it a bit larger or down Alt or Option. Drag this up inside, press P on your keyboard for pen tool. And let's do a very quick selection. There is going to hold on here. Although oxygen click here, I'm just going to click and drag Alt or Option click to this area because I don't want this. If I just keep doing is just going to be messy. I cannot do a proper following. So Hollinger, other option clicking here, so I have one handle and then I can follow my line any row. And that's the trick for the Pen tool, is a lot of weight is low wages. Click here and drag, hold down Control and just make this line this way when it doesn't work, sometimes lot Alt or option, just click and remove that handle. Then I can just follow it very much faster. Nice, right? Can I easy? Right? Now, when you did the path tool and to the selection, make sure you go to path, double-click and call this row. Basically we save this path so if we need it later, we can just have it. Go back to layer, right-click and make selection. Pull it in two, okay? And do the mask. And how cool is that? Why we need the path onto, because the edges shouldn't be that sharp and still is sharp. So we need to do the blur later. It's going to come back here. Now, if we do the Command or Control T, look, which I'm just going to get a basically very large selection. Now, press Enter. But if I right-click and do they convert to a smart object and command or control T? I get a proper selection. Now rightly, do the wrapping, drag from here, drag it down. Basically is just going to be alike, like this turn. The house is actually attaching to this and the air is coming. So we have that kind of lower angle of the rope. Plus on your keyboard. I don't look this part and just contract is down a bit. So from here, press Control T, drag this up. Again. I've just contract is play around with it till you get something like this. Now, Command or Control and click and the house in the house folder. And just, I'm just going to drag this up a bit. Maybe I need to do my Control T and make this a bit smaller. I'm holding down Alt or Option. I guess this is much better. So we put everything in a folder so you can just, anytime we want, we can just select it Control T and just make it larger or smaller. Now, let's do the not for this area and the connection for that. It's going to go back to this folder, drag this row, one in turn is going to drag it and bring it here. And do this election. I'm just going to do a very rough selection for this because it's just going to be very far away from us. Click here, here, and here to here. Command Control J. We don't need it. I'm just going to remove this actually. So I'm just gonna leave it for you guys, the row, I'm just going to leave this below so you guys can have access to it. We said call this rope. And this rope as well. Hold down, Shift, select both of them, put it on a folder. I'm just going to call this rope and just going to be below the house. Now, let's go inside. And I'm just going to select this rope. I'm just going to call this connection. Connection. All right. Control T on Mac control T, right-click, select the perspective track. This is angle and I'm just going to make these unique what I'm doing. Alright, cool. Maybe inter and see I'm losing that part. Gun Control T or Command Control key. I'm just made this a bit smaller. It's going to go inside. Right-click to the perspective. Alright. Larger, smaller. From this angle. Just going to make this a unique back press Enter. Now this is cool, that is Control T is just going to put this here and put it here. I'm just going to make this a bit larger. Became smaller from the side. Put it here. Most of the time. We're just going to put this here. I'm just going to put the angle, drag it. Make these larger. Rightly do the perspective like this. Like dad, it should be beat. Smaller, press, Enter, Control T again. Just going to leave this here. Come here. Drag this up with the corner. And this is one plus E on your keyboard for eraser. I'm just going to erase this part. I cook now. And I Control J to duplicate it, Control T, right-click horizontal. Track this and just put it here. Very interesting. You can drag this. It's okay. Make it smaller. And ICU. For this one, I'm just going to take this one. Come here is, is L plus E for ray there and just raise this. What about just go this way? I'm just going to be straight. Nice. Micronutrient disrobe. Can I control T? Drag this up a bit, maybe a bit less. So everything is connected perfectly complicity and make you bored for this. Look, it's kinda out a bit, but it did not is coming. It's going to be perfect. So I'm just going to check it out later by Control J or Control T. Leave these here. Cooh, and so I'm just going to drag this and leave it here. I'm going to Control J or Control T. Come here. And here you go. Just take a look. How cool is that. But something is missing about this area and there's a nut. Come back to your folder. Rope not crack this here. Hold, shift and make this a bit smaller. Just going to go inside. It's press P on your keyboard. And let's do the selection. We depend too. I'll clear it. Let's go back. Alt or Option key here, until corruption clique here. Let's do a proper selection. Nice, very nice, very easy. All right. That's it. Let's go to pass. Double-click. Carl this not. Let's go back to the layer. Right-click. Make selection. I'm just going to read that one. Okay, Command or Control J to duplicate it. And let's get her up addressed. Drag this here. Just call this. Not just going to remove this now they don't need it. I'm going to Control T two is selection. And drag this. Make this split here. Nice if I come back, I mean addressed and as something is here. Now it's time for you to do the coloring actually. Just going to hold down Shift and click here Command or Control E. I'm just going to call this connections. Now. This is the actual rope. This one should be above here. Right? Let's go to actual raw. Or in this one, we see the color. Here is dog, here is different, column is messy. Now, create a new layer. We're going to call this color. And just do the clipping mask, hold down Alt or Option, and click the clipping to the rope, which can zoom in a bit. When you hold down the Alt and clicking. And they're not just going to zoom exactly on that folder and that layer actually. That's why sometimes if you're holding down Alt and just if you are not between the layers for the clipping mask, you accidentally click and this timely, it is going to be zooming. That's why we just backed. So I'm an a color for the rope. Plus B on your keyboard. And pick up a color, which is going to just do the coloring to this area as well. Look, everything is color. Now. Let's go to normal, but in a gutter. So go back. Now, we have done the coloring, but it's a bit too much in this area. Can take on debt mask, please be switch it to black and make sure the flow is a bit low and gradually. So it means it going towards the sky, the car is changed. Now I'm sure you guys notice this black area around her up. So let's add a new layer, is going to call this color. This B on your keyboard drag in making it smaller. If it is too large. Just pure color from this area and just do the coloring. Then with these area that all of it doing just the corner of this, say around these alien, I'm just going to do the corner. It's like, like it's coming through. All right, cool. Now I'm just going to go to lighten. So because the light in order to screen it's making it more interesting, but lighting is better. So if I believe I did too much around this area, which could do the masking Presby and my keyboard make it a bit larger and do the proper thing. I'm just going to use this very low flow and gradually it's like light is coming through. Actually, this is nice. Medical. Next thing I notice in the rope is the edges are a bit sharp guys. I'm just going to select this blurred tool. And because it's a smart object, I can work on that. But we don't need a smart object. We actually know the size, everything is perfect. We don't want to move it. So now I'm just going to right-click and rasterize it. And I'm just gonna make this larger and gradually go around this area to make this area a bit bearish. This is going to help us to leave that actually derive job is Exactly. And this area. All right, cool. Now you have them the first parts and it's perfect. Let's go inside, Let's go and, and not adding new layer on top of it. And do the clipping, just going to call this again color. We are in the rope folder. Press B on your keyboard and pick up the same color. And just go over it, make sure the flow is 100 percent. Put this color and we are done. I'm just going to click and does not. And the colorful, the color layer with contract this down a bit. But I mean, this saturation is very high. So how to fix that? They're just going to double-click and then not go to Color Overlay and bring down this passage until a matched everything is going to make it larger. All right, cool. Now, I'm just going to click on this to make it more cleaner. Now it's time to do the connections. Just looking at the connections globally. Make sure we choose same color. Nice. Now. And the New Layer, Mask color. Press B and do the coloring to color. But it's, I mean, it's a bit bright, can make it darker color here. Just means it's good to curve, track this. So to match the color. Go back and maybe up. This is perfect.
26. Creating Clouds and Adding The Trees: So everything is match. What about below the house? You should see blow the house, right? It's close the rope go inside the house. Can click here, add a new layer, drag it down, call this bottom of the house. Bottom. Now, let's come here. Let's make it closer. Here to here. It's fine. It's fine. Maybe around these alea. Yeah, cool. Indigo. Now, just being a keyboard pickup, darkest color and do the coloring guy Control D. And it's perfect. Nice. Now it's more realistic and we are exactly inside the house. So this is cool so far. Now if it get closer, it should be a connection between the rope and house. It's going to say the rope above. Add a new layer. Press B on your keyboard and all to pick up the same dark color. And do 23. But can I control Z? Right-click, make sure the hardness is a 100 percent. Again a bit. And I mean site dab between these two out in here. It should be something like this, something like this, and maybe something like this. So if I go out, you guys can see it. There is a connection actually that it makes sense. So there is something. But because we are out, we don't see it much. So let's go back and bring this stone, drag, drag it and put it here and you see the plus sign and just let it go. Just unlock it is W on your keyboard. Make sure you click on Select Subject. To do this selection is a busy. Mask it out. Now, drag it and drop it here. Cannot control T. Track it up, bring it down, do a bit of rotation. I'm just going to drag it up, maybe a bit larger. Drag it down. All right, cool. Now I'm just going to call this grok. Drag it and drop it below the rope folder. And here we go. Let's go back again and bring the trees to write, drag it and put it here, Alt and Shift and drag it and just leave it around this area. Just the branches. Let's bring these three. The left one. Make it a bit larger. Just leave it here. All right. In there. All right. So far so good. I mean, this is the tree is I'm just going to Command Control G to group it and just gonna call this trees. So you have the house, we have the rope, you have a trees. What else? We have? The Cloud plus B on your keyboard. Let's go to the top of the house and all. Let's go below the house and above the rope. Know exactly. Right. Now it's time to bring the cloud. The cloud should be below the tree. I mean, above the rock. It's fine above the rock, which can click Add a new layer. I'm just going to call this cloud and put it on a folder, drag it and drop it to the folder. I'm just going to pull this clouds clouds folder on your keyboard and make sure you select the layer and the cloud press B, right-click. In your images folder, there is a brush, dots ABR. Right? Now. Press P on your keyboard, right-click CDs. Click on this little icon here. And import pressures come to the image folder and click on this load. Come at the bottom, you see a lot of clouds that Gil going to use CDs heart, which can click here, make it a bit larger, and use it exactly here. But this is going to be the same color as your foreground color material cannot control Z. Curve here, D on your keyboard and press X to switch it to white. And just double-click. Have this heart here. Which is going to be so cool. I'm just going to add in our hearts. Right-click, pick up another Cloud. One here, right-click. I'm just going to look for something that just going to be below this area. Very nice. I'm just going to Control Z. And on like this one. We pick a better one. Right? Nice. Here actually is better. Or I can use another one different. As you see, there's a lot of shadows, so you wanna make it like there's a lot of cool. Let us cloud here. I'm just going to press B. Make this very small, is small little cloud here. So it's like these clouds are the foundation for these shadows. The same. It's going to be something like this. I'm just going to leave this area clean so we need a space. Always. Cover art works. All right, very nice. That what else we need? We come back here and we need the birds, drag it and drop it. It's gonna put it here, make it a bit larger. Let's put it on adding color burn or multipolar. Maybe darker color is much better. Static image. Let's do the masking. Press B on your keyboard, right-click. Make sure. This, if you go up, you see the soft round brush. And I'm just going to do the cleaning. Here, the edges. And it is see the beautiful birds inside the clouds. Just going to drag this and put a tub. The birds, all right. But the birds are too sharp and just bring down the opacity. So we don't forget. What about the house? Look at the edges are sharp is that go inside the house, right-click and rasterize it. Makes sure we click on Blair icon. Just make this smaller and just go over the edges guys, very quickly. Nice. We shouldn't see a very sharp edge. Big glaring B just going to blend in. The house to the sky is going to be more believable. Firstly, just the edges. What about bottom? I'm just going to click on this here to get the bottom. And what about this? The bottom and this one? Maybe I can track this and click on the layer and drag it up. We can just merge these two. Now these two are merged. Maybe drag this up a bit. So we just fix this area first. And the bottom, just going to call this Pattern. Make sure this Layer 2 is selected. I'm just going to slowly go over this area. So it's not going to be that sharp. Very nice, very interesting, more believable. Cool guys. What about the sun? The sun just going to be at the end. Right now. Let's do the depth first bit lead to the background, just going to call this BG and right-click and convert to a smart object. Let's go to Filter, Blur Gallery, the favorite tilt shift. Now the teach-in, just going to drag this down and gradually from here to the end of the city, it is going to be Blair. So I'm just gonna make this more bilayer so you guys can see exactly what we are doing. See here. And drag this down a bit. Drag it up, and just going to be less blurry. And this is good, I guess. Maybe drag this down or up. Very nice. Risk across again. The cool thing about it is anytime we need, we can come back because they're smart filter and WC Handy Bulgaria and fix it up. But for now it's okay.
27. Adding Birds and Realistic Lighting to the Scene: What about the house? Right now? Let's do the depths for the house. I'm just an aesthetic Dow's click the See. The color will see the color Command Control E to merge, it is going to call this Hello. For now, just wait. Again at the bottom, see the bottom. Merge this again by control either I'm just going to call this house. So we measure three things. So you now have to house, which is a double-click here. Drag this to the left so you guys can see exactly what I'm doing. Click on a color overlay, pick up the sky. Click. Okay. Now play around with this. I'm just going to go back and you're really satisfied. We did depths that you guys see in this episode. I believe this is good for now because it's a smart object every day, Garrigan, will it come back as numbers monopoly? You just put a gallery and it gets just double-click on this and go back and the Layer Style and just fix the year for nouns. Okay? Now we're just going to play around with some cloud. So to merge everything. But before that, I'm just gonna go back to my folder and drag to bring the soft layer. Now, drag it and put in this corner. Press Enter. Good to normal. But on screened for now, the skin is so cool. I'm just going to Command Control T and make it very large. And this size, like this click, Okay. Now we want to add more shrine to these rooftop. Let's come press Control J to duplicate the sun flare. Mac control T, make it even smaller and drag it and bring it around here. So it means the sun. It just really, really close to the house and it was more dreamy look. But I'm just going to mass the sun out on your keyboard and do something like this. So we basically, we had one son, which is here. All right. Very cool. Now, this signage is going to affect these three as well. I'm just going to click on this tree and come here cyst because the direction of the light is from left to right. So it means we have to command control T right-click and flip horizontal. And just let's go back. And we are good to go make the BBB up, right? What else we can do? And I'm just going to blend this 3 to the background for now. How did this with the adjustment layer? Click the curve and just do the clipping, pin down the light it and drag it up. It is going to be bled in this too much green in it. So it means I go to green and drag this down. It's too much purple. I'm just going to add more yellow first. I mean, decrease the Ghetto, which is going to add more yellow to it because the sun is coming in, so it's just going to be more yellowish. And how we can make it more interesting, guys, take a look. There's some filler, the original white she was going to be soil for can I control J to duplicate it, drag it here and just take a look. I'm just going to drag it and put it above tree, right? Just going to be due to cleave it masked by itself. But now I can just play around, get it inside. It's three, play around to get a very cool effect. All right, How cool is that? And how cool it simple. Again, I'm just going to come up with reject, duplicate it and put it above the tree left or down old and do the clipping master, this one, I'm just drag this here. This is more close to the sun. So every part of it is just going to be so interesting. Just turn this off. It is something is missing. Something is enough, right? Just, let me take a look. Right? This is cool. Now, just take a look, take a look at this one. Right? This is so-called. What about left one? We put default, we added some light. The light is just going to affect this part, so it's cool for now, but it's too sharp. What about this one? Is sure a bit as well. I'm just going to get again this one. Good adjustment layer, hue and saturation. Bring down the saturation a bit. So it's not going to be dad sharp. What about this one? And then this treaty left. I just meant the saturation. Practice situation down assertion is going to be dead. Make sure you do the clipping mask as well. So it's just going to be effect on this tree. And we also need to do the care of parts, add up a bit, light, drag these. So it's just going to be more match. What about these? Proc it to them? Clean up, I mean, close the tree. And the birds, the sun flare, I'm in the rug. Let's right-click and do the Convert to Smart Object. Let's go to filter, filter gallery and feel Blair's my favorite. I mean, by default, it's not bad. We need to add a bit of blur to it. For this here. Something is missing here. We're just going to fix it later. Just going to put this here for now. Click. Okay. Let's go inside. Let's see what is standard Rocco. So it's under three. What is this? So I'm just gonna take a look in the sun. Something goes is missing. I mean, this curve should become here. This is just going to be removed. And that's it. I was thinking what is wrong with this image. So that's what the sinuses, the extra sun we just added. So let's come here and what's now? For now, we added everything to our image and we have to fix some details. The first thing that we have to fix is this. I believe this is isn't that right? See the rope and color. And that's the color. It's B on your keyboard and it is smaller. Now be tantric. Anything then you see is too much, you have to remove it, guys. The cool thing about this masking is a dime, you see something is wrong. You can just go back and fix it. I'm just going to click on these three, right and drag, make it up. And the shadows are very, very sharp. Make sure you get it under the curve. And drag this up. Make sure you add a new curve adjustment layer. Drag this up. And I just need to be effect and the shadows. So it means F2. Double-click here. Remove this from the highlight and just leave it in the shadows. So that's why it's going to be so dreamy and cool. What about this one is the same. Let's go back. Let's click on the left adjustment layer at a curve. Drag this up. You need to tell it that you just have to be effect and the shadows. So we'll remove it from the highlights and just take a look at it. How cool is that?
28. Final Color Matching or Color Grading: Now we're just going to close the tree, rope, house. Everything. Come above the bird. I didn't New Layer, just going to call this clouds. B on your keyboard. Make sure the foreground color is white. Right-click and let's go down. Let's pick up a very cool and large brush, just gonna make it straight right? Now with this one I'm just going to click, guys are just going to click around these areas. And maybe you want more. Here. Again, Right-click another one. Here. The light is, I'm just trying to do something cool. Now, what about the house? I didn't really care what I write. One more click and make it larger. You should have selected something like this, like this. And drag this down. I get right-click something like is. We're going to add more. Cloudy should look to the house. Nice notoriety was an immediate fits. Be here. Something like this is much better, I guess I'm just gonna try different angle of it. So I'm gonna make this smaller. It's going to be more believable. All right. I believe so far so good. And I added a lot of things to get them in. And let's click here. I mean, these cloud, I don't want this cloud to be interop. So what do we want to do is connect the rope. You just selected press mask, right-click. Let's go up to 40 South round brush click here and make it very small. We loo flop capacity. This is the thing that it has to be sharp In a concept to my Control D to de-select it and just take a look at it. What else? Everything is cool, everything is nice. I'm just going to go back and forth to see what is missing. Everything. Everything is nice for now, but look, I mean, this is sharper than the stone. It's not right. Let's go to Blur Gallery. Double-click on it. And let's make this a bit sharper. Coo. Maybe less with more. Okay. What about this city? This with the BG and open this up, get a complete Gallery. This should be sharp. In that sharp practice. Practice down. I believe this is going to be cool. Maybe. This nice. I believe this cool Now press Okay. When that's a cool thing about this process, I can easily go back and force and just fix everything. And how cool and easy is that. All right, Now, we need to make this house a bit sharper. So what to do? There's a lot of way to do it. But just make sure everything is perfectly, everything is nice. I believe everything is cool, but this still is something not right about it. Just double-click on this though. And Michelle click on overlay and at a bead of these color to it, close to it. Now, much better. Much better. What about this darkness, this Schoenberg of the city? Let's double-click on the background layer. Again. Click on Color Overlay. So we need to do this as well. We need to add some bluish color to this shadow so it makes sense everything. Right now, cool. Let's go up. Click on the top, add a new layer Command, Control, Shift, Alt Control, E. To duplicate it, hold down Control Shift Alt E, and we add an image on the top. I'm just going to call this color grade. Now, just right-click on it and convert to smart object is good to Filter camera Raw Filter. I'm just looking for a shopping list. Some of the parts like can add some effects. Click on the vignette. I'm just adding some white vignette around this area that makes more sense. Cool. And I just get attention and pay attention to this center area. Let's go up. Add a bit of yellow temperature at a contrast, at texture clarity. And for now, let's suppose, okay, well done, Alt and click on the mask. Cool. We just come back to that first image. Press B on your keyboard, make sure the flow is very low. And the foreground color is white. Now I'm just going to gradually, I'm just going to back, just sharpen the part that I want. I want this part to be sharp, right? The house. Coo. How close they're very interesting. Let me be these birds EBIT this area. No microcytic back, just to house. All right, cool. Now, one more time. Add a new layer. Control Alt Shift E. I'm just going to call this final right-click. Current does not object. Filter, camera Raw Filter. Let's go add some very cool and interesting filters is going to provide color and browse. By default, we have artistic, artistic to 64. Let's see which one is more matching. I mean, artistic 05 is very cool. What about this one? Like this one? It's totally up to you. Screw up actually see the mother. Mean it's very bright. And the vintage, just six. Nice. There's 10. It's too bright. It's good to artistic five. Click. Okay. And Okay. Now take look. Everything is to take a message and everything is a very, very believable. All right, now you guys know exactly how do the compositing of simple and beautiful and creative images to get it to make something very artistic practice guys, make sure you just see the background, the city background, and just replace it with this above background. Right? So the city should be replaced with the above. And this rocker should be replaced with this rock to everything else, it should be the same. So just replace this and just drag this and put it here and just replay this like a Mac Control Z with the city and do the same process as I did and just send it to me. So I'm just give you some feedback. When you guys are ready, you can go to the next project.
29. How to Composite A girl with Lots of Hair to a Background: All right. It's time to show you my compositing secret, how I do it exactly. So without wasting time, let's just start doing. I'm just going to drag this BG. Good to your 005, my compositing secret. And it's going to be two project. But before we start doing any projects, Let's see what is the concept and what is the logic behind every single steps that I do exactly. So I'm just going to drag this BG. And let's go ahead and drag the model. I'm just going to just put it right here. Pressing W on your keyboard and click on Select Subject, right, cool. Now I click on the Layer Mask. Now let's go to your adjustment layer and click on threshold. What is threshold exactly? Threshold edge is going to show the Dorcas and delighters part of the image. So we start from right to left and left, right. So as you see here, the shadow of the model is darker than the shadow of the background, which it shouldn't be. It should be the same. Just look. I'm just going to click on a new layer. And let's find the darkest part of the image in the background. It's here. So I'm just going to right-click, make it larger angle here. Press B, and just click around this area. So this is the darkest part in our background. Now let's find the darkest part in our model, which is here. And just take a look at it. I'm just going to go back to my nutritional attendees are and drag this from left to right. But before we end the stores, you see the model. The shadow is dark, so we have to fix it. So it should be the same. First, you have to see the dark side in the background. Then you have to see the dark side and a shadow in the model. I'm just going to show you how we can fix this problem. Go to Adjustment clinical level and drag this down. Just going to call this shadow. Click Adjustment Layer, create another level. I'm just going to call this highlight. Let's go to Adjustment Layer and click on curve. We're just going to call this color. And that's it. These are the steps. Click on your shadow in this area and C, you have to fix this part. Make sure you hold down Alt and kilobit to the model. The same with the highlight. The same with the model. Oh, just hold Alt or Option and clip it to the model. Now click on the shadow. As you see, this is dark and we have to make it brighter. So what to do? Just click and I drag it to the right and weight. Now let's go back to threshold. When we drag this from left to right, just take a look at this one. And this one, this should be appear first, then distribute appear at the same time. Exactly. Before that. Just drag it to the left to right. Just take a look. Cool. Look first. And now we have, this is something from here. Cool. This is nice. Now Dennis off and take a look. When I said before, after, before, after, before, after school. Now, this is so dark and it is so dark, so it means they are the same. Now, let's go back to bright part. And they're just going to turn this off for now. Click on threshold, drag this from right to left. This bar from the background should appear first, and then the model, the highlight of the model should be appear. So I'm just going to come here to the high-ranked and drag this to the left. And now just take a look. Let's go back to threshold. Drag these to the left. Now, it's cool. This is peering. Now the model is occurring at the same time, school TEN threshold of, let's go back. Do you want to see what happen? I'm just going to click on the model Command or Control J to duplicate it, hold down Shift and click on hold this area command or control G to group it. Because I'm just going to see the before and after. Just take a look. How sharp is that? And now, just to end this, you see, right? Now, sometimes we just going to take a look at this exactly. And I'm just going to come back to my highlight. Drag this a bit to the right. You're just going to play around with it. And again, go back to where it was, shadows. Just drag it to the right, go to the highlight, and drag this to the left debit. We always can play around with it until we get something very cool and interesting. And now let's go back to background. Click on this little icon here that disappeared. Right-click, make it Convert to Smart Object. Let's go to filter blur and Gaussian blur. I'm just going to make the background around 10 is fine. Now, just OK. And now we can see before, after, before. It's very high contrast, the very coloration. And now take a look at this is totally match the background. Now, there's a lot of things in compositing, but for now we're just talking about matching it. There's a lot of things we can do. We can just add some highlights, so I'm some rim lights to make it more believable. But for now, we're just talking about light, shadows and the color. Now, after we fixing the highlight and the shadows, everything is okay, everything is cool but still something is missing. And that is color. So I have to fix it. Could do color, make sure this one is selected. This property that the mask hold on Alt or Option. Click on Auto. Now, click on Find dark and light color. Click and shadow, and find the darkest part of the image. And now click on the highlight and click on the highlighted area from here. And just take a look at how close is that to the background, alkalis. And just press OK. Always pressed know. And we are done guys. We added shadows, highlights, and color and see how cool is that, how believable is that? Of course, we can make it much better with adding rim lights and we added some lights to it. But for now, for a simple composite and see how easy is that. I mean, you can do this in less than five minutes. Then you can add some room lights and you can add it to any background. All right, let's go and do the first project in my secrets in composite.
30. Compositing a Ballerina Girl to an Outdoor Environment: All right, Now we know the concept of threshold. Let's go to the first project. Let's go to the Project 1 in my composting secret. Just drag this BG Amborella background. Let's go back and ballerina address, drag and drop it here. And you can zoom in a bit and 10 is off and click on this icon to swell. So create a new layer. And I'm just going to clean up this tree. I don't really like it. It's just kind of distracting. Let's go. In polygon lasso tool, which can zoom in a bit angry here. Really quickly. I'm just going to remove these trees from the background. Zoom in a bit. So always just click on the inside and the outside like this. So I'm always inside. Look inside this term. Because this is going to be a very much cleaner selection. And I'm using my mouse again, that may tablet so anyone can follow along and see exactly how I do it with the mouse. Alright, cool. And that's enough. And make sure you click on the eyedropper. Click here, alter option and press Delete. And can control D to de-select it. And we'll again polygon a lasso tool. I'm just going to zoom in, go to TB1 and fix it up. Very easy selection. And here you go. Author option and press Delete on your keyboard, and we are done. And the horizon line should be around here, which is fine. And what about the ballerina? The horizon line is around here, around exactly like the hand. And you should know when take football a lot in his studio. You definitely know exactly when the camera is. So the camera exactly here, which is the writer like a W on your keyboard, select subject. And let's zoom in and fix the box. It's good to a Lasso Tool, hold down, shift. And here we go. I'm just going to go around my mouse. Just like that. Hold down Shift again. Very easy. Hold down Alt or Option. Fix this one, alter option. And here we go. Scoop up. Now shift and very quickly is going to fix this one around this area. And this one as well. Screw up, let's see if something is missing a lunch shift. It is. A bit of these hair. Hold down, Alt or Option around this neck gets messy, right? Cool. Let's go here, hold down shift and add this cute dress shift again. And I think this is cool part, right? Very nice. And click add a mask. Very interesting. Just drag it and drop it here. I'm just going to look in a very cool position, see if I can find. I'm just gonna put it right here. I'm looking for this triangle. I just want the light coming through this, trying to throw their hands and always make it a very interesting. Now, press Command or Control T, just drag this and put it here because now we know exactly where subjects should be. Hold down Alt or Option and Shift and drag this down and make it a bit smaller. And here we go. I believe this is very interesting and this is cool. Now, very quickly, let's go to Adjustment Layer and click on threshold. Then the offer. Now, ballerina, again, let's create our level, just going to call this shadow. Clipping mask. Again. Level is called Lives highlight clipping mask. And let's go to care. I'm just going to call this color to make it more clean. I'm just going to hold down shift. Before that, let's click on ballerina can't control J, duplicated it because I want to keep it as a copy. Click on the ballerina copy and hold down Shift and select the top one cannot control G to group it. So I'm just going to be more organized. All right, let's go to a threshold and drag this clique and this icon. Drag this to left to right. So let's see and check the shares. Before that, let's find the two color that we are looking for exactly should be the same color. Create a new layer. Press P on your keyboard. Make sure this is red. I'm just going to come in. I'm looking for something like flow 100 percent, something like this. Then I'm looking for and around the stomach, same color. So these two should be matched. First the background, then the model. Let's go back to threshold. So by default we have something here. Let's go a bit more. Still. Nothing happened. So it means should be darker. Let's go to shadow. And to make it darker, you have two options. First, you can use this one and a bit of this to the left. And let's take a look. Right. Now. It is much better. All right, now, something is not right. I mean, delight in a background is coming from right to left. Take a look, see the light coming here, and this is the light. And the light in a model is left to right. Between us, you have to select the model kind of control key. And right-click, Flip horizontal line. I'm just going to press Enter and 10. This off the ballerina. And this is exactly how it should be. I'm just going to just leave it here. This is exactly what we want, right? Cool. Now the light is matching. So we fixed the shadow, which is cool. We don't need this. Let's go and look for the light. Let's turn this on. Let's go to the right and drag to the left. So the minute these area is appearing, delight and the face should appear too. Maybe this area. Just take a look at this area. Right, cool. We don't really need the highlights. I believe the highlight is okay. Just in a highlight, we can add some light from right to left. This is make it more interesting or not. Let me check. Let me play around with the light. I believe is a screw. So I was just wondering if I see and check it with DC area or this area. The highlight is more look like this area, which means if I click on the threshold, is appearing first, look, the minute this is appearing in, the highlight in the face UP appear to. So I'm just going to go to the highlight and make these appear as well. Look. Now it should be totally the same. Look at the same time. Now ten is off. Now it is totally match. Right? Cool. Now let's go to the Color. Click. Make sure you click on this property. Hold on Alt or Option. Click on auto and make sure if find dark and light color is selected in the shadow. And the shadow, just look for the darkest parts. We can always change it. I mean, it's, it's very dark. What about the highlighted? I'm just going to look for this one or this one even the background, which is cool. This one as well. Or I'm just gonna make it maybe this or this, it doesn't really matter. No. And this is cool. So maybe the color effect wasn't really dad good because by default when we fix the highlights and shadows, most of the time, the color it's fixed to, but we always keep it as well. So maybe in future when he needed. So it means most of the time when Sharon highlights be fixed, the light and color and everything. But at the end sometimes it doesn't look like a really dumb matching the background. That's why we added this curve. Now let's cutover model and great new layer. Let's fix these clone area. I'm just going to click on Control and add a selection, hold down control and click on this layer mass to add the selection. Make sure these areas selected. I'm just going to call this clone S on your keyboard. Make it a bit larger. It a flaw, a 100 percent hold down Alt and clicking this area. And here we go. Maybe I should be a bit more close. Look to fix that part. Or maybe I should be fixing this as well. Where I could click here. I always click and this area that has shadows. So it is more believable that the extension of the dress is real. Nice. Look, this is not believable now this is cool. Sometimes you have to go back and read two or three times and make sure come to the end. Somehow I got a Scottish accent. Cool, Very interesting. Now we are down Command or Control D to de-select it, and we'll lock. We have created very cool clonic. Right? Now. What else? Now it's time for the shadows. Come here. Click new layer at the bottom of exactly behind the model, at the bottom of the ballerina copied, just going to call this shadow. Just zoom in a bit. Press B on your keyboard, right-click, and now make sure this is straight. I fix the clone. So sometimes happen. Now dabbing, but the tree, the flow should be very low. Let's go back, back. So let's go back and I got to z. Right? Then I make the flow of 40 and get a smaller quantity. Again, the same thing. Now, one to come back. So the light is coming from right to left, so the shadow is more this area. But before we do that, just right-click and drag these up. So the angle is up to down, just like this. Or it is way less. Now, this is a very, very much livable because there's a dress and at the end, you see something very, very cool and interesting and believable. Right-click and make sure this is fixed. But the color of the shadow, it doesn't match the background. So how to fix it? Very easy to double-click on the right side of a shadow. Go to Color, Overlay click and pick a bluish color. And play around with it. Press Okay, now double-click again and the shadow. And we just want to make it appear on the shadows. Mean the color should be matched with a shared on Avi to highlight what our alt click or Alt or Option and click and is to separate it and drag it to the left. You see the shadows is appearing and you see a very cool, perfect match. Now, I can go back and see if it's really believable, which is or if it's not, you can play with the color overlay to the left or right to make it more believable. And we got this shadow around here, should have something like this. Nice Press. Okay, now this is very, very interesting numerical or what else you have to do? You have to fix. Let's go above the clone and add and add a new layer. I'm just going to call this color. You see when the legs are close to the ground, the color of the ground is going to be affected on the legs. What I mean is if I hold down Alt and with the brush, thank go around exactly on top of the legs because it's clipping mask, it is going to affect the legs. All right. Or we can just make it more bluish, which is better. Now. Go to Blend Mode and put it on color and bring down the opacity. You see. How cool is that? We can increase the opacity and add a layer mask to it. Press B for a new keyword and Sweden. Click an X to switch this black to the top. Make sure the flow is very low around maybe 25 to 34, and just gradually click on it. So it means from the bottom, gradually the color is just going to affect the legs. See how cool and interesting is that. Well also it can add a bit of color. Here. And the legs. We did very, very low. No one knows, no one say exactly. I mean, the matching mean. How cool is that? Wallets, we can do? The same thing. I'm just going to add a color again for the face. Just take a look at this area, guys. I mean, these colors, this darkish tone color, something like this. And you can really added to this model, the face and down is okay, but the top Muslim, something like this. Again, I'm just going to put it on color and just drag it down. And also double-click on it. Make sure it's just going to be effect on the dark side, not the highlight. And this is how at the end we match everything to the background. At the end of this project, I'm just going to go to the top and go to color adjustment, clear on the lookup, lookup and the total, and see which one is better using my mouse wheel. And most of the time make it something like this. I mean, very contrasted. Then drag down the opacity and just take a look from close area. If you see him in the legs are still affected. Mean nowhere as you can always go back. Press B on my keyboard. Very low. I mean, look, we now gradually you see everything is matching. And trust me, this is so cool. Let's go back to Color Lookup and play around with it. Maybe this is a very interesting. At the end, something is still missing. And what is that? When the light is coming from the back, we have something called a rim light. But for now, I'm just going to show you guys how we can create a very cool and very fast highlights as a rim light, just, I'm just going to call this green light. Press B on your keyboard and the floor own territory is fine. Make sure you pick a color from the background. Just get close. And just dab guys. See, I'm dabbing, just clicking a link, like dabbing around my subject. I want to see before and after, before. After. Look. Nice. Now, dab, dab, they're here. So always load coming through lucky. Like here, like here. What about these areas? A bit here? Here? Look, just guys take a look at it. I mean, I'm just going to drag this, make it a bit larger because the light is coming from the right to left would be the flow very low. And take a look. You want to see before and after. Before limb light, after him, light. And how cool and easy is that to match a subject to any background guys. You guys enjoyed and learned this technique, which is my spatial and secret in compositing. Now we go for a very crazy and inspiring project. So you guys can follow along, do some practice, and do exactly the same thing that I did exactly here. And just send it to me. And I'm just going to tell you if you're okay, you can go to the next level. This was very interesting, very cool project and it was easy. I hope you guys enjoyed this. And let's go to the next project.
31. Compositing A Warrior to A Desert: Alright, let's go to Project 2 in my compositing secrets. Let's drag and drop the PGE2 to the Photoshop. Let's go back and drag and drop the warrior plus into plus W on your keyboard and select subject. Right? Let's zoom in a bit, see which part is not matching. I'm just going to click and select the Lasso Tool. Hold down Alt or Option, and remove these areas. It's go up or down shift. And let's add to this. Let's add this part, lunch shift. And let's add down Alt or Option and de-select these areas. Shift again. So when you see the plus sign, it means I'm holding down shift, right? It easy lays down shift. And here we go. This is not selected at all. Now I'm just going to use my Quick Selection to shift. And here you go. Let's see. Is there is dun. Dun as well. All right, cool. Let's go back here. Click on Mask. And here we go and drag this and just put it here. Which is very cool. Let's go inside leaves is something missing. Just going to click and go around this area with lasso tool. And I'm just using mouse, auto option and delete. Here we go. And let's do our process again. Threshold, then it off and bring the level. I'm just going to put it down Alt or Option and just going to call this shadow. It can 101 level. I'm just going to call this highlight. Other option to clear mask and care. I'm just going to call this color. So let's put the threshold and let's go from left to right. Slowly. It should then be darker than the background. So which means I have to go to shadow and make this brighter. Let's keep going. Steel. So is it the same time, which is cool itself, right at that. What are the highlight? From right to left or right? The background firsts. This is meaning that the bright side and the highlights are okay. So it's the same time. First the background, then the highlight here, school. So no need to change the background. Very interesting. Now the color, I'm just going to come into care of. Make sure this is selected, hold down, alter option, press auto. Find dark and light shadows. I'm just going to find a part like here and just drag it down. We're just going to play around with it until I'm satisfied with the result. Coup to highlight something here. So just take a look at it. Register ICU. And now, okay, No. Now see how co-design, how fast we just fixed these areas. Let's just zoom in. I'm just going to go to the word, go to the mask. And most of the time just press B on your keyboard and make sure this is very small, right-click. Soft, round brush. And flow should be around 19. Just take a look. I'm just going to go around. It should be like this is exactly inside this sense. Something like this. We not this part. Something like this. And what about this part? Alright, nice. Now, just take a look at these parts along Control and click on linear layer. So we'll call this shadow B on your keyboard with the first, the press B for brush, right-click. Make sure this is a very small and should be D is angled and get off the shoes. Make sure the flow is around Titi. Took 23. And now it's make it very dark. Cool. Right-click here, go. Just going to keep clicking it again. Just take a look at that. Usually do something like this. But the color doesn't match. So it means I have to give me, me, me, me this part as well. Make it a bit here. And here we go. Nice. Now, just double-click on the shadows. And this will cover overlay and just pick a color that matches. Now let's go to blending option. Hold on Alt or Option. Drag this to the live. So just appeared the highlighted, showing the highlights and the shadows. Right, cool. Let's go back. I'm just going to see the overlay. I'm just going to play around with the darkness of the shadows. So which one is more livable that they believe this is cool? Now press Okay. Now this is symbol guys, but in compositing you, we added a lot of stuff like dust, how this good to the folder, project and defiance. And we have something called brushes. And brushes. We have something called dust and powder brushes. If you go to Window and add brushes, you just going to pop up front here. And we're just going to drag this tropic to the trash can to show how it works. Double-click on dust and power. Double-click. And it's going to be appearing here. And now, open it up. Go on the top and add a new layer. I'm just going to call this dust. Now. Click on one of these like PE 10, doesn't matter. Now, just add dust. But before that I'm just going to Command or Control Z. Just pick a color, mean that it matches the exactly the ground. Let's zoom in and take a look. I'm adding gradually and various loading. I'm adding thus, my environment. First issues. So it's going to be more at the bottom. And at the top, it's just going to be less. Look how closer and now. And in new layer, call this a and thus two. Now, what about the body? So if I add brush here, guys, I want to use something like is like dust is exactly on this and the clots. And I mean, so we're just going to double-click here and hold down Alt and click and the shadows and drag it and drag it to the right. Alter option. Drag this to the right. You see, now it's like the dots or undeclared itself. And how cool He's a look from here to here, see the dust and the clouds. And these are the parts that are really interesting. What about let's go back here again. Pick another one like this one at another one that's like dust three. And this is exactly a compositing. I mean, you have to just add new layers that does to your environment. I mean, does the bat here and increase the flow? Look, it's like maybe less, exactly something like this. This is like dust are coming out of these tools aren't all auto color. But I'm just going to change the color of the dust that's under like this. Is it? How clues that guys, I mean, this is exactly compiling a step-by-step. I'm adding more staff to make composite to make it more believable. So this is exactly the concept and now you know the basic Exactly, you know, everything about have to composite lot of stuff two or three and out dust and brushes and a lot of stuff. So just do some practicing, create exactly the same thing, exactly like this, or add and add that person to this environment, send it to me. And I'm just going to tell you if you're okay to go to the next project.
32. Ballerina With A Snake Project - Fast Selection And Put them in the Canvas: Alright, now let's go to Projects 6, ballerina and a snake, and then go to images. And you have five images and drag and drop all the images into Photoshop. And it's going to be like this, the rock snake. And I have already the selection with the pen tool. So you can see the clip very shortly. How I did that is kind of be fast forward. That light is going to be like this. And the ballerina, it was exactly like this. So I did the selection tool. You can see very quickly how I did that. Now in this rock, I'm just gonna do the selection because it's a bit tricky. Because if you press W and edit keyboard and select the subject that Photoshop is going to tell you. It can recognize what are we exactly looking for. So the thing is after come here and select the Object Selection Tool and drag around the subject that you want to be selected. And automatically, Photoshop is going to select this, but this time did a very bad job. Again, long shift and drag around that area. With the help of lasso tool, I can just hold down Alt or Option and minus this area. And it's going to be awesome selection. This board hold down Alt or option and go around this area as well. That's it. Click on the mask and it's going to be perfect. Hold down Control or Command, and click on the Layer Mask to get a selection back. Right now, press S on your keyboard for class time to click on a new layer. Make sure the current and below is selected, will then Alt or Option and start painting over. With the help of this selection. We're gonna do worry about going out of the selection. So it's going to be perfect. And we're just going to follow these lines. The rock is going to be helped a lot. Right here we go. See how easy is that to, to the clone stamp tool. Right? Now. These parts very nice, kinda Control D to deselect it. Now, we have the Iraq Lamb shift. Click kinda Control E, just call this rock. And my Control G to group it. Again, call this rock. We are going to be very organized and this. Now, let's go and go back to these images. Drag and drop the BG, the background, and hold down Alt or Shift and drag it up from the center. It's going to be like this. Drag it. The blue drug. Can I control G to group it, call this BG? Close that up. The next is going to be the ballerina. Masking, drag it and drop it here. Can I control T? And I'm not going to be worry about the resizing and losing the quality because just gonna leave it here for now. It's smart object, directory, command or Control T. And make it a bit larger. I'm just going to drag it and put it here. Maybe smaller ICU, some teams like here. And then it's going to refine. Making my country teams making it rotate it. It's better. Drag it up, it ICU. The ballerina is going to be here exactly. Look and willing to help up arrow key on my keyboard. A B here is perfect. Comeback Control T. So became smaller. Around this size. Alum ballerina and click here and just contract this rock. Rock should be within the left, maybe a bit and a ballerina. All right. Now, let's save it. Go to File and Save As and, okay, so you guys make sure I save it wherever you want, any name. So anytime from now on I'm just going to save our file so we're not going to lose it. Sometimes Photoshop, it's hanging and it doesn't work. So make sure always, every five minutes you press Command Control S to save your Photoshop file. All right, for ballerina, can I control G again? This ballerina? Close that up. While it's we need, we need a snake. I'm just going to drag it. Make sure you click snake dragon and drop it here. And I can Control T and just go negative it larger and rotate it. This is going to be something like this, right? But it's to peak. Maybe the size is going to be perfect. So now I'm just going to drag it and put it here. Is maybe really smaller for now. All right. Now press into so we need to bend this snake. So how do we do it? Let's go to Edit Puppet Warp. For now. I'm just going to put in more than rigid. Click, click here. Click here. We need the mesh. If you don't want to see the mesh, just check this off. But for now, we're just going to keep it and drag it up. Drag this inside. Don't scared to just permanent guys is so easy to work with. I'm just going to click that on. Now. It's super cool. Make sure this is going to be coming down a bit here. Here. All right, I believe I like this very much. Now. Click on this check to add it to this thick and viscous. Drag it and put it here. This leg is going to be below the ballerina. It's good to be like this. Cool. Command, Control. T. Don't worry. Just make it a bit larger, press into it. It's just going to come back in a position. Just going to leave it like this. Cool. All right, That's it. This is exactly what I wanted me be. Here. It's going to be much better. All right, cool. Now we learn the Puppet Warp tool technique, which it was perfect and it's really useful. Now we have everything we needed. Just need the light back, long shift and click on the mask, drag and drop into a snake or Mac control T. Before that, make sure right-click convert to a smart object. I'm just going to call this Light, drag it and put it outside snake. And I'm going to just call this snake. So everyone has his own group. This one, please. The light kinda Control G again. The lights now we are organized. I'm happy. Can I control T and make it a bit small? Just come here. Let's see if we going to find a very cool one. That's it. Here we go. It's going to be something like this. Around this area. Let me check. Now. Let's fix the hand of the ballerina.
33. Create Realistic Lighting: Again with the help of Puppet Warp tool, just going to pick this hand, edit the work. And, but for now the density is normal, just bullied and more points. Again, rigid. Anybody closer? Control plus what is that? Cool. Just put some points. So is now going to move. Nice, nice, nice. So this part is not going to be moving. There we go. What about this letter hand? And you're going to drag it here from the bend, hold on Alt. And you see the rotation it too much. This one down. Let's see if I'm holding down Alt. Again, 11 here. Here we go. All right, go and check. Let's go to light, is going to adjust it with this area. Something like this. It's going to be lucky. He's holding the light it hand. We check if it's not beginner. Alright? So write this size. I'm going back on forests so I can see what I'm going to do with this. The light, liam S press B, and right-click, make sure the hardness is a 100 percent. Make these various Mar and a 100 percent. Here you go. Take a look. All right, let's switch to white and let's go back. These areas. Now it's like he's holding the disliked the hand. Perfect. All right. Everything is fine. Let's close this up. Let's go start with the BG. Go to EEG adjustment layer. Now we know Level, drag this and put it down left, right now, we don't need to use the threshold because we're just going to use and trust her eyes. Drag this to the left. All right, so now let's go to rock. Again. Level. Drag this to the left, make sure you do the clipping mask first, which is going to be affected Rock. Make it a bit sharper because when it's closer, it's going to be more contrasty. All right, that's enough. Let's go to this again and make this a bit brighter because it's further right? It should indeed that sharp the shadows, I mean, the shadow here, it's sharp, is dark. But I did bag does shadow. I'm just going to tell them that make the shadow a bit brighter. So it means it's far away from us, right? Very simple. It's got a snake. Close that up. Again. Liberal clipping mask. Drag this the left and make it a bit sharper with just drag this to the left. It's sharp to brightness a bit more because the girded more contrasty. So I'll make this sharp as well. Very nice. That snake and a stone should be the same in case of shadows and highlights and every day. All right, let's go to a ballerina. Again. Just can close that up. Level. Do the clipping mask. Drag this to the left. And here we go. We'll go back and forest and until we get something that we really want. Go and the light as well. Actually this is off. I just meant to be devolved. Do the clipping mask, drag this to the left. Let's zoom in a bit. Can take this as well. So it's the mean. Look at the shadows, so dark with the magnitude brighter. A bit. Right? Now. We start with the light. Fix the light first. Let's go to click on the level. Make sure you click on Polygonal Lasso Tool. And here we go. Kind of control and delete. Again. Kinda go through and delete. So when we get delight, deadline is going to affect the part near the boundary and I go. So this is start with the painting. Close that up. Open the ballerina and go to the Mask. Press B for brush, and make sure you place kinda Control S to save the file. So press B for brush and just right-click and make sure the hardness is on 0 guys. And the flow should be around 20 or 15. Zoom in a bit. This B, again, I'm just going to just start painting over the black on top. Let's take a look. Alright, so the part near to the lives that is going to be brighter. Let's take a look. Everything closer. It has more life to it. Maybe these port should be dark. Spot should be a bit brighter here. And let's get closer. B for brush and tap. Here. Just this part is brighter. Alright, cool. Maybe be more deface. A beat here. All right, cool. So now what about the color of the light adjustment layer and get it going, hue and saturation. Make sure you keep your mask on me. I'll alter option colorize. Just drag this and put it on me, be around. Sure, I'm just gonna put this on 60. Drag this and just make sure this is around 30, 30 and 60. Hold down Command or Control and press I to inverse the selection. So it means there is nothing here, is B for brush. Press X to switch the whites, basically zooming in it. B again. And let's see. Just take a look. Here is more or less is more here. Face. And very gently, very slowly. We're just going to gradually over the other parts because they're scared. Maybe read here and here. But take a look at the intensity of the color. Closer, has more intensity to it. Let's go back. Just take a look. Alright. Graduate in a story which is going to fix and do a perfect job for this lighting effect. Just going to stop right there for the battery. Now, let's go to a snake. Just get closer. With B for brush. Switch the x. And the flow of 15, I'm just gonna go over its parts. Just take a look at this. And maybe these parts, the white parts, ties more, more. To just take a look then very gradually, very gently. This is the bright part of snake face. School back. Thanks. Again. The same thing. Adjustment layer, the unsaturation. Do a clipping mask, colorize. Now you can do this same number, 30. All right, tailed T and 16. And cool, kind of control I to inverse the selection. Press B again, make sure the foreground color is white, X. And do the painting. Very cool, crazy. There's a green part that around here. I'm just going to color this green part as well. Just lose it. And that Misko negative it bigger. And gradually I'm going to paint her. Let's go back. Very nice. What else do we have for the color to get this done when the light is here? I mean, we have something here. And the rock. Frisbee. Make sure we have something here. The eggs. So you can see something cool. Jasmine layer. You can saturation do with equilibrium mass. You know, when you hold down Alt and click on one of these, is going to be zooming on that specific layer. That's why something happened. So it just meant a colorized. Take the 60, which is cool. Now, can I control? I? Press V again X to switch to white. And here we go. Again, white. And here we go. How cool on how easy is that for now? All right, Now we have everything. Let's restore to the real deal for lighting. Go to lights at the top. And we're gonna add something called glow, which just gonna name this glue one. Hold on Alt and do them. Clear mask Alt or Option. Zoom in a bit, double-click. Make sure that transparency shapely ease off. Always, anytime you're just going to put it on color and dark colored dodge, make sure align alt plus b. Be an ALT, so you get the orangeish color, that orange, maybe lighter, right? Cool. And just dab once and dab here. And you see the light true mean is going to be bigger and bigger. Cool. New year, new layer, glow effect. This time, I'm not gonna do the clipping mask. Let's go to screen mode and just double-tap. Make it a bit larger. Double-tap, larger. If you want to just this double tapping and screen just effect on the bright side, just double-click here and make sure this is off. And I click Okay. Just going to affect the bright side. Is close that up. Go to ballerina at the top. I'm just going to add something called glow. Do the clipping mask. Let's get closer. Make sure you put it on Dodge and Burn. Or color dodge. Make sure it does. Transparency, ship date is off. Make sure the flow is around three js, just three. And this is small. And with the same color. I'm just gonna go around this area, guys. Just look around the corner. Because it's closer. It's going to be affected with the light. Let's take a look. How cool is that, that we can affect even the hair. The face. A bit, a bit here. Maybe dear. Very gradually and very gently. Let's close that up. Look how cool unrealistic is dead guys. Very nice. Now let's do the same thing. We just make that up. Naming layer, mask, godless glow. Double-click. Make sure transparencies of color. Dodge. Zoom in a bit. B for brush and start painting over 3% flow.
34. Create Shadows with the Light Color: Okay, here we go. Let's take a look. Now. The hand is a bit off. Let's go back to ballerina, the close side b. And makes sure. Or here you go. You can make this brighter a bit. The flow should be more. To make these more realistic. Let's go below the ballerina, hold down Command or Control, and click and create new layer. I'm just going to call this shadow price. Now, the Zoom inhibit plus b and x switch to make it black. It very gradually. Just going to add dark shadows. Just like realistically touching this snake. And here we go, especially at the site. Nice, very nice. Let's take a look at this. Now. This click on ballerina layer mask. And then start painting. Let's go back to the painting. This is height. Here you see this white area and clean that up. Let's go to the shadow. Is going to fill it with black. I guess we should be more lactate. Now. Make the very low around 52. And here. Gradually just going to add this squared. Just take a look at it. Cooled, unrealistic ease, that guys. All right, this is perfect for now. Let's go back a bit. Let's make this snake a bit cooler. What I mean is at the top, Let's create a curve and make it a bit darker. So it's going to be exactly like the stone. And it brighter. So it's going to be sharper. And not that much. I believe this is very, very cool and very interesting. And it going to make it so dorks or I mean, this is fine. For now. Now. Let's go and inside all of this and make it more matched together. So how do we do it? Is because the, the rock first double-click around this area. Go to Color Overlay. Make it a bit. Pick up this color, bluish and add it. The tat. Maybe two more. Let's look like this. Leave these as cool. Let's go to a snake. Double-click here. This still has it, but it's sharper. Let's go to ballerina. Double-click here. Look, has it. And it's perfect. Zone back and forth. And I like it. I like the whole idea, and it's fine. Now, let's add more light to it. We're going to go here, is going to be a light for the whole picture. B for brush, make it a bit larger X to switch to orange. And make sure this is going to be in a screen. Or I'm just gonna put it on Color Dodge for now, maybe double-click here and JD is off. Just tab. I'm just going to do some tabbing. Ebit maybe under girl bit here. Together. Nice. And the eyes. It here. And nice. In general, it is perfect. The touching parts length may be a bit here and there. I mean, I'm just going to play around with it until I'm very happy and satisfied with the result. Just take a look at this area. This is general, right? But if I close this up to ballerina and this glow, coolish, nice. This is too much press E for I click arrays. And the flow very low. E, razor flow is the more, it's going to be a very low mean that, that's it. Sometimes we color it and we raise it, we make it less to make it more realistic. I believe this is very interesting. Now. It's time to add some fog. So there are there. So before that, let's go to BG and click on the BG, go to Filter and bilayer and put it on boxplot their box. But there is more interesting. Just take a look at it. How cool is that?
35. Final Color Grading : Just going to separate the ballerina and mistake. And it makes it more cool. Right? Above the level, you just going to create a new layer. Depth is going to call this fog. Each folder has his own fog. Let's go to this folder, the brushes to find projects, fires brushes, and call and double-click on a flat brushes. It's going to appear here. And the brushes, if you don't see a window, brushes, open it up. Thank you here, make sure the flow is around 50 ish or down Alt and click on the background. And just behind. Look, I mean this is cool. But about the rock at the top, the same thing, it's going to call this fog. Let's pick up another one. In the newer, nice enough. Snake at the top called this fog. If it will make it even larger. Nice. Close that up again. Let's go to ballerina at the tab. Create the fog name layer. Let's pick up another one. This one should be very, very flow should be very low. And zoom in a bit here, under dressed a bit. So from here, it's going to blend it to background a bit. This technique, very nice, very cool guys. In general, I'm very happy with this. Now. Click on the top. And you know, sometimes when we do have light, we have some sparkle around this light, right? I'm just going to click here, close that up. Good to these brushes folder and look for soley art, essential brushes and double-click here of an Arab. At the top of this light, misconduct create a new layer. I'm just going to call this spark. Click on sparkles. Make it very low or not old, and pick up with very orangeish color and just make it smaller. Sparkle should be very small. I'm just going to just go around this area. Just take a look. How cool is that. It's not much, but it's affecting Command Control J to duplicate it, it makes it more sharper. It's a bit sharp. Go to filter blur and Gaussian blur. All right. All right. Now let's zoom back a bit and see what else we have to do. The most important thing here that we are missing is the shadow of liquor. Just take a look at it. Look how unrealistic as that mean. This is dark and this is lighter shadow. So how to fix them? Actually, it's very easy. Close the light. I'll open that ballerina folder. Let's go under shadow and click on a new layer, commissioner colleagues shadow as well. And just zoom in a bit. Press B on your keyboard and make sure the brushes is smaller. Right-click. And I'm just going to drag this and make it this angle. I mean the size. And take a look. Alright, cool. It is foreshadows. And what about the direction? I'm just going to come here. The direction of the shadow. It's this way. I mean, you see this area. So after right-click and drag the subway bit Min, and this direction, now, hold down Alt and click and pick the same color as this shadows, right? Alter option. And I'm just going to double-click. This layer is exactly below the ballerina. So anything that I have I'm creating, it's going to be at the bottom and make sure directly again, the hardness is and 0 as well. And I'm just going to keep clicking. Make it larger. Alright, cool. So this area should be sharper. And more areas. And see, I'm dabbing, double-clicking. All right, cool. I believe this is perfect. But now I'm going to blend mode and put it on overlay and just take a look at it. Let's zoom out and zoom back. Just look. How cool is that. What else you can do? What about the color? I'm just going to double-click here and the color is so yellowish. If I go to color overlay C and adding the same color as here, and play around with this until I'm happy with the results. Look, I'm getting the shadows and getting a same color is NY then turn. What about the feet? Look is a dark line around the shoes. We can fix that as well. Go and the top of the ballerina, getting an illegal layer and call this shadow as well. Press B again, make sure the brush is very small. Right-click and fix it, bring it back to circle. Let's go with inside click and flow is steady percent. I'm just going to go around this area and take a look. Maybe flow should be less. And 12 guys look. I'm kind of blending. Look. Lending shoes to the stone and look how cool is adding know and understand that this is fake. It's exactly is there. Look, maybe if I go to the shadows and go back again, make disappear. After this angle. Look, maybe I can add more shadow to this. Maybe I click Add and the shadow, I'm just going to call this shadow as well. Chateau in, come here and make this a bit darker. We can fix the darkness. Maybe less. Let's go back again. Again. This area. See what they want. We have to, we have to get exactly what we want guys. Look. Now. I believe this is realistic or equal. Cause that up on the top of the light, click on the new layer. I'm just going to call this final Control Alt Shift E is going to make all the layers in one picture. Or Command Option Shift E. Now I'm just gonna make a copy because my Control J to duplicate it. When is it like this? Right-click and convert to smart object anytime that you want to go to Filter and camera filter. So before that we can test more object. Now when we are in, so I'm just going to zoom in a bit and drag the temperature to left to make it a bit bluish, right? Because in a schematic way of color grading the blue and the orange is going to make it more natural and appealing to the eyes. I mean, people who enjoy this kind of color. Close this one. Now, let's go to highlight app and adding a bit highlight. The highlight is just going to effect the more lights around this area. And to make it more dreamy and a bit artistic, drag the clarity to the left and drag that texture to the right, is a cool combination. And Tibet it to add more wide and more color saturation, drag the war. Why brands to write? And the saturation a bit to the right and not much a bit. And color that up. Let's go to profile color, click on browse. By default, Photoshop have a lot of colors that we can add to our pictures at the end. It's like a color preset. So this kind of artistic 06, it's fine to my eyes. And let's go back a bit and just contract back. Just take a look at it. Good, basic again, maybe add a bit of temperature. Alright, I believe this is 101. Press. Okay. Now, just take a look at it before and after color grading. I'm just going to add another one command or Control J to duplicate it. Close that up, close that up. Again, go to Filter and camera filter. This time, we are going to add a little bit of vignette. Why? You know why? Right now? If I add a bit of vignette, the attention and the focus in the picture is going to be the girl and the stake, right? Z. Adding much less. See before and after. That's how cool is that. Sometimes people do not. Why is that? The focus is here because we added to the vignette. Now click OK. Add a mask to it, press P on your keyboard, right-click and fix that up, make it cycle again. And the flow should be less. Now I'm just going to fix these parts. I'm just going to clean this vignettes because the legs should be the focus. And I'm just going to get more attention here. Just take a look at this guys. How cool is this edge? All right, Perfect. I believe this is the final. And we are done. Here is going to right-click on this and convert to smart object to be more clean. Final copy two is the final image. Guys. Make sure you do some practice. Send this image to me. I'm just gonna give you some feedback. And I have the dad, if you feel and you're happy with your result, you just need to copy exact same thing with the same features. You can go to the next project.
36. Project Batman - Create Realistic Lighting: All right, Let's go to Project 0, 7, the Batman. And inside the images folder, just click on the Batman. I drag it and drop it into Photoshop. Now, just uncheck this. I'm just gonna call these Batman and kinda contribute to duplicate it. I'm just going to call this one. All right. I'm just gonna turn this off because I'm just going to work with this one. Now, Command Control G to group it. All right, I'm just going to call this to Batman method one. Alright, the first thing we do is to select the Batman and whiskers can press W on my keyboard and click on Select Subject. Right? Now, click on the Shift and see the plus sign and just click here. I'm just going to click, click, click. If it doesn't work, sometimes the best way to fix this is just going to go to you can do the same thing and you see the object selection tool, hold, shift, and drag and drag around this area. I'm just going to select these as well. And also select this one. Also select Islam, I'm holding shift. Its funding. It doesn't fix it properly. Because as they told us, we're just going to click the Lasso Tool, hold down Shift and just go around this area would be fine. But as they advertise in Photoshop, if you do the same thing with objects selection and hold down shift and say, Okay, fix these issues. It should be fixed. But sometimes it doesn't work because as Photoshop and it's awesome guys. Now we have this selection. Just click on the Layer Mask, and that's all. And right-click and convert it to Smart Object. Coop. Come below the Batman, create a new layer. I'm just going to call this BG and just drag it and drop it inside the folder. Right now they are aligned plus G on your keyboard and make sure the foreground color is white. The background color is something like this area, which is cool. I'm just going to press, Okay, Make sure the radius is selected and drag and drop it from left to right. Something like this, which is cool. All right, we're going to show you two methods. The first method is basically a lot of people use it for bottom-up innovation because it's so fast. But professionals don't use this method. So first, I'm just going to show you the basic and the fast method. All right, now we are inside the layer style. Just click on the inner shadow, see that now, make sure it's an overlay distance. 0, truck is 0 and the size is around is array doesn't matter for now. I'm just gonna pick up a color. Make sure you pick up the color that is affecting the subject, which is white. Right now, I'm just going to click Okay, and look at this area. Just check this out. This area, this area around the subject. Or at juicer. I'm just going to move this slider to the right and left and see the difference. Now, I'm just going to click on this plus sign here. See that? Now? Make sure we add more light to it. It's an overlay right now. So if you have two inner shadows that you are on, OLA and size are 250. The second one, I'm just going to put this on the screen because it's creating the very white edges and the size, it should be very low. Something like this. So basically, this is how most people work. Now press Okay, before we go further, I'm just going to click on the Layer Style and go to curve. Drag this down to make these darker. But make sure to click on clipping mask. Now, when you did the clipping mask, just double-click here. Hold on Alt and click on distribute it and drag it to the left. I'm just going to tell it, just show it under highlight, not under Shadows. See how cool is that. Now press Okay, Let's come back to the Batman. Press Command or Control J to duplicate it and drag it and drop it above this curve layer. Now, I'm just going to show you the difference between the opacity and the field, because this is the best way to show you how it works. Come to the Batman one click and this effect and drag it and drop it into the trashcan. We don't need it. Now. Ten this off. Now. We have the one on top, right. Now, if I drag down the opacity to 0, see the subject total is going to be disappear. But if I bring it back to a 100 percent, is going to come back. Now, check this out. If I bring the field to 0, it just going to disappear, but the effect is remaining. So anything you do, any effect is on your subject. You just going to be there when you drag down the field. And this is what we want. Now, check this out. Come to this layer and 10, these odd. We have the effect on top of this. Now hold down Alt and click on the Layer Mask to disappear the feel. Now we're going to defeat anymore. Press B on your keyboard. Drag this down. Now. I can go inside with the white area and just see, I'm just going to Iran. But the problem is when we do this, this is not our effect. So what happened? Make sure you double-click here again. Going inside, make sure the layer mask hides Effects. Check this out. If you check this on, everything is going to back the normal press B on your keyboard, make sure the mask is selected. Now, let's go zoom in a bit, depressed B on your keyboard and just go around these areas. He was going to bring back everything, but we let go. We don't need this one, which is called press Z and make you really don't need to click on this area. Just anything that we want, that one mass this. So I'm just going to go around the subject and I want a ds and dad. And that's it, not here, but x and just removed from that part because the light is coming from left to right. And this is what we want. So this is our first method, all right? Which is not that, it's cool, but the problem with this method is, if we want to click around these areas, mean I don't have full access to everything. And everything is equal. Z, just totally equal light. The light is not equal on, in these areas which is broken, the light is coming through. But with this effect, everything is simple. Everything is just very simply just around our subject.
37. How to Create Fast Rim Light : Just hit Command or Control J to duplicate it. Ten this off. Let's see before and after, which is huge difference, but let's make it better. The method two, I didn't number two, what is it? I'm just going to remove this one. And also I'm just going to bring back the field, right-click and delete the layer mask in this one, right? The curve should be above, which is cool, and this is what we have. And I'm just going to double-click here. I'm just gonna go inside again. Screen, maybe make it a bit more. So you guys can see exactly what I mean. Right? I'm just going to drag it to the right so we have more screen, more bleeding from the light coming through. Now press Okay. What else we can do in this? You see the background and the subject, it doesn't match, right? Just double-click here again. Go to Color Overlay. Make sure you pick up the color that is going to be affected. Mean the same color here. So we have the same color of the environment on our subject. Press. Okay? Again, you can play around with the opacity to see which which one is better for you guys. I mean, around 21 is good. Now press Okay. Now, the cool part admitted to is if I right-click here and just affect z, not here, just under effects FX right-click. You can create layers. It means I have separated our effects and I have just individually access to it. Click on it, hold down Alt mask. Click on it went down all the mask or the old unmask. Now, if I press B and switch to white, gradually in one by one, I can go inside and I have control of this. I can go inside again, have control. So I can change one by one. And I have more control on this, especially this one. See, which is cool. It's still about the bleeding. The same problem, but it is much better. It is much better than that one. The previous one, because we have more control. We can do the masking individually. I don't need totally go for one mean plus D. And then you have access individually. It is much better for the result and for the process. Still. But still I can let come inside. I cannot change anything. Mean That's the problem. Or we can add to it. With next level. This was the method to see what happened. The method1 limited to much better. What about metadata three, comma Control J to duplicate it, I'm just going to call this method three. It's going inside and I'm just going to remove everything, guys. This one just lets remove this one as well. Just going to just double-click here. Go to color overlay. The same color is affected and that's all just above the curve. Click on the new layer, hold down Alt or Option, and do the clipping mask. I'm just going to call this rim lights one or REM 1. Let's go inside. Now, what is the trick? What is the famous method to fix the rim light? I'm just gonna press B on my keyboard and make sure the soft round brush is selected. Floor is should be around 30 plus. Okay. Now, we're going to show you something. You guys see exactly what I'm doing. Something like this. Sometimes you see I have done the clipping mask, but something is missing, something is wrong. Press Command or Control zed. The care of layer should be also clipping mask as well. So it means anything above the Batman should be clipping mask, the curve, dream. Anything above. If one thing between is not clipped, so that it works. I can that be inside the Batman. Now I can go to dream line. I can go inside. Just check this out. I hold down Alt and pick up the color exactly next to the batsman. And I'm outside guys. I'm not inside. I'm not doing this. This is wrong. I'm outside and gradually income coming in, say the corner. And I'm building up because it's flow is on Thursday. So I'm removing am just going to come back and this is exactly what we do. You can go inside this be again, make it smaller to the proper rim lighting. Look. So what about these parts, you see as a broken part and a shirt? And if I go to something like this is much too, I can come and drag this inside case C. And with this much good, if a go over my brush, I can make it softer. I can make it more believable. C equals a plus B. Again. I can go faster. Check this out with how easy and how cool is that. So what about these parts, which is going to go back, press R plus b. We are pleased that to make it more natural, go-to as much due and go over it. The same thing here. Press B. As much though. Like smashed is going to make these two coming together. Which pee, more realistic. Semester began to make this software. Now let's zoom back and see how cool is that. I can press R and plus B, make it a bit larger and keep doing the same thing that we were doing. You see how cool is that? So this is the, basically the method that most professionals use it. And I'm just going to show you a bit. So hold on Alt and pick up the same color next to it, because the color is changing and gradually from Wired is the purple. So we should then just do the white thing around. The subject to the rim light basically is coming exactly from next to it. Here we go. See there's a bleeding, just going to smudge tool and just coming inside. Egn. Again. Here we go. You see how cool and how easy is that? Definitely it takes more time that previous methods, but these are reset view Z to zoom back. And very, very interesting. All right, now let's go inside. And what about these parts? Press Oregon, just going to zoom and rotate it a bit more. Zooming in, just B and little bit more. Smarter. Here we go. Maybe the flow does something goes wrong because hold on Alt and pick up The next to it. And here we go. Now it's more natural and realistic. Is it these two broken parts which can zoom in a bit and pick up this smudge tool to make it smaller and check this bleeding days. This is exactly what we need. And these methods and the same thing here. It's very small, very gradual. Playing around with this look, speak and make it a bit larger. Maybe I can go inside of it a bit more. And here you go. So here the edges should be very white. And gradually, I'm just going to be this up and see exactly what I'm doing. You know, there are some parts that they have more bleeding in. You don't know me sometimes. So it should emit exactly equal. It's not believable when you make it totally equal. So there are some parts that they are more light coming through. Press R again and please be this part. And this were coming to this area and that anymore. All right. And there is much to zoom in a bit. Make it a bit larger. Our receipts should be good to this area. No, we shouldn't because the light is coming from left to right. And that's it. What else should we do?
38. Create Realistic and Professional Rim Light: All right. Click a new layer. Recent call this room to make sure you are no other option but the clipping mask. Press B. And the next thing we do is is the general lighting Presby. And make sure you hold on Alt and pick up a light color from this area. I'm just going to go around this area. So just these areas. The bright side of the Batman? Yeah. Just the bright side. Should immediately area. Let's go back to our property. This, this area press B alone, and just this area should be fine. Now, just double-click here. Well then alter option and on the line layer, click on this little icon and drag it to the right. So this should be appear just on the whole egg from right to left. Maybe more. See the texture. A cool is that how shiny is there? And press again. Now it's getting better, but I just see before and after, before and after. So what else should we do? A new layer? And this is the rim light that we are looking for Exactly. I'm just going to zoom in a bit. Presby, when the light is coming from left to right, is going to be affected on a lot of places. Like if I press B to light is just going to affect this area. And this area is one, this one, we're just going to effect. And the area that are more bright, the bright side of these areas. And if I double-click here, not Alt, and drag this to the right, you see what I mean? So the texture is just going to appear from the back. If I don't do it, it's just going to be white. But if I do it, you see, we need to see the texture in. This is the texture that we are looking for. All right, Now press Okay. Now see how believable is that or how close up. What else we can do with this method? All right, let's go inside. We are in the same layer. And guys, just take a look at this one. You just hold down Alt and click here. Maybe it would be make it a bit larger. And I'm coming inside. I'm creating my shadows. I'm creating a very cool and interesting lineup shadows for myself. And I'm making more interesting IS should be a bit brighter. The right button phase. And what else? I'm looking for some areas that needs to be more bright, like this. Like this part, this part, this part C. So we are basically we are going inside and we tried to make sure this is white guys. Sometimes accidentally change this. And you see these areas are getting brighter. This part. To face me be me. I can add more light to it, but I don't really like these parts, guys. I believe something is not right. I'm just going to raise this part. B again. Go back and do it again, but I'm just going to do it on top of this case. And that bottom, bottom should be here and here as well. Let's create another layer. I'm just going to clip to the kilometers or him for. I'm just going to separately create a very cool light effect inside. I'm just going to show something. This is can be also write. The right thing for our method is the B Brush tool. Let's zoom mean plus r, plus r. To rotate the eraser. I'm just going to click on the eraser. As these parts guys. Too crazy, there should be sharp around these areas because the difference should be shown exactly. Press R, then reset. Let's zoom back. See the light coming through, basically, which is cool. Now, double-click here again. Click on the underlining and I'm just going to gradually show it something like this. Say something like this. Now, let's see which one is that one, the light. That light, which is this one. Right? Double-click on this layer and press B. Makes sure I'm just going to use a clipping mask with this one. Now we have created a layer mass right? Now, press D and press x. This one is black. Make sure the flow is around 20. Enter. Now I'm just going to gradually come, see, very gradually. Just going to come forward and make this smaller and smaller. It is going to be H plus x. Again, I'm just going to bring this back and zoom back. Now, this is nice to the light is coming from the edge, is sharper, now gradually is coming inside. So I can show the gradual parts. A bit more interesting. Let's bring this back. Now. This is cool. Now, be playing around with this until we get something that he really alike. Right? Eye blink. This is so interesting. Now, if I go inside and if I click, let's check this out. I can do my Control J to duplicate it and do the kinda messy again. So I can add more light to Etsy before an S, and now it's sharper and it's more gradual and more interesting. What else we can do? I'm just going to click on this part again. And good to adjustment layer. I'm just going to click on cure, drag it up. Command or Control I to inverse the selection, press B, make it larger. And, and now I'm just going to go around guys. And we're going to make this area, especially around this area brighter. See just around this area. And this is going to show exactly what is going on in these areas. The light is coming. Now, see before and after, before and after. And how cool is that? Now it's cleavable. Everything is believing, right? You can believe that the subject is belonged to this area. You want to see before and after. We started with this normal. Now, we added the method 2. Now the method 3, it's more believable, more contrasted. This isn't, I mean, it doesn't match. But check this out. Did like exactly coming from left to right. And how gradual is the lightest?
39. How to Create Colorful Edge Rim Light : All right, Now let's get to composite, which is going to come up with duplicate it. I'm just going to call this composite. It's not a method is a Batman composite. Right? So I'm gonna go inside, I'm just going to click everything and I'm just going to keep the curve. And that's all. And this is going to be our stores. And click on the BG, go back to image file, drag in this PGY1 and hold on Alt or Option and Shift and drag it up. Or I can. And I'm going to press, Okay. Let's go to filter blur and Gaussian blur. I'm saying keep it on this one. I'm just this one should be a bit sharp around 45. It's cool, I guess. So. What about this method? Is a good adjustment layer and add a hue and saturation. I'm just gonna make the background a bit more saturated. And let's go back to our Batman. We don't need this BG and we're just going to drag it and drop into the background. So we have a new background. What about this one, guys? Just take a look. We have a lot of light here. So so based on this amount of light, you have created the rim light and there's lighting direction. What about this one? The light is coming from the back so we don't have a light from the front. So how we can fix and how we can combine this. Now let's go inside. Click on the Batman WVD, going to call overlay and make sure you pick up very pinkish color. And you can play around with the opacity. I believe this is cool. Now, let's go above. Well then Alt or Option and do the clipping mask. We call this one. Let's go inside. Now. Just, just take a look. I'm just gonna hold on Alt exactly next to it, guys here, here. And I'm just going to go over and then Alt and click and just go over this and make sure the flow is around Titi non-motor. Just going to go around this area. Again. Just take a look. We're going to use the same method. So this area is more pinkish, but these areas black. Exactly. I'm just going to hold down Alt Option and pick up the color that exactly is next to it. And this method is make it more believable, more natural. All right. One more time. Bleeding of the light year and deer. Now, smudge tool. Pick a beer. Just play around with it. This much do is make it more gradual, more national. How cool is that? Smaller? Now, part B again, the smaller, pick up the color are the rotation. And I'm just going to play around with these two. We have this same method. And you're playing around with it until you get something very cool. Press pH here is going to play around with this much tool. All right, because r, Let's go around this area. Press P, C. How cool is that? How easy is that? I'm just going to keep doing this until the load exactly is coming through. And we can feel that isn't right lighting. So if you pick exactly the same liked from next it or sometimes I can make it a bit larger. And these areas make it smaller areas. Areas areas smudge tool, larger. The ink smudge tool is the best tool for this method because it makes it more natural, more Gleevec. So sometimes the light is, has it bleeding inside and this is making it very cool, very interesting. And I call this B again. And this is different. Let's go back inside R for rotation. Zoom in a bit, please be. And what about these parts? Well done All to see the color. The color is different. So based on the color of the background, we are coming through and gradually we are going to paint around our subject guys. And this is the basic and professional method of the rim lighting. It larger to make it more obvious. So I'm gonna make it more faster for you guys. So but it's still want to make sure everything is done professionally. See this part, this part, the light. And if I go somebody make it smaller, maybe that can go inside. And I can go around this area to make it more natural. Make sure you click on this smudge tool. And from this part, I'm just going to go around this area. This much 2 is going to make sure you just go slowly and combine these parts together. And as you can see, is much tools make it more natural because due sometime there's a bleeding inside and you don't know sometimes and sometimes I'm just gonna go back, make this much is small. So you can get this part very Much better now I'm just gonna make it bigger. Again. I'm just going to click and go inside and do this same thing until here, again, a smudge two, and here we go. So there's our receptive you. Let's zoom back. What about, you see, how cool is that the sports, I mean, it's very much everything that we believe that the light is coming from left to right. What about these parts? So basically, it's countries are, Let's come back here, press B, we can make it larger. I'm just going to go around this area. Now clues that this method is perfect. Alright, nice. Coming from till this area. Here we go beat. And from this part is getting pinkish and here is a bit more red. This is how it works, guys. The light is coming through and see how believable is that. All right, press R. Is it the view? Zoom back and see it. What do you have that? I can go inside and I can see there's some part that they need the bleeding part to be more believable. And you see something like this. Make sure you use the smudge tool to make it more believable. More natural light is coming to them. And I'm just gonna go in front of it to see which part is getting more. See it. Now, take a look. If you come inside now, I'm just going to put us now I'm just going to click on the Layer Mask. Press be switched to x. If you believe it too much. It simply with your brush can go inside and just clean this up, guys. Clean that up. Sometimes it's various trunk. And the best way to fix it. This goal we did brush because the edge should be shore bird and graduate is coming in, sorry. But sometimes you eat or do it. And with this, I can fix it. It's Supernatural and it's super cool.
40. How to Create Lights for Any Part of The Body: All right, Now what else? I'm just gonna click a new layer. I'll alter option. And we're going to call this room too. But it's B. And make the brush where beak, although old and pick up a very pinkish color or maybe this color, this color, then I'm just gonna go over these areas. And maybe a bit here. Not that one. Maybe you mean just the red parts here. And that's it. Double-click here. And hold on Alt and click in this area and make sure these parts are getting much better. Again, another dim light. Make sure you do the clipping mask into plus b. Now this time, hold down Alt and click on the side. It's going to click on these parts. Disburse, disperse. Double-click the Alt or Option, click on this icon and drag it and various loading. I'm just going to see the effects. We here. Let's go back. I'm just going to see the effects and very gradual. And this layer, which was red, right? I'm just going to add more of this reddish color, I guess, this one, this layer. And again, let's go back, hold down Alt and maybe it is. Cyan color is coming through. The combination. This should be very natural and realistic. Again, and this red one or down Alt and click on this layer. I'm just going to go over the hand, this one. And this one, just going to click on this. And maybe this part is a bit more bluish. And this is how we fix things, guys. Now, let's go inside. What about the eyes? Let's create a new layer. To the room for B. We get various small. I'm just going to pick up a color like this. It's going to be very bright ish color and something like this. Let's see what's going to happen. They will click here and other option drag this to the right. Now you see this area, it's irradiation, It's very cool. Press, Okay. Now, all right, Let's zoom back and do the saving. So let me just, I don't want to lose this. Just save the layer. And let's go above. Continually miscalled this dream five. And under the Quick Mask, let's go inside a bit. Let's play around with this. See which parts are, can get more light to it. And I'm just going to double-click on that Alt and drag this to the right. Because I want to be very gradual. Now I can play around with this, discard, this part. This part's bit. Now I'm playing around with these areas to bright side to make it more believable. This is the final touch that we all do. Maybe these areas a bit Missy and is going to fix this and snap this one is this one to the Clipping Mask and press B. Anemia can just remove this area habit. Let's go to Layer press plus BHN, small. And I'm just going to go around the edges to make it more natural. Right? This is cool. In these parts. The Layer Mask, press R. Let's go back. Press be larger. And I'm just going to play around with it. Did get something that it's natural. We don't want to make it too much bleeding. Plus r. Let's zoom back and now check this out. So exactly, we have lot of lights here, we have a lot of different lighting. So for final touch, I'm just going to adjustment layer, click and drag this up. All right, Now come out Control I to inverse the selection process. Be sure to press X to make this white and make it larger. And C, I'm just going to go around the backside, around this area. Just want to make this area brighter. If I make this area brighter, I make my subject more believable and there is a separation between our subject and the background. You want to see the difference then is off. Ten is iron. So this is March believable. More interesting. We didn't use any filter, we just painted light as the bus step. And we created something very interesting and very cool guys. We have a lot of lights here and now check this out. This was the first year started from here. Then we created this. This is our method tree and our main method. So basically we had a lot of light coming from left to right. And now the brightness is exactly depend on delight source, what are destroyed. This slide is totally different. It's very gradual. So because it's gradual, I'm just going to zoom in. You see these lines. This one can be more interesting. I'm just going to create a layer above it, right? Sometimes it's happening. We see the line here which can be fixed. Now, although Control or Command and click on this layer. Now let's go to select, modify, and expand by one and press Okay. And now I'm a bit outside. Press B and rotate this. I'm just gonna show something plus b again. Make sure it's very small. Should the light is very small. Something like this. Well down Alt. And guys look. Now I can fix these areas because sometimes there is a line here which it doesn't make it more natural. And the better method to fixing these dark lines here instead of removing it. Because there is a method to remove that, but I don't want to remove it. I'm going to build up the light and make this not that much. Make it more interesting. At that much. Make it, let's make it a bit larger. So I can come very gradually. This better. I can come inside. C, it's very easy guys. I'm just going to come in here. It is selection. And just make it more interesting. You want to see what we are doing. Spirits are and receptive you is on back. When I Control D. You see now, this is very interesting. This is very cool. So if you get a very dark side and very dark area, make sure you use the same method. Good to hold down command or control and do the selection. You zoom in a bit, go to Select, go to modify and expand it by one. I start painting and we get rid of these hard edges. You see how beautiful is that? So make sure you some practice, send it to me. So when is okay you can go to the next project.
41. Tomb Raider Project - How to Do Fast Retouching: All right. I know you guys, you have been waiting for the term writer poster. Alright, let's go for it. There is a lot of work to do and you guys are going to learn a lot of things, a promise. All right. Good. You're 08 warrior image folder and the PSD file is this one. Just double-click on it. And I already did the hard work and the pen tool and just selected the girl. All right, that's what I did. And this is the original image and we just going to turn it and there is a gun. And just I brought everything to Vegas is the gun. And I only did the selection as easy. Just go around it. And this is very loose selection because we're just going to use the top and the bottom of the gun and just do the selection. When you did all the selection, just press Command or Control N. And the size file going to be 1080, 1350. This is the Instagram best size are. Then press Okay. And here's the trick. The four key file should be 3, 8, 4, 0, a width, and 21, 64 height. But the thing is, if you want to print this out, is going to be very small and it's going to be very low quality to make it really interesting and proper for the print size. Let's go to image, image size. And just we have to be close to 3000 pixel. It's going to be for k, just gonna pick a 300, 300, it's going to be 2240, is going to be around for K. All right, then press Okay. All right, cool. Now I'm just going to come here and drag this model and just put it here. All right, right-click and convert it to a smart object. Guess, we're just going to scale it. Just go Command or Control T. And drag this down and just put it here. For now. Let's go to image and drag the BG, put it in here. I'm just going to scale it up a bit, inter, drag it down. And I'm just going to make it e like AGB, larger, go up a bit. I'm going to find the best place for this, which is going to be this area. Just cook. Now plus Enter Control S. To save it. It appears the save it anywhere you want. I'm just going to save it here. Tom writer EN English version. Press OK. Right. I don't know, just going to be a distraction. And this one as well. I'm just going to keep it. And I I need this one as well. The first thing I'm just going to do is to fix it up. We're just going to do some frequency separation. I have a total cores on beauty retouching guys. I urge you guys to watch it. There's a lot of things to learn, but I'm just going to do basic Frequency Separation. First. I'm just going to keep this one Command Control J to duplicate it, which contain is off. Drag this and put it here below the median, right? Now, right-click and rasterize the layer. We're going to call this L for low and a clinical degree j for higher frequency. Then this off for now. And we'll tend to be geographers going to be a distraction. Low, and we're just going to do it filter knows and median. And around seven radius is cool. You have to blur it. Let's go to high frequencies, get to image, apply image. It's 8-bit. And make sure the layer is going to be low. Okay? Everything else should be the same. Probably normal is good to be linear light. Well down Shift Command Control G to group it. I'm just going to call this fs, short for frequency separation. Let's go inside Glick and low. Press B for brush is good to brush and mixer brush. Put everything under 30 and make sure check this off. So this is transparent. Everything else is unsteady. Listerine. And I'm just going to mix from white to dark area. As I said, I will very, very amazing course. For beauty retouching guys, Ultimate Guide to retouching. Just make sure to wash that out. And what I'm doing here is going to be a very, very basic, all right? What I'm doing in low frequency is combining the color and creating some depths to my image. And there is a lot of dark areas and an image, so I'm changing that color. To make it more interesting. We get these areas and also look at this here. Yes. This is how you combine images. Cool. Very nice. Very easy to do this process. So I'm not doing the clean up, I'm not doing the dodge and burning. I'm doing the basic because it's going to be dirty at the end. And it's not a beauty image because there is lot of their blood and scratches, fog and a lot of the stuff and the face. So we're going to make it very, very beauty. As I mentioned earlier. So, well, just be, all right. I think this is cool. It's good to H for high frequency. And I'm going to get in and click on Patch Tool. Pashto is the fastest. So I'm just going to be very fast. I'm not just I'm not going to spend a lot of time on this. That's why I'm using the patch tool. All right. As I said, guide, this is not a proper way of doing the retouching. There's a lot of stock before this, but as I mentioned, I'm just gonna do it the fast way because this is a course for Let's go here. Compositing. Nice. But still I'm trying to do my best to create something interesting. Because at the end of the day, if someone wants this for print or for advertising for commercial, it has to be perfect. That's why I'm doing my best to create something very inspiring. All right, cool. I guess this is not batter scholar. And let's see the before and after. If I come here, this is the model, so this is before and after. And there's a lot of cool cleanup as enough money I've done more frequently depression, I'm just going to right-click and convert it to a smart object. I don't need it anymore. All right, let's go back. Now. It's time for liquefying is called the fleet air and liquefy. The first thing I'm just gonna do, I'm just going to click on the first icon here and old right-click drag it to the right to make it larger. And this is the stomach. It should go inside. It's a bit kind of fat. And here basically most of the time it's, there is a gap and this is what we have. Again, maybe a bit forward, right? I'm just creating very interesting stuff here. Maybe push it forward. I want to make it more skinny. And also here I want to make it flat. I could much better. Now I can click on this icon to make it go inside of it. More believable that she's skinny. Interesting, Cool. And what about here? I'm just going to make it pop, pop. Now, let's go inside a bit. Drag this up and the chin. As the comic bit forward. Let's go inside. This is going a bit inside out. Look. And I believe it's getting much better. Or maybe I just put a bit to make this bigger. That much. This one. I believe this is very, very cool. Which is a maybe it spit beak just going to make it. Maybe you can put this one and you get caught inside to make it nor small. All right, Cool. Said before, after, before, after. Small, compact. Or what else? I'm just going to go bring back this one and let's do some feather. And let's go to Filter Blur, Gallery and field blur. This is always the best way to go. Just gonna put it here and make it, hi, This one should be low. This one. And it gradually, I'm just gonna make this a bit more here, a bit more. I'm just going to make it this up here. Maybe a bit more. It more. Alright. Now, gradually, as you see here, Maybe I can see more or echo. It's much better. I like it. We created some depth to our image. Maybe ICU. I like it. I like it very much. It's very beautiful. Or I'm just going to press Enter. Now, step-by-step, I'm just going to go further and do something magical and crazy. Let's go to fs. For now. Let's match the light.
42. How to Create Cinematic Lighting And Draw Extra Hair: Let's go to Adjustment Layer, care of drag this down, make sure the clipping mask, they go to fs down, down. Now, double-click here, you guys already know. Click here, drag this to the left. I'm just going to show the shine. An interesting let's okay. All right. Let's be organized. Allow Shift-click on FS methodology. I'm just going to call this model. The fs should be model to Autumn Writer. So call it model is easy to follow. Now. It's matched the color to the background. I'm just going to double-click here. And let's get the color overlay. Understand, come here, I pick up a greenish color. Right? Now, play around with this until you get some team in that it's matched on, I believe 11, It's match. Let's zoom in a bit better. And it's still, I mean, it's going to be fatty. I'm just going to go to Filter Liquify. It's going to push this a bit forward. With this one. I believe in this is out. Now I'm just going to make it more livable. I will use this cool numbers again, much better, right? What about BG? And above? All right, I believe I can fix the background as well. I'm just going to go to care of maybe the S curve. Make it more interesting. Yes, it is. I believe this is so interesting, so cool. And they're now at based on data. I can go for my model, maybe a bit up too much, right? Nice. Nuscale down, shift the BG clinical through G to group it. I'm just going to call this BG for background. Now we have the model and we have the vg. Now let's go for summer, stuff like the here first. I'm going to go inside the model. I'm just going to add a new layer. I'm just going to call leaves. Here. Let's go inside. You see the hair is crazy. It doesn't match at all. So how do we fix this one? Easy-peasy. Let's go to your brushes and look for hair drain brushes. Open Designer is going to shoot something again. Double-click on hair drain brushes is going to appear here. Cu now a Presby. I always go for 14 because it has look for three brushes. Make it very small. Let's come in a bit. I'm going to show you a very cool things. I'll just press Alt, click here and make sure this is going to be brushes to normal brushes and that the mixer brush. Again, I'm just gonna go here and we get a 14 one. Hold down Alt and a start painting. Holding Alt and pick the same color next to it. Make sure the flow is a 100 percent very low, very small. And don't worry, just go for it. We have to remove these hard edges guys first. And also we are going to add some rim light. At the same time. I'm going to show you what I mean by second. What I mean, real light guys. It means hold on Alt and picked a bright color here and go inside. Look at the edge of this. We have something called a rim light. And appalling down ALT is a combination of white and look. Combination of these colors and these colors, and these colors, I'm going inside. Look. So it means if I go back, just take a look at it. It's beauty. It's amazing. Are just a rotated press B and you have to see it when it's finished. It's going to be much better and more interesting and more believable. Because most of the time is at the corner. Don't worry if you just mix the colors. It doesn't matter. If you can go over it and it can fix it. Holding down Alt and picking a color next to it. And I'm continuing. That's what I'm doing. And I'm losing this hard edges. That's the main point of this. For now. And holding down Alt again and we get bright color. Let's go for it. Sometimes we have to go to a different times over it until we get what we want to. Beginning should be mixed. The edges should be more upright. Look at how easy and colleagues that are a GYN go inside. B, for brush. Again, it's very dark. And that's why I'm going to do times or it first we dark, right? Then we different color. Now it does color. Now we're combining now and a white color and h. Now, check this out. See how I am combining and fixing this beginning. And it started with it. It's like combining very gradually. This B. Look, look how I'm combining the colors, because I'm picking different colors and trying to combine those colors together. But very gradually, there is no rush, right? Which is careful. Coincide. The point is doing something believable because I didn't have a day. Everybody is looking at our arch Berg should be like, wow, this is cool. What a ream late. Freely me, wow, it's like, I don't know how you did it over. You have overdone it. So holding down Alt. And this is the h. This is something that people should see. Look, I'm just combining different color has well, to this beautiful work. Plus our reset the view. Let's go back and check these out. I mean, you see there, how cool is that? Now, if I press bar again, if I go inside, what else I can do? I can press B and the edges should be whiter. The edges should be white. Are cool. And these are the oil some part here, here and there. So this process, it's very enjoyable. Just put on some music and enjoy the show. Because I love this. Does nothing on earth that can make me happy. I mean, more than the Sun. Trust me. I love what I do. It's very enjoyable. Doing something like this. This is the best work on the planet. Now some point, some very near to brownish color. To combine the first start. I can write for this area from whitish, brownish. And this convention is making this real. Let's go back and check this out, guys. What about these parts? I mean, okay, I believe I can make it better at the end, especially these parts. But for now, it's perfect. That's was the hair.
43. How to Create Glow Effect or Shine Any Object: Now let's add some light. I'm just going to go above the model. I'm just going to call this globe. Let's go to your images and some flair. Just drag it and drop it to image, lung, Alt and Shift or Option and Shift and make it do various small. Let's go here and put it on Linear Dodge. Add this V on your keyboard so you can drag it. Is it Each hard edges Command or Control L? And just make this a bit darker or even brighter. Not much CPU. This is very, very cool. Just check these out. I believe I can make it larger Command or Control T and make it a bit larger. So we can see the effects. Remember, all right, The position is perfect or ICU. Now again, Command Control J. Just put it here. This time. I'm just going to leave it on a screen. But we need some, some flare from left to right, unless color alone and make it very big. Just going to leave it here. So we have the sun and we have this shiny. Nevertheless. Our ICU. Now, the necklace, it's just going to affect the person, the model. And we're just gonna do some rim lighting. We're just going to add some scorer. There's a lot of work to do. Now I'm just going to click on this. Can I get to G? I'm just going to call this hello bride. Now it's a time for lighting. When we have a glow here, the orange glow, this is going to be affected on deface the hand, the gun, and everything. But before we add this one, I'm just going to go back and I'm just going to go to this gun because it's the gun time. Let's go back and drum. Just drag it and put it into my Control T. If we go and drag it back to below the model. And here we go. Just going to go inside this, inside the folder, drag this off. And here we go. Let's see. I'm just going to leave it here. Something like this, maybe a bit rotation. All right. Now this is better. This is better because I believe, right? This is cool, I guess is as good. Now, right-click and call it a Smart Object. And I'm a problem. And you can double-click on it. And I want to be the same color as this one. And then go to color overlay. I'm just going to pick a color. I'm just going to pick a color around this shiny area, around this a year. I'm looking for a color that matches. Alright, cool. Maybe more shine to it. Now that bad. All right, Okay. Now everything is okay so far. So focus. So we're just going to call this gun and hold down Shift. And I'm just going to combine it with the model as well. Kinda Control E. Or let's merge these two together. Can I control E? Right? Now inside the model we haven't gone. You have the model and we have the hair. The here and the model should be in the same thing right now. They're just going to come and Control E to merge it. Now again, even decagon, let's merge all of this together. Command Control E to merge them in. This is one. For now is perfect. The reason I did this and manage all of this together is, is delighting time is a rim light time. So everything should be unique because separate layer, we have to add it in separate layer. And it's a lot of time. So we have one layer. I'm just going to call this model. Now. We don't need this one, is going to close it out. Go to sun flare and Mindy glow on. Let's close this one, create a new layer. I'm just going to call this. Skin glow. I'm going to leave it on multiply 4. Now. You see you later. I'm just going to be, let's make this up and we have to change the brush to General and soft round brush. Let's go. Well then all too big, you're very yellowish color. And I'm just gonna show something. So this yellow is going to be affected everywhere like this area. Look, we have to be careful. Sometimes the color is changing. I mean, this area is yellow. This area is yellow. You can deface. Given the nose. Let's go back. Again. In the hair. Him and this gun would be a bit weird. This one. Maybe these areas a bit more. This is closer. Closer. So in areas which is closer, it's going to be more light ish. I think energy is going to peak bit orange-ish. So this area probably is more areas, more luck. So I'm just going to show that this area has more lightweight, right? But there are some parts like these area, the edges, which is going to be more bluish. I'm just going to add another layer. This one is going to be on Color Burn for now. Let's check it out. It's going to pick you very yellowish color are. Let's go inside. Now let's show you something. Just check this area. It's going to be a bit, but it's too much for now. All right. Because the flow is 100 percent, uh, we shouldn't work on flown a 100 percent, it should be around 30. And we can just add it ourself. Gradually, these areas more. Right now, PQR. Let's go back. Shine, shine. Our school back here again. Is B. Make it very small. There's a lot of small detail that it's going to make your work interesting. Alt R. And let's go back. And from back, you see that if I'm coming back, you see it's a very natural, very interesting. Let's see if I can change this to make it more, something more believable. Let's put it on Linear Burn. I believe linear burn is much better. Now, we have added this skin. Now, let's go inside and duties for the phase as well. Look at it here. And it here. Very low. And nose, eyes, even the hair a bit more shiny. So every part that you feel that can be more shiny, which is edited. There's some parts that it's going to be affected like this parts. I believe this is cool. All right, we're going to press B and just add this bit of this yellow here and there. All right. Let's go for the rim light for the hand.
44. How to Create Realistic Rim Light : I'm just going to go here. I'm just going to call these rim light. And just going inside and open up the model alarm Control and click here. Now, make sure you go to select and go to modify and expand it out. If HN for two and just leave it like that, it's going to go inside and see if it gets outside. Because what they didn't like that we're just going to add to it. Let's go from here. Before rim light. I'm just going to add some light to so I'm just going to see the light. I'm going to Control D to deselect it. Let's go above the BG. And let's add some more life to it. Something like this. Just go. I like this. Alright. Now let's go back to green-light. Come out of control, hold it and click on the model. Zoom inhibit, check this out, select, modify and expand it. And two, and let's zoom in because we can't remove these hard lines. Be the white parts. It is white. Frisbee. Make it very small. Or down Alt and click on this white area. And I'm going to add these canoes it B again. And here we go. Now in this part, I'm just going to add some light on holding down Alt and close to the skin. If you don't want to see these lines, the selection Command or Control H is going to be hide it. Now. Well then alter an exactly next to it. I'm going to add some light. And what is this? And you see these age. It's going to be appear just going to go back. It's going to be the highlight of our model. All right, Now, let's continue. Can highlight is going to be very interesting. And it actually is very easy to do. This is make our composite to 50k to the background. So that's why it's most of the time, if you see all these beautiful images, it's because of their limb light in the room, light is going to be match with the background. I'm just going to hold down on, Let's go back. Press B and see these are again. Just be going to go faster. Let's go back to z. I read too much. Sometimes you want to go faster but it's going to be messy. So always be careful. And go fast, zooming in our play around with it. Make sure it's easy for your hands to just draw it. And then go for it. Again, these parts. School back. Then, Alt, pick a color that is white, this B. And I'm just going to go because I now we'll very bright parts. And this is going to be maybe a bit more interesting. That's why this is so cool guys. You can add more light to this part. Maybe this part it's with bluish. And have enough bluish as well. So don't make it too obvious. At the end of the day, it's going to be exactly next to the background, maybe a bit brighter. Our BI team logarithm see those dark edges which are going to be equal R, B. Let's go back. Only need these parts. Let's go back to z, r, and the sideview. It's going to NSG gesagt. Missy, how cool is that? When it would be far enough there for the, that's the shine that is going to be perfect. And it's go in Paris, be maturing on down Control, click on the model. And I'm just going to go inside. Select, modify and expanded by two SBN and holding down Control and picked from The next to it. I'm adding their rim light to the gun. Our b isn't that much. I mean, it's a bit long as we have the rim light is going to be very cool. Very interesting. If you don't add the real light at the end of a day, something is missing. If you do get the image, you know something is not right. And different method that is the rim light or desaturation or receive the light or a saturation. Let's go back. Current control D, R, and Z, and go back and just check this out guys. Right now I'm chicken. When the sun flare, maybe this is too reddish. Want to make it a bit better, as I'm thinking about it. At the end, I can add some color to it and with the combination is going to be fine, I guess. So basically, each step I'm thinking about it, if it's too much or not, I believe for now it's fine. It makes sense. Because in the next step, I'm just going to add some scar to it.
45. How to Create Realistic Scar and Blood: All right, let's go. And the model, I'm just going to close everything. Let's go and the model and add a new layer. I'm just going to call this is Core Data Control G. This is going to be basically, so this is basically is going to be its core. A scratches and blood. So you know, as inside. So let's go for the scar. Open this up. Let's go to brushes. Look for eschar brushes, which could double-click on it. And it's going to be appear here. I'm just going to close that up, open the score. So let's go for a score that I'm just going to add around here, Here. Nick and the face. No, no. No. So see, this process, it takes time and it will right-click and maybe this is the one. I believe this is good. All right, this is match. Right? Now, make it a bit larger. And here we go. Just make sure that the flow is a 100 percent. Just double-click. Alright, cool. Now to make it more realistic, just double-click here. It's going to bivalent emboss. Make sure this is on Pillow Emboss. This is going to be around, make this 0. Going inside to see each one is better. This then is off. And our Qu Zhi say exactly inside. And what about this one? This one it should be like as well. Which is looking to see which one is better. All right, this is cool. What else? I'm just looking for something care of ish, something like this. Something that should be a bit care. Yes, this one at bat, rotate and large. Cool. Maybe this one is better. And because we are in the same layer, the Bevel and Emboss is going to be affected as well. Let's kind of face in this one should be fine, I guess, right-click. But because of delight, look, there is a light. We're just going to create a new layer. Hold down Alt, and drag this effect and put it on a new layer. I'm just going to call this a scar face. Right? Now. We have to make these darker for the face because this light is going to be affected because the light is on top. Right. How cool and interesting is that. What else? I mean, the neck should be also something around nick. No. I'm looking for something like this. Rotate it. Larger, larger, smaller. Maybe a bit rotation. This one is good. I mean, just not too much because I don't wanna make it like somebody's just cut the Throw them. And satellite is it's it's that much to me. Slowly just touched the neck. So you should be something like min very gradually just touched the neck. Alice, she should be dead by now. Right now staffers scratches, just click here, I'm just going to call these scratches plus b. Now, I'm going to choose something very cool. Click on the hard round brush or the heart pressure size brush. Make it very small or smaller. Let's go inside. Let's be maybe around five. Just check this out. Guys are large, older and just pick color. This is the scratches. So it means I have to go over it two or three times that each should be darker around this area. Something like this. Something like cut, py look and water. So the key is going over these lines. And it's like a deep cut and a scratch. This is the key parts. So don't forget. So we have all these yam, some scratches. So if it coming here because it's outside and piccolo is not affecting, so I'm just going to pick the same color. Whereas B and here notice very darkish. Look, it's like a cut or the hand. She needs to three pressures. So get closer and scared. See how cool is that and how easy is that. So we are adding some, something like this. So I believe we need something here, something bigger because it cut here. As you, how interesting is that? Now, let's go add some blood. Getting new layer is going to call this blood. Again, there's two pressures. The first one, double-click the Black Law. Check this out. I'm just going to make these various small, come closer, make this smaller again, and click here and there. To make this psi most of the time makes sense. Click. Like she has been punching someone. That's where the blood is everywhere. Where else have we do have bladder emptying. They're just going to leave it like there should be in the shirt. Probably get blood everywhere. Right now. I want to add some tea and like Let's go down. These kind of brush your cool. Something like here. Something like this. And looking for a blood test which is going to drop of blood or something like that. I'm just going to look for it until means this screw. Pick the same color. Go up. And I'm looking for bivalent emboss, hold down Alt and drag it and put it here. Just going to call this drop and make it big here. And just double-click here. After fix this area, I'm just going to double-click in here. This one should be, is color. In this solution, the white or the scholar. Right? Because if I make it white, I'm playing around with them until I get something more interesting. We hear, we hear decoding about it is I can just move it around and play around with it. Plus b. Maybe go to general and mascot out and see if I can just clean this area. Let's just mix. So I believe is better. Cool combination, nice. So at the end we add a lot of their attitudes, so it's going to be realistic. Trust me guys. Again, let's go back to this layer. Nine. Wish I could make it small. And here we go. Press B. Go to mask x for switching. Just going to pick up this one again. And we don't see much of this is going to be easy. And here as well, I'm just going to call these squar. Those add up all the scar and blood is going to be insight. What else? So basically we need some debt. So how to add some desert? Close that up, close that up. This go to file and look for close this one. Let's go to file and look for fog, brush, studio art. Double-click. This is going to be cool. Scar above. Just going to call this a plus B. Makes sure this one is pitch black. Capacity is very low, very small. Again, it's going to pick a color like this. And look, maybe you've basically I just gonna put it on multiply. So it's just going to add some depth. That's why I said this is going to be more realistic at the end. So you see this line is going to go there and brush tips is spacing should be 0. So that might go something like this. Maybe a bit more. And this is the least cool for creating lines. And a buddy creating any kind of lines. So if you need to add lines to something, they can do this. Six backed by the Earth. Here and there. Some ten like this. Maybe I need to change this baby desert here and there. Especially these shirt. And already like it. And it's very wide, it is distracting. That's why we are adding as well. I believe this is very interesting and very cool. Or maybe this is too much. It's going to the eraser. Think, clean that up a bit. Clean that up is PAN with different brushes. I'm going to go over this. I mean, this is better. This is more natural. Close this core.
46. How to Add Dirt to the Body: Let's go to glow at the top. I'm just going to add something. Now we need to burn something that's like a burn parts. At the end. You have to make it a bit burnish. And let's pick up the color. Flow is still much school here. Yellow. And I'm going to make this maybe a bit burnish, the same red color. Because when it's red, it's some kind of blood around this area. In the area is going to be a bit reddish area around it. That's why I say make it more or a bit darkish. Right? Now it's more believable, I guess. Nice and cool. Witnesses touching. And most of the time I'm just adding this part through most of the Mhz CPU. I was a gloss the gluon, and let's bring the tree. Just drag the tree and just put it here and make it really small. This one. Go to Filter Blur Gallery. And now for this one, I'm just going to put it on Gaussian Blur. It simple. Right? Leave it as is. So I'm just going to leave it here. Cool. Drag it, hold down Alt and duplicate it. Control T, make it large in tear. And just going to leave it here or not Alt again, and I'm just going to bring another one here as well. So just contract is maybe can rotate this. I don't want to see these parts. Something like this would be fine. All right, Very interesting, Very cool. I love it. Let's go back a bit and let's go inside. Recently I had some shine to the face as well at the end. So don't worry about it. This is the tree and alone shift command G. This is going to be 3. But I'm just gonna go to adjustment layer, hue and saturation. Make it more saturated, the tree amine, and make it more dark. Make sure the clipping mask to just gonna be some just affected on the trees. And the reason we dark in this tree is because of the depth of field. So the closer is going to be darker and more contrasty. And that's where we see this beautiful lips of field. And, and everybody is going to believe that this 40 is real, right? Alright. So everything is cool and everything is interesting. I love it. Maybe in this one, I'm just going to go the globe art. And I'm looking for this one. I'm going to make it a bit bigger. I believe this is going to be more interesting if I make it more larger, right, cool. I love it. And that's why I'm just going back up for us until I see something interesting. Now, we have added the tree denounced time for the scorer. The best thing we are going to create, this could do a scar. Let's go above adding their skin scar. Let's go to score and dynein is good. Right click and rotate it. It is going to be fine. It's gonna make it a bit larger. Maybe right-click again. Here we go. All right. I believe something like this is going to be fun. Just double-click here. Right? Now. Hold on Control or Command and click on the Klinger soar, the color that we just painted in. Now, press S on your keyboard for our class time to well done All and just paint over this area. And paint over this area, Alt and paint what you see. So this is going to be our skin, the body skin. But how to make it realistic, guys? What does this mean? This, see this one. This is going to be three. And when I get closer, I have something like this, which is not here anymore. You know, sometime this is happening. And sometimes we can create something like this and clear out this should have been a brush. Brush. And I'm just gonna clean this area. We don't want to see these again. So this is why we use a lot of work. Though, is closed glows scar. This is, we are Double-click here. We need to go to inner shadow. Just going to go inside 3, 3 and 3. And based on Multiply, which is going to be done, I'm just going to press OK. Now press B again, make it to various small. We need to add some scratches or we don't need actually, let me just sum add some scratches. Be small scratches. All right. Control, scroll back down control after we inside, when adding these scratches, there are some cuts. Right? Cool. Now, let's go to blood and piquing your blood. And let's add some blood with the flow. A 100 percent. These kinda blood. It's too much. Mm-hm. Darker blood. So you see Control D and this is going to be our a scar and it's a really believable Qu. So we have had a lot of stuff here, guys. And the rim light is so cool, really interesting. I love it. Now, if you have to make the girl more interesting, more believable. Let's go to the top. So I'm going to the top and and then we're just going to add some rain to its for now. I'm just going to click on the top Control Alt Shift E to make only one layer, right? I'm just going to call this Final for now because we need to add some rain and the topography. But for now I'm just going to add some filter. So make sure you right-click before theta and convert to a smart filter. Now let's go to fleet air and put it on camera raw filter. In camera. I'm just going to need some orangeish, yellowish and some greenish because she is in a jungle. Add more contrast to it. Come here for vignette. You need to be focused here. Go to Basic again. Epitaph. Why barons? Shadow should be lower? Lock. I don't wanna make it too. Dark. Shadow should go back a bit. Here is good, good, good. Press. Okay. Now come I Control J. Let's go to Filter Gallery, Galleria feedback. There is gonna be so interesting. I'm just going to leave it here. This one. And nothing a 100 percent there. You can use this one as well. Sometimes it doesn't, it doesn't work properly. Now, let's play around. This part should be a bit blurry. This part should be a bit theory. And this part as well, a bit theory. Next is Larry. Here. Cool. This part will be there as well. This part should be sharp. Nice, I love it. So the focus is going to be integral. This okay. Marriage missing. Something is here. I don't know what is that? Let me check this tree. This is the scar. So you see sometimes I think there is scar. Okay. Now press B. Let's go back. So this is, I mean, this is the best course guys because you guys see exactly what I'm doing. Graze it, flow. And I am going to raise it from this part. This is going to create some myths. We need to add some more debt. But even it this brush, I can add some dirt. That much. We did very low though. I can. That's it. That's it, guys.
47. Final Color Grading, Creating Realistic Rain and Movie Cover Typography: Now let's go back. So you see exactly, my process is going to go back. I'm just going to remove all of this. And I'm going go to the top. Again. Gotta control Shift E, right-click. Convert to a smart object. I'm just going to call this final fitter camera filter. This in-process. Add a bit of yellowish, greenish, more contrast. Leg should be a bit less. Shadow. Bit less. Let's go to Effect. We ate. I don't wanna make it so dark. Heavy exposure. Nice. Black should go back a bit. Press okay, for now. Come back on truly j now is totally clean. Filter. And Blair gallery 1 here and make this 0, which is going to be here exactly. The point here should be less than point here. Point here. And this is going to be very, very cool guys. I love this. Into focus. Area is around here. I mean, this is maybe more focus here. I love this button. And press Okay. Now let's bring some. I can make it a bit brighter, I guess. Or I can leave it. We can leave it. Let's go to MH. Bring the rain and brush. Here we go. Okay. As we run a screen, again, the cool part is let's go to Blur Gallery and forbear. We need to add some depth to this image. So here, again, nothing here. Actually here it should be Larry. The more blurry. So we don't see the rain here in the face. Here. Let's go back right here. Maybe more blurry. Here, more blurry. I can play around with this. Here. Again, see the rain. And here maybe more, but there is a, this is how we separate the foreground and a background. I love this. So this is the rain is coming. Here, it is clean. Here is the Rain about, is going to bring it amine here. Drain is coming. Maybe here. Drain is coming here. Less than, less or equal. It's coming here as well, what they're not and the face here go. Still believable, interesting. Yes, well, here should be admitting this that match because he actually be more here should be less. I loved this part. I love it. But I could now press Okay. Now check this out. I'll press Control S because I'm more to lose this file. You they'd do the same thing. So we have the background which is rainy. We have here. Actually I unbearable just going to double-click and a blur gallery. I will make this more. I don't want to rain the size of the size it kinda inside. Like this, kinda be inside. More. All right, cool. I love it. Now. We have rain. It's okay. Another layer. Click on Shift E or Control Alt Shift E. And I'm just going to call this final two. Let's make it smart object. Now. It's the time to make these sharper filter, camera raw filter. And let's go to texture and clarity. I'm just going to press. Okay, but let's make it a bit. Greenish. I believe is too much clarity as to how much should be like this. Phi can effect. That's engineered. Okay? All right, I love this. And let's double-click on camera filter that before that, it's going to close this up. I'm going to Control J. We need to look for some effects, which carefully there has, it's good to camera flutter. Can Rafi there? And let's go to Color, browse. Artistic. I'm looking for something interesting for my image. I love this. Let's go for another one. It takes time, it depends actually. We train you liaise really like that one discipline. It's more saturated then it's kind of blending everything together. I love it, But isn't that really pop? This is I can guess. I mean, the original one is better, I guess, or maybe this one. Well, I'm just going to more than 10. Thank you. Okay. All right, cool. Now, let's go to your image. Good, warrior. Let's go to Font and double-click on Tom Ryder, kicking his thought. And if install it, make sure you save it. Press Command S to save your file. And you have to close your Photoshop and open it up again, then press T on your keyboard. And for this topography, it's going to switch to white. And I'm just going to call time right there. I'm just going to bring it here. Can make a tea without altering Shift or Option Shift. And I'm just going to leave it here for now. You can new layer. Let's zoom in a bit. And I control are coming here. Can I control R4, the ruler? And move until you guys know already? And here you go. Alt, Delete and plus V, which can drag this down. Drag this up, and press T again. Make sure this time you are around 80. And rise up the price of the Tom writer. I mean, small part is okay, So make sure in case of aligning is the same size. I mean, you can guess that control T make it a bit larger, a bit much. Let's go to this. Put it on to a 100. Come to the center. Maybe 500, maybe 700, maybe 750. All right, Now, coming here, can I control T and make it smaller? Cpu? Now, Double-click drop shadow, which is fine. Click on this one. Double-click drop shadow, which is fine. Now, Shift-click on top down my Control G, just going to call it taper, scruffy. Now, to make it more interesting and blending be a 2D image. Just double-click and this area on the right side, hold down Alt and just drag these to the right or down Alt and separate these. And this is going to be inside Tom brighter tone writer. Maybe, maybe it that much. And this is cool. I don't need this, I'm just going to click it and drag it. This is too much blurrier at year, but I mean, you can just play around with it until you get something very cool or interesting. Here, I believe. Display Parish area. This is what I do. 1 eighth you see something is blurry is what I'm doing. I'm just going to close everything. Close this one. Close this one. As add some rain, which is cool. And just look at the top and Command Ctrl, Shift E a duplicated everything and put it into. And I'm just coming to this image and mask it out. Press B and a very flowy low. Just going to play around this area, guys. To make it look. I'm bringing back those scars and those areas that they were a bit blurry. Right. And I believe topography and that's it. So you guys know exactly how I did my work and how I am working. You and at the end, I'm seeing something is wrong, something is missing. I'm just going to fix it. Maybe this is too much. Let's go back and make it a bit layer. It doesn't matter. This is cool. Maybe it clear now with this, I love it is gradually is grading side and this is exactly what I was looking for. Cool. I love this image. I'm just gonna save this. We will get A's and, and that was the rise of the Tom right? Air photo manipulation.
 Soli Art, Content Creator | Digital Artist