Transcripts
1. Class Introduction: With all the new AI tools
flooding our feeds, it's easy to wonder. Do I still need to learn
product photography? What's the point if AI can
just generate images for me? And if you've been asking
yourself those questions, if you've been feeling
confused, overwhelmed, or even afraid of
getting left behind, this class is for you. This is not about choosing sides between photography or AI. It's about learning how to
blend both intelligently, creatively, and in a way that still feels true to yourself. In this class, you
learn what AI can help you with and what
it can't replicate. Why your eye, your taste, and your personal story are still your
greatest strengths. How to use modern
tools like Chachi PT, Canva, and lightroom AI to enhance your
product photography, not replace it, and how to turn a simple product photo into a powerful scroll stopping
piece of content. Explore real versus
AI generated images, walk through practical tools, and I'll even show you how I approach my own class project, so you can confidently
create your own. Hi, I'm Rose, a mom, photographer, and
creative entrepreneur. I've helped thousands
of students around the world capture
stunning photos of food and products using whatever camera they have
access to and their intuition. I've also navigated the wave of AI alongside you, testing tools, facing fears, and
figuring out how to keep showing up without losing
what makes my work mine. What I've learned is this, AI can be fast, but it cannot be felt. And in a world
that's speeding up, your ability to slow
down, see clearly, and create with emotion,
that's your edge. So if you're worried
about falling behind, if you've been avoiding AI because you're scared,
it will replace you. Or if you're just not
sure where you fit in anymore as a
photographer, creator, or business owner, this
class was made for you because you don't need
to keep up with everything. You just need to create
from a place of clarity. And use the right tools
with the right mindset. So come join me and
let's create Smarter. Let's create with more ease. And most of all, let's create with heart.
See you in class.
2. Do You Still Need Product Photography Now That AI Is Here?: First of all, congratulations. By watching this class, you've made such an
important decision for yourself and your
creative journey. I don't take that lightly, and I am truly honored
to be here with you. So let's tackle the big question on everyone's mind right now. Do I even need to learn product photography
with AI everywhere? I get it. AI can generate
images in seconds. It's easy to wonder why bother learning this when a
machine can just do it for? Here's the thing
product photography isn't dead. It's evolving. And that's where you come in, your eye, your
taste, your story. AI can make images, but only you can make
them meaningful. And that's why what you bring to the table matters more than ever. Yes, it's true. AI can generate marketing
style images in seconds. It can give you clean
backgrounds, flawless lighting, and even fake product mockups that look pretty good
at first glance. But here's what most
people don't realize. Those images are predictable.
They are generic. And honestly, they're
kind of emotionless, because what AI can't
replicate is you, your brand's heart, your story, the little imperfections that actually make
something feel alive. For example, I am such a fan of whole
foods, especially fruits. There's this fruit
shop I follow on Facebook called Tage
tai Tropic Delights. Every day, they post close
up shots of their fruits, not AI, not stock,
just the actual fruit. And because it's real,
I can see the texture. I can almost taste the
juiciness through the screen. It makes me excited. Kid you not after a few hours of scrolling
through their fruit photos, I'd find myself
in their shop the very next day filling
up my basket. That's the power of real images. AI can't replicate
that yum factor that comes from texture,
freshness, and imperfection. Now, let me give you
another example. My own class project, I did two shoots
a practice shoot and then my actual
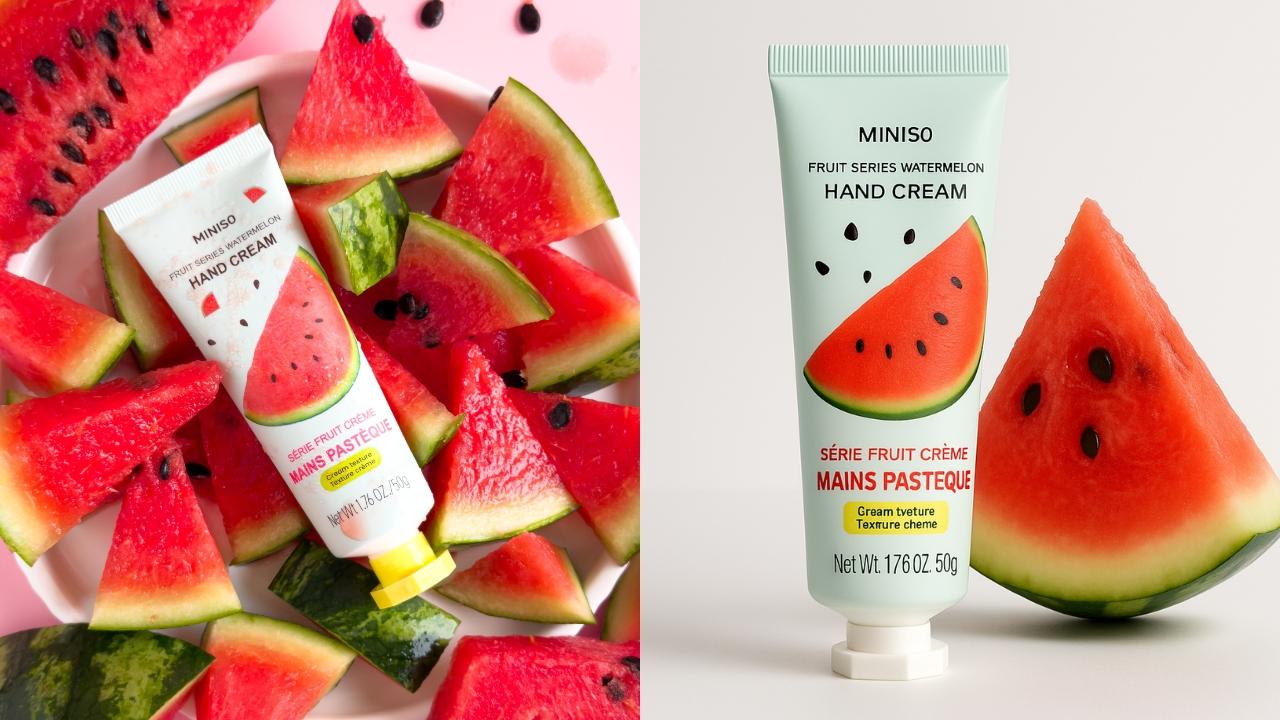
final project. I chose skincare as my subject. And since I love fruits
and these products had fruit flavors like
strubbery and watermelon, I styled them with real fruit, and I didn't hold back. I pushed watermelon
into the scene, let the juice drip and really leaned into capturing texture, shine and the sensory details that make you
feel the product. Then just for fun, I ask AI to generate an image
of the same idea. And the difference was clear. My real photo had richness, texture, and that messy,
delicious aliveness. The AI image looked
polished but flat. It lacked the flavor, the soul. That's what
I want you to see. Your creativity, your ability to see and capture what's real. That's what sets your photos apart. And here's another thing. Customers today are
sharper than ever. They can sense when an
image is too polished, too sterile, too artificial. What they're craving
isn't perfection. It's connection. They want real, real texture, real materials, real stories, photos that make them feel like they can
almost touch the product. Smell it. Imagine
it on their table, in their home or in their hands. That's the kind of photography
that builds trust, sparks emotion, and turns
browsers into buyers. If that juicy example
wasn't enough to convince you that your
product photography, photography with heart is
still more powerful than AI, let me share some wisdom. AKA, M nerdy side from
a few books I love. In the visual story, Bruce Block reminds us that the true power of an image
isn't just in what it shows. It's in what it makes us feel. Think about it. A photo of a candle on a shelf
is just a candle. But a photo of that
same candle glowing in a dimly lit room with
soft shadows on the wall, that image makes you
feel warmth, peace. Maybe even nostalgia. AI can copy lighting, but it can't feel what
peace means to you. You can. Donald
Miller in building a story brand teaches that what sells isn't just features, it's clarity and emotion. Customers want to know how does this product
make my life better? Your photo of that Kendle
doesn't just show wax. Tells a story of rest after a long day of creating
calm and chaos. And that's what connects. And then there's Sherry Turkle in reclaiming conversation. She says, We are tempted to think technology gives
us more control, but real connection
requires vulnerability. That's what your photography
offers, vulnerability, a peek into your brand's soul, a quiet invitation for your customer to
trust you and think, This was made for me. Even now with AI everywhere, people still buy with
their hearts first. Your photos are
the bridge between your product and their emotions. So if you've ever caught
yourself thinking, maybe I should just let AI
handle my product photos, remember this, AI can help, but it can never be you. It doesn't have your
eye, your creativity, or your unique way of telling
stories through light, composition and color.
That's the magic. That's the part
only you can bring. And in the next lesson, we'll go even deeper
into the things AI can't touch, your taste, your intuition,
your perspective, the real secret weapons behind unforgettable
product photography.
3. What AI Can’t Replace: If Lesson one reminded you that product photography
still matters, this lesson is all about
reminding you why you matter because it's not just about using a camera or a phone. It's about the eye
behind the lens, the person behind the product. And no matter how
powerful AI becomes, there are three
things it will never be able to replicate your eye, your taste, your story. Let's start with your eye, not just your eyesight,
but the way you see. Your eye is shaped by
your life experiences, the food you grew up eating, the colors in your
favorite cafe, the tiny details that
give you goose bumps. AI can calculate patterns, but it can't make intuitive
creative decisions. It doesn't know when a slightly off center frame
feels more alive. It doesn't sense when the light feels soft enough
to feel like home. You do. Next is your taste. Austin Cleon calls it your
creative fingerprint. It's the way you like
things lit, styled, framed. It's your color palette, your mood, your visual language. The more you create, the
more your taste sharpens. And eventually, people start recognizing your work even
before they see your name. AI can mimic
thousands of styles, but your curated,
deeply personal taste. That's not something
you can download. It's cultivated through
practice, curiosity and play. So if you're still figuring
out your visual style, that's okay. Keep showing up. Your taste is being formed
with every photo you take. And finally, your story, whether you're photographing
your handmade soaps, your client's coffee cups or your small business products laid out on your dining table, you are telling a story, not just about the item, but about you, why
you chose that plate, why you styled it by the window instead of under a ring light. Why the shadows matter? That is your voice. That's what connects your audience
to the image. AI might be able to
create an image, but only you can create meaning. Here's something you'll hear me say again and again
in this class. AI is fast, but it's not felt. You are. You bring sensitivity. You bring intention.
You bring care. Those things show
up in your photos. Even if you're using
the same tools as everyone else, that's your edge. That's your value.
The next lesson, we'll talk about how to actually use AI tools the smart way, not to replace your creativity, but to support your workflow, so you have more time
to focus on the fun, meaningful parts of the process. You'll learn how to make AI
your creative assistant, not your identity.
I'll see you there.
4. AI as a Creative Assistant: Alright. So we've talked about why your creative
voice still matters. Now, let's talk about
how AI can actually support your creativity,
not replace it. AI can feel intimidating when you think it's
here to take over. But what if you
started thinking of it as your creative assistant? Not the artist,
not the visionary, just someone or something, who can help you brainstorm
faster, edit quicker, and stay focused on what
you love most creating. In this lesson, I'll walk you through five real ways I use AI in my product
photography process and how you can start
using them too. If you're feeling
stuck before a shoot, you can open up Chat GPT or your favorite AI writing
tool and ask things like give me five
cozy styling ideas for photographing
handmade candles, suggest a color palette
that feels clean, modern and calming or write a short story or vibe for
a coffee product shoot. It's not about using what
it gives you word for word. It's about getting
inspired faster. So you don't waste hours
in creative blocks. Think of it as a
brainstorming buddy who never runs out of ideas. Let's be honest,
sometimes writing the caption is harder
than taking the photo. That's where tools like
Chachi PT can help you turn your product photos
into captions that sell EtS descriptions, Instagram captions,
short TikTok hooks, or even client copy drafts. You're the one providing the vibe and AI gives
you a starting point. Then you edit with heart. This saves so much time, gives you more space to
focus on your art and helps you show up more
consistently without burning out. If you've ever taken a
great product photo, but the background
just wasn't working, you love tools like
remove dot BG, Canva background remover, and
photoshops generative fill. They can erase
cluttered backgrounds, smooth out wrinkles in fabric, help you test different mockups, all while keeping your
original shot intact. Just remember your original
photo still matters. AI can't replace good
lighting, angles or mood. It can only enhance what
you've already created. If you use Light room
mobile or desktop, you might have seen a
feature called AI masking. It can automatically detect
the background, the subject, like your product, and
specific areas like skin, fabric or the sky. That means instead of
manually brushing over areas to adjust
brightness or color, Light room does the
tedious part for you. So you can focus on the fun
stuff playing with a vibe. This is actually one of
my favorite AI tools. It's subtle, it's fast, and it sometimes
feels like magic. Product photos don't
have to stay static, and you don't need to spend
hours making this happen. With Canvas, magic
animate and templates, you can turn one
photo or a series of shots into a quick five
second promo reel, a scroll stopping
product carousel, or a stylish slideshow with
music and text overlays. Just a quick note
that Canva isn't reading your photo and
automatically editing it, but it's smart presets
and templates suggest animations and layouts based
on the content you choose. This makes it super easy to get professional looking results
in just a few clicks. All these tools are powerful. Yes, but they are
just that tools. They help you create faster. They help you show up
more consistently, but they don't define
your style or your story. You are still the
creative director. You get to decide the vision. AI just helps you bring that vision to life
a little faster. In the next lesson, we'll look at something really eye opening, real product photos
versus AI generated ones, and what actual customers
respond to more. See you there.
5. Real vs. AI: What Customers Actually Trust: I'm sure you've probably seen AI generated product photos
floating around online. They're crisp, they're flawless. They're kind of impressive, and maybe you're like
me and went to look at your own photos and
started comparing. There may be a sting
of comparison, but I want you to know this. You are creating something
AI never can Trust. AI generated images
are often fast, technically sharp,
easily repeatable, and almost too perfect. But they also tend to be
emotionally flat, generic, missing imperfections,
and therefore humanness, and not always accurate
to your actual product. On the other hand, your
real product photos might have natural shadows, slight texture variations, and a reflection of your space, your life, your world. And most importantly, they carry honesty,
presence, authenticity. Here's where
psychology comes in. Customers don't just buy
based on logic or price. They buy based on trust. They're quietly
asking themselves, Can I imagine myself using this? Does this brad feel honest? Is this photo showing me
something real or staged? When you use real photos, styled with care and intention, you're not just
showing a product. You're saying, This is real, this is mine, and I
made this for you. That's the kind of
energy people lean into. Let's say you're selling
your skincare product. An AI image might show a flawlessly rendered
tinted lip oil, unrealistic lighting effects in a background that doesn't
exist in the real world, but your real photo might show that same tinted
lip oil resting on a linen cloth or maybe
peeking out of a makeup bag. Which one feels more believable? Which one feels like
something I'd actually use in my own home or in my own life?
It's a second one, right? Because it's human.
And that's what makes people stop, feel and trust. In a world where everything
is filtered, curated, and automated, realness itself has become a form of luxury. Your audience is
drawn to content that feels organic,
personal, and alive. And often the photos you
didn't think were perfect are the ones that pull people in the most because they feel like you. So if you've ever looked at an AI generated
photo and thought, I can't compete with that, let me gently remind
you. Not supposed to. You're not a machine.
You're an artist, a communicator, a storyteller. And in the long run,
people trust people. They want to see your
hand in the work. They want to know who
they're buying from. Ralness isn't
something to outgrow. It's something to lean into. Here's an experiment. Feel free to try this after this class. Take one of your product photos, any photo that feels
natural and real, compare it to a generated
mockup or a polished template, and then ask yourself, which one feels more me? Which one would my
audience trust more? Let that answer remind you. Photography isn't about
chasing perfection. It's about creating connections. The next lesson, I'll walk you through my personal
creative toolkit. The apps, tools,
and time savers, I actually lean on
to help me work smarter while staying
true to my style. Think of it as your behind the scenes pass
into my workflow. You don't need all of them, but maybe one or
two will support your journey in just the
right way. See you there.
6. Smart Photographer’s Toolkit: Welcome to one of
my favorite lessons in this class,
because in this one, I'm pulling back the
curtain and showing you what I actually use
behind the scenes. My go to apps, my creative shortcuts,
and the gear I keep coming back
to again and again. Not because these are the
only tools that work, but because they
help me save time, stay creative and
fall in love with product photography
all over again. Here are the essentials I still use when shooting
product photos. For the camera, my iPhone
15 for quick shoots like social media posts,
stories or mockups. For professional shoots, I use my Panasonic Lumix DMC
G 85 mirrorless camera with my favorite macro lens Panasonic LumixG 30
millimeter F 2.8. It's perfect for small
product details. For the prime lens, I have a Panasonic Lumix 25
millimeter F 1.7. It's sharp, versatile
and budget friendly. Next is the tripod, M workhorse
multifunction tripod. It's a QSDSDthnine nine
H with overhead frame. It's ideal for overhead
flat lays boxings or stationary product demos. For the lighting and diffuser, natural light with
shear curtains. Yes, Daylight still wins for
quick product photo shoots. Now for artificial light, I have my GO Doc SL 60 W plus a 60 centimeter
softbox with grid. If you want something more
flexible and more up to date, check out the GdoxSL
62 BI by Collar LED. You can adjust warmth to flatter different product types like
jewelry versus skincare. My reflector is
simple but effective. It's a multipurpose
folding whiteboard with this reflective side, the white side, and the
black one for negative fill. For the backdrops,
I have foam boards, tiles, and vinyl flat lays. For product photography, I
also use minimal setups like dual sided waterproof
backdrops or colored poster papers for
that clean editorial look. Last but not the least, are my styling tools,
tweezers, dusting brushes, microfiber clots, and small props that hint
at lifestyle context. The devil is in the details, especially when customers
zoom in online. If you're brand new or on
a budget, don't worry. You don't need everything
I just listed to start creating beautiful
product photos. Here's the simplest
starter kit I recommend. Your phone camera and
recent smartphone works, natural window light
with a shear curtain, white foam board or cardboard
reflector to bounce light, freeight through mobile
app for editing. That's it. W just these. You can already create clean, professional looking photos
that customers will trust. Start small, master the basics, and then upgrade only
when you're ready. Here's where the smart side of product photography comes in. These are the digital
tools that help me plan, shoot, edit, and market my work. For planning and
organization, Pinterest, which is free, is
still my go to for mood boarding and
styling in spo. Noon is where I usually
plan shot list, track line deliverables, and
organize campaign ideas. For editing, Lightroom mobile is perfect for editing
product sets on the go. Batch editing saves me hours. Lightroom classic
is for desktop. This is my main hub for
professional client work. For AI powered workflow support, I have ChatGPT plus. I use it for brainstorming
campaign captions, content hooks, or even generating product
storytelling angles. I also have Canva Pro. It's perfect for
resizing product photos, for ecommerce platforms,
Instagram, or ad creatives. Sometimes I use CapCut and Premiere Pro for
turning product shoots into behind the scenes clips at boxing style
reels or TikToks. Now, if this list feels
overwhelming, breathe. You don't need all
of these tools to succeed in
product photography. Start with what
you already have, pick one tool or gear
that excites you. Maybe it's through
mobile or maybe it's just your reflector
and get really good at it. Then as your skills and
confidence grow, add more. This journey isn't about
copying my toolkit. It's about finding what works
for you and your products. Now, in the next lesson, I'll walk you through my
personal class project, where I take you
behind the scenes from idea to styling to execution. You'll see how I apply both traditional
photography techniques and smart tools to bring a
product concept to life. It's going to be fun,
so let's keep going.
7. My Class Project Demo: Bringing fruity Skincare to Life: Before I walk you through
your class project, I want to share mine so you
can see just how simple, fun and expressive
this process can be. I'll take you behind
the scenes of my own project and
show you exactly how I turned an idea into a finished photo from the very first spark
of inspiration, all the way to the final shot. I'll walk you through how
I came up with a concept, the tools I used, my lighting, and
styling decisions, and how I stayed grounded and creative without
overthinking it. For this photo shoot, I decided to photograph some skincare products that
are inspired by fruits. I wanted to create
photos that feel fresh, inviting, juicy, and nourishing. A little playful but still
approachable and warm. Why? Because the goal is to
create a sensory experience. Photos that almost let
you smell the watermelon. Imagine the tongue of tomato or feel the smooth texture
of the lip oil. That's what makes people
stop and connect. For my wood board
and inspiration, I hopped on Pinterest and search for things like
product photography with fruits and fruit
inspired product styling. I'll be honest, I got really inspired and ended up painting
quite a lot of images. But here's my recommendation
for you. Keep it simple. Saving around five
to seven references is more than enough. That way, you'll have a clear
direction without feeling overwhelmed or accidentally
copying someone else's style. My top tip, let your inspiration spark
clarity, not confusion. As you can see from my pins, they all pointed me toward one clear theme, fun and fruity. That meant I didn't include
any dark or moody shots because those would have clashed with the feeling I
wanted to create. So remember, when
you're building your own mood board,
aim for consistency, choose images that
align with your vision, so your shoot feels clear, focused, and true to your story. Yes, pinchers has always been my go to for collecting
photo inspiration. But this time since I've been learning more about
Chachi Pitti, I decided to use both. For this class project, I told Chachi Pitti I'd be
shooting skincare products, so I ask for help when it
comes to styling ideas, so I don't start from scratch. So here's my whole prompt. It's long. I told
Chachi Pitt everything. Here's what it suggested. So overall direction, fresh, juicy and sun kiss. Think of the moment you slice a chill fruit under warm light. Then it gave me a color
palette of pinks, corals, light red, pale greens and
beach tones for warmth. Plus texture tips like
adding water droplets or juice and glossy reflections
for that dewy feel. It even suggested a few
shot ideas, hero flatly, juicy detail, hand interaction, and lifestyle feel, most of which you'll
see me try later. So yes, my creative combo for this shoot was Pinterest
and Chachi PT. So visual inspiration with a sprinkle of smart
brainstorming. That makes helped
me stay organized, inspired and super excited
for this juicy project. Let's start with my setup. So this is my main camera the LumixGeighty five
with a macro lens. And just last week, I finally got my hands on the new iPhone 17 P. So we're going to
experiment with that, too. Now, here are the
skincare products we'll be photographing today. We've got two hand creams, one strawberry and
one watermelon, plus a watermelon flavored lip oil and this tomato
glow skin facial mask. Over here, I have my
reflector and, of course, my juicy fruits, our
props for this shoot. And yes, wet wipes
because I'm a mom and I already know this is
going to be a little messy. I actually planned to
shoot during the day, but it turned out really cloudy. Here's how it looked earlier.
Super gloomy, right? So I felt the window light wouldn't be enough to
create those bright, fun and fruity photos
I had in mind. So I decided to do
it tonight instead. For the lighting, I'm
using my G docs 60 W, which I've had for ages and have used in many
of my other demos. It's reliable, easy to set up, and gives me a clean, consistent light even indoors. And that's it. My
simple little setup. Here are my backdrops. This one's double sided. And I have two more
down here just in case I want to
switch things up later. So I started by washing
the skincare products first since I'll be styling them together with the fruits, and I'm hopefully still eating those fruits after the shoot. Next, I set up my backdrop, nothing fancy, just a simple double sided one I got online. Before jumping into
the style version, I always like to take a
few test shots first, just the product alone
to check my lighting, background, and overall setup. So here I am positioning the product sideways to
the light source with a slight tilt to make sure the text and product details
catch the light beautifully. The other side
looked a bit dark, so I added my favorite
multipurpose reflector to balance the shadows. Now I'm taking my first test
shot using the iPhone 17 P, and this is actually
my very first time using it officially
for photography. So I'm both excited
and a little nervous. No. It's not even edited, but it looks really
clean and professional. I'm honestly amazed. Next, I'm just
experimenting with different positions and angles, testing how the product
catches light from various sides before we move on to the more
exciting part, which is adding our juicy props. And, wow. The flat plea version. Even more stunning. Okay,
let me just go back to my moodboard and check out a few ideas for this
juicy photo shoot. This photo right here
especially caught my attention, and it inspired me to create my own version of that
juicy summer fresh vibe. So next, I'm prepping the props, starting with the watermelon. Now, I'm not an expert
at cutting fruits, and that's totally okay
because my goal here is to make this whole process
look as human as possible. So my plan is to
experiment and cut the watermelon into
different shapes and sizes, making it imperfect, but still fun and
visually interesting. So my main goal here is to show off the juiciness
of the watermelon, its seeds, its vibrant color, and that beautiful green rind. To really highlight that, I decided to mash a
few slices to reveal more texture and make the
shot feel more alive. Now, I don't want to soak
my backdrop too much, even though it's waterproof, since it's all made of soft material and
could be damaged. So I'm using a plate to
hold the mashed watermelon, and actually, that
worked out perfectly. It's like hitting two
birds with 1 stone. The plate not only keeps things clean but also adds an
inviting touch to the frame. Gives this feeling
of, we're serving you juicy watermelon
goodness, right? Now, let's move on to styling. I'm placing the plate with a watermelon in the
center of the scene, then arranging the rest
of the slices around it, not randomly, but also
not too stiff or staged. I'm following some basic
composition rules, but mostly trusting
my instincts. Can totally do the same, but if you ever feel lost, remember, there are
simple composition guides you can refer to in
my other classes. I'm also showing different
sides of the watermelon, including the outer rind
to keep the textures interesting and the colors
balanced. And that's done. Now it's time for our
product to join the scene. I'm placing it right in the
middle, slightly slanted, following a diagonal
composition to add a bit of movement
and energy to the frame. And now it's time
to take photos. Since we're going for a
flat layer overhead angle, I'll start experimenting
with my iPhone 17 pro first. I'm setting the format to raw four to eight megapixel for maximum sharpness and
flexibility in editing later. Then I'm switching
to the two X lens, tapping to focus on the product details and taking a shot. Now, let me try
adjusting the exposure a little just to see how the light affects
the overall feel. I also noticed something. The plate marks are showing up, and it's not giving that happy accident vibe
I was hoping for. Instead, it's a bit distracting, so let's wipe that off
before we continue. Alright, now I'm
taking more photos, experimenting with the
iPhones different lenses, especially the four X lens for a closer, more
detailed shot. It's looking nice, but I think
we need to be a bit more intentional and careful with the details for these close ups. As you can see, we're running a little short on watermelon, and the mashed part isn't as
attractive in this framing. So let's fix that. I'm adding a few smaller
watermelon slices into the gaps to make the layout feel fuller and more balanced. And since the upper right
corner looks a bit empty, I'm adding just a
few watermelon seeds to fill that space, but keeping it intentional, five seeds following
the rule of odds to stay consistent with
our fun and juicy theme. Now, let's see how
it looks on camera, starting again
with a two X lens. Then moving a little closer. And finally, a real close
up using the four lens. And, yes, that's so much better. Now, let's compare the
earlier version with a mashed watermelon
to this updated one. The second version still
feels fun and juicy, but it's also more polished
and inviting, right? That's the power of troubleshooting
during your shoots, an absolute human touch. Or should I say
something only you, a real person can do. Speaking of humanist, let's add a little watermelon
juice to the product and seen for that extra
juicy, slightly messy vibe. Now, messy doesn't
mean careless. We can still apply
intention and control by planning where to spill and
gently wiping off any excess. For the next shots, I'm keeping the same
iPhone settings and snapping a few
more variations. Another one. And another one. Now, let's switch
up the perspective, trying a 45 degree angle
instead of overhead. Oh, I love that. These shots bring a
slightly different mood and personality to our setup. Still fun, still fresh, but with a more lifestyle feel. And that is it for this round. In the next video we'll make
the most of this same setup, but move on to our
next skincare product.
8. Demo 2: Watermelon Flavored Lip Oil: Four. Now let's replace our hand cream with a watermelon
flavored tinted lip oil. This one's a little tricky because the product
itself is red. So I'm thinking
carefully about how to make it stand out
against our setup. To troubleshoot,
I removed some of the watermelon pieces
in the middle to expose more of the white plate. That extra contrast
helps the product pop. And there, I think that's
working beautifully. Let's see how it
looks on camera. I'm adjusting the label so the text faces the
light properly. Since the product is small, I'm switching to the four X lens on the iPhone for a closer shot. Hmm. Not bad. But now I want to try
something a little different. Instead of a flat lay, let's go for a straight
on angle this time. So here's my crazy idea. I'm going to put the lip oil into a thick watermelon slice, one that looks sturdy
enough to hold it. I'm a bit nervous. Not
sure if this will work, but okay, it's actually working. I actually love how
it's leaning slightly, giving off a fun leaning
tower of pizza vibe. It adds drama and
interest to the frame. Now I'm just shifting a
few watermelon slices around to balance the styling. And since we're
shooting straight on, I'll switch over to
my mirrorless camera with a macro lens. Let me show you my settings. So I'm shooting handheld, so my shutter speed is set to
around 1/200 to avoid blur. My aperture is wide open at F 2.8 for that beautiful
background blur and extra light. And my ISO is slightly higher to keep the exposure
bright and clean. Alright, moment of truth,
let's take the shot. So same best practice applies even on my
mirrorless camera. Tap to focus and make sure
your subject is tack sharp. And I love it. The only thing I
want to adjust here is the placement of the seeds. Since we're shooting
straight on, they're not visible in
the background anymore, so I'm moving them forward to
act as foreground elements. So let's try another shot. Still not quite right. Okay,
one more tiny adjustment. And finally, I'm happy. Now, I'm adding a
few close up shots since we're already
using a macro lens, capturing more of the
product details and texture. Hm. A little more watermelon
in the background for depth. Oh, and wow. I'm loving
this set even more. Next, I want to experiment with the reflective side of my
multipurpose reflector. Whoo. That immediately
looks better. The shiny reflection gives it a more fabulous polished
vibe. I love it. Now, I'm curious
if the iPhone 17 can capture the same
level of awesomeness. So let's test it. Okay, first, in normal photo mode. Nice, clean and vibrant. Now, let's try portrait mode so we can adjust the aperture. Wow, not bad at all, right? And here's a side by side look, I mirrorless macro shots versus the iPhone
17 portrait mode. Honestly, both look amazing and super interesting
in their own way. I am really enjoying this shoot, and I hope you are, too, because in the next lesson, we're styling another product this time with strawberries. Mm, so exciting. See you there.
9. Demo 3: Strawberry Flavored Hand Cream: For our next product, we'll be photographing this strawberry flavored hand cream. I've got two packs here. This one looks super photogenic, while the other
one, not so much. So that's the one I'm slicing, because I want to show
the inside texture of the strawberries for
more visual variety. The goal is to make our viewers almost taste and
smell the freshness. Like they can feel that juicy strawberry sweetness
through the screen. For the backdrop,
I'm thinking of switching to the
green one this time. So let's test how that looks. So placing the product
and strawberries on top, the green leaves of
the strawberries are getting lost against
the green background, and it's just not as
vibrant as I imagined. So we'll stick with our
original pink backdrop. It's more colorful, more fun and definitely
fits our fruity theme. This time, I'll start
positioning the product first, then slowly adding the
strawberries into the scene. The So my plan here is to place
them alternately, pull strawberries,
then sliced ones to keep it balanced and dynamic. And my son wanted to join. According to him,
Mommy, you're too slow. So I let him join in. Me humanist, right? So we're just enjoying
the process together. And, honestly, what
a cute bonding idea. He's having fun. I'm having fun, and that's the whole point. So once we place all
the strawberries, I realized the setup
looked a little too neat. So I decided to squish some
of the strawberries in the middle to make it look more natural, vibrant, and full. It's not exactly what
I pictured at first, but let's see how
it looks on camera. So quick review of
my camera settings, aperture at F 2.8, shutter speed at
1/200 and ISO 800. We're shooting
straight on again. Wow. I did not expect that. It's actually so cute. Let's take another
one. And another. This time, a bit closer. Now let's try shooting and
landscape orientation, since most of our shots have been portraited
or vertical so far. Ooh. That looks
really good, too. As always, I make sure to tap and focus on
the product text, so it's sharp and readable
in the final photo. And Bola, I love it. Next, let's add a little
more human touch. I want to include my
hands in the frame, so I'll need help from
my other assistant, AKA, my husband. So he'll be the one
taking the photos while my hand act as the
model for a bit. So we're just experimenting with different poses and vibes. Not quite happy
with the first few, so let's try again. This time, gently
lifting the product for a more natural,
graceful feel. Yes, that is so much better. And, of course, we're not
skipping the flat leg shots. This time, using
the iPhone again. Nice. I love how playful and
juicy this set turned out. Next, we'll photograph both
products in one setup. See you in the next lesson.
10. Demo 4: Watermelon and Strawberry Hand Cream Scene: Before I clean everything up, I want to try this pintres
inspired setup I found earlier where both
the watermelon and strawberry are in one scene. Good thing we actually have
both flavors of hand cream, so let's put all that
fruity goodness together. So first, I'm wiping down the watermelon hand
cream because, yes, it literally took a
watermelon juice bath earlier. Then I'm adding both
products into the scene, surrounded by slices
of watermelon and strawberries.
Nothing formal here. I'm just following my
instinct for a placement, so it doesn't look
forced or staged. I want it to feel
like the products are naturally and
joyfully there. Once I'm happy with the setup, it's photo time again. So I'm using my ralless camera, same settings as before, experimenting with both landscape and
portrait orientation. Then I'm adjusting the
product positions a bit because they look a little
awkward in the first shots. Again, no strict rules here, what feels fun, natural
and eye catching. Alright, let's try again.
Oh, that's better. Now, to make the composition
even more dynamic, I'm adding a few
foreground elements. And nice. Next, I'm adding a layer
of human touch again, so including my hands in the frame while my
husband takes the photos. Wow, I love how this
makes the scene feel more alive and spontaneous. Now, for the last
crazy and messy idea for this set, I thought, What if I squish a slice
of watermelon into the watermelon hand cream
while Paul takes photos? I told him to adjust
the shutter speed and ISO higher so we can capture the motion while still keeping that
bright, happy vibe. It feels a little awkward, and honestly, I was kind
of regretting it at first, but as you can see,
my son was having the time of his life watching,
so we rolled with it. I noticed the
strawberry hand cream was looking a little left out, so we did another squish moment. This time, focusing on the
watermelon flavored one again. A few more squishes, a few more clicks, and
here's the result. It's juicy, it's messy, and okay, my hand isn't
exactly photogenic here. But hey, that's real life, and that's the human touch. Alright, time for a
big cleanup before we move on to our last
skincare product, the tomato glue
skin facial mask.
11. Demo 5: Tomato Glow Skin Facial Mask: Four. For our last skincare product, we'll be photographing the
tomato glow skin facial mask. This time, I'm laying
the backdrop completely flat because we'll be
doing all flatly shots. No more straight on
angles for this one, spreading out the backdrop, cleaning the surface
one more time, and we're ready to go. I intentionally left the
tomato mask a little wet, so it looks juicy and
refreshing on camera. With just the reflector added, the scene already looks vibrant. So let's take a quick test shot. So making sure it's set to raw four to eight megapixels and using the two x lens
for sharper detail. A quick tap to focus, adjust the exposure a little. And nice. Not bad, right? Now, let's slowly but surely start adding
our juicy props. So first, the whole tomatoes. It doesn't look as fun or
festive as I imagined. So let's add another
mask for balance or two. The better, but still
not quite there. So next, let's slice
the tomatoes to really show off their juicy
texture and those fun shapes. Now I'm not a pro at slicing, but I'm honestly
loving how these look. I can already imagine
how graphic and playful this setup will be once
it's style flat lay style. So let's go for it. Adding the slices into
the scene one by one. I'm trying to follow a
diagonal composition, but not too perfectly. I still want it to feel
organic and spontaneous, like the kind of mess
that makes sense. Mm. So slicing a few more
pieces and done. Okay, so let's check. Cleaning it first because,
yes, it's smudged. So there we go. Sharp and ready. Now, time for photos. Let's start with
landscape orientation. Wow, so cute. Let's take another one. I
love it. Trying a close up. Not loving that one as
much, but that's okay. The photos are nice, but
something still feels missing. So I'm adding more
tomato slices. Smaller ones this time for variety and a bit
more visual interest. Now placing them carefully,
adjusting the angles. Okay, now it's feeling
fuller and more dynamic. And it's photo time again. Just tweaking my
shooting angle a bit, following the gridlines
for composition. Nice. Then trying a
45 degree angle shot. Nice. And here we go. Our final tomato shots. Alright, before we
wrap up this demo, let me quickly show
you how I used AI to enhance some
of the photos we took and how I asked Canva AI to animate one of them for
fun eye catching result. Here's one of my favorite
ways to let AI help me edit faster while
keeping my human touch. For example, in this
photo, let's say, I want to add more
strawberries into the scene with generative AI, I can do that in seconds. Then if the result isn't perfect or it's
not what I wanted, I can just click on Refine and choose the version
that fits best. Because remember, AI can assist, but we still make the
final creative call. Now, for small imperfections like dust or minor blemishes, I usually just use Lightroom
regular spot removal tool. But when that doesn't
look quite right, generative AI can step in and clean things
up beautifully. Another example,
say your backdrop has wrinkles or wrinkle marks. I know that's struggle.
Just turn on generative AI, let it smooth things out and refine until it looks seamless. It's fast, subtle and
still feels like you. Let's say you want to post
your photo on Instagram, but wanted to move a
little to feel more alive. You can open it in Canva and simply ask AI to
animate your photo. I did that here and
in just a few clicks, Valla a dynamic animated
version of my image. Simple, but it adds an
engaging touch in seconds. So, yes, AI isn't here to
replace your creativity. It's here to support
it, to save you time, spark new ideas, and make your process even
more enjoyable. You saw how we infused
every photo with intention, story, and emotion, the human touch that
only you can bring. Now, pairing that with the
smart assistance of AI, that's where the magic happens. Alright, now it's your turn. I can't wait to see how you bring together your creativity, your story, and your own
rhythm with these tools. Project could be a candle, a piece of jewelry, a tea blend, a handmade soap
or any product you love. But here's what I hope you
take away from this demo. Ground your shot in an
emotion or experience. Ask yourself, what do I want people to feel
when they see this? Let tools N AI
support your vision, but keep the heart of it human. Now that you've seen my process, it's time for yours. In the next lesson,
I'll walk you through the class project
prompt step by step, so you can create something
you're truly proud of.
12. Your Class Project: Bring Your Product Photo to Life: Now that we've explored
all these soulful, smart and modern
ways to approach product photography
in the age of AI, it's time for you
to take what you've learned and make it your own. So here's your class project
designed to help you apply what we've talked about without pressure
or perfection. You're going to choose
one product photo, style it with intention, and bring it to life using
your own creative voice, supported by any of the tools or tips that resonated
with you in this class. Let me break it down for you. Your project has
three simple steps. First, take or revisit
a product photo. Choose a product that you love, something you sell, make use
or want to practice with. Style it in a way that feels
aligned with your story, your branding, or just
your current mood. You can shoot something
new or revisit an older photo you'd
like to re edit. Next, is to enhance it
with one Smart tool. So use just one AI or modern
tool to bring it to life. Add a caption using Chachi PT, remove the background
and place it into a new layout with Canva, animated with CapCut or Canva
for a short form video, edit it with Lightroom
using AI masking. No need to try them all. Just experiment with one and let yourself explore
without pressure. Step number three is to share your process plus
what you learned. Upload your final image or video here in
the projects tab. In the description, share what product you photographed,
what tool you used, what you discovered or
felt while doing this, a tip for someone else who might be starting from scratch. You don't need to
write a full essay. Just share from the heart. This is your space
to reflect and be proud of the creative
work you've done. Whether this is
your first project ever or your 50th,
you belong here. This project is your
chance to pause, apply and celebrate
the growth you've experienced in just
a few short lessons. You've taken the time to learn. Now it's time to create. Not perfectly, not for praise, but just to honor your progress and plant a seed of momentum. I can't wait to see
what you share. And don't forget if you see another student's project that inspires you, leave a comment. Let's make this a space where everyone feel seen
and supported. I'll be checking the
project stab often, and I'd love to see
your creative take on what we've explored together. No, go create something
you're proud of. I'll see you in the
final lesson for a few last words
before we wrap up.
13. Final Thoughts: Four. My friend, you made it to
the end of this class. And I just want to take a
moment to say, thank you. Thank you for showing up.
Thank you for creating. Thank you for trusting
that your voice, your eye, and your
story still matter. Because in a world that's
rushing towards speed, automation, and perfection,
you chose to slow down. You chose to create
something real, something thoughtful, something
that only you could make. This wasn't just a class
about tools and trends. It was about learning how
to use smart tools while staying rooted in your
soul led creativity. It was about building a
workflow that works for you, quietly,
intentionally, beautifully. You don't need to fear AI, but you also don't
need to follow it because at the
end of the day, the ability to tell a
story through light, styling, and emotion, that's
something only you can do. If this class opens something
up for you and you want to explore product
photography more deeply, I'd love to invite
you to check out my other classes
here on Skillshare. I have one that focuses
just on product styling, where we go deep into
choosing a theme, working with textures,
props, color stories, and visual storytelling that
makes people feel something. I also have short
beginner friendly classes on camera settings, lighting, both natural and artificial
and composition techniques that make product photos pop. These are great if you're
looking to strengthen your eye and get more
comfortable behind the lens. Each class builds
on your skills, not just technically,
but emotionally. Now, if this class meant
something to you, if it helped you see your work
or your worth differently, I'd love it if you could leave a quick review here
on Skillshare. It helps other students
find this class and gives me feedback on how I can
keep growing with you. And if you're
sharing your project on Instagram, please, please, please tag me at Rose
Nene and at Skillshare. I would love to celebrate
your work with you. Also, make sure to tap the Follow button
here on Skillshare, so you'll know the moment
my next class goes live. Or when I give away free
Skillshare premium membership, I have three per
year, so watch out. Remember, you don't
have to do it all. You just have or
you just need to start with what feels
right right now. Try one idea, experiment
with one tool, let it snowball naturally, and trust your timing. I hope to see you in
my other classes. Congrats again and buy for now.
 Rose Nene, Photographer & Videographer