Transcripts
1. Introduction : My name is Dee Smith, and I'm a professional
illustrator and qualified teacher based
in Scotland in the UK. In this class, I'll show
you how to illustrate this cute stack of books using the digital
drawing app Propriate. As a professional artist, I use Propriate for
all of my work. I have illustrated everything
from children's books to greetings cards that I
have licensed worldwide. I do this solely
using ppropriate. It is my digital art tool of choice because it
is super intuitive, has so many amazing features
and tools that produce professional level results and
as long as I have my iPad, I can make art anywhere. In this class, I'll talk
you through the steps needed to illustrate
this adorable booksck. You will learn some useful
techniques and tools that you can then apply to
create your own unique art. Plus, you will have
a beautiful piece of art that you
can feel proud of. This class is suitable
for a range of abilities from beginners
through to advanced users. Beginners, I will talk
you through each step of the illustration process
so that you can easily follow along and get to grips
with appropriate basics. More experienced
users procreate. This class will help you build
on your existing skills. If you're a seasoned
pro, you can put your own spin on the
class so that you have a commercially
relevant piece of artwork that will
bolster your portfolio. The class comes with some
resources to get you started. I have provided a
book stack sketch, and a suggested color palette, and I will explain
how to import these into Procreate in
the next lesson. As a thanks for
taking this class, I am giving you a
free star stamp brush that you can use in any
future art you make. Let's grab an iPad
and get started.
2. Materials and Equipment : For this class, you will need an iPad with the
procreate app installed, an Apple pencil or
stylus to draw with, and you will also need some
additional project resources. To access these, go to the
Projects and Resources tab and scroll down until
you see download resources. There are three resources here, a booksck sketch, color palette, and star stamp brush
to get you started. Click on the Books Stack sketch and when prompted,
select Download. Go to the Download icon on the top right
and click on this. You should see the Book
Stack sketch here. Select this and hit Download and it will export straight
into Procreate. Go back to the
Skillshare class and click on Books Stacks
watches this time. When prompted, select Download and then go to the Download
icon and it should be here. When you select the
Book stacks watches, because it is a zip file, it will go straight onto
your iPad downloads. Simply click on
the white part and it will export from
here into Procreate. Now, if you open your colors, you can see the
watches at the top. Okay, one more to go. Let's go back to Skill
Share and select the link for D's
star stamp brush. Again, you want to download. Click on this in the downloads and it will go to your iPad. Select the white part as before and it will go
straight into Procreate. Now when you go into brushes, you will find the brush. Mine has gone right to the top. Now we are ready to draw. See you in the next lesson.
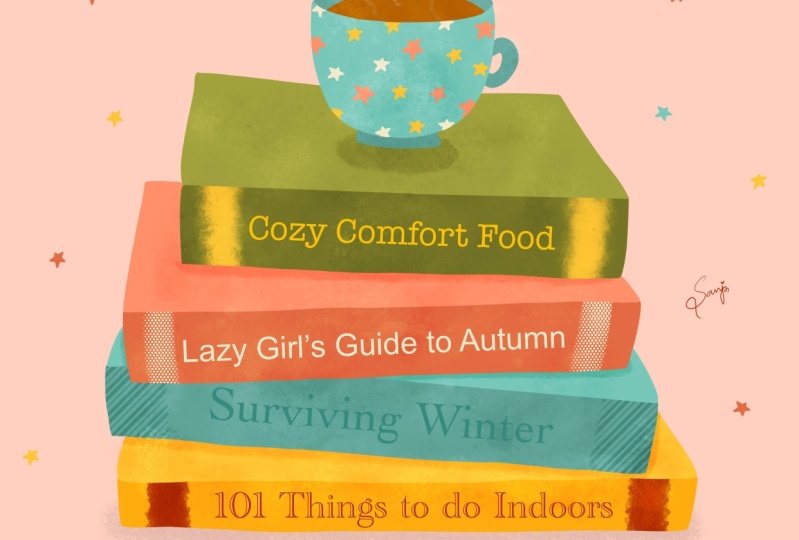
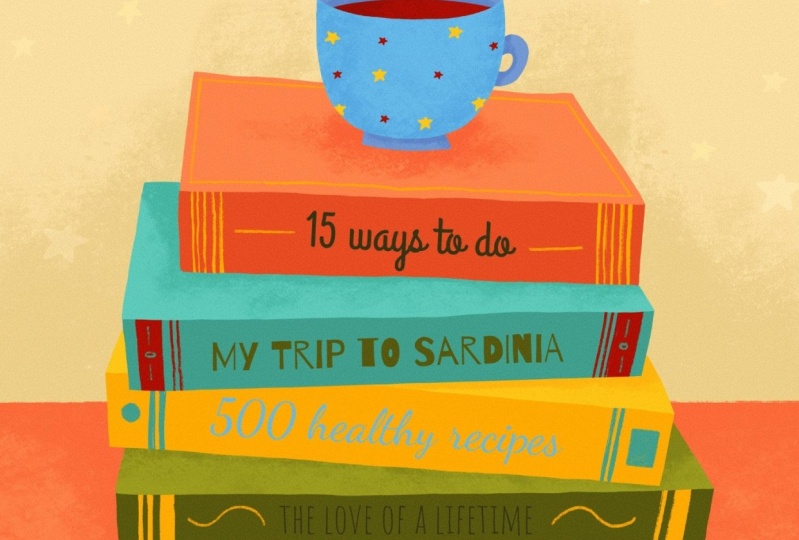
3. Colouring our Books: In this lesson, we will
be coloring our books. You should already have
the book sketch open, so we're going to go
straight in with the color. Let me show you how to select
a brush to color with. On the top try menu,
we have a brush too. Tap to open the brush library, and you can see that the brushes are organized into
different sets. Today we are using
the inking set. Let's tap on this set. You can see that this
set has lots of brushes, but let's choose the
brush called studio pane. We can use the pen slider
bar on the left to increase or decrease the size of our brush by sliding
it up or down. Set your brush
size to about 30%. Now, let's select our color. On the top right, we have
a little circle of color. This is our color library. You can add color
by selecting from the disk or our color palette. Today, we will be using
the class color palette. We already imported
our swatches file, so the booksck palette
should be right at the top. You will see it
is already set to default because it has
a blue tick beside it. The palette is organized into two rows with a light and
darker shade of some colors. Let's select our first
color from the top row. Next, we're going to open our layers by tapping
the layers icon, which looks like
two small squares. You will see we have
a background layer and our sketch layer. Think of layers like
sheets of paper. Each time we color a new
section over illustration, we will put on a new layer. This means we can easily go back and change the color of
the design at any time. Let's add a new layer by
selecting the plus sign. This layer needs to go
below our book sketch. To do this, hold and drag below. We are now going to trace the front cover of the top book. If you make a
mistake, don't panic. You can take two
fingers and tap on your screen to delete
the last action. You can also do a
three finger tap to redo the last action. Okay. Let's keep going and finish off the outline
of the first book cover, ensuring there are no
gaps in our lines. This is important and I will
explain why in a moment. We are going to use a
function called color fill, which quickly allows
us to color a shape, and in this case, the shape we will color is our book cover. To color fill, tap on the colored circle
at the top right. Next, drag and drop the
color into the shape. If all your lines are touching, the shape should now
be filled with color. However, if the whole
canvas is colored, that means there are gaps and you should go
back and close these. We now have a front cover
colored on the top book. Let's select the
layers icon and choose that plus sign to
add another layer. Hold and drag this layer
under the book cover. This will be our book spine. Open the color library and choose the darker shades
of your book color. This will be in the second row. To close that color library, simply tap the colored circle
again at the top bite. Next, trace the outline
of the book spine. To zoom in or move your
canvas at any time, you can place two fingers
on the screen and pinch. Use color drop like before
to fill the spine shape, ensuring all lines are touching
and there are no gaps. Well done. We have now
colored our first book. We're going to color the next three books using
the same steps. Tap layers and add a new layer. Hold and drag this layer
below your first book spine. Select a different lighter color from the top row of the palette. Tap the circle to close
the color library. Let's trace the
next book's cover. Because this is a smaller area, I'm going to decrease
my brush size, tap the brush size slider on the top left and
drag to around 25%. Now fill this with color. Let's do the next book spine. Select layers again
and add a new layer. Drag and drop this below
the second book cover. Remember if you make a mistake or need to redo at any time, just use the two finger tap. Go to the colors and select a darker shade from
the bottom row. Tap the circle to close
the color library. Next, begin to trace the
spine of the second book, ensuring again
there are no gaps. Now fill this with color by dragging and dropping
the color circle. Let's turn off our sketch
layer to check our progress. Go to layers and tap on the sketch and then tap on
the tick to hide the layer. Don't worry too much about messy edges as we will
tidy it all up at the end. Let's turn back on our sketch
layer and color book three. Tap layers and add
another layer. Drag this below all
the other books. Choose a new color for this one. Remember to keep
it a light shade. Tap the circle to close the color library and trace
the outline as before. Let's use color fill to
color in this shape. Hopefully, you're feeling
more confident with this now. Next, go to layers and add a new layer for
our next book spine. Drag and drop below
the third book cover. Choose a darker color from the palette and trace the
outline of the spine. We have one more book to
do, so let's keep going. Go to layers and
add a new layer. Then select a lighter
color from the palette. Trace the book outline and then use color fill
to color this. Add a new layer for the final
book spine and drag and drop this to the bottom
underneath the last book cover. Choose a darker color from the palette and trace
over the book spine. Then drag and drop in your
color. Excellent job. We have colored all four books. Let's turn off that sketch later again to see how it's looking. So far so good. In
the next lesson, we will be coloring
our cup. See you soon.
4. Colouring our Cup: In this lesson, we will
be coloring our cup. The process will be like
coloring our books, so hopefully you're feeling
a bit more confident with. Let's select layers and add
a new layer for our cup. This layer will stay on top of all our book layers because we want the cup to be at the front. Open the color library and choose a color
from the top row. Using the brush slider, we are going to decrease
the brush size to about 20% and we're
going to zoom in on our canvas by placing two fingers on the screen
and making this motion. Next, trace the outside
part of the cup only. Remember, if you need to undo, use the two fingertap
at any time. Once your outline is complete, you can use color fill
to color the cup. Go back to layers
and add a new layer. This will be the
base of our cup. We want to drag this layer
below our cup layer. Choose a darker color for the base and trace
around the outline, making sure there are no gaps. Once this is complete, you can color fill this shape. The next step is our cup handle. We're going to create
a new layer for this. We don't have to change the position of the
layer this time. Let's keep our color the same. But because it's a small area, we want to decrease
the brush size by moving the slider bar down. Now we can trace around
the outside of the handle. Again, use color drop to
fill in this shape quickly. This now just leaves us to
color the inside of the cup. For the inside of our cup, we will need to add a new layer, tap layers and the
plus sign to create our new layer. Keep
the layer where it is. It should be between
the cup and handle. Keep the color the same and
trace over the round shape. Go to the color circle and drag and drop to
fill it with color. Let's turn off our sketch layer
to see how it is looking. To do this, go to
layers and find the sketch layer and
uncheck this to hide it. I think that is
looking super cute. I have a few messy edges, so let's learn how to tidy up our illustration in the
next lesson. See you there.
5. Tidy Up our Illustration: In this lesson, you
will learn how to use the eraser tool to tidy
up your illustration, creating nice sharp edges, and giving your drawing a
polished professional finish. Let's start with our top book. Go into layers and
select this layer. Tap on the eraser tool and hold your pen down
for a few seconds. You will see a message that says erase with current brush. This is the quickest
way to ensure that you are erasing with the
same brush you colored. Now that we have the
eraser selected, we can run this along the
edges of the top book. Sharpening up any lines or edges or erasing any messy bits. Now, it doesn't have to be
poker straight or completely perfect because we do want it to retain its
hand drawn quality, although we do want it
to have some finesse. Remember, you can pinch
with two fingers to zoom in or rotate until your canvas
slightly if you need to. You can see I do
this all the time. Once you're happy with
the top book cover, you can move on to the spine. Let's select that
first spine layer, which should be the layer
directly underneath. Tap on the eraser
tool and again, tidy up the edges and any
parts you aren't happy with. Now, let's repeat the process for the second book spine by firstly selecting the layer and then erasing and
sharpening the edges. Repeat these same steps for
the other book covers and book spines and also for
each part of the cup. Pause the video for a few minutes and join
me when you're done. We have now tidied
up illustration, and I think it's looking
much more polished. In the next lesson, we are going to have lots of fun by adding details to our books and making them much more
interesting and unique. See you in the next lesson.
6. Adding Details: In this lesson, we
will learn how to use Procreate clipping mask to add fun details and textures
to our illustration. This is where we can really put our own spin on the project. We will start with
our top book spine. Let's select this layer. Add a new layer by
tapping the plus sign. This layer will now be
above our book spine. Now, tap on this same layer
and in the menu on the left, select the option
called clipping mask. You will now see this layer has a little arrow pointing down towards your
book spine layer. Anything we add on
the clipping layer will be clipped onto
the book spine. Adding details on a
clip layer means we can always go back and
make changes easily. As a professional illustrator, this is so important for me as a client might request
a small change. It's good practice
to use clip layers, especially if you are thinking about making money
from your art. Tap on the brush menu and scroll down until you find the
set called textures. Tap to open this set and then select the grunge brush
away at the bottom. Set the color of your
brush by tapping on the color library and choosing
a color from your palette. Think about choosing
a color that will work with the
color of the book. If it's too similar, you
won't see it very clearly. Bear in mind, we need to keep the middle part of the
spine free for text, so we want to keep details in the safe space at the edges. I'm going to keep it
simple by drawing two thickish lines down each
side. I am happy with that. If you need to
undo, don't forget the two finger tap this
is your best friend. Now we can repeat this
process for book to spine. Select this in the layers
and add a new layer above. Tap on this layer and then
select clipping mask. You will see that arrow again. Now, change the
color of your brush by going to color library and palette and then
change the style of your brush by tapping
on the brush icon. We are still in the texture set, but let's change our
brush to rosette. We might need to decrease our brush size using
the slider on the left. On the clipping mask layer, let's apply some details at
either side of book to Spine. As you can see,
these small details really add lots of
fun to our books. Repeat this process by adding details to the
remaining book spines. Be sure to leave space for text in the middle and be sure to add any detail on a
clipping mask layer so we can easily change
the details if we want to. Pause the video and spend a few minutes
finalizing the details. Our book stack is looking so cute. Our cup, however, is
looking very plain. Let's add some
detail to the cup. Maybe a nice star pattern using the class resources free
stamp brush I provided. Let's tap on the layers and
select the main cup layer. Add a new layer above this
and tap on this layer. Select clipping mask. Now go to Brush tool, and in the brush library, choose D's star stamp brush that you installed
at the beginning. Go to the brush size slider
on the left and decrease the size to about 10% by
moving the slider down. Choose a brush color from the color palette and then
start to stamp onto the cup. Don't worry about
going over the edges. Because we are doing this
on a clipping layer, the star will only
clip to the cup. Change your brush
color again and apply a few more star stamps. I'm going to change the
color once more and add a final couple of stars
to fill up any spaces. Our next detail is to add a drink to the
inside of our cup. Let's find the layer with
a round inside shape. Add a new layer
above this one and then tap on the layer and
select clipping mask. We will want to
change the brush. Go to the inking set and
select the brush called Ica. Change the color of your brush to one of the browns
in the color palette. The final detail is to
add some steam coming out of the cup to make her
drink look like it's hot. Go to your star pattern layer
and add a new layer above. Change your brush by selecting the brush icon and
finding the charcoal set. Choose the brush
six B compressed. Set the brush size to small, about 4% using the slider
bar on the top left. You can change your
brush color to pure white by tapping on a
white in the color disc. Alternatively, you can select the off white from
the color palette. Now paint on some wavy lines. Fo, you have created steam. Don't worry if you can't
see all the steam. This will be more
obvious when we change the background
color in a later lesson. Our illustration has
really come together, and it's so much
more interesting with all these fun details. In the next lesson,
we will learn to add some texture to our
drawing. See you soon.
7. Adding Texture : Adding texture just gives an illustration much
more depth and interest. It gives digital art a more handdrawn quality,
which is the look I like. In this lesson, we will learn
a quick way to add texture. For this, we will be
working on the one layer. You guys should hopefully feel confident
adding layers now, so let's jump right in
by adding a layer at the top of all the other
colored book layers. Notice the little M at
the right of your layer. Let's tap on this and
open the blend mode menu. Choosing a different
blend mode will create different
effects in your art. Today, we will be working
with the overlay blend mode. Tap to select overlay. Tap back on the layer
to close the menu. You can see the M
has become an O. Now, go back to your
brush library and scroll all the way down to
the set called Industrial. Select the brush
called rusted decay. Tap on the brush icon to close that brush menu and go
to the color library. Go to the color disc and select a gray that is
right in the middle. When using an
overlay blend mode, we work in different
shades of grey. To add a lighter effect, we would choose a lighter gray and to add a darker effect, we would choose a darker gray. If you choose a gray
right in the middle, it won't work, so
be careful of that. Let's choose a darker gray. Tap back on the color
library to close this. Now we are gently going to paint some texture
over our books. Be sure to keep your
brush within the books. We don't want it going on the background if you feel
your texture is too intense, then you can tap back on the texture layer and pull the slider to
change the opacity. I'll set mine to about 80%. Tap the layers icon
to close this. Let's now add some lighter
texture by going to the colors library and selecting a lighter
gray this time. Again, paint some texture
over the books and cut too. You can reduce your brush size on the top left slider FE two. Although the texture is subtle, I think it really enhances our art and makes
a big difference. Next, we will add some drop shadows to our
books to make them look more three D. Let's go to layers and select
the top book cover. We are going to be painting on a shadow that the
cup would cast. We are going to do this on a separate layer,
so let's add this. Tap on the new layer and
select clipping mask. Tap on the N and
then scroll down and set the blend mode to
overlay like before. Go to our colors and
in the color disc, we're going to choose
a darker gray. Now, tap the brush icon and scroll down to
the charcoal set. Select six B compressed. Tap back on the brush to
close the brush library. Zoom into your top book
using the two finger motion. Paint a round shape
for the shadow. If it looks too intense, then go back to the layer and change the opacity to about 50%. We will do the second
book the same. Select the second book cover in the layers and add
a new layer above. Again, set the blend mode to overlay and change the
opacity to about 50%. Now paint on the drop shadow. We are going to continue these steps for book
cover three and four. Pause the video
and give yourself a couple of minutes to
complete the drop shadows. We have now added
on some shadows, and I think these subtle changes
make all the difference. Great job, everyone.
In the next lesson, we will learn how to use
the text tool to add some fun titles to our
books. See you then.
8. Adding Text: In this lesson, you
will learn how to use the text tool to
enhance your art. Procreate comes with some
pre installed fonts, or you can buy fonts
online to import. Let's start by selecting
the Actions menu. This is the wrench icon on the top left next
to the gallery. Tap on the wrench icon to
open the Actions menu. Tap on the icon that says ads. From this menu, let's
select Add Text. A blue bounding box will appear
containing the word text. Use the keyboard to type your new book title
into the textbook. The textbox will extend
to fit your changes. To change the font style, you can use one finger
to double tap the text. This will open the
text entry Companion. You can tap and drag the larger blue nodes around the text to highlight
all the text. To further adjust the
text font or style, tap the font name in the
font entry companion. This will open the
Edit Style panel. Now we can scroll through the fonts and
select one we like. I'll select American typewriter. You can also change
the color of the text, which is highlighted by going to colors and choosing
one from the palette. Think about a color that will
work well with your book. To move the text, let's drag the bounding box to
where our book spine is. To resize the textbox, you can drag the blue nodes. Notice that it changes
the size of the textbox, but the text size
stays the same. To change the text size, move the size slider down
until it fits your book. Once you are happy, click Done. We need to repeat this process
for each new book title. Let's select to the
Actions menu again. This is the wrench
and select Add Text. Use the keyboard to type
the name of the new book. Let's do a one
finger double tap on the text to open the
text entry companion. Tap and drag the blue
nodes to highlight all text and then tap the font name and select
a font from the list. Choose a color by tapping on the color library and selecting
a color from the palette. We can adjust the
size of the slider. And move the textbook to
fit in our book spine. Let's select the
Actions menu again. Remember, this is the Rnge icon. Select Add Text. Use the keyboard to type
the name of the new book. Let's do a one
finger double tap on the text to open the
text entry companion. Tap and drag the blue
nodes to highlight all text and then tap the font name and select
a font from the list. Choose a color by tapping on the color library and selecting
one from the palette. We can adjust the
size on the slider and move the text box to
fit into our book spin. If we need to rotate
our text slightly, then we can select
the transform tool, which is the arrow here, and we can move the
green node to rotate. Once you are happy with this, you can tap the transform
tool to deselect. Repeat these steps, pause the video and join
back in a few minutes. A You can edit your text at any time
by going to Layers, selecting the text and
choosing edit text. Our book set is now
complete with titles. The final step is to add
a simple background. I will see you in
the next lesson.
9. Adding a Simple Background: In this final lesson, we will change the
background color and add a few more details
to finish things off. Go to layers and scroll right down until you see the
background color layer. Tap best to open
the color library. From your palette,
choose the off white or any other
color you like. Add a layer and drag it
above the background. Let's now add some star
stamps to frame our booksck. You can change the color and
size of these if you like. The very final step is to add a drop shadow underneath
our booksack. I'm just going to keep this on our current layer
with the stars. Select the color of
your background by holding a finger down
on the background. Now, go to the disc and choose a slightly darker
version of this color. Now go to brushes and
find the charcoal set. Select six B compressed and paint a shadow
under your books. Our booksack is now complete. I am so excited to see
your finished project.
10. Sharing our Project and Final Thoughts : Congratulations on completing your books that illustration. I hope you enjoyed the
class and you now have a better understanding of Procreate and all
its possibilities. I really hope you continue
your Procreate journey and apply these new skills to create your own
unique works of art. I can't wait to see
your finished project. Please do post your projects. Posting your work is a great
way for me to leave you some positive feedback and for you to interact with
fellow students. Be sure to comment
on their work too. I know it will make
someone's day and the chances are they will leave
you a comment right back. Head to the Projects and
Resources tab within the class. From here, click Cate Project. Follow the prompts
relevant for your project and then click published
when finalized. If you enjoy my class, then please give me a
follow to stay up to date on any future classes
and announcements. Click the follow button
next to my name on top of the video lesson
player on your profile page. You can learn more about me on my website and Instagram too. You can share your work
on Instagram if you like, but please tag me so that I can reshare and leave a comment. Finally, please leave
a clash review. It really helps my class to gain traction and I would
appreciate it so much. You can leave a review
by going to the reviews tab beneath the video player in class on the right hand side. Thanks so much for
drawing along with me today. See you soon.
 Dee Smith, Professional Illustrator and Teacher