Transcripts
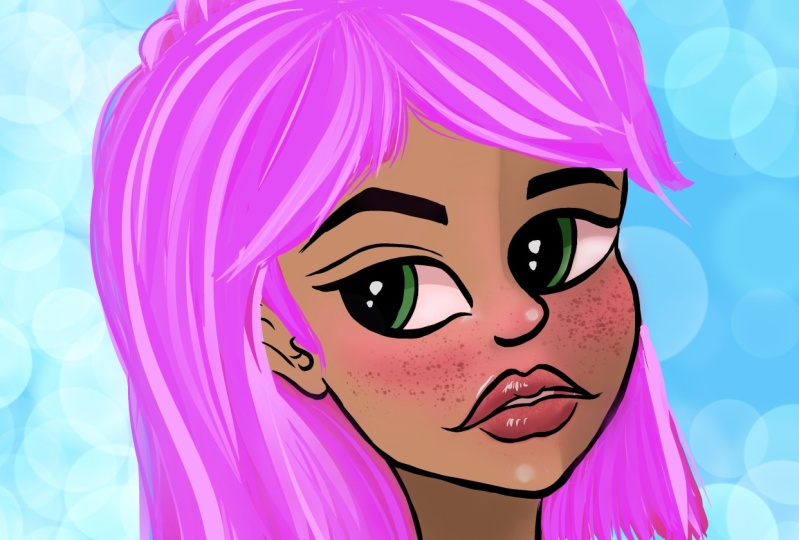
1. Welcome: Hi, my name is George, and in today's course you will learn how to make this wonderful cartoony portrait. Learning to illustrate on the iPad can be a little bit frustrating. That's why this course is specifically designed to guide you step-by-step. There will be no fast-forwarding and no skips steps. You will get detailed guidance on everything you need to create a beautiful illustration. For this artwork, you will need the Apple pencil, iPad and the procreate app. This might look like a very complex illustration. However, it's very simple and you will enjoy every moment of making it. And with all of that being said, Welcome to this wonderful Procreate course.
2. Background color and circle: For this illustration, you will need a canvas that is 4 thousand by 6000 pixels. And first, going on the Color Palette, making a new color palette and renaming it to curl. Perfect. Once you've created a color palette, you can start to create a beautiful gray. This gray can be created by moving the slider to a blue and then moving the gray scale to about 50%, drop it on the background. And once you've done that, you can go ahead and create another beautiful color, this time, Brown. Once you've done that, you can tweak it a little bit until you have a nice Burgundy brown going into the inking, selecting the syrup brush. And you can start to draw in a circle, hold your pencil down. Once the shape snaps, you can put a finger on it to create a beautiful circle. And that's all you need for this step.
3. Portrait construction lines : Now that you have your circle, you can start with the same syrup brush, making an angled line a little bit more towards the right. Once you've done that, you can create a perpendicular line to this 12 beautiful lines, one on the left and one on the right, creating some sort of a V-shape that is not connected, making a segment and then going would a curve to it from the right side. And once you've done that, you can go ahead and make the chin this time following the straight line a little bit more and then going towards the bottom of the face, for the next part, you will need another beautiful line, right where the circle meets the first line and for the lips and other wonderful smaller segment. And that's all you need for this step. Let's go into the next one.
4. Portrait features: In this wonderful step, you'll learn everything you need to know about how to refine the beautiful features of the portraits. Let's first add the gray color to the background and double tap on the layer to decrease the opacity of the drawing to about 53%. Going back on the layer. Now with the syrup brush is zoom in on the face, starting from the first line, the first perpendicular line, you can start to go with a curve going down and out towards the second line. And once it meets the second line, it goes into a nother curve, going the other way around. For the mouth, too. Beautiful dots that are very, very important. And then a curved line underneath and a curved line on top. Once you've done that, you can go ahead and connect the first top line with the points. The points can guide you to make those beautiful as shapes. And then middle of the shape, you can make another curved line and then connected to the wonderful dots, zooming in a little bit more to create two beautiful T, super-simple, connect them with a line. And then for the bottom lip, just the wonderful, nice curved line. Let's make the top curved line a little bit more, going down, zooming back out. Once you've done that, you can go ahead and select the brush with the burst selected. You can start to work on the eye, draw beautiful curved line that goes towards the line. And then on the bottom. And draw and a 100 beautiful curved line going Towards the first one. Super simple to make. Let's erase the corner and make it a little bit more curved. Now, with the second, I can go ahead and connect it to the nose, thus creating a little bit of a perspective. And let's redraw the chin. Little bit more close connecting the chin. And then for the beautiful eyes, can start to see how two beautiful curves can make you iris and the pupil. And for the right one, they go towards the nose in this pose, she's looking towards the left. Go ahead and select everything with the freehand, select the features. And let's play around with the wrap tool, first with the position, and then with the wrap tool, as you can see, you can start to play around and move them a little bit more to make them be on the structure a bit more. And then with the wrap tool, you can start to play with them until they fit the first construction lines a bit more. As you can see, much better. Okay, It seems like the first circle is a bit bigger. So let's start to make another one by following a beautiful circle. First, let's call on the first layer and start drawing a beautiful circle, holding the pencil down in order to make another smaller circle for the head, since the first one was a bit bigger. So let's try to make it quite circular. And then let's erase the lines that we don't need anymore. And the GIN one as well. Cleaning up just a tiny bit of the drawing. And there you go with this step as well.
5. Portrait shaping: And here is where the magic starts. You can make another beautiful layer and call it shaping. Once you've done that, you can click with two fingers on the layer with the features and move the slider of the opacity to about 50 percent. Going back on the third layer and start with the eyes by zooming in and redefining those beautiful lines. For the bottom curve, you can make it a little bit more angular. Also make the iris and little bit bigger and the pupil, you can extend the first curve little bit more, creating some eyelashes drop in a color where the pupil is. Once you've done that, I can go ahead and redefine those beautiful lines and then create another beautiful curved line on top. For the second I going first for the nose with the S-shaped making it much, much more defined, calling for the bottom and then for the top curve, making it a little bit more as an ES, thus creating a nice and beautiful eyelash for the iris and the pupil. Create the beautiful curves and drop in the color indicate the middle of the top lip. And then going with two beautiful as shapes towards corners. Going for the bottom and the teeth. And then for the bottom lip, just going with a nice shape, a curve, and then for the corners to more curves going the opposite way. Let's position some beautiful eyebrows just above the eyes, going on an angle, as you can see, the first part of the eyebrow and then going for the next angle, that's creating that nice and beautiful eyebrow, going onto the eraser with the syrup brush and erasing the corner continuing from the nose trying to position the second eyebrow test over here, creating the first squared line, positioning it a little bit more to the right and then going for a curved line. Just like this. Once you've done that, you can go ahead and work on the Wonderful right side cheek and create that beautiful line of the face for the chin. Just try to segment the line into two, thus creating a more angular line. Let's make the chin a little bit more narrow. And then erase some of the line to create a more interesting shape and a more clear line. You can also close the line from the right side of the eye, just going and creating that wonderful V-shape cut out towards the eye, zooming back in and creating a beautiful segment indicating the ear. The year should be as big as the nose as you can see, two beautiful segments. Once those segments are created, you can start working on the year. For the year, you can start to create a beautiful curved line. And then for the lobe, just a tiny bit more close to the head. It's a very simple shape. It should be right about the same size as the nulls for the top of the head, you can start to indicate a beautiful line and then another one just going and indicating the shape of the head as you can see. And for the ear you can double the line, as well as making that beautiful. That is, right at the start of the year, sticking out of the head, erasing some of the chin to create a beautiful line. Once again, this time a little bit more confident. Now you're racing the imperfections by zooming in, taking a step back and looking at the trying, it can start to see that the circle of the head is a little bit too much towards the right. So let's draw it once again, but a beautiful curve just like that. And there you go with this step. Let's go into the next one.
6. Portrait drawing the hair : For this wonderful step, you can go ahead and delete the first and the second layer, thus revealing the last sketch. Go ahead and move this beautiful sketch, rotate it a little bit more towards the right so the head is not so tilted. Zooming a little bit in and drawing a beautiful next starting from the year, going towards the bottom and then from the right side just going and drawing another beautiful curved line, thus creating a wonderful neck. Add another layer and name it to hair. Go ahead and add a darker color to the color palette. This will come very the later. Now creating a wonderful pink and zoom in onto the neck, start to draw a squiggly line going towards the left and then going from the right chin with beautiful curved line and then separated into kind of a square and then a squiggly line going towards the neck. For the foreheads, you can start to indicate a beautiful line. And then going towards the right, it goes behind the head and also little bit on the outside with the curve on the right. Moving forward the left side with a few curves, thus creating a wonderful line for the hair. And then moving towards the left side can indicate the forehead part of the hair. Now for the hair that is right next to the ear in front of it, just to beautiful lines as a V and another one going closer to the ear. And let's make her a button for the bundle, you need to go with a few curves from the left side towards the bun, and then from the right side of the head make a curve going a little bit more to the outside, and then a circle at the top to indicate the button. And then the buttons should be kind of a trapeze, a squarish shape, and then make a few lines. So you indicate that there is a lot of hair there. For the left side. Beautiful S-shape, and then a few more strands of hair. Don't worry, if the shape doesn't look that great, he can adjust it in a few seconds and then finishing the wonderful shape with another curve and then a straight edge, making a few more adjustments at the top. And then going back and erasing some of the lines that shouldn't appear in the finished drawing. Just on the ear and on the circle just behind it, where the hair is. Also the small beautiful lines that indicate the forehead going in for the right side and erasing the circle with the syrup brush. Perfect. As you can see, it just needs a little bit more refinement on the neck, thus creating one line. Once you've done that, you can zoom out a little bit the CFPB, the hair, looks nice. Let's go on to wrap tool. It can start to play around a little bit with the proportions of the hand until it looks a little bit just marginally better. Squish it down a little bit and then move it towards the left. And that's all you need to do in this step.
7. Hair color : For this step, you will need to create a darker tone of this magenta pink color, the more colorful one, and add another layer, rename it to color. Once you've done that, you can start to block in the color of the hair, can go ahead and make the syrup brush a little bit bigger and draw in the hair just around that shape. Let's first drop in color right below the drying. So you can start to draw in chest covering this wonderful shape of the hair. And you can go a little bit more on the outside at the bottom where the lines, the squiggly lines are, those are just a sketch. And as you can see, on the right side of the face going very close to the face and making some more adjustments onto the left side, making a runaway hair. And then right by the year, a few more lines. And here is where you can start to play around with the shapes a little bit more on the forehead. And now going forward the right side. And just a simple block in color. It's very easy. Just follow the wonderful drawing you just did. You don't have to be exactly perfect with those marks. You just need to follow some of the shapes. You can turn it around the canvas and fill it in quite nice and fast. Can start to see. The drawing, starts to look a lot better. Go ahead and select the pink color and you can start to draw in some nicer lines on this drawing. Just going and making some strands of hair can undo the first one and start working on some beautiful strands of hair. Wavy at the top of the forehead, three beautiful lines going and converging towards each other. And then for the top of the head and on the left, just making it smaller and make those beautiful, nice lines. And let's indicate the top of the section where it changes from the forehead to the bun with three beautiful curved lines. And then going towards the right and on the forehead as well can start the seed. That section is quite more clear and on the right side it needs a few curves as well, add a few more. On the left, erase some of the hair that comes over the year. And on the right side, just a little bit of the hair now. Okay. Going back on the darker pink, this time making it a tiny bit darker and start making some dark strands of hair. Just going behind the ear. Can start to see just indicating some small lines going a little bit outside of the shape to create some wonderful strands of hair. And then going and accentuating those lines going in between them. Just like this. And for the right side as well, going in between those first pink lines, going for the top and creating some of those curved lines going in between the first pink lines for the right-hand side, just going outside of the first shape, the few curved lines going back to the latest pink and increasing the pink even more to make some highlights on the first strands of hair. As you can see, just going and making some wonderful highlights on the first pink going and extending that hair on the left and going for the forehand and creating more highlights just next to the first highlights lines creating some runaway hairs. Wonderful. And as you can see, you can go ahead and move a little bit towards the top of the button and create some curves that go towards the bottom of the bun, selecting the utter beautiful color, that light pink and dark one to create the same exact things. And on the right side you can start to create some more dark hairs going and selecting the first, like pink and making some more strands at the bottom of the right-hand side. And then going with the lightest color and alternating the hair's going in, extending the shape towards the neck, and then erasing some of shapes with the eraser. Once you've done that, going back to the brush and making some more nice locks of hair with this wonderful brush set to see a little bit more defines going and creating some more strands of hair and going on the left side with this color and extending some of those hairs a little bit lower, creating some nicer shapes. So it doesn't seem like it abruptly ends, extending some of that hair behind the neck and some runaway hairs onto the right side as well. Going back to the lightest color and indicating some of that right sides, foreheads, hair. And then on the top left, just a few more highlights. As you can see, this highlight is concentrated little bit to the left of the hair. And that's where the light comes from. Going back to the first light, pink and creating some more strands on the right side. And there you go with this step as well.
8. Face color : Now that you've locked in the color of the hair, you can start to erase some of the outside edges right by the ER, creating a nice outline for the face. Now, put up the color on top of the shaping and add another beautiful layer for the blocking of the face. Call it color to drop it below the shaping. Go ahead and select the brown, make it a little bit lighter and more towards the yellow, creating a wonderful skin color. And what the syrup brush make it quite big and start coloring in the face. Go ahead and move towards the right. It can color in over the face and the eyes as well. Don't worry about it. And then moving towards the neck, go head and a little bit outside and try to fill in those gaps if there are any a little bit more outside of the neck, moving the shaping up above the hair as well to so it shows through. Once you've done that, you can go on to the color palette and make a rosy can color. You can find it on the color palette. Going onto the air brush with a soft airbrush, make the flow quite small and start adding some rosy skin color on top of the face, right at the middle section, over the nose and the cheeks a little bit more, creating a beautiful triangle, as well as on to the lips. Wonderful. Select the first skin color and let's color in back, the chin, going to the pink skin color and adding a little bit more in the center face. Once you've done that, go ahead and make the color a little bit darker and even darker still, and add some of this even rosier color onto the cheeks and on the lips as well. Wonderful. Go ahead and alpha lock the layer, gone to the selection tool and start selecting the side of the face just right next to the nose, and going down towards lips and coming back over under the neck and then closing the shape by pressing on the small little circle. Go ahead and make a darker brown color, a little bit more different than the color of the lines. And with the opacity low and the airbrush you can start to draw in this shadow color, drawing a few passes. And once you've done that, go ahead and create a beautiful shape around the nose and cooling down back again into the intersection between the light and the dark. And once you've done that, you can go ahead and darken it a little bit more, creating some more shaping into the dark. Go ahead and say, munch the edge just so it seems a lot more integrated with the first layer of shadows. Undo the selection and to a little bit more shaping of this line. Let's zoom out and see if the colors look right on the right side of the face, you can start erasing some of that color that has gone outside, going and creating a very light, yellowish white, very, very light. And can find it Just over here. And the darker version, darker, grayish, pinkish color. And then going a little bit lighter and a little bit darker, three beautiful colors. And you can start to draw in the eyes what the second pink. And this looks quite well. Journalling just the top side. Once you've done that, go ahead and go on the right side and drawing the whole shape. Just like this under the trawling. Perfect building on the lighter version, making it a little bit darker and drawing and the bottom highlight, putting it on the color pellet and then drawing in the highlight of this eye, the sclera, shaping a little bit more of this eye color. And as you can see, it looks quite wonderful. Going forward the right eye and with the darker version of this pink adding the shadow, of course being the shadow side of the face. The shadow and the light are much more dark as you can see. And there you go with the step as well. Such a wonderful and easy one.
9. Eyes color : Okay, For this step, you will be making the colors of the high, some nice, beautiful green eyes. Wonderful going in on the color palettes. And first, adding a little bit more shadow towards the top of the head. Once you've done that, you can go ahead and undo the alpha lock and see if there are any gaps and fill them in when either the lighter side or the darker side going back and alpha locking layer going and making a beautiful, vibrant green. And then making it darker for the shadows, maybe more saturated as you can see, zooming in on the right-hand side, I, and adding this beautiful green zooming in on the left-hand side, I am making just the shadow at the top. And now going for the lighter one and adding this wonderful color just at the bottom, it can start to see the line just continues onto the left-hand side, making a darker version of the screen and doing this same shadow that goes and continues the line of the shadow of the eye. Once you've done that, go on to the shaping layer and alpha locket selected black and start drawing in the pupil of the eye over the lines with the alpha lock, you can drop in and leave the lines still feasible, as you can see, going in for the right-hand side, I, and keeping the lines of the nose and the eye still intact. Wonderful. Look at how gorgeous it looks. Now for some highlights, going back on the color, selecting the light in the corner and start drawing beautiful highlights. Another smaller one to the left-hand side of it, as well as some small edges. Perfect going for the darker yellow and making the highlight on the right. I just a little bit darker. As you can see, the highlights on the right are darker going on the color. And with the same darker, yellow, you can start to draw in some highlights of the nodes on the top, as well as beautiful highlight just right by the corner of the eye in another one just above the lips, as well as some beautiful more export steps. And 14 the corner of the chin. Don't worry about the shadows and the highlights. They will be blended a bit more. Going and selecting the brush called Flickr. Selected. Go ahead and select dark brown. And with this wonderful color, select just the base with the automatic selection tool. Once you've selected the face, you can go ahead and create another layer on top of it. Let's create a darker red color and add some freckles onto the face, Just a few dabs of paint and the freckles are done. Once you've done that, go on to do wrap tool and start moving them a little bit more towards the left-hand side. Play around with the shape, this position, and stretch them a little bit more in order to make them look nicer. Once you've done that, erase some of the freckles that are on the eyes and the nose just a tiny bit, making them a little bit less visible. Just a few are enough to make the portrait look just a lot more wonderful. Yes, the few freckles on the left and right side below the eyes double-click on the layer and lower the opacity just so it blends with the last layer. Greats, Okay, select just the black of the eyes and the whites in order to exclude the wonderful colors and click on inverts. Once you've done that, go ahead and start with the flicker brush and the black dark color, add some texture to the lines. Once you've done that, select the three top layers, squeeze them down, and there you go with this step.
10. Lips color : Oh, go ahead and select the wonderful layer width drying and the hair as you can see, and go on the selection tool on automatic and select the lips chest, try to make a selection of the lips very easily with the automatic shape to go on the color, the selection is still visible on this beautiful red or create a ban on liquor. Start creating some root word of you passes over the lips. You can start to see what a beautiful, Rosie lip color it makes and texture. Okay, a few more passes with a little bit more opacity, just on the right side and everywhere on to the lips, going a little bit darker. This time with every brush, the soft blends. And at the bottom, making the opacity higher and brush a little bit smaller and add a beautiful shadow onto the bottom lip and the top lip, don't worry about the inside of the mouth. Click on the syrup brush and select this beautiful purple that you've created for the eyes and start drawing in the teeth with this color. Just go around the lips, creating the deeds, and fill in the colors just like that. Making a wonderful color go on the darker version of this color and make the shadow on the above the T. They're not white, they are purplish and divide them to make two of them go back on a darker version of this color and add a little bit more of a shadow just next to the lip and the darker shadow to closing the inside of the mouth. What this wonderful dark color. Okay. Once you've done that, the final bit of the corners of the mouth, go ahead and use the smudge tool with a little bit of the soft brush and blend those colors in the teeth so they don't stand out that much. Start to see how beautiful they look, okay, zooming back in and with the brush can start to add and cut a little bit more on the right side, making them smaller. And there you go with this step as well.
11. Tank top : For this next step, you will need to select the sponge to zoom in on the highlight on the chin and start smudging those beautiful edges with the syrup brush. Just make it very small and put the bell best city at about 50 percent. Once you've done that, you can smooth it even more on the right side and the top. Just to make it a little bit more integrated with the space. Perfect. Looks so much better. Okay. Now going and making another beautiful layer with the syrup brush and the brown you used. The outline, start continuing a little bit of the neck, just a little bit way onto the right side, but a curve this time going on the outside. Once you've done that, you can go ahead and make a beautiful circle indicating the shoulder of the girl, as well as a beautiful line going down. Then on the underside going little line, a little bit curved at the end. And then going down making a beautiful hand. Once you've done that, you can go ahead and add a little bit of a curve at the end of the line on the right and on the back, just two lines going down and cutting a little bit of that corner. And then going in at the top to add a beautiful tank top to bottom, and then going around and around the chest, making the tank top co around the girl. Maybe making her chest a little bit smaller and then going and making a beautiful line for the fabric and then continuing to tank top-down and closing the gap on the left side and the right side and cutting those corners to make it seem like it goes around and it's a bit more round the shape and then the waste of the girl. And there you go with this step as well.
12. Body : Now that the rough sketch is done of the desktop and the body, you can add another layer, click with two fingers on the layer below and lower the opacity at about 50 percent. Go back on the first layer. The new layer created and start refining those shapes. First with the front of the chest and then at the back of the neck, and then trying to make the line of the shoulder, this time not like a circle but with some beautiful lines making them a little bit Angular, just to make them seem more interesting. As you can see, just a few refinements and the shape looks much better. Okay, going ahead and redefining those edges of the tank top going on the underside of the hand and then on the top side, just making that line a bit thicker for the chest. Now, making the line that goes down a little bit more round and then going down but a straight line just going towards the belly on an angle and then breaking it a little bit, making that straight line a little bit more curve, and now on the back making it a little bit smaller. So it seems like she doesn't have bad back. And then forward the belly just a little bit of a of two lines, one on the left and one on the right, going back on the layer, undoing it to check if it looks good, and then deleting it to reveal the final sketch. And you can go on to the move tool and position it a little bit higher as a tiny bit higher just so she doesn't have such a long neck. Okay. Going and continuing the bottom of the belly with some curves going towards each other. Just so she has some pens and the hand going in front. Perfect. Such an easy process. Going and erasing some of that line that was not in the best place. For effect. Going and adding another beautiful layer and putting it on the bottom, okay? Selecting the skin color and the lightest skin color and making the syrup brush quite big. And starting to block in the front part of the chest. And now going on in the back and making the hand very beautiful block and of the hand just going in on the outsides and then erasing the part that goes inside the tank top, perfect. Covering it all, and then going and moving the canvas down and coloring it in. And as you go down, being careful to cover also the part of the belly that is exposed. Perfect. Then just like that, taking the eraser to make some adjustments. Okay, Going on this beautiful white, we can get a little bit more blue, adding it on the color pellet and starting to on the tank top. This will be the color of her white tank top. Going very carefully around the hands just so it doesn't get outside of the lines. And once the outside line is covered, you can go a little bit faster with the silver brush and press a little bit harder to make the brush a little bit bigger. Perfect. Now going on the front of her chest and doing the same on the outside, being careful and where it meets the skin and closing every gap, moving up onto the top part and then selecting the skin tone just to make some adjustments, going back to the white, okay, and going down onto the tank top. As you can see, this a very simple and straightforward process, just coloring it in with some beautiful color and being careful not to go on the skin tone or in the background. Once you've done that, you can select this wonderful green for her pants. Perfect, or her skirt. Who knows? And there you go with this step as well.
13. Refinements. Thank you!: And here you go. For the last step. In this step you'll make some shadows on the skin and the beautiful tank top as well as some bocce balls in the background. Okay, starting with the skin and with the selection tool, making a beautiful selection around the chest and closing the shape, calling to the brush, going to the airbrush and the hard brush, selecting the brown and starting to make the shadow onto her beautiful right side. Okay, let's select the shadow color. Since it has been done with Capacity lowered, and fill that space in back and put the color onto the color palette. It's going and adding another shape to the hand. Just going around with the freehand selection and selecting the right part of her hand. Just going and making a little bit of an outline. Okay. Going outside of the canvas and coming back around behind the line of the trying, slowly moving your way up and around the tank top sleeve and closing in the gap. Perfect. Once you've done that, click on the brush and start drying with the color of the shadow. Perfect, Wonderful. Making them matter. Beautiful selection just for her belly, just going down and selecting the front side of her belly and making a little bit of a square in front just to make a shadow over there as well. It's these little details that make all the difference. And now for a highlight onto the left part of her shoulder, making a beautiful circle, selecting the color from the highlight just on the chin and lowering the opacity to make the shadow a little bit less miserable. Okay? And making the brush smaller to make the shadow a lot more concentrated in the top. Okay? Going and clicking on the adjustment and the Guassian blur and making the shadow not so visible, going and putting it at about maybe 15. And once you've done that, go ahead and end smooth those edges with the smudge to make it a little bit bigger and smudge those edges just so it doesn't seem like it's sticker. Wonderful. Go around and move the brush around until it looks natural. Zooming back in on the tank top, selecting the whole tank top, and going on hue saturation and brightness, clicking on the layer to tanked up a little bit darker. So it's not so whites. Okay, going in setting this color, so you have it on the color palette. Perfect. Once you've done that, you can go ahead and select the front of the tank top with the freehand just below her chest and make a beautiful triangle shape just going below her chest with the hard brush and a darker gray, darker blue gray that you'll find on the color palette. Or you can make it by just sliding towards the blue and the gray, make this beautiful shadow. And now I'm going and making another beautiful selection, just going down in front and connecting to the shadow of the belly. Okay? Going and adding this color on top and see how beautiful it looks. The fabric just gives it a little bit more dimension. Perfect. Once you've done that, you can go ahead and make another beautiful selection, just continuing the shape and going on the top side of the chest this time and color it in, giving that shape a little bit more dimension. And going on the back and making some beautiful stripes, just one, and then making another beautiful stripe a little bit more high and going on a slight angle. Perfect. Just two of them to give the sense that this is some fabric and not just the flat white color. Let's make a selection first and the hand another beautiful stripe just a little bit lower and coloring it in. And maybe it needs another one just going towards the right. This will be a very beautiful shadow onto the left side, selecting the dark color of the skin and making a beautiful selection underneath the 10 top just to give a shadow underneath it. So it casts a shadow onto the skin as well. Just a few details going and selecting a beautiful shape in front and on the back of the tank top, at the bottom. Perfect. As you can see, it looks much, much better. Selecting the white of the tank top and then making it a little bit brighter, just so you can add some highlights as well. You've played with shadows, and now you can play with some highlights, making a selection just on the corner of the shoulder and adding this beautiful color. You can also make a little bit of a shape just as you mate with the shadow and color it in. Just a few small details and changes to give the image a little bit of pizzazz, a little bit of more interesting look. Such a beautiful illustration. Once you've done that, you can squeeze down on the layers and position it unveiled a bit more towards the left and maybe make it a little bit bigger, just so it stands out a little bit more perfect. Going on the beautiful layer, selecting the boca brush and adding some beautiful circles behind her and with some glimmer, adding it to the backgrounds. And there you go with this wonderful and gorgeous cords. Thank you for being part of this community.
 George-Daniel Tudorache, Together we will create amazing things.