Transcripts
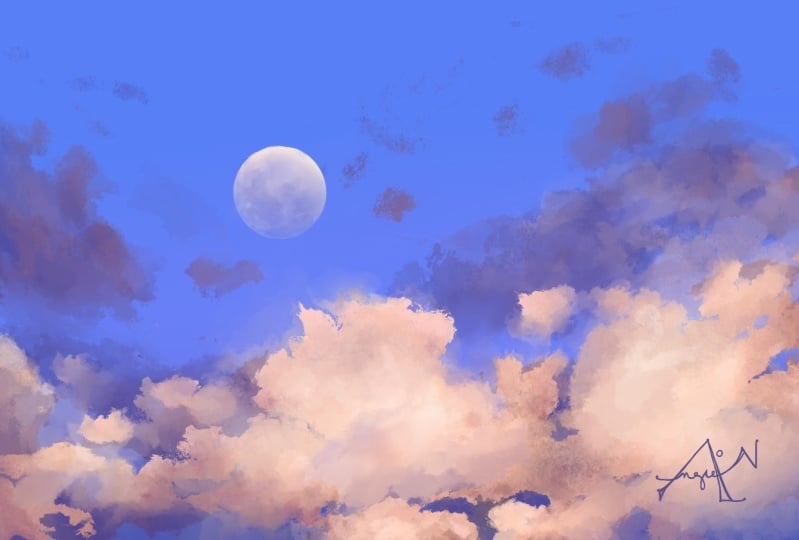
1. Welcome: Hi, my name is George, and in today's course, you will learn how to make this colorful moons sky scape. This course is specifically designed to guide you step-by-step. This will make the process very easy and enjoyable. All you need for this course is the Apple pencil, the iPad, and of course the Procreate app. You'll create such an easy illustration by playing around with layers, colors, and textures, with all of that being said, Welcome to another course.
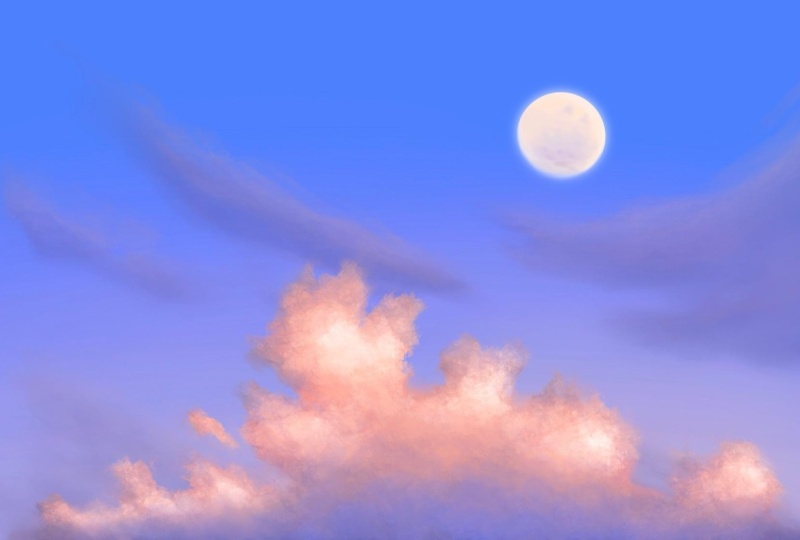
2. Landscape moon: You will have to create a new Canvas. Canvas will be 6000 by 4000 pixels. This will give you seven layers. You will find the color palette on the beautiful Resources page of this wonderful course. Let's go into the hues and values and create the colors. If you want, you can skip this step and just download the wonderful palette. Or if you want, you can go along and create your own colors, just as encouraged in this step. Going in for a beautiful blue, a beautiful nice, colorful blue, maybe a tiny bit more towards the green going in and dropping the color just like that and making another little lighter blue, it's better for the backgrounds. And once that is done, Let's set the color, so you already have it on the color palette. And just like that, make this a little bit more purpley. Perfect. Let's set it over here. They're very close. Making this blue a little bit darker and placing it next to it, going in and making the purple just a tiny bit darker, wonderful and an even darker, one, little bit more colorful. Maybe a bit towards the red, just like that. And a deeper and nicer shade of pink. Tiny bit of adjustment to make it just a tiny bit more towards the orange. And now more desaturated orange just over here and going and making another lighter color and an even lighter one. Perfect. And going and making the complete and beautiful row of colors. Now going and making this color a little bit more red and this orange, maybe a tiny bit more pinkish, setting it all. And as you can see, what a beautiful line of color. Once that is done, you can add another layer and rename it moon. This will be the moon layer, but the syrup brush. And of course, let's select the second lightest color. And let's hold the pencil down to create a perfect circle and place a finger just like that. That's beautiful circle. And let's make it smaller and position it just on to the right side. Once that is done, you can also rotate it a little bit like this and add some color to it. We're going into the eraser and going into airbrush, a soft airbrush, just like that, lowering the flow and start erasing at the bottom left of the moon. Just erasing did a bit of that moon and lowering that beautiful flow just so it gradually goes into more erasable moon, as you can see, it just blends it in with the sky. And going in, just put less flow, just a tiny bit to blend those layers. You can also go on the outside, on the right side. And as you can see, it just started to look so much more integrated into the background color as going any racing a little bit more to create that beautiful gradient effect. Okay? And that is it for this step.
3. Gradient: Going and adding another layer on top of the first colored layer and calling it gradient. This will be the gradient of the sky. It will have a nice purply hue. Let's select the blue first, the lighter blue. And with a beautiful airbrush, soft airbrush and a big brush medium, let's say start drawing at the bottom. That's increased the flow. As you can see, it starts to glow. Very nice and beautiful. Glow adding and making it a tiny bit bigger, decreasing the flow. So we have that gradient, very nice and beautiful. Okay, going into a darker blue and adding it at the bottom, just so it has an interesting effect. Once that is done, Let's undo it because it doesn't look quite as good. You can go into a lighter color and add that glow to the bottom of the cloud scape. And there you go. This step is done as well.
4. Moon details: Okay, Let's go in and alpha lock the moon. And once that is done, you can go in and add the second blue. Decrease the size. Select another brush, this time from Inking, silicate, inking brush called Syrup. Let's make it quite small and have just a tiny bit of flow, might be a bit bigger and a little bit less flow. This blue will act as the texture of the moon. As you go down, you can increase the flow and add more textures just like that. Okay, Let's undo everything so you can see everything just over here without lifting the pencil. As you can see, just creating a nice, beautiful texture all around. Leave a little bit of small sized holds and select the purple and start adding even more without covering all the first layer. Now. Okay, and the third layer at the bottom, just like that, maybe some small dots, perfect and small dental one. Over here. As you can see, you can decrease the flow and add another layer on top. Let's smudge a little bit of this nice texture just in small areas just so it doesn't look so on organic. As you can see, just a small little bit helps to make the moon just that more nice. Let's select the lightest color going in with the brush and the airbrush, soft airbrush, increasing the flow and adding some more light around the right side just so it seems more round. The moon now seems more round. As you can see, the moon has started to look just amazing. And there you go with this step as well.
5. Distant clouds: Going and creating another layer just above the moon and renaming it to be clouds. Clouds, one, Enter and then go into a brush, going to artistic and find hurts. Perfect. Once you've found hertz increase the size at about a half and the flow at about a third, pick up the purple and start layering some beautiful clouds on the right side on a diagonal angle. That diagonal is a little bit too steep. We are going to change that in a second. Let's decrease the size. And let's change the angle just a bit and move it a little bit down. Let's manage those textures a little bit. Once that is done, Let's go into the brush once again. It seems like to brush needs a little bit more color, in this case, a 100 percent flow. And just like that, creating some more textures. These are just lines that we connect together and make interesting shapes. Very simple, very easy. And can increase the size to make those beautiful clouds just like that. Very simple and easy to do. And just going into a beautiful eraser, making the flow a tiny bit bigger and just erasing just a tiny bit of those clouds. So they seem more interesting. They have a little bit of variety and texture. As you can see, they're a little bit too harsh on the sky. And for this one, just increase the size. Any race, just making them very translucent, perfect. Decrease the size. And you've raised a little bit of the edges here and there, so it seems more integrated into the backgrounds. And once that is done, can increase the size as well. And you can erase a little bit of the connections as well. So they have just this floaty feel to them. Going into the smudge tool, you can do the same with the edges. A lot of the crispy edges are being just blended in. It seems like those clouds were just brushed by the wins and they're super fluffy and super nice. Translucent clouds. As you can see, you can go either on a diagonal line or just small, little long circles. Going over some edges. Keep some of the hard edges in just so they seem very nice and diverse. Just a few more touches at the bottom, can start to see out of those clouds look so much better. And there you go with this step as well.
6. Light on distant clouds: In this step you're going to take the clouds and alpha locket select this pale orange, decrease the flow with the brush called Hertz, go over the top of the clouds. Each individual Cloud has top where you can put this wonderful color. Tried to stick to the top of them. So this way, it seems like the light comes from them. You can start to see it better once it's zoomed in. How much more of a difference this color makes. It just adds so much diversity. A little bit more on the left side and zooming back in, you will find the opacity tool by clicking with two fingers on the layer and then adjusting it to about 73 percent or however much it needs to be an order to look close to this. Once that is done, you can go in and change the clouds a little bit with the wrap tool to make them a little bit more round to X-like wrapping around the moon. Just makes very, very interesting. It has a very dynamic and it's a very cool trick to add more of a dynamic perspective to your clouds, to your compositions. It works especially good with clouds. As you can see, flipping back and forth, you can clearly see the difference. And there you go with this step as well. Super simple.
7. Foreground clouds: For that, you will need to create another layer and call it clouds to. This will be the layer of the foreground clouds, the more colorful and opaque clouds. Selecting the Hertz brush, as well as the purple color. Start by making a beautiful shape, just a cloudy shaped like that. Decrease the size and start making small break way, as well as interesting textures around the Cloud. This will seem very squiggly and that's how it should look as well. Don't worry if it looks too flat, it looks this flat on my illustration as well, but we have a trick for that. And going in and finishing the few blobs, adding some more on the right side, just like that, connecting some small parts, as you can see. Once that is done, you can go back in and see the whole squiggly line that has been created. It's not a uniform, It's as organic as it can be. If you have two soft edges on where you have erased, you can add just a touch more paint in order to have it more rough. Once that is done, you can go into the wrap tool and play around until the beautiful cloud looks brushed away by the wind. Can start to see playing around with the rap too, will make this glaube Luke, ten times more organic. Trying to find a place to put the Cloud where it belongs, stretching it out, pushing it, pulling it around. We'll make it seem so much better. Look at that. And once that is done, you can fill in a little bit of the space is just to add a little bit of pizzazz. Look at that, just some breakaways, tiny bit of new shapes. And once that is done, I can start to see the beautiful clouds. Let's erase a little bit with the same brush. That's very good. Make it small and with a 100 percent flow, you can start to add a little bit of holes here and there to break away that feeling that the Cloud is so flat and doesn't have spaced, it doesn't have everything it needs. And there you go. Such a simple step. Let's go into the next one.
8. Color to foreground clouds: Making the clouds in the foreground more colorful. First of all, let's select a beautiful blue and alpha lock the layer. Once the layer is Alpha log, you can go in with the brush, increase the size, decrease the flow, and start making some small patches of this beautiful blue. As you can see, it's on the lower side, but try to keep that purple on the lower side as well as on the top side, you can already start to see the clouds look just a 100 percent better. This can be even better. Going in with the second color. Let's decrease the flow just a tiny bit and start over the blue just on the top side of the blue chess like that. And going in with some swivel motions with the same brush. This is the same brush called hertz. Once that is done, you can start to go in to some beautiful brownish red color that you will find on the palette or you have created, because this has so low of a flow, it will look quite good. If not, you can go back into the lighter blue and add some more on top. Don't worry about the purple on the top, that will be almost completely gone. You can go in and add a little bit more blue just like that. And of course, going in for the lighter orange, as you can see, it layers, very nice. Let's lower that flow even more so it blends even better with the blue. You can start to see the light coming and showing through the clouds. Just like that. Once you have done that, add a little bit more just so it frightens them even more. Remember, the flow is very low. Jumping into the next brightest color and going a step above the layer and a little bit into the last layer as well. So it doesn't seem like they're so separated that they blend together. Can start to see the glowing us of the clouds. Once that is done, you can go into the third color and add it close to the top, can start to see the light just becomes apparent at this moment the magic has happened. You can also go a little bit lower. And also if you want, you can go into the blender and with a soft airbrush, just blend a little bit of the clouds at the bottom as you can see, it makes a lot of difference. Look at how beautiful your illustration starts to look. Once you blend in and make those clouds a little bit more fluffy. Going back into the blue with the same brush that hurts. You can add some more textures on top, this time going with dark color first. Now going in with the orange is just to add more variation where it needs it. Going in and going to the second lightest color and adding it to the top of the cloud. Look at our little flow this brush has, and it makes so much of a difference. Let's concentrate on the top. Perfect. Just scribbling about very simple with the alpha lock on, makes it so much easier now with the lightest color, just adding it just at the top, just like that, increase a little bit of the flow and now concentrate on the middle. Tried to stay a little bit away from the edges. So it seems like the cloud is more round as you can see when zooming in and making the brush smaller, the splashes of color are just in the middle of the cloud, increasing the color, making it more white will give you a better effect. Just like that, super easy to do. Now going in and going to the hue. Again, increase the reds just a tiny bit. Let's increase them. This is by default in the highlights. These are the colors that we want to change. The highlights, increasing them going a little bit more to the red and a little bit more to the yellow will give you this very glowy and like sunset feeling to your clouds. We can decrease the flow and increase the size and width the same color and a little bit more white, just like that. And there you go. Let's go into the next step.
9. Final touches: Okay, and one last trick to make everything with a soft brush on the smudge tool, you can go in and blend just a few edges that seem a little bit too tight. Just removed the Alpha, lock the layer and starts munching just a touch of that beautiful cloud just to make it seem like it comes out of the sky and it's not just the sticker on top. Okay. This part just over here looks a little bit too wonky, so it needs a little bit of touch with the smudge tool. You can start to see how much of a difference it makes. A tiny bit, okay. Those per pleat things need to be a little bit less contrast the chest a little bit. And now you can go in and smudge inside the shapes just a little bit to make the clouds a little bit more fluffy. Don't exaggerate with this. And going in with the brush and the color, that light, beautiful color. And then going in with some blue, some grayish blue to add more textures on top. And just like that, maybe a little bit of this beautiful orange, just a little bit in the middle, will change IV and more of the textures. And just like that, look at how beautiful this looks with just a few touches. Once that is done, selecting the lightest color, Let's go in and do the alpha lock and go around the edges a little bit. It seems like that banana looking thing doesn't look that well. So let's go undo the alpha lock and try to smudge it out completely. If not erasing it. Well, smudging it looks okay, but going in the other direction, we'll make it just look like a mess. So let's erase it with the eraser. Okay, no more banana looking clouds. Looks like a normal organic Cloud. And there you go. In the next step, you will see how to turn this sunset landscape into a night scape.
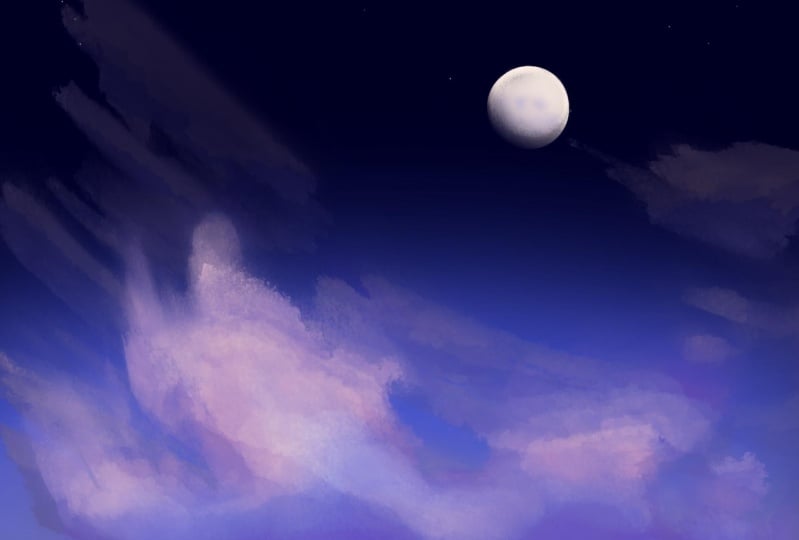
10. Night scape. Thank you!: And now select the artwork and duplicated. Once that is done, you can go into the second one and beautifully go into the first layer, just the first layer, and go into hue saturation and brightness layer and then blow or the brightness as well as the saturation. You can already see how much more the clouds glow for once that is done, go to the Gradient, go hue saturation and brightness and on the layer and lower that brightness as well and maybe increase a little bit of the saturation this time. Once that is done, you can go on that, that can clouds and select the layer. And in color balance you can go and increase the blues in the highlights and then in the shadows increase the yellows is the tiny bit. And the reds go to the midtones and go a little bit more to the blues and play around until they feel like they are part of the illustration a little bit more. Once that is done, you can also go and change a little bit of the shape of the clouds. Just like that. You can make this a little bit more dreamy, a little bit more interesting, just by changing very simple shapes of the clouds. As you can see, it looks much, much more interesting and different than the first illustration already. N just a few minutes, if not seconds. Double-click on the layer and lower a little bit of the opacity to about 90 percent, let's say. And once that is done, we can play around a little bit more. What to wrap tool is to tiny bit and let all of that being done. Thank you so much for taking this course. If you are gracious enough, you will post your creation as well as give a review for this course. Thank you so much for being part of this community and see you in the next course.
 George-Daniel Tudorache, Together we will create amazing things.