Transcripts
1. Introduction: A couple of years ago, I was so tired of
drawing traditionally, and I used to admire artists that I could
see on Instagram. I could see the
hyper-realistic types of portraits that they used
to make using the app, Procreate an app
on their tablet. I wanted to start doing that
but for the life of me, I couldn't figure
out where to start. This class is for all of you who want to start using Procreate once that
drawing digitally, but you do not know
where to start. Hi, my name is Jenna an
artist from Nairobi, Kenya I've been drawing for
the past five or so years, and my passion is making art accessible to everyone
no matter your age, no matter your background, because I remember how it was. First at drawing as
a beginner artist after taking a really
long break from art. In this class, I shall take you through the absolute
basics of Procreate. If you've ever wanted to
know how to use Procreate, this is a class for you because
I shall take you through every single tiny little thing that has to do with Procreate. We shall start with how to
setup your Canvas and go through all the different tools that Procreate has to offer. I shall explain to you
all the tools that are in the app and by the
end of this class, trust me, you will know
how to use the app and how to even create your own
beautiful artwork with it. Along the way, I
shall also show you my little tips and tricks
of things that I do to make my workflow easier and of other things that
you can do to include in your work to make
it to outstanding and different from all the
others that are out there. How to bring in your own
little flair to your artwork. If you're ready for
that, join me in this class and let's move
on to the first lesson. [MUSIC]
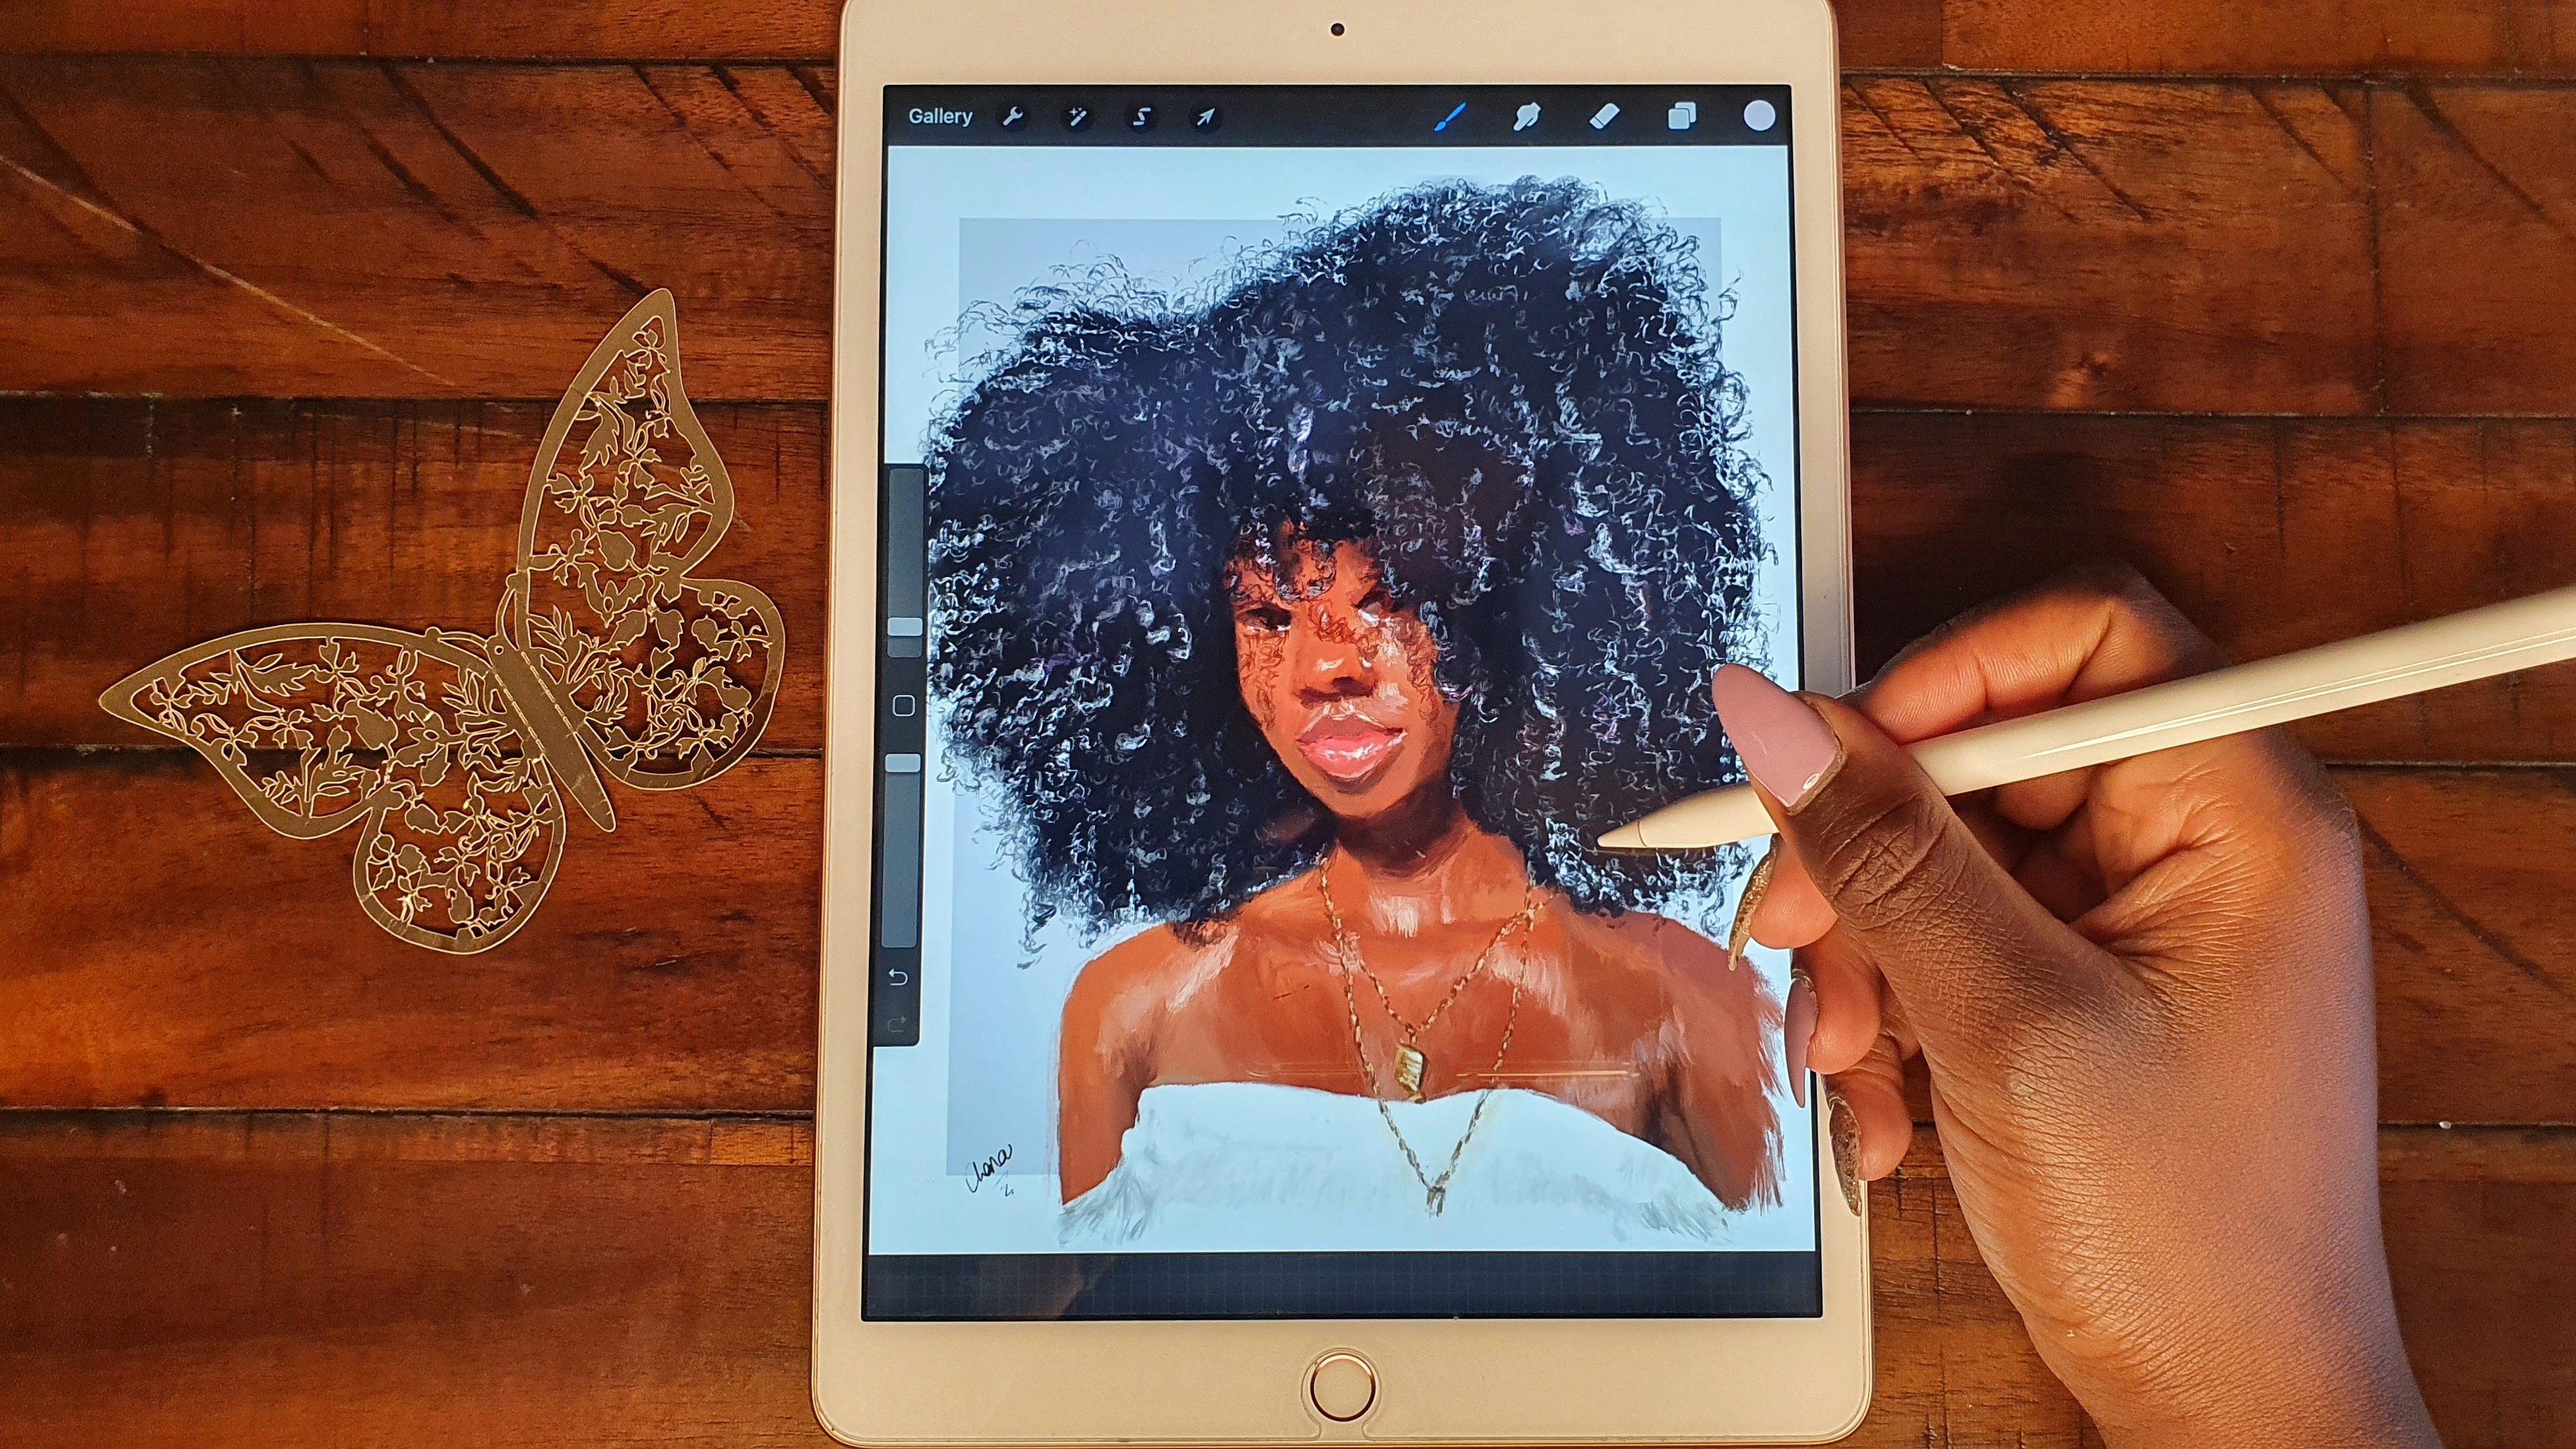
2. Materials: [MUSIC] Let's go through all the things that you'll need for this class and the things that you'll
need are really few. First of all, you'll
need your iPad, and Unfortunately,
or fortunately, you can only access Procreate
through the App Store, the through iOS devices. So whichever iPad you have, as long as it can support
Procreate, that's all you need. Then other than that, you also need a pencil. I really use the Apple pencil, the faster nutrition because that's what's compatible
with my iPad. There are also other
styluses out there. That can get on Amazon that are configured to work
together with the iPad. I've never tried any of them. But if you find one that works and has good pressure
sensitivity, it's a good idea to try
it because I'm sure most of them are more affordable
than the apple pen. The other thing
that you'll need, though, it is not a must, if you can get a drawing, glove it normally
look like this. The two fingers of
yours will be covered, and that is because
when you wear it like this and you're
drawing on your surface, it just protect your palm from the screen so that you
don't leave any smudges, and also in case, your palm ends up drawing or putting strokes
where it's not supposed to be that is avoided. But that rarely happens
because I've drawn without. I always tend to lose it so I draw without
it quite a bit, and I never really draw on the wrong place
because of my pump. So this is not a must. Good to have, but not a must. The last thing that you will need for this class is
access to the Internet. Which of course, if you're
accessing this class, I'm sure you have, and now, after going through all of that, let's talk about this
class's class project. [MUSIC]
3. Class Project: [MUSIC] For this class, the class project
shall be continuous, let me say it like that. What I'll want you to do
is to open up your app and just do the
actions as I do them, so that you can also
learn by looking at what I'm doing and by
doing it yourself. That's the first thing
that I'd like you to do. The second part of this
class project will be, there are some parts in some lessons where I'm
going to be editing certain photos and adding certain textures and
different backgrounds. I'd like you to do the
same thing as I'm doing, or also just look
for your own photo and do the same thing
that I'm doing. In the class project section, you shall find different
examples of photos that you can edit and try to transform them into different reference images
for your own personal use. Feel free to do that. That is part of
the class project. Then lastly, at the
end of this class, I shall take you through
an entire demonstration of a sample artwork that
you can make for yourself using the
different tools, tips, and tricks that I'll
have taught you in this class. Please feel free to follow
along to that lesson and make your own artwork the same
way that I have made it. Also you can transform it
and add different effects, use different brushes to your
own style to suit yourself. That will be the third part
of this class's project. In the next class, I shall lead you through the
introduction to Procreate. [MUSIC]
4. Introduction To Procreate: [MUSIC] Let's go through all the different aspects
of the app Procreate. I'm sure if you're
taking this class, you're already familiar
with what Procreate is. It's an app that
is available for iOS devices and you can
download it from the App Store. You can use it to draw, make finished
pieces of work that can both be given
out professionally, or even just for your
own use for clients, commissions, stuff like that. When you open up Procreate, what comes up is usually your gallery of all the different art works
that you've ever done. At the top here, you can see
that we have the plus icon, which is for starting
new projects. We have the photo part, which you can click on then
you input a new project, a new photo if you
want to edit it. You can also click on Import, this helps you to import files, and you can also select. When you select it, that
means you can duplicate it. For example, this one, we have duplicated it. Also when you select it, you can share it or you can
click on Preview and it will open up the file so that you can preview the file by itself. Whenever I come into Procreate, my first step is
always to click on the plus icon and I don't normally select any of these canvases that
are already pre-sized. I just come straight away to the screen size
section because I prefer to modify my canvas
from inside Procreate. That's a preference for me. In the next couple of lessons, we shall be going through
all the different tools that are available in the app and we
shall start with the tools available
under the Action tab. [MUSIC]
5. The Action Tab: Add: [MUSIC] First up, let's talk
about the add section. The first one is when you
want to insert a file, just select Insert a file
and then you can select whichever file that
you have on your iPad. These files, you can use
them as reference images or as your basis as you're
starting off drawing. Next up is inserting a photo, which takes you directly
to your gallery. Select whichever photo that you want as you start your artwork. Next one is taking a photo, which I don't
personally prefer using because my iPad
camera isn't so good. Maybe yours is, so you can
use that if you want to take a photo and then import it
directly into Procreate. The next option is when
you want to add a text, you just add a text
type whatever you want. Then you can select that text and edit it however you want, and you click at this
point over here, you can change the font, the style, the design, any attributes of
how you want it to be aligned or any kind of way. Then after you are done
with it, just click "Done". If you want to come
and re-edit it again, just double-tap or you can just single tap and
it'll come up like this. You can clear, cut, copy, paste, still align it from this point, whatever you want to do. Whenever you write a new text, it'll come up as a new layer by itself and when you
double-tap that layer, you can rasterize it, which means that it's like it compresses the texts
and makes it into an image, and that means that you
will not be able to edit that text again once it
is already rasterized. But then if you rasterize
it immediately, then you remember,
I've made a mistake. You can always click on
"Undo" and it'll you go back to being a text layer. Let's just delete that
because we don't need it for now and go back to
this action section. The other options here are cut, copy, and copy canvas, which you can use if you want to cut something
from your canvas, if you want to cut a section that is selected on your canvas. For example, let us
just insert a photo. Let's import this
one and select it, we place it on our
Procreate canvas. If you can come here, we're
going to select Cut and it's good to cut the
entire layer like that. Then you can just click on "Paste" and it'll
paste it back on. You see, it is back there. We're still going to
come to this section, which is the selecting bar. But just as a quick
preview, for example, if we have selected a section
over here, like that. If we click on this
toolbar right here, we can click on "Cut" and it'll cut that section
that we'd selected, and then we can click on "Paste" again and it'll paste it, but paste it as a new layer. As you can see it has been
pasted right over here. That's what those actions do, and if you want to
copy, you just click on "Copy" right over
here, Copy canvas. Let's again, delete these because we don't
need them anymore. Now, this first layer
can never be deleted, all you can do is just clear it. Then since I've
opened up this area, let me explain about
this background color. It can always be changed to whichever color
you want it to be, like default only
comes as white. But if you tap on it, that layer, you can now
change it to whichever color. Let's change it to this
but you can change our background to whichever
color we want it to be. That's a good way to start
if you want to really have a black color at your background whenever
you're starting your artwork. Background, let's
just set it as white. Then here for the color picker, if you double-tap at the top, it'll automatically
click to pure white, and if you double-tap
here at the bottom, it automatically
defaults to pure black. So just double-tap
somewhere there. Pure white, double-tap, pure black,
double-tap, pure blue. Now let's move on to
the canvas section. [MUSIC]
6. The Action Tab: Canvas: [MUSIC] The Canvas section
is pretty long, so I have divided it
into two.The first part, we shall talk about all the
different actions that you can find under the Canvas
section and in the second part, I shall show you how to set up your Canvas using all
those different tools. The Canvas section is the
most interesting part. Well, the part that I use
the most, let's say that. We first of all have
crop and resize where you can change
all the settings for your Canvas and this is
where normally change the settings when I
start my artwork. The next one is, now these three over here, we have animation assist, which is important if you
are animating something. We'll not be doing any animation anytime soon in this class, so I'll leave it at
that at this point. We also have page assist, which is important if
you're making a comic because comics have
multiple pages. This page assist helps you
when you're making a comic to keep you organized and to
keep track of your work. Drawing guide is what
we use in most of our 2D work, our
two-dimensional work. Because when you click
on the drawing guide, automatically this grid
comes up on the screen and this grid can be edited here
under edit drawing guide. You can see that first of all, we have the first
option which is 2D grid, the
two-dimensional grid. We can change the opacity, make the lines thicker
or even they disappear. You can change the
thickness of the line, you can change the grid size, make the grid bigger, smaller, however we want it, and we can also change the color using this slider at the top. I don't know if you
can see that color. Let me add the opacity and the thickness so that
maybe we can see the color change at the top. All these are very useful whenever you are
drawing if you want to keep your work exactly aligned as the reference
image that you're looking at, you can use these
guides to draw. You can always move your grid using this blue
dot at the center, and you can rotate
your grid using this green dot at the bottom
to whichever side you want. This assisted drawing helps you out when you
are drawing in that whichever lines you place
will be locked exactly according to the orientation of this drawing grid over here. Let me give an example. Let us leave it as done. Now, let's make
sure we've selected our brush and opacity
is at 100 percent. Let's try to draw a line. You see, no matter even if I want to draw a diagonal line, it will automatically
snap to either horizontal or vertical because
that is how our grid is. That's where drawing
guide comes in. Sometimes it's
really handy if you want to draw a completely
straight line, or if you want to maybe measure measurements
proportions from a different reference
image that is here on the side, it's really useful. There are so many
good uses for it. Let's just clear this
layer and go back to our edit drawing guide so that we can check out
the other types of grid. We have isometric, which again, the same things apply, the same rules and colors, everything, but just
that for isometric, the lines does help you maybe if you are drawing a machine, let's say, or a building, something with lots of angles, this will come in really handy. Again, you can move it, you can rotate it
however way you want. It's an isometric view. The next is perspective, which is important if you are drawing a landscape cityscape, something where there is a vanishing point
at the horizon. Because as soon as
you tap right there, one vanishing point is created. If you want two
vanishing points, you can just tap
at another point. Now, you can see we have two
different vanishing points. We live in a
three-dimensional world, so the maximum number of vanishing points
you can have is three. You can tap the last one wherever you want and
just leave it like that. You can also move
those vanishing points to whichever spot
you want it to be. That's where that
comes in. Remember for all these other options
still isometric perspective, we still have assisted drawing here to help us if we need it. [MUSIC] The last one is symmetry which places for
you a mirror line such that, to give an example, whatever you draw
on this side shall be mirrored onto the other side. That's the goodness
of a mirror line. If ever you need to draw something that is
very symmetrical, maybe a vase or, I don't know, whatever you'd like to draw, that's where that comes in. We can clear now that
layer and go back here. Once you are done with
whatever you're drawing, if at all we were on the 2D
section and you are done with needing that assisted
drawing and now you need to make your own
pure authentic lines, make sure that you've tapped
away from assisted drawing, then go back to your Canvas, then you'll be able to draw
the lines as you can want. You can still see we can see
our drawing guide over here. If at all we were to
remove the drawing guide, these lines will disappear. Let's come here. If we remove our drawing guide,
the lines disappear. If you do need the
drawing guide there, you can just still
leave it to guide you and make sure just you put
a color that you can see, whichever color
that you've chosen. If you need a drawing
guide somewhere with assisted drawing but you
don't want to see it, you can just put the
opacity as zero, then come back and
draw our lines. You can see the
drawing guide has automatically kicked into place. [MUSIC] Now, let's just clear that layer because now we're
done with that part. Next up, let's make sure
first of all we've removed our assisted drawing and we've clicked away
from drawing guide. The next part is reference, which is important when you are referencing to an image,
your reference image. You just click on it then the reference can
either be your Canvas. Right now our Canvas is blank, so can't reference that, or an image, where
that means now you import an image
from your gallery. Maybe let's import this one. Then once it's imported, you can always adjust the viewing window by dragging from the bottom-right corner. Then you can move
it by touching at the top and moving it to whichever section of
your screen you want. If you want to remove
these writings at the top and at the bottom, just tap in the middle like
that and it will disappear. Then you can, of course, arrange it wherever you want it to be. Once you're done with
the reference image, you can just tap here and it
will disappear. It's gone. The disadvantage of
the reference box, the reference window, is that you cannot use your
color picking tool to color pick that reference.
Let me show you. If my reference is right
here and I want to pick maybe this black
that is right here, I cannot bring my slider to
pick over here. You can see. That now that disadvantage, so if you want to color
pick from your reference, make sure that your
reference has been put onto your Canvas, and in projects in the future, I'm going to show
you how that is going to be done where you just have your reference right here and what you are drawing, your piece of work right here, so that it's easy
for you to reference from one to the other
and pick the colors. [MUSIC] Now, next, we have flip
horizontal and vertical. This flips your Canvas so that it gives you a
different perspective. It's very important
when you want to see any kind of mistake
that you've done in your work because we
aren't always accurate and when you look
at something for an extended period of time, sometimes you get so jaded and you stop seeing any
mistakes that you've made. Using the flip horizontal, maybe let's add a photo so
that I show an example. Let's add that one. Now, when you use
flip horizontal, it'll rotate this image
back to the Canvas section. It will flip it horizontally, so now you have a new
viewpoint to look at. From this viewpoint
you can maybe see mistakes that
you had made before. You can also flip vertical
where it takes it upside down according to the
middle center line, so it's flipped it vertically. Whenever you're drawing, use it as many times as you want. It's really helpful
to open up your mind, open up your eyes,
see new things. Next up is Canvas information. Here you can put your name, your signature, you can see
the date that you created it. If you're sending
out the file to someone, now, you're secure. You know that that file has been embedded
with your details. You can also see the
dimensions of your work in pixels and in inches if you've chosen inches
and in dots per inch, which is the pixels, the resolution of your work. You can see the number
of layers that you have and the number of
layers that you've used. How many of them are assisted, like the assisted section
you remember I showed you, how many are clipping layers, which I shall show you as well, how many are layer masks, which I shall show you as well, and how many are layer groups, which I shall show you as well. You can see the color
profile of your work. We shall not mess
with anything over here but for advanced users, you can change to
whichever color profile that you want according to the work that you're
trying to make. You can see your video settings. Procreate automatically
records speed paints of you whenever you're painting
so that's really good, unless you check it off, you opt out of it. You can see now the settings
that your video has and these settings can be
changed in preferences, I shall show you, and you
can see the statistics. [LAUGHTER] How long you've been painting, how many strokes, how you've made the file
size and everything. [MUSIC]
7. Setting Up Your Canvas: [MUSIC] Now, let's take the
time to talk about how you set up your Canvas. You remember I said that
when I start a new project, a new piece of
work, my first step is always just to select the plus icon and
select screen size. I do that because
I like to define my Canvas size according to
the art work that I'm making, whether it is a landscape
or in portrait mode, and also according to the final output size
that I want it to be. For example, if I want
to print out the work on an A1 sheet of paper and A2, A0, A4, it doesn't matter. You can also always see
the dimensions of paper, pick the paper sizes. When you go to the Internet
and just search for like A0 paper size, A1 paper size, it has up to A10 or whichever specific
dimensions that you want for your paper. I just look at the size of paper that I want
on this section, and that helps me to
make my decision. Let me give you an example. I just go here to
the tools section, then I select on
crop and resize. My first step, the first thing I always do is to change
the DPI to 300. That depends stands
for dots per inch. It's a good resolution
for if you're going to end up printing a
work or print work, don't leave it at the 132
that was there before. If you have, let's say, a bigger capacity iPad, the iPad Pros, you
can be able to even select 600 or
something even higher. The thing is that every time
you select a higher DPI, it lower the number of layers
that you have according to the model and storage
that your iPad has. Let's see here, I've selected 300 then let me tap over here. Let me just tap on done. You see, it's saying that I
have 72 layers available. But now when I come here
to the Canvas size, actual canvas size, let us change it to inches. You can see it's
quite small for me. It's 7.2 by 5.4 inches. Here you can change to
whichever dimensions you want. As I said, I prefer
it in inches. Most of my artwork, I prefer to draw on it as big of a canvas as I can afford, though that normally ends up sacrificing the number of
layers that I can get. In a way it also taught me
how to draw on less layers, which is a good thing and also can be a bad thing.
It can be limiting. It depends on how
you look at it, but it's enabled me to learn how to walk around my limitations, which is how to draw
on less layers. First thing, if you select this dot in the middle,
when you click on it, it means that whichever
figure you put it on this side, this
is your length, it will automatically
relate it to the size of the width if I select
it to be linked. For example, if I change to 16, it automatically
change the width to 11.98 or rather the height
of it width to 11.98, and I don't even
notice over here, my number of layers
also changed. Let me change maybe again to 17. You see now I have nine
layers available to draw, but I change it to
maybe 25 layers. The higher my Canvas, the lower the number of
layers I'll have available. Most of the times I
try to at least have six layers to work with
when I'm painting. If again, as I said, if you have a larger
capacity iPad, more recent model,
you'll probably have more layers than
me, good for you. It'll be easier for you to
draw and work around it. But still, no matter how
small your canvas is, there are still workaround
onto how you can end up resizing your work later on
once you are done with it, and you have to resize it in the right way so that
you don't end up losing the quality of your
work because when you draw something quite small. Now you see my Canvas
has grown quite big. When you draw something
that is quite small, maybe like here,
then you want to expand it to a bigger size. Sometimes you can end up losing the resolution of the artwork. All the details that
you put in could end up being large or distorted. When you end up
resizing your work, let me give you an example on how you would resize your work. If I want to resize
this piece of work, first step that I would do. Come here to the canvas,
"Crop and Resize". You can see it showed me that
I had 13 layers available. Come to settings. The DPI I can leave
it as that for now, and then I select this, so that it links the
length and the width, it does not distort the size of my image once I'm changing it. Then also click on
resample canvas. If I do not click
on resample canvas, then I changed maybe
to 20 by something. You can see what
happens, it's just that my canvas at the bottom
is what becomes bigger, but my image is resized. What I need to do is
that first thing, this link is selected and resample canvas
is also selected. Then after that I can change
the size of my canvas. Now you can see it's gone
to six layers available. My canvas is still fine. If I want to change it,
maybe let's see what the highest for my iPad can take. Maybe 25, I have
two less available. Let's see any higher maybe
28, one layer available. Let's see if we can get
at 29 by something, 29 maximum layers exceeded. The highest for me is
probably 28 or 28.5 by 26.19 at a DPI of 264. That would be now the
biggest size that I can get. That is how you
resize your canvas. Then you see if I touch it with two fingers and try
to move it aside, it's going to end up, when I click on Done, it would cut off
part of my image. Let's just have a look. You see it's cut off part of it. What I need to do when
I'm resizing is again, let's do just the same process, and then if you do end up
moving aside your canvas, just remember you can always
select on snapping so that your canvas snaps right into place where
you want it to be. Then just click on "Done". You can see we have
resized our image with minimal loss of quality. That's how you edit your Canvas. That's how I usually
do with mine. Just come here to
the settings and editing whatever I need
to edit them about. In the next video we shall
talk about sharing and video. [MUSIC]
8. The Action Tab: Share & Video: [MUSIC] Next up is sharing. This is very straightforward. This is where, after you're
done with your work, you can share your work to other devices or
to other people. It can be shared as
a Procreate file, Photoshop file, PDF file, JPEG, PNG, and TIFF. You choose whichever
one that you want. For printing artwork, the best one that I
usually go for is PDF, and then I export it
as the best quality. It's better than exporting it as a JPEG or PNG personally for me. Then you can also share
individual layers as a PDF or PNG files for all your separate layers
that you have drawn. As an animated GIF, these are all if you're
making animations. You can share it as
a GIF, as a PNG, as an MP4, or as an HEVC file. Those are the different
sharing options. Next up is video. Remember I told
you that Procreate would automatically record for you a time-lapse of you painting the speed
paint of your painting. If you have any interest of
posting it on Instagram or showing your client to show all the steps
that you've made, this is when you get it. You can see a replay of all
the steps that you've done. It's showing us what we've
done today in our work. You can also see, when
you check this off, that's when it will not
record the time up, and then you can export
it once you are done. Export it as our full length
or as a 30-second video. [MUSIC]
9. The Action Tab: Prefs & Help: [MUSIC] Then after that, the
next one is preferences. You can either choose it to be a light or a dark preference. I prefer dark because the light, it messes up with the values. If you watched my previous class on values when you're drawing
a striking portraits, you'll remember me talking
about how important having appropriate and accurate values are whenever you're drawing. This light highlights
that I already know the background from our
light interface usually interrupt with my
deduction deducing of the value that I
have in my drawings. I prefer having a
dark interface. But go again with
what you prefer. The right-hand interface just means that my color picker and my brush tool are on the
right instead of on the left. I prefer that because
I'm right-handed. But either work,
whichever is more comfortable for you,
that's what it does. The brush cursor, what it means, let's first of all
clear this layer. The brush cursor when it's off, it means that when
we're drawing, we will not be able to see. I need to select a color.
Let's select this one. When we're not drawing,
we'll not be able to see the icon for the brush at the bottom versus when
it's on, raise it here. Let's raise this so that you
can see that brush icon. You are able to see
that brush icon whenever I tap on the screen, so that's the difference. You can choose whichever
setting you want. I always leave mine as a brush with a brush
cursor being on, for me that's what I prefer. Every single brush
has a different icon. Let's see the dry brush. That's how the icon looks like. Gouache, the icon
looks like that. Each and every brush
has a different icon. The next thing is
dynamic brush scaling. Let's, first of all, clear again our layer and go back
to select the brush. We're using the portraits
in the Nikko Rull brush. Now, let's, first of all, take it off and
raise this brush, maybe somewhere
here at 11 percent. When I draw a line like
this, then a zoom, another line, another line, another line, another line. What happens when the dynamic brush
scaling is ticked off? It means that whenever
you zoom in or zoom out, the size of your brush changes
automatically like that. You see when we zoomed in, our brush size
became very small, versus, let's first
of all check it. Now we'll draw our first line, second line, third
line, fourth line. It's ticked on our brush size. Let's redo, the brush size
always remains the same. That's just what the dynamic
brush scaling means. The image to whichever
setting that you prefer but just remember, that it does affect
your work and your brushstrokes so don't get confused when you're painting, and you're wondering
what is not happening. [LAUGHTER] Now, the next
one is project Canvas. You can project your Canvas to another screen if you want
to so that's what that does. Now, these things, we're not going to play or
mess around with them at all. You can connect legacy
stylus like if you want to connect another stylus. The pressure and smoothing, you can mess around with this, to play around with the app, the sensitivity of your pen, maybe take it higher
take it lower. I'm not going to play
around with mine because I love it as
it is at the moment. You can just leave it at the
default settings once you've already gotten your
Procreate app installed. Next one is gesture controls. There are so many different
quick gestures that are here that you can program
into your iPad. For example, pressing on the box here at the
side together with touching could invoke
the quick menu or something like that. I don't usually use
any of these gestures. All that I have installed setup, which I think is automatic, and you never really have
to install it yourself, is when I drag down
with three fingers, it comes up with a
cut, copy, paste, and quick menu, let's say that, rather than using it from here, the toolbar, I can easily cut, and I can again swipe
and easily paste. That's all that I have for now. But you can set up whichever
ones you want for yourself. Now, here again, we have the undo delay because we have
the undo and redo button. If you want there to be
a delay between when you press the undo and
when you press a redo, just play around
with it over here. Again with a selection
mask visibility. Whenever you've
selected something, you can also mask whatever
is around it for it to not be as visible or vice versa. Next up is now the help section. I think we've gone through
all the preferences. The help section, we have
the restoring purchasers, which I guess is if you want to restore
the purchasers that you made before, which is, I think only purchasing
the pro version of Procreate advanced
settings here. You can now go into
your settings section, and now change in our settings
for the Procreate app. Procreate handbook,
here you have also, you can learn about Procreate
itself just from reading the handbook or going
here to procreate. You can also use the
Procreate Folio, which is a robust support system for all users who use Procreate, can go there, see other
people's artwork, get brushes for free, and others for purchase. It's a really good place and also leave a review if you like. [MUSIC]
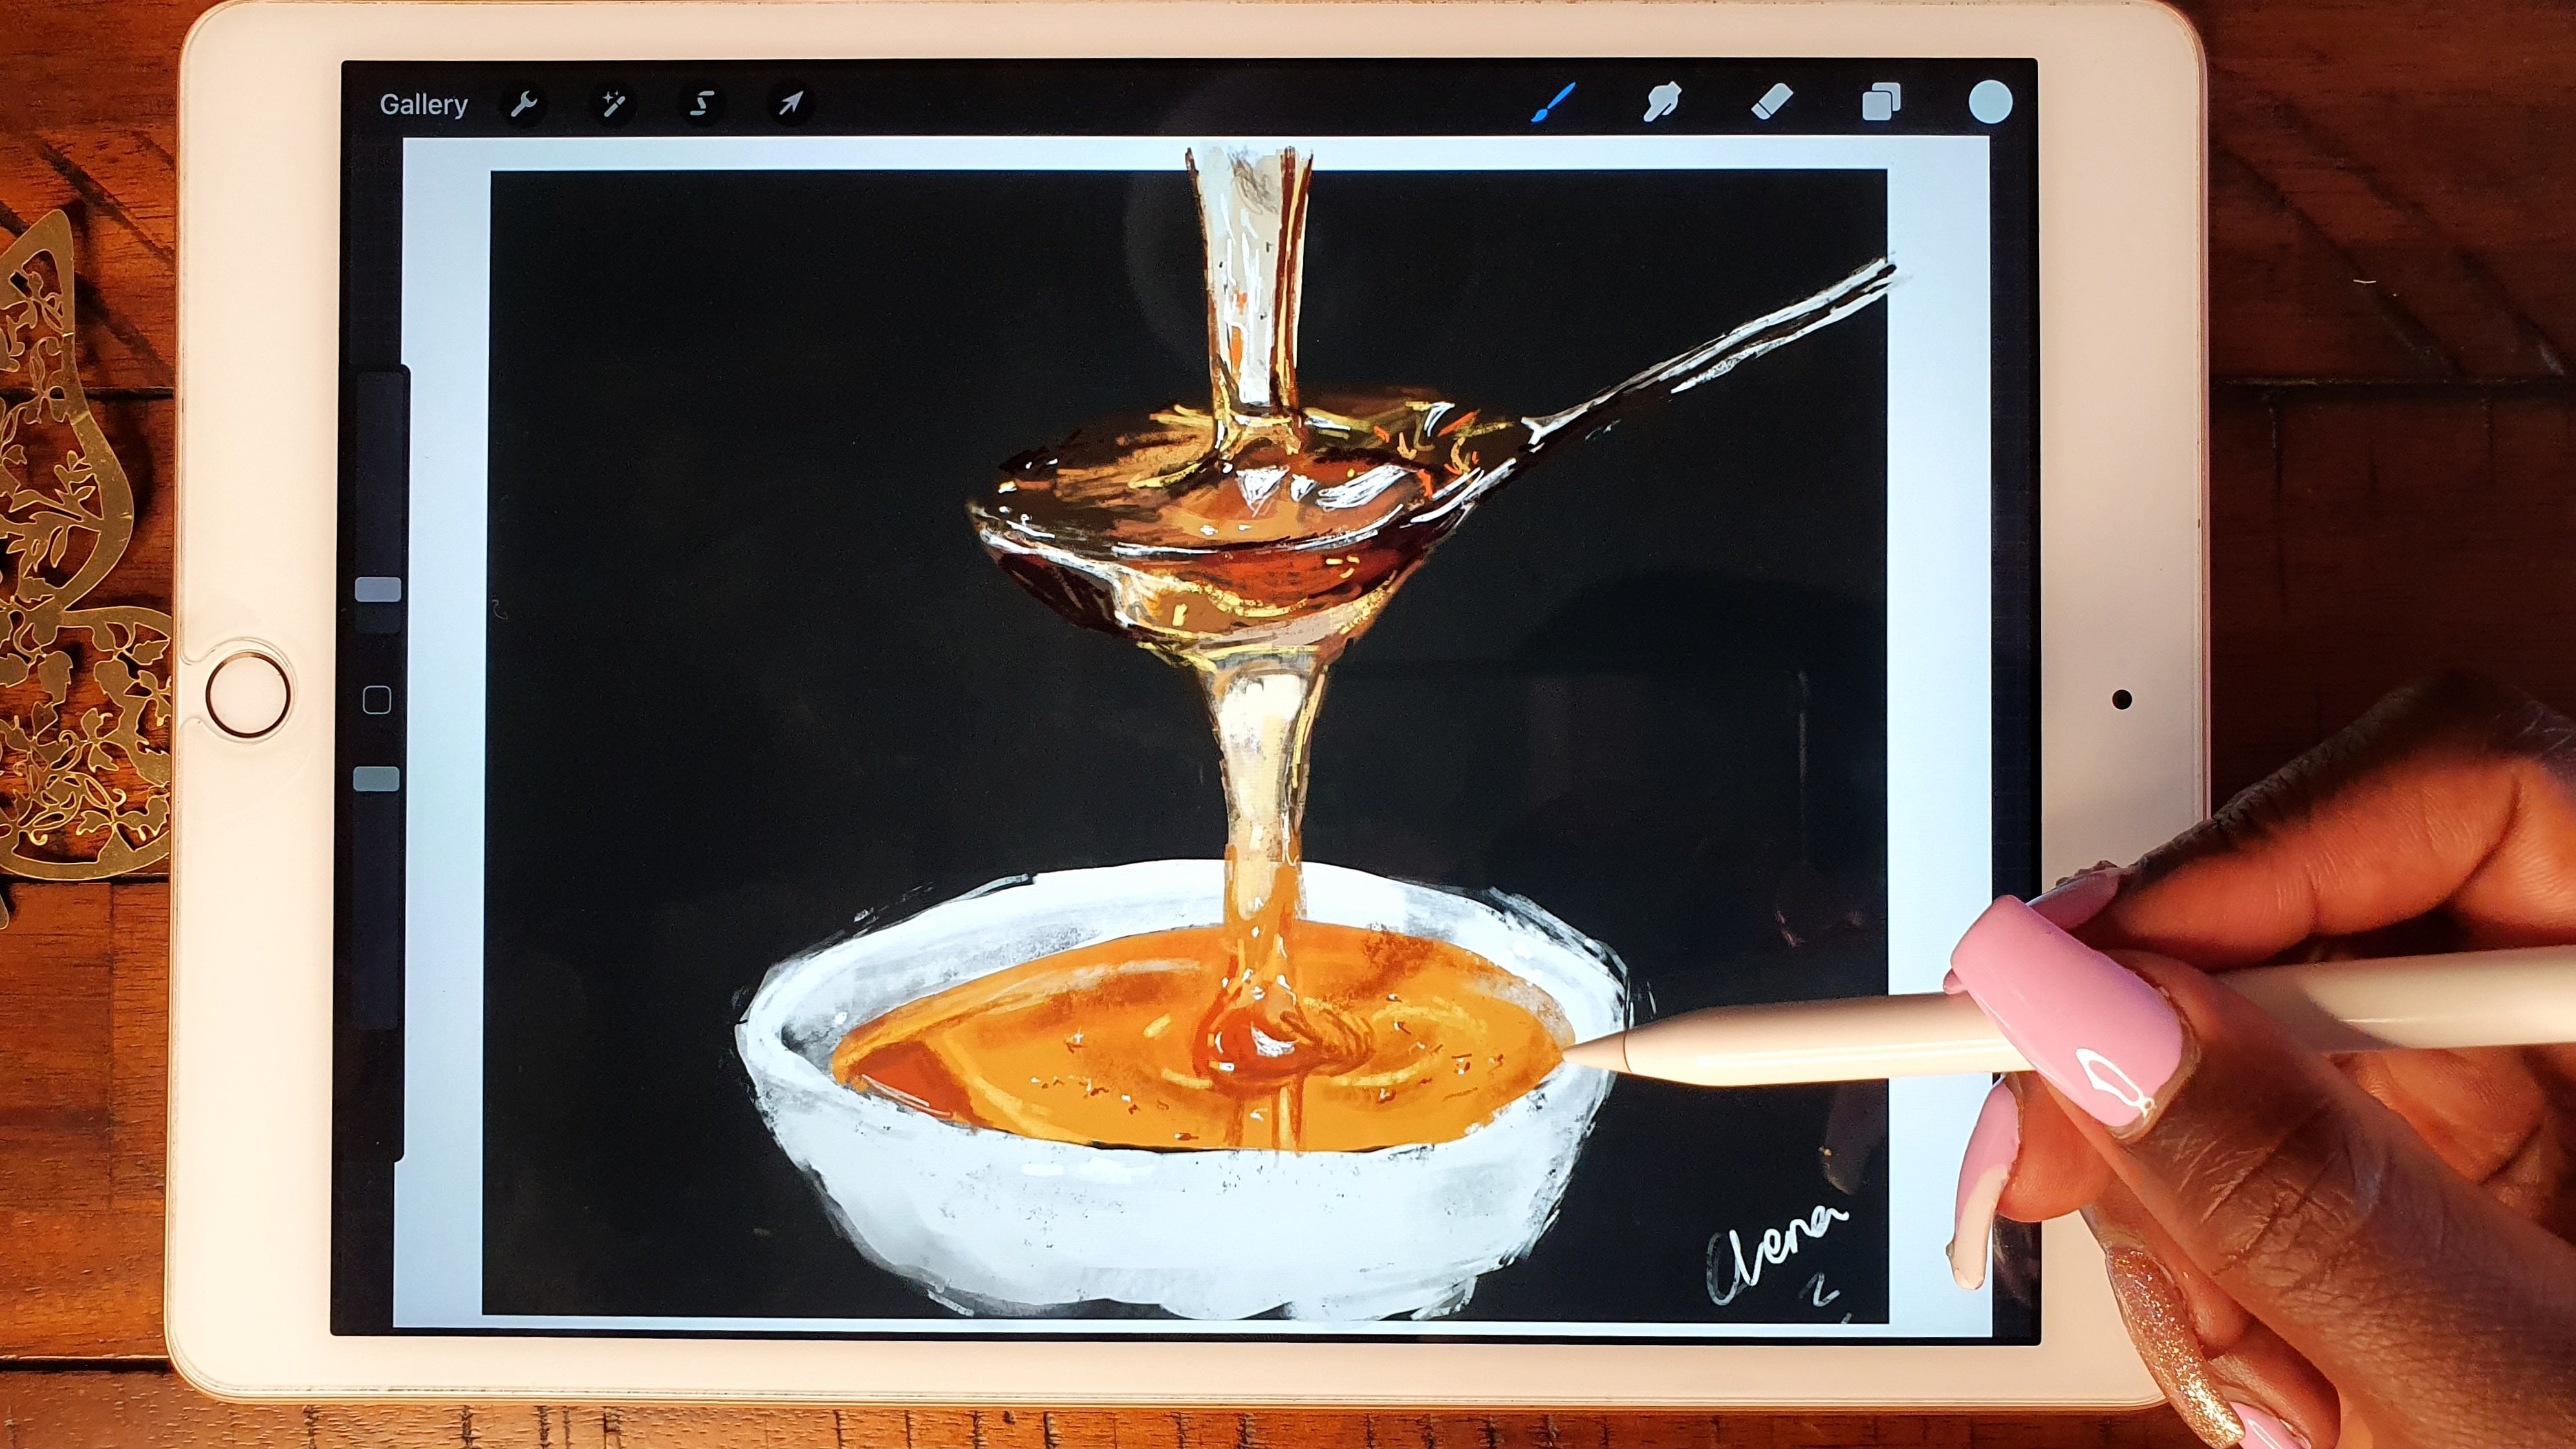
10. The Adjustments Tab: [MUSIC] Next up now, we move to the
adjustment section. This is the part that
you play around with your drawing as much as you
want to play around with. Let us clear our layer, and import a photo. Let's play around with this one. We can make it bigger
once we've imported it, just by dragging over
here at the corners. Like that, and then once
you're done with dragging it, just click on that
arrow and it is set. So when you come here, we can adjust this. It's going to adjust this layer, that it has been placed on. If will not adjust
the other layers. If we had maybe multiple layers, other layers on top or below. It will just mess around
with this one alone. So what we can do is we click on "Hue, Saturation
and Brightness." Hue, it's the kind
of color it is. Red, green, the pure colors. Remember, our skin tone
was orangish already. So if I do come to
the blue section, it's going to interact
between the blue, and the orange-yellow skin tone, to make a green pigment, a tint to it. So just remember that that's
how it's going to interact. Background was originally green. If we go to the green section, it just makes it more
green, towards the yellow, it makes it more brown,
towards the red, it interacts now whichever color that was originally beneath. Next up is saturation. Saturation is just how
pure the color is. We can play around with that, make it desaturated,
or really saturated. Then brightness, which is
how dark or light it is. You can play around
with that, with your finished artwork, or an image that you want to edit when you're starting
off with the painting. Now we can undo everything, and go back to our original. The Color Balance. Here you can play with
the color balance. For example, here we have
quite a lot of greenish. If we play around with
it, going to the green, everything becomes green or magenta, everything
becomes magenta. That's how you play
around with it. The Gaussian Blur, is all about blurring
your object. You just drag on the screen, to put the degree of
the blur that you want. That's what it is. The next one is the Motion Blur. This one, it makes
it to be in motion. Can you see that on the camera? So you can put all these fun
effects in your drawing. [LAUGHTER] Let's undo. Next up, let's see, Perspective Blur. You can move it around
the way you want. It's blurred from a point. Let's move that
point. Maybe that. It's like it's dragged
from that point. Wherever I have put this dot on. I did skip the Curves, the curves here you
also play with them. They're quite advanced. So this requires a
lot of fiddling, to make your artwork to look
however you want it to look. The Gamma, plays with all
of these ones together. The Gamma is like the
mother of them all. Just play around with it, when you are done
with your work. Next one is noise. This one makes
your work noisier. More pixelated, more grainy, and you can also take it down. You can play with
all of these ones. All of them. They're all
different from each other. The Sharpen, makes
your work look more crisp. If we raise it up. I know here it's not
really being seen, but if you had a work
that was really blurry, you can raise up the
sharpening and make it pop a lot more. But don't do it too much
until it becomes too sharp. There is a good balance to it. Now that's where you have to
use your intuition to make sure that your work is
balanced and not to sharp. Next is Bloom. You can also play with Bloom. All these things, you can see it's
bringing up like an old timey kind of glow
and blur to her skin. All these ones can
be messed around with the size, burning. Can also check out the Glitch, which makes your work glitch. Which is already a
pretty really nice piece of artwork as it is. Zoom in, zoom out, however you want it to be, it can all be done. Let's undo again.
Next is Halftone. Again. Next is
Chromatic Aberration. All these are effects that
you can just do to your work. Now, Liquify is a good tool, especially if we had
something selected, because, you can move and distort images
however you want. So let us reset. For example, if I were drawing, and there's a
section that I feel like I've not drawn
it as it should be. Maybe her chin is too close, I could just move it. I can move her cheek
however I want, her chin. That's the goodness
of digital painting. You can edit things
very quickly. You don't really
need to repaint it. There are many tools
and workarounds, to make your work perfect without giving
you too much work. But then again, it's
a lot to learn, and when it's done incorrectly, it could also really frustrate
you as you're working. So that's what the
Liquify tool does. It just pushes and distorts things into whichever kind of form that you
want them to be. You can also just experiment
with all of these, because there's so many
of them that you can play with and make [LAUGHTER] whichever figure that you want with your final
piece of artwork. Now, last one is Cloning. Cloning basically just
clones whatever you have over here that
you have selected. For example, I can clone
it just right here on the side and draw
my own new figure. It's pretty easy. That's just
the fine tools for you to play around with whenever you are doing whatever
you want it to do. [MUSIC]
11. The Selections & Transform Tabs: [MUSIC] Now, let us talk
about the selection and the transform tabs. They go hand in hand together, so sometimes you'll hear me say selection instead
of transform, or transform instead
of selection, just because they are used
hand in hand together, so follow along to all the different things
that I shall be showing you. The good thing about
digital art is whenever you've drawn something at a place it's not
supposed to be, you can always select
it and move it easily rather than
traditional where you'd have to erase or rather
repaint over or erase. For example, freehand, mostly we'll use
freehand and rectangle. Freehand allows you to draw
whichever shape that you want as long as
you make sure you connect back to
the original dot, then after you've done that, you can swipe down
with three fingers. For example, if you
want to cut it, you can cut, then again, when you swipe down again
and then you do paste, it'll paste it, but
on a new layer. See it's now pasted
on a new layer, so you can just select, no, we'll come to the
"Select" button, but right now I
can also show you. Now, select it like this, using the arrow and move it to a wherever section
that you want, so that's how that works. Let us undo everything. Again, now when it
comes to selecting, you can also select
like that with a freehand and
then just directly click on the arrow
and move it to wherever you want it
to be, like that. Again, we can undo everything. Now, the other option
is the rectangle, which is the other one
that we will use a lot. Now, that one just automatically selects it in a rectangle, square section like that. Oops, I clicked on
something different. That's how now you select. Then when you're
moving these icons, these dots at the corners help you to scale whatever
you want to scale. When you click it like this,
it scales it like this. You can scale it to the side. Use this to rotate. If you don't, we want to go back to how it originally was, click on "Reset", like that. Then here on the snapping thing, it helps when you're
moving things, the snapping and magnetics. When they're both selected, it means that when now
you're moving something, it'll snap into
place, for example, if you want it directly
at this corner, it'll help it to come
directly at the corner. There's the one
that we don't need, which is the, I think magnetics, let me see, yeah, the magnetics is
normally makes it a little bit glitchy
when you're moving it. It can now snap
directly to the corner. Again, like this. When you hover
around the middle, it will show you
the center line of your artwork and it
snaps directly there. Snap into the center, move it, it's snapped, so that's where this part comes in, snapping and magnetics. It depends on your preferences. We've talked about
the uniform select, which means that
whenever you move it, it's going to move uniformly. You can also select on free
form where now you can move just one side and it's going to compress or expand
whatever you have. We also have distort, which basically changes
the orientation and size of whatever
that you have. Lastly, we have
warp, which again, we'll warp it however you
want to have it warped. You can play around with it, if you at all you need it during your artwork to make whatever
figure that you want. Again, you can also back
maybe at a uniform section, if you want to flip
whatever you've selected, you can flip it right here, and you can also
flip it vertically, you can rotate it, and you can make sure it fits within the canvas, the bounds, whichever side is shortest rather it will fit
towards that side. [MUSIC] The interpolation dot, it's either going to be
reading nearest neighbor, bilinear, or bicubic. What happens is when
nearest neighbor is the fastest kind of expansion and contraction
like distorting the size, but it uses less data points in comparison to bilinear and
in comparison to bicubic. In terms of the least
amount of data loss, bicubic would be the best. In terms of the most amount of data loss when you
are compressing, resizing your image,
the nearest neighbor would give you the
most amount of data loss, if that makes sense. In terms of order, it
is nearest neighbor, then bilinear, then bicubic. When you are resizing your work, your canvas, your image, especially for a
complete piece of work, make sure it's either selected
to bilinear or bicubic. [MUSIC]
12. Brushes, Smudging & Erasing: [MUSIC] Now let's talk
about the three siblings. Brushes, smudging and erasing. Brushes are all on
this part right here. For this artwork and most
artworks in the future, we shall just be using the default brushes that
come in Procreate. They are pretty
good as they are, if not absolutely awesome. But you can also always
look for brushes that are free or for sale from
different artists. You remember when I
said Procreate Folio? When you go to Folio,
you can search for brushes and see
brushes for Procreate which are there and go on
to Gumroad and purchase brushes that have
been uploaded by brilliant artists and use
whichever ones that you want. Whenever you want to upload
a new set of brushes, you just come here
right at the top, there's the plus button. Now you can save your set. Let us save our set, rename, maybe call
it star or whatever. You can upload your new brushes. First of all, you can make your own brushes by playing
with all of these settings. Have fun and play with them, or import a new set of
brushes that you have downloaded off the Internet and then you import
them over there. We don't need to do that. If you don't need it again, long-press like that
and click on "Delete". I mostly use the
Nikko Rull brush, the old brush, and
the dry brush. You can draw a shape by the way, with any kind of brush. But I usually like dry shapes
with a monoline brush. If I'm drawing a triangle, I
just draw the triangle then I hover right here once I'm done. Then you can click
now on "Edit Shape". You can leave it as a triangle
and edit the dimensions, distort it however you want or I can change it in
a quadrilateral, where that means now
I can make it into a four-sided figure or I
change it to a polyline, which now just means
that I can change the lines to go however
I want them to go. That's the goodness
of that brush. This smudge tool,
it smudges work, which is really fun to use, especially when
you're painting skin. But I personally do
not like to use it on my artwork unless the client specifically asks for
extremely smooth skin and look because I prefer
my work to have a bit of a painterly feel to it so
I rarely use the smudge tool. Let me show how it's done. Under the smudge tool you
have the same exact brushes as under the brush tool. You can choose whichever
brush that you want. I have it under the soft
pastel, let's leave it there. You can smudge your
work and smooth it out. You can even raise the brush
size and smooth it out, create smooth transitions
just like that. I'd rather you don't depend
so much on the smudge tool. Of course, it's digital work and you can do
whatever you want. But I'd rather you not depend
on it so much when you're painting just also try to blend your artwork
without depending on it, just by using the brushes. By using the brushes, I shall show you as we're going to
be going on with the class, it means you've to do a lot more of color picking so that you
can pick the exact color, that are right at the range. For example, if we're
painting this part, if you want to blend
these two parts together, I'd color pick this
part and paint it. Then again color pick
this part and blend it. Again, color pick again right
at the middle and blend so that you create
smooth transitions from section to section. Not always just depending
on abrupt color changes. For example, just this color here and this color
here then now just depend on the smudge brush
to blend it all together. It's better for
you to just learn how to create gradual
transitions by using the intermediate
colors in that line between those two colors that
you are blending together. Again, I shall show
you during this class, I shall explain all of that. Method erasing tool,
really important. I use it quite a bit when I'm drawing highlights and hair. I shall show you that both in this class and
in a future class. [MUSIC]
13. Layers, Part 1: [MUSIC] The layers are a part of Procreate that you will tend to use quite a lot. The goodness of digital art is that you can create
so many different layers and a walk step-by-step without having to just do
everything on one canvas. If there's one thing that I love about digital art is the layers, they can first of all look confusing when
you're starting off, especially when you don't
know what they are. But in the next three lessons, I shall teach you everything
that I know about layers and I'm sure there are so
many other things that I don't know and I've
not yet taught to you. Let's get into it our Layers. Now, layers are really
fun to use as when you look at this photograph, you can see that the objects in the photograph are at different distances
from the camera. We have the window that is
where the back with a wall. We have the camera
which is right in front of the window on the wall. We have also the flower, which is maybe at the same
distance with the camera. Then we have the
figure that is at the forefront of the camera. When we are painting this scene, we would arrange our
layers in this way. Our first layer would be
specifically for the wall, the background
wall, and windows. That means I can draw the wall completely here at the
back if I wanted to. I can paint this section and I wouldn't mind going down here to where it is covered by the figure because
that's our bottom layer. I can also draw this window and come all the
way down over here cover this section because I
don't mind even down here. Then now once I'm
done with that, I would also have another
layer on top of that, now that one would be
labeled maybe Objects. Now on this layer, that is where I would paint the
camera, the flowers, and even this colored Maasai shuka I would even
paint it over here. This Maasai shuka since it is behind the flowers
I could even put another layer and
when a long press this layer like this
and move it down, I can move it there because
it is behind the flowers I could place it there
and label it as Shuka. I know the shuka is right
behind the flowers, it is not going to
obscure the flowers. Then now lastly, I'd have this layer now needs to
be the top-most layer, which would now be the figure because it is at the
complete forefront. You can even have an
intermediate layer for the table to strike between the
figure and the objects, that's the goodness
of the layers. It means that whatever you paint the background if you do paint another object
on top of that layer, whatever was on that
background shall not be seen so it helps you to arrange your work
very easily it makes it easier to paint
rather than traditional, where you'd have to plead exactly around this
area over here, like that with watercolors, that's what you'd have to do
exactly around this section. With oil paints, you can
always paint on top of those sections because
oil is opaque, but now with transparent
colors and mediums like watercolors
and color pencils, you can't do that you have to be exact as you start off so
that's the goodness of layers. Let's move on maybe to this slider this is
for the brush size, and this is the color
picking tool as I showed you before and then this
is for the opacity. Let us select a color. Maybe let's put
this orange color. At highest opacity, can see that's how
it looks I put it at mid opacity and I'm still pressing with
the same pressure, and at very low opacity, still pressing with
the same pressure that's the goodness
of the opacity. Instead of you may be
controlling the pressure with your hand because you
see now I'm at 100 percent, let me put it at 100
percent opacity, and I can make it very hard. But the good thing is also
when I press really lightly, I can still make it very
soft and even softer. The opacity slider makes you
not need to do that at all. Next, let's maybe talk
about a little bit about the importance of
drawing on the right layer. For example, if I were drawing may be the
wall and windows, they make the mistake of
drawing it on the wrong layer, which is maybe the figure layer, you could end up getting
really frustrated later on if you're trying to
color correct that layer. You remember when I
talked about the color correcting section over here, maybe you're trying
to color correct her skin and you have
drawn a camera right here yet it does not
supposed to be there. Just make sure whenever
you're drawing, draw on the correct layer that you have planned to draw
on just not to bring any more confusion to
yourself later on. But then again,
if you do draw on the wrong layer, Let's
say for example, that these strokes were supposed to be on
the object layer, and I just figured
out that, oh no, I've drawn it on
the wrong layer, I could always come
and select them using the free hand selection
tool maybe it's these ones that I need
to move, swipe down, cut them, make sure
I have come down to the object section then we swipe again paste It's going to paste them exactly on the object layer where I wanted them
to be pasted on. That's one thing that
you can do if you ever make the mistake of painting
on the wrong layer. But just to make it
easier for yourself, always try to make sure
that you're doing it on the right layer [MUSIC].
14. Layers, Part 2: [MUSIC] We can also talk about the different
things that you can do just on the last section. Let's just use this one. When you tap on a layer twice, you can now have the
option to rename it. If you want to rename it
from the name objects. We can select it, select everything on
that layer easily. We can also copy
everything on that layer. You see it said copied layer. That means if we do like this, it's going to paste a new layer. Just have a look, it's pasted it again as an inserted image. We also have the option
to fill the layer. We can fill it with whichever
color that we want to. We fill it with black. Then another option,
let's undo that. We can also clear the layer. It will delete
everything. You can see that now that layer is completely empty
and has nothing. Now for the Alpha Lock, let's select this one because we already pointed
something on this layer. Alpha Lock just means that
when we paint on this layer, it will only paint
over the sections that already have
a paint stroke. For example, let's
Alpha Lock this layer. You can see now it has a
checker box on the background. That means if we select
like a black color. If we decide to paint all
over, it will only paint over the sections that originally
had a paint stroke. That's the goodness
of Alpha Lock. If you just want to paint
within a some select bound, you can just Alpha Lock
that layer and you will only end up painting
within that section. I shall show you examples in the future in my
classes on how we can really use this Alpha Lock to our advantage whenever
we are painting. When you're done
with Alpha Lock, just again, uncheck it
and it'll disappear. The other thing is
called clipping mask. A clipping mask,
it means that we can create a clipping
mask on top of a layer. That means whenever we paint on that clipping mask layer
that we've created, whatever we are
painting will only be seen on the parent layer. Let's do it with this one, the objects one or maybe the figure one, this one at the top. We create a new layer
on top like that. Then we tap on it and then
we click on clipping mask. Now you can see that there's this icon here of an
arrow showing that it's a clipping mask related to the figure layer right below it. That means maybe we've selected this black color and
now we are painting. The paint will only go onto wherever there is paint
on the parent layer. You remember our parent layer, the figure there was
paint right here, so it will only go there,
it'll not go anywhere else. That's the goodness
of the clipping mask. Then now you can
edit that color. The clipping mask option is
a non-destructive option in comparison to the Alpha
Lock layer because we have not messed at all with
this original figure layer. If we're not happy
with whichever color we put on the clipping mask, we just of course delete it and the original layer is
exactly as it was before. It's a really good option
if you do not want to mess around with our
original section, but we want to edit the
colors a little bit. [MUSIC] The masking option allows
us to erase or add something to a layer
non-destructively. If we want to create a mask, tap on the layer that
you want to mask, and click on "Mask". It'll create a layer
mask right on top of it. Now for the layer mask,
if we paint with black, it erases something, but it's
not really truly erased. It is just concealed using our layer mask with
the black color. If you want to bring it back, we just come back and select our white and just paint it back in. This is also another
non-destructive option alternative to using the eraser. [MUSIC] I've taught you two different
nondestructive methods of editing your layer. The first option was
with a clipping mask, and the second option
was with a layer mask. The clipping mask
is an alternative to using the Alpha Lock option and the masking
layer mask option is an alternative to using
the eraser option. Feel free to use either
of them whenever you want to edit your work
non-destructively. Now, we can also merge all the layers that we
have into just one layer. That can easily be done by just selecting like
this and pinching. That way you pinch them
all into one layer. You can also undo it. If you want to match one by one, you can just click like this, and then click on "Merge Down", it will merge with the
layer that is below it. That's how you merge layers
and make it into one. For example, if you want
to also create a group, which means that
we've linked all of the layers together
maybe into one group. We just select maybe the
top one and then all of the rest we swipe them
towards the right, like this. Then after you're done,
you just click on group and they'll all
be grouped together. You can close it and
you can see the group. Now, this grouping of layers
together makes it easy for you to arrange your walk
into different sections. You can also hide
them all at once. Edit them, rename them. Flattens means just that
they're all going to now be merged into one single layer. We can redo that up to the
way it was once before. Now swiping to the left like that means that you
can duplicate a layer, gives you the option
of duplication. It also gives you the
option of locking, which means that now
it cannot be edited. For example, now this one can't
really do anything to it. You can't paint it, you
can't do anything to it. Another option, let's see,
deleting is deleting. You have to unlock it
so that now we delete that layer. That's what it does. What else haven't
we talked about? Merging down, combining down. Reference just means that now that layer is assigned
as the reference layer. Inviting means it
invites the color. Whichever color is opposite
to it on the color wheel, it will invite whichever colors are opposite to it
on the color wheel. The other options that maybe
we've not talked about, let's use this layer as an example is when you
click on this "N" button, you can edit the
opacity of your layer. Then there all these
other filtering options which you can just
scroll through and choose whichever one
would brighten up your work however way
you want to use it. Those are all
really good options to just edit your work to whichever format
that you want to use with all the different
filters that are available. Those are all the options
when it comes to the layers. [MUSIC]
15. How To Use Layer Blending Modes: [MUSIC] We have talked quite a bit
about the layers a bit and I've also told you about the different blending
modes that are available. But I haven't really
given you any kind of concrete examples of the goodness or however they can be used to your advantage. If you ever want
to add texture to your work or to add some
patterns to your work, that's where the layers and the blending modes could
come in really handy. Let me give you just an example. I just found it. This is a piece of work of a Valentine's flower
that I did last year. If we zoom in, you can see that I
put some watercolor, not really watercolor,
but paper texture, yet it is a digital
piece of art. What I did was, let's just go to my layers. First of all, I can
see I even added and inserted image to bring
in some more texture. But let's look for the
paper texture that I used. Let's first of all hide most of these guys
until we narrow down to which one was
the paper texture. Let's see, let me leave this. Let me do something like this
so that I can be able to tell this to the side. It wasn't that, it
was this layer. Let's remove that and add in everything else that was there. What I did, this is
how the painting looked before I added any
kind of Canvas paper texture. Then what I did was I just added an image of
people normally upload, people are still
kind, they upload images of canvas texture. Then what I did was
I played around with the blending mode, the filters to get now
the look that I wanted such that it was transparent but still being seen
for the art work. You can see the layer that
I went for was overlay. If you go back to
the normal which is how a layer usually is normally when
you're just editing, you can see that that's
how the canvas looks like, like that's how that
paper texture looks like. What I did, I just added it
in and I played around with all the different kinds
of blending modes. Then I liked overlay the
most as it was still there, but not there too much,
if that makes sense. Then if you want to reduce
this texture a lot more, all that you do is actually
just lower the opacity up to a level that you
want or you can even just leave it
at 100 percent. That's what I did
for this painting. Another thing that
I noticed that I did was I added an image. Let us just put that image
back in, here it is. This is the image that I added. If we play around with the
image and go back to normal, let's just see how it was
originally right here, and at 100 per cent, this is the image
that I added in. Oops, let's just undo that. It is just a normal
watercolor texture that I downloaded off
the internet and I shall show you where
I got it from. Then I just added it into here by coming here and adding an
image, inserting a photo. Remember when I said
you insert a photo, it comes out as a new layer. You see it's written
even as inserted image. Then I just came
here and I played around with the different
kinds of blending modes. I think the one I liked the
most was color burn because I wanted the mood to
be a lot darker. I liked how this blue
interacted with that section. I will then made it darker, raise it to the normal. You see this dark blue, I liked how it interacted with other the corner
and made it darker. Color burn just means that you're making something darker, while color dodge, here it makes it brighter. That's what I did, color burn. Then if you can notice,
let's go back to normal. I didn't align it exactly at the corners because
I wanted to steal to have like a bright white
border here at the end. I just put the image to be
just a little bit off center. Just feel free to play
around with the settings of your own image once
you have inserted it. Then once I did that, I played around
with the opacity. I can't remember
what opacity I had put but we can just leave it somewhere there at
around 44 percent. That's how now we do it. Now let me just show
you where you can get those canvas textures. The place I always
go to is Pexels. It's my go-to all the
time, pexels.com. Then when you come here,
you just search for canvas texture or paper texture. Let's first of all search
for canvas texture. Now here you see that you have so many different types of options for the canvas texture. What you can do is you can even click over here
on paper texture. So scrolling here, you
can see that we have this really nice paper
texture, even here. This is a really
nice dark one if you want a dark, grungy look. This paper looks really
pulpy and nice. Where is it? I want something that has
texture that we will be able to see when I import
it into my image. Maybe let's download
this one and save it. Another things
that you can do is you can just come to the
internet generally and then search for paper
texture, JPG, JPEGs. Then you can see here so many different kinds of
paper textures. Even on Unsplash, there are other options
here on free pic, there's so many different ones, just look for one that is
free unless you want to be worried but free for commercial use in case
you're editing it. Other things that
you can also do is, let's just go back to Pexels. You can also search
for something like watercolor. Here we go. You can also download
like one of, this is an image, but again, you can always overlay
or an image as well, so maybe something like this. That texture looks really nice. Even this texture
looks really good. Any kind of texture. Let's
just download this first one. Let us now go back to
Procreate and open up an artwork that maybe
I'd done a while back. Let's play around with this one. I had already duplicated it. Let's see. I want to make
sure that this is a copy. Remember what I said, you
just click on "Select" selects the image you want to duplicate then duplicate it. Never hurts to have
so many copies so you can always get
around with them. Then once we're here, I want to go to the top most
layer, choose Layer 10. I really hope that it's there's still layers to
play around with. Then I click on here and
then I insert a photo. Clearly it wasn't
downloaded another photo, it was maybe
downloaded as a file. So click on ''Insert a
File'' then under Chrome. Then here are the two
images that we downloaded. Let's click on the
''Paper Texture'' first so that I can
show you what to do. We import it. Then next thing to do is to resize it such that it
covers the whole thing. I want you to cover
the whole thing so let me just
resize it like that. Then click on the
arrow to confirm. Now, next up is I click on the ''N,'' and
then I key around. Let's move this to the side. Click on the end.
Then play around with the different kinds
of blending modes. Color burn, you see how it
looks, darken, multiply. It all gives you a different
look for your artwork. I don't know why
I really like the linear burn for some reason. Even the darker color
looks really good, though it's cut out
that white part. Lighten, screen, color dodge, add, overlay, soft light, hard light, vivid light, linear light, pin light, hard mix, difference, exclusion, subtract,
divide, hue, saturation, color, luminosity. There's one I really
liked at the top. Then remember what I like
might not be what you like. I really liked the linear burn. Let me see if there's
any other one that I really liked more. I really like the
linear burn, this one. What I shall do is I shall now just play
around with the opacity, maybe take it a little bit
lower, somewhere there. You see, I like how it's
become even darker. I hope that's a
little bit visible. I like how it's become darker. If you zoom in, you can see
that there is a little bit of texture from the
paper being seen. If I were to even change it, I'll change it to multiply. You can just play
around with any one of them that
you really like. Just put the texture
that you like. I still feel the color burn. Now you can see that your image looks like it was
drawn on paper. The texture of that image, the canvas texture, paper
texture that you have imported is affecting now
how your artwork looks like. For now, let me
leave it like that. Let me show you how you
can add even a pattern, ignore the watercolor
texture that we had added. Select Duplicate, Cancel. Where is it? This one. We can again import. Make sure that you're
on the topmost layer. We aren't. Yeah, we are now. We can also, again,
insert a photo. Again, it was a file actually. Insert a file, select the watercolor texture that
we had taken at that time. We can rotate it and
make sure that we have put snapping so that
it snaps into place. Actually, no, it
should be magnetic so that it snaps into place. We want it to be
exactly 90 degrees, then we expand it however we
want it to be, like that. Let's make sure we've
covered everywhere we have. Click on that. Then again, now just
start playing with the different blending modes. I've just painted somewhere. Let's now play
around. Let's see. Starting from the top, multiply. That didn't look bad actually. Darken, color burn, linear burn, darken,
darker color. You just see how
it brings around some interesting textures when
it comes to your artwork. There's one that I
really liked already. I don't why I'm really
liking the linear burn. If I do leave it on
the linear burn, then I just play around with this and lower it a little bit. Then I've already come
up with something new, a different look to my artwork. I could also still come here and play
around with the hue, saturation, and brightness. I could take down the
saturation of that image that I have just imported so that I leave it as
black and white. Then I could just have
these interesting patterns on the background. That's how you can
play around with those blending modes
that I showed you before to add in some new interesting
textures to your artwork. If you learned a little bit
about the elements of art, you know that texture is a really important
part of artwork. That's something that is
really fun for you to do. Maybe one last thing is I can show you how to add texture, maybe even to clothes
and stuff like that. Let's go back to Pexels. Let's see. Maybe if you wanted
this nice blue pattern. I think let us still play
around with the same lady, or let's play around with this girl over here that
I had drawn a while back. Actually here, I want to play around
with it on the layer below the stars
because I'm going to be playing around
with her clothes. I'm just going to
insert a file again. Now select that pattern
that we had added before. I want to move it
down somewhere there. Then what I want to
do is to make sure, you remember what I talked
about when it came to masking, click on Mask. Now we can erase if we do want. I can just erase the
sections that I don't need. Let's take this up. Let me choose a more solid. Maybe let's go with a soft
brush to be using over here. We make sure that we're removing everything that we don't need. We can, first of all,
even play around a little bit with
the blending mode. I like that. We can play around with
that so that now when I am erasing I can see
exactly what I'm doing. The sections that I don't
need just all the way around. Remember once in a while to lift up your pencil
whenever you're doing such things so that if
you do need to undo, you don't also end up undoing the good parts that
you had already done. [LAUGHTER] Something like that. Can even soften out
this bottom part just that it's a little
bit softened out. There. You can even select
it and just move it a little bit so that we cover a larger area, somewhere there. You see how you can
play around with your layer and add
something new to it. You can just use a white to bring it back a
little bit to those sections. Again, maybe spread to
this side so that we move it a little bit to
cover until the end. Then continue coloring
this section right there. Select it again and expand it just a little bit right there. Then again, now go to
black so that we can erase just a little bit
what we don't need, sections that we don't need. You see how it
[inaudible] You just used the Layers option. Maybe we take down the
opacity a little bit, there. It has added an
interesting texture. That's how now you play around
with the blending modes to add texture and life
to your artwork. I hope at this point,
you've understood layers, at least a preliminary
understanding about them. They still have so
much capability that we're not going to have
gone through in this class, such as using them during animations and the
making of comic books. But as I said before, that's not part of this class. I hope you're ready. Now, let's move on to the
next part, which is color. [MUSIC]
16. Colour: [MUSIC] Now the last step, I think
is the color section. The color section, you
have all these options. Let me zoom in. For the color sections, you have all these four views.
Let's start with the disk. The disk is basically
the color wheel, but now it's in a disk format. For example, if we come
here to the greens, if you come towards
here at the top, you have the desaturated
greens and right here you have the saturated greens and here it goes
down to the black. You have white, saturated
green, and black. Right here in the middle, the values, all of
them are right there. Now you can move to whichever
color that you want. Classic is a square
instead of a circle. Here you have the
hue right here. You see the hue. Remember
I said the hue is a color. You have the saturation, how pure the color is, and
you have the brightness, how dark or light
it is right there. Next is harmony. This one is particularly
important when maybe you're doing what's it called,
the color schemes. If you want a complementary
color scheme, which is opposites, you see, it gives you
directly over there. If I click on here, the
part of complementary, I can also select
split complementary, analogous, which I
do want to try just right next to each
other and tradic, tetrads, all of them. It's up to you and you can also control the brightness
right here. Next is the value here, I can directly select the color that I want and
I'll note it over here. I select the color that I want, the saturation that I want, how pure it's going to be
the brightness that I want. For the palette section, this allows you to import all
the colors in a file or in an image so that you
can just select them directly from the
imported section. For example, we can create a new palette
from a photograph. That means we can
come to the input a photograph section, select our photo, perhaps
that one and it'll import all the colors from
that photo, that image. But then again,
it's never really that accurate because
as you remember, I selected a photo of my
face in a blue dress and it hasn't gotten any of the
colors from my face. These are all to desaturated and not dark
enough for my skin tone. It's more useful when you just want a general color range. Then you can use that to bury it yourself as
you're painting. For example, let me just
go back to my gallery. I started this sky
cloud painting. Let me open up reference so
that you can have a look. Is it open? Here it is. I wanted a sky that
has these colors. I will not draw any of these things over
here on this side. What I did was I imported
here in the color section, I had these three
different palettes. Let me show you the photos
that they came from. They came from these
three different photos. This one, this one and this one because I
knew I'd be able to get a large range
of colors from them. When I'm doing now my drawing, I just pick from whichever
of the three that I wanted. That's how you use the
importing thing, color picker. Next up, I think
the last thing I'd show you is that when
you're painting, if you want to make work
easier for yourself, for example, as I said I
usually use this value part. You can just drag from
the top over here and move your color picker
wherever you want it to be. I will mostly have mine
depending on what I'm doing. Sometimes I'm
watching something on Netflix as I'm painting. It just depends on
the day, the mood. I can now just arrange my different
sections, viewpoints. I'd also have maybe my
reference viewpoint right here. Drag from the bottom
with your finger just like that, and arrange it. Tap here at the top and
move it, arrange it here, then have Netflix here or whatever I want to
do as I'm painting. You can always arrange your
viewing space like that. This is zooms in, this zoom out. Remember, whenever
you get tired, take frequent breaks
when you're painting so that you come back
with a new perspective. Sometimes you don't notice mistakes until
you've walked away from your painting that's
when you notice new mistakes. An example is this artwork. But till now, if not
yet finished in my eye, because this part
doesn't look that good and this petal for
doesn't look that good. I will let us come back and see new mistakes that are made
and I come back and edit it. When I put my signature here, it's still not yet complete
in my mind until the day that I feel like I'm
completely done. Same goes to this one which I've been doing
for quite awhile. I'm not, yet done with
it and it'll take me a bit of a long time. I just take my time
slowly as I work to make sure that I have done my work the way I
want it to look like. [MUSIC]
17. How To Select Your Reference Image: I think at this point
we've gone through all the different tools and sections and hidden
icons in Procreate. I think at this point, let us move on to how you
would select and edit your reference image when you are beginning a
new piece of work. Because I know I've gone through this in my previous classes, but I think this is going to
be the be-all and end-all of how to select your
reference image and how to edit it within Procreate. I have two preferred places of getting my reference images. First of all, the first
one is always Pexels. Pexels is for when I am drawing mostly landscapes or birds, animals, sometimes people. This is really nice. [LAUGHTER] This is
really, really nice. People, environments. This is where I normally
get my images from. You can search for anything. For example, when I
wanted to draw the sky, I just came and searched
for, I think clouds. Then what I did afterwards, the good thing about it
is that you can filter it and select the color scheme
that you want. The hex code. Now hex code is usually the
color scheme of the colors. For example, hex is usually
a range of numbers. For example, pink hex code, and just search
for pink hex code, and then they'll get the
hex code just right here and select the kind of
color pink that you want. You can select here, or sometimes you may just write pink clouds
and it'll come up. You can specify to write to the size that you need.
This is really pretty. All sizes and orientations depending on the kind of
reference image that you want. Even portraits are really
good to get from here. For my class on how to draw a striking portraits in
charcoal, with black people, I got most of them from right
here because I think what I searched for was just
portraits, lighting. Let's see, lighting or
something of the sort. Lighting, I hope I've
selected the right thing, and you get really
interesting portrait. The good thing about Pexels,
oh this is so pretty, is that you can use it
for commercial use. Sometimes you just
can draw exactly, copy as it is over here. Of course using
your own artistic license and changing
whatever you want, or you can just
take aspects from different photos and incorporate
them into your artwork. That's Pexels for you. Other alternatives are
usually Pixabay and Unsplash, but Pexels is the most extensive that I have
found and it's all free. The other option that you
can use is always Pinterest. Pinterest is awesome
for portraits. Absolutely awesome and
you can even see that my home feed is filled
with portraits. You can just come here and
see whichever ones you want. This is really pretty, and also see inspiration
from other artists. You always learn something new from other artists like, yeah, I really love how she's put the highlights or he's
put the highlights. Get inspiration. Save them and use them
in your own artwork. Get inspired by them. Once you've gotten
one, for example, if I wanted to draw this one, which I probably will want
to paint it later on, just click on download
image and it shall be downloaded into your gallery. There it is. You can just use the same process of
importing it into Procreate. Import it and paint it. If you want to draw it
in black and white, you can come here, edit it and just to decrease
the saturation completely. Wait, where is it? Over there. It's not yet striking enough if you've
taken my past class, you will know that we like
to draw striking portraits. You can see her skin doesn't
have a nice range of values. We definitely know that this part under the neck
should be much darker. This part here should
be much darker, as well as here, there
should be more of a shadow. What I normally do is come to black point and then I
take it to a much higher. You see now the contrast
is getting better. Come up here, the brightness, we can edit it, but I don't think this one
needs any brightness editing. Contrast, I always
take it a little bit higher always,
no matter what. Because now you
can see that this highlight over here from the reflected light is
popping a lot more even here, this dark section right
here is popping more. The highlights are all popping
more, even the shadows. Her neck right here
at the rib-cage, at the joining part, it's a lot more visible. So just play around with these settings if you're
painting in black and white, which are also a really
good exercise to do. I'll have make up class
in the future and how now to paint portraits
in black and white, and later on, on how to color them after
you've done that. Because that is also a method
of painting where you start with a black and
white complete range of values and figures, then later on paint on
top over it with colors. It comes from the traditional
painting when you're painting with oil paints where you have an under painting. Then later on add glazes on top. I have makeup class on
that, in the future. [LAUGHTER] Just
come around here, play around with it if you want to paint in black and white. If you do not like also the
color scheme right here, you can export into Photoshop, play around with the
background here, and then make it
into what you want. But also, you can
do it on Procreate. [MUSIC]
18. How To Edit Your Reference Image: [MUSIC] Since this is Procreate, we shall be editing our
reference image right here. It's much easier to
do it on Photoshop, but we are talking about
Procreate this time and the Photoshop will be a different class
in the future. If you want to edit
your reference image, the first step is
possible to come here and import your photograph. Here it is. It's imported right into our painting or drawing. You can see they
created a layer for it. Maybe if you want to change our background into a
different color, we don't like the screen, maybe. [LAUGHTER] We can select
the background and take it onto a different layer so that now we can play
around with the hue, saturation, brightness,
and all that. First step is to select
our Selection Tool, remember it's this one, and make sure you come
to "Freehand". Now we're going to just trace
all around the background, first of all,
that's a fast step. So let's do that. [MUSIC] When you're tracing
around somewhere, make sure that if you do lift up your brush from the paper when you continue
with your tracing, you have to join that spot directly where you
lifted it up from. Otherwise, you shall have
an incomplete selection, and I shall show
you that in a bit. [MUSIC] I'm doing my best to
be as exact as I can. But of course, to be
human is to error. There are some sections
that I can already see I have messed up a little bit. Note, once I've
gotten to this point, I shall just come all
around the back because I have to close my selection and bring
it back to this point. There. Now we've
done our selection. Next thing is to use
our three fingers to swipe down, like that. Then now we're going
to click on Cut, and then swipe down again
and click on Paste. If you click on your layers, you'll see that the background is now on its own
different layer. From here, we can have fun and play around with the hue and saturation and brightness
and everything. Maybe for example,
if you want to now make the background, let's see, red, if we wanted to. Though this one, the
green one is really nice because it really matches
with her eyeshadow, but we can make it red
to play around with it. What we'll do is we'll
just exactly come right here to the Adjustments
section and click on Hue, Saturation, and Brightness. Now when we play with the hue, saturation, and brightness, the only thing that is
going to be adjusted is the background because
the background is what is on that layer. Remember, we click on it; hue saturation, and brightness. We can play around with the hue. The purple looks so nice. Now you can see the imperfect
places where I selected. But this is just for editing
purposes when you're playing around with
your reference images. I had said that we
are going to make it red, for example. Let's come to this
part over here. Remember it's still interacting with the original
background, which was green. The color that we're
getting over here, it's not a pure red
because it's interacting a little bit with the original
background that was there. If we wanted a pure red, we'd still have to
play around with the saturations right there. So we can play it
around with that. Even more of magenta and
make it brighter or duller. See, we have a whole
range of colors. That crimson color
looks really nice. You can see the parts that were empathically cut can still
be seen right there. That way you can
play around with the background and
maybe come up with a mockup of how you
want to reference image to look like
the final image. Even other than that, we can still play
around with the hair. We can give her a
different hairstyle. Make sure that when
you're doing these edits, just do it on a
different layer so that if you don't
like it in the end, we can always change it
back to something else. You can just paint over
the hair, that's too big. Give her maybe a
different hairstyle. Try see how she'd look with it. You can just paint
over that whole place, leave her edges on. That's like a huge bouffant kind of hairstyle. Give her that. Maybe play around with
the brightness to give it a little bit of
highlights and all that. Maybe give her a braid as well. Give our highlights,
whatever you might want. You can just play
around with it and see whichever hairstyle
would be best for you. Remember now over
here, since we have the original hairstyle peeping
out, what you can do is, you can just pick out
the background color and paint over it so that all that we can see is a new
hairstyle that we're giving her, whatever it might be. It can be this that I've made, you can make it flatter. You can give her a huge uproar. Now I want to erase
that. Let's see. I actually wasn't erasing. You can now give her huge uproar by erasing what we had drawn before and making sure that this part is selected
and colored in. [MUSIC] Erase this, select that, smaller brush
size, then an uproar. We need a little bit of this
to paint over that section. [MUSIC] There is a
little bit smaller. Just like that. [MUSIC] Make sure that the color of
the background is the same. [MUSIC] Just to define the uproar. You see, you can just
play around with your reference image to
get a look that you want. If at all, once you've
made this afro, of course now this is just
for you to make mockups. You can save them as you
go along as PNGs or JPEGs, that you can reference to them. Of course, now you see this afro doesn't have any
highlights or anything. You can't really see the
highlights on the poof. You can just now come
back to Pinterest and search for maybe
a lady in a ponytail. Lady in ponytail afro. Let's see the images
that we come up with. You can see this one. It doesn't really show us the
highlights so well, it she does show the highlights
over here on the side, and you can now use it as your reference image
as you are painting. Maybe let's search for lady with afro or just afro ponytail. Let's see what we're
coming up with. This is a video. I thought it'd be really nice. This one is pretty
good because when you click on it and zoom in, you can see how the curls
have little tiny highlights. It gives you a reference
on how you're going to add the highlights on your poof
afro that you have drawn. Or if it was a braid that
you had decided to go for, you just come back over
here and search for braid ponytail black woman, because it was a black woman
that we were painting, otherwise we'd get other
kinds of colors of hair. Just seen one, this one. Braided ponytail, but it's in the dark so you can't see it. This is pretty nice. Now you can see
the highlights on the braid and now it also guides you on where to put
highlights when you're painting your
own braid on the hair. That's how you just mix
and match references, edit them to make them
how you want them to be. Feel free to use all
your artistic license to make whatever kind of reference
that you wanted to make. Have fun with it. [MUSIC]
19. Lily Of The Valley Part 1: [MUSIC] Now let's put
everything together. I decided since it's the
month of May for the project, the sample artwork, we're going to draw the
lily of the valley. I didn't know even how
this flower looked until I look it up for
this class [MUSIC]. But it is absolutely
pretty and beautiful. I think it's a good example
to show you how to use all the different
tools that I've taught you about in this class. I'm looking forward to seeing
how you are going to apply your own deduction to
make your artwork unique. Feel free to do different
steps from what I have done. You can also use
different techniques that maybe you might intuitively think of just to
make your artwork your own. I'm looking forward
to see what you come up with and
please feel free to post them up on the
class project section. Let us just pick out
a reference image. They're really nice ones, so many of them over
here. Let's see. We want a simple one just
for this class [MUSIC]. I like this one, though, all of the images
are really nice. Let me download it [MUSIC]. Next is to create a new
canvas with the screen size. Then let us see. Let us edit our canvas size. First thing is to
change our DPI to 300, second thing, let us change
our dimensions to inches. I want to print it
out. Let's see. Let's just link it and make
it maybe 16 by something, that's 11 layers available. That's good enough
to start with. We shall still end up
cropping this canvas later on. Click on Done. Next step, let us import our reference image
in the canvas. Reference, Image, Import Image. Select that. Now let's move this
and resize it. Somewhere right here. Looking at our reference image, we can see that we
will need to either crop our canvas to
be a little bit smaller like this or we draw it while it is
vertically like this, but I prefer having a
larger screen to work with, so what I shall opt to
do is to crop mine. Let's just crop it using just our eye to
something, let's see. According to our settings, this is 8.15 by 12 inches. Let us make it
eight inches width, but then let's
come back here and link it because I like
how this is sized. We make it just a
little bit larger. We had too many
layers available, so let's make the
longer side 16 so that we have 13
layers to work with. Then we click on "Done". Let's move this right
here to the side. Great. Perfect. For
the first step, let us tone our background. Let's not work with
a white paper. Let's come here to
our background color. Let me do that. We can preview how the
color of our canvas. Let's come back here and select
a nice background color. I want something dark but we shall still end
up editing it later on. Maybe something like that. [MUSIC] I'm going to go along as I create this palette
for you guys. First step, let us select a pen. Let's go with a calligraphy
monoline pen to sketch. Make sure that we're
on a new layer. Our background color is set. Then for the color, let us select, let's see. Which color do we go with? Let's go with this white
that I have right here. I'm going to save it
right here in my palette. Make sure we are at a size, let's see, 2 percent.
Is this monoline? That size 2 percent
is really nice. Looking at our reference image, all that we have to
do, the first step, is just to create
one of these, guys, then we shall copy
it because we're making a simplified flower. We're going to just draw round, you can draw it as big
as you want it to be. We shall still end up
resizing it later on. [MUSIC] It's not that clean, so we can use our
eraser to erase. You can just leave the
reset on the monoline to erase that part right there. Make sure if you
do make a mistake, erase it carefully so
that we don't have any gaps because we shall
be filling this section. After we've done that, we can now just drag this straight color right here and fill it
in just like that. Let us minimize this
and see how we are going to scale our diagram. Let us just select it using the Select button then making sure that
you're on uniform, let us just resize it and let's remove the
snapping and magnetics because otherwise
it's going to make it look a little bit glitchy and make it small like that. Maybe right there. Then let's move it
somewhere there. Just somewhere at the center. Then when you're
done, click on that. Next thing, let us now
duplicate this layer. Duplicate it, select
it, and then move it. Let's offset it maybe
somewhere there. Another one; duplicate, select, move it maybe
somewhere here. Let's make this one
just a little bit larger and we can
rotate it a little bit. Come back to this one
duplicate, select, move it, maybe somewhere
here. Click Done. Duplicate, select, move it. We're going to make
these guys overlapping. You can see these two right
here are overlapping. We'll make these
ones overlapping. This second one that
I'm putting right now, I want it to be behind the first one that
we've already set. What I'll make sure,
once I've set it, I'll come back here to the
layers and make sure that it is underneath the
top the other one. Let us just hide these
other guys to make sure that it is underneath it. Let me move this canvas
to the side right here. You can see that the one
that is on top right here, when we hide it, it is the one. So this second one
is right below it. Good. Let us make that
other one visible. Now let's maybe make this one, let us duplicate this. Duplicate, select, and move it right here, rotate it a little
bit right there. Let's now make this
one right here. You can see it's
behind this one, behind also this one, so it should be somewhere here. Let's go to that layer.
I think it was this one. Let's hide and see.
Yes, it was this one. Whichever one that we're making, it should be now
below this layer. Let's first of all
make that visible, duplicate and then make sure
we put it underneath it. Select and move it right here. I know that it's a little bit difficult to see since they're all the same color but we shall end up playing
around with the colors. Whenever you're unsure of
which layer you're on, just hide that
layer then make it visible again so that you can be able to see which
part you're drawing. Now we're done with that. Maybe now let's put this one, this flower right here. It's behind this flower. This one is behind this flower, so we'll make this big flower and then move it
right down there. Let's first of all
find this big flower. Which one is it? I
think it is this one. No, it's actually not
that one. Is it this one? Yes, it is. This one right here. Let us duplicate it, then make sure that
we moved it below, and then select and move
it maybe just right here, then maybe rotate
it a little bit. Have fun with yours. It doesn't have to exactly look like mine. Let's make another one
right here at the bottom. We can just use any of
these other layers. Let's duplicate this one. Select, move right here, rotate to the side,
maybe right there, make it a little
bit smaller there. Let's make this one now. Which one do we do? Duplicate, select, move right here. Make it just a little
bit tinier, there. You can leave these ones, we can just draw
them in later on. [MUSIC] For now, that has now
started working on these guys that we've
duplicated right over here. [MUSIC]
20. Lily Of The Valley Part 2: So what we're going to do is add a little bit of
shading to these. So we're going to do them one
by one so that you can get in some practice on
how to do the shading. Let's start with the top one. Which one is this one? It's this one over here. So we can cluster, will
alpha lock that layer, alpha lock it so that now
when we are shading on it, nothing is going to the paint is not going to
go anywhere else. Then make sure that
we have selected the painting brush right there. That is actually
the knee corral. We wanted to use any
corral brush default one that comes with procreate. So we are going to
come right here. I'm going to choose, going to come back to my desk and to just
play around the greens. So I'm going to choose maybe add dark green color
somewhere there. Then we need to make this
a little bit bigger. Then I'm just going to shade, shade, adding some
shading, some shadow, or shading all over just on some areas to make it look a little bit
three-dimensional. Some parts would mean
to leave bright white. And also make sure they have to make sure that I have
saved it in my palette. Then come back again to my desk, maybe just a little
bit of a darker color, just for some little
bit of variation. Then here show that it is calling this a little
bit in the shadow. So we shall repeat this process
for all the rest of them, making sure that I have
saved this in my palette. Let's now come to another one. Maybe the second
one is this one. Let's see which one
is it right here? This one right here. So again, I'll just
come here to my desk. Or I can just use
directly something that I've seen here
on my palette. Select that green
and do some shading. Oh, one thing we forgot to do, make sure that your
alpha lock that layer. That has to do some shading, little bit of shading
all the way round. Can even just come
here to my desk, select a bit of a greenish
light green color, make my brush bigger and
put it all over everywhere. When my green to be
a little bit yellow. So I can just come right there. Selected. Play around
with your color wheel. All that I want you
to focus on right now is not necessarily choosing, selecting the right colors. It's just learning how to use Procreate and how to use the different
layers and all. Let's go to another one. This one last step of the log so that we don't
forget it and find it. It's this big one right here. So again, come here
to our colors, maybe let's use this dark color. She did think I can use
a little bit of blue. Let's come here to
maybe lose sections. Maybe something a bit
darker, the blue side. Remember to leave some sections white so that it looks
like it is highlighted. Great. Again, let me just save this to my palette in case you want
to use that same color. Next, let's move on to
this one. Which one is it? It's right down
here at the bottom. Let alpha lock it. Let's use a little bit of green. There's a green that
I didn't see you. I think this one wasn't saved. So let me just come to my palette and make
sure I saved it. Let's use that green cluster will be alpha lock the
layer. Yes, we did. Let's shade right
there a little bit. Then choose a darker
color. This dark. Mice maybe just shoot
this one inside. Right here at the bottom. At the top. Great. Now, moving on to the next one, we're just repeating
the same process all around this one right here. Let's start with
alpha locking it. Then let's read this section. Right here. This other section
ruined said she did so much because it's
like as if it's in the light meat this
side, much, much darker. Let's leave it as that because
we will make the edges pop by shooting this part that is
underneath the second one. I think is going
to be the next one we're doing right here. Let me undo that. Next one. Let's make trades the one. Wait, which one is this one? Let's see. This one right here
at the corner. So again, that has alpha lock. Select a greenish color. Maybe this one. Again, don't remember. You don't have to use the same exact color that I'm using. I'm just going on my color
wheel and selecting effects. It's very green. I'm selecting some
greenish color. And just using that. Then we're going to make the
rest of it be in shadow. Let me make sure that
I've saved this for you. Let's select that color and
shade the rest of this guy. Let's put him in
shadow completely. Then I think we can afford to make to make that green a lot darker right here and this other edge make it
darker. Now, moving on. Next guy, which I neither
this one right here. So again, Alpha Lock, come here, Let's select on our palate
the dark blue, this guy. Then we're just going to
make sure that this part, this section that is
overlapping, is weighed up. So that's the top flower. Can seem like it is
popping lot more. There we just eat that day. Feed him in sheet
to this bottom one, this bottom part
to be much darker. Let's let's see if
we can bring in another color just for a
little bit of variation, maybe the screen just
a little bit on top. Great. Now next guy, this baby. Let's see where she is. She's right here,
which was in the back. So we're going to shade her. Use, maybe, let's use
this guy right here. See shade right here. Maybe leave that part
sheet. I like that. Now, who are we left with? We're left with this one. This guy right here, the top. Let's alpha lock. Did
we Alpha lock this guy? Let's see. We might not have, we do not alpha lock this. So what I'm going to do, this is a good
example now to show that what happens when
you don't Alpha lock. So we're going to undo until
we redo everything that we did right here and
make sure that we have done nothing
on that layer. Yes. It's now clean. Let's now alpha lock it. Remember, don't make the
same mistake as I did. Like it when at
least you can also see the mistakes that I make. I always, always for some
reason forget to alpha lock. If I'm supposed to lock. Usually forget to draw
on the right layer. Means that I just
have to do lots of redoing of my work,
which sucks sometimes. Now next layer, again, Let's make sure we
have alpha locked her. And I remember this guy
right here, the top. Let's take that dark color. Shade one side. We're just observing the light. The light seems to be
coming from this direction. Sheet like that. And then on to the last one. Right here. I know it seems repetitive. But you see every single flower has a different,
you haven't locked. Every, every
different flower has a different kind of
lighting scenario. You could duplicate after you put the shadows
on just one flower. Thing is you won't have so much variation in terms
of lights and shadows. Especially when it comes
to this reference image, you can see that it
has lots of variation. Every flower is different in
the lighting that it has. So that's why I decided
to first of all duplicate then add the lighting. Good.
21. Lily Of The Valley Part 3: Let's go now to the
adding one layer. Let's move it right
to the bottom. Because this layer,
we're going to use it to add the stems. We're going to leave these
shoots right here at the top. For now, we're not
going to draw them. This light green color,
yellowish-green. Let's see which
color can be used. We can use whichever color because we can always
edit it later on. What I normally like
to do is to look at the general color all over and draw using that
color first. Let's see. Let me see. Let's test out this color. How
does that look? Yeah, I like this color. Let's use this one. Let me make sure I've added it to my
palette for you guys. Then I'll come back to my
calligraphy pen monoline. Make sure I've taken
the size up way higher. Still way higher, a
little bit higher. I think that's a good size because our Canvas is quite big. So let's move this
canvas right here. Then now you're going to see the goodness of the
monoline brush. When to start like that. Then we're going to
hold it right there. It's created an arc for us. Then let's come down like this, hold it right there. Created another arc. Because I'm trying to go
carefully to make sure that I'm creating smooth lines. For right now, I want to
create smooth lines then maybe I can add just a little
bit of size over here. Then right here I'm going to
add another guy like this. See it's created for us an arc, though that's quite a sharp arc. Let's make it a
little bit smoother. I don't like it. Let's
make it into a line. I was hoping it and
give me a polyline. Let me just redo this
part, this line. That one, I already drew
it smoothly enough. Then let's come down right here. Maybe you come like this. We need to make some parts fatter by just drawing over it. Then let's maybe draw this guy, that was actually
quite a smooth act. I'm proud of myself. Let's
make this guy fatter. Let's draw this, make it a little bit fatter. You see how with the monoline, you get to draw really
smooth lines surprisingly. Draw this guy right there. Let's draw a little bit
of green right there. Now, let's come down right here. Since I'm making it quite fat, I don't need to make
it into just one line. Then going to make it
go down right there. Then maybe draw this
shoot right there. I think we'll just have to
add maybe one of these so that this guy right
up here doesn't seem like she's hanging too much. What I'm going to do
now next is maybe, let's see which thing
haven't we used. You remember the masking
and the clipping mask. What I'm going to do, let me see, I'm going to
create a clipping mask. Let's now learn how to use
clipping masks in action. We create another layer, then double-tap on it and
click on "Clipping Mask". It's clipped to the
greens, the shoots. Now we're going to add a
little bit of variation, it's a bit too plain. Let's come back and make
sure we've selected our painting Nikko Rull brush. Now let's start with
some highlights. Let's use this white we
already had right here. Let's just add in
a little bit of highlights to some
other sections. It looks a little
bit translucent. Just not all the sections, play around with the
size of your brush. To just add a little bit of
highlights to some areas. Not everywhere,
just to some areas. Let's go that right
there. Where else? I think I like that right there. Maybe is a little bit right
there. Little bit there. Right there. Good. Next, let us select a
much darker green. Let's click on a green
then come to our disc. We want a dark deep green. Make sure that I've added it
to our palette right there. Let's see if the screen, we're going to add
some more variation to our shoots in some sections. You don't want it to just be
a plain seam green all over. You want to make your artwork
interesting to look at. We need to add some darks. [MUSIC] I'm going to also make it even darker. Let's go there. Save it to our palette to make some sections even darker than others in a little bit of
variation to our work. Right there, maybe. Right there, a guide to be
in shadow all the way down. What do you think? For now, that's okay according to me. Remember whenever
you make a mistake, just feel free to undo, that's how my baby is
looking right now. That's a bit too
dark right here. Next, you could
actually have labeled all these layers just to be sure which layer you are drawing
on, I chose not to. I think let's now draw
one of these so that it doesn't just look like
it's hanging up there. It's bothering me. You've seen we've reached a maximum
number of layers per team. Now we're going to learn how
to work around our layers. Let us now find ways
to merge these layers. First thing I want to
do before I merge, remember this is only
the case that you're also limited and you've
reached the limit, let me. Let us work as if you have
also been limited like me so that we find ways
to work around it. Last thing I want
to do is I want to blast some of these guys, especially the ones which are in the background so
that they bring in some variation in
terms of which ones are visible and
which ones aren't. Let's start with this one
right here at the bottom. Let's find it. You see why it's good to label, so you wouldn't have
to do what I'm doing. I'm going to blow this
one fast. Here it is. I come to that now, then come the adjustments. Then I come to a Gaussian
blur to blur it a little bit. [MUSIC] Oh I just
remembered something. First thing is to
make sure that you've removed the Alpha lock fast before you come
to adjustments. Gaussian blur, it
out a little bit. Maybe six per cent. Another one I want to blur is this guy right here.
Let's find her. [MUSIC] She was down
here somewhere. There she is. Remove Alpha lock, come to Adjustments, Gaussian Blur, let's blur a little bit just to make it seem like it's in
the background. That other one was
at six percent. Let's make it all
to six percent as if it's also quite behind. Maybe let's make it blurred. Another one I want to to
blur, is this guy right here. Let's find the guy. You see the iteration
process I have to go through all the time because of my laziness in
terms of labeling, there, we finally found her. Again, remove Alpha lock, come here to Gaussian blur. Well blurry too much,
maybe three percent. That's not bad. I also want to blur this guy right down here. Let's find the guy. Feel free to be annoyed
at my iteration process. There, found it. Remove Alpha lock. We need to blur this. Let's see how much
we're going to blur it. Just going by eye. Some of them, I'm
blurring them a lot, some of them are a little bit,
like that, seven percent. Looking at this, I
think I'm also going to blur this a little bit. Which one did I say I was
going to blur. No, that guy. Otherwise Is fine. That one. This one, I want to blur it. Remove the Alpha
lock, Gaussian blur. Just blur it a little bit. [MUSIC] Then maybe this last one. Let's find it. [MUSIC] Now we'll have to merge all of them together so that
we can get more layers. Once you do this,
you cannot undo it. Click on "Merge Down". Now all these have been merged because some of them
are still alpha locked. The layer is still labeled
now as Alpha locked, but you can always remove that.
22. Lily Of The Valley Part 4: [MUSIC] Now, let's make one layer
for the petal up there. Again, come here,
make sure we've selected our calligraphy brush, the mono line, and then
let's select a white. This is more yellow in
nature, but it's fine. Let's select a white. Then make sure it's small. Remember we made our
size a little bit big. Let's zoom in a little bit. We can just draw it
as big as we want to, first of all, then
we shall resize it. You build it like that. Then I'm going to select it and start resizing it and
rotate it a little bit. You'd bring it right there. A little bit smaller. [MUSIC] Let me just make sure
that I have added this shoot to be joined to it. Got to a 100%. I join it. Going to erase this
section right here. I can see it's a bit obvious
that joined, just like that. Can even make it a little
bit narrower towards the end by erasing. Now, next thing, let's come back here
to our clipping mask. We just make sure that
we have selected. Now, this isn't how
you select colors. Like maybe that
color right there. Make sure we get back
to our painting brush. You corral. Make it bigger. I think we need a white to make it look a
little bit transparent. Are we on the clipping mask, yes we are, let's
make it a little bit transparent right there? Look like a shoot. Then a little bit darker on
some edges. Right down here. Great. It's a bit
obvious right there. Now, let's come back
and finish this guy. By now, I think you know
what you're going to do. We're just going to alpha lock the layer or remember you can also use a clipping
mask if you wanted to, then we are going to take some
yellow, maybe our colors. This guy right here, make sure you're on
the right layer. Yes, we are. Then maybe come
back to our desk, come to a yellowish
color, that one. [MUSIC] This is just an exercise in learning how
to use Procreate. Now, if it's a bit too harsh, we can lower the
opacity like that. [MUSIC] Now, what else? Maybe I want to make this
part a little bit darker. That's why I've come to the
disk clipping mask here. Then I'm going to
select this dark blue, and then we need to shade this section a bit
too bright for me. Now this, we can
consider it done. Now we're just going
to play around with the background layer, looking at our
flowers that bright. Maybe make our background a little bit dark with
a lot of texture. We can tear our new brushes. You could use any of these. But we can use any
of these guys. But we can play around with
the texture than brushes. Let's see, which one do
we want to use today? Let's use grunge. Let me see if I can find
something else today. Stickman looks nice. I want a dark green color. I'm going to experiment with
these guys, but let's see. Let's take that dark green. I don't like this texture. It's a bit boring,
don't you think? Let's not use stickman. Sketching nothing. Drawing, no, evolve, let's see. Make sure that you
select the color, the size is my actual process
whenever I'm drawing. I really experiment quite a bit. I'm not cutting anything out. C, dry brush. No. If you'd like something so far just use
it for your own painting. But I thought of something. Let me do what I usually do. I show you, let's come to this layer and fill
it with a dark color. By dragging from the top,
that's not dark enough. You need to go
darker. Let's see. Is that still darker? No, too dark, too dark. Let's pull back. Not bad. That's not a bad one. You can now take this
chance to learn how to play around with the hue
saturation and brightness. Hue, saturation, brightness. Let's see, you can put
whichever one that you like. Because what I want to do is to come here to make
Crop and Resize tool. Make sure I've not selected
my re-sample Canvas. Make sure you've
selected the link. Because what I want to do is now to just resize my Canvas. My camera unfortunately cut out a small pad
section over here. What I did was that I
made sure that I centered our drawing exactly at the middle of the Canvas
that I've just expanded. It doesn't matter how much
you will have expanded it, in a few minutes, you'll see
just how big I made mine. Now as long as you've selected
snapping, just a line, you're drawing the green part
right at the center of it, then click on ''Done''. The next thing that I did was I went to my background
layer, you know, it, and then I tapped
on it and then I changed my background
color to a pure white. After that, what I did is
that I may try that I went to the layer where we have
our dark green background. Then I double tapped on it and made sure that
I alpha locked it. Then I selected
my soft airbrush, and I selected a light
yellowish-green color that is in our palette. I shall show it
here on the screen. Then after that,
I made sure that the size of my soft
airbrush was quite large because we're
going to be covering the whole Canvas and you
shall see in a few minutes. Then after that,
I just moved on. It seems as if the light is coming from this
side. What do you think? Color pick a little
bit. Maybe here. Just to make the transition
a bit more seamless. If you'd like, you can
even use the smudge tool, this guy right here to blend
the two areas together. [MUSIC] Down here I want it
to be much darker. [MUSIC] There we go. You can even make this color, this one that we were using, just a little bit brighter. Now, this is where maybe the
value part would come in, you could bump up the brightness but still
bump up the saturation, maybe that way and let's make this bright
but even brighter, just right at the corner, you could even pick up
a little bit of yellow, push it towards the yellows. Just a little bit, and wait, not there, right there. I didn't save this. Let me make sure I've saved it to a pallet. There. Now sure it's been saved. Then back to that yellow
lightly at the top. There. You've made
a simple piece of artwork just using Procreate. I think we've used most, if not all of the tricks
that I showed you. The only one that we haven't
used is the masking option. Remember I told you that
that one is if you want to erase something
non-destructively, that's when you use it. What else, we've not
added in any textures. Let us duplicate this. Maybe we add in some
textures with blending mode so we go to Gallery,
select duplicate. Done there, come back here. Let's see. I don't
know if I have any textures saved
up. Let me see. Now here 1, 2, 3, 4, 5. I don't know if I
have another layer available. Yes, I do. Let us add in image,
insert a photo. Do I have any saved right here? I don't have any textures. Let's use the other
texture that I had saved the last time
from my files. We could use this texture. [MUSIC] Here we go. Make sure we rotated it, make sure snapping
and magnetics are on the wall so that
we can rotate. There we go right at the center. Now, I don't want it
to be at the center, I want it to be for
this guy right here so we'll end up cropping
it right there. Good. What we can do is first of all, let us contract
all these people. We can lower the
opacity of this. [MUSIC] Now, we can crop it, come here to rectangle. Then we can just draw
the rectangle we want which for this
section like that. Then, I need my three fingers, move down, then cut it. Now we've deleted this
because we don't need it. Then down, paste it. There we go, right there. Let's now start playing
with blending modes. Let's expand just a
little bit, right there. Blending modes. Play
around with these ones. Let's move this here to the side so we can see what we're doing. There. We can play around with
different blending modes. Again, I have a thing for linear burn. I
like how it looks. [MUSIC] Like that. I like the linear
burn, this one. I even do like the effect
that it then put the flowers. But if we don't want that effect around the
flowers themselves, we can now select
the Eraser tool. Here now we can't use
the monoline brush, let's use the soft
brush to erase just right here around
the flowers if you want so that our flowers doesn't have to be everywhere
so that our flowers remain the way we've
drawn them before. Some areas of the
flowers can be left with the effect that the
addition has brought in, that blending has brought in. That way we have done it so you can see that's
how it looked before, this how it looks after
and it looks even grungy and prettier like that. That is how you can use Procreate to create some
beautiful little artworks, whichever one that you want. In future classes I'm going
to take you through how you can even create
other things. We're going to
draw people, we're to draw realistic things. This is something that I drew, that it's pretty realistic. I hope you enjoyed watching and following along with that. If you have any questions, please feel free to
list them down below. I shall include every
single resource that I have used for this class. All the colors shall
be in the palette. Feel free to use whichever
color that you'd like from the color
disk yourself. For this class, we mostly
used these colors right here, which are close to each other. Do you remember
what they're called if you've learned
about color schemes? They are called the analogous colors because they're right
next to each other. Us we have used these colors,
the yellows, the greens, and the blues, that is what we have used to
make our artwork. Even after everything
that we've done, the artwork that like most is
this one which has more of the blending modes effect that we've added
on the background. For this one, you
could also still edit it not even put this
background that I have put. You could take one of these brushes in the
materials section. Again, where is the one which
I normally like the most? The textures. I
usually like using the grunge texture quite a bit. Are we on the right layer? No this one I Alpha locked it. Let's add maybe one layer
so that you can see, put all those together. You could add some texture on your background instead of just doing what I have done, any of these guys can be used to bring some texture
into your artwork. I hope you've enjoyed
watching along and I can't wait to see what you've come up with in the class
project section. [MUSIC] If you have any questions, please feel free to reach out
in the discussion section. [MUSIC]
23. Speedpaint: [MUSIC] I really hope that you enjoyed drawing and painting
along with me. I'm really curious to
see what you've drawn, so please feel free to post your project in the
class project section. Put it at any stage, whether it is at the first stage where we started at
or at the last stage. You can also post the
different iterations with different kinds
of backgrounds, textures, blending modes used, anything that you want, whichever kinds of hues, iterations, doesn't even
have to be white and green, you can use whichever
colors you want. Please feel free to go
wild with everything. In case you have
any questions or if something wasn't clear enough, please feel free to post it in the class discussion section, and I'll get back to
you as soon as I can.
24. Closing Thoughts: Now we've come to the
end of this class. I really hope that you enjoyed
following along with it. I tried to make the class
as simple as possible, trying to put myself
in my own shoes, how I felt when I first started using Procreate a
couple of years ago. I hope that there is no confusion in how to
use any of the tools, at least when it comes
to drawing and painting. When it comes to animation
and other things, we shall go into
it much later on. I hope that you've enjoyed, really looking forward to
seeing what you come up with, and I hope to see you in my future classes
where we are going to be painting
different subjects. First of all, definitely portrait because I
know that is what most people have
an interest in but we're also going to animals, landscapes, even later on
into animation and comics. If you're also still interested
in drawing traditionally, I have other classes
up already here on Skillshare so I hope that
you'll check them out. If you're going to see
the different projects that I'm working
on in real-time, you can check out
my Instagram where my stories are almost
always active. Happy painting, and see
you in a future class. [MUSIC]
 Chena, Artist