Transcripts
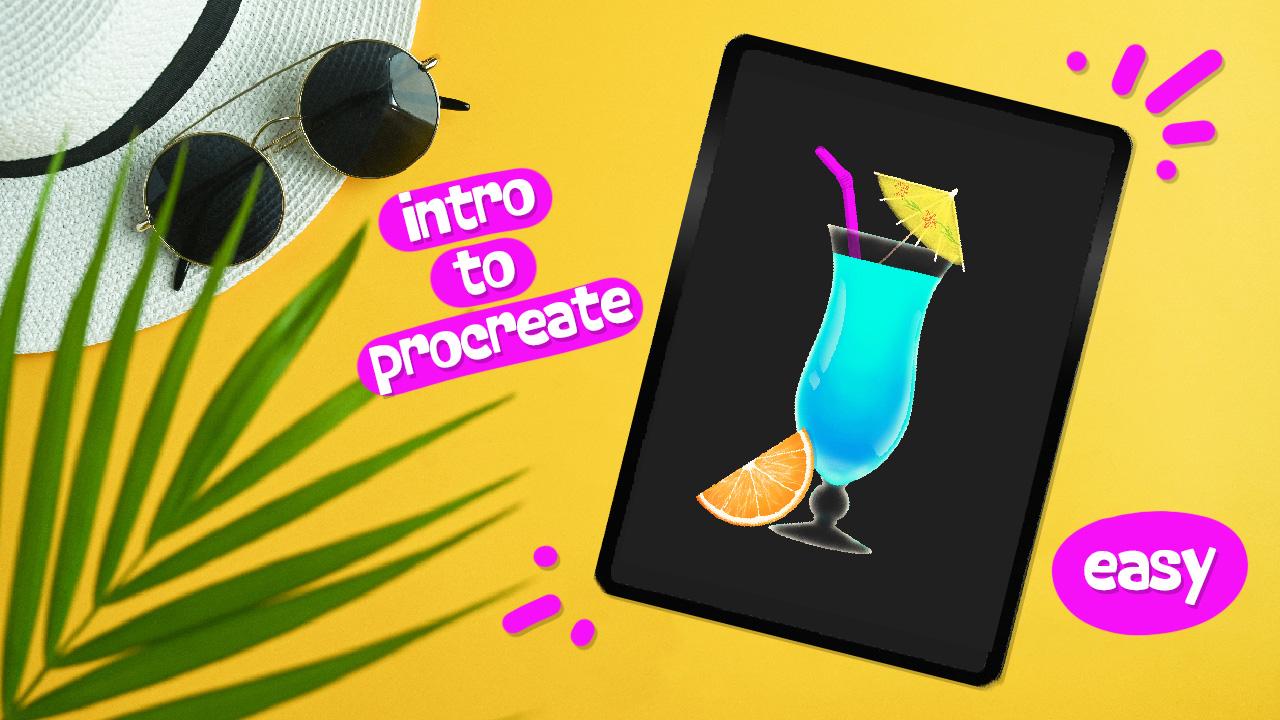
1. Intro: So you want to get started
with procreate right away. I totally understand. It's an exciting app, and it's a lot of fun to use. That's why I want to
share the basics of procrate with you so that you can jump right in
and get started. Hi. My name is Shae Maven, and I'm an artist, graphic
designer, and content creator. When I was first trying
to learn digital art, I was using photoshop
and I never got very far because
it felt intimidating. But then I found procreate. Procreate really
simplified digital drawing so that anyone can do it. Even with no experience
with digital art, I know that you will
feel more confident with procreate by the
end of these lessons. Even though the project we're making looks like it
may be challenging, I promise that
Procreate makes this a breeze and I'll be here to
help you along the way. If you have any questions, you can reach out to me
in the discussion area, and I will be happy
to answer them. I hope that you find this
class to be helpful, and if you want more
content for me, you can join me on
YouTube and Instagram. I also have some
digital freebies on Kofi if you guys
are interested. Also, don't forget to share your projects when
you're finished because I'd love to see how everyone's final
piece comes out. Anyways, I know that you guys are excited, so let's get to it.
2. The Gallery: When you open up pro grate, the first thing you're going
to see is the gallery. From here, you can arrange
and organize your canvasses, import files, and photos
and create new canvasses. For this video, I will
only be going over how to arrange and
organize your canvasses, and I will go over creating a
canvas and importing later. So the first thing
you're going to see here is thumbnails of all
of your artwork. Over time, you may have
a lot of canvasses, and you may feel like
the gallery gets a little overwhelming
and feels scattered. At this point, you may
want to create stacks. Some of my artwork
is already in stacks and you can tell because they
look like stacks of paper, where if there's single
canvasses, you don't see this. To create a stack,
press and hold on a canvas and drag your finger to hover over another artwork. Once it turns blue, you
know the stack was created. You can add multiple pieces
of artwork together this way, and it's a great way to store and easily
find collections. If you decide to remove an item from the stack,
it's just as easy. Select the artwork that
you want to remove and press and hold it and then
drag it over the file name. Once it turns blue, then
you're back in the gallery and you can just release it on
a blank spot on the Canvas. Another thing that I do
with stacks is name them. I don't always name my artwork, but I do find that
I like to name my stack since they're
part of a collection. To name your stack, just click on the text
below your stack. Then give it a new
name and click Done. If you want to, you can do the same for your
individual canvasses. Also, you have the ability
to reorganize these files. To do this, click
on an art workers stack and then drag your
finger to the new location. Make sure to hover over a
blank spot on the gallery so that you don't accidentally
add to or create stacks. The last thing I
want to show you in the gallery is how to delete, duplicate, and share
your canvasses. It's really simple. You just swipe left with
your finger over the file, and you'll see these
three buttons. If you click on the first
one that says share, it will bring up these
different file formats. Once you select a format, you will then be able to
share your exported file. If you want to
duplicate your artwork, it's just as simple as
clicking Duplicate. To delete the file
is just as easy, but you'll see a warning that says you can't undo
what you delete. Make sure that you are
certain that you don't need to file anymore
before you do this. If you want, you can choose select at the top
of the page and you can do the same actions
for multiple files at once. To preview your artwork, you just pinch to Zoom. Once you're in here, you can see an enlarged version of
the artwork you selected, but you can also scroll through to see all of
your other pieces. This would be handy if you wanted to quickly
show your work to other people without having to go into each individual canvas. To exit this screen, just pinch the page again.
3. Creating a canvas: Creating your Canvas
is really simple. From the gallery page, click the Plus button. Once this is open,
you'll see a list of canvases that you've
already created. You can select one of these or you can create a
new canvass size. To create a new Canvassize, just click on the black
rectangle with the Plus inside. This will open the
custom Canvas window. At the top of the
page, you can change the Canvas name by
triple clicking on Title Canvas and then typing in the text
Tropical drink. Width and height
defaults to pixels, but you can change that here. You can choose
millimeters, centimeters, inches, or pixels, but today
we're going to use pixels. We're going to use
2,400 for the width, 3,000 for the
height, and 300 DPI. DPI stands for dots per inch, so it's basically how
pixelated the image will be. If you're only sharing the
work online, 72 is fine, but if you want to
print the image, 300 DPI is usually the standard. I personally like to make
most of my digital work in 300 DPI just in case I
decide to print it someday, but you don't have to do this. One thing to note is that by changing the width
and height amount, you'll actually change
the layer amount, so you'll want to be
cautious of this. You don't typically want a small number of layers
for really detailed work, but for simpler pieces,
you might be okay. The only other thing that I mess with is the color profile. You would use RGB if you
were going to use this digitally and CMYK if
you wanted to print it. Today, we're going to choose RGB and then we're going to
choose the second option. Now that we've entered
our Canvas information, the last step is
to click Create, and it will automatically
take you to the art board. If you want to go
back to the gallery, just click on the word gallery at the top left of the page. If you want to use the
same Canvas again, it's now saved at the bottom of the list so you can
easily reuse it. If you decide that
you no longer need this Canvas information
or you want to edit it, you can swipe left on the Canvas name and you can
edit or delete it here.
4. Digital freebies: To make a tropical
drink similar to mine, I've made a color palette and
some brushes for you guys. To download, go to the
project and Resources tab. Then go to where it says Download Resources and click on the files you wish to use. It's fairly easy to add these, but if you have any issues, please let me know
in the comments, and I'll do my best to help you. Now that you've added the
brushes and color palette, we're ready to get started
with creating our artwork.
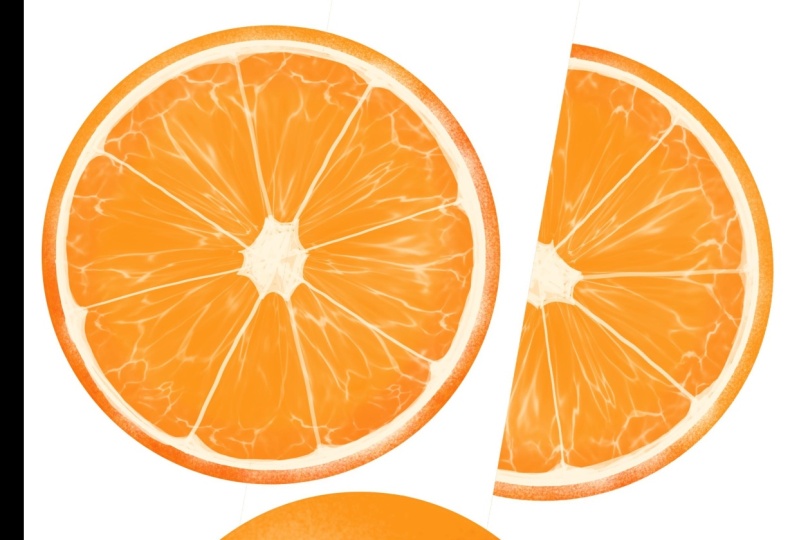
5. Whole orange: We're going to
start off by making an unpeeled orange and
then the next step, we'll use this as
a base to create half an orange and
an orange slice. This first section
might seem like a lot, but it's just because I will be giving extra instructions, since this is a basics class. I'm assuming that you haven't
used procreate before. As we move through the sections, you'll get used to
the tools and I won't have to give so
many instructions, and things will become second
nature before you know it. We'll go over the
artboard tools as we use them instead of me just telling
you what everything does. I find that actually doing something is better
than just explaining, so we're going to jump
in and just get started. First, we need to click on the Brush icon and
then choose Cligraphy. From here, we're going to choose the brush called mono line. Then click on the Color
dot on the top right, and we're going to choose the
one called Tropical Drink. If you click on the three dots, you can set this as
your default palette to make it easier to find. Then I like to set my
color panel to classic, but you can use any of these options to
select your colors. You can see here that my
palette is now at the bottom, and I'm going to choose the
first color in the first row. Now, draw a circle, but
don't lift up your pen. To make a perfect circle, just tap on the screen and hold it and it will
make a perfect circle. Also, if you drag
your pen in and out, it will increase and decrease
the size of your circle. This is called a quick shape, and you can do this with other
shapes and lines as well. Another way that
you could do this is to draw your circle, but actually remove
your pin from the page. At the top, you'll see
where it says ellipse, and then you have a drop
down to choose ellipse, or you could actually
change it to circle. We don't need the second circle, so use two fingers to tap on the screen until
the shape is gone. If you go too far, just tap with three fingers
on the screen, or if you prefer, you can use the arrows on the
side of the screen. Now let's fill in our
shape by touching the color dot and dragging
it into our shape. We need to add some
shading highlights and texture to our orange, so we will do this
with clipping mass. To do this, click on
the two squares at the top of the page to
open the layers panel. Then click the plus button to add a new layer and then click on the layer to open the menu
and choose clipping mask. This will make it so that
what you draw on the shape is restricted to the shape
and not outside of it. If you were to turn
off the clipping mask, you would see that these
lines extend past the shape. Then we're going to click
on the in our layer, and we're going to change the
blending mode to multiply. There are a lot of
blending mode options that I'm not going to
share in this video, but I highly recommend that you try them out and
see what they do. For our brush,
we're going to use the soft brush
under airbrushing. We're going to use
the same color and I know that's going
to seem confusing, but the blending mode will
make it look different. We're also going to change
the size of our brush. On the left side, you
see these two sliders. The top is to change
the brush size and then the bottom one is
to change the opacity. Both work in the same way. Let's tap on the bar and
change the size to 10%. A little trick for
accuracy is actually to drag your pin away and
then move the slider. If you want to save the
size and use it again, just click on the
plus button and it'll create a little marker
of your save size. If you'd like to delete it, just go back in and click
on the negative sign. The first thing to decide is where the light
is coming from. I'm going to act
like my light source is coming from the
top left of the page. It needs to be lighter here
and darker on this side. Now let's gently add some
shading to the orange. We want to do this
lightly because this brush is
pressure sensitive. The harder you push, the
more color is applied. You'll want to do this lightly and gently and build
up your color. Let's add another
clipping mask layer, and then we're going
to add a little bit of the original color on
this outside edge here. Just go outside the orange with the brush and add a little
bit of bounce slight. We're going to add texture now, so we're going to need
another clipped layer. Change your layer to multiply, and then we're going
to switch our brush to speckles under the
tropical drink brushes. Set your brush size to 100%, and then we're going to
keep the same color. Now gently add this in to
the areas where you've added shading and have it extend a little bit into
the lighter orange. I want to add a
little more texture, so I'm going to add
another clipped layer, and then I'm going to
set it to multiply. For this layer, I actually
want to lower the opacity, so I'm going to adjust
this slider down to 55%. Then let's go back into our tropical brushes and we're going to select citrus fruit, and we're going to
set this to 20%. We're going to keep
our same color, and then we're just
going to add in a little bit more texture. I want to add a light
section on the other side. Let's go ahead and add in
another clipped layer, and then we're going to
set our brush to speckles, and we're going
to set it to 55%. Let's switch our color to the second color
in the first row, and then we're going to add a little bit of that texture
on the opposite side. Again, I want to add a
little more texture. Let's go ahead and add in
another clipping layer, and we're going to set
this opacity to 80%. Then we're going to change
our brush to citrus fruit, and we're going to
set that to size ten. Now we'll just go back in and add a little bit more
texture right over where we had the other
texture. That should be it. If you're happy with the
way that your orange looks, let's go ahead and group
these layers together. Make sure that the top
layer is selected and then swipe right on all
of the layers below it, except for the one that
says background color, and then click group. Go ahead and name this group by double tapping on the
layer and clicking rename. I'm going to name
this whole orange. And that's it. We're all
finished with this section, so let's move on
to the next one.
6. Orange slice & wedge: Now that we've made
our whole orange, we're going to need
to make half an orange and an orange wedge, so let's get into it. To get started,
we're going to need two copies of our
original circle, so just swipe left
and duplicate it. And then don't take
the top layer because all of your clipping mass
layers are attached to that. So just grab the bottom two, press and hold, and then let's move that outside
of our group layer. We also need a copy of our group layer and you
do that the same way. But we don't need
all of the layers, so let's flatten this one down, and then we'll shut off
the original group, and we'll shut off
one of the circles. Now let's switch to
the circle layer, and then we're going to
use the selection tool to reduce the size of this. Just make sure that it's
set to uniform and check snapping and make sure that
that's turned on as well. Then you can just
grab a corner and you can reduce the size
of that circle. Then we're going to go in
and select the third color in the first row and we're going to drag it
into that circle. Now let's add a new layer and then we're going to
switch our brush to speckles under tropical drinks
and then set that to 15%. Go ahead and zoom
in on your orange. What we're trying to do here
is make this look a little bit more realistic and get
rid of that harsh edge. Just make sure you're working back in the cream a little bit because you don't want this to extend past your orange rind. Just a little tip, you can
actually rotate your canvas around so you don't
have to twist your hand into weird
angles to do this. Now that we're all done
with that, we actually need to toggle our
circle layer back on, and it's underneath
these other layers. Let's go ahead and
move that to the top. Then we're just going to resize this one like we
did the other one. Now, let's go ahead
and add another layer. This one is actually
going to be clipped, and we're going to set the
opacity of this to 70%, and then we're going to
go into our brushes, and we're going to choose
elements and water, and then we're going
to set that to 12%. Now just brush this all
over the orange circle. Now we're going to
do something fun. Select the one tool for your adjustments and
then select liquefy. From here, you want
to make sure that your size is set to 60, distortion at 18%, and
pressure momentum at max. You also want to make sure
that this is set to pinch, and then we're going to press
and hold in the center of our orange until it looks
something like that. Now we need to add
another layer, and then we're going
to go and we're going to choose Calgraphy, and then brush pin and make
sure that that is set to 2%. Now we're going to draw out
the wedges of the orange. Draw some lines across and
meet them in the center. If you actually want these lines to be straight and
not so wobbly, you can hold a finger down on the screen and it'll
straighten them out, but I actually prefer them to look a little
bit more organic. Then let's go ahead
and zoom in and we're going to draw
the center of the org. You're just going to make
these little U shaped lines that remind me of a spider web. These do not have to be perfect. Then you can drag in your color, or if you want to, you
can just color it in. It's entirely up to you. Now we're going to
do something similar on the opposite
end of our wedge. Just draw out that
U shape again. Again, it does not
need to be perfect. Having these lines
a little bit wobbly makes it look a little
bit more realistic. Now let's go in and choose
our orange circle layer, and we're going to add a
clipping mask layer above it. Then we need to
switch our brush to the soft brush and check
that that set to size ten. Then we need to
switch our color to the fourth color
in the first row, and we're going to add
a subtle dark edge to the flesh of our fruit. Just outside of your fruit, add a little bit of that dark color and
it's super subtle. You might not be able
to see it very well, but zoom it out a little bit and you can tell that there's
a difference here. Now we have a whole orange, and we have an orange slice, but we still need
an orange wedge. Let's go ahead and duplicate
this layer and turn it off, and then with this new layer, let's go ahead and flatten that. Now we're going to slice
our orange in half. Choose the selection
tool and change it to rectangle and then drag out
a box across your orange. Then we're going to
swipe three fingers on the screen and we're
going to choose cut. Now your left with just
half of an orange, and I'm actually
going to go in and rename this layer
to orange wedge. All right, all of the
oranges are done, and if you want to, you can share them in the project below. We're actually going to
save this to use later, and we're going to move
on to making the drink.
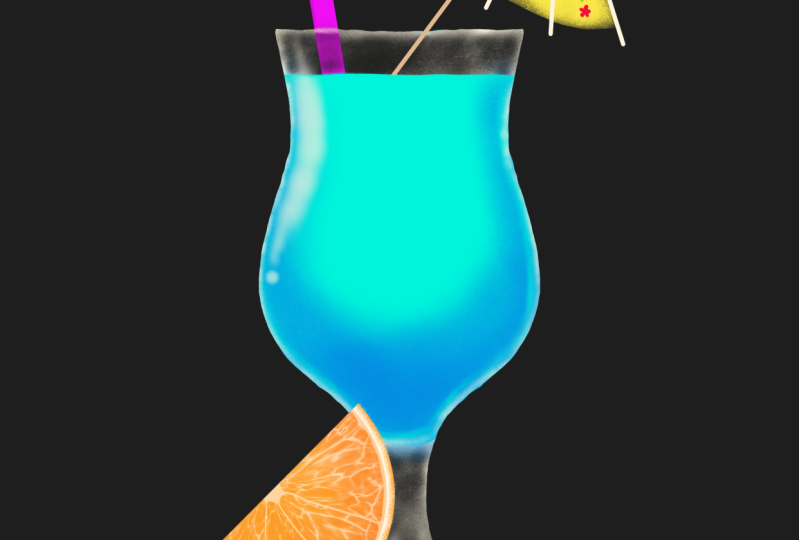
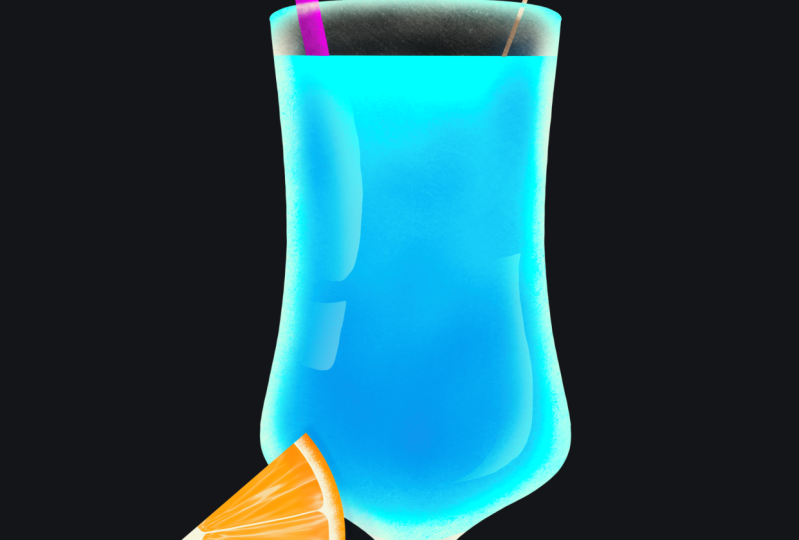
7. Tropical drink & glass: I would imagine that when you saw the thumbnail
for this class, that you looked at the glass and thought this can't be
beginner friendly, and I can understand why. I can promise you, though, that this is way
easier than it looks. And again, procreate makes everything so simple so
I know you can do this. The first thing that we need to do is change the
background color. Go into your layer
menu and select background color and choose the first color in
the second row. Then we're going to add a
layer above the orange wedge. Now we're going to
choose a wrench icon, and we're going to toggle
on the drawing guide, and then we're going to
select edit drawing guide. From here, we're going to
change it to symmetry, and you can see
now that there is a line on the center
of the Canvas. You're able to change
the settings here so you can change the color
of your drawing guide, the opacity, and even the
thickness of your line. This isn't something that we're going to keep on the canvas. We're just using it
as a drawing guide, so it doesn't matter what
settings you choose. Once you've made
your selections, go ahead and click done. Now let's go ahead and change
our brush to monel line, and then we're going to select the third color
in the first row. For this next part, you
have a couple of options. You can either try to freehand the glass shape or you
can trace an image. I'm going to show you
how to trace it because this allows me to show
you a few more things. The first thing
you need to do is find yourself a reference image. I got mine off of Invodo elements and I pay a
subscription to use this, but you can find
images on Free Pick or Pixabay or wherever you
prefer to get free images. Once you find one, save
it to your images. Once you've selected
a reference image, go in and add a layer
underneath your assisted layer, and then choose the wrench
icon again and select add, insert a photo, and then choose the image
that you just saved. Once your image is imported, you can now resize it
to fit the Canvas. I'm trying to get
mine so that it's somewhat centered on that line. All right, I'm happy with this. I'm going to go in,
choose my assisted layer, and then I'm just going to
start tracing my glass. As you can see, what I drew on the left side is now
mimicked on the right side. It doesn't match up
with the glass on the other side and that's
not going to matter at all. Now that my glass
is all traced out, I just need to zoom
in and make sure that there aren't any
gaps in my design, and then I need to go
in and fill the image. I'm all finished with
my reference image, so I can go ahead
and toggle that off, and I can also shut
off my drawing guide and make sure that my assisted
layer is shut off as well. Now we're going to add
a clipping mask layer, and then we're going to choose the second color
in the second row. Now, right over top of
that glass silhouette, just draw a line across and then tap your finger on the
screen to make it straight. And then we're just
going to outline the glass to make it look
like it has a liquid in it. Then just drag your
color dot into the glass and it should
look something like this. Let's add a clipping
mask under the teal. Then we're going to switch
our brush to frosted glass, which is under your
tropical drinks and set it to size 20. Then we're going to
switch our brush to the first color in
the second row, and we're going to add
some texture to the glass. Try not to actually go all the way to the edges with this and let it fade out a
little bit as you get closer to the side so that
it still looks white. Your darkest spots will
actually be closer to your drink and it will fade
as you get towards the edge. I'm pretty happy with
how that came out, but I still need to
work on the bottom. It's the same idea. Make your darkest point
towards the center and then leave your edges
a little bit lighter. If you need to, go
ahead and reduce your brush down so you don't
get too close to that edge. All right. Now we're
going to change our brush to the third color
in the second row, and we're going to
keep the same brush, but we're going to
set it to size 30. And then let's go in and add
a clipped layer at the top. Now just take this blue color and follow the
shape of the glass. We're not going all
the way to the edge, but we are following that shape. I want more of this
towards the bottom, and I want it to fade
up into the teal color. Now we're going to
add a little shine to the glass where the light
reflects off of it. If you need to, you can refer back to your
reference image. So Let's add another clipped
layer on top of this. Then we're going to
choose our soft brush, which should be in
our recent brushes, and we're going to
set that to size ten. Then switch to the third
color in the first row. Now we need to make a selection, choose the S at the top
and then choose free hand. Now just draw out the shape that you want for
your reflection. Then you're just
going to take your air brush and you're going to add a little bit of reflected light towards
the center of the glass. If you're happy with that, go ahead and exit your selection, and you can decide where else you might want
to add some more. I'm going to go ahead
and do that off camera. I then add another
clipping mask layer and I'm going to switch back
to my frosted glass brush. Now just add a little bit of that frosted glass right
to the edge of your drink. It's fairly subtle, but
it definitely helps it to make it look a
little bit more realistic. If you take this too far
on some of the spots, you can click and
hold on the eraser and it'll set it for
your current brush. Then you can just
go in and touch up a little bit where maybe you went a little too heavy with it. If you wanted to make this
a bit more realistic, you could do this
entire step over again, but switch to teal. Then just kind of add a touch of this teal onto your glass. And you don't need to
add a ton of this, but it does reflect the
drink onto your glassware, so I think that it makes it look a little bit
more realistic. You don't have to add much, but I do think that it gives
it a little extra something. I think this looks pretty good, so let's go ahead and
move on to the next step.
8. Straw & Garnish: The straw and garnish are pretty simple pieces
to add at this point, so we can do them
both in this section. I hope that you're
already feeling more confident with procreate and
that from this point on, things will be a
little easier for you. But don't worry. I'm still
here to help you through it. For this step, we're
going to add in a straw, and we're going to bring
back one of our oranges. If you wanted to, you could
use all of the oranges, but I'm just going to use the
orange wedge at this time. As you can see, our orange is
actually behind our glass, let's just move that to the
top layer so it's in front. Now I'm just going to
make some adjustments to this and get the placement
the way that I like. All right. Let's switch to the third color in
the second row, and then we're going
to use our soft brush and set it to size two. Then add a layer just underneath your orange wedge and
set it to multiply. Now just add a little bit of shading behind your
orange on the glass. I actually think this
looks a little too harsh. So let's reduce our
opacity down to about 75%. Now, for your
straw, let's change the color to the first
color in the third row, and then we're going to switch
our brush to mono line. We're actually going
to tap on that again so that we get
into the brush studio, and then under properties, I want you to set the
maximum size to 33%, and then just click Done. Now let's add a new layer above your orange and then let's
let the brush size to 100%. You can draw your straw
shape however you want, but I'm going to
do a bendy straw. I think I actually want to
make some adjustments to this. I'm just going to move
this around a little bit, and then I'm going
to go in and erase this little section
here that I don't need. Now I want to reduce my
brush size down to about 30, and then I'm going to add in the little ridges on my straw. Now let's add some
shading to this. We're going to add another
clipping mask layer and we're going to set it
to frosted glass size two, and then we're going
to set the brush to the second color
in the third row. Now just add a little bit of
shading underneath each of these ridges to imply a little bit of an
end on your straw. We also need to imply that
there's an opening here. Use your selection tool and draw out a circular shape
on your straw. Now use that same brush, but set it to size four, and then just add a little bit of shading inside of your straw. We also need to add some shading to the underside of the straw. Let's switch to the soft
brush and set it to size two, and then just add some shading to the one side of the straw. That looks pretty good,
but now we need to try to make it look like the
glass is over the straw. Let's create a layer on top
of everything and then let's set it to frosted
glass size ten. Then we're going to choose the first color in
the second row. Now just add a little
bit of this black color right over the straw just
to the top of the glass. If you got a little
bit of this on, your drink, just go
ahead and erase it. Now we want to do the same
thing with the white, so switch to the third
color in the first row, and then let's reduce our
brush down to size four. And add a little bit of the
white on the edge here. I'm doing this really gently. I don't need to
press hard on this. All right, This is
looking really good. I'm going to go ahead and group some of my
layers real quick. So I'm going to go ahead and name this one
orange wedge again. And then for these layers, I'll just name this one Straw. All right, guys, we're
almost finished. We just have one
more piece to make, so let's move on to
the next section.
9. Umbrella: Oh. I'm so excited that
you've made it this far, and you should be really
proud of yourself. We just have one last piece to make that really ties
this all together. I don't know about you, but I don't think a tropical drink is complete without a paper
umbrella, so let's make one. All right, to get started, we're going to make a guide, so add a layer on the top
and switch your brush to monoline and then change your color to the third
color in the first row. Now I'm going to draw out a triangular shape with
two straight lines, and then I'm going to
do one curved line. I actually want to make
some adjustments to this. I'm just going to alter a few things to get the shape
the way that I want it. I think that will
do. I am actually going to lower the
opacity of this layer, and it doesn't matter
what it's set at, just whatever you're
comfortable with. This is a guide that we're
going to delete later, so it's not a big deal. Now let's add another layer
on top of that and then switch to our paper umbrella under our tropical
drink brushes, and then set that to size eight. Let's also change our color to the third color
and the third row. Now just brush your yellow
color right over your guide. This is meant to
look a little bit transparent because it
is a see through paper, so don't worry about
completely filling things in. Also, don't worry, if
you go over the edges, we'll fix that later. Just try to stay somewhat
close to your guide. If it helps, you can go
ahead and turn this layer off and then just try to fill
it in a little bit better. That looks pretty
good. Let's turn our guide back on and then let's switch our eraser to monoline and set
it to size four. Just go ahead and take your eraser tool and
draw a straight line, and this will act the same way
that your brush tool does. If you press and hold it, it will make a straight line. We're going to do that
on both of the sides, but not the bottom. Then just zoom in even further and clean up what's
remaining outside of that. The bottom of the
umbrella is different. We want that to appear
wavy because fabric at the bottom of
an umbrella would not be crisp and straight. Just go ahead and draw
out your line and don't hold it down when
you're done because it doesn't need to
be really sharp. Then again, and clean up what
remains outside of that. We're all done with our guide. We can either delete
it or just uncheck it, and then let's switch
our brush to mono line, and we're going to
set that to size ten and then we're going
to switch our color to the third color
in the first row. Now we need to make the
structure of the umbrella, so we're going to extend
past the umbrella a little bit and we're
going to press and hold. You can make however
many of these you want, but we want to try to avoid making one directly
in the center. Now let's add a layer
just above that, and we're not going to switch
our brush or our color and just make a little nub at
the top of your umbrella. Now we need to add a toothpick. Let's add a layer just above our guideline and we're going to switch our color to the sixth
color in the third row. Then just draw out
a line directly from the center of your umbrella all the
way into your drink. Then we're going to go in and erase what extended
into the drink. Again, we want this to look
like it's behind the glass. Let's go ahead and add a layer
just above our toothpick, and we're going to switch
to our black color, and then we're going
to change it to frosted glass and set
it to size eight. Then we're just going
to add a little bit of that black color right
over our toothpick. We're going to need
some white as well. Let's switch this to size four, then we're just going
to add a little bit of white right at the top. As you can see
here, this section has a little bit of teal. If we just press and hold
right over our drink, it'll switch to our
teal color for us. Then I'm going to reduce this down again to about size two, and I'm just going to add a little bit of teal
right at the top. The last thing we need
to do add some flowers. Let's add a clipped layer
just above our umbrella, and then we're going to change our brush to the studio pen, and we're going to
set it to size five. Then for our color, you can
choose the green or the red. It just depends if you
want to start by drawing the flower or if you want to do the stem and leaves first. For this part, you can
do it however you wish, you don't have to make
yours look like mine. And you can add as
many or as few flowers as you want in any
style that you choose. F If you're happy
with how that looks, let's go ahead and lower the opacity of
this to about 60%. Then let's go ahead and group
all of these new layers, and we're going to
name this umbrella. I think this looks great, but it is pretty
close to the top, so I'm actually going to
grab all of my groups, and then I'm going to
use my selection tool to just move it
down a little bit. We're all done. Make sure that you share your finished
piece with the class. I can't wait to see how
everyone's project turned out.
10. Outro: Oh. Thank you so much for taking these
lessons with me today. I hope that you feel
more confident using Procre and that you had
fun taking this class. If you would like to join me for more classes in the future, please give me a follow
here on skill share. Don't forget to
share your project below and tag me
on social media. Thanks again for watching, and I'll see you next time.
 Shay Maven, Artist + Designer + Content Creator