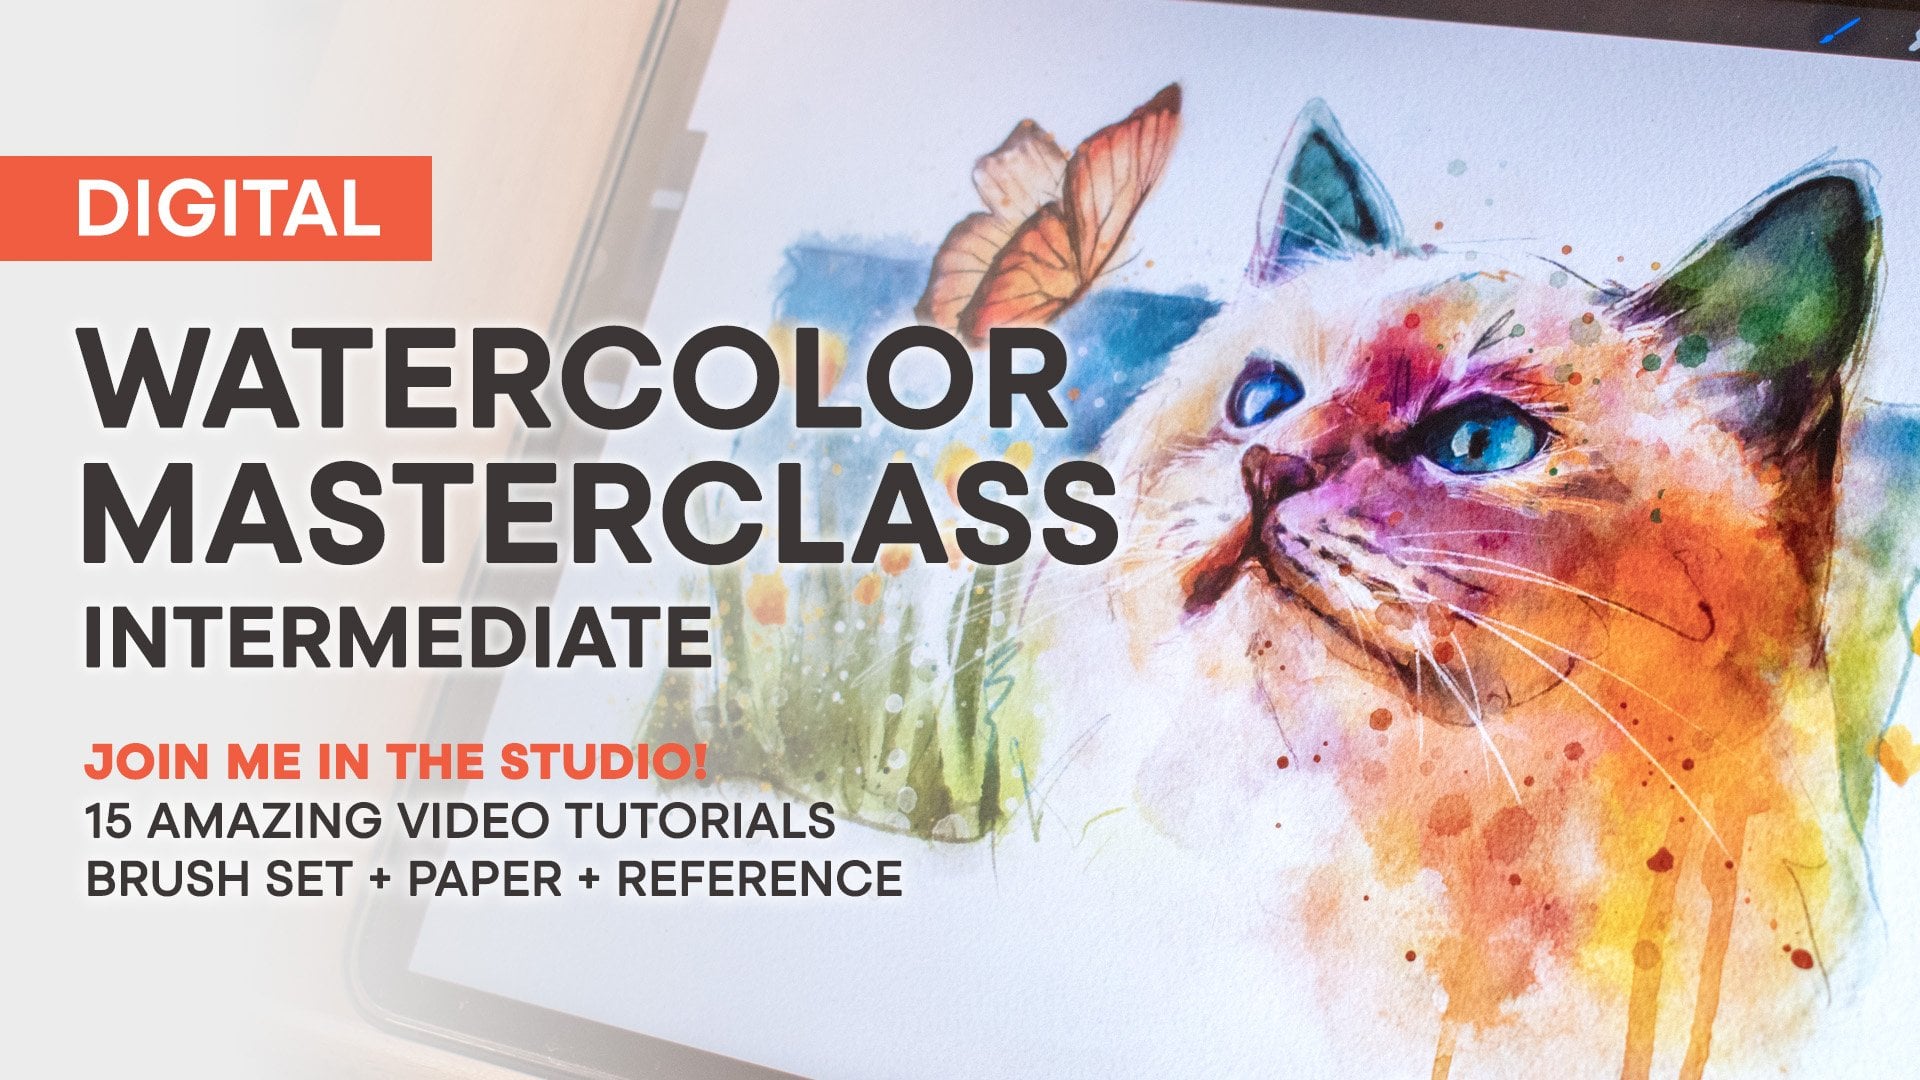
Transcripts
1. Introduction: Hey, there, and
welcome to the class. In this one, we're going to do something a little
bit different. I'm going to walk you
through a complete watercolor painting
from start to finish. We're actually going to paint it two ways at the same time, one traditional and one
digital and procreate. Now, the reason for
that is I know a lot of you are coming at this
from different directions. Some of you might be working digitally and trying
to understand how traditional
watercolor actually behaves and others might have
a traditional background, but aren't quite sure how to translate those techniques
over to digital. So what I want to do here
is really bridge that gap and show you that the process
is actually very similar. We're going to work from light
to dark, build up layers, develop our values,
and gradually bring the painting to
life step by step. And by the end of this
class, you'll have a finished piece of your
own, and more importantly, a better understanding
of how watercolor works whether you're painting
traditionally or digitally. So go ahead and grab your
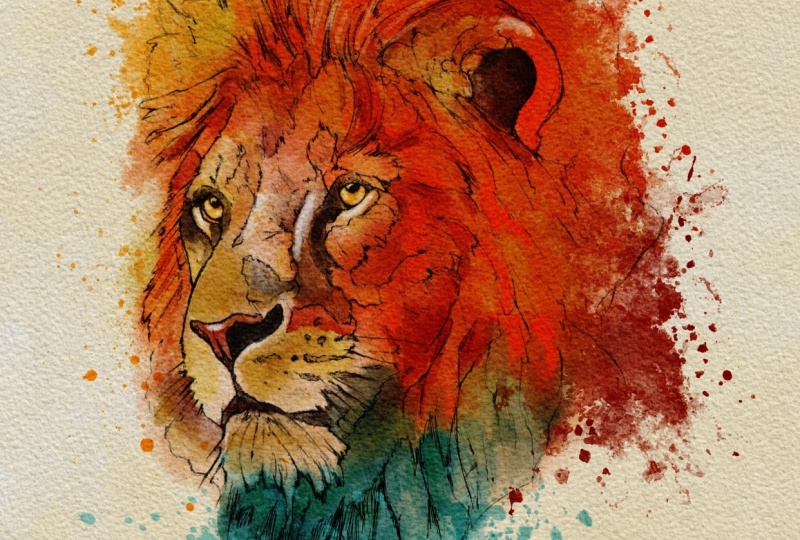
materials, let's get started.
2. Your Class Project: All right, so let's talk
about your class project. For this class, your goal is to create a finished
watercolor painting using the same process that
I'm demonstrating either traditionally or
digitally in Procreate, or even both if you want
to try them side by side. Now, I've provided you with this sketch that I'm
using in this class, so you can follow along
exactly if you'd like, or you can print it out for traditional watercolor or import it into Procreate
and paint digitally. As you work through the lessons, just focus on taking
it one step at a time, starting with your light washes, then gradually building up your color and your values
and then your details. Don't worry if
things look a little rough in the middle stages. That's completely normal. Just trust the process
and keep going. Now, when you're finished,
I'd love for you to upload your piece to
the project gallery. You can share your
final painting or even a few progress
shots if you'd like to show how your piece
developed along the way. It's always really helpful not just for me
to see your work, but for other students
as well because everyone approaches this
a little bit differently. So take your time with
it, enjoy the process, and I'm really looking forward
to seeing what you create.
3. Side by Side Concept: So I've never done this before. This is the first
time I've tried to paint the same subject, the exact same sketch on both
traditional and digital. And it's really I think it's going to be kind of
cool and kind of fun. So let me show you
what I've got here. I have a, um, a sketch that I have transferred onto a cold press
watercolor paper, and this is just kind
of a rough lion here. This is probably a
little bit more detailed as far as the sketch goes
as maybe what's necessary, but sometimes I get kind of carried away and really
get lost in a drawing. So I start adding
all these lines and some shading in here that
probably isn't necessary, but it's kind of fun to do. And what I did was
I took this sketch, and then I scanned it and
added it into Procreate here. And I'm going to give you
guys this sketch file so that if you want
to follow along, if you want to try this
painting along with me. Now, you can also you
can print this out and you can do it traditional
as well if you wanted to. Okay? So with that explanation, let's go ahead and
let's get started. What we're going to do is
we're going to start with the traditional side first because once we apply
a little bit of paint, we'll have to let that dry. So we'll go over to the digital side second while
we wait for layers to dry. Alright, so here we go.
4. Setup & Approach: Okay, so the first thing
that we're going to need to do is apply a little
bit of clear water. So I've got a couple
different sizes, well, several different size brushes
over here just off camera, along with a large
container of water. I'm going to start
with this bit larger. It's a size 14 round
brush that I'm going to use on this initial
stage of just adding washes. I also have a paper towel in
my left hand that I use to occasionally soak some of
the water out of the brush. I'm also using the This is a
Windsor Newton Cotman set. This is the same set
of paints that I used in the traditional
watercolor course. Alright, so the first
thing I'm going to do is add a little
bit of water here. I can see that there's a little bit of
pigment in the brush. I'm gonna clean that out. So there's a little
bit of red in there. I want some really clean water. So I'm gonna add some
clear water here. Still got some pigment in
there, but that's okay. I'm not going to worry
too much about it. So my color scheme for this, I'm thinking is going
to be something that's just really fun. I'm not going to worry
about being, like, super realistic with the colors. So I'm thinking kind of
just like an orange and blue with some yellow, probably. Let's go ahead and
start with that. This is really kind of
all my initial tone here. So I'm starting with clear water because I'm
gonna be adding paint, and I'm going to let that
paint just kind of flow out into this nice, very
transparent wash. So that's our goal
with the first step.
5. Applying Traditional Wash: And I'm going to do
that with a little bit of This is yellow ochre. And I think this
is cadmium yellow. So I'm gonna mix a little bit of those two colors together. I've still got the
same large size brush. So I'm just going to
start by just dabbing in and kind of guiding
the paint real lightly. This is probably a
little bit more opaque. I just got a little bit of
the paint out of the brush. So what's really kind
of important, I think, at this stage is just to lightly apply these colored
washes and not be really overly concerned with how
tight my brush strokes are. You know, just kind of
kind of let the paint flow where it wants to I
want it to be real light. I don't want to come in real strong with heavy
color just yet. His eyes are going to be
probably this yellow color. And I'm purposely leaving
some of these spaces here just because it kind of
breaks up the color, and it kind of gives
us a little bit of a sense of a highlight
in some of these areas. And it just kind of it gives us room to sort of play
with the color. Like, if I just go in and
just wipe a solid color in on a watercolor,
like, suddenly, it's like all of the decisions have been
made and there's no room left for me to really do
anything within this layer. So I just kind of try
to go in real light. And just kind of, I guess this is just
kind of like letting the brush sort of dance around. Okay. And I think we're
going to want to go ahead and move into more
of an orange color. So I'm going to
grab a little bit of this is cadmium red light, which is really one of my favorite colors for
traditional paint. So before this dries, we're going to add a bit
of this orange in and let these two colors
just sort of happily sort of mix together. And again, like I said, I'm not really worried
about realistic, super realistic colors for this. So my plan is just to kind of
start with orange out here. There's going to be some
shadow in here in the face, and then we're going
to try to use, like a real bright sort of aqua blue down here
just to kind of make a gradient transition
from that orange to blue with some yellow
highlights in between. And I started with yellow
because I want some of that yellow to peek
through the orange. So not super concerned with preserving a lot of the
highlights because I think we'll come back with some
white wash in the final steps, and we'll bring back some
of these highlights. So I'm not going to be really super worried
about trying to preserve those just
yet, or at all, really. Alright so this is a really white wash. And before we stop
to let this dry, let's see about maybe
adding in blue as well. So I'm going to rinse this
brush out pretty good. And I'm going to
mix a little bit. I think I can't
remember for sure. I think this is like
a serlean blue. And this down here is vermilion, kind of a greenish blue. I'm gonna mix these two
together to try and get kind of this more of
an aqua or turquoise. Okay. So now, I know that
this part right here on his chin and maybe some of this over here
is going to be lighter. So I'm just going to try to
get my color underneath that. This is probably a
little bit too intense. I'm going to keep it lighter. So I just rinse the brush out, and then I'm coming back in with water to just kind of
spread this color around. And I'm going to
bring a little bit of the blue up into the yellow. And that's probably good. Part of me wants to kind
of bring the blue up here, too, so let me give that a try. Maybe just add a
couple little spots of blue in a couple of places. Again, with some clear
water just to spread that. And then I'm dabbing up the excess water with paper towel. I'm adding a little bit
of that into the darks. And I'm going to soak
that with a paper towel. Okay, so right now, this is still pretty wet. Like, it's not dry at all, but the sheen of the wetness has gone down
and soaked into the paper. So this is a stage that a lot of times I will like to
or I like to take a spray bottle and just hit it with a couple of really
light sprays to just kind of give the paint some
additional water to spread into. And it just adds a kind
of a nice texture on this initial wash. Alright, so let's stop here and
let this stage dry, this initial wash. We're
gonna let this dry, and we're going to
move over to do the same stage on the
digital side and Procreate.
6. Digital Setup & Brushes: All right, so let
me talk a little bit about my file setup here. I have a 4,000 by
5,000 pixel canvas, and it is below or my sketch
is below a paper texture. So I have this folder here that it has paper textures and
it has some paint effects. So these are just watercolor textures that are set to color burn over my painting
just to give it some more realistic
looking texture. And this is a cold press
watercolor paper texture, which matches the paper
that we're painting on. And this paper texture
is available as part of my ultimate
Canvas creator product. There's a set of
watercolor papers, a set of dry media papers, and then a set of paint
canvases that all do the same thing as far as adding a textured surface
to your painting. Okay, so I'm going to be using my master
watercolor brush set. You are certainly
welcome to use whatever is your favorite
watercolor brushes to use to follow along. If you're using the master
watercolor brush set, this is the main brushes folder. There's brushes,
washes, and splatters. So we're going to be inside
the brushes folder right now. And if you scroll through the top portion
here is detailed brushes, textured rounds, which we'll
be using in a little bit. I've got flat brushes, but we want to scroll
all the way down until we get to the
wet texture brushes. So all of these brushes
within this portion here, along with the stains and washes are for the stage
that we just did. Now, I mean I don't mean that you only use them
in the first step. But I mean, of course,
you can create washes throughout the
process of the painting. But for this initial
first step where we're just creating a nice light wash, that's specifically what
these brushes are good for. So let's get there's
a nice variety here, and let's try a couple
of different ones. Let's look at watercolor
light wash right here. And I'm going to use a light yellow that's maybe kind of similar to that yellow
ochre that we were using. And I want to be on a layer. Let's put it below the sketch. And let's just see about
adding just a really light. This is a very light
wash. And I think probably what I'll
end up doing is maybe using a couple different
wash brushes to give us maybe a bit of a hard
edge wash in a few areas. And I'll show you what I mean. See, let me show you
right now what I mean by a hard edge. So this brush here,
as you can see, just painting off
to the side there, it creates a very soft edge, meaning this would be like if
there was a lot of water on the paper and you just put in a little bit of light stroke, and that paint it just spreads almost into
nothing because there's so little paint in the brush and so much
water on the page. Okay. But when you have a
fixed area of water, that paint will spread, and it will just kind of
stop at the edge. So if we look here, here's a wash that we created, but this is kind of a
hard edge right here. And then this out here, here and here, some up here. And then, of course, the
transitions between colors like here and here are
very soft edges, meaning the colors are blending together or it's blending
out into clear water, and it's creating a softer edge. So what we have right now with this brush is a
very soft edge wash.
7. Applying Digital Wash: Just adding that
first bit of yellow. And you can see that
I'm just sort of doing the same type of same type
of motion I did before. I'm holding the pencil towards
the back of the pencil. You know, I'm like or the
pen. I'm not like this. I'm more like this so that
I'm just getting that light, sort of just letting
the brush sort of or pen sort of dance around. On the painting. Alright, so let's go ahead and
try another one. Let's get deep stain or
pressure wash. Let me see what pressure wash that gives us a real nice varied edge
and then deep stain. It's kind of similar but
with a different texture. Let's go back to pressure wash. This is just going to deepen
the yellow in a few places. All right, let's go
over to the orange, and I'm going to keep this
on the same layer for now. So let's get something similar
to that cadmium red light, which is kind of a
bright orange color. Let's start adding that in. Okay, so one thing that you will notice on the digital side here is that we are getting more saturated
colors more quickly. Now, we could have
done that with the traditional paint if we had used more paint in
the brush than water, but I like to go in
a little bit softer with traditional
paint because you really don't have a safety net. You know, you can't
undo, so it's better to just kind of go in
with the attitude of, you know, you're kind of sneaking up on the
final product. You're not going in
too heavy and you're just kind of kind of take
your time a little bit more. Be a little more careful. Alright, so let's go ahead. Let's go ahead and add the blue, but we're probably
going to come back. And I'm thinking something
maybe right in here. We're probably going
to come back and add a little bit more orange. I just want to use
this same brush to get in a little
bit of that blue. And again, still I'm
on the same layer. So we haven't
changed layers yet. We're on a layer
below the sketch. All right. So now let's look at maybe choosing a different
brush and adding a little bit more
saturated orange into our initial wash here. So, let's try a different brush. Let's go with
something that maybe has a little bit different
or a little bit harder edge. Maybe this extremely
wet painter. Let's try that. Let's go back to the got our
orange back. So let's see. Yeah, that's going
to give us see how that will give
us that'll give us a little bit harder of an edge versus the brushes
that we were just using. So that's going
to work. Perfect. All right, so let's
come back in. I'm thinking that I'm going
to zoom in a little bit. I'm thinking that this area here this area here needs to
be a little bit more orange, maybe right up here because
we're going to have some shadow areas come in
around the eyes and the mouth. So maybe all this out
here just needs to be a little bit
just a little bit more a little bit more orange
into our initial wash here. So, let's go ahead and let's do this part on a new layer just in case we want to back
up a little bit. I'm still going to use
real light pressure with this because I'm probably jumping
a little bit ahead of our digital or
our traditional painting. So I'm just going to add a
little bit here and there. And maybe right here. Show you what I'm doing
just a little bit out here, just trying to get a little
bit more intense orange. It'll be over here as well. Let's go ahead and get a really sharp edge
brush because I know our traditional
painting definitely has some sharp edges
at this stage. So let's just see if
we can match that. Let's try the sharp
sable might be. Yeah, that's probably
too intense. Let's get the
mostly water brush. That's going to work better. So let's just see about doing a little bit of a hard edge. Just some of these
wash areas here. All right. Okay, I think
that's probably pretty good. I think let me go over. Sure I get some color
into his eyes there. In fact, I'm gonna switch
back over to our yellow. Some more color on that side. Okay, let's go ahead and
we'll stop right there for this initial wash phase
for our digital side. Now, let's jump back over to the traditional painting
and see if it's dry yet. I
8. Beginning Second Layer: Okay, so the painting
wasn't quite dry yet, and a real easy way to tell that is if you put your hand over it and it still feels
cool to the touch, then it's not it's still
a little bit too damp, too wet to continue
with the next layer. So what I did was
I just hit it with a blow dryer real
quick just to dry up any wetness that
was still there. Okay, so looking at it,
I can tell by making the comparison to
the digital sketch. We don't have the saturation of color yet that we had
on the digital side. We were able to get to a more saturated color a little
bit more quickly. But that's perfectly
fine because we're going to start to
add some more layers here that are going to bring out some of that
color saturation. So I'm going to stick with
this larger size brush. And one good tip is, especially
for watercolor painting, is to try and stick with
the biggest brush you can from the start, try to stay with
the biggest brush you can for as long as you can. So all of these initial
stages, big brush, and then as you work and you start to drill
down to the details, try to wait as long as
you can before you get to that really small fine
brush for details. Okay. So now I'm going to go in. I'm going to take a little bit I believe this is lazarin
crimson here and a little bit of the
cadmium red light. And I want a little bit more
intense color this time. So there's going to
be a bit more paint in the brush or maybe an equal
amount of paint in water. I'm just going to start to go in and I want this initial
layer to show through. I don't want to just completely
cover this initial layer. I want to just kind
of be a little bit more decisive on where I place my strokes
this time around. Okay, so let's just start
here with this bit of hair around the eye. I feel like there might
have been a little bit too much might have been a little bit too much
blue still in the brush. Let me go back. Or maybe that was too much
a losar crimson 'cause it just kind of
had a little too much of a of a desaturated kind of look. Alright. Okay, that's
probably better. So I'm kind of just
painting outward, like, maybe the
direction of the hair. I'm just trying to pay attention to just where my strokes are going at this stage
because I kind of want, you know, I still want
some of these gaps. Like I said, I want some of that initial layer to show
through as much as possible. And I know that this
area right here is dark. I'm gonna go ahead
and paint it in, so it's gonna wind
up being darker, but I just kind of need to
see sort of where I am. As far as my values
are going to go. So this technique is wet into dry because
our paper was dry. And now I am adding and every stroke is going to
give us this hard edge. But now I'm coming back with clean water in the
brush. There's no paint. There's just clean
water. And I can soften some of these edges
before they completely dry, which is really going to blend this layer in
to the painting. A
9. Trusting The Process: And I know you've probably
heard me say this before, but I'm going to say it again, and I probably will say
it many more times. But all paintings kind of have this ugly phase
here that we're in. Like, you're thinking, Oh, well, you know,
where's this going? But you have to just
sort of trust what you're doing and know that
you're going to stick with it. Until you get to some sort
of phase that is complete, because this is
far from complete. And I think that a lot of people maybe give up somewhere
maybe about this phase. They just think, Oh, my gosh, this is just looking so
terrible. I can't save this. I can't recover it.
And you actually can if you just keep on just
keep on keeping on. And you're going to see here in a little bit this is going
to start to come together, it's just going to
take a little bit. So we've got to
have patience with ourself and patience
with our process. And it's funny because
you're going to see that this traditional painting is it's going to take a little bit more time
than the digital. And you can see me,
like, you know, kind of slow down a little
bit and just kind of study the stroke I'm about to do just to make sure that
it's where I want it to be. A Taking just some clean water here and just spreading some of this color into
surrounding areas just so that it kind of has
a nice blend in some areas. Hopefully, you can
see that camera. Okay, so now I want to
add or continue this wash out in this direction because we've got a lot of
intensity here in the color, but I want that color
to just kind of spread out a little bit. And what I think I'm
going to do actually, is wet this area again
before I add the color. That way, it's going to spread. Kind of like we did in
the first first step. So you can see that that stroke, it doesn't have the same
hard edge as these others. Like, it's just the
paint begins to spread into the wet
area of the page. And again, I'm going to add
some more cleaner water. I'm just looking around to see what else we need to do here. I think I'm going to add
a little bit more blue into this area down here, and then we're probably
going to let this dry and go back to the digital painting. So let's get some blue. This time, I think I'm
going to stick more with the serlean blue so that it's more blue than
green. Let's just add. This is wet into dry again, so the paint's not going to
spread quite like it did for I'm going to take a
little bit of clean water and just kind of
soften that edge. And I think we'll
leave it there. We're going to come
in a little bit, and we're going to start to
add some darks into here, and then that's going
to start to bring out some of the values. And that's kind of a
stage where it really starts to take starts
to take shape, and we'll be probably more
precise with our strokes, whereas these are all
kind of loose and just sort of letting it
do whatever it wants. But then we'll start
drilling into more of the details in the next step. Okay, so now is
probably a good time to take a break if you want
to get up and stretch, maybe walk around a bit, fix a cup of tea or coffee
and come back and dive in. But it's always important to remember to kind
of get up and just relax and just kind of take a more wider view and just step back and
look at the painting. It just sort of helps to keep your frame of
mind relaxed so that you're not too you're not too hyper focused on
what's happening, and you can just kind of take a breath and study
where you are so far.
10. Digital Color & Edge Control: All right. So looking at
our digital painting, let's go ahead and let's
create a new layer. And let's get an orange again, but maybe we're
going to go a little bit more red with it this time, a little bit more saturated. And let's try. Let's try this
sharp sable brush, which has a pretty hard edge. And let's go in and
let's get a little bit more focused into some
of our details here. So I'm going to
get right in here. And trh add some of
these harder edges we will blur or soften
in just a little bit. But this is just kind of
giving us a base to work from. Now, you can do this
stage really with any of these sharper edge brushes. Like if you wanted to use
this rough round wash, it's just not quite as
intense. Let's try this one. So, see, that one is a
little bit more intense, but the edge is not as hard. This one probably has more of a granulated texture,
based on the name. So lately, I've
really liked using this sharp sable brush just
because of that hard edge. And this color that I chose, it might be a little
bit too saturated, but we can always make
that adjustment later. Since this is digital,
there's a wide safety net. So for the smudge
tool, I'm going to choose this loaded
into wet brush. That way, I can just soften
some of these edges here. Not all of them, but some. I'm going to keep some
of the hard edges. Okay, back to the brush. Let's try a little
bit over here. I and let's kind of take
a step back and see. I think we need to maybe do some here into the ear. Maybe right here. And then let's take the
smudge tool and just soften a few of the
edges we just created. And I'll show you kind of
what I'm doing here is just moving the brush around. When the edge when the edge of a stroke
blends out like that, it really feels watercolor. You know, it feels like that traditional style
watercolor look is being achieved because
it just feels like such a natural Okay, see if now we need. I feel like here pretty
soon with the digital side, we're going to need to
jump into the dark. I feel like the traditional
painting might need one more pass of color. We'll see when it dries. Cause colors usually
with watercolor, as they dry, sometimes they
get a little bit lighter. So let's go ahead
and with this layer, let's add let's take
that blue that we had but maybe go a little
bit darker with it. So now I'm just coming in a
little bit more intense blue. And I'm going to soften
the edges here. All right. So now I think no I need to
come in here with the eyes, and let's try maybe we put
that on another layer. Yeah, we'll go ahead and
add another layer for that just in case we need to
edit them separately. Then go back to the orange, but let's make it a
little bit more yellow. And whoops. It'll be
a bit less intense. I can breathe that color
here a few places. When I zoom in like
this, it's a little bit easier for me to see some of these little details that I had in the illustration
or the sketch. So then, of course, I
want to paint them. Oh, it looks like we
need to get the nose, as well, so let's get a
little bit more of a red. And I think maybe we'll
leave it there for now. Go back to this layer, do a little bit more smudging. Okay, so back to this layer. In fact, I'm just going to
merge these two down just to keep just to keep my
steps on the same layer. And I'm going to take
that orange that we just had and add it out here. And do a little bit of
smudging on that as well. I say smudging because
it's the smudge tool, but it's really
just kind of adding water is the way
I try to think of it to blend those edges out, just like we were doing with
the traditional, you know, I was coming in and
adding clear water just to soften that edge. Okay, so let's stop right there. It's amazing to me
how much faster the digital painting is
versus the traditional. So that is definitely
an advantage, I think of digital. It's it's so much faster, but traditional is so worth it. It's worth the wait.
11. Traditional Water Control: Okay, so one thing that
I'm noticing about our traditional painting
here is that now, watercolor is all about
controlling the amount of water versus pigment in your brush and then what's
going down on the paper. So you can see, right
here in this area, I probably had too much water, and it just sort of pushed a lot of the
pigment out towards the edge of the shape
that I had going here. But that is totally fine. So one thing that I
want you to understand about traditional watercolor is, I am not what I
would consider to be like a purist type
watercolor painter. Like, this kind of
stuff doesn't bother me because I'm just going to
come in with another layer. I don't get discouraged. I don't get worried. I don't mind when
the paint doesn't do exactly what I
intended for it to do. Again, I just kind of
embrace that ugly stage, and I just hang with it, and, you know, sometimes
I will bring in other, you know, we might try some acrylic markers or some colored pencils
or something and just just get it to the end product to me is
what is most important. It's not being traditionalist or pure in the sense of
watercolor painting. To me, the final product is
what's most important and the fact that I am enjoying
the process along the way. So stuff like this,
these little things that might drive more of a purist watercolor cost
it might drive them nuts, but to me, it doesn't
bother me at all. So let's take a look at
how to address that. Okay. So one thing to notice here is, I think we started with a size 14 to get that initial
layer of color in. And then the second stage
was like a size eight, which you can see,
another round brush. It's just smaller. Now
we are zeroing in. So we're going down
to the size four. To get in some of these
just smaller bits of detail and some of
these strokes that will be sort of like like
strands or groups of hair. But before we do that, though, one thing that I noticed, I noticed this now I'm
dropping brushes. But I noticed this in the
traditional painting, which is a really cool
aspect of doing these at the same time is that
if we look here, you can see that
there's more like this sort of golden yellow
on his forehead there, which I think is really cool because it might potentially
look kind of like, you know, he's being lit
from this direction. And so there's just this
nice yellowish tint there. And if we look over at
our traditional painting, it doesn't have as much yellow. So I was just going to try
and see if I could take a little bit larger
brush here and come back in with just
a yellow wash over that area and just kind
of see what it does. I don't know if it's
going to give us the same effect or not,
but we'll try and see. And I'm likely going to come in with I'm taking a little bit of the water out of the brush. And I'm looking at
the digital painting at the same time trying
to get the same areas. It's basically this entire Okay, something a bit
like that, I think, is going to work because we
can always come back in with white guash to bring back some of these
highlights if we want to. But I think that's going
to give us a little bit closer to what we
have in the digital.
12. Starting Detail Layer: Okay. So now that that
yellow wash is dry, we're going to come
in with a size four, and we're using a smaller brush because we want to be careful and get in just start to
add in a bit of detail. It's a little bit larger detail, but still just sticking with colors because watercolor
is transparent. So every time we come
in with a color layer, it's building up this contrast before we go in with, like, a really dark dark like here
in his mouth, nose, eyes. This part right here will
probably be pretty dark. These little details
on his whiskers, underneath the white
fur here on his chin, the ear, those will
all be really dark. But before we get there,
we just want to add another layer of a little
bit more saturated color. Alright, so going back
to some lysarin crimson and Cadmium red light. You can see now we're
really starting to build up that contrast. Clear water to smooth
out that edge. Another thing, too, that
you've probably noticed about the traditional versus digital the difference
that we have here, other than this being
a bit slower is that, um we have more
contrast going on as far as the darks are concerned
on the digital side, and a lot of that is
because of the blackness of the sketch line because we're painting underneath this layer. So like, if we took this and
drug it down underneath, a lot of that black of the
sketch lines disappears. So that's just something
to keep in mind. We can always color
the sketch lines. We can always take
the opacity down, you know, if we want
those lines to blend in. Now, for the traditional side, in order to if we want to bring
back some of that sketch, we're going to need to
take something like some darker colored gouache
or maybe some micron pins or something that's going to really darken those lines, which we'll probably do
in the more final stages. I So I'm just kind of studying my sketch lines and just adding in some of this contrast where I think the where this hair is going to clump or maybe change
values from light to dark. Some of these lines
are kind of abstract. You know, it's just kind
of some sketch lines that I'm putting in
as I'm drawing and, you know, you don't have
to follow them exactly. You know, just kind of let them be a little bit of a guide. You know, it's
probably not something that I intended to
be followed exactly. It's just to add
some abstract sort of movement in the sketch. I I think because this is sort of a sort
of gets abstract here, the man or the hair is man, I'm just going to wet
this area again and just add some like just drop some color into it
and kind of let it take shape on its own. Maybe right up here. I All right. Let's do the same thing
with the blue real quick. I think that's probably enough. Okay, so let's let this dry. And then I think
in the next phase, we'll come in and we'll add our really dark darks so that we can start to
evaluate our contrast. I
13. Value Structure: Looking back at our
digital painting, let's start to add in some of the dark so that
we can start to build up that value contrast that really brings
the painting to life. So let's go ahead and let's stay on layers
below the sketch, but let's create a new one. And let's go ahead and
get something that's maybe red but really dark, not quite black, but
really close to it. And let's just see maybe be
loaded with paint right here. I think mostly water
is going to be too. Well, that's not bad. Let's start with that
one and just see kind of where we land with
our darks here. I'm going to size
this brush down. And this is probably going to
give us a good first pass, but we're probably going to
want to go a bit darker. I'm just sort of slowly
darkening these areas. You can see right off
the bat what that does. I just immediately starts to
come to life a little bit. And I'm going to use
the same loaded tout to soften my edges. And you can see here that
I'm just really focusing in on some of these shapes. I think I want to keep
this area a bit lighter. But then this right here is probably going to
get lightened up, and this right here will probably get
lightened up as well. Billy, this is a pretty good
brush for this task because it's allowing us to sort
of slow build these darks. You know, we're
not going in super heavy, black, super dark, which we could do, but it would probably require
a little bit more softening or setting the transparency to
something real light. So I'm kind of going
over the edges with the Smudge tool here just to
kind of blend it out some So each time I pass
over a dark area, it just gets darker,
which is what we want. Okay, let's see if we take the
loaded with paint brush is just super saturated,
super dark. So if I size that down, I'm gonna come in here
and get some of these really just really
super black blacks, even though we're not using solid black, but
it's really close. This nostril just needs
to be really black. So when we add these darks, it really gives us a sense
of where we are with our values because
we've kind of been working middle of
the road so far. I mean, we've had some
more saturated colors. Like, we started with
this really light wash, and then we built up these color more saturated
colors on top of each other. And that provides some contrast. But then when we come in and we add these darks like this, it just really it really
punches up the contrast. I'm gonna take this wash brush and just lighten that back
just a little bit here. So all I did was took the eraser with this
looks like it's set to just any one of
these big wash brushes. We'll do that. And I just
tapped a few times over the darks just to take
them back a little bit. Alright, so taking a look here, I think These would be dark. This would probably
be pretty dark here. And then under here
would be pretty dark. Okay, so now we've got a bit of this good dark
contrast coming in. I kind of want to see maybe
we should take this brush, size it down, and let's
get a little bit lighter. Maybe just come in
here and hit a few of these sort of
transitional fur areas, you know, where the
fur is just kind of changing color or overlapping and sort of creating
this Dark edge. And, you know, I tend to go fast in these
demonstrations because I don't want these videos
to be hours and hours. But, you know, if you see me
working faster than you do, I mean, that's not typical. Usually, I work a lot
slower than this, so I don't know, I wouldn't encourage you to
work this fast because it's really not necessary
for you to do that. In fact, I would highly
recommend slowing down. It's all about enjoyment. Want it to go by too fast. All right. Let's see. There's probably some
darker over here. Let's go back to
that almost black. S. Well, maybe that's gonna
wind up being too dark. Something like this. Okay, that's looking
pretty good. I kind of I feel like I feel like this area right here needs a little bit of something, probably maybe a little
bit more color here, probably the yellow, maybe a little bit more
across the nose. I feel like this line here and this shape here is probably
going to stay mostly white. But let's see. Let's go ahead. Let's
back up one layer, and let's go I don't know if that's
our yellow that we had. Yeah, I think it is. Let's just go back to the sharp sable brush and see that might be too. Let me lighten that
up just a little bit. And we'll come
across the nose with that color and then soften
a little bit of the edge. And same down here. We'll
soften a little bit of that. That feels better
because probably we'll wind up likely taking this white up into
a few areas up here around the eyes just
to balance that out, so this won't be
the only part here. That's white. Okay, I'm just going to sample
a color in here and let's go back to that
layer, the darks layer. And let's go back to, we've
already got the sharp sable. I just want to just
deepen that color. Maybe do the same right up
here, maybe right here. I'm just kind of
looking to see where it feels like it's
lacking a balance. A Whoops. I think right there. So as you can see with both
the traditional watercolor and the digital watercolor, it's really it's
the same process. We're just building
up layer upon layer, building our values
up so that we've got we started with a real
light wash and we're just going deeper into the darks and just building up
values and building up building up our details. I'm just going to
continue to buy some of these just details
that might be there in the strands or the
clumps of hair or fur.
14. Applying Darks with Gouache: Okay, now that we have some of the darks into the
traditional or I'm sorry, the digital painting, let's go over to the traditional version, and let's begin to add
some of those dark, some of those darker blacks. Now, I'm going to
introduce a new medium, a couple of new
mediums, actually. This first this is a
guash palette that is just it's almost empty, but it's got enough
of the black here for us to use on the painting because there's not going to be a ton of black. I'm also going to use some micron pins in a
couple of different sizes. This is a number
two, and I think I have a number
three and a number five that I'm just
going to use for some of the really
super tiny details. Alright, so let's go ahead
and get started on that. First of all, looking at the areas here that I
want to add black two, just like we did in the digital, of course, the nostril
here, the mouth, the eyes, and then
some of these shapes here that I want to have a bit more deeper value. And I'm probably going to use I've got a size four
and a size two round, and probably the size two
which is probably going to be best maybe for this
area here and here. I want to be pretty
precise with those shapes. Alright, so I'm adding a
little bit of water into this the black of
the squash palette. Now, guash is just the
same as watercolor. It is just more opaque. So whereas watercolor
is very transparent. Gouache acts just
like watercolor except it is just more opaque. Alright, so I think
I'm also going to add a little bit of the
olzard crimson into this. I'm going to mix this
in a new space here on the palette so same as we did
before in the digital side, it's not gonna be
just 100% pure black. And yes, I am getting wash into my watercolor palette.
But that's okay. So I'm just paying attention
again to those shapes that I just painted on the
digital side there. And I'm getting all of the
paint out of my brush so that I can just the same as before, I can just sort of blend out a little
bit of the edge here. Now, adding when we start to
add the details like this, it's going to slow
down a little bit, meaning that I'm
going to have to get a little bit more precise
with what I'm painting. I will probably time
lapse a little bit of this stage just so the video doesn't end up being
several hours. I think we're probably
already looking at at least a two hour
tutorial here. So I don't want it to be
much longer than that. This is a pretty fine brush. There's a pretty fine tip at the end there
once you get it wet. But I still think I
will likely be using microns for some of
the really small, like, sketch lines that I
want to bring back out. A You'll notice, too, that I sort of change the
direction of my strokes here. Sometimes I'm pulling
this way or this way. I usually won't push
strokes this way. I'm always either dragging the brush this
direction or down. That's just the most
comfortable for me. I tend to do the same thing with the Apple pencil, as well. I So a lot of times my technique is like filling in
this shape right here. I'm going to paint a bit of saturated color along the edge, and then I'm going
to come back, as you've seen me do before, I'm going to come back
with just clear water in the brush and blend that edge out to fill
the whole shape. A Now, again, this is pretty much
a wet to dry technique, meaning that most of
the paper is dry here, and we're painting
onto the dry surface. And this is especially
important for details like this because the paint's not going to spread, it's only going to go
exactly where I'm placing. I Some of this fur up here just kind of
it's kind of abstract, you know, doesn't just go to add some shapes and some movement
of the brush just to kind of create an idea of just some messy fur
that's around the ear. Since all of our
focus really is here, I don't have to be quite as
precise everywhere else. Now, to get these darks
down here in the blue, I probably want to get a darker. I want to mix some
black guash, I think, with blue instead of
the Lazarn crimson because it'll be too red. A Okay, same as I did before with the azarin crimson
and the black gouah. I mixed a little bit of the Cerlem blue and some
black guash to create a darker version for some of the shadow areas
this blue portion. Just putting in a little bit
of just the serlem blue by itself to mix in with some of those black spaces,
black shapes. And with some abstract
areas like this, it's really just a matter of kind of finding
where you are happy. You know, there's not a I'm not looking for something
specific right here. I'm just saying, Okay, well, what feels right to my eye? You know, just moving some of this paint
around and thinking, Okay, well, I've got a good
mixture of light and dark. I've got a good mixture of blue, and then I'm going to
leave it when my eye is happy with where it's at. And if I'm not happy, I'll just keep going
for a little bit further, say, Okay, well, maybe I need to blend some of this blue up into the
white fur on his chin. You know, and that gives
me a little bit of room to play with some highlights
in a later stage.
15. Adding Fine Details: And now I'm going to
take a micron pen. This is a size five. I want to pay attention to
to kind of the direction I feel like the fur or the
strands of fur are going. And I don't want it to all be
uniform because that's not the way that fur works, meaning I don't want it to all be going in the same direction. It kind of needs to
vary a little bit. So this process is just
kind of bringing back a little bit of my sketch lines. Go ahead and add whiskers here because I need a guide for
the shapes or the directions. Again, this doesn't need to
be uniform, just like fur. And I might bring in some
highlight on these with some whiteuah so that they're
not just completely lost. The micron pen, it's a really
good opportunity to get just some real fine shapes to reinforce some shapes that were created by the watercolor. I pull the pin back and
I'm just kind of looking I study it for just a second
and just kind of see. That's why I'm jumping
around, moving around, just kind of trying to
decide where I want to add little random bits. Like, if I just concentrate
on one area, you know, for too long, then I'm going
to it doesn't stay balanced. Then I'll have to match all the other areas
with what I did. And so I try to just kind
of jump around and move around and make adjustments
as I work here. All right, let's leave the
traditional painting here for just a little bit, and
we'll come back to it. But let's jump over to
the digital and sort of bring it to the same portion or the same place
that we are here.
16. Digital Color Balancing: So let's let's make a
few adjustments here. So I've been looking at this, and I've kind of decided that maybe some of this red
is just a little bit too saturated in comparison to
our traditional painting. So I'm going to go ahead and go to the layer
that has that red. And I'm going to just
kind of make a selection here that includes
most of the red, and maybe we will
feather that selection a little bit and then do a hue saturation
adjustment and just take the saturation
down so that it more accurately reflects
our traditional work. And plus, it'll give us
a little bit of room to go brighter or
more saturated, before we finish the painting. Okay, let's also take
our sketch layer, and I'm just going
to duplicate it. I'm going to turn
the first one off just in case we need it later, which we probably won't,
but you never know. And I'm going to tap the thumbnail here and
I'm going to select Alpha lock so that whatever
we paint on this layer will only show over
the sketch lines. And let's take let's take this loaded
with paint brush because it's really opaque, and let's just get an orange
maybe a little bit lighter. And let's paint over, I
make my brush bigger. Let's paint over some
of our sketch lines. Actually, we probably need to go darker because we don't
want them all to disappear. We just want them
to kind of blend in with the painting
a little more. And then for down in this area, I'm going to switch
over to blue. And again, I don't really
want them all to disappear. I just want my sketch to
blend with my painting. Alright, now let's add inside
a layer below the sketch. And let's go with yellow that's almost white
but not quite. And we'll use the loaded with paint brush again
because this is going to be more like a guash because we're going to be painting
in some highlights. So in a little bit, you'll see what I mean by using guashe because
again, it's opaque, so it's going to show up
over our painted layers. It's not going to
be transparent. I think I want blue down there. Little highlight over the eye. I think I'm going to
grab a brush that maybe has a little bit more. If this wet edge detail is going to have a little
bit more transparency. I Now, we could also combine
all of our layers, and we could do the same thing with an eraser brush
with the opacity down, but I like to do it
this way because it allows me a little
bit more flexibility, meaning it's not as permanent. I could go back and I
could delete this layer of highlights and I
could start over again. Okay, I think that's
looking pretty good for our highlight layer. Alright, let's go back and
let's leave this here. Let's go back and let's check on our
traditional painting.
17. Traditional Gouache Highlights: Okay, looking back at the
traditional painting, I can tell I'm getting to a point now where
I'm kind of starting to I can see some of the
smaller details because the painting is
starting to come together. I want to darken the
eyes because if we look over at the digital, like, at some point in time, I added some paint
to the eyes here. They got a little bit darker, and then that wasn't
really reflected on the traditional painting.
So I'm going to do that now. Just to get those a
little bit darker there. So now in the guash palette, there is a bit of white
right here that I'm going to be using to add highlights. I'm going to mix a little
bit of the yellow ochre into a portion white guash here. One thing about white
guash is it's going to lighten as it dries, meaning the white's not
going to be as intense. So I oftentimes have to come back with a couple
different passes. I get a little quiet. It's just because I'm focusing in on just what else is needed to kind of wrap
this guy up here. And I think I'm going to call it here on the
highlights for now unless we make some more adjustments and maybe I see
something else that needs a little bit
of a touch up. Let's go ahead and
let's let these dry, and then we may
come back in with a little bit of
additional touch. I
18. More Digital Washes: Back over to our
digital painting. Let's take a look at
some things that we might do here to wrap it up. So we've got a good, nice blend of colors. We've got some good values,
some good contrasts. We added some dark deep shadow shapes and
some highlights now. So what can we do to kind of push this one over
the finish line? So first up, let's take
a look at doing maybe some additional washes
because right now it has kind of a really sort of a clean edge all
the way around here. So it's soft, but
it's pretty clean. So maybe we're going to add some washes down to the outer edges and kind of
reinforce some of our colors, and then maybe we'll
toss some splatters over the top of
everything to wrap it up. So if we add a new layer
below everything else, and maybe we'll just
sample this orange, but make it a
little bit lighter. And we're going to go over
to we've been working in the brushes section of the
master watercolor brush set. Let's take a look at the
washes collection here. And let's see about
maybe just grabbing. This is water wash four. If we were to drop that in
try and make it bigger. I don't know if I like
the shape of that one. Let's spin it around. That might work a
little bit better. Let's see about
another one, maybe. Make it a little bit smaller. I'm just kind of
moving it around. Let me just put it
on another layer so that I can so that I
can move it around. Something a little
bit more like that. I like that shape there or that wash that's kind of pushing
the outer edge. Let's see. Let's combine those down, and let's add another new layer, maybe let's see about maybe doing a yellow one
over on the left side. So maybe we'll get
Let's get this one. Before we change to yellow, let's see about adding,
I like that right there. So let's go ahead
and merge that down. Now let's do another new layer, and let's switch
over to a yellow. It's pretty good.
It's a little bit lighter than what we have
here. So let's try that. Let's just Let's get the same one and just drop it right
here. Maybe right there. It's on a new layer, so I'm
going to move it around. Maybe something like
that. Let's try one more yellow one,
merge that one down. New layer. I really
like the water washes, but maybe a splatter
wash. Let's see. That's not too bad. It's going to cover up it's covering up some
of our highlights, so I'm going to erase a
portion of that there over his nose so that it doesn't
distract from our highlight. Urge that one down, and
then let's add a blue one. Let's do another new layer. And let's just
sample a blue from here and maybe go a little
bit lighter with that. And, okay, let's try another really liked the
water washes for this. Let's see. Let's
go back to those. Let's try this one. And that
actually works pretty good. Kind of reinforces
the shape there. Let me move it
around a little bit. And I think that
works pretty good. Let me try one more, though. Just add another new layer. Oh, that's kind of
interesting, actually. Let me slice this one down. And I'm just going to place that one right
there because it's creating a really nice
blend of the blue and red. It's merging those colors
a little bit better. Let's go ahead and merge
that down and maybe one more to wrap up our
additional washes. I got a little bit
of a splatter there. And maybe I'll merge that down. Maybe I'll take
the liquefy tool. Maybe we'll just push this one. We'll just change
the direction of the splatter just a
little bit there. Yeah, I think that
works a bit better. All right. Now that's cool. Let's go ahead and we'll merge all of our additional washes. They're all now on
the bottom layer.
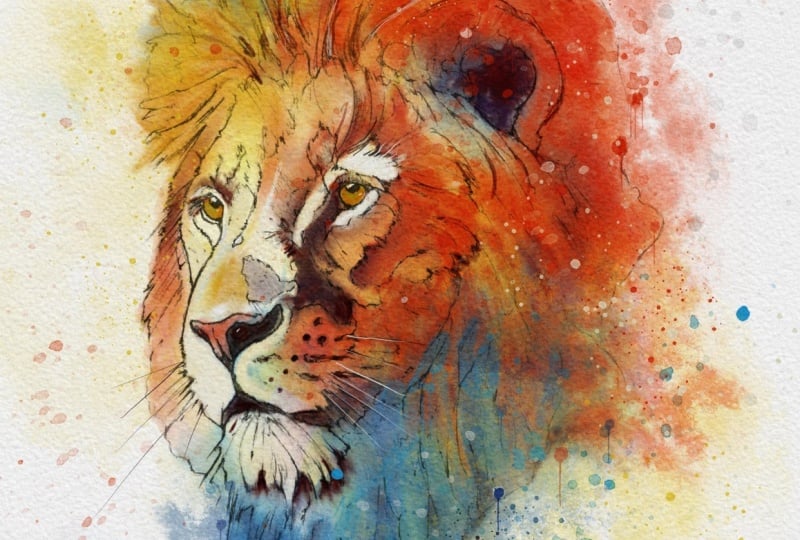
19. Final Digital Effects: So now let's create
a new layer on top of everything else on top of the sketch
and everything. While we've got this blue, let's make it a
little bit lighter. And let's go over
to the splatters. And let's just see. Let's try a couple of different ones here. Let's see about doing
maybe something like this. Be okay if we size it down
and rotate it around. That's probably
pretty good there. Let's do a new layer, and let's maybe get maybe we'll make this one
a little bit darker. Let's get maybe
heavy splatter one. I think that works pretty good. And then we'll go
ahead and merge the two blue ones, make
another new layer, let's sample this red, make
it a little bit lighter. And maybe we'll just maybe we'll just throw in some of these random drips here. Let's see about maybe getting drips three.
Let's see what that does. Okay, now instead of stamping
them or dropping them in, I'm now painting in a few spltrs and I'll show you
what that looks like. Just really random. If you don't like them,
you can always double tap. I think I want my colors over here to be a
little bit lighter. And then maybe really light for over here whiter than that. Or maybe we should get
Let's get the tiny specs. You can see what's happening
here with some of these. I'm going to take
the eraser brush so that I can I'm going to use loaded with
paint with the eraser. And that way, I
can remove some of the ones that I feel
are too distracting. Let's see about brush flex, too. Let's see what that does. Just adds, that adds a little bit more variety, which was what I
was looking for. Maybe we'll get a real dark
color over here from the ear. I and do something
kind of like that. I think that's probably
gonna do the trick. I say that as I add
more splatters. Something like that.
Let's try one more. I'm gonna go ahead and do
one more new layer I kind of want to bring the red splatter
over to the left side. It's more of an orange, and let's just see if we
get one of these. Maybe not satisfied
with my splatters. Maybe Maybe this one Whoa, yeah. Oh, man. Okay, so here we go. Let's see if we can kind of size that down just a bit there, and I'm going to race
a little bit because I don't want too much over the face that it's to the
point of being distracting. And then maybe we will get this lighter yellow color and
then do something over here on the right side that
sort of balances that out. Maybe heavy splatter one. Let's drop it on a new layer. We can move it around a
bit, a little bit lighter. I Yep. I think something like
that feels pretty good. One more. Yeah, I think that's probably that's
probably pretty good. So let's do one. I'm
gonna go ahead and flatten all of these
splatters onto one layer. I'm going to turn off the paper texture for just a moment. And what I'm going to do is I'm going to three finger swipe, taking these three
fingers here and swiping down and
choosing copy all. And then make sure we're
on the topmost layer, but below the paper textures, swipe again and do paste. So now we have a flattened layer of everything
we've painted, and we want to turn the
paper texture back on, and then let's get just to
see may not be necessary, but if we do a hue saturation, do we need to bump the
saturation up just a little bit? There, I think that
works pretty good. What about a color balance? Let's see, we are on midtones. Let me just see if we
push the midtones. A little bit red or
a little bit blue. Be a little red.
Yeah, I don't know. The red's kind of nice. Then moving a little bit blue. And then let's take the
shadows and move the shadows a little blue sin. Okay, so I think that gives us a really nice color
variation if we wanted it. I don't think it's
entirely necessary, but we could just make some final adjustments to
our colors that way. I'm gonna go ahead I'm
gonna leave that off because I think this
one is going to be closer to our
traditional painting since we were trying
to match those colors. Okay, so let's jump back
over there and take a look at it. A
20. More Traditional Washes: Okay, now back to our
traditional painting. I'm kind of looking
at both of them and comparing and just
seeing a few things that I might make some
small adjustments to mainly here and maybe
a little bit right here. And maybe we'll even try to
add some additional wash out here to sort of change
the edge of the painting, and then we'll wrap it up
with some splatters here. So let's go ahead and
I'm going to take some more of this cadmium red, white and before I add it to the painting, I'm gonna add some
clear water here, and I'm just going to
kind of just let it go all the way around here. I soak extra up there here. Alright, now almost
out of paint here. A Go ahead. Allow some of this to clean the squash out from the azar and crimson because I don't need
that the blackqh I'm just randomly adding some bits of paint
outside the edge. All right. Now I'm going to reshape some of
this with paper towel. All right, and that's
just going to change our outer edge of our painting. Gonna add a little bit
of additional wash. I'm going to do the same
thing with blue here as well, so I'm going to clean the
orange out of the brush. Of course, I'm really
anticipating these splatters. A little blue here. And then the wet the paper a I think I'm going to spread some of this kind of like we did with the digital painting. I'm gonna spread a
little bit of that blue. Mixing a little bit
of vermilion in. I'm gonna spread a
little bit of this blue. Up into the red. Alright,
so I'm gonna let this dry, and then we're going to try
a little bit of splatters. I
21. Traditional Splatters: Now that this has
dried, let's see if we can add some splatters that might be similar to
our digital painting. So there's several tools
that I use for splatters, and one is this fan brush. I think this is maybe
an oil painting brush. It has very stiff bristles, and it will hold a lot of water and paint
but very loosely, and you can tap it
in to add splatters. This is a stencil brush, and it's very bristly as well, and you can run your finger on it to make really
fine splatters. And very similar to
that is a toothbrush, very stiff bristles
that you can flick with your thumb and make a lot of
splatters that way as well. So let's start. Let's start with this brush, and I'm going to add
some azarin crimson and cadmium red,
white mixed together. Some more water in there. In order to make splatters, you've got to have a lot
of water in the brush. So let's see if we can just make a few splatters out
this way this way. And I'm going to go
ahead and soak up a couple You that I don't want, I'm just
going to scrub them out. You have to do this
pretty quickly because it will begin to
dry and stain the paper. Okay, so I've added some
water to the paper there, and we're going to want to
let it dry before we add any more splatters because the splatters will spread
into the wet areas. Okay, those first
ones have dried, so let's see about maybe
adding some more here. Got the same ban
brush, lightly tap. All right. There's a couple
there that I want to get rid of here there. Okay, let's add a few blue ones. Let's do the same thing here. And then come in and
lightly tap blue splatters. Okay, I'm gonna let those
dry before adding more. Alright, now, I had a few
lighter yellow splatters in procreate. So I'm going to bring
this squash in. I'm gonna take the fan brush and I'm going to soak it
in some white squash. And I'm just going to use white, but I've dipped it in
the water lightly tap. Because there's so much water, these are not going
to dry as intense. I think I'm going to get rid
of the really big one there. Yeah, so these may not even be visible when they dry because there's so
much water in there. In fact, I'm going
to go ahead and just dip it back into the guash. Just use a tiny bit of water in the brush and just hit a few more because I know some of those are not going
to be visible when they dry. Now, that looks like a lot, and it looks probably
kind of scary. But again, once this dries, some of them they're
not going to show up like they are right
now while they're wet. So I'm going to just
dab out a couple of these and maybe leave it right there and let it
dry and see what we've got.
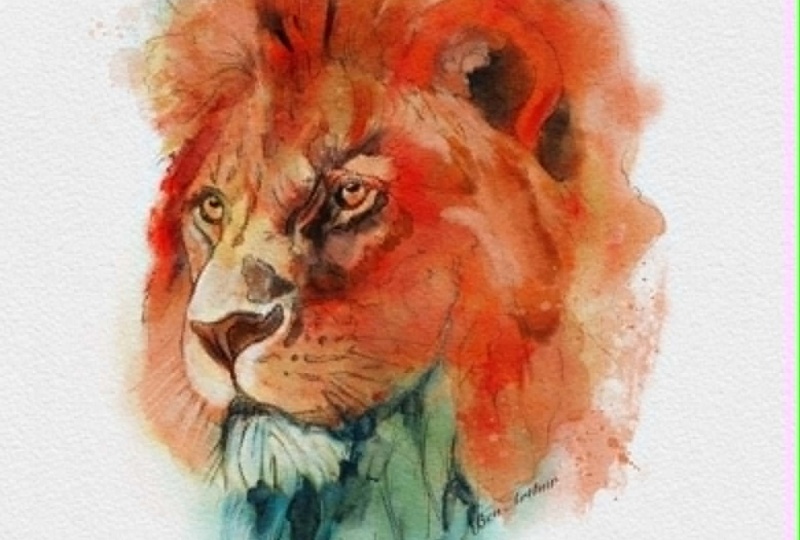
22. Final Comparison: And now that these
splatters have dried, you can kind of see that they've blended
in with the painting. They don't stand out quite
as much as they did. So if you compare them both side by side and
you look at them, and you can see that the
two are very similar. We followed a very
similar process. We built layer upon layer, worked from light to dark, and the results are very
much they're very similar. So it's been really fun to see and just work on
both of these paintings together and just
see kind of how one bit of the process
translates to the other. And it's really amazing to me how realistic you
can get on the iPad. With these watercolor
brushes and Procreate, it's just amazing and it's fun. And it's really flexible. I think that we found that
these two processes can be really similar and both
an equal amount of fun.
23. Closing Thoughts: All right. That's going
to wrap up this class. I hope you enjoyed
working through this process, and
more importantly, I hope it gave you a
clearer understanding of how watercolor
actually works, whether you're painting
traditionally or digitally. If there's one
thing I'd want you to take away from this is that both approaches really follow
the same core process. You're going to start
with light washes, build up your color, developing your values, and gradually refining the
painting as you go. And remember, don't get
too hung up on the tools, whether it's brushes,
apps or materials. What really matters
is understanding what each step is doing and how
the process fits together. Now, if you haven't
already, be sure to upload your project
to the gallery. I'd really love to
see what you created, and it's always helpful for other students to see
different approaches as well. So thanks so much for
taking this class. I really appreciate
you being here, and I'll see you
in the next one.
 Nathan Brown, Creating digital and traditional art