Transcripts
1. Introduction: Pre-comps, track
mattes and masks. What the heck is that? If you have heard
these terms before, but you don't really
know what it's about. This class is for you. I'm Alyssa, I'm an
animator, illustrator, designer, creative dabbler
of sorts. And I'm here to hold your hand through learning
some After Effects. So keeping it fun, nothing too intimidating. This isn't about being the most incredible
graphic designer, motion graphics
artist in the world. This is about having a bit of fun and having a bit of play. So I'm just going to show
you some tools in a light and non-intimidating way
because After Effects is animation and animation
supposed to be fun. It's just unfortunate that
After Effects is scary. So I'm here to make it a
whole lot less intimidating. So this class is all about
some really early on tools in After Effects
that have huge potential. So pre-comping is
effectively grouping stuff. So if you've started in
After Effects and you've got a huge amount of
layers and you just want to be able to put
some stuff together. That's the magic sauce.
Track mattes and masks, use them kinda similarly
but for different purposes. So track mattes and how you can hide just a little
bit of something, reveal it kinda like you're
looking through a window. Masks are attached
to a layer so you can use it for things
like making an eye blink. What we're gonna do in this class is go
through all of those. I'm going to give you a really specific project that shows you how these tools can work in this very
specific context, but then reuse them in
a few different ways. So hopefully you can start
to see their broarder potential and how you could use them in your own
ongoing projects, while no experience
in After Effects is needed to start
in this class, I would recommend if
you're feeling like it's a little bit too complicated and deep divey at the beginning. Go back to one of my earlier
classes and have a look through those because
this is all kind of flowing along together. So it's building on those
skills we've already used. Having said that, if you're
already feeling a little bit comfortable with
the basic tools, jump straight on in friends, if you know how to
use transforms, if you know how to render,
you're gonna be fine. This is specifically pre-comps, track mattes and masks, and some slightly
more advanced tools, but still nothing too fancy. If you're keen to
keep building on those After Effects skills, jump on in friends
and let's get going.
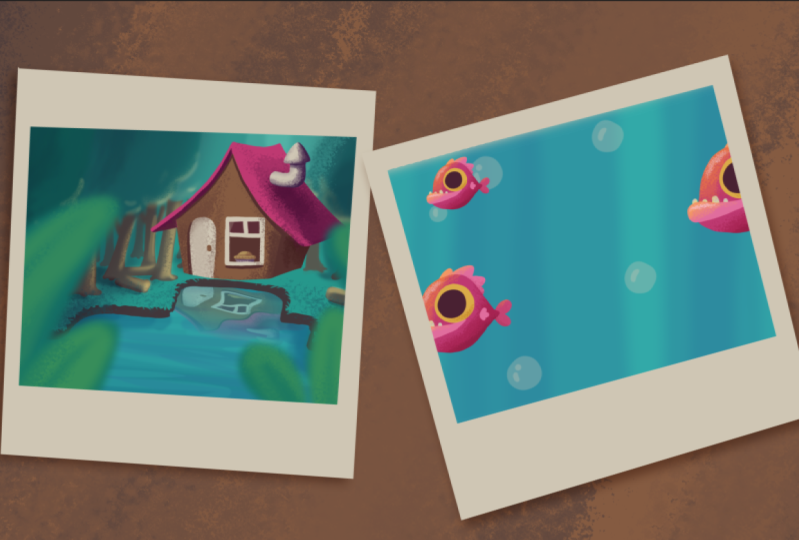
2. The project: This is what we're going to
be creating in our class. A little 1920 by 1080 looping animation or
not quiet looping. So it's going to be
working with assets that I created in Photoshop using
a little layering system. And then that is going to be
imported into After Effects. And we'll start
animating from there. So we're going to use
those layers to go through pre-comping,
track mattes and masks. If you'd like to work
with you own assets, you are absolutely welcome. But I highly recommend
that you watch the videos first so you
know what kind of set up and what kind of layers
are needed so that you can make sure that we've
got some continuity. The main purpose of this
project is not to make something incredible
and totally versatile, it's to get comfortable
with the tools. So the project is really
specific to make sure that I can cover those tools
as thoroughly as possible. Having said that, it's more important that you learn
how you want to learn so chop and change how you like and make the assets that you feel most comfortable
working with. The final video is
going to be a 1920 by 1080 landscape video. It's going to be an MP4. If you would like to
make it a little gif that you can share
online oh my gosh, plays do. If you'd
like to make it square. Absolutely more than welcome. If you want to make it vertical, you've got options because
it's two Polaroids. You can do whatever
you like with it. But the main thing that we're
going to talk through is just your classic
HD normal ratios. We're not gonna do anything
more complicated than that. But if you are interested
in going further and making the project work
for you, please do. Don't be afraid. Don't
be afraid my friends.
3. Inspecting those files: So go ahead and download
that Photoshop file. It's just this one
here, Polaroids. And then we'll open it up
and have a little look, see. So it's important
here to note how After Effects and Photoshop
can work together. And Illustrator for that matter. After Effects can read layers. So it doesn't need, you don't need to export every everything that you want to animate as its
own individual file. You can just import one
big Photoshop file. And After Effects will be like, Oh, I recognize them
layers, I'll use it. So... What that means is you need to split up everything that you might want to animate
into its own layer, e.g. if I want this little
fish fellow to swim, I need the fin to be its
own individual layer. So they're two separate things. Same with the eyeball. If I wanted to do some blinks, I need to keep it all separate. Another thing worth noting
potentially at this point is that After Effects
can read folders. So in Photoshop you can have a folder created with
this little tab. If I pop all of this polaroid
into here, group one. What that's going
to do when I bring it into After Effects, is it's going to
read this group, this folder as its own, pre-comp, its own composition. So you'll already have
one big main comp and then the comp
for this Polaroid. So that is a way of
setting up your files. It's not what we're
gonna do this time. We're going to leave it just raw as it is all
individual layers, just so we can get the hang of pre-comping things and grouping things directly
in After Effects. But it's handy to know
that you can do that. Cool. I think that's all we need
to know about this file. So let's jump on over to After
Effects and bring it in.
4. Importing our layers: So in After Effects, I'm going to make a new project. I'm going to go file and import. So I can go import
file with Control I or I can double-click
in the project tab. And then I'm going to
navigate to my Polaroids. And before I hit Import, I'm going to change
the import as from Footage to Composition,
Retain Layer Sizes. It's important we do that. Because. If I jump back here for a tick, Here we go,
the fin is a great example. So if I want to
animate this fin, I want to be able to click on just that little space where the fin is and know
that I have it selected. If I don't tivk
Retain Layer Sizes, what it'll do is make a
bounding box the size of the whole composition,
which is far too big. That means if I select anything, I'm going to hit
whatever is on top, basically because
the bounding box is the whole thing
for all of the layers. So we always want to
take retain layer sizes because animating without that that is a pain
in the bottom. Then we'll hit Import. And now because of
the Photoshop file, I don't know why After Effects, thinks this is important,
but you get to do it twice. Basically. Composition,
Retain Layer Sizes. That's what we want. Editable layer styles. Great, because that means if we've got any blending
modes in there, we can adjust them
directly in After Effects. Just a note, if you're
using Illustrator files, you don't get this option twice. It's only for
Photoshop. How fun. Let's have a look at
what has come in. So we have a composition. Now I know it's a
composition because this icon is the
composition icon. And we've got a folder. Now if we twirl down our folder, we can see all of our layers. Amazing. So many layers. Now these are automatically
in alphabetical order. So just as a note, I don't know if that's
very interesting, but it's a handy to
know they're not in the order that you have
them stacked here. They adjust straight
out alphabetical order. So if we are still thinking of this project window
as our pantry, then this is a little
Tupperware container full of your very organized
ingredients. This is the little herb
wreck, herbs and spices. But we don't need to go
in there because we've already got out perfect mixed
spice collection right here. It's already done. So if I double-click
on this one, that'll open up a composition. Because when we import, we selected composition
retain layer sizes. So created a composition for us. And all of our layers are nice, clean, tiny bounding
boxes, Beautiful.
5. Preparing comp settings: Usually when you're creating a new project in After Effects, you'll need to make a new comp. But because we've imported one, we can just work
straight from that. But before we go too far, we want to make sure
it's the right settings. So to update our settings, we go to Composition and
Composition Settings. Or as you can see, Control K. If that menu isn't
allowing you to select, it, just makes sure that you've
got a little blue box around either your timeline or your comp window that
tells you where you are. If you're just in
your project window, it doesn't know what comp
you're talking about. So you need to be in
your, one of the two. They represent what comp
comp you're in. So comp settings. Now, what I wanna do, mine is actually set correctly, which is fantastic, but
that doesn't always happen. So whenever you import a scene, it will use the
size of the file. But the frame rate and the resolution and timecode,
all that kind of stuff. All that is just
assumed from whatever the last project you did was
the last time I was in here, it was a six second
comp, so that's handy. And 25 frames per second. Perfect. We want 1920 x 1080px, 25 frames per second square
pixels every time. 6 second duration should be plenty. That is looking
hunky-dory to me. Just make sure that
yours matches. Something else
I'm gonna do while I'm here is a bit of tidy up because this is a bit
much information for me. I don't care about
all this news yet, so I don't need my in-out
duration stretch, no thank you. I'm
going to down here, click this little
guy. Tiny little, I don't know. I always think it's a knee it looks like a knee
to me. It's not. But that's what I think of. I'm going to turn the knees off. I'm also going to turn off
this little guy up here. I'm not sure why that's on. It's just a bit excited to be here. So I'm going
to turn that off. That's our motion blur, which I can show you later. But for now, we don't need
it slowing down our machine. So make sure that's all grey. And what I'm gonna do
right now before we move on is I'm going
to save my file. So I'm going to
go File, Save As. And we always do this
at the very beginning because After Effects
always thinks it's being really helpful in
saving it somewhere extremely dumb. Call it
Polaroids, animated, maybe. And hit save. So now that we
have everything saved, organized, we're all
ready to crack in. What we're gonna do now is we're going to start pre-comping. So that means basically
grouping everything.
6. Grouping via precomps: Alright, let's get
pre-comping. So... What I wanna do is there's a
couple of simple groups that I know we're going to have
because we've got a Polaroid and another Polaroid. So I'm going to
grab those elements and I can grab them from here. You can see that's a
little bit faffy though. I know that I organized
it beautifully here. So I can, I know the layers are stacked the same way so I
can use that knowledge. So basically Polaroid one, all the way up to bubble. I click on the bottom one and then hold shift and
select the top. Then I can right-click
and go to pre-compose. Keyboard shortcut
is Control Shift C. And now I'm going to
name it Polaroid One. These little tick boxes should automatically
be ticked for you, move all attributes
into new composition. That means nothing in
this particular instance but hopefully I can
explain that later. But we do want everything
to go into the camp. Absolutely. And we always want this ticked. This means very
little right now, but adjust composition duration to the timespan of
the selected layers. Once again, After Effect is
being complicated, I'm gonna, I'm gonna show you so hot
tangent while I do this. So I'm going to cancel
that for a second. If I just cut this for a second and I pre-comp
and I don't take this, see how my layer goes
all the way to the end. But my images disappear. If rather than unticking that, if I grab everything, precomp and tick, adjust
composition duration to the timespan of the selected
layers and go, okay. My new pre-comp is at
the correct length. So I can see when it disappears. That's all that little
tick box means. Adjust composition duration to the timespan of the
selected layers. How long are the layers?
Crop the comp to that length. It's not a permanent chop. It's just a handy-dandy chop. I'd always always
have that ticked because you've got visual cues of where things are happening. That's what that
little button means. Back to where
we were, Polaroid One. And then hit OK, you may automatically
have opened new comp. That's fine. That doesn't matter. That just means it's
going to open for you. If you don't have
it ticked, like moi, but you want to open
it, double-click. That's how we get there. You see now that you've
got little tabs. So I've got my Polaroids and Polaroid One, Polaroids,
Pollaroid One. A good way to tab
between the tabs is, would you believe hit Tab? And then we'll show you
a little flowchart, Basically of where you are. So now we can see we've got a lot less layers in our main comp because we've grouped a bunch
of things together. So I'm going to work just with this Polaroid One comp for now. And we can mess around with
everything else lighter. So I'm going to double-click. I also want the image that's on the Polaroid to be
its own little comp. I'm going to grab everything
above Polaroid one. So the water to the bubble. And control shift C, or right-click and pre-compose. And I'm going to call
it fishy pic and then hit OK or Enter. And that
will pre-comp that. I've got my Polaroid back and then I've got
the picture. If I double-click a
little fish, friend. And we're gonna do one more. We're gonna do fish to eyeball. I'm going to go Control
Shift C, pre-comp. Fishy. Amazing. So now we've got four comps. So if I hit Tab now, I'll see, I can go back to fish pic, back to Polaroid one. Back to Polaroids. I can also click through
here in my tabs. And you'll also notice that
you've got more pre-comps in your pantry about layers. I've got the original and
the individual little nests. Now this is just a way to
keep things a bit more organized so you don't have thousands of layers in one comp. There's also some
other advantages to it that I'll show
you as we go along. But the other thing we
want to do at the moment, at the very beginning of this, we imported some files and
we set retain layer sizes. But now we've got this
huge bounding box. So what was the point
of all of that effort? If I go to grab the background
Polaroid's in the way. So what I wanna do is
basically crop it. To crop a comp. You can obviously do it through your comp settings,
composition and settings. However, if you
change these sizes, It's just no matter
what it's going to scale it from the center. So it's going to be everything
has to be in the middle, which ours is not. The easiest thing to do is
this little guy down here. It's got a rectangle
with a rectangle in it. Whoa, scientific. Click on this. This is called a
region of interest. If I draw a little box
around what I want, it doesn't have to be
perfect on the first go, you can adjust it. But this creates a region
of interest. It's a focus. The main tool of
region of interest is if you've got something
really chuggy on your machine, you can just tell After Effects to focus
on just this area. So that's all that will preview. In this case, what we're
going to use it for is... if we set the
size about the main, main polaroid size and
we go to composition, Crop Comp to Region of Interest. So if that's our region
of interest tool and we're going
to crop out comp. We're going to crop it to
that size. Shablammo. And then I'm gonna do the
same with my fish pic. So I'm gonna jump inside, grab my region of interest tool. Now, once you've cropped it, and if you're not
happy with that crop, easiest thing is to undo. Because otherwise if
you scale it out, you're going to be scaling
from the middle again. So do be precious when you're
doing it the first time. I would never go right to the edge because
as you can see, it's not going to show that bit. You're going to
actually cut a bit off. So give yourself
a bit of margin. But we don't need
all this stuff. Comp, crop comp to
region of interest. As always, one more
time with the fish. Now if I go back
through my little tabs, I can see here that they've
been cropped, great. I can also see
everything is moved. That's fine. We can just pop
them back in place. So that is the one
annoying thing about the region of interest. It doesn't remember,
where you put stuff. So you do have to move
it back in place.
7. Animating our fisho: Now that we have our
same kind of setup, we're ready to start animating. So I'm just still going to focus on one Polaroid at a time. And we're gonna get
that working well. And then we'll basically rehash everything with Polaroid number two. So don't worry about
getting everything set up put just a
little bitty at a time. So I'm gonna jump
into my Fishy. And what I wanna do is I'm
going to animate this guy. Now that resolution
is atrocious. So I'm going to change my
preview from quarter to full because I reckon this
computer can handle it. If ever your computer is
being really laggy. I highly recommend animating
on quarter. I'm a big fan. But do make sure that
you flip back to full to check it
every now and then, particularly before you render
because you want to make sure everything looks
exactly as we think it does. If I go back to quarter, quite a bit of variation. Like it's obviously pixelated, but you can see if you're
trying to line stuff up, you wanna make sure
you're on full. Let's animate this guy swimming. Simple swim. I'm gonna get the fin to flap about because that's
how swimming works. First thing. Basically I'm just
going to rotate it. That's how I'm
gonna make it swim. But I need it to
rotate from the joint, basically, the moment
the anchor point is in the middle of the fin. So I use my rotate tool. That looks weird. That's not how fins move. So I need to move
my anchor point. Use my anchor point tool
keyboard shortcut is y. If I move it over to the edge, there's a vague big point. Over here-ish
and then w for wotate tool. That looks better. Then I'm going to animate
the rotation of this fin. So I'm going to open
the Rotate property. So R on the keyboard, will open up the
rotate property. R. Now go to the very
beginning of your little comp. And I'm going to
activate the property. I don't need it to be at
this neutral position. I'm just gonna go
from one extreme. Move along in time
to the next extreme. So bloop, bloop, bloop. Yeah. There's no need to tell it
where the middle point is. That's how I drew it, but
it's going to rotate from one extreme to the next. Great. So the next pose after this
one will be the first one. So I'm just going to grab it. Control C. Move along in time then Control
V, That's right. Copy Paste works. Great. I don't think that's
quite the same distance. I'm going to nudge it on over. If I play that, look at it. Amazing. It's really
not that amazing, but look, it works. What I wanna do is
I want it to loop. So what I could do
is I could copy all three and paste
all the way along. Now I'm overlapping
because my first and last are the same,
so I can do that. I play that. She goes. But that's tedious for one also, if we
want to make a change, I have to do on all of them. I'm not gonna do that. We're gonna do the
loop expression. So I'm going to Alt click
on this little stopwatch. I'm going to hold Alt on
my keyboard and click. And then I'm going to type
in my favourite expression. loopOut() Really important. You've got a capital O for Out, but a lowercase l for loop,
and then bracket, bracket. Now if I click off or hit
Enter on the numpad, close. Now if I play, that will go infinitely. That's important
when we're using a loop out expression that the first and last
keyframes are the same because otherwise
you'll get a glitch. So if you find, you get a
little glitch on the loop, that is usually why. The reason I'm getting
glitch there is because it doesn't fit
perfectly into 6 seconds. If I just nudge this over one, she will fit into
six second loops. Lovely. I don't know that I like
it. So what I'm gonna do, I think it needs to go faster. I think these a little
frantic piranha fish. So I'm going to move these
all closer together. Nah that's cute. And then of course, a little bitty of easing. You can select everything by dragging and selecting
or my favourite. Click the word of the
property that you want. Rotation, that select
all the keyframes in there, and then hit F9. For your basic Easy Ease. That's cute! Awww. It's not quite a perfect loop. Why is it not a perfect loop? Because I can't do math. So let's see if we can
get it onto ten frames. And I can't be bothered waiting so I'm gonna go back here. There it is. Perfect. Lovely loop. So anybody that missed that ramble, to get it
looping smoothly, you need the length of
your loop to fit evenly and divide evenly into however
long your whole comp is. So in this case my
whole comp is 6 seconds. So if my loop goes
for ten frames, ten frames fits neatly into 6 seconds times 25 frames per second whatever that
is, 150, they go. So it's got to fit
evenly into 150. So if I have ten frames per
loop, that'll fit nicely. Cool. So that little fishy is
doin' it's thang. Great.
8. Just keep swimming: Now if I go back to my
little fish peak comp and I play out here, theories, do any little thing and the best thing about a comp. One of the many great
things about comps is I can have multiple
instances of my fish. I'm just holding Shift. So when I scale them
a fish so it stays proportionate and then getting weird distortionary hold Shift. And then if I do Control D, D for duplicate, that makes another
instance of math fish. I got as many fish as I
like, all different sizes. Now that we've got the fishy
is doing they're thin, flat. We should animate
the position cell. This one could be simple,
could be convoluted. Doesn't matter which
one you start with. But I'm going to pick
this one because again, I'm going to start
with him off the same as I'm going to
hit P for position, open up that property and then
hit the stopwatch mirror. Belong in time. I'm gonna go to the very end because
what I'm swimming in the hotel all the way across. Stunning, amazing. That's just a beautiful
little escalated moment, not a particularly
convincing fish move. So what I wanna do is I
want to make it more fluid. Now because this is a
path I can animate. It, hits the pen tool up here, a little fountain nib. And we're gonna get a pen tool. And then just on this path I can drag and that will add handles. So like the pen tool in
many other Adobe programs. If you hover over, you see the little
cursor changes. So if I click it
again, that's just going to remove those handles. But if I click and drag, that'll create new handles. And then I can grab these and do whatever
I want with them. Much more. I don't want to say realistic because it's a
funny look on page, but it's not as
stagnant, which is not. So then if I do the same kind of thing with all the Alba fishy, if one next I guess because
that's what was selected. In the mirror of cross, I generally find it
easier to animate the position just as a straight line first and
then add the curve ease. It's just you've got
something to work with them. You know where you're going, you know how long you've got. And you've also got this
little motion paths, dots. So you can see kind of what's
happening on each frame. I just find it slightly
easier. Myself. Do whatever works best for you on how can this guy actually much too fast
now he's up Tiger. So it's really important that
you keep playing it back. Like proper playing it back. Not just scrubbing through. Because scrubbing through is
how fast your hand moves. How fast the actual
animation is. Always important
to check because I'm completely
ignoring the bubbles, by the way, don't
worry about then. We could add more points
on that motion paths. It adds a little
bit of complexity. So I'm not going to bother, we just wanted something that's not completely
innovatory. So just two curves is going to be absolutely planning to get that kinda look. Bbb. Now we've got all
of our fisheries. It's really nice that they move at slightly different paces. The fins all being perfectly
in sync is a bit weird, but we're going to play with
that in a minute anyway. So we're going to
leave that as it is.
9. Blinky bois: Now that we've got
them on a map, we can see what they do and
don't know about you guys. The non blinking vibe
is flipping terrifying. So I'm going to animate
them blinking because it's a bit on the crepe side. Actually also something that I absolutely should have done is taken on over the full let's have a look how
it actually looks. Shelly might take a hot second
occasion, but it's okay. Sorry. I'm so used to just working with quarters that I didn't
even think about it. But that was ugly. But still that deaths there. Okay, So let's jump in
to our fish friend. We're going to animate a blink. So what we're gonna do, there's so many ways to do this, but this is just
one that I like. So on the eyeball, we're going to
basically mask it off. In theory, you could
potentially do a little scale. But the pupil getting squashed completely
gives away the game. So I'm not gonna do that. I'm going to use the pen and
I'm going to animate a mask. So how does one with
the eyeball selected? If I go up to my pen tool
and start clicking around, basically I'm going to create the top eyelid and the bottom
eyelid as one big shape. So I'm going to start
with my open I oppose. So I'm gonna click and hold. So again, nice little
curve at the top. And then click and hold. Oops, wrong way. Now I don't need this curve because I'm just gonna go
straight down from there. So I'm going to, I'm holding Alt and then dragging that
handle back into the dot. Then I'm going to click. And then again I'm
going to hold Alt so that I create a new split. Annoyingly that did
nothing the other end. So that's fine. I'm
just dragging by him. And then I'll continue it on. Drag this one back. And I have not learned that
up very well, so that's fine. I'll just nudge it on either. Holding Alt again and
drag their unpacking. It really doesn't
matter if you do have curves and left sides. I'm just saying
precious makes it easy for me to keep track of
where everything is gearing. So you could do this just by clicking and
clicking UI around. I like the curves personally, do have a go with the pen tool, start to get used to it
because it is stupid, helpful. Just a note, if you found while you're
being clicking away, you started to create a stripe. That's okay.
Everything's or hot. Don't panic. All you've done is
you've created a shape. That's exactly what you've
done. So delete that. You don't need it. What you need to do is
make sure that you have the layer selected before
you start creating a shape. Because if you have a layer
selected and then you start drawing a shape after
Effects is going to be like, Oh, you want to mask? I got you. And it will create
a mask for you. If I twirl this down, I can see now I have a mask properly. If you don't have a layer
selected, It's like, Well, you must want to
share it because what am I going
to put a mask on? Make sure that you have a layer selected before you
create anything. With the eyeball selected. I'll just do that one more time. I'm going to click and drag. Click and drag. Done this so many times
and still no good. But that's not important. So you can see when I cut through the eye
what's happening, something that I completely
forgot to tell you. What are we doing? So if you move the shape, it's just revealing
his main section. So we are creating the open
eye-blink part right there. If I twirl down this math, I've got all these
little properties that have a stopwatch. A stopwatch means
I can animate it. So if I want to animate
this guy and blinking, what I can do, hit the
stopwatch on mask path. Then if I move along
in time a little bit, I can move these points. So I'm gonna go back to
my normal selection. I'm going to Shift
click on one of these points that
just diesel X1. And then I'm going
to re-select it. Yes. It is silly. Yeah. Selecting the points
is a pain in the bum. Look, angry thief. Get, I'm going to move
this one down as well. And this one right up. I'm just basically
faking a closed eye. It's not gonna be
completely closed. That's fine. I'm going to move
along and time again, and I'm going to copy paste my first one where
it's nice and open. So if I scrubbed through a little blink and I can put
a Z on it if I wanted to. Amazing. Then because I've
already animated at once The best thing, copy, paste it. Wherever you want. Heist two together should blame or you could
have double blink, loop, loop, retirement. So once you've animated
one blink this way, you don't need to do it again. And if you don't
like it, delayed it, copy, paste. Amazing. It's a little bit robotic. I don't want it to be all
exactly the same pricing. That feels a bit weird. We got a little blinky
fish. Very huge. So I would also
point out that you can do anything else with it
doesn't have to be a blink. Feel free to play around. It could be making
efficient angry fish. That's fine. If this is my neutral
pose or I can do is plug that in here over the
top of all of my neutrals. So copy, paste, paste and paste. I'm going to make now I
have blinking angry fish. Actually got lava, sinister. But I'm gonna, I'm
gonna stick with the happy fish because happy
fish is friendly fish. Just like that. So have a play around with it. You can get quite a
bit of expression out of just angry eyelid. But if I go back to
my main fishy peak and play this back now, it's even more insane
because they were all blinking perfectly in sync. So I'll show you how
to fix that next.
10. Offsetting fish friends: So what we're gonna do to fix this creepy fish pod is we basically need to
offset the animation. We want it to start
at different times. So if I just hit U
on the keyboard, That's going to hide
my keyframes for me. And I'm going to basically, well, I need to do is
shoved them other, right? So if I grab this one,
shove it to the left. No particular science to this just randomized, just different. Cool. So I've got one shot there.
Let's play with play that. Now they're all
slightly out of sync. All gets a little bit
blinky needy in there. So I'm just gonna natural WIOA. Don't worry about
the broken bit. We'll address that in a minute. That's better. They don't feel like they're losing their marbles
quite so much. However, there are disappearing. That's a problem. The reason is out fishy comp is 6 s and
our fishy peak is 6 s. But if we nudge everything over without clicking
and dragging over, we don't have enough
comp to work with, fair? If we go in here and go
to our comp settings. So Control K, easiest way or
competition income settings. We just need to
change our duration. So safe bet would be double it. So my thought 12 s instead. Go back to my main comp. Now I can see I have all this extra to play with so
I can drag it out. Won't die off the end anymore. But it's still disappears. Because back inside
my fish comp, I haven't extended
the layers here. The light is still
in that six times. So I just need to
grab everything here, extend that out as well. So I'm just dragging
it all the way to the end, not moving it. Because that would just
change the problem. I'm at. If I hover over, I get this little arrow cursor. I'm going to drag that
all the way over. Or I can go to the very end with my little timeline marker. And I can do Alt and
closed square bracket, and that will extend
the end to that point. Now if I go back to my
fishy pick and play, nobody vanishes. He stops. He doesn't vanish. Why does he stop? Because I'm silly. I think so. Yeah, it's
because I'm silly. Yeah. Okay. So that's the thing. So now the keyframes are
out of sync as well, which I forgot about. So sorry team. But what we wanna
do is we want to shove those back to
where they were. So quickest way, select
the word position. That'll grab all the keyframes, even the ones that can't see. And then I'll just drag them
over to back in time without comp grab and shovel
that, apply that back. There we go. Nobody's overlapping getting
anybody else's business. So we moved the whole layer, but when we move the lines, we took the keyframes with us. We didn't want to do that. We've got a nice little
staggered animation. We're pretty close to done
with the same really. I haven't played with
the bubbles yet. I'm going to turn
them off for now.
11. Offsetting, but better: Wanting to jump back
to this scene and show a slightly neater way to offset the animation
so that at the moment, the creepy little fish friends are all blinking
perfectly in zinc. Heck, and weird. So what I did before, it was messy, but
it totally works. But what could be Nita is now that we
know what's going on, if I jump straight into my fishy camp and change
the length of it. So I'll do my 12 s because that looked
like it worked nicely. And I will extend all my layers. So Control a to grab everything, and then Alt close bracket
to extend it all out. Then go back to my fishy pick. And you can see it's
kind of extending off the timeline already. So I drag it and I
can save this heaps more already there, right? So what that means
I can do is rather than grab and move
the whole layer, which is where we messed
up our keyframes, right? So if I grab the
layer and move it either takes the
keyframes with it. What I can do is if I use
my anchor point tool, which don't ask me why it's not, but it is the anchor point tool. It's also called the
pen behind tool. Maybe that's what it refers to and can see the cursor changes. If I grab this and
move it around, I can see I'm not sure if it's going to come
up very well in the video, but there's a texture
that's moving. So what that means is
I'm actually dragging the inside contents along. This little fish is now blinking out of sync
with the other ones. So I can do that with
a little days as well. So it's very sporadic because I can't really
see what I'm doing. And I'm just randomly
dragging basically. I can say that works
as well as obviously a much neater way
to do it because I'm not messing up
all of my keyframes. That is using the anchor point. So y or pan behind. Neither of them makes sense
for what you're doing. So grab the, grabbed the layer with that tool
and then you can drag, loan the contents in
either direction. If I jump into the timeline. So easiest things Jersey from the very beginning
and I jump in, I'll say I'm actually at
the five-second mark, will go back and go to the
beginning on this one. At the very beginning. When you jump in
and out of layers, it will try and put your timeline marker
exactly where you are in relation to
that previous comp. So that's kinda how you
can see what's going on.
12. Final touches: So what we're gonna do
now is just basically continue tidying up
and finishing off. So this is my fishy peak. That's pretty spiffy,
I'm happy with that. But if I go to my Polaroid, that makes no sense. Fish hanging outside
of my picture. So I need to mask them back in. But first, I'm going to
reset my preview to be full. So I can actually say
how beautiful they are. Now to do the mask, same as the eyeball with my fish pick that I have that selected. And I'm going to
grab my pen tool, and I'm just going
to click any cookie, click 234, and back
to the beginning. Now you know that
you've landed up in the little circle icon appears. So do try to get that blend. Move these if I want. I don't want it to be perfect because my Polaroid
isn't perfect. So my Polaroid picture
shouldn't be there. Now if I go back
to my Polaroids, full play, that little bunch
of fish is still in there. A little fishy thing. And the great thing is I have full control over this
little Polaroid itself. So I'm also going
to animate that. So I'm going to move
my anchor point, so y and move the anchor
point down a bit. Then they have to get
back to my selection. The reason I'm moving it
there is because I'm kind of imagining somebody
throwing it a little bit. So it's pivoting a little bit more from the bottom that
it is just the middle. It's coming in with
a bit of force. So I'm going to start with it out of frame down
here somewhere. So do position and rotation
and activate that. And then I'm going
to also rotate down a little bit and activate it. And then sometimes when I'm not sure how long
something should take, I'll just like play and then stop it when I think
that action should be done. It's not very scientific, but it's done me well. So back to my selection
and pop it up. Gives you something to
work with the very least. And then I'm going to
overshoot this point. I'm just trying to
get like a flow. Yeah, that feels all right. But it does feel very straight. So similar to the
fish animation. I'm going to use my
Pen Tool to curve up. Whoa, that's hefty. Be aggressive. So
I'm going to slow it down because it's slowing
down with friction. So it's not gonna just stood up. And I think it's going to finish rotating after it
finishes moving. Not quite that much,
just a little bit. That's better. It's
kind of a ball. Then we've got one Polaroid. Now that totally works. I am going to go in and
animate the bubbles that because I might bubbles. Let's add an item. So all I'm gonna do is just randomly and it
might their position. So position. Now is that too fast? Yes. The answer to the question
is yesterday's too fast. Then what I can do now, I
wouldn't bother looping. And actually, because
we haven't got the length of a compound to
have a full loop anyway, you'd only get a section of it. So it'd be easier in
this case if we wanted duplicates to just literally duplicate it and offset them. So I'm not going to
make a loop with this. A second bubble. Let's do that. I can hear a bit
slower, actually. Big Boy, Little Big
Boy. That's right. I know what I'm talking
about. This is fun. That's quite nice not to be too excited
about some bubbles, but then this one, it's probably actually
going to start here. So what I'm gonna do, rather than just animate
the position from here, I'm going to use the
open square bracket to move the layover so it
doesn't exist before them. Then plunk it down here
and animate the position. Good. Maybe fast. Rather than moving the keyframes out of my timeline where I can't
see what I'm doing. I'll just have it ended earlier. That does the same
thing effectively. That feels like a better price. And I want these to do that twice because that's quite cool. I'm just going to make them
happen at a different time. So that's kinda offset. And then about here, these ones, I want them to not be in the same
spot because that's obvious. So I'm going to select position and I'm going
to nudge it over. So if I select the
word position, that means I'm getting all of those keyframes
on that property. And then I can adjust
them together. As long as my timeline marker is on one of those keyframes, I can move them together. Because otherwise, if
you don't select it, you're only doing one at a time. Which means you'll get like a weird angle. And
I don't want that. I want to, I want it
floating up in the up in the gravity's right except you, if you're going
to start lighter, need to be white in here. I'm probably want one at
the very end as well. So it doesn't just like, Oh, we're doing the bubbles go. You begin, you belong over here. Actually, I'm going to
do two because two, when it's pebbles, two
is better than one. All right? So I'm just control Dang
and playing it by ear. As you may have guessed, varies. No plan. I'm just having a
Red Hawk macaroni saying what takes
a muffle labor. That's cool. So then it ends
with some bubbles in space. Fabulous. But what I am gonna
do is I'm going to shove all the bubbles behind my fish because it is bugging me that they
float over the top. Might have like the little
ones float over our friend. Just not the big ones. I think that will be less disruptive. And then also it helps
fake some depth. If you've got some going
over the top and some not. I'm finding it quite hard to see what's my fishing,
what's my bubble? So I'm also going to take
this moment to grab my fish, change the layer
color to raspberry. And then I can see
what's a bubble? Lots of fish that having to
dig through my lions codons. This bubble. It doesn't go so it's all right. I was gonna get it to
weave betweens and fish, but it doesn't
quite hit that one. So we're okay. Now, if we're happy with
our little bubbles, back to my Polaroid one,
how does that look? They're amazing. That's how it looks
like. Some might even come back to our Polaroids. All. So nice. Little animation.
13. A spot of admin: Before we jump into
the next Polaroid, we're gonna give it the old side because we should be doing
that all of the time. So at the top you can see
I've got a little asterix. That's how I know I
haven't saved it. I've done something
and I haven't said, so Control S, sublime, a little asterix is gone. So keep an eye on that
because that's how, you know, you goofed up. You've done a bunch of stuff for many hours and forgot to say. Also before I jump
into the next one, I'm going to do a little
bit hold and management because my pantry
is getting out of hand and I'm not here for it. So what I'm gonna do is I'm
going to make a new folder. And I'm going to do
one called assets. I'm gonna do one cold. So assets will be my layers. This shows these Polaroid
layers that can go in there, donate to deal with that
again, attempt this DOM. In my comps. I'm also going to add a, another
folder called pre-comps. Because remember, we've been
making a bunch of pre-comps, which are comps,
I don't know why. I don't know why After
Effects does anything, to be honest with you,
but they called breakups. So this is our main composition. That's where we are
now. Pop that in comps. These other ones are gonna
go in my parade comps. Now the reason I
differentiate for me comps is what I'm
going to render. My final video. Pre-comps is all the
pieces are needful that potentially pre-comps
could be in my assets. That's also fine. Whatever floats your boat. I've just gotten so used
to this being in mockups. That's how I work. This is all my raw stuff. So Lyons, audio textures
or that kind of stuff, I'll usually put into assets. That's just me. Everybody has to find
their own flavor. So do as you see fit. But to do something
tiles is fine for now. But let me tell you
when you come back in six months and six other file. You want it to be NUS
future, you will love it. So pre-comps at what
I could do in here, I could add another folder
and have one called Polaroid. One Polaroid to I'm
not gonna put a code. There is a point where too many folders, as
too many folders. I'm done. I don't need that much, girls. But yes, the folders is just
for your own organization. You don't it's not going to break any links or
anything like that. That's just so you can
find where everything is. I would really recommend
your main comp is somehow Stan DOT compared
to everything else.
14. Let’s do it all again!: Now that we've done that, we're gonna go back to the
very beginning process of break pumping our staff. But for Polaroid number D. So this time I'm gonna go left five and shift all
the way down to Polaroid to so Control Shift C Polaroid
and then hit Enter. And apparently white for ages, I hope your machines aren't
as a foodie as mine. Now you'll notice
whenever you break up, it's automatically going to pop it in your mind calms bit. That's fine. But do get in the habit
of tidying up as you go. You don't have to
look straight away, but make sure before
you pack up for the day that everything is where it should
be, if you can. I'm going to double-click
on my Polaroid D, and I'm going to set
my region of interest. So last time we did all
of our pre-comps first and then went back into the
past and rage it of interest. It doesn't matter which
order you do them. As long as you do them. Like do you have a bit
more buffer on that side, I reckon, because we've got
fiddle leaf action potential. And then Composition Crop
to region of interest. Then I'm going to pre-comp all the stuff that's gonna
go inside the picture, forest, all the way up to leaf. Control, Shift C, hot peak. And then jumping region of interest probably isn't
so important this time. But I'm going to
follow the process. So I'm going to grab a region of interest tool and just
cut off that bottom. There we go. I'm also going to do the half's because they are all
going to work together. So I'm going to do house, same, same window apply whole. Let me obviously. I am also very aware that I
know what these layers are. Huge. You haven't,
you didn't make it. So do feel free to poke
around and play with it. This is how I'm gonna
pretty complex. It's not a rule. You
can play with stuff. As I always say, feel free to break
it and then fix it rather than worry too
much about being precious. But I do know for a fact
because I've done it before, hole through to house. He's what I want to pre-comp. So control shipped fee. And hot. It is a house on hot.
What's the difference? Demographic. And we're going to do a
regional interests. Again. Dvdt the beauty. Now, we need to move all the bits because
everything has moved. Where should not pop that back? There ish following your van. And then Polaroids. Yeah. What am I actually do at this
stage is my masking first. So in this case I'm
going to mask my hot right now because, why not? So I've already pretty
competent so I can do that. So selecting my hot peak, grab my pen tool. I'm going to look great. I'm going to fix it
says no, quite ugly. I drew this. I'm allowed to say it's ugly. You can't because
that'll be rude. Alrighty. Then. It's already nice and crisp. So that's lovely. But now we're actually
going to animate it because it's kind of boring. If the fish are cool, the hot needs to be
something interesting. So just like we
did with the fish, the first thing we animated, the literal little
fin flapping away. We're going to similarly
animate these leaves. So rather than a frantic flap, we're gonna do a
slow ambient sway, like it's kind of in a breeze.
15. Ambient loops: Let's jump into Polaroid. And then hot peak. And we're going to animate
liens, these little leaves. We're gonna do the same
process we did with the fish. So first thing and then
set the anchor point. So why to get to the anchor point tool and shove it down near
the rotation point. Then W for rotate can check
that that looks about right. That looks absolutely stunning. So natural. This isn't about
being authentic. Sweep that being representative. I'm gonna do the anchor
points and all of these leaves conduct
little bit of a stem to vaguely base it off the point. And then I'll do one at a time. I'll start with
number one because it's called number one. That's nice. So I will go
off or rotate to open up the property or I
can just twirl down. Mr. Armando toiling is
still always an option. So then rotate the property. I'm going to set it
back a little bit. Hit the stopwatch. This time it's probably
going to animate a lot slower than a little. Fishes thin might go to
1 s for the next move, this might be too
slow, but we'll say, let's go to the next extreme. Keeping an eye on
these rotations here, because what looks like not much might accidentally
be a whole bunch. So just keep an eyeball on that. First one is negative five. Second one is almost positive. That's almost magical. That feels or Raj about
approximately a pace. That's fine. Then I'm gonna go
to 2 s. Copy paste. My first one. This time I'm going
to easy A's first so I can get a better
vibe of how it's moving. Oh, that's too much. That feels like it's
drawing attention. I don't want these leaves
to draw attention. I want them to just
kinda be there. So I'm going to
either I can make it move less or I can
make it move slower. I can do that. I'm going to go with
move less first. Better. But I still
think it's too fast. So I'm going to make it all
happen at the 3 s instead. That's better. Now, once again, I need to do the loop because it's on the loop twice because
it's going so slow. This would be an instance where you might just copy paste. But for longevity
and for simplicity, if I ever wanted to extend
my comp or I want to offset all of these and I need
to move the layers around. Looping makes it easier to do that without having to go back. So I am going to
loop the animation. So that means holding
Alt and clicking on the stopwatch and
doing loop out. And then Enter on
the numpad to close. Now that should go all
the way to the end and then hopefully
loopback perfectly. That's alright. So we'll
do that on all the leaves. Will set the rotation. But they are gonna be different. I don't want it to
be exactly the same. So I could animate
them exactly the same and then offset the keyframes kind of like we did when we
duplicated the fish. Or I can animate them to be slightly different
in the first place. So I don't have to
offset quite so much. I don't know if that
made any sense, but let's see, happens. This time I'm going
to rotate in reverse. I go in together and say
that's a little bit different. Well, that's not going
to work because it's not going to loop
because it needs to be divided evenly into 6 s.
So I need to make this go. Three frames. Three secretary, that I'm just a bit of a mini
pants and I forgot that. Ef nine out. Good. It is a little bit too in sync. So even though they're going
in different direction, it's happening over the
exact same manner, friends. That's silly. I could make them happen
at different rights, but then our risk
stuffing up my loop and we can probably already gather how much I don't want to
mess with math right now. So what I'm gonna do is I'm
going to select my keyframes, ones that Amanda, just now. I'm gonna grab them and
shove them to the left. That's outside of my timeline
As are entirely unmanned. Because what that means is I'm effectively offsetting
the keyframes. If I hit U here, you can see. So this is one set of
keyframes, starts and ends, and then the other starts
somewhere in here, and then the V. So they're not happening at
exactly the same time. Feels a lot more organic. Without having to
do any moments. That's just grabbing your
keyframes and moving them over. So I'm going to do
that exact process all over again on these ones. So we don't go read it. Cool. That looks kinda cool. I've got a little
liberty do please by Control a and hit U. That'll tab all of
my keyframes away. I can see much better
what is going on. Quite happy with
that, it's going to look weird because we've got we can see the
ends basically. But if I go to hit tab, tab back to Polaroid and
white for an autosave. Lovely. It looks pretty great. Like not to be smug
about it or anything. I'm actually just
a bit surprised, even though I've done it like 20 times, I'm still
a bit placed. So if you have it
cropped off the edges, it actually looks
quite convincing if we see the bots, if I look down. But if you trust the
process and make sure you double-check as you go. It looks kinda came. Next thing we're gonna
do is we're going to jump in to the heart. There's a little pie in the window that we're
going to animate. Popping up.
16. Pie time: Now that we've got some
ambiance happening, we'll do the actual
animation part. So jump into the hut. And then in here, if we zoom in a bit closer, you can see these layers. So I'm going to turn off
my house for a second. So you can see, turn
off the window. That was a little cheeky pi, j pi and a little bit
of steam. Lovely. So what we're gonna
do is we're going to animate the window, opening up. The pie, popping out
into the window. Sill has windier. The pie is going to pop up. Okay. So for now, if I just
turned my window off, sorry, I didn't mention
these little eyeballs. We can turn lights off so
we can see what's going on. I'm going to turn
my window off for a hot minute while I'm
animating the pie. So first thing is P for
position to animate is the pi going from
nowhere up to the shelf. Right? Now, if I would like to, I could animate a little bit of scale like it's being
pushed out as well. I would like to I would
say, let's do that. We want to open up
the scale property while the position
property is open. So if I hold shift
while I hit S, that will open the scale while
keeping possession of him. I'm at the scale. Getting bigger whale,
little bit kit. And then again, been amazing. And overlap slightly. It feels to match that there's
a little bit too cartoony. So I'm going to
type the values in. Instead. There it is, that's
better, a better position. And then a bit of scale. I'm going to animate
to the steam. It's going to look real
dumb for a hot minute, but trust the process. So I'm going to animate the position for the first
time and I adjust the opacity. So P for position. Once it's on the shelf, that's what I wanted to start. I'm going to do this.
And I made it up. So in this case,
because I know where I wanted to end rather than animate and then guess,
I'm working backwards. So I set my keyframes, That's
where I want it to end. And then I worked backwards
to animate it down. In these guys because I'm not
doing any rotation on them. I'm not worried about
where the anchor point is. Usually I'll do that first, but in this case, it
absolutely doesn't matter. So I'm not going to
bother I'm going to easy way and then offset so they don't happen at the same time because it looks super weird when that happens. Well, that's too fast. That's nuts. Cool. Now, it shouldn't be in front
of the pie. That silly. So let's pop them behind, shall we? Yeah, that's better. And a little bit of opacity too, because I look a
little bit too of the house capacity and
again, working backwards. So I know I want
it to end at 46. So I will set that first
and then go back to zero. Again, easing. Have it happened
the hall I actually and now I'm happy with that. So rather than do it twice, copy the opacity
property and paste it, paste it on the opacity
property for the other steam. That's lovely. So we've got our little pie. But if I turn my window
back on, can't see it. That's silly. So I need the
window to animate as well. So I need the window. I'm going to lock this house,
so don't keep nudging it. The window to get up. That's what I do next. Now, this is cleverly
built so that the house is on the houses
on top of everything. So the house is hiding
the window frame. So I don't need to mask or do
anything tricky with that. I just need to
animate the position. So position and up. I'm going to leave a little
bit because, you know, it's an old window to be the easing on
both ends on this one. Happy with that, but that means now the pie is
happening too soon. So I'm gonna grab all these
layers and shove them over. Now ideally, we would have
done the window first, but I think it's
important to show that it really doesn't matter. Really doesn't. You can do things in
any order you like, and you can come back and
change him and shove them and move them around to
your heart's content, my friends to your
heart's content. Needs to be like old ladies law. To slow down. I think I
think it's a bit too peppy. It's a bit too much. Walk the fish, the
fish or to exalted. Not the fishery
appropriately excited, but this is a different thought. I wanted to animate at a
different pace. That's better. Now I'm gonna go back to my main scene and I'm just going to take a
hot second to compare. That feels fun. Like they're slightly
different pace. That's nice. I'm happy with that. Great. Always good to double-check the context of your whole thing. Don't get too bogged
down in the olive stain. Looks amazing now because it doesn't make sense with
the rest of your scene. So always go back. But speaking of
steam, it does look a bit gentle word used. So what are we going to do
is make it a bit of jazzy by adding some effects to eat. So the steam, we're gonna get it to do a little bit of
weirdly wobbling, a little Weebly wobbly stuff.
17. Wibbly wobbly steam time: So I'm gonna go, I'm gonna select my same layer. I'm gonna go over to my
Effects and Presets window. Now, if you don't have
that, that's fine. Go to Window and then
find it in your list. So being in the top, is
there an alphabetical order, effects, effects and presets? If you've got to take, it means it's open somewhere there. Just close it and open
again, That's fine. Then I'm going to search for
an effect called Wave Warp. This guy with my layer selected, if I double-click, it's
going to plunk it on. And already, you might
have noticed she will wobble to apply it back. Look at a Tolkein, but doing some stuff. So what we can do is mess
around with these settings. I'm finding it
difficult to see him and we will wobble with
the bounding box on. So if I go Control Shift
H or Control Shift H, that will turn off
my bounding boxes. So I can just see
what I'm doing. Now on the Wave Warp,
what we've got, we've got height and we've
got width and direction, and speed for a bunch
of settings actually. But the main tool we
want to play with right now, height and width. If I reduce the, if I reduce the width,
I shouldn't be able to. There we go, you
can start to see it kinda distorting itself. And if I play, you guys
can see what's happening. Now because these are
really small layer. Because remember, it's
just these tiny pixels inside a huge comp. And we don't need a big number to make
it do something cool. So we just need a little bit. So the wave height
and the wave width, that depends on
which direction it's going as to what's, what. If you do it? If you imagine a wavy line, you've got the height of the
waves and then you've got the width between age wave. That's basically what
it's referring to. If I want to make
some variation to it, I can adjust the direction. So if I change it to zero, you can see it's like perfectly
through the middle of it. And you get a more
obvious ripple. I want to go a little
bit distorted though, because it's fun. Beautiful. That's all it needed. So then I'm going to grab that effect and I'm
going to copy it. I'm going to paste
it a mother one. You get some settings that work. Why reinvent the wheel? But I want it to be
slightly different. So I'm going to set the angle to be kinda the opposite,
but opposing. That looks weird. Maybe what I'll do is
I'll change the size. They're not completely in sync. Yeah, that feels better. I think that fading
is happening a bit. It feels weird. The more
effect you add them all up, you probably want to
change everything. That's fine. We go, That's looking cool. If I go back to my hut. See it in the full context. Grandma's back down little pine.
18. Reflections: The last little bit we're gonna do is we're going to really ground the same because
at the moment that's a, that's a little pond there, but there's no reflections. There's no The wasn't
doing anything. It feels kinda weird. So what we're gonna do is we're going to basically use
what we've already done, the Wave Warp to create
a reflection of the hat. To create a reflection
of the hot, we need a duplicate hot. Just like we did with the fish. I'm going to Control D to
duplicate as I've got to now. And then a bit of a giveaway, but I've got this
water mat here. If I turn that off, you
say nothing changes. Because what I've
done is I created a layer that is the
same as this water. And that is so I can, it's kind of like a mosque,
but it's a bit different. So on the mat, what we're
going to use it for. So on this heart that
we just created, I'm going to flip the scale. I could do this with the
proper scale properties, but I'm not going
to worry about it because it's gonna be
able to store it anyway. I just wanted to be
squishy and turn a watermark off so I can see
what I'm doing probably. I'm just going to line
it up with this one. We want it to be squishy. We wanted to be squeezed so that it looks like
it's a reflection. It's not just like the exact copy because that's
not how perspective works. We want to squish
it a bit, right? You can see it's got the whole
animation happening in it. Now, if I have a little look, see in here, you've got blending modes you
can play around with. I'm actually not
going to write now. I'm going to leave
it exactly as it is because it feels the
most right to me. I think normal is
gonna do me just fine. I'm just going to
drop the opacity. So T for opacity
and toil it down, That feels better to me. I think there's a few in
here that could work. And this is exactly when
they are fun to use. And when you're making
reflections and different effects and things. Well, having
it at the moment. So I'm just going to keep it on normal and drop the opacity. Then what I wanna do before we get too lost isn't buying what the heck
a track matte Tibet. Now this is specifically
for 2023 and beyond. If you've got an earlier
version of After Effects, I'll put a little bonus video
in on what you need to do. But what we're going to
ask After Effects to do is this lay here is effectively going to
be treated as my mask. So just like we drew mask on other things earlier that
are attached to the layer, we can use a separate
layer to be a mask. Why would we want that?
Because in this case, we've distorted it and we played with the scale
and we're gonna do some other things
to it that we don't want to react to the mask. We want it to be a completely
independent thing. So what we're gonna do is we're
going to say on this hot, you're gonna go over to
the Track Matte menu. And we're going to say that the water matte
layer is the mat. Now it fits perfectly
inside the mat. So wherever this is, it's going to only show
where the water is. Similarly, if I grab
the mat and move it, you can see it breaks
the reflection. So on the layer that you want
to be mattered or masked, go to the track matte option and select the
layer that is the, that, that is how you do that. Then we want it to be liquidity. So we're going to do what
we did with the stain. We're going to add Wave Warp. This time. We're going to play
with the direction a lot at the beginning, because that's the
correct way to do it. In any pants. Have
a little play. But we want this to be
ambient action at the moment. It's a little bit chaotic, so I'm going to just
reduce the speed. The speed here by default is one which doesn't
sound very fast, um, but I'm going to
make it a decimal. So I'll go like 0.4. I feel better. Now, we can play around with the height and width a lot more
if we wanted to, but I'm actually quite
happy with how that landed. I think that's all right. But the last thing I want
is I'm going to fight it off because reflections aren't normally perfectly clear. Otherwise we'd see
everything all the time. So what I'm gonna do is even though we're
going to track matte, I can add a mask as well. I'm going to use my pen tool. And with my hut
selected, stops paying. I'm going to click
just loosey-goosey around and cut through the top. Right. That looks stupid. But bear with me. Because what I can do is under my masks, I've got feather. If I pump that value up, by, then you get a more
authentic kind of reflection. I don't even make
that a bit smaller. The opacity a leader does not. Go back to my main Polaroid. All That's lovely. Does runoff. Cute. Then all that's left
is animating ease, animating the Polaroid coming in and doing a couple of
little funnel final touches.
19. Old Mattes: Little bonus note here
for anybody working in After Effects 2020 or earlier, before they changed their
Track Matte system. This is how you will
do the track mattes. What's really important in the older versions of
after effects is that your mat is directly above the layer that
you want to reveal. So in this case,
you've got my heart. Not just isolate that here. At my water layer, that is going to be my
Mash goes above it. So it's really
important, that's 6.7. If it's underneath,
it won't work. It has to be exactly above it. Sera, what you do on the hot, you go over to your
track matte column. You say, I want the
one above, to me, my Alpha Matte Alpha
inverted or being it reveals everything except where the water is sort of
just revealing outside. Alpha Matte reveals where
the water is, should blend. Then it's working exactly the
same as the 2023 version. So it's just the, the stack order that's
different really. And that you can only alpha
matte to one thing at a time. So if I needed to
reveal a few things, I'd need multiple
instances of this mat.
20. Final touches: I'm going to grab Polaroid to, I'm going to animate
the position and rotation of the Polaroid. I'm going to first though,
adjust the anchor point. So same as last time. Position. Tasting. Just going to start down here. Now, I couldn't be
doing this in reverse, but I'm just really
not that precious. So I don't mind having to rely on it because it's one
big rectangle in a frame. And again, get a bit
of a curve happening. So it's a bit more organic. And never at the same
time because if we had to definitely
be the one on top, like happens last, which has
never been what I've done. Because we've got Polaroid
won and Polaroid to, and I've gotten really stuck up on me which one goes first? So, use your best judgment. What you want to have this cute. One thing I am noticing is this action happens before
the Polaroid is in frame. So I'm actually going
to take a hot second, jump on in and my goal of that action happen
a moment later. So that means all these
are going to move on with all the windows not going
to open straightaway. So now if I go back to my
Polaroids, Yeah, that's better. So it gives the Polaroids a second to come all the way in. So it's really important
that you like I keep saying, check as you go. Because as soon as
you make a change to one company will adjust
everything that a dean. That looks mighty
spoofing, I reckon. I am noticing that I've
fallen over to the right. So I'm going to pop them back in a bit because that's annoying. And assign with me you show. Now I want to add a little
bit more definition between these two. So this is when I'm going to add a little bit extra
flavor to our lions now. So now I'm going to add
some layer styles so I can add a drop shadow on my layer. If I right-click
in the timeline, all the window, it
doesn't matter which one. Lifestyles. Drop shadow. Then if I twirl down, you can already say
it, but it's hideous. So I'm going to
make it not ugly. The default one is just nasty. So I'm going to
pump up the signs so I can see it all
the way around. Something that I
really recommend you do never use a black shadow. It gets of muddy sometime,
sometimes it works great. But I find that hit and miss. So I like to get a color from the scene already,
usually the background. Then it's already
set to multiply. That already feels a bit better. I might drop drop it down a bit. I don't mind it
being quite half. That's right. I can play
with the distance to it, nudges out to one side more
if I want to make good. And then again, as always, when I've got one thing looking fabulous, don't do it to us. Copy, paste except
on this Polaroid. Going to twirl down
the properties. And I'm going to change
the angle so that it's the shadows coming
out the other side. So as if the light source
is kind of in the middle. Lovely. We could also do that with
the images themselves. Because Polaroids
traditionally have a little bit of a
ridge if we wanted to. But I actually quite
like that crisp edge. So I'm going to leave it
just as 0s. That's it. That's our whole scene. So we're gonna say that
done. We got to render.
21. Rendering: So we're gonna do one big
render in Media Encoder. So my personal preference
as well wines. I'm going to go to Composition, add to Media Encoder, Queue or Control Alt M. I
love my keyboard shortcut. Then that's going to open
up a new program so that I can render it out while still
working on other stuff. It also has other codecs
that I could use. It's just got a few
different options. You could render it
strikethrough After Effects. But by default it doesn't usually come with
the codecs I need. Sarah, I prefer Media Encoder, but everyone has their
peripheral personal preference. So what I wanna do
now is set my format. Easiest thing to do is
click the little blue text and white flipping ages
for this thing to open. And we can change the settings, are very least check them. By default, you may
have already nailed it because it's what you've
been rendering it anyway. Scrub through, we can see H.264 is the format that we want
because it's a nice small MP4. So we've got all these options, but H.264 is flip and
perfect for what we want. Match Source, pretty much always that is set to what our
composition settings are, which means our 1920 by
108025 frames per second. And ask where pixels we want it to match what we
said at the beginning. The other thing we'll
do is we'll set out Polaroid location and the name. So we're gonna go workshop
and there is fine. Actually know what am I doing? Polaroid? I'm just go animated. I'll hit Save. Then that's all we needed. That is absolutely,
absolutely it. I do like to do a
quick double-check of our Match Source settings that we have in Dade
go 1920 by 1080, because sometimes
you've scrolled where you didn't mean to and you've changed it
without meaning to it. So really good to
just double-check the original
settings are correct and you can do that just
by scrolling down here. So that's it. I'm happy. Okay. Then he'd play. Watch it. No, it's fine. And we go all down and
click on the little link. It'll take you to it. And here we did it. And apply that on loop
because it's beautiful. So this was a very
specific example, but hopefully it
gives you a bit of an overview of how mats and masks can work in a couple of other little
things along the way. And there's lots of other little tools that
we can keep exploring, but I'd love to see what
you guys are working on.
22. Wrapping up: That's it. We've made it to the end gang. So now you've got your
little animated sequence. You can pop it on your socials. You can share it with your
mom to do is you plates. But through these
very specific process of making these two Polaroids
with little fish in a hut. Hopefully you can see how these tools can be used
on a broader scope. So pre-comps, track maps,
masks, endless possibilities. I'd love to see what
you guys make in the future using these tools. I'd love to say the
projects that you've made following these steps, feel free to share it
in the little projects thinking down the bottom
or the discussions. Tag me on Instagram, whatever, just show me
what you're making. Um, just to be curious
what everybody is up to. Thank you so much
for taking the time to get up all the way
up to this video. You're awesome. And I'll see you next time.
 Alyssa Smedley, Sharing my hawt tips