Transcripts
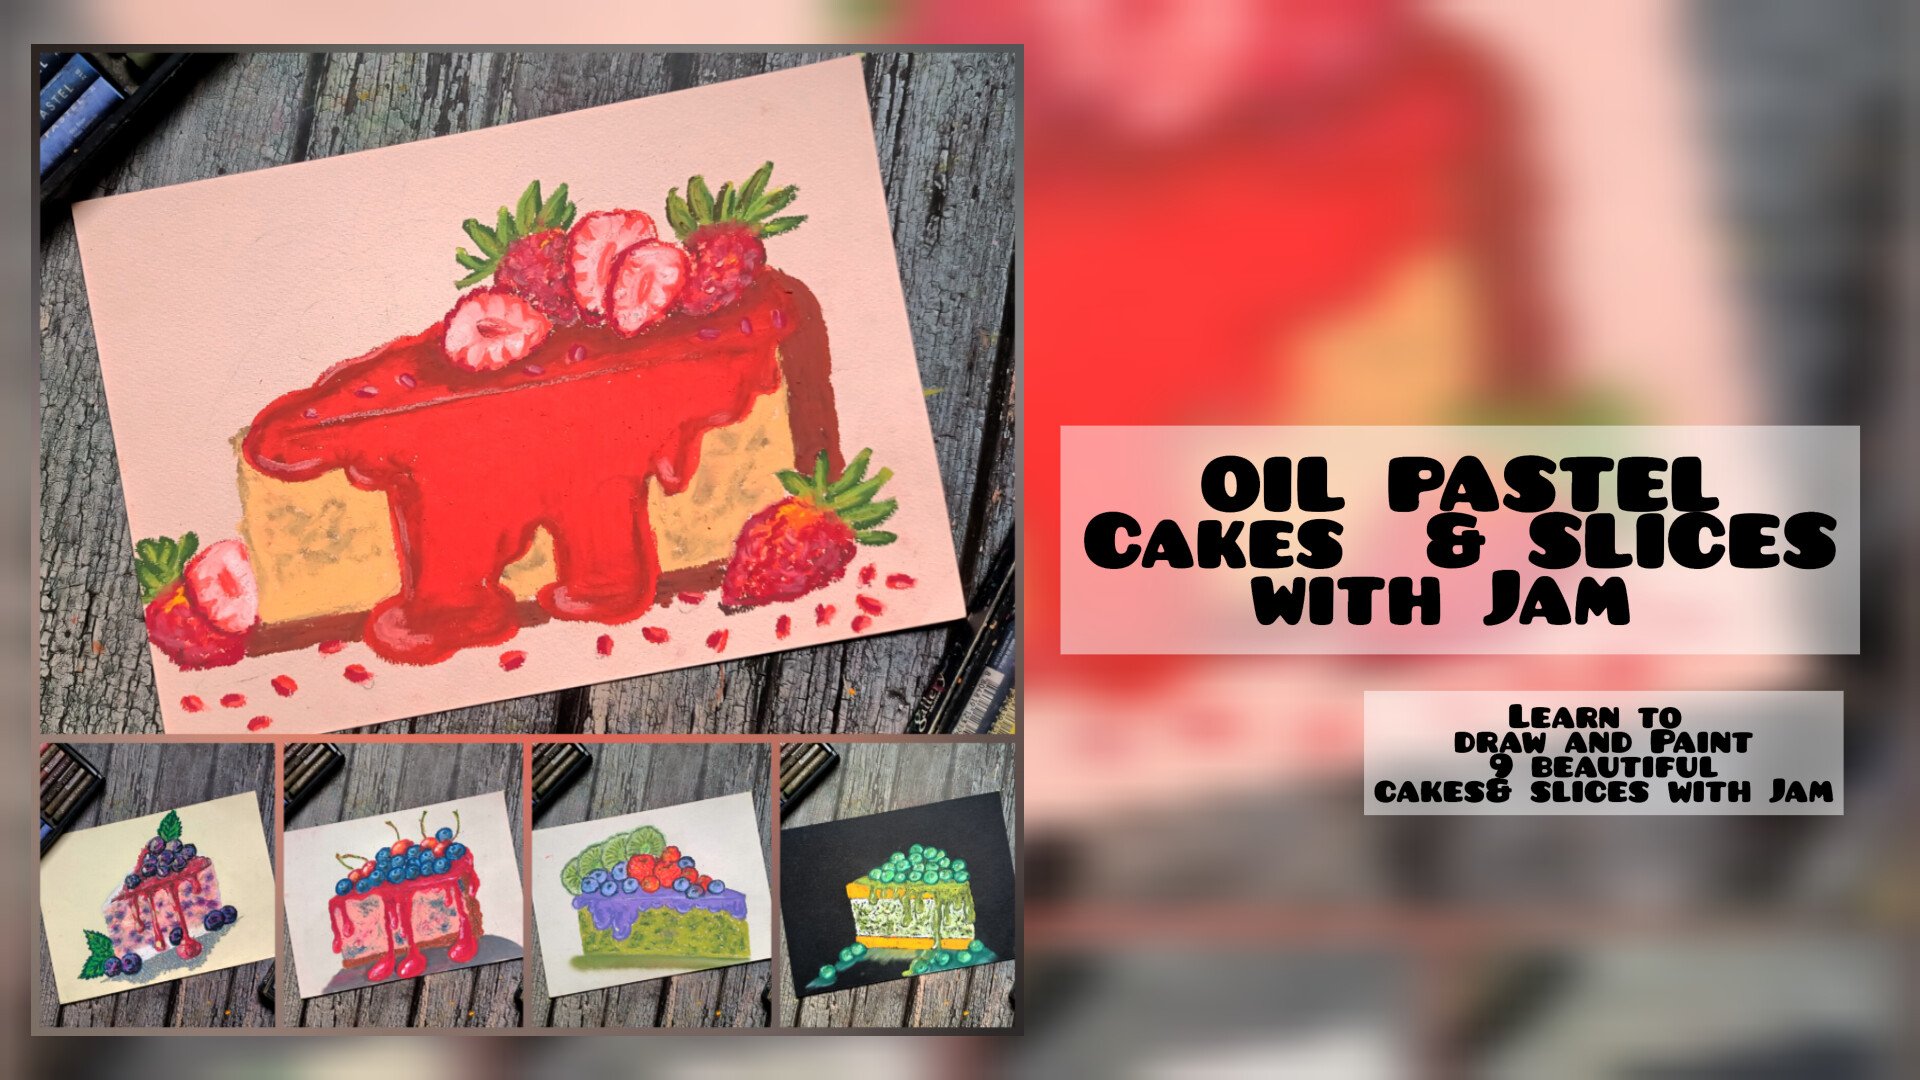
1. Welcome and Introduction: Welcome to this class on
pound cakes with ILP stool. In this class, you will
learn to paint this too beautiful and vibrant
pound cakes than this class. You'll learn the basic
of the ILP style. We will start the class with a basic escape for the
pound cakes and the leaves. Then move on to some of the ILP still basics in the
field technique. I have included this photos
in the resources section. You can download it from there. Continuing forward with
the different styles and color combinations of the
leaf and then the flower, the purple and the
red hydrangeas. After that as simple sketch of the pound cake using the
stippling technique. And finally, the
two main project. I'll be basically
drawing the same, right? But for the second one, I'll be making some adjustment and financing is this class is for the beingness
and the intermediate. You don't need much knowledge
of the oil-based still. Also for this class, you don't
need any blending tools. Most of their drawings
are in real time, so you can also join along
with me while painting. Hi, my name is Michelle and I'll be your
instructor for this class. By proficient, I am a civil engineer and I'm
an artist based off India. You can find my other
work on my Instagram. You can also check out my
other classes on Skillshare. I hope you have fun with
this class and learn something new with
the new older best. See you in the next video.
2. List of Supplies: For this class you
will need a pencil. I mean, is it a subnet masking
tape to secure the beeper? Pedestrian removed or dust
particles from the ILP. Ilp still people here I'm
using more ULP still be wet. And RUP is still here. I'm using gallery ILP still.
3. Basic Sketches: In this section, I
will demonstrate how you can draw the cakes easy. I will use some of
that basic guideline that you can follow
to draw the KKT easy. So starting with the basic
guidelines for the cake, drawing a square, going on
at this graph behind it. And now connecting the edges of the square root parallel
straight lines. This is the basic structure that I'll be using
to draw the cake. Moving on to the
second demonstration, instead of this straight eight
on the top of the square, I'm doing with the
curve, the hole. We do it in real time. So I encourage you
to join along with me and let's practice
the sketching section. Drawing a straight line
parallel to the base of this first square in the
top part of this square. Now connecting the two
squares by drawing a straight line and connecting
the edges of this graph. Doing the theme for
the top of the cake, look equally following
the contour like this carbon that but part of the cup and
straight on the sides. For this third one, I am just changing the orientation
of the cake. Following the same guidelines. Going into this gray behind
it with God one top. Now connecting it with
the butler lines of the key line on the top and the state
line on the site. Moving on to their sketches
for the leaves here, I'll be demonstrating
to example, one with a three
and another one. The two lives were
drawing simple leaves, starting with a straight line and are defining the
outline for the leaves. My straight line, I
mean the line that divides the leaves
into two equal parts. When these were done with
the first demonstration of the three waves moving
on to the second one, drink two leaves starting with a straight line and are defining the outline
for the leaves. And with this, we're done with the demonstration
for the leaves. Now going into this
kid screen and overlaying it on top
of the pencil sketch. To the basic structure for
the cake will be in the form of a rectangular slab with
a curve on top of it. Moving into the second example, hiding the curve on the top and now connecting the base of the square with a straight
line connecting the top, also. Now defining the
contour of the cake. Cutting on the top and
straight on the sides. In the main predict,
I'll be adding close to the insights
of the French side of the cake. Floating other. The third example, sketching out that side of the
cake that will be invisible to us by
using a dotted lines. Now I think Godwin a straight line to define the
contour of the k. For the second example, I decided to add
and slice the cake. So I'm going back once
again with the pencil and sketching out the
guideline for the slice. Now, in this case spin. Now moving on to the leaves, overlaying the black on
top of the pencil sketch, adding means to the leaves. Me finding the edges of
the leaves with black men. Earning leads to
the second live. Knowing the same
for the third one, defining the edges of the leaves as well as adding the veins. Moving on to the second
example of the leaves, finding the outline of the
leaves as well as adding that means starting with
the mean. Mean. If I need the outline
of the leaves. And finally, adding the veins. I hope that this
demonstration you are clear to draw the physical
structure for the key. And with this, we're
done with the music is getting for the cake
as well as the leaves. See you in the next video.
4. Basic Oil Pastel Techniques : In this exercise, we
will talk about some of the basic oil pistol techniques that I'll be using
in this class, starting with a preset ILP. So sort of Addison's
encrypted the appraiser, starting with the low presser, applying a little bit of
pressure with this ILP style, you can see the consistency
of the color is not uniform. Moving on to the medium
pressure with the ILP style, the consistency of the color
with this medium presser is somewhat more uniform as
compared to the low pressure. And finally, the high pressure. Here, the consistency
of the color is most as compared to the low pressure
and the medium presser. So here good demonstration
of how we'll be using different kinds
of tracer to draw. So I'm starting with this purple and applying medium presser. I am drawing it, but Bill
hydrangea flower with it, starting with a medium presser. And on top of that, I'll be using two different colored and applying high
repressive the hole. We do it in real time. So I encourage you to join along with me and
let's practice. Now going in with a light purple and applying heavy preset. Overlaying this light purple
on top of the purple, applying, How are
you good with it? I'm not completely covering
the earlier layer. I'm just overlaying some of this light purple on
top of the color. And finally going in with the
white to add the highlight, I am applying heavy
pressure with this white to add the highlight. In our projects, I'll be using different combinations
of the color. Here I have just used medium
and the high preserved. In our main project,
we'll be using the combination of
all three places. And with this, we're
done with the appraiser. Moving on to the blinding. Blinding, I mean, mixing
two or more color. But when I went using
a single color, the blending refers to obtaining smooth consistency of the
color throughout the drawing. So starting with the blending
of two or more color. Here I'm starting
with a rosette, hello, playing low pressure
with this rosette. So for this first
demonstration of the blending, I'll be using two different
color that does it. And our nice yellow,
I'll be showing you how different kinds of places yield different
kinds of lending. As you can see, the
blending of trend with this low pressure is not
somewhat consistent. Moving on to the second blending using the medium pressure. And now I'm going in with
the oranges, yellow. The blending alternate
somewhat more consistent as compared
to the earlier one. And finally, with
the heavy preserve, applying heavy but this
are in this yellow. The blending obtained is uniform and more consistent
than the other tools. Continuing forward with
some more example of the blending here named this reversing the
order of the colors, starting with the oranges, yellow here I'm applying medium presser with this
aren't nice yellow. Now, going in with the resident and applying
medium pressure, as you can see, the blending
of things is not uniform. Starting the second one
with a low presser, applying the load balancer,
but this aren't nice yellow. Now going in with that asset
in applying the low presser, that blending octane into less uniform as compared to
the medium freezer. And finally, going in
with a heavy pressure. And now overlaying on top of it, the blending is more uniform and consistent as compared
to the earlier two. As you can clearly see by
attending or that up that color blending or tended
somewhat different. So he yielded
demonstration of how I'll be using this blending
in the main project, starting with this round, it represent a small
chocolate nugget. Aim is to represent this
token nugget as a part of the cake that is near
the surface of the cake. That is why I've blended it in such a way that not all the
up down will be covered. And some of the
brown will appear as a part of the cake that
is near the surface. With this grown in our initial low ABA
Applied. Hi professor. Now moving on to
the second example. Here, apart from the blending, I ever use overlaying also. So here I ever started with a rosette overlaid dark
brown on top of it. And now going in with
this odd in this yellow, the gold was the same
tools to present some chocolate dust behind
the surface of the cake. And with this, we are done
with the demonstration of the blending and now containing worldwide with the overlain by overlaying I
mainly in one color on top of the other
in such a way that there are two
color don't get mixed. So you will see a demonstration of the overlaying technique. I am drawing a league
starting with a lighter by region of the green to paint
the basics tip of the leaf. Now going in with a darker
where edition of the green to define this IEP
and add detail to the leaf. I'm overlaying this dark green
on top of the light green. And with this, we're done with our first example of the
overlaying technique. For the second example
of overlaying technique, I'll be using a combination of blending and different
kinds of teeth. Starting with the
dark green door, the basic guideline
for the leaf. I'm applying medium pressure
with this dark green. Now going into the light green and feeling it inside
the dark green. Applying a low to medium
preset with this light green. And blending some
of this light green or dark green by overlaying. Finally going back
once again with a dark green and adding detail and defining the
outline of the leaf. I'm applying. I replace
it with this dark green to overlay it on
top of the light green. And with this, we are done
with the overlaying technique. Continuing forward with
the stippling technique. My name is starting
with a demonstration of a stippling
technique combined with overlaying
and blending that I'll be using in
the main project. Starting with the dark brown, creating a small dots
with the dark brown. Now overlaying a little
bit of residue on top of the dark brown and blending
the ages of that asset. And now blending these
two colors by using the stippling technique
by STP naming, creating very smallest straight
line in the random order, overlaying these are in UCL on top of the dark
brown in there as it by applying heavy preserved using the
stippling technique. The purpose was seen to represent the brown
as the chocolate. That is just we need the
front side of the cake. Now moving on to our
final demonstration of the stippling technique. So this is the basic of
the stippling technique, creating a smaller strokes with the ILP still in
the random order. As you can see, the consistency of the colors in our
two new fun with this, the stippling technique
will be using this stippling technique to make the blending appear translation. And with this, we're done with the demonstration
for the preset, blending over link and steeping. See you in the next video.
5. Leaves: In this section, I will show
you how you can sketch and draw leaves have different time for the main project with e.g. of this fetus and Tim, different color
combinations of the green. For this section,
we'll be sketching out the simple sketches
so the leaves starting with the first escaped. For this case there
will be six leaf, three smaller 1.3 big one. The big one will be
surrounding the smaller ones, starting with the
three smaller ones. The whole radio
ads in real time. So I encourage you to join along with me and
let's practice. Now moving on to the
three bigger ones. This big advantage will be
surrounding the smaller ones. Starting with a sketch
for the middle vein of the leaf and then defining the object
outline of the leaf. Erasing the title to
add just the last leaf, starting with the middle of the leaf and then
surrounding it. This Mandalorian
is codenamed trim. Moving on to the second sketch. For this, there will
be only three leaves, starting with the middle vein
or the midrib of the leaf. And then defining the object
outlines for the leaves. I find it easy to sketch out the guidelines for
the lease by name, starting with the midrib or
the middle vein of the leaf. And with this, we're done with our second sketches or three. Moving on to the third example. For this example, I'll be
sketching out to Edison caves. Starting with them, it drifts, make the placement of the
other leaves more easier. And with these, we are done with our third example of the leaf. For this first example, I'm drawing another
set of three leaves, but with a different
orientation of the leaves. Again, following
the same procedure, starting with the midrib and continuing forward as I did earlier by drawing
the rest of the leaf. You are welcome to sketch the
leaves in different kinds and in different ways,
whatever you prefer. And with these AMD and with their basic sketches
for the leaves, going in with the eraser to
lighten the pencil lines. Removing the eraser
dust with Deborah's. I find it easier to
remove the dust with the breath as it apart from adding the
lines with my hand. And with this,
we're done with the sketching with a pencil. Now let's paint. For this. I'll be using emerald
green as a dark side. And Olivia last
slide set of green. Here, I've already started
with the emerald green, applying medium precedent, overlaying it on top
of the pencil escaped. Here also, I find it easier to start with the
midrib of the leaf, adding more veins coming
out of the midrib. Now moving on to
the outer leaves. To keep them in project simple, I'll be using only two
green for the leaves and some time a little bit
of white for the highlight. That's what the greens, I'll be using a dark shade of green to define the outlines and
the details of the leaves. And a light shade of green
to fill in the colors. And with this, we're done with
the emerald green for now. Continuing forward
with Olivia low, filling in the rest
of the live with this Olivia and overlaying it on top of the green thing, medium pressure with this
olive oil yet but cheaper, different color
combination of the green. And these were done with Olivia love for
the inner leaves. Moving on to the outer leaves, applying medium pressure with this olive yellow overlaying this Olivia learn top
of the emerald green. By the application of
medium pressure with this Olivia loan top
of the emerald green. We have particular
that the mixture of both emerald green and yellow. And with this, we're done with Olivia love for
the outer leaves. Going back once again with emerald green to redefine
the tip of the leaf, as well as adding
details to the leaf. The same. I am not a strictly following the earlier
outline of the leaf. I am making adjustments as I go. Continuing forward with
the emerald green, adding the outline of the leaf, as well as adding the details to the midrib and
adding the veins. And with this, we're done with our first example of the leaf using a darker side as well
as a lighter shade of green. You go into the second sketch. For the second example
of the three leaves, I'll be using dark green
and yellow green. Here. I've already started
with a dark green. Going over the pencil sketch
with this dark green. I'm a blank medium presser
with this dark green. And finally moving on
to the third leaf. Now adding veins coming
out of them. We dream. With this. We are done with
the dark green for now. Now going in with
a yellow green, filling in the insights
of the leaf and overlaying it on top of
them a dream and veins. Here they were playing
me depressor with this yellow-green forward laying this yellow-green on top
of this dark green. As you can clearly see, the part where the
yellow-green is overlaid on top of the
dark paint. There is. It can be a friend
color. This color is due to the blending of
yellow-green with this dark green. Now moving on to the
third and final leaf. Applying medium pressure
with this yellow green. Adding this yellow-green
wherever required. With this, we're done with
the yellow-green going. Make 1 s you that dark green to redefine the
shape of the leaf. Starting with the
mid riffs and then adding winds coming
out of the midrib. And with this, we are done with our second example of the leaf. Moving on to the third one. For this, I'll be using
grass green line green gear. I've already started
with our gasoline. Moving on to the second leaf, starting with imagery and then defining the
outline for the leaf. Adding the veins
to them we dream. And when these were done with
the grass green for now, continue forever the light beam this time instead of
applying medium pressure, I'm applying heavy
pressure with this line, mean blending this lime green with the grass green by
applying heavy pleaser. So it should be clear
by now that for the leaves I started with
a darker shade of green, and then I go in
with a lighter shade and fill in the
rest of the leaf. I overlay the lighter sit on top of the midrib and the veins, as well as on the
edges of the leaf. The purpose of this overlays
to achieve a somewhat of a blend between the darker and the lighter
side of the green. And after this blend
of the two color, I go back once again
with the darker side of the screen to redefine the
outer shape of the leaf, as well as to add the midrib and the veins coming out
of them. The dream. Here I have done the same, going back once again with the grass green to add
the outline of the leaf, as well as adding
them in a dream. And that means coming out of it. With this, we're done with
our third example for the leaves for the sport. When I'm going back
once again with the eraser to lighten
the pencil sketch. Removing the eraser
dust with the press. For this fourth example
of the three leaves, I'll be using malachite
green and the light olive. Here. I've already
started with them alongside thing,
starting with them, a dream containing forward with this melanocytes queen and defining the shape of the leaf. This time, I have not added the veins coming
out of the midriff. This is to show you that if you forget to add the veins
in the beginning, you can add it later on. Edition of the vein
is easy later on. As we add darker shade of green on top of the lighter
side of the screen. Now filling in the rest
of the leaf with the slight or live by
applying medium presser. The purpose of using different variations of
the clean is to show you that you can use
additive variation of the green, whatever you prefer. And you don't have
to rigidly follow the same color that I'm using. You can use any two variation of the lighter side and a
darker side of the screen. And you can obtain
somewhat same result. Moving on to the third leaf with a slight olive playing medium presser with
this light olive heading in the light I
live wherever required. With this, we're done
with the light olive. Going back once again
with this melanocyte, me overlaying it on
top of them agree. As well as adding the
veins coming out of the midrib lead to finding
the shape of the leaf. Finally moving on to the third and the final leaf for this e.g. with this, we are done
with the coloring for our fourth example
of the leaves. Here it even more example of the color combinations
of the green that you could use mosque me and that, that caused screen. Starting with the Maschine as the darker side of the brain, that basic outline of the
leaf and the small screen. Adding the veins coming
out of the midbrain. Now going into the
turquoise green, applying medium phasor
with this turquoise green, filling in the other side of the leaf with this
turquoise green. And with this, we're done
with the turquoise green being met once again
with them off-screen. Pooling this mosque
on top of the midrib, redefining the tip of the leaf. Adding the veins coming out of the midrib with
the small screen. And with these, we are
done with the basic sketching for the different
kinds of the leaf, as well as different color
combinations of the leaf. And use a different kind
of pressure as well as the blending that you can
use to draw the leaves. I hope you learned something
new from this section. See you in the next video.
6. Flowers: In this section, I will show
you how you can easily draw purple and red height and just flour for
your main project. For the flowers, I'll be using two to three different
sense of the color. And this flowers will
be multilayered. Since it isn't CBO
the circle there, you don't need to start
with a pencil escaped. Here, as you can see,
I've already started with a mole for our first
purple hydrangea flower. Finding a sip of the flower
with them all by applying medium to high pressure.
It's very easy. You just have to create a small semi-circles with the color. And with these, we are
done with the mom has done primarily for our first
hydrangea flower. Now going into the light
gray at the secondary layer, overlaying this light
gray on top of them all in the same way, creating
small semi-circles. Some yellow to my green going in with the tissue
paper to remove it, you have to keep
your color scheme as overlaying technique leads to accumulated color
on the tip of the ILP style. Since this is just
a demonstration, I'm continuing forward with
a little bit of yellow. I'm focusing mainly on the lower right
side of the flower. Instead of this light gray, you can use white also. And with this, we are done
with our first example. For the second example, I'll be using darker shades of that color with three
different layers. Here. I've already started with the lilac to create the
shape of the flower. Creating small circles
with this lilac and filling in the insights of the flower with this lilac. I'm applying high-return
medium placer with it. With this, we are done
with the lilac bell going in with the
mob as the secondary we're playing mean
impressive that this mall, well what link it on top of the allylic but not
completely covering it. Threatening small
subtle throughout the flower with this mall. And with this, we're
done with them all. Going in with a
light gray is the third and the final layer. Mainly focusing this slide on the lower side side
of the flower. I'm using the slight way to represent the lighter
region of the flower. With this, we are done
with our second example of the hydrangea flower. For this third example, I'll be drawing two flower, one behind the other. Here I've already started with a light purple for
the first flower. Moving on to the second flower. If I nailed outline for the second flower by
creating small to me circles and now filling
in the entirety of the flower by creating
the same small semi-circles. With this, we are done
with the light purple is the primary layer for now. Now I'm going in
with the periwinkle blue as the secondary layer, meaning adding it on the
middle left of the flower. Applying heavy pressure
with this periwinkle blue. Adding some periwinkle blue on the lower left side
of the flower. Using this periwinkle
blue to create differences in between
the two touching flowers. And with this, we are done
with the periwinkle blue. And finally going in with a light gray to create the
highlights for the flower. I mean, he focusing on our top light of the flower
with this light gray, the additions of the
second-order third color on the lower right or the
lower left of the flower, is to add the diamonds
into the flower, as well as to create
the regions of the light in the
shadows for the flower. With this, we're done
with the third example of the purple hydrangea flower. So as you can see, the use
of three different color for this last example of
the hydrangea flower, the light purple as the
base for the flour. Nobody wrinkled to
differentiate between the flower and to other
dark and say to the flower. And the light report
the highlight has created the opinions that
the light is falling on the right side of the
flower does it's lighter on the top right side and a darker on the lower left
side of the flower. And the user different
combinations of the purple and the
blue as two so that you can achieve the
same desert with other reasons of the color
in the main project. Apart from this light gray, I'll be using white to
add the highlights. And with this, we're done
with examples for that. But Paul hydrangeas continue forward with the
right height endures. For this first example, I'm starting with the brown
as the primary layer. For this example, I'll be only
using to color this brown and the Scarlett creating small semi-circles
with them around. And with this we're
done with the brown. Now going in with
that Scarlett as the second layer and applying medium pacer
witnesses cartilage. Or what language
is Scarlett on top of the brown with a
small team in circles, but not completely covering
all the brown with Scarlett. With this, we are done
with this cartilage. Bring back once again
with the brown and adding it a little bit
on top of this Scarlett. And with this, we're done
with our first example of easy to liberate hydrangea. For the second one, I
am using it on well, instead of the brown as my primary leed for this
rate hydrangea flower. Here I already started
with the raw umber. We define the outline
of the flower. And now filling in the inside of the flower with the
small semi-circles. I am applying medium to high
pressure with this wrong, but it definitely Madrid and applying medium
visitor with it. It's partially covering that all might have been
this flame red. And with this, we're done
with the flame red for now. Going into it, The Scarlett and many focusing on
the left side of the flower to indicate that the light is falling
on the left side. And with this, we're
done with that Scarlett. And finally going back
once again with a mud. And I didn't get on the lower
right side of the flower to create the sideway lesions
in the hydrangea flower. And with this, we are done with our second example of
the hydrangea flower. For the Tailwind, I've
already started drawing the two hydrangea flower
one behind the other. This time I have started with this Scarlett as
my primary layer. If I need to seat belt that
to flower and filling in the inside with a
small semicircle using the same Scarlett. With this, we are done
with the Scarlet for now. Continuing forward
with the brown. Focusing this brown on the lower right
side of the flower, as well as on the
edict of the flower. Continuing to create
small semicircle with this brown on top
of this cartilage. With these, I am done with the brown and now going in with the flame red and sparsely overlaying it
on top of the brown. And with this we're done
with the flame did. And now going in
for the light side, for this, I'm using light gray. So it should be clear by now
that you can easily create the hydrangea flower with two
or three different colors, starting with one color as the base rate for
the flower when darks it for depicting the sideway region or the
darker region for the flower. When lights it to depict the lighter region for the flower, or to add highlights
for the flower. Adding more gray
wherever required to represent the
highlighted portion for this hydrangea flower. With this, we are done with
our third and final example of the rate hydrangea flower. And now we are done
with the older examples of the purple and the
red hydrangeas flower. Continuing forward
with combining the flower with the leaves. On this first one,
I am starting with the purple hydrangea leaf, following the same procedure, starting with a light purple as the base layer
for the flower. Defining this heap as well
as filling the inside of the flower by applying medium presser with this light purple. And now going in with
this periwinkle blue, adding this periwinkle blue in the middle and the lower
part of the flower, my applying heavy pacer. And with this we are done
with the periwinkle blue. And finally going in with the lilac as the third
and the final layer, overlaying this lilac on top of the Queen of
England, the Purple. Mainly concentrating
this slide lake in the lower right
side of the flower. And with this, we're
done with the flower. Moving on to the leaves. The leaves, I'll be using dark green and the lighter live here. I've already started with a darkening to
define the shape of the leaf overlaying this dark
green on top of the flower. And with this,
we're done with the dark green are now
going into it, the light olive, applying medium pressure but
disliked or live and filling in the
inside of the leaf. And with this, we're done
with the lighter left. Going back with a dark
green and adding it to redefine the shape of the leaf as well as adding details to it. That means coming out of the
matrix with this dark green. Dark green on top of
the slide are left. And with these, we are done with our first example of the
hydrangea flower with the leaf. Moving on to the second example, the red hydrangea
flower with the leaf. For the second example here I've already started
with the flame and AID defining the seat as well as
filling in the inside with the flame lit by applying medium presser with
this claim written. With this, we are done
with the flame red. And now going in with
this colored for the middle and the lower
left side of the flower. I'm making this flower face towards the light that
is on the right side. And finding going in
with the brown and overlaying this brown on top of the Scarlett and the flame red. Applying this brown
on the lower left of the flower as well as on
the edges of the flower. And with this, we're
done with the flower. Moving on to the leaves. This time I am using melanocyte
green in the line wean. Here, I've already started
with MLL site green, defining the outline
of the leaf as well as adding the veins
coming out of them. We'll be using this
malachite green. Moving on to the third
and the final escape for the leaf using
this malachite green. And with this we are done with the malachite green for
the sketching section. Continuing forward with
the lime green link in the lime green mayor
Blaine medium pestle. Blending this lime green by overlaying it on top
of them, LSI green. Doing under the second leaf, applying medium for
where this lime green and blending it with
the malachite green. And finally moving on
to the first leaf. They're putting the same,
applying medium pressure by this lime green and blending
it with the melanocyte mean. Adding in the lime green
wherever required. With this, we are done
with the lime green. Living back once again
with this malachite green, redefining them it
drip debate as well as the edges of the leaf
with this MELAS A13. And with this we are done
with our second example of the hydrangea
flower with the leaf. I hope you understand how to use the different shapes
of the color for the flower as well
as the leaves. And how to combine the
flower with the Lean. See you in the next video.
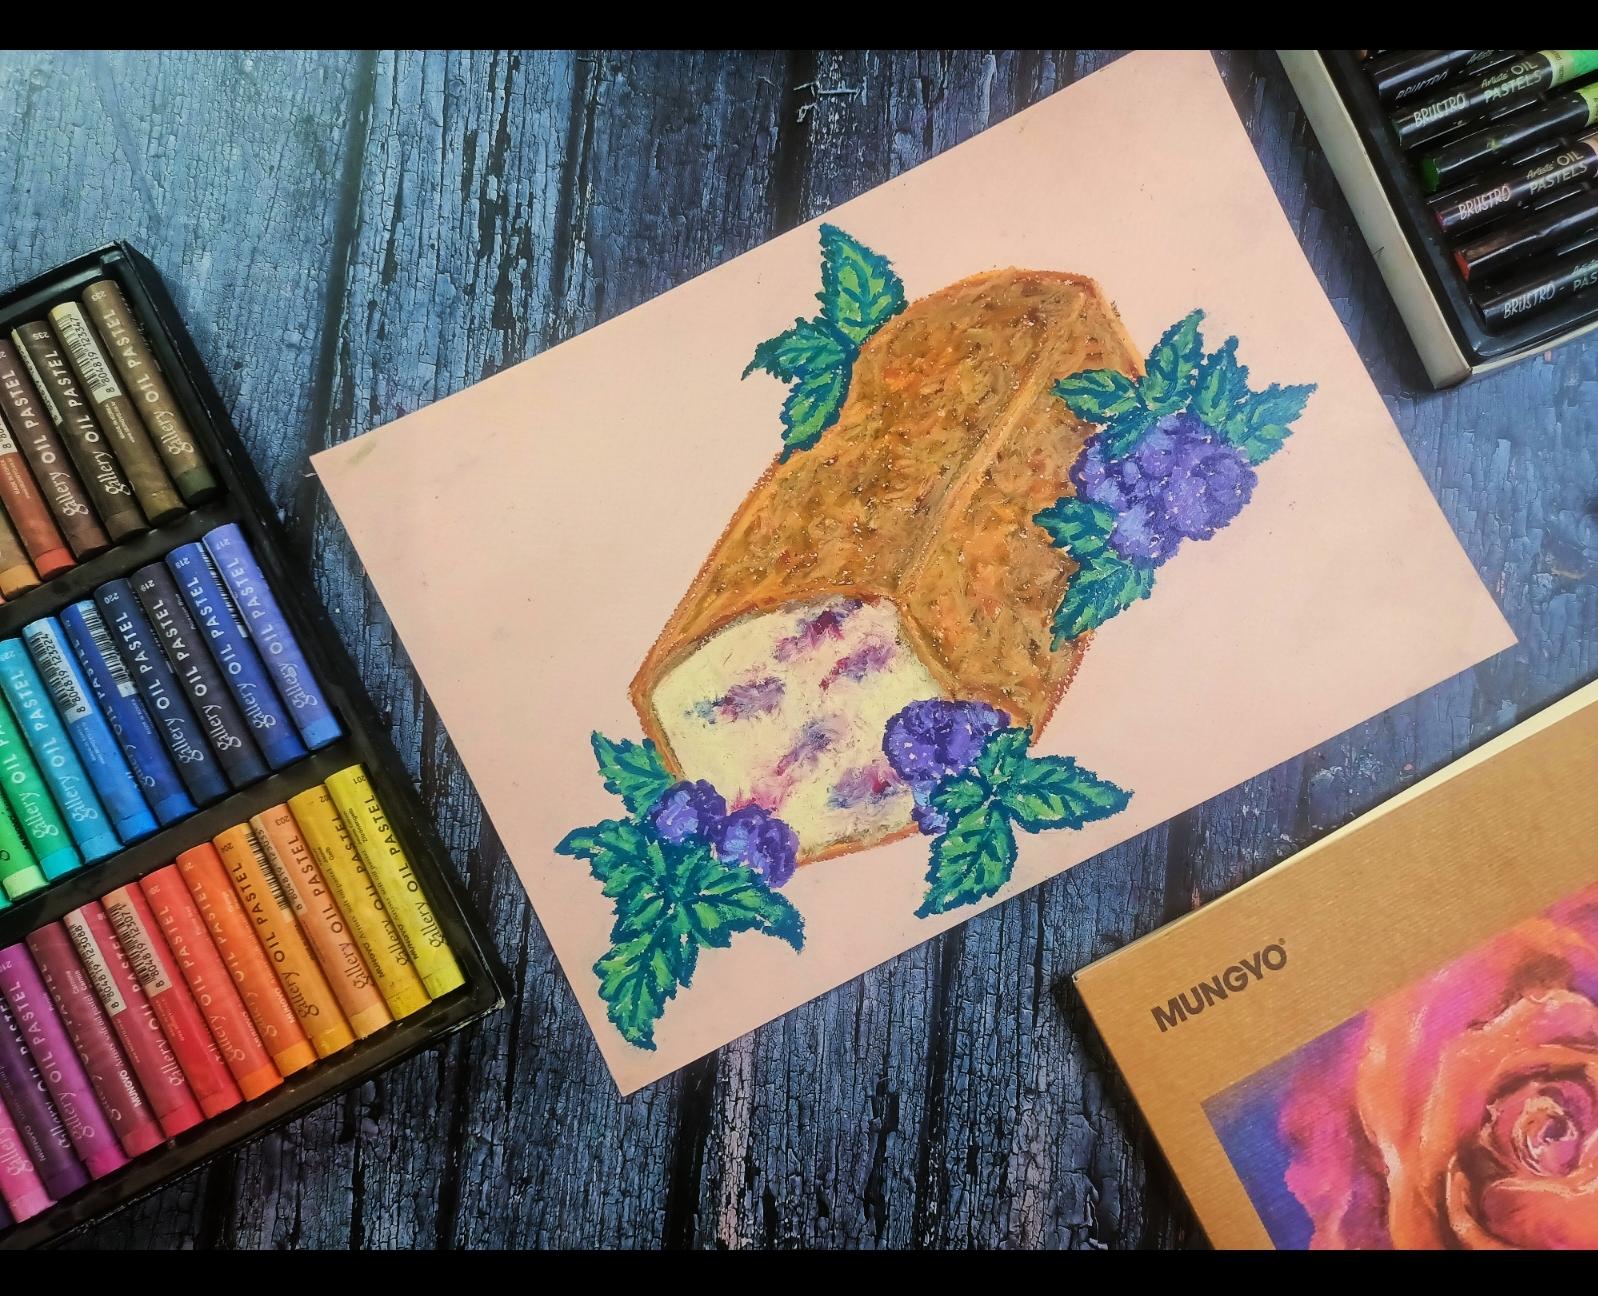
7. Easy Cake with Stippling Technique: Now starting with this first
demonstration of the cake, this will be fairly
simple drawing. There will be no
additional element apart from the k. I'll be only using stippling technique
for this cake or used the stippling
technique to create the texture for the cake. So here I've already
started with the pencil to sketch the
basic outline for the cake, starting with the
two parallel lines for the front of the cake. Now connecting the end
of the both lines, it's getting another set of parallel lines for the
slice of the cake. I'll be following the same
step as I told earlier during our basic escapes video and authentically would
align with occurred. This cake will be in the form
of simple rectangular slab with God top along with a slice of the cake
attached to him. Doing the same for
the top of the cake. Everything and making
adjustments as I go. The whole radio DJ in real time. So I encourage you to
join along with me. Finding that cut off
the cake once again. Now moving back to the
slice of the cake, depth and dimension to
this slice of the game. Going back and
adding another set of lines mirroring the
earliest slice of the cake. Now extending this
grid lines from the top of the cake because
kids besides for the king. And the lip read a line from
the bottom edge of the cake, finding the cut but the
other end of the cake. And now connecting the front
and the back of the cake with another parallel line
to the side of the cake. Joining the ages of the
other end of the cake. Coming to the front
side of the cake and adding that sketch where
the crust of the cake, doing the scene
for the slaves of the cape, that is adding crust. That anything that extra line
and finalizing that sketch. This time, I am not
lighten the pencil mark as I'll be using color
with the heavy freezer, it will beauty the pencil
sketch on its own. Also, I'll be using
opaque color, so David's no need to worry
about the pencil marks. For these, we are
done with the sketch and let's color the key, starting with the brown. Treating stippling marks with non by applying heavy
precede with it. Continue making stippling
mark with this known. Now moving on to the
other side of the cake, continue making the
stippling mark windows blown by pulling
heavy person with it. With these, I am done
with creating a sibling, Margaret Brown for now. We'll be done with the crest
of the cake with the scene, but owned a blank medium visit and fill in some brown for
the cluster of the key. Input, the front side of
the cake with this brown. Getting some more math here
and there with this brown. These were done with
them around for no fine-tuning forward
with the result. Using the heavy purchaser
with this does it to create a stippling mouth and overlaying some of this receptor
on top of the brown. Doing the same for
the rest of that. But I want to know what links them all data set on top of it. Moving on to the Addison
tied with this research. I read this, I am done
with the asset for now. Flowing into it, that
golden yellow and filling in the empty
space with it. Applying heavy presented with this golden yellow to create the stippling mark and filling it in the back and the species leaving some spaces
near the edges of the cake and touched
with this golden yellow. Leaving some spaces near the
edges of the cake untouched. Outlining the shape of the
cake with this golden yellow. Boiling, this golden yellow on top of the lead pencil is hit. And now adding some
of this golden yellow near the outlines. With this, we are done with
the golden yellow for now. And finally going in
with the oranges, yellow filling it in all the empty spaces
and it's partially overlaying it on top of
the brown, golden yellow, creating a stippling marks
all over the cake with his own news yellow spots or web link with
autoimmunity alone, top of the recipient, the brown, earning this clipping mouse
near the corner of the cake. And with these, we are
done with the oranges, yellow for the upper
part of the cake. Going back with them at home, or didn't get on the
right edge of the cake to create a darker
region for the cake. White creating the darker
begin for this cake. I'm applying medium
pizza with this. I don't know. We met with ordinance yellow, starting with the
outline or the kick and covering it with
a stepping month. Coding the rest of this
cake with us are in this year alone by creating
stippling mark all over it. Stippling marks all over the cake with this
automobiles yellow. This dip in bulk on top of
the bone that we did earlier. Powderly adding the
sublingual color with the cake with
this orange, yellow. Earnings and motor
stippling marvelous are in this yellow here and
there wherever the coin. But with this, we are done
with the side of the cake. We're now moving back
booth rental the cake. Going into the recipients
that owning the brown that we painted
earlier with this rosette. Boiling a little bit of
brown on top of that, is it? For now going in with
the island, use yellow. I didn't mute or
unmute yellow on top of the brown
and the rosette. Adding this oranges, yellow
on top of the brown that I said to create a blended
color and creating, tax it for the rest of the cake. Getting forward with
creating this stippling, with this on a new scale on top of the brown
and the rosette. And with this, we're done
with the addition of oranges, yellow for the rest of the team. That will be went
with a slice of the Craig said owning the brown with that asset
for the slice of the cake. Now moving on to the crest
on the slice of the cake. Doing the same for the cluster
of the slice of the cake. That is adding the
ordinal scale on top of the brown and the reset
to create the blended color. And cleaving the textbook
for the crust of the cake. The new water with
a sibling with this auto Nicea law and the rest of the
cake or the slaves. With this, we are done
with the ordinance yellow for the slice of
the Keq for now. Put the site so dislikes of technique adding a
little bit of brown. Forward linked someone has
had on top of this brown. We met once again with the
golden yellow overlaying this golden yellow on top of the brown in the desert in
the form of stripping, getting flooded with
the golden yellow on top of the brown
and the rosette. Then finally going
into the oranges, yellow and overlaying it on
top of the golden yellow. But I won't I don't think so, but I don't need
that and it's up the slides to make it darker. Now going in with
this ordinance, yellow and overlaying
it on top of the brown. With this, we are
done with the class for the slice of the cake. Normally wouldn't put
the insights of the Keq. For this, I'm starting with the brown dots and
circles with this, but on the ground with
a slice of the cake. Earnings mode. But down
here in the editor. When these were done with them around for the
insights of the cake. And find me going with the PLO, creating the stippling
month throughout the inside of the cake
with this yellow. And know what link
this on top of the ground. A blank here. We put this below to
create this doubling maps. Completely pinval depth. I continue with
this wheel yellow. Moving on to the corner of the front side of the cheek
with this failure load. With this, we are done with
the front of the cake. Moving on for the
slice of the gig. Doing the same, applying
how people instead of with this yellow and overlay
it on top of the brown. I'll bring this are the
brown with this bill yellow for the slice of
the cake way of playing. Happy, pleased with
this. Be yellow. Adding some water stippling with the pale yellowy required. With this, we are done
with the pill yellow for the slice of the cake as well
as the front of the cake. And with this, we're done
with our first basic cake. The next part is optional, adding that back down
underneath for the K. For this, I'll be using
green in the white here. I've already started with degree applying medium visit
with this grand, adding it at this
side of the cake. And with these red and width at only one side of
the cake with this gray moving on to
the other side. So that I will name this layer of the
cake with this green. Expanding that to be
a little bit more. Now I'm going in with the white whittling, a little bit of white
on top of the gray. And with this, we're done with the right side of the cake, moving on to the other
side with the same weight. Removing the masking tape to add the light on the
bottom each of the bead. I decided to add some more
gray on the left side up to the ceiling height as debt on the right side of the cake. No earning the white, but no covering the rest of
the year with this wine. Removing them, asking people
the other side of the beam, covering the rest of the
area with the right. Earning world-wide
wherever required. With this, we are done with
the base for the cake. And finally, we're done with the cake as well as the Meese. See you in the next video.
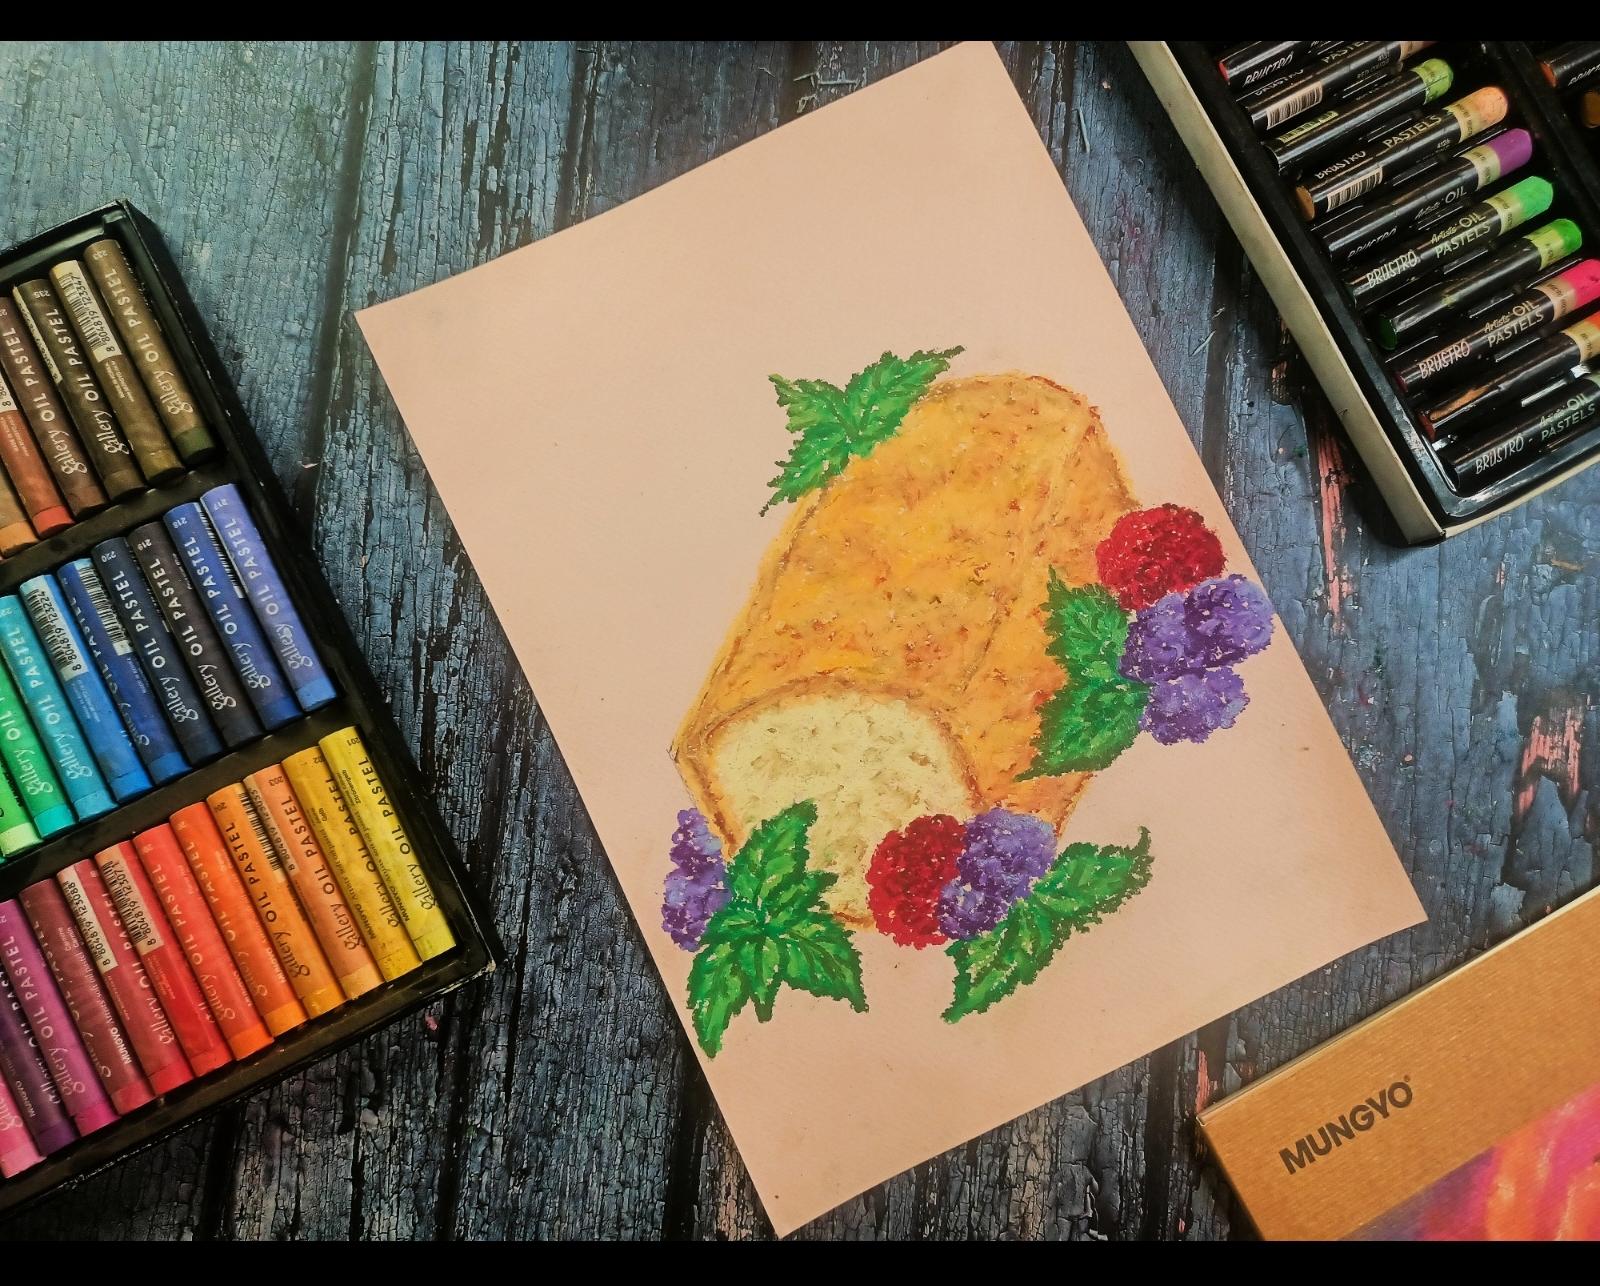
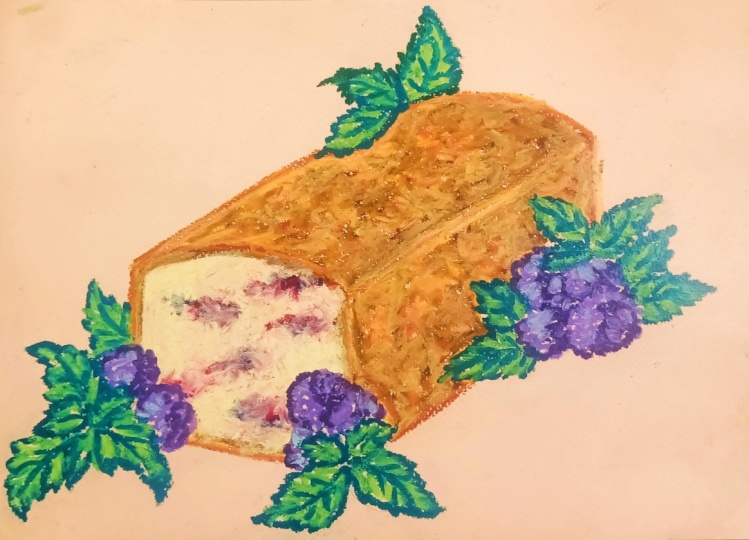
8. Pencil Sketch for the 1st Project: Now let's start with
the first main project for the class, starting
with this kid. Here, they've already started
with the pencil escape. Good thing, two
parallel lines for the front side of the cake. Joining mode, the parallel
aim, the codon, the top. Connecting the lines at the bottom with the straight line. Making I just went to
one side of the cake. Now extending straight line towards the backward to
the list of the gate. This gives you another
line parallel to it. For the other side of
the gig dining world, the pattern aligns
with the codon, the top, adding the pizza, the cake with
another State Plane. Finally, the last line
to include the cake. So at least we had altered
with a V6 equal to k. Moving on to adding the
leaves and the flower. Starting with the
bottom-left corner. Sketching sixthly rescue
practice in the earlier section. Heading a circle behind me to represent the hydrangea flower. Moving on to the
bottom right side. Whose article for
the two flowers? Turning green leaf on the
top right corner of the key. Moving on to the lower
right corner of the key, starting with a circle
for the flowers. Burning fuel live
adjacent to the flower. Adding some texts on the top of the cake with
the pencil is good. Lightning the pencil
but with a razor. Making some correction and I
just went to the ki repeats, we are done with
the basic escape. I'll be making
some tedious every required while
painting looks good. See you in the next video.
9. Leaves and Flowers for the 1st Project: In this excellent money
we earn in cholesterol, the leaves as well as the flower was starting with the
r in this yellow. Overlaying this out
in this yellow on top of that pencil is good. I'm leaving the alias
of the flowers and the leaves and dusted
with this RNAs yellow. Earning the order in this
yellow color bottom of the key. Hiding a little
bit of orange and yellow on the top
and the side too, so the contour of the cake. And with this we're
done with the oranges, yellows, and greens. Starting with the grass green. I am using this grass green is the darkest shade of green. If I need an outline to
leave with this grass green. I'll be mostly following the same process as I
demonstrated earlier. Starting with the darkest green, then I'll be going with a
lighter shade of green. I'll be using the
lighter side of the Queen for the
insights of the leaf. As well as I'll be
blending a little bit of that later said with a
darker shade of the clean. For this project, I'm
using light Oliver's, the lighter side of the green. And finally, instead
of going back with a darker set
that we started, I'll be using another
sale of the darker green. Instead of the dark green. I'll be using mostly in this time. With
that small screen. I'll be redefining and
threatening the seat belt, the leap, as well as celebrating the midrib and
the veins coming out of it. Continuing forward with the
grass green. For the leaves. I decided to add to edit the leaves in the front
side of the cake. Going in with this but aspirin to add the two
edits, the leaves. Now adding the waves coming
out of them with Graves. With this, we're done with
the grasping for now. Going in with the light dollop of a lens sides of the leaf. I will playing medium pizza with this light olive and blending some of the dark
green with the light. The light olive leaves
on the top of the cake. Moving on to the six leaves
with this light olive. Filling in the color
for the leaves. Applying medium pressure with the light olive to
fill the color. The lighter liquid.
The front two leaves, applying medium pressure with
the light all up to fill the color and find me anywhere I started
with the lighter lives. These were done with
the light olive and now going into the most cleaned as the second darkest
shade of green. This is different from
the watery practiced. I intending the grass
green with the moles going to really find the answer
in the shape of the leaf, as well as adding the
details in the form of murder him and the
veins of the leaf. The starting the
smallest glue for the lethal the top right
corner of the cake. As you can see,
I'm not completely covering the grass green
with the small screen. I am doing this to bring more vibrancy of the
color to the leaf. Continue forward with the small screen for
the lower limbs. Defining ends up winning
the seat of the lead with the small screen as well as I'm increasing the side of
the leaf a little bit. Moving to the left that are
in the front of the cake. Finally, moving on to the set of six leave with the small screen. Defining ends up
winning the seat of the outer list with
the small screen. Writing the midrib and the range for the lead with
the small screen. With this, we are done
with the most when for no. Going back once again
with a light dollar per increase the
side of the leaf. And moving back once
again with this mosque mean to do unifying the
seatbelt, the live. Link them with groups as well as adding the rains
coming out covered, no earning the most
green wherever required. And with this, we're done with the leaves for this project. Now continuing part of
the hydrangea flower. I'm starting with the
purple hydrangea flower. Afford the heartbreak. Yes, I am starting
with the mole. I'm using this law as the primary lever for
the heartland years. Starting with a plant flower. Blame medium pressure
with this wall and creating small semicircle. Applying medium brush
or with the mole. Moving on to the hydrangea
flower behind the cake. Finally, moving on to
the flowers are dying, applying medium
brush with the law. This type of flower
or descend to the k. Moving on to the second flower. A little bit of more and
more for the first flower, as well as the moon while
for the flower and the current them all for
the type flower. Applying medium pressure
with this mole. And with this, we're
done with them over as the primary lead for the
honeymoon years flower. Now for the secondary layer
of this hydrangea flower, I'll be using lilac. Going in with the lilac. I'll be overlaying this
lilac on top of the mall. I think this slide click
on the bottom left side as the light is coming from the
top right side of the cake. I'm using this lilac to depict the shadows
for the flower, as well as to establish
the differentiation between the touching a
decent hydrangeas lowered. Moving onto the set of
three hydrangeas, flowers. Hi Nina allylic on the bottom
left side of the flower. With this, we are
done with allylic as the secondary layer for
the iodine yes, flower. Finally, for the
lightest shade of the color for this
hydrangea flower, I'm using this light ray going in with a light gray. Light gray on the top right
side of the hydrangea flower. Adding the light good for the hydrogenous flower
that are behind the K. And finally, moving with this
gray for that set of three hydrangeas
flower gardening, this slide, we're on the top
right side of the hydrogen. Yes, lover. Adding some more light gray here and
there wherever required. And adding a little
bit of this light will be on top of
them all as well. With this, we're done with
the purple hydrangea flower. Continuing forward with the
rate I'd bring your flower. The primary layer of this
retina hydrangea flower, I'll be starting
with the Scarlett. Scarlett as the
primary layer for the first hydrangea
flower applying medium preserve and this is cartilage. I am making this rate
hydrangea flower a little bit bigger as compared to the purple hydrangea flower. I decided to add one won't hydrangea on the
front of the cake. Applying medium presser
foot, this is cartilage. Making the second read hydrangea flower a little bit bigger. Going back to the hydrangea, the back and adding
a little bit of motor Scarlett to make it
a little bit more rigor. And with this, we're
done with the Scarlett as the primary layer for now. The secondary layer of
the retina and India's, I'll be using this carmine. Now going into the
Carmine content, creating this
carbon on the lower left side of the red flower. Hurting the car went for
the flower at the Rec, applying medium price
of a discount rate and overlaying it on
top of this cartilage. With this, we're done
with the Carmine at the secondary yet for the
radar Linnaeus flower. Now for the final layer for
the later hydrangea flower, I'll be using the brown
going in with them around, applying medium to high
presser with this brown on top of this Scarlett
as well as the Carmine, adding this blood on the
middle of the flower, as well as on the upper
edges of the flower. We go to the second flower, adding the brown near the
purple hydrangeas level, as well as near the
edges of the flower. And with this, we're done with the coloring of the leaves, as well as the purple and
the red hydrangeas flower. See you in the next video.
10. Coloring the Cake for the 1st Project: Now let's paint the key. For the cake. I be
starting with the ocher. Moving into an alcohol. Using this ocher to create
another outline for the cake, just below the RNAs yellow here I've already started with
the front side of the cake. Well, we love to the
top of the peak width. It's all good. I think the socket for
the back of the case. And finally
overlaying this offer on top of the sites of the cape, put all this, I've applied medium pressure with this ocher. Now can you think of a number
from the top of the cake? Applying medium preserve of this ocher to create the
marking on the top of the cake. The same on the side. That is cleaning them
out with this aka link. Few more marked with
this, all got on the top. And with this we're done
with the octet for now. Going back with the
other NuScale low. Using the stippling to
overlay the oranges, yellow on top of Docker,
medium preservatives, or unless the alert
overlay it on top of the continuum to our leaders are in UCL on top of the socket
for the top of the cake. Moving on to the
site of the decider, nice yellow overlaying
it on top of darker. Now moving to the
front of the cake. Overlaying that order
new loan top of darker by applying heavy
to medium presser. And finally, adding more or a nice yellow with red
ocher was not covered. Adding a little bit of more or a nice yellow near the
corner of the cake may applying medium preserve as well as the leaves
and the flower. Adding some more. Or in
New Zealand near the edge of the key release, we are done with our
nice yellow for now. Continuing forward, I'll
reusing this golden yellow. Going in with a golden yellow filling the rest of the
empty spaces on top and the side of the cake
with this golden yellow. Applying medium presser with this golden yellow geared for leading this golden
yellow near the leaf. Now moving on to the side of the cake with this
golden yellow, carefully earning
this golden yellow near the flower as
well as the leaves. I think this golden yellow
wherever they are the lists concentration of
the golden yellow are there the empty space? And with this, we're done with
the golden yellow for now. Now I'll be continuing
forward with this research. Going in with the rosette, starting to overlay
this on top of the ocher and order
in this yellow for the front of the cake. I'll be using this visit
for the outlines as well as I'll be adding the cracks on top of the cake
with this rosette. Applying low to medium
presser with disrespect. Adding this rosette with
the low pressure to indicate the correct on
the top of the cake. Continuing to add more text on top of the cake
when it's an asset. Now moving on to the side of
the cake with this result, continue to add more cracks on the side of the cake
by applying loop is adding the rosette
near the flower. Focusing some of this rosette to surround the leaves as
well as the flower. Later on, I'll be
making the surroundings of the leaves and the flower as well as the corner of the kick a little bit darker to
represent the side. Dewey begins for the cake. Going back with a brown for
the corner of the front side. Earning a little
bit of more button on the top of the cake. With this, we are
done with the brown in the rosette for now. I'm finally going back
with the oranges, yellow overlaying. These are a nice
yellow on top of the resin and the golden yellow. I'm applying medium
pressure with this orangey yellow to overlay it on
top of the other colors. You can ask why covered
all the color after doing so much,
which I will reply. Since we add applying medium
preset with this auto, nice yellow, the color beneath it will be somewhat visible. You can see that begins
with the golden yellow, brown and desert minute. This oranges yellow as this layer is comparatively
somewhat trial solution. Adding this on this load near
the front of the cake and overlaying it on top of
that asset and unknown. Now moving back to the cake
with Assad and use yellow. With this, we are done
with the ordinance yellow for the top of the cake. Moving on to the
side of the cake. Doing this in applying
medium to hyperextend with this orange and yellow and overlay it on top of
the golden yellow. Whereas I can get it fully
filling in this order Nutella, in between the flowers
and the leaves. Now moving on to the
corner of the cake, We are playing some of that
in this yellow color front of the key and earning
some more yellow here. And wherever
required. With this, we are done with the
oranges, yellows. Moving on to the
insights of the cake, unfortunately, my
cameras stopped while filming for the
insights of the gate. What I did for the inside is I started with the pale
yellow as my primary layer. I feel the inside
of the cake with this pale yellow by
applying load reserve. Then on top of it I added
random street some of it. And finally I went
back with the PLO and covered the whole front of the cake with this bill yellow. So to summarize, for the inside of the cake to start with a pale yellow at random streak
of ocher on top of it. Go back with the field yellow
and cover the entire front. With these. We're basically
done with the painting. Adding the final touches, adding more definition to the
leaves with the most green. Adding more details in the
form of sharpening the leaf, as well as adding more wave
coming out of them in dribs. Going back with
this color to add mode diamonds into the
right ideas. Flower. Adding a little bit of round
for the hydrangea flower, a little bit of more green. And finally, removing
the masking tape. With this, we're done with
our first-class project. See you next video.
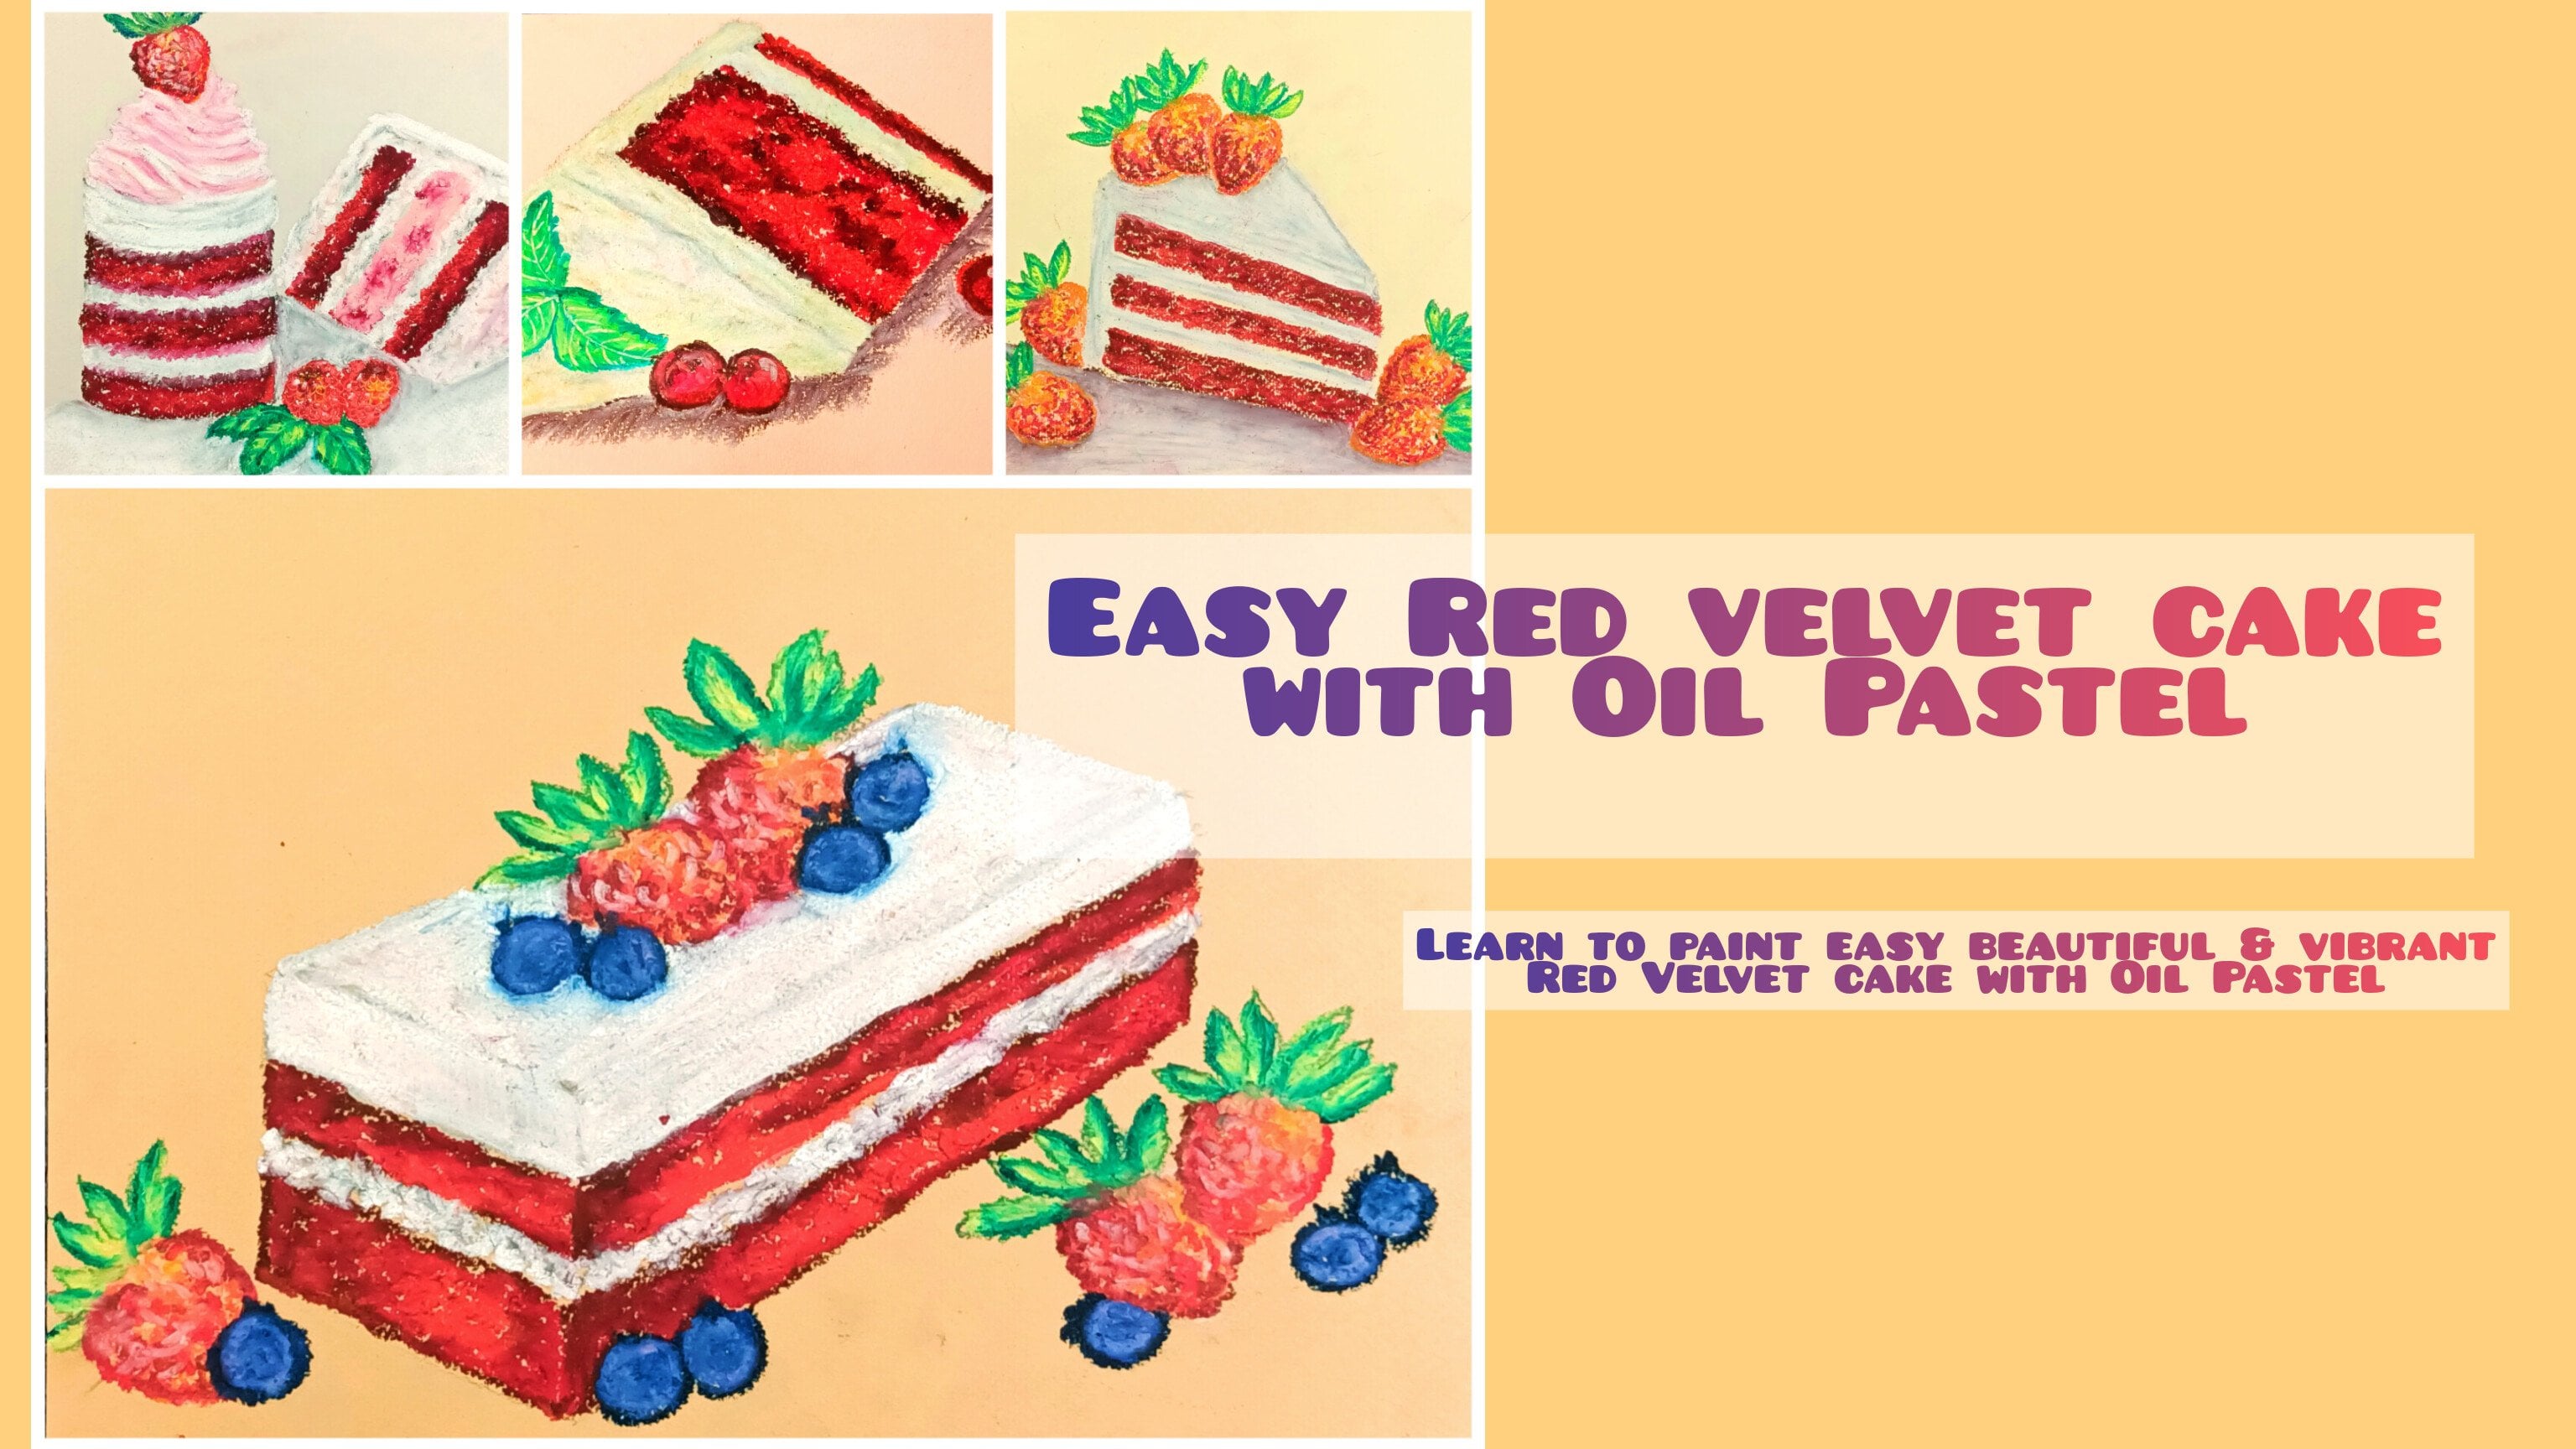
11. Sketch for the 2nd Project: Starting with a sketch
for the second project. This time I was getting
it in landscape. Starting with a straight
line for the other side. Adding the front curb, extending the fossil
scraped clean. This getting the
other straight line parallel to the earlier line. If you're not comfortable with
this kitchen in this way, you can start with the square as we did in the basic sketches. Refining their friend with
a two parallel lines. Now connecting the front to the back with another
straight line. Finally connecting the
front of the cake. With this, we're done with
the basic shape of the cake. Making. Some are discontent with the first one
is seal is good. And I was getting for the
leaves and the flowers. Anything that faulty
line with the eraser, as well as the pieces where I'll be adding flowers
and the leaves. Starting with the
leaf at the front. The same state at
the six slip that we practice in the leaf section. With this, we are done with
the three inner leaves. No writing delta three leaves. And now we're done
with this set of six leaf adding the flower, this flower in the form of
circle, hiding another flower. I was not satisfied with the placement of
the other flower. So I decided to add it just
below the first flower, hurting another circle
for the second flower. With these weird derivative, our first leaves and the flower. Moving on to the other corner. Starting with a circle
for the flower, adding another behind it. Now adding the additional gifts, would this lever adding well as smaller leaf on top
of the two bigger ones. And finally adding
one more flower just behind the
other two flowers. With this, we are done with our second flower on the leaves. Fire knee moving onto
the back of the cake. Starting with a circle
for the flower. Leaves. Adding another flower.
Adding more leaves. I think few more leaves. Lightening this kitty
with the eraser and modifying the
leaves and the flower. With this, we are done
with the leaves and the flower for this
corner of the cake. Finally moving to
the upper corner and adding few more leaves. With this, we are done
with the basic escape. See you in the next
video where we'll be collecting the key for
our second project.
12. Cake Coloring for the 2nd Project: In this section, we will start the coloring, starting
with the kick. This time. I'll be using the darker shade of color as compared to the past predict. Here I was starting
with data set, starting with
defining the outline of the cake with this other set. Applying this lesson on top of the pencil escapes by
applying medium presser. Defining the front outline on
the cake with this message. Overlaying useless it for
the side of that, heat. This up toward the
bottom. And now adding seven as it on the top
of the cake by using Lopez. I think this does hit
on top of the cake. It the bottom row,
small random street. And now we'll return to
the side of the cake with this desert doing
the same thing, small random streak
with this research. And with this we're done with the original dataset
for the sides. Adding some more, does it for
the outlines of the cake. Now I didn't tell me that hit on the top of lucky to using Lopez earning of a second the sides carefully adding this written near
the leaves and the flowers. Now I'll be continuing
forward with this bone. Going in with their own healing, the brown with a medium presser
in-between there as it, while leaving some of the
empty space in between. Getting forward with this, without writing it
on top of the gate, hurting them down for the sites. Getting forward
with the addition of this brown on top
of the research, moving to the front of
the cake with this brown. Adding a narrow strip of
brown below that assert. Moving back to the
side of the cake, adding get near the
front outlines. Now focusing a little
bit of brown on the top corner of the
keto dependent corner. Doing the theme for
the side of the cake. Concentrating route
on top corner as well as surrounding the leaves and
the flower with this brown. I am doing this to make
this region and darker in color so that it will act as the side Dewey
we did for the case. Carefully reading this but only in the flower as
well as the leaves. And with this we're done
with the brown fur. Know. Now I'll be going
into that orange. Doing it even
though it's orange, filling the rest of
the empty space, as well as overlaying
this orange on top of the brown.
And notice it. Continue to overlay this orange. I didn't know who the
upper corner of the K. And finally moving to the lower corner of the top of the cake with this orange. Moving on to the sites
with this orange, applying medium
piston and filling the empty spaces and overlaying this already on
top of them round. Good for learning
this already in between the flowers
and the leaves. And find new feeling the upper corner of the site of the key. With this, we're done with
the site of the key F4. Now, moving on to the front
of the cake with it orange, overlaying it on
top of them around, and that's it over the
outline of the cake. I think some auditing
to the other edges, as well as the terrible decade. With this, we are
done with the orange. Continuing forward with
the oranges yellow. Now I'll be using this
RNAs yellow overlaying. These are a nice
yellow on top of all the three colors by
applying medium pressure. Since the other three
colors we're off comparatively darker state as compared to this
oranges, yellow. The pattern and the
texture created by them can be easily seen
even after overlaying, it's already scaled
on top of it. I think the auto nuclear
look to the sides. Adding this or in this yellow near the edges with
a medium pace, it will be moved to the
upper coordinate of the side of the cake with
this orange, yellow. And finally, I think this orangeish yellow
wherever they're needed, let's concentration
of oranges, yellow. With this, we are done
with its R&D is yellow. We go on to the
insight for the key, for the insights, I'll be
starting with this violet. Going in with this violet. We could eating
salmon streets across the inside of the cake
with this violet, applying medium pressure with this file to create
the random streaks. Running a small streak
with the violet. With this, we are
done with the violet. Now I'll be going in
with this carbine, moving in with this Carmine. Well, what links some of
this got one on top of the violet by applying
medium to high places. Moving one for the
other violet discrete. I decided to add a stand alone. This trick with this carmine. With these, we are
done with the carmine. Now, I'll be going in with the pale yellow for the
inside of the cake. Going in with the yellow. Willingly insights
with this pale yellow by applying hypervisor. I'll be overlaying
this pale yellow on top of the car mine as
well as the violet. Many focusing on overlaying this on the sides
of the carmine. Violet. Uh, no, with these, we're almost done with
overlaying the pale yellow. Now filling the rest
of the empty spaces with this pale yellow by
applying, having places. Really feeling this feeling
alone near the flower. It being this B along the
edges of the cake also. Forward link a
little bit of more pale yellow on top
of the colors. With this, we are done with
the insights of the cake. Finally, we are done
with the coloring. Put the cake you in the next video where we'll be coloring the leaves as
well as the flower.
13. Purple Hydrangeas and the Leaves for the 2nd Project: Moving on to the
leaves and the flower for the second project. For this, I'll be starting
with this malachite green. Going in with this malachite
green for the leaves. Starting with
defining the outline of the leaves with
this malachite green having them in groups and the rains
coming out of it. Moving on to the leaves on the corporate side of the cake. Starting with the inverse
model, three leaves. Well, we go to the outer means. I think the mid reps and
the veins coming out of it. Outlining the lead
me, I'm the cake. We went to the leaf at the front with the smell as I've been. Starting with the
smaller leaves. No, moving on to
the bigger ones. And finally, moving on to
the leaves at the back, starting with the midrib and then finding the
outline for the leaf. Adding the another
set of leaves, herding them in real,
live with them. And let's say top Booleans,
adding them in braille. And with this we're
done with them. Lsi dream for defining the
outline of the leaves. Moving forward with a
lighter side of the Queen. For this, I'll be
using this light olive going in with the light or live. Starting with this
light only for the top leave a blind median
beset with it. Blending the melanocyte from the midrib along
with a light olive. Moving on to the
leaf at the back. Moving on to the set of the two leaves with this light olive applying medium pressure with this light olive,
filling the insights. Now when we look to
the front leaves, applying medium presser with this light color and filling
the insights of the leaf. I missed adding the
color for this two lips. Moving on to the final
set of the leaves, starting with filling
the bigger leaves with this light olive willingly leaf that's behind the
flower and the cake. Now the police model, one's mood light or live
wherever required. Mood light or live
wherever required. I decided to add
one more leaf on the top, defining a seat belt. The live with the slight or live with least we're done with
the light all for now. Now going back with
this malachite green, defining the scope
of the leaf as well as adding the
midrib and the veins. Doing the same for
the rest of the leaf, starting with
redefining the sheep are now adding the
midrib and the veins. These defining the shape of the leaf as well as
happening the leaf. Once again, adding the midrib and the veins by overlaying. Moving on to the left at the front with the
smell aside green. And finally moving
on to the leaves at the backward, this
malachite green. Moving on to the
set of the three leaves with this male aside, green, defining the
shapes of the leaf, adding them in groups and the
veins again by overlaying, are now moving on
to the setup tulips with this melanocyte ring. With this, we're done with them. Lsi green for the leaves. Moving on to the
hydrangea flower. To keep the second
project simple, I'll be only using
verbal hydrangeas. Now going in with them all, applying medium pressure but
the small for the flower, filling them up
with other flowers. We go to the other side, filling them off with
a two hydrogen years, filling them up
with other flowers. And finally moving on to
the back of the cake, applying medium presser
with this wall. Moving on to the other
flower with demo, earning a little bit
of more and more, we get an innovative
but required. And with this we're
done with them always the primary lever
for our hydrangea flowers. No blending in with this violet, starting with the flower at
different with this violet. Violet on the top right side
of the hydrangea flower. Now moving on to the
flowers on the other side. Finally, moving on to the final four hydrogen use
flour and the bag. Also defining the outlines of the hydrangea flower
with this violet. With these, we are
done with the violet for the last four flower, or the more violet wherever required for the other flower. And with these, we are
done with the violet. If I need to add the
highlight for the flower, I'll be using this light gray. Going in with this light green, adding this light gray
on the top left side of the flower, applying heavy. But instead of with
this light gray applying how we preserve it, this light green
overlaying it is sparsely on top of the
light purple and violet. Light purple. But the mall. With these, we are done
with our second project. See you in the next video.
14. Conclusion and Thanks: Congratulations on
completing this class. I hope you have fun with this class and learned
something new. If you have any
doubts or queries, you can ask me in the
discussion section. And here we have
finished the project. Please upload it in
the project section. Also, if you enjoyed this class, let me know your
thoughts on the class by leaving a review in
the review section. Eagerly waiting
for your projects. Thank you. I have also included
two bonus video, how to add the
fixative script to your painting and another
drawing of three pound cake. See you in the next video.
15. Fixative Spray: In this video, I will
show how to apply that fixative spray for your
drawing to preserve it, as well as to avoid
this matching. For this, I'm using
this ERP nuts artists for hotel before use. Start to spray hard. You only make keeping the
spreading of the paper. This way to spot from the screen will
disappear when it dries. Wait for it to dry
for four to 5 min. Notice screen for
the second painting starting in spring horizontally. Since this week,
say tips are toxic, always be unmasked
when using it. Let it dry for the
four to 5 min. Since the first layer of
his prey has already dried, I'm going in with
a second layer, this time adding the
screen vertically, leaving it to try for
another four to five minute. Now moving back to
the first painting, applying a second layer of the spray coating in
this vertical way. Now letting it to try for
another four to five minute. Now it has dried. You can see a thin layer of glossy surface has developed on the surface of the painting, thus preserving the oil-based
or for a long time, as well as preventing
smudging on the surface. With this, we are done with the demonstration
for the screen. See you in the next video.
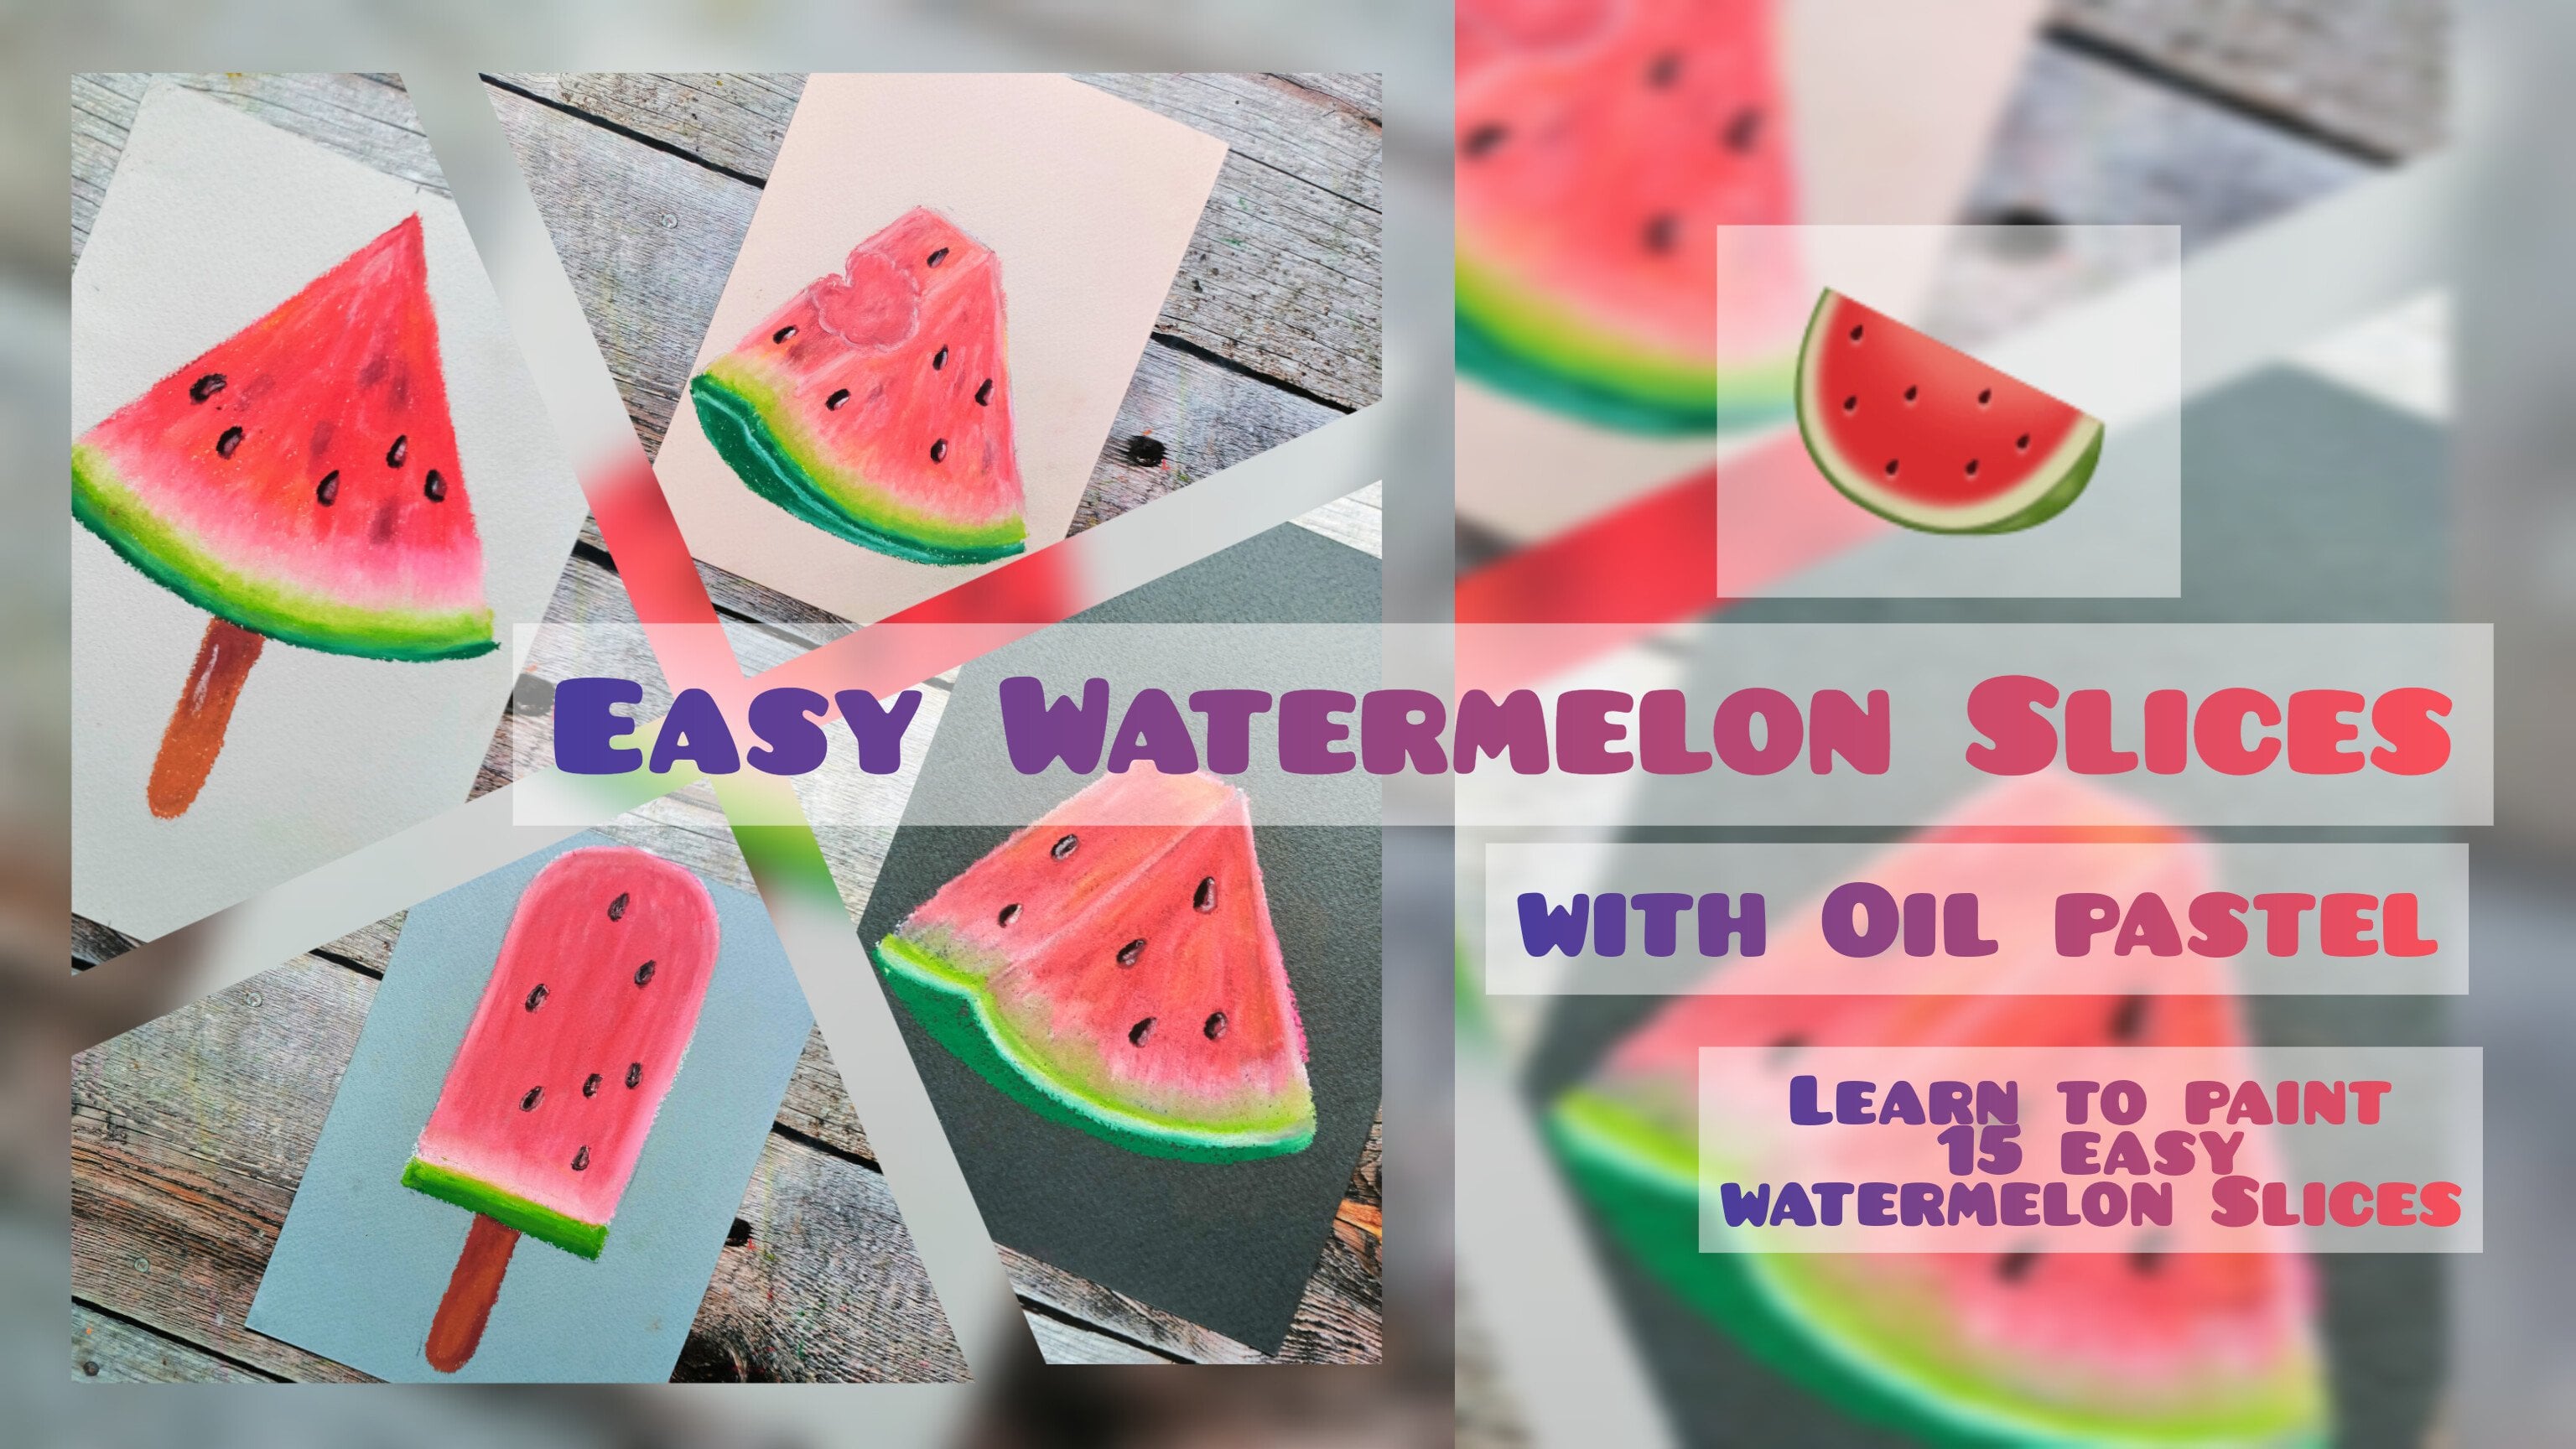
16. Bonus Three Cakes Sketch: For this bonus video, I'm starting with a sketch
for the three gigs. This time I'm using
black Bristol paper. Since this bonus video
has three cakes, I'll be following the same
process that I told you. That is starting
with this graph. Drawing another line behind that is parallel to the
front of the square, extending the Padlet line from the edges of
the square root. Now connecting the
parallel lines at the end, adding another line at
the back of the scale. And finally connecting
it with lease. We're done with the basic
sketch for the first case. The second case, I'm
starting with the losing some of the lines
from this first gate. Continue making this
fits for this graph. Sketching the other two sides of the square and finding
closing the square. So I am having trouble with the placement of
the parallel lines. It is in the front
disappeared completely. I was having problems
starting from the front. So I decided to
start from the back. Getting the parallelogram
for the top of the key. Those getting this
grant for the front. It's in some of the lines
to make there just Min node defining the reason
the back for the cake. With this, we're done
with the second case. Moving on to the third
and the final one. This one is behind
the middle key, starting with this threat
for the front of the deque. Extending the state of
parallel lines from the upper corner of the square
for the top of the gig, going to ping their
parallel lines and it's getting the
rec for the cake. And now adding the cost
for the top of the cake. It is in this spirit, laid
on the top of this grid. With these, we're done
with this kit for the three gigs of
the bonus video. See you in the next week where
we'll be coloring McCain.
17. Coloring the Three Cakes: In this excellent bonus video, we'll be coloring the kink, starting with a whiteboard,
the first cake. By finding the outline of
the cake with this white. Earning the right foot,
the front of the king by overlaying it on top
of the pencil escaped. No Arduino IDE over the
outline of the second king. Hardening the lead
for the crust, for the front of the key. Defining that include on
the cake with his wife. Coating the entire top of this cake with the white
by applying low presser. Now adding the light
for the sides as well. Finally adding the whiteboard, the front. With needs. We are done with
the white for now. Now I'm going in with the black. I'm using this black to darken
certain digital the key. It'll be earning this black
on the top of the cake, as well as on the
side of the cake. Outlining the side of the
cake with this black. Adding a little bit of black on the side corner for the key. Adding water streaks of light
across the top of the cake. Adding some black
for the front of the k between the upper side
of the cake with more black. I can read these. We are
done with the black. Now I'm going in
with the stressor, starting with surrounding
the black with the thoracic, as well as overlaying it a
little bit on the black. Defining the code
outlined in the dataset. Moving on to the
side of the cake. Now or what lingers on top of the white board link this
receptor on top of the black. One linguist doesn't
on top of the black for the front of the key. I think some order
set on the top. And with this, we're done
with the rosette for now. Continue forward with them down. Well, what linguists
brown on top of the white, black
and the rosette. A blank Jaime, but instead
of with this doubt overlaid on top of the
rest of the color, covering the entire top of
the cake with this brown. Moving on to the front side
of the cake with this brown, or what lingers
Brown by a blank, obviously sell enough coating
the sites with Deborah and these were done with them around continuing forward with the golden yellow. Starting with the
top of the cake with this golden yellow. Adding this on the front and overlaying it on
top of the outline. Some on the side. I think a little bit of mode,
golden yellow on the top. And some here and there. Going back once again
with this desert. Applying hype this at
about this in a second, covering most of
that space with it. Adding something to
sit on the front. Adding it on top of the black. Aren't we need, we are done with the reset. For the insights. I am starting with the brown, creating small circles with the brown overlaying a little bit of black
on top of the brown. Now going in with a lemon
yellow and using the stippling to create the tax ID
for the inside as well. Let's overlaying
this lemon yellow on top of the brown
and the black. Continuing to create the stippling with
this lemon yellow. Completely filling
in the insights of this first peak with
this lemon yellow. And with this we're done with the lemon yellow for the
insights of this first gate. Going in with the white as the final layer for the insane. Applying heavy. But
instead of at the slide and overlaying it on top
of the other colors. Now using the stippling
with this white to maintain the texture
of the inside. I think the white on
the edges of the crust. And with this, we are
done with our first gig. For the second one, I am directly starting
with the black. I'm using this black to bring the data fits it for the key. Using the black to bring
darker set for the cake as when I'll be overlaying another color on top of the black, part of the light will
be clearly visible. Hiding the Blackboard site. Hello, At least we're done
with the black hole now, continuing forward
with the brown, adding the brown on
the top of the cake, adding a little bit
on the top of the black and other on empty space is hardening never
down on the side. With these, we're done
with them around. Now going into
windows are in this yellow covering the top
with this orange, yellow. Well, what LinkedIn
or a nice yellow on top of the brown
and the black, completely covering the top of the cake with this
orange to yellow. Adding the stokes
from the other side and waiting in the
middle of the key. Completely covering the top of the cake with this
orange, yellow. And with these burdened with
no or a nice yellow for now. Going back with the blackboard,
the front of the cake. Now overlaying them
around on top of it. Now going back with
the ordinal scale of overlaying it on top of the brown and the black for
the front of the key. Adding the ordinal scale
up all the sides as well. Adding some ward or in
this yellow on top. Who could eat the variation and texture for the top of the cake. I'm going back with this brown, earning long streak of
brown on the top of the cake on the sites as well. Now I'm going in with
this rosette and overlaying most of the
receptor on top of the brown. Adding little sit on the side. Well, what Linda's does it
for the front of the crest, for the k. Moving back to the top of the
cake when this vesicle. And now to finalize the kick, I'm doing Mac Windows
or in this yellow, applying heavy pressure with
this odd in this yellow to overlay it on top of
the rest of the color. That is the black, the
brown that I said. Powderly covering the top of the cake windows
are in this yellow. Moving to the site when
the oranges, yellow. I'd been disorder in this yeah, Linda front by
applying heavy prison. Now for the insights, I was starting with the black creating small dots and circles, adding down on top of it. And now going into
with the ocher, whittling this ocher on top
of the brown and the black, creating stippling
marks with this ocher. And finding going in with
the white willingness, white on top of them around
the block and the output completely covering the rest of the inside with this white. Completely covering the rest of the inside with this white,
the stippling marks. With these, we're
done with the inside, adding some more
white on the sides. And with this, we're done
with our second kid. Moving on to the card game. Like the second cake, I'm
starting with a black. Adding the lungs
speak of the black on the top of the cake as
well as on the side. And moving into to the side with the black, creating long streets
with this black. Adding some more black
for the top as well as overlaying it on top
of the pencil sketch. Now continuing forward
with the brown, adding comparatively
smaller streets of Brown across the
top of the cake. Moving on to the site of
the cake with this brown continuing to create
the smallest streaks of bone that runs the
side of the cake. With these, we're done
with the creation of streaked with it. Some don't. And no continuing forward with
this oranges yellow thing, even the smallest
weeks as compared with the brown and adding it
on top of the brown, as well as adding it on
the sides of the king. Moving on to the side
of the cake and doing the same thing even the smallest
weeks with the oranges. Hello. And with these, we are done with the
ordinal scale for now. Finally going in with
the golden yellow, overlaying this golden
yellow on top of the brown, black and not in this yellow line medium for server this artemisia learn covering the entire top
region of the cake. In England that
it's another stroke and completely filling the top. Filling the rest of
the empty spaces with this golden yellow. Overlaying this golden yellow on top of that pencil is good. And release we're done
with the golden yellow for now. Now for the friends. I was starting with, overlay it on top of the pencil escaped. Louis minimum the
odd in this yellow. Adding this ordinates
yellow below the brown. Now going back with
this golden yellow, starting with the
front of the cake, overlaying this golden yellow on top of the brown and
odd in this yellow. Moving on to the site with this golden yellow
doing the same as the top or what lean that golden yellow on
the top of the black. And odd in this yellow. Finding the outline with
this golden yellow. Covering the entire side
with this golden yellow. With these two are done
with the golden yellow for the front of the cake, the top of the cake,
as well as the side of the cake. No further insights. I'm starting with a Black
doing the same as the idea took a fitting small dots in
the circle with this black. Now I'm adding some streaks
of auto nice yellow. And with these we are done with the other nice yellow for
the insights of the cake. Now, going in a bit this white and overlaying it on top of the black and all the nice yellow on the upper left
side of the cake. Finally going into the solvent for the rest of the
insides of the cake. A blank, heavy preserved with
this element and creating a stippling mouth to cover the entire insights of the cake. Earning the stippling bar near the edges of the
insights of the cake. Applying heavy pressure with this element to create
more stippling mud. And with this,
we're done with the basic of coloring
for the three cakes. See you in the next video. In the next week
you will be adding flowers and the leaves.
Would the cake.
18. Leaves and Flowers for the Three Cakes: Now moving on to the leaves. Here, Damon, starting
with a dark green. I want starting
with this, getting their guideline for the matrix. Later on, I'll be adding
the leaf on top of it. Adding clean water
with lips indifferent. A non-defining the outline of the leaves with
this dark green. Adding the outline of the leaves for the first three, Madrid's. A now moving on to the
other side, or Linda's dot, we were on top of the
cake to add another e. Adding another set
of tools for this cake. Adding another set of tools
for the back of the cake. Apart from this dark green, I'll be using Olivia
and light olive. Starting with Olivia. Know, going in with a
lighter live feeling in their lives with
the slight olive lead when they started the Olivia, I was not able to overlay it on top of the
insights of the cake. So I decided to use light or live instead
of the old yellow. Now using the slight olive to overlay on top of the
inside of the cake. As you can see, I am
somewhat table to overlay this color
on top of the cake. Trying it on the
three set of leaves. Moving on to the
lips and the front. Now continuing forward to add this light only for the
rest of the leaves, are adding the light only
for the leaves at the back. Now for the three sets
of Lee, as you can see, I must do unable to properly overlay the light or
live on top of the cake. No need to worry about that. We will be adding the
darker shade of green. We will be making the
adjustment to the leaves are in that darker shade
of green will be properly overlaid on
top of the leaves. Adding more light olive
for the other leaves. With these iron under with
a light or live for now, going back with an RFP for
any darkening the seat belt, the leaf, as well as
adding their midriff. And that means coming out of it. Moving on to the leaves and
the liquid is about green. Know, but the thing that leap in the front are doing the
midrib and the veins. With these, we are done
with the least for now. Moving on to the flowers are starting with a light bulb
well as the primary layer. Adding a little bit
loud or doesn't do it. Now going into it, this
buddy wrinkled view, I think you're on the top
left side of the flower. I'm finally going in with this lilac are linked below
their periwinkle blue, as well as overlaying some of this lilac on top of
the periwinkle blue, going back with a light
purple and overlaying a little bit of weight on top of the allylic and the
fundamental blue. No further it hydrangea. I am starting with this
element as my primary color. If I knew the CBO of the
flower with this element, adding another flower
or just intuit. Enough willingly
insights with this L1. Now going into it that Scarlett, Scarlett on top of this element. Finally going in with
the brown content, creating this brand on lower
right side of the flower. Another great idea behind the
first and the second gig, starting with this element. Now, going into the red, I am adding this
flowers are randomly. I'll be adding few
more flowers here. And then finally going
in with the brown. Adding another popular opinion
just behind the escape, I'm starting with
a light purple. Now going in a bit,
this bit of Intel blue. And finally adding the lilac. No earning another great
idea behind this first cake. Now, starting with this element. Well, what linguists
call it on top. And by adding the brown. Now adding the final hydrangea, holding this hydrangea in between the first
and the second cake. I already started
with this element, what linguists call
it on top of it. And finally going in with the brown most element to lighten the color. A little bit of a scarlet. And now adding the purple, I didn't get in between the
second and the third cake. Starting with overlaying
this light purple on top of the
insights of the cake. Applying high pressure, but
this light purple to overtly. Now going into this, but it wrinkled blue for
the second layer. Goading the light purple
with this periwinkle blue. By me going in with this lilac, adding some white to
lighten this flower. And finally the last
flower for this bonus, we knew another purple
hydrangea flower. Behind the first gig. I'll be adding the leaves
after finishing this flower. Now adding the periwinkle blue. And finally the allylic
near the edge of the cake. Moving on for the leaves,
starting with a dark green, this getting there three midrib, adding the leaves
surrounding the midrib. So going into it,
this light olive, spilling the insights of
the live with this light or blue light olive what the third and finally, no, going back
with a dark green. Redefining the tip of the leaf, as well as adding the
midrib and the ring. These we are done
with the flower and the leaves going in with the white for
the final highlights. Mainly adding this white on the edges and the
outlines of the cake. This part is optional if you are satisfied with
your painting, the original need
to add more color or make any adjustment. Since I was satisfied
with my painting, I decided to add some more color and make some adjustment. Now, going into it, that golden yellow
for the third cake, adding some golden yellow
on the top of the cake. Hardening a little bit of
golden yellow on the side. For the second cake, I'm going in with
the ironist yellow, adding a little bit of
ordinance yellowness. Oh, I'm laying this out in
this yellow on top of the brown. For the first kick. I'm going in with that said, adding another layer on top of the kick in the form of
the contour of Nicky. Overlaying some brown
on top of the stressor. I mean this brown near
the edge of the cake, as well as where
the motif touches. Going back with a light or
live for the few leaves. With these, we are done
with our bonus video. I hope you enjoyed
this bonus video. See you in the next
class. Happy painting.
 Vishal Munshi