Transcripts
1. Welcome and Introduction: Welcome to this class on easy by term loans licensed
with the ILP. Still, in this class, you will learn to sketch
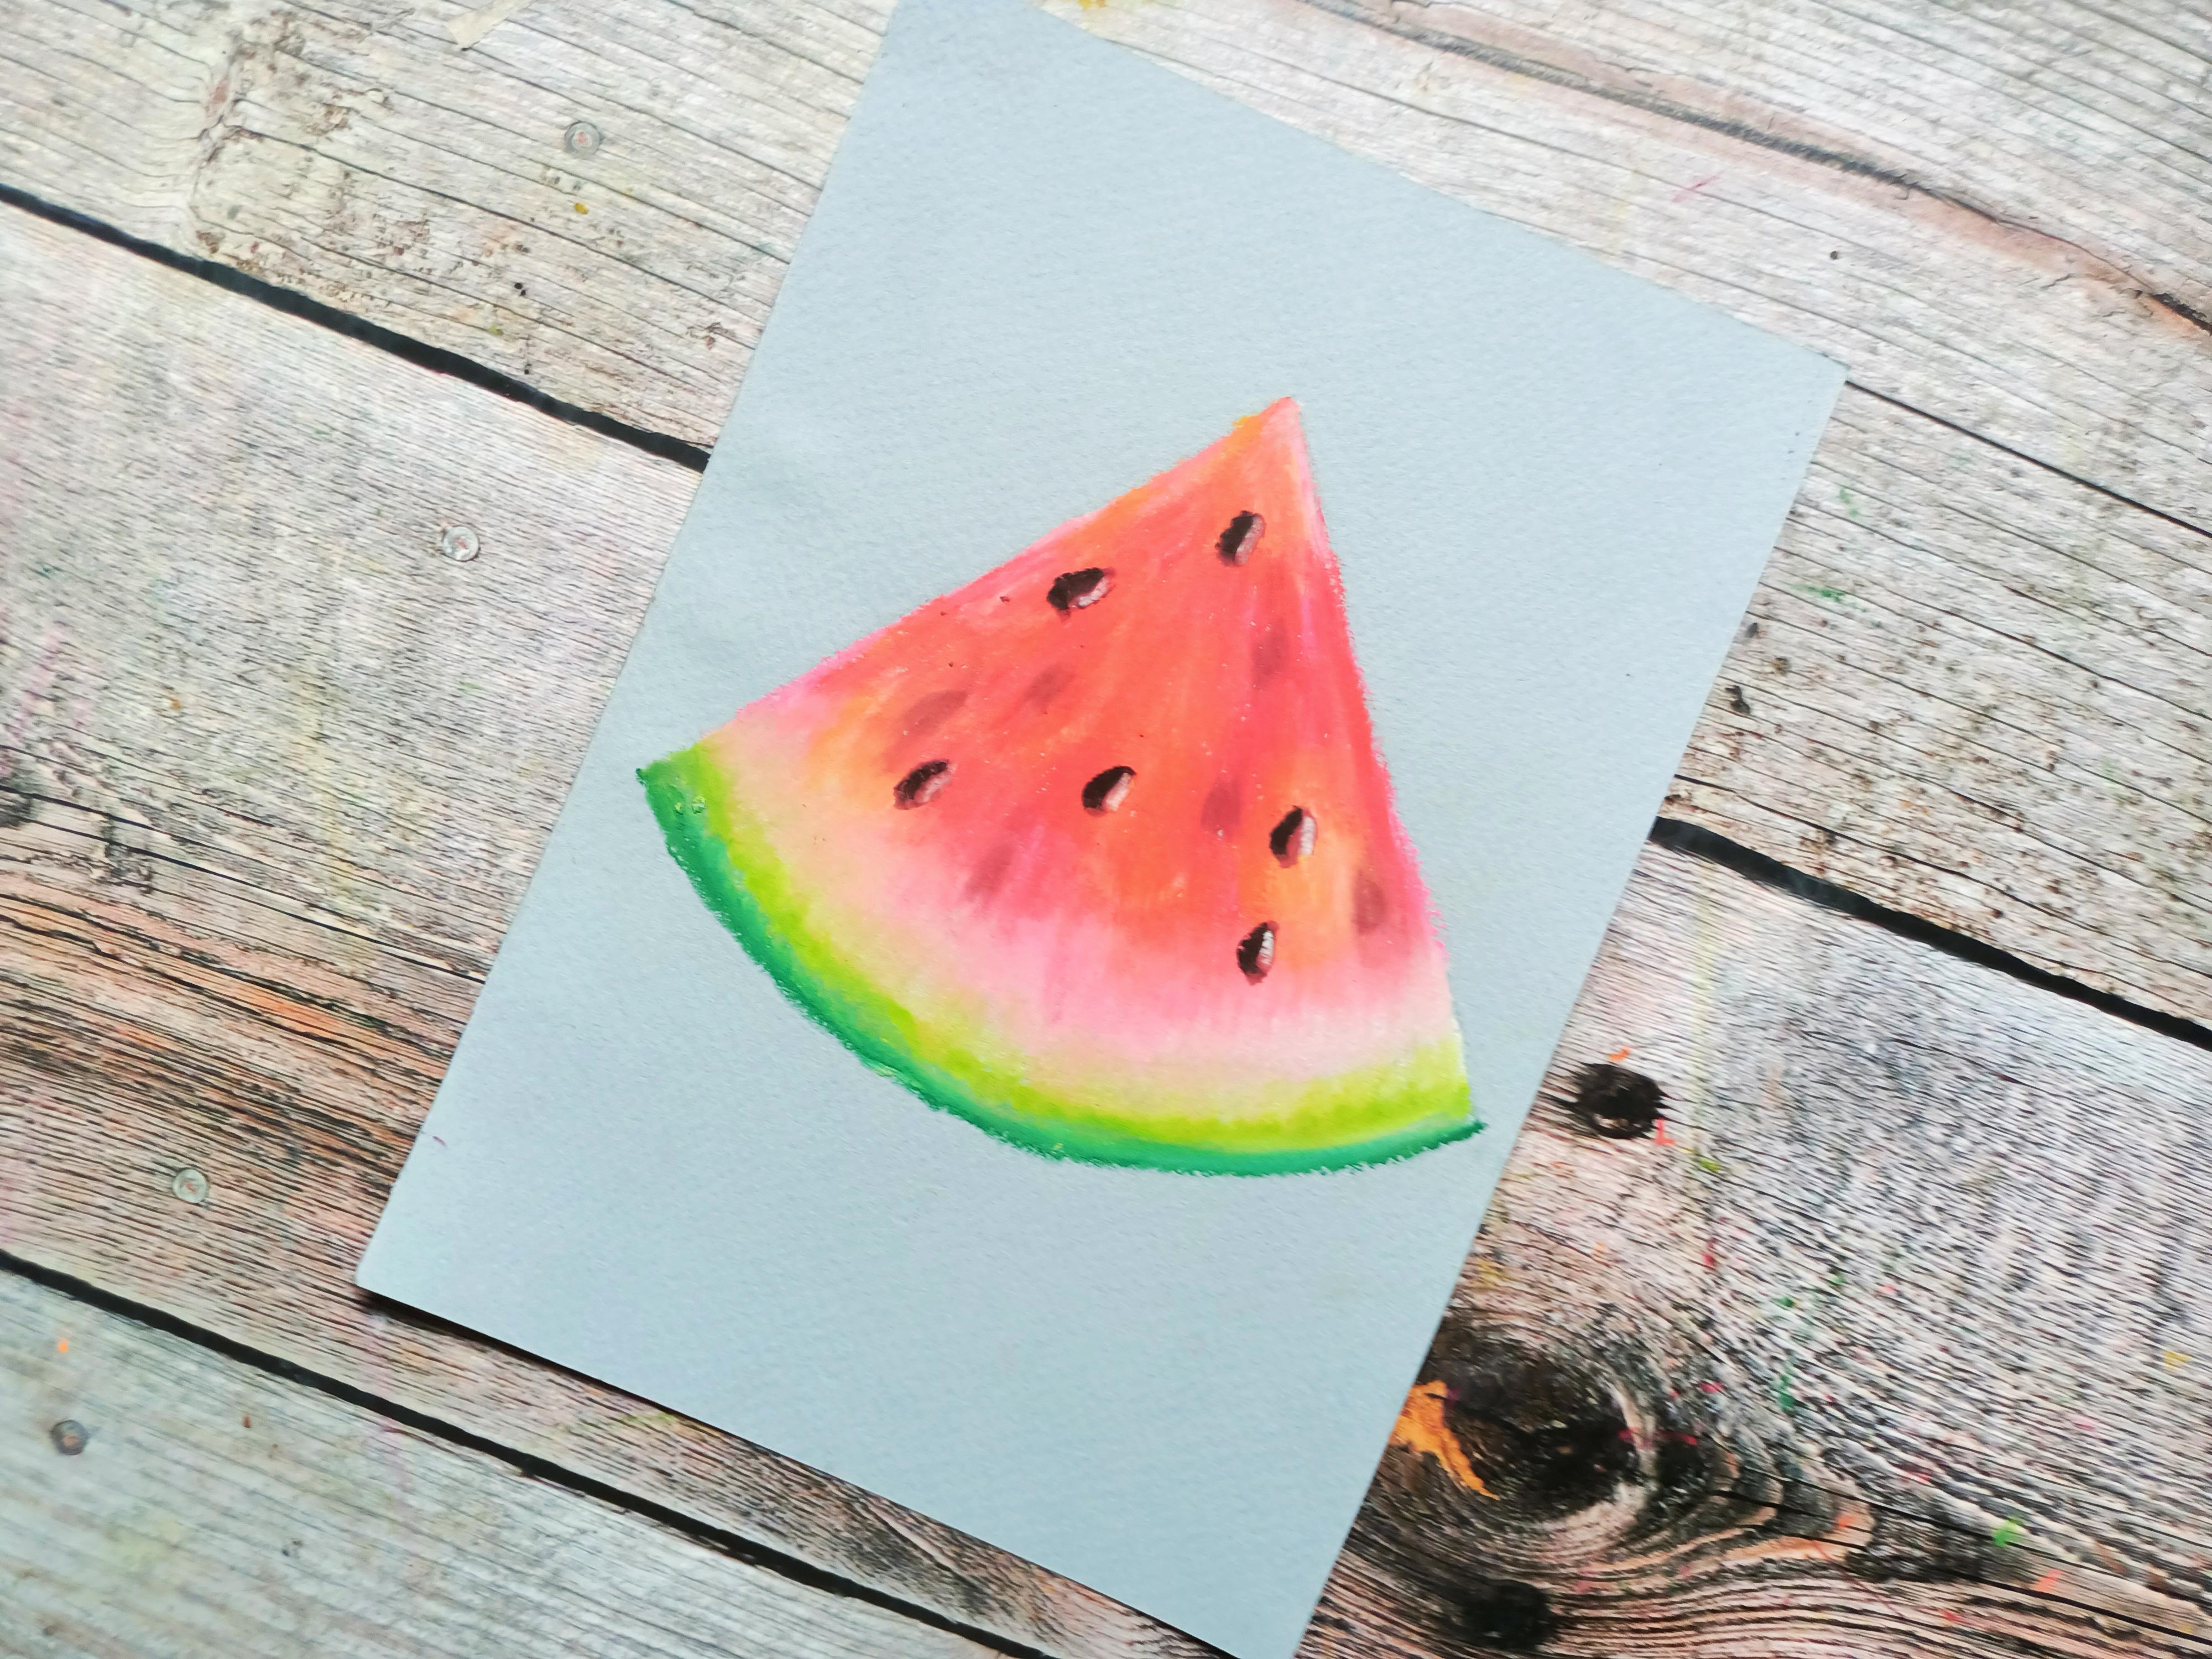
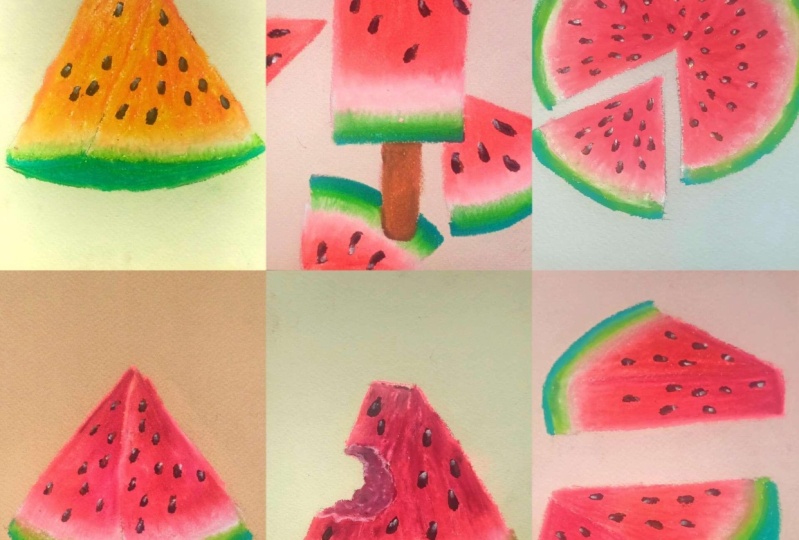
and draw this 15 Beautiful, easy and vibrant
watermelon slices. We will be drawing
the watermelons licensed have different
shapes, sizes, and different colors, along
with one watermelon popsicle. This class is for the
beginner and intermediate. You don't need
much knowledge for the ILP style to
start this class. This class is beginner friendly. All the videos are in real time, so you can join along with me. By the end of this class, you will be comfortable
with blending the colors. Use different pressure and few of the techniques
for blinding. We'll start the
class with the basic introduction to the ILP still like strokes preset
and some techniques. Then move on to
the consistency of the color and
overlaying technique. After that, we'll move
on to blending and gradient equation for
the watermelon slice. Then we will move on to the different color
that you can use. After that basically is getting for the bottom line slices. And finally, the 15
watermelon slashes. This perfect and
Martin learned slices are divided into five parts, starting with the
six simple slices. Then move on to the two-fold
slices of the watermelon, followed by three different colored slices of
the watermelon. Then we will move on to the two-by-two Milan
on their sticks. And finally in the
last two slices, parallel and facing each other. Hi, my name is Michelle and I'll be your
instructor for this class. My profession, I am
a civil engineer and I'm an artist
space debris near. I have few more classes in
school and said that you can take and you can find me
either work on my Instagram. I hope you have fun
with this class and learned something
new and exciting, wishing you all the very best. See you in the next video.
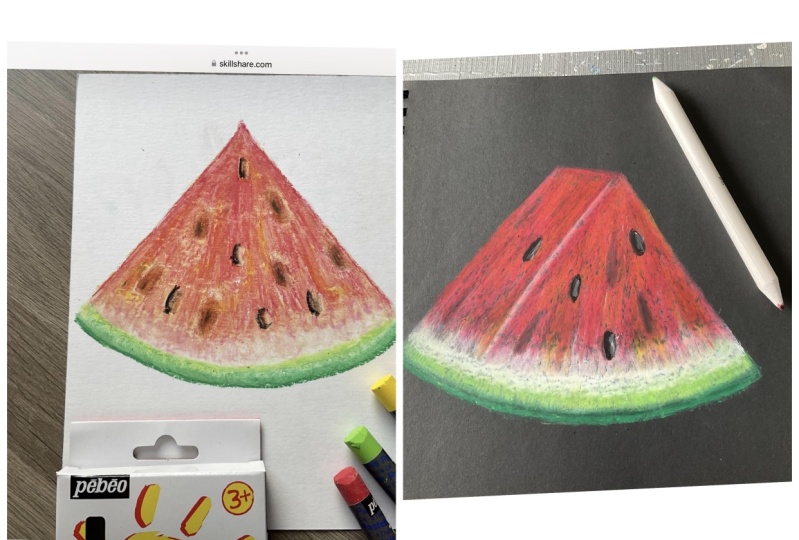
2. Class Project: For this class, the
class project will be uploading any or all of the
15 watermelons license. You can come up with your
own unique watermelon slice. You can also upload the
gradient that you have created. Please upload a project
so that you can share what you have learned with
me and other students. Don't underestimate
leaving a project I personally tear is
all your project. Eagerly waiting
for your projects. Happy painting. See
you in the next video.
3. List of Supplies: For this class you
will need a pencil. It isn't subnet masking tape to secure the people for blending you will
in tissue paper. Here, tips. Blending stump. Still people are better off more than 140 decent
thickness will do their work. And finally, the ILP style for this class I'm
using Bruce dose, artist ILP still see
you in the next video.
4. Oil Pastel Basics: Starting this first
demonstration, we deal with some of the
basics of the oil-based. Oil-based tools are very
versatile in nature. They give vibrant color and
are easy to carry any news. Mining techniques
can be used with ILP cells like
catching a stippling, crosshatching, blaring,
overlaying, et cetera. The starting this demonstration
with the strokes, with the oil-based,
you're going to create a variety of stokes. Creating some strokes with the oil-based a
wedding in thickness. Here I have created thin and thick strokes depending upon the
side you are using, as well as the pressure
you are applying. The sleep and the side of
the strokes will differ, will be using the thin
strokes for the outline and the thicker strokes to
fill the rest of the colors. Now moving onto the
same techniques, starting with the hatching. Hatching, I mean creating
straight-line pulsating, moving on to the cross hatching, creating crisscross lines. And finally the stippling creating random strokes
with the ILP still. For our class project, we'll be using a little bit of hatching and
stippling technique. Now moving on to the
operation ILP stands are very pleased as sensitive. And the present are generally categorized into three types, starting with a light pressure, lowering onto the medium tracer. And finally, the heavy patient will be mainly using the
light and medium pressure for the upper part of
the watermelon slice and how we place it for the
bottom part of the slides, as well as for the seats
here at some of the example of using different pressure to create the three
different techniques, hatching, crosshatching,
and stippling. Now moving on to the
second demonstration using the medium pressure. Finally creating the hatching, crosshatching and stippling
using the high repressor. Here's another demonstration of using a stippling technique. This time I embedding this
item that random strokes, starting with the
smallest strokes and moving up to
the large strokes will be mainly using
the medium when the loudest looks for
our class project. With these, we are
done with the basic introduction with
the oil-based still. See you in the next video.
5. Consistency and Overlaying: Starting the second
demonstration with the consistency
of the colors, starting with the three
different position, the light pressure,
medium pressure, and finally the heavy
place it may consistency. I mean, when I mix the color, how uniformly the admixed. Starting with blending
the first one. Moving on to the second. And finally for the third one, there is no need to blend. As you can see, the mixed color by blending it most uniform in the heavy pressure and decreases with a medium
to light pleasant. Now carrying on with
the demonstration, this time I'm using two colors with the three different
types of pressing, the light pressure,
medium and heavy. Finally, with the
heavy pressure, this pellets are just overlaid a little bit on
top of each other. I'll be adding the colors in the scene men in
the main project, but instead of little
bit of overlaying, I'll be covering them
most of the colors. Second set of the colors I'll be covering when on
top of the other. This is what we mainly
using in the class project. Moving on to the second and finally the third
with the heavy pressure. Now let's blend the colors. As you can see,
the consistency of the mixed color
increases from low to high pacer mean evenly using the medium pressure
for our main projects. Here's an example with the green using two sets of the green, covering the light
green a little bit. And now I'm going in with the
Q-tip to blend the colors to achieve a final
consistency and uniformity. Now moving on to another example with the three
colors that we'll be using for our base.
Stacking with the white. A little bit of light lean, finely going in
with a dark green. But all the three
colors I've applied a little bit less precise
than the heavy pressure. Blending the colors to
a smooth consistent to create a transition from
Darwin to the white. Now moving on to the
overlain by overlaying, I mean, adding one color
on top of the other. Different blending
the two colors are for adding another
layer of color, but not blending it with
the rest of the colors. Here's another example
of how we will be using it to draw the
watermelon slice. Starting with white, applying
low to medium patient. Overlaying a little
bit of yellow, a little bit of
fluorescent hot pink. And finally going in with the vitamin would lead one
color on top of the other for the purpose of
lending to create a layer of color with variation ranging from light
to heavy chains. Blending all the colors together to achieve a final consistency. Here's a second
example of overlaying, adding brown with
a heavy pressure. And to save the light
hand side is where the seed will be using
black and white. So generally we will
start with the medium phasor for overlaying
prior to blending. And after that will be blending the overlaid color together
with them underneath color. And on top of that will
be adding the seeds. So here the example with
the two calendar with the medium present
that I'll be using for the blending in
the main projects. Going into the same two
colors as the above. I use the same two colors as the above with a medium presser. And the last time
we did not blend. And now going into the
blending stump to show you how when we blending the
colors with the medium racer, blending the two
colors together. After blending the colors, I'll be adding the
seats on top of it. For that, I'll be using a
lead oxide are well-known. And on top of the seats, I'll be using black on one side and white on the other side. And using that white to blend
the black with the brown. Here's one more example,
starting with the light. I didn't see it with the brown, pink and about 1
million on top of it. And now blending all the colors. The purpose of adding the seats
I'd like to are depicted. There are seeds present
beneath the top layer, has some of the brown could be easily seen even after blending. Now writing the seat
present on the top, going in if the
black and the white. And with these, we are done with the consistency in the willing. See you in the next video.
6. Blending and Gradient: Moving on to the third
demonstration video. In this section, I'll
be showing new blending two or more colors and using
different tools to blend, as well as how we will be using the blending in
our main projects. My gradient, I mean creating a smooth transition from
one color to another color, generally from a dark
gray to a lighter. Saying. For the general
demonstration for blending, I'll be using three
primary colors, yellow, red, and blue. But this was a demonstration. I'll be blending by overlaying and applying heavy present, starting with the combination
of yellow and red. So you can see the
blending is not that moon and a very little determinants of orange couldn't be seen. Moving on to the red and the blue there to collect
and not blend. The blue got overlaid with
landing on top of red. Finally moving on to the
blue and the yellow, some green color can
be seen in the middle. So blending with the
heavy pressure is quite tricky depending upon
the color combination. Now continuing with
the same color, this time, I'll be
applying medium. But laying that in, a little bit of irony has farmed
in the middle. Moving on to the
red and the blue. A violet has found at
intersection point. Find me. The blue and the yellow being
can be seen in the middle. If you will apply heavy
pressure to blend it properly. Orange, violet, and green can be seen in the middle
of the two colors. We will use the medium
pressure to overlay and then blend the colors with blending tools to get the desired color. Here's another
example of watermelon slice creating using
blending with medium preset, starting with a
whiteboard outline, adding a little bit of
white for the inside. I think some fluorescent
push on top of the white. Finally going in
with the vitamin. Now going into with
a Q-tip and applying heavy pressure to blend
all coalesce together. That is getting another color with the variation in say it's the combination of the
three candidates are different from each
individual color. Now for the BCE, starting
with a dark green, I think light green elevate. And finally the
white on top of it. Blending the green together. This is different from
the earlier blending. This time, instead of using
overlaying technique, I'm extending the dark green on top of the light green
to blend with it. Moving on to the
red and the white, blending that in with the
white by extending the light. Finally for the
green and the white, I'm extending the green to
blend it with the white. This is how we will be
painting the project. I'll be using the boat
combination of the blending, that is by overlaying
and my extending. Being onto blending using tools, your tip, blending
stump and tissue paper. Creating small blocks with low
by applying medium vessel. For this first block,
I'm using Q-tip to lend to a final consistency. We mainly using YouTube to fill the insights of the slaves. For the second luck, I'll be
using the blending stump. I'll be mainly using the
blending stump or the ages and outline as the blending done with the blending
stump, it's precise. And Chris, for the final block, I am using tissue paper. You will have to fold
a TCP port five times. Using the pointed edge
to blend the colors, I'll be mainly using
the tissue paper when I'll have to
blend a lot easier without much various and
as it offers Laplace, Caesar and high uniformity. Moving on to another example, colors that I'll be using the main project and
blending using the Q-tip, starting with the white, adding some yellow overlaying
fluorescent push on top of the yellow
and the white. Finally adding never median. For the base, I'm starting
with a dark shade of green. Light green above it. Now let's blend the color, starting with the
blending stump. Blending of light
from the outside to a finite consistency with
this blending stump. Using the blending stump to maintain the sadness
of the outline. Now going into the Q-tip to blend the rest
of the inside this blending that aid
with the greens and the write-back sending the rate for the seats, I'll be using brown
or red oxide, creating teardrops
shape for the seeds. Now, going in with the
Blackfoot one side and the rightward other
side of the seed. Doing the theme on
top of the example. Now moving on to
the gradient for the watermelon, starting
with the whiteboard, the top, then going in
with a fluorescent pusher. If I needed 1 million. No blending the colors
together to create a smooth transition from
light to 1 million. Starting from the white and
gradually moving downward. So this will be the gradient for the top of the watermelon. Loving on to the
second gradient. Gradient for the
greens and the right, starting with the white on top. Adding light green, Willow, it finally going in
with a dark green. Now let's blend the
colors together. This time I'm starting
with the bottom, starting with a dark green
and gradually moving upward. So this will be the base
gradient for the greens. Finally, combining both the
upper and the lower part of the slides together to get the gradient for
the whole slice. Starting with the white.
Ink flow doesn't pusher. Going in with the vermilion. Going back with the right. Ending, the light
green. Finally going in with a darker shade of green. Now let's blend the
colors together. I live lightning this
gradient in two parts. Starting with the top and doing the same with the
flourishing push our extending it to the
right for blending. Blending never million by extending it to flow
does in pusher. Now going back to
the weighted median, extending it downward to
blend it in with the white. Bending the light
with the light green. It's only moving downward
towards the dark clean. Going back to the white
with the light green, blending once again, peeling
it a smooth transition. And with this we're done with the gradient for
the whole slides. I hope to get the rough idea of how we'll be using the colors from lending and creating
reading for the main project. See you in the next video.
7. Colors for the Watermelon Slices: Let's talk about the color that we'll be using in this project. I'll be using different
colors up we still people. So the result of the color wheel bearing for the upper section
of the watermelon slice, you can use fluorescent hot pink preemption,
who are million? Fluorescent orange, yellow
are in fluorescent orange. Apart from this, I'll be using fluorescent Scarlett and
fluorescent fusion also. I'll be using white, chrome, yellow, fluorescent hot pink. And we're mean for
the upper part of this lays mortal green, yellow, green, and the light toward the bottom of
the watermelons lays for the seats in this deep, for the watermelon slices, raw sienna, and when like brown. Apart from this, I'll be using the red oxide and
black and white. That's where the greens you can use bottled green, yellow, green on green, or any other two combination of the light green and dark green. Mainly I'll be using
bottle green and the yellow green family. I'll be using white, chrome, yellow fluorescent hard spring. And we're mean for the
upper part of the slice. Mortal green, yellow, green, and the white fur the bottom
of the watermelons lays. And that's where the
seeds, I'll be using, the red oxide, black and
white. That's what they stick. I'll be using raw sienna, brown and red outside
of art from this, we'll be using black, white, and wrong will see you
in the next video.
8. Watermelon Slice Sketches: Now moving on to our
final demonstration on this malware is
getting the license. Growing their watermelons
license is very easy. It all comes to a simple
shape of a triangle. And for the triangle will be
just adding and cared for the bees to transform it
into a watermelon slice. Make it even more simpler. You just have to do an inverted T. The vertical line will define the height of the slice and the horizontal line will define
the width of this slice. And finally, to finish this
advocate for the base. Now moving on to
the third example. Following the same instruction, starting with inverted T. If finding the site. I
think the carpet dummies. And for the side, adding
another parallel line to the right and
connecting it to the bees. Doing the same for that
current by extending it. Now moving on to
the fourth example, this time the left
side is visible. Let's actually a straight
line for the top. And now started
with a seeming to be following the same procedure. And finally adding the curves. Moving on to the
next example mode, the sides of the vitamin
learner equally visible, sending me the
middle lane and then turning it with the
outline of the watermelon. You can escape the same
by using the inverted T. So here the same example using inverted T as a reference
to escape the slaves. For this slice will miss getting a slanted slice of watermelon. Following the same procedure, starting with the inverted T, state may miss getting
this length and inverted T. Finally,
adding the curve. Moving on to the eighth example. For this will be sketching
a slice on the ground. The starting with a long
rectangle for the visible side. No, using the inverted T to
draw the rest of the slaves. By me adding that good. Moving on to the next example, watermelon slice with
the unequal sides using the intersected
inverted people, the beast. And it's getting the
rest of the outline. For this next example. The bottom of the watermelon
slice it invisible, starting with the
gut. But the myth. Now using the inverted
T to draw the rest of the slaves with them always. And finally, moving on
to the final example, watermelon obstacle, using the same inverted T for the height and the
base of the popsicle. But instead of
cardboard dummies, adding the curve at the
top, extending them nice. And finally adding the
stick for the popsicle. Put the seat will be skipping the seats in
the fall of teardrops. With these, we are done
with the basic sketch. Now going into the
black marker to darken this gate using the inverted T as a reference. We go into the third slice. I think the seeds foot
slice with the seeds are cleaning the fifth slaves. Moving on to the sixth
and seventh place. Now to the eighth place. Finally the last two
slices and the popsicle. Moving on to the popsicle, erasing the pencil marks. I forgot to add the
seed for the popsicle. And with this, we're done with the final demonstration, renew.
9. Normal Slice of Watermelon: Starting with our past,
light up the watermelon, starting with a straight
line in the middle. Me finding the sites
of the watermelon, starting with the left side. Now moving on to the right side. Getting the beats with
another straight line, earning the cut for the base. Now we're using the guidelines and lightening the
ventral months. And with these, we are done with this kids for our first slice. Let's paint starting
with the white, adding a little bit of
white on the sites as well. Now creating small wins with
the white in the middle. And with this, we're done
with the white for now. Going in with the yellow, I'm using chrome yellow overlaying a little bit of yellow on the edge of the white, as well as surrounding the
white with this chrome yellow. And with this, we're
done with the yellow. Now I'm going in with
the brown for the seat. The Brown, I am
using a little side. These states are
inside the slave, so only a little bit of it will be visible after the overlaying. Now I'm going in with
a fluorescent pink starting from the top of
the watermelon, slice. It, laying it on
top of the white, the yellow and brown. And completely
filling the rest of the insights with this
heart fluorescent pink. Gradually moving downward with this hot fluorescent pink
covering all the colors. But this heart fluorescent pink. Finding the right outline of the watermelon slice wing to the bottom of the
slides and adding the pink and defining the
curved section of the slides. With these, we are
done with the hot fluorescent pink for now. Continuing forward
with our mean. Overlaying this 1 million on top of the heart
fluorescent pink. Now covering all the
pink with this one mean, mainly concentrating this wormy on the middle of the
watermelon slice. Now moving on to the
bottom of the slave, going in with the greens. Here, I've already started with a bottle green for the
bottom of the slays, me finding the outline
on the slides, but this bottle green know our namely yellow
green above it by leaving a little bit of
a space in between them. Going back with the
hot fluorescent pink as the gap between the greens
and the pink in the middle. And on the right side is
comparatively bigger. Fining going in with the white, starting with filling the white in-between the pink
and the green. Now over LinkedIn white on top of the heart,
fluorescent pink. Better blending for the
smoother transition from the hot flow doesn't bring to the right and to the greens. And now adding the white
in-between the greens. Lastly, I need some
whites wherever required. And release we're done
with the basic colors. Continuing forward with
blending the colors. I'm starting with this
blending stump so as to define and blend the edges of the slice to avoid blurring. Blending the bottle up into
a smoother consistency. Continuing forward with blending the two greens with
white in between, I am blending in circular
motion with the blending stump. If you prefer Q tip,
you can use those. Learning the Lord brings 1 s to get a
smoother transition. Moving on to blending the
light green with the white. I switched the
blending stump with a Q-tip for a quicker blending. Going back with
the blending stump for the edits of the watermelon, blending with the
blending stump to define the edges RPM to get a pinup
consistency of the color. Moving on to the other side. Finally, moving back with a
Q-tip to blend the insides. Applying heavy pressure
with the Q-tip to blend. All luck alert. Moving
downward with a Q-tip, blending them round seeds. Doug learning the hot
fluorescent pink with a white, changing the Q-tip phoneme, blending the pink now
white and liquids. We make once again to
blend the clean with the rest of the carrot to
get a smooth transition. And with these, we have achieved a smoother transition between the rate and the
greens. For the seats. I'm going in with that red
dot sine phi plus exceeds. You can add more if you prefer. Going in with the black, but whirling with black on
one side of the scene. Finally, going into the white for the other
side of the scene. Using this white to
blend the black with the radial site to get a
smooth color and release. We are done with our
first watermelons lays. See you in the next video.
10. Left Sided Watermelon Slice: Moving on to the second
slice of the watermelon. Starting with the left side. If finding the types
of the watermelon. Moving onto the right
side of the slide. The finding that nice with
another discrete line. Earning the gut or the miss. Anything the base
of the triangle. Finding lightening
the whole pencil is key with the region. And with this, we're done with the basic speech for
the watermelon slice. Moving on to adding the color, starting with a
white to draw with the pencil outlines
for the upper section. Now adding the light
further insights. Hi, my name is small means with the white ring on persecuting them meets
with the weight. And with this, we are done
with the white for now. Now going in with the yellow, I'm using chrome yellow, willingness yellow on top of the white without covering
all the white. And with this we are
done with a yellow. Moving on to the base of the
watermelon and starting with the bottle green for the
base of the watermelon, filling the green
for the left side. And with this we are done
with the bottle green. Now I'm going in
with a yellow-green. Yellow green by overlaying
it on top of the white. With this, we're done
with the yellow-green and the rest of the green. Going back with the white
and adding it in-between against the white above the yellow-green. With these, we are done
with the whites and the green for the base of
the watermelon slice. Moving back with but part
of the watermelon with the fluorescent hot pink filling the insight of the
watermelon with the spring, as well as overlaying it on top of the white
and blue yellow. Covering the rest
of the insights with this fluorescent pink. With this, we are done with
this hot fluorescent bring. Adding a little bit of
white for the edge, as it was not clear. Finding going in with the Batman overlaying this 1 million on
top of all the other color, that is the white, the yellow, and the fluorescent art being gradually moving towards
the right with our median. And with this, we're done
with the anatomy and the left age of the slaves
was completely covered. So I decided to add
white to maintain that crispness of the
edge and release. We are done with the color. Let's blend the colors. Starting with the
blending stump, blending the edges of the water main to a final consistency. Moving on to the white
line in the middle, blending the other
SQL final consistency and maintaining the
sadness of the edge. Switching the
blending stump Q-tip to blend the insights
of the watermelon. Starting with the top left
side, really moving downwards. Blending the colors
with the white. Moving on to the other side. It actually blending
the colors downwards. Now blending now right. Going in with another
Q-tip for the twins. Starting to learn Nahuatl
green with the white. Moving on to blindingly yellow, green with the white and Nevada to the rest of the colors. And with this, we're
done with creating the transition from one
color to the other. Going in with a brown
for the C. This time, I'm using the red oxide can add more feed if you prefer. Bringing them into Blackboard
one side of the scene. Adding the white
on the other side. Using this white to blend
the black with a red oxide, Burlington white,
and going back with a Q-tip to blend it with
the rest of the color. And with these, we are done with our second watermelon slice. See you in the next video.
11. Sharp Watermelon SIice: Moving on to the third
watermelons line, starting with a straight
line in the center, defining the bees with
another straight line, but stimulating
the length of the other tried using the pencil. Now adding this sign, extending another straight line mean for the side of the slides. Moving on to the right side. Finally ending the
cut for the base. Straightening the line a
little bit, and release. We're done with the
rough escaped lightning, the pencil sketch
with the eraser. Now let's color the
third watermelon slice, starting with the white. The white on top of
the pencil is kits for the upper part of the
watermelons life. Adding some white
for the inside. Now creating small
rings with the white. And with this we are
done with the white one. Now, I'm going in
with the yellow. I'm using chrome yellow
overlaying yellow in the middle of the white and surrounding the veins
with the yellow. And with this we're
done with the yellow. Continuing forward with
a fluorescent hot pink filling the inside with
this fluorescent hot pink overlaying it on top of
the white and the yellow. Gradually moving towards
the right with the spring. And with this we are done with
the fluorescent, hot pink. I'm going in with a brown
for the inside Teams. Adding few more seeds with the white finding going in with the one mean governing the entire upper part of the watermelon with
over 1 million. Overlaying this,
whether million top of the pink and the white feeds the red value moving downward with
this word median. Now going back with the right and adding it below the pink. Moving on to the other
side with the white. And with these, we are done with the upper section of
the watermelon slice. Now going in with the green, starting with a bottle green for the bottom of the
term, landslides. Now going in with
a yellow green, adding the yellow-green, green while leaving a little bit
of a space in-between. Unreleased, we are done
with the yellow, green. Going back with the
white and adding it in between the bottle green
and the yellow green. Now continuing forward
with the white and adding it above
the yellow green. And with these, we are done with the basic color for
the watermelon slice. Now let's blend the colors. I'm starting with
the blending stump, going in with the blending
stump to blend the white of the ages 12,
finer consistency. Moving on to the other
white edge line. And finally to the right side. Note learning that cleans
to a finer consistency with tarp page with this
blending stump starting from the left. Now changing the blending
stump for the Q-tip, starting to blend about
the median, the pink, the light yellow and
round are together, starting to bind with
the Q2 from the top, gradually moving downward
while blending molecular tip. Blending the color
near the right edge. Blending the load
effects and blood, forming on to the other
side with a Q-Tip. No blending that color
just above the white. And buy new blinding the
right and the pink and Nevada mean to create
a smooth transition. Gradually moving
towards the right while blending to get a
smooth transition. Now to meaningless height of the Q-tip and
blending the greens. Blending the bottle green with a yellow green with the
white in the middle. Gradually moving toward
the right while blending. Now going forward once
again with a Q-tip to get a finer
consistency of the green and find new blending
the greens to the red. Blending these three colors together to get a
find it all nice. And from greens to the rain. Going once again with a
Q-tip over the greens. And with these, we are
done with the blending. Now going in with the brown, this time I'm using
a red oxide folders, each black on one
side of the team. And finally going into the
white for the other side. Using this white to blend the
red oxide with the black. Adding one seat on
the other side. The theme going
with the black on the one side and the
white on the other side. With this, we are done with our third slice of the watermelon. See you in the next video.
12. Two sided Watermelon SIice: Moving on to the fourth
slice of the watermelon, starting with a
straight line for the window ledge
of the watermelon. This getting our Nanette
boost straight line from the rest of the
photo, straight line. For debates of our
turbulent lives. Let's get into more of
a straight line for the side edges of the watermelon
starting from the left. Now earning them before
they were stimulants lies. And with these we are done with the pencil sketch
for the fault lies. Lightening the ventral escaped. And now let's color
the boat's lives. Starting with a whitewater
edges of this laser. Overlaying the white on
top of the pencil escaped. Adding some white inside and creating some wings
with the white. Now going in with a yellow
and surrounding the white. This time where I'm not
adding the underneath seeds. If you want to add the
underneath it, you can add it. This time I'll show you
how to add the seeds after final blending and releasing, we are
done with the yellow. Now continuing forward with the fluorescent hot pink for the insights of the watermelon. Wheeling the entire
upper part of the watermelon slice with
this fluorescent pink. Here, I've already started with a fluorescent pink
for the bottom. Now moving upward. Now moving on to the other side, starting from the bottom
and moving upward with this being whittling, this being on top of the
chrome yellow and the white. The defining that I edited, the pink as they mistakenly
cross the white outline. With this, we are done with
the fluorophore and hot pink. I'm going in with the one mean. Well, what linguists wetted
median on top of the pink, but not covering
the entire pink. Now moving on to the other
side with our median. With these, we are done
with the vermillion. No, going back once again with the white link just below
the fluorescent hot pink. Know, continue forward
with the greens, starting with a bottle green for the bottom part of the slide. Going in with a yellow green, adding it above the bottle, mean by living a little bit
of a space for the light. Going in with the white and adding it in-between the greens. Boiling this white on
top of the yellow-green and extending it to meet
the other whitish streak. Moving on to the other side. And with this, we're done with the basic color for
the watermelon slice. Let's blend the color. Starting to blend the white
from the right age to a finer consistency with
the median and the pink. Now, moving on to
the other side, blending the thing
with the white while maintaining a crisp page. Going live with a Q-tip to blend the rest of the pink
and never median. Starting to blend from the
top of the right side, gradually moving
downward with a Q-Tip. No blending the color
with the white. Moving on to the other side with the Q-tip doing the theme
starting from the top, gradually moving downward
with this Q-tip. Now moving on to the green, switching the side of the
curator for the green, starting to blend a bottle green to our final consistency. In the state of this Q-tip, you can use the blending
stump workers paid. Now blending it to
the yellow-green. Moving on to the other side. Blending they're
both green together. No moving upward, extending the yellow-green
upward with a Q-tip. Doing the same to
the right side, that is extending the
yellow-green upward. No. Blending the yellow
green with the white arrow, extending the yellow-green
with the Q-tip. Going back-and-forth boots, I'm blending with the green hill. We get a smooth broadness
and in-between. With this, we are
done with gradient descent from green to the red. Now going into the red oxide
for the underneath themes, this step is optional. I have added seven teams. You can add more. We met with over 1 million
and overlaying it on top of the seats and
recite the seeds. Blowing back with a Q-tip and blending it with the
rest of it, the color. I mean, nobody million
to the right once again, to achieve a finite run listened going in with the new Q-tip to blend into the white
and the green. Hiding the seats again, the same as adding blackboard, the one side and the
whiteboard the other side. Using the white to blend
the black with a red oxide. Unreleased, we are done with the fourth slice
of the watermelon. See you in the next video.
13. Slanted Watermelon Slice: Moving on to the widths life. This will be another
simple drawing of the watermelon slice, starting with a slanted
discrete line for the base. Skating another straight
line from the middle, dividing the beat into two parts and defining
the height of the slice. Hiding the signed digest with
another two straight lines. The line was not perpendicular. Adding the curve for the maze, lighting the pencil mark. Know, let's call it our fifth
slice of the watermelon, starting with the wind blowing over the pencil sketch
with this wine. Adding some white
inside as well as creating small wins
with the white. No, going with this chrome
yellow forward link, some of the yellow
on top of the white as well as surrounding the
white with this yellow. And with this, we are done
with the yellow going in with the fluorescent hot pink covering the entire
inside of the slice with this fluorescent hot pink covering the entire
inside of the slice with this fluorescent pink while overlaying it on top of
the white and the yellow. Hiding the car with this blurs
and partnering with these, we are done with the
fluorescent pink. Now I'm going in with the
red oxide for the seeds. Continuing forward
with the vermillion. Filling the insights
with the vermillion by leaving some of
the pink uncovered and release, we are done with the vermillion for the base, going in with the bottle green to yellow green. By neither, by adding
the white will load the fluorescent hot pink
in-between the greens. And with this, we're done
with the basic colors. Going in with the
blending stump to blend, starting to blend the edges of the watermelon with
the blending stump. Moving on to the other side, learning the white with
the pink and the rest of the color to a
finer consistency. I knew going into the Q-tip
to blend the insights. The second from the top and
gradually moving downward. Blending the
vermillion, that being that aid oxide from the sea
and the white and the yellow. No blending the color
with the white. Gradually moving
towards the right. Blending by extending the white
to the rest of the color. No blending the yellow,
green with the white. Going back ones again
on top of the white, that the beam and the rest of the color to achieve a
smoother transition. And phonemic blending
their bottle green add lobbyists with the
white and the yellow green. And with these we are
done with the blending. Going back to the red oxide for the another layer of seeds. That black on the one side. On the other side.
Unrelenting the black with the red
oxide using the white. And with these, we
are done with the fifth slice of the watermelon. See you in the next video.
14. Bite marked Watermelon Slice: Moving on to that sit
slice of the watermelon. Starting with the inverted P for the height and the base of
the terminal and delays. The sites. Connecting
at the top. The bees in the
form of the good. This is a slice of the
watermelon will consist of multilayer blending and
somewhat more red ones. Hiding the bite mark
on the left side. These were done with
escalating lightning. The pencil mark says that you get to skip
trust, not that clear. I decided to escape to the side and about mark once again, earning the minute mark, lightening the whole
escapes once again. Now let's color starting with outlining the white
mark with the weight. I think that means on the side. Moving on to the front
side of the slice, adding some white and
creating the veins mark. Adding a streak of white on the lower part of
both the sides. And with these, we are done
with the white for now, know going in even
the chrome yellow overlaying some chrome
yellow on top of the white. And with this we're done
with the chrome yellow going back once again with the white to redefine the side, as well as adding
some more whites. Continuing forward with
the fluorescent part being overlaying this fluorescent pink on
top of the yellow and the white covering the entire inside with this glorious and hot pink. Now moving on to the other side, feeling the insights
with the pink and release, we're done
with that fluorescent pink. Know going into the red oxide
for the underneath seeds. Going in with the
world we live in and starting to add the 1
million for the bite mark, starting from the left side, overlaying this 5 million
on top of the other color. Moving on to the front, gradually covering the entire front side with this vermilion. With D3, we are done
with the 1 million. Now continuing forward
with the green, starting with a bottle
green for the base. Adding another thin
layer of water green. With this, we are done
with the water green going in with a yellow green, going back with the white, filling the white in-between
the yellow, green and green. And with these, we are done with the basic color for
the watermelon slice. Now going into with the blending
stump to start blending the edges and the site to
find them consistency. Here I've already started
with the left side. Moving on to the other side. No blending the insides
of the white man. Continuing forward for the rest of the blending using the Q-tip, starting to blend from the top and gradually moving downward. Well, we go to the other side. Our new blending the upper part, moving downward and blending the white with the pink
and I'm Armenian. Moving the same to
the other side. No blending the yellow-green when divided by extending it. Doing the same to
the other side. Keep on blind and you get a smooth prednisone
with the green. No blending the bottle green
to a smoother consistency. Learning the bottom green
and the yellow green. Going in with an enteric, your typical blends or more. No, I didn't say more
about the median as I was not satisfied
with the upper body. If you're satisfied
with your drawing, there is no need to
add further 1 million. Blending the vermilion to
the rest of the color. Blinding never median
on the other side. Now focusing on the bite mark, going in with the
fluorescent pooja to redefine the outline. Guarding the button
Media near the outlines. Adding some white to
lighten the bite mark. No blending the three colors. The bite mark and ascites
or not that distinct. So I decided to add some
more white on the edge, defining the scope of
the bitumen and adding some more white on the boot
side to light in that alert. Blending the white with
the rest of the color. Now to make the bite
mark more distinct, I'm going in with our media. What links I've read outside
and top of this word median. Now blending these two colored with the
rest of the color. Blending the colors above
and below the bite mark. Adding some more immediate
and white for the bite mark. Blending the two colors. And finally going back with the whiteboard outline
of the bite mark. Blend in this white
a little bit. No blending some more
wherever required. With these, we are done
with the blending. Now, going in with the
lead oxide for the seat. I didn't see it
on the both side. Doing the theme, adding
black on one side of the street and white
on the other hand, using white to blend
the Brown with the black and white for the bottom plot, highlight what a bottle green. Blending the white to the
rest of the bottle green. I decided to add some
more white board, decides if you're satisfied, there is no need to
add more colors. Finally, blending the
white of the sides. And with this, we are done with the sixth slice of
the watermelon. See you in the next video.
15. Circular Watermelon Slice: Now moving on to
the seventh slides, I have already sketched
a circle with a pencil, starting with a light. Dividing the slice
intersects part. Earning the means
with the white. Now adding more white
for the inside. Encircling the slides
with the white. Weighing in with
the bottle green for the outline of the slaves. Boiling the yellow-green on top of the wine release. We are done with
the yellow-green. Continuing forward
with the yellow. The yellow for the insides. And with this we are done with the yellow carrying forward
with a fluorescent fuchsia. Then release. We are
done with the future. By an E going in
with them 1 million. Overlaying this one, we
lean on top of the future, the chrome yellow and the white. With these, we're
done with the Permian filling in the rest of the
empty spaces with the white. Now going into that adult
site for the seasons. We make once again
with the word median. And with this, we're done with our basic color for the slides. Now let's blend the colors, starting with the blending
stump to blend the outer edge. Learning the bottle
when my yellow, green and a white to
a final consistency while maintaining the course
outline of the slice. Adding a little
bit of more green. Now continuing forward
with the blending stump. With these, we are
done with the outline. Tweeting the blending
stem with a Q-Tip. I decided to show you how to use the tissue
paper for blending. Going in with a tissue paper to blend the rest of the colors. Quoting the people
firebrands and using the age to
blend the colors. Blending from inside to outside for the mean
and the future. No blending with the right. But I do believe that being the whole slides with
the tissue paper, when you find it's competitively hard to blend with
the tissue paper, folded paper and
nipples are coming. This way you can use the same
people want to buy paint. No blending the rates
with the green, with the white in the middle. And with these, we are done with the first round of blending. We make with that issue
paper to blend up pinkish color to the
rest of the vermillion. Blending the greens
a little bit more. If you're satisfied
with your blend, you don't need to blend mode. Once again, blending
the greens to the pain. And with these, we are
done with the blending. I'm going in with a red oxide for the seats of the watermelon. I was not satisfied
with that tradition. Sorry, I decided to
add some more white. No, blending the white with
the rest of the colors. With this, we are done
with the blending. Moving back to the seeds, going into the black
to add separate seeds, I decided to leave the
red oxide as it is, as the earliest seeds
were completely covered because of the
multiple blending. Finally, going in with the
white to add highlight for the black seed release, you are done on the seventh
slice of the watermelon. See you in the next video.
16. Four Circular Slices of Watermelon: Continuing forward
with the eight slaves. For this, I have
already drawn a circle. My reading list article
into four equal parts. Separating one
slice from the top. Separating another slice from the bottom-right mill, lightening the pencil
marked with Eurasia. Now let's color the
watermelon slice is starting with a bottle green. Put the outline. I think the bottle blend to
all four slices. Now I'm going in with
the white adding above the bottle
Greenberg all the slices, hiding the bipolar last slice. Now I'm going in
with a yellow green, adding this yellow
green above the white. Moving to the second slice with this yellow-green, yellow green. For the final slides. With this, we are done
with a yellow green. Now going back with
a green tint the right to make adjustment
to this event, this idea of the slices, going back with the white to define the outline
of the slices. Finding the outline of the
final slice of the watermelon. Extra pneumocyte of the
biggest slice, a little bit. Going back with the
bottle green and the yellow green for
the extended sizes. Now continuing forward
with the white, adding the whiteboard
or insights, greetings, small veins with the whiteboard, all the slices. With this we are done
with the white bone now. Now going into the chrome
yellow overlaying a little bit of chrome yellow
on top of the white and surrounding the white
with this chrome yellow. Going on to the
third and the fourth slides for this chrome yellow. And with these we are done
with the chrome yellow. Continuing forward
with the seats. For the seats this time
instead of the red oxide, I'm using Van **** brown, adding the seats
or less licensed. Finally, adding the seats
were the biggest slice. Now, going in with the
photos and hot pink, starting with
defining the border with the pink, put
all the slices. Now filling in the pink for
the insights of the slaves. The starting with
the biggest slice, overlaying this
fluorescent pink on top of the brown seeds and the
yellow and the white. Know moving on to
the adjacent slides with this Motors and hot pink. The pink for the third slice. Finally, moving on to the
fourth and the finance lies. And with these, we are done with the fluorescent hot pink. Continuing forward with a very mean for the rest
of the painting. The starting to add the
vermillion for the biggest slice, covering half of the pink
with this vermilion. Now moving on to the third
slice with this 1 million. And finally adding the vitamin
line to the fourth slice. Adding a little bit of more than 1 million for
the first slides. And with this we are
done with our median. I'm going back with the white
and filling the rest of the empty spaces in between
the pink and the green. Adding the white wall,
the second clays. And finally adding the
whiteboard. The fault lies. Adding some more Florida than hot pink for the second slice. And with these, we are done with the basic coloring
for the slices. Now let's blend the colors. I'm starting with
the blending stump, blending the sites of
the watermelon slice with this blending stump. Blending the white with the
pink and the vermillion. Finer consistency. Blending the right
with the pink and the vermillion player
finer consistency. By ni, blending the
sites of the big slaves. These were done with blending the sites of the
watermelon slice, going back with the greens
and the right polis life. And now using the blending
stump to blend the dreams. Blending the bottle
green and the white and the yellow green
together to get a smooth transition from
the bottle green to the yellow-green while maintaining the crisp
outline of the slaves. Moving on to the second slice
with this blending stump, learning the three
colors together. And finally in
blending the greens and the right for the port lies learning the first slice
a little bit more. Moving back to the third place, which we did not
blend it properly, blinding the greens and the
white properly this time. Blending the colors a little
bit more wherever required. Fruiting the blending stump with a Q-tip for the insights
of the watermelon. Starting to blend all the colors together with this Q-tip. Moving on to the top
slice, but this Q-tip, blending the colors
for the big slice, gradually moving
downward with a Q-Tip. And find new blending
the bottom-right slice of the watermelon. We're almost done with blending
the red being yellow and the right side of the Q-tip to blend
the green with the white ring on to the big slice, extending the green to
blend with the white. Now moving on to the top slice, doing nothing, blending the
greens with a white, black. Finally, blending the colors
for the middle writes lies. Going in with another
Q-tip to blend the reds with a green
with white in the middle. Blending the three
colors together till we get a smooth transition. Moving on to the
bottom-right slaves into new blending that color till you get a
smooth transition. And buy new blending the
colors for the top slides. No blending the color
wherever required. Continue blending
until you achieve your final consistency
of the color. This morning, the
sides of the slaves. These were done
with the blending. Continuing forward with them
in **** brown for the seat. By me adding the seed
for the top slice. I think few more
fields here and there. Now I'm going in with the black, one side of the seeds, adding a little bit of
black for Aristides. With this, we are done with
the blackboard, the seed. Finally going back with
the white polar seed, adding the light on the
other side of the seed. And using this white to blend the black widow
and **** brown. Adding the white to
the rest of the seeds. Going back with a Q-tip to blend greens a little bit more. If you are satisfied
with their painting, there is no need to blend
the colors or any further. With this, we are done
with our eight plays. See you in the next video.
17. Yellowish Watermelon Slice: Starting with the nine slides
with the pencil escape, hiding the curve for dummies. This will be another simple
slice of the watermelon, but this time this will be
in the yellow is colored. Redefining their top. Lightening the pencil
sketch with the eraser. With this, we are done
with the basic escapes. Put our ninth watermelon slice. Now let's color the ninth place, starting with the
whiteboard outline. I think comparatively
more white for the insight as compared
to the other slices. Know, going in with
the chrome yellow, covering the whole
white with this yellow. I leave me alone other side. Adding some more yellow
wherever required. With this, we are done
with the chrome yellow. Funny going on with
fluorescent pusher. Well what lean a little bit of flourish and push on
top of the yellow. Adding this glorious
infusion on that side. Adding some multiple origin
future on the lower part. These were done with
the fluorescent future. Now let's blend the colors, starting with the blending stump to blend the edges of the sides. Blending the ages of the
sites to a final consistency. Learning the white
with a yellow and it is now going in with a Q-tip to blend
the rest of the colors. Starting to blend the
colors from the front side. Blending the yellow with the fluorescent fuchsia and
the white together. Learning the chrome yellow with a flourishing future
and the right. Moving on to the other side, blending the chrome yellow
with a flourishing future and thereby gradually moving
downward with a Q-Tip. And with this, we're done
with the blending for now. Going in with the red oxide for the seeds. Are that succeeds. You can add more.
Repeating the same steps for the seeds are adding
black on one side, white on the other side, and using white to blend the
black with the Red Oxide. Know going in with a white. Using this white to blend
the black with a red oxide. With these word
nevertheless eaten the upper part of the slaves. Continuing forward
with the Queen's for the lower section of
the watermelon slice. Starting with a bottle green for the bottom of the
watermelon slice, defining the curve
of the bottom, but it's got a green,
yellow, green. I love the bottle
green. This time I am not adding white
in-between and green. Now going back with a white, filling the white
for the rest of the empty spaces by extending
the green with the white. Gradually moving
towards the right. I think the white ones again. No blending of white
with the yellow Tati was moved broadness
and from yellow to green extend mainly yellow downward to blend it with the white. Now extending the green upward to blend it with the white. And with this, we're
done with creating a smooth transition from
yellow to the greens. And finally, we are done with the nine slice of
the watermelon. See you in the next video.
18. Orangish Watermelon Slice: Moving on to the 10th
watermelon slice. Starting this good
with this lended inverted T folder templates. Adding the sides, defining that girl. Riding the edges inside. This time we will be painting and oranges watermelon slice. Lightening the
pencil mark with the iridescent and
removing the desk. Now let's color our
taint watermelon slice. Starting with the whiteboard
outline of the sides. Writing the code for the meal, adding some white
for the insights. Finally, creating the means with the white know going in with a chrome
yellow overlaying this chrome yellow on top of the white and covering
most of the way. Moving on to the other side
with this chrome yellow, adding some more chrome
yellow for the lower section. And with this, we're
done with the chrome yellow continuing forward
with a flourishing future. As partially covering
this chrome yellow with this person future. Going back and forth to both side with this
loris and future. And with this, we're done
with the fluorescent fusion. Continuing forward
with the orange, overlaying this orange on
top of the fluids in future, as well as the chrome yellow. And in this orange
on the other side. And release we're
done with the orange. Finally going in with the fluorescent orange
yellow on top of all the colors covering most of the cultivated
fluorescent orange, yellow. And with this, we are done
with the colors for now I'm going in with the
blending stump to blend the site as well as the
ages of the slaves. Moving on to the other
side of the slice. But this blending stump, finally blending them into
leads to a finer consistency. Switching the blending
stump with a tissue paper, blending the insights
with this tissue paper, gradually moving downward
while blending the oranges. Moving on to the other side of the age. But
this tissue paper. Now switching the tissue
paper with the curator to blend the color
near the site pages. With these, we are done with
blending for the orange. Continue forward with a green, starting with the bottle green for the bottom curve
up that's life. Oh, Alenia locally and on
top of the bottle green. Now going into the
right and adding it in between the
orange and the yellow. Now let's blend those
colors together. Starting with blending
the ordinary divide by extending the ordinance, no one would gradually
moving towards the right. Blending the origin, the
white for the other side. No blending the green
with the white. First, starting to blend
the bottle green with a yellow-green to achieve
a smooth consistency. Now, extending the greens to
the whiteboard, blinding. Blend the colors tell you
achieve a smooth transition. And with this, we are
done with the blending. Continuing forward with the
red oxide produce heat. Adding the seats
on the other side. Now going into the blackboard, one side of the theme and the
white for the other side. Using this white to blend
the black with a red oxide. Removing the excess
weight with the pencil. Continuing forward
with the white. I decided to add
some more black as the white was overpowering
Some of the field. I think the white to
balance the seed. And with these we're done with the time slice of
the watermelon. See you in the next video.
19. Orangish Yellow Watermelon Slice: Moving on to our 11th
slice of the watermelon. For this, we'll be drawing an orange yellow watermelon slides. Put this 11th slice
of the watermelon. I'm using a black Bristol paper. Continuing forward
with the pencil escapes the curve for the base. Lightening the pencil mark. Now let's paint the 11th slice. The starting with a way
to define outlines. Turning the light on the side. Creating small wins with away. Me finding that God gave
up the upper section. Now going into it,
that chrome yellow, starting with overlaying
this chrome yellow on top of that right? Now feeling the entire inside
with this chrome yellow. With these, we are
done with the chrome yellow continuing forward
with the flourish and future. Covering all the yellow with
this fluorescent fusion and release, we're done with
the fluorescent future. Nobody can limit the orange overlaying this
orange on top of the yellow and upload
this and future. Moving on to the front
side with this orange. With these, we are
done with the orange. Now going into the vermillion, it's costly overlaying
this vermilion on top of the other color. And with this, we are done with the color for the oranges, yellows slice of the watermelon. Let's blend the color. This time, I am directly
starting with a Q-tip, starting with
blending the alias to a finer consistency
using the Q-tip. Now starting to blend from the bottom, gradually
moving upward. And when these were done with the left side of the
watermelon slice, or you go to the front side of the watermelon slice
with this Q-tip. Starting with
blending the phoneme blending the rest of the inside. Blending the right side Ed. No blending the rest
of the insights. These were done with
blending the color for now. Continuing forward
with the greens, green, bottle green
for the bottom part. Ideally yellow green
above the bottle green. Going back with the
white and filling the white in-between the
green and orange. I added a little bit of
more vitamins Technion, covering the white
with the orange. And now let's blend the color going back with a Q-tip
to blend the colors. Starting with the bottle green, blending the bottle clean
to a final consistency. Moving onto blending
the bottle green with a yellow green
and the white, extending the greens to meet
with the white for blending. Now moving on to the front
side of the watermelon slice, blending the greens
with the white, tending the Q-tip and now blending them right with
the oranges, yellow. Fleming this to color by extending the right
to the orange. Now blending the
colors horizontally. With this, we're
done with the colors farther to the right of
sight for the seeds. Now I'm going in with a
black for the one side. I mean by two on the other side. Using the white to blend the black and the brown
a little bit. Finally, using some white to add a highlight what the bottom
of the watermelon slice. And with these weird
delimiter over 11 slice of the watermelon. See you in the next video.
20. Watermelon Slice on Stick: What are 12 slides? We'll be painting a watermelon
slice on the state. Starting with dividing the
paper into two equal parts. Now adding a straight line as
the reference for the base. Adding this, finding the toe. Find neat adding mistake. When these were done
with the basic sketch. Now let's paint starting with
the whiteboard outlined, adding some white on the right. Since I'm mistaken, you use
more white than necessary. Moving there, this
fight with the eraser to maintain the
sadness of the line. Adding them, I pull the inside, creating small wins
with this way. With this, we are done
with the white for now. Moving into with the red
oxide for the seeds. Using chrome yellow dots
around the white and overlaying a little bit of
chrome yellow on top of it. And with these, we are done
with the acromial low. Continuing forward with
the fluorescent Scarlett, this time willing the insight of the slice with this
Florida Center Scarlett overlaying this floaters and scarlet on top of the yellow, the red oxide and the white. Filling the rest of
the empty spaces with this fluorescent Scarlett. Scarlett on the
side. And release. We are done with the
Florida tender Scarlett. No, going into
winter, 1 million, 3 million on top of the
fluorescent Scarlet. And with this, we're done with the vermillion going to the
base of the watermelon slice, starting with the bottle
beam for the base, hiding in chemistry per bottle green for the bottom
of the slides. Overlaying white on top of it. By me adding the yellow green on top of the white and
the bottle green. Now going back with the white. Billing the right in between
the green and the red, the white and
circular motion and extending some of the green upon adding another layer
of white on right. Now let's blend the color. Starting with the
blending stump. Blending the site with
the blending stump. Lending the white to a final
consistency and uniformity. Going back and forth until
we get a smooth blending. Moving on to the other side, blending the white with
the fluorescent Scarlett. Going back and forth until
we get a smooth blending. It is in some of the extra
color to get a crisp line. Continuing on with the blending, using curative to lend
the rest of the inside. No blending the seeds. Starting from the top with a Q-tip and gradually
moving downward. Moving back and
forth with a Q-Tip. Morning, back-and-forth
with a Q-tip? No. Blending the right, going back and forth with a Q-Tip. Finally, blending the
colors above the line. Starting with blending
the bottle green, know blindingly yellow, green and a white with
the bottle green. Going back and forth
with a Q-tip to create a smooth transition from
the green to the red. The white with a red
by extending the way. No, extending the greens
to blend with the wine. Listen, was not that smooth
for I decided to add some more white blending the wider
the rest of the colors, starting with blending
with the red. Going back and forth until
we get a smooth transition. Now blending the
green with the white, going back and forth until
we get a smooth transition. And with these, we are done with the basic learning
for our 12th life. Continue adding the seed. Using the read outside
pool the seat. Adding the black
on the one side. Now going in with the
white one other time, using the white to blend the
red oxide with the black. With this, we are
basically during the 12th watermelon slice. Moving onto the stack.
Starting with adults, you end up with an outline of the stick filling the inside with the red oxide
primarily on the top left. Now filling the entire inside
of it, this raw sienna. Now let's blend the
two colors going into the blending stump to get
a crisp line for this day. Lending the outlines first. No blending the inside. Adding some white
for the highlight. Learning the highlighted white. And with these, we are done with our dual slice of the
watermelon unstick. See you in the next video.
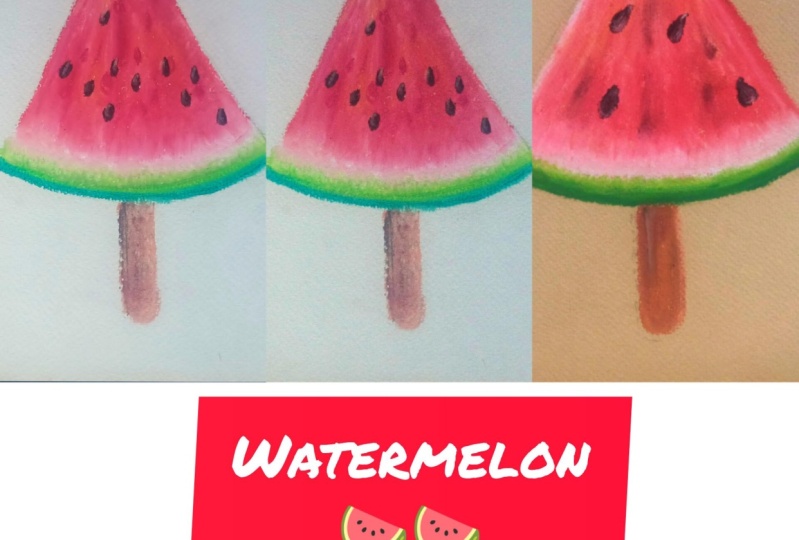
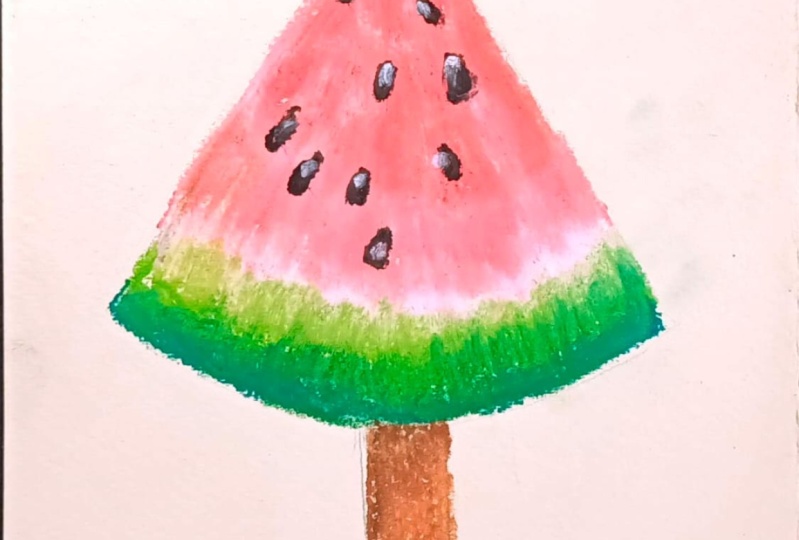
21. Watermelon Popsicle: Starting our tartan
slice of the watermelon. Instead of the watermelon slice, will be drawing and painting
of our terminal popsicle and using the same color
as that of the watermelon. I am already started
with a sketch. Adding the curb top
for the popsicle. Writing the popsicle stick. With this. We are done
with the basic sketch, lightning, the pencil marks. Now let's paint the
starting with the white, outlining the female the top and adding some
white beneath it. Now in defining the
whole airplane with a white filling the inside It's
cards live with this white. For this popsicle allowed
to using any chrome yellow. And with this, we are
done with the whiteboard now continuing forward
with a flourishing future. Covering the white by overlaying fluorescent future on top of it. Gradually uncovering
the whole white. Now moving downward with
this flourish in future. And with this we're done with
the fluorescent fuchsia. And finally, going in
with the vermillion, this buddy million on top
of the flourish and future. These were done
with the vermilion. And now let's blend all the
three color now, right? The fluorescent fuchsia and
the vermillion going in with a Q-tip to blend the vermilion with the fluorescent
fusion and the right, starting from the top. Blending the sights
a little bit. Since the whole ADH loud and only three colors and
no and admin team. So I switched the Q-tip with a tissue paper for
quicker blending, starting to blend
with the bottom of the popsicle using
this tissue paper. I'd really moving upward
with the tissue paper. By me blending the vitamin at the bottom with this
flourish in future. Blending a little bit more
for uniform material, getting a final
consistency of the colors. And with this, we're done
with the blending for now. Continuing forward
with the greens, starting with a bottle
of wine for the bottom. Adding yellow green
above the bottle green. Blending the two greens together by overlaying the yellow green on top of the bottle green
and applying high repressor. Now, going back with the white, adding it up the greens, going back with the Q-tip to blend the white with the
rest of the popsicle. Learning the white by extending
it upward with a Q-tip. And with this, we're
done with the upper part of the popsicle stick. I'm starting with this
at all. Tiana, filling their insights
with a raw sienna. And now adding the red
oxide on top of it. Mainly focusing
this red oxide on the left side of blending the two colors
together with the Q-tip, starting from the top and
gradually moving downward. A little bit was
left. With this. We're done with the
stick. Moving back to the popsicle with the
red outside for the seat. I added 7 ft. You can
add more or less, whatever if we follow the
same steps for the seeds, adding the black on one side and the white on the other side. I think the white to blend
the black with a red oxide. Blending the red oxide with
the black using the white. These were done with our
watermelon popsicle. You in the next video.
22. Two Parallel Watermelon Slices: Moving on to the protein
watermelon slice for this helmet
drying two slices, starting with a top slaves. Hiding the cardboard displays. The second slice below it. I think the curve,
what does lays? No adding the side and release we are done
with the basic is good for the
borderlands license. Lighting the pencil mark. But the reason now let's color the two
slices as usual, starting with a
whiteboard outlined. Adding some white
fur die inside. This time I am not adding the mean or the
slices are the small. Moving on to the second place. I mean, that might
further insight and release. We're done with
the white for now. Now going into the Columbia Law, earning some yellow
on top of the white. I mean the Columbia Law
for the other slaves. And with this we're done
with the chrome yellow. Now going in with a
fluorescent and hot pink covering the
bottom limbs lies with this fluorescent hot pink covering the white and
the chrome yellow, as well as all the empty spaces with this fluorescent pink. Moving on to the first slide, covering the white and
the chrome yellow, as well as all the empty spaces with this fluorescent pink. And with these, we are done
with the fluorescent harping. Going in with the red
oak fight for the seats. I didn't see it for both
the watermelons, lysis. Finally going in
with the vermilion. I mean, nobody million on top
of the ludus and hot pink, but not completely covering
the fluids and dark pink. Moving on to the
first lights with the 1 million and release, we are done with the vermillion. Now let's blend the color. This time I am directly
starting with a Q-tip, starting to blend
insights with a Q-tip. And for the outlines
with the White Album, blending it from the inside. Moving on to the top of
wastewater million slaves. Blaming the right
of the outline. Moving on to the second slide is starting to blend the insights
of the top of the slide. Finally, blending that
color for the outside. Lining the whiteboard outline. Blending the fourth
slice a little bit more, blending near the sides
of the second slaves. Now I'm going in with the green, starting with a bottle
green for the base. I think the bottle green for the second slice and
filling the inside. And with these, we are done
with the bottle green. Now going in with
a yellow green, adding it up the bottle green, adding the yellow green
for the second slaves. Going in with a Q-tip to blend a bottle green to our
final consistency. Pioneer adding the
white in-between the greens and the vermillion. Adding the white for
the first slice. And now let blend the white with the rest of the
greens and the rain. Starting with blending the
greens with the right. Moving on to the second place. Blending that aid
with the white. Moving back to the first slice
to Venice, the blending. And with this we're done with the transition from
green to the red. No blending the color
wherever required. With this, we're done
with the blending the colors for the
watermelon slice. Moving on to the seed,
starting with the red oxide. I didn't miss each
for the boat license. Now going into the blackboard, one side, hitting the right on the other side and blending the black with a red oxide. With these were done with
our 2oth watermelon slice.
23. Watermelon Slices Facing Each Other: Moving on rather than the
final determinant slaves, like the earlier slides, we will be doing two
slices this time. This time this license will
leave facing each other. Here I've already started
sketching the basis for the two slices using the inverted T to draw
the rest of the slides. Defining the base and adding the site for both the slices. Making adjustment with a
sketch wherever required. Release we are done
with the pencil sketch. Lightening the pencil
mark with a reason. Now let's color the two
slices. That's you as well. I am starting with the
white phone outline. The outline for the
past life earning this aids. Defining the bees. It is in the extra sketch, going back with the white and filling some of the
white for the inside, creating a small veins. This time I decided to
start with a green, going in with the bottle
green for the base. Billing their insights
with the bottle green. Moving on to the first slice. Filling the sides. Going over
that collects once again. Now going in with
a yellow green, adding this yellow-green of, of the bottle when
football does lysis. When needs were done
with a yellow green. Going back with the white. This white above the yellow-green
put borders license, the byte in circular motion at sending some of that
green with this white. Moving on to the second slice, adding the right
in circular motion and extending some
of the greens. Continuing watered
with the chrome yellow surrounding and overlaying some of the white with
this chrome yellow. Moving on to the second slice. And with this we're done
with the chrome yellow. Now going in with a
fluorescent future, starting with the second slice, covering the white
and the chrome yellow and billing rest of
the empty spaces. But this fluorescent future. Moving on to the first slide, the starting from the
tip of the slides. Gradually moving up one, covering the violin
and the chrome yellow by overlaying and
appealing the rest of the insides. Filling the sides. And with this we are done with the fluorescent fuchsia
adding this each but the brown ni going in with the median willingness familiar on top of the
fluorescent future. Mainly concentrating this
bar on top in the middle. Lewin mech with the white
to depend on the sides. Now let's blend the color. The starting with
the blending stump, starting with the base
of the second place, blending the bottle green to a finer consistency with
this blending stump. Now moving on to
the first layer, blending the bottle green to our final consistency
with the blending stump. No, blending the bottle
green with a yellow green. Switching the side of
the blending stump, blending the sites to
find inconsistency, blending the white outline
to F I knew consistency. Finally going in with
a Q-tip to blend the inside doesn't go down from the top and
gradually moving downward. Moving on to the first slave. Starting with blending the sign. No blending the brand.
Gradually moving upward. No blending the white of the
sides a little bit more. Starting with
blending the greens with the white by
extending the green. Bring the theme for
the first life. Going into it, another Q-tip to blend the white with a
red by extending it. Going over the
colors once again. Moving on to the first life. Extending that to blend with the rate going over the red and the
white 1 s until we get a final consistency
of the color, as well as a smooth transition. Now moving on to the greens, learning the white and
the red ones again. No blending for the sides. With these, we're done with them lemming continuing forward. But this heat going in with
a lead oxide for the seat. I think the seeds
for the first life. Moving on to the other slides. Now adding the blackboard,
the one side of the scene. Now going into the whiteboard, other side, using the white to blend the
black with a red oxide. Moving on to the first
slides with the white. And with these we are
done with the tendon, the final afternoon slaves. See you in the next video.
24. Conclusion and Thanks: Congratulations on
completing this class, and thank you so much
for taking my class. I hope you had fun
with this class and learned something
new and valuable. Please leave a review so
you can help me and let the other strength know how
you feel about the class. You can do this by going to the review section and then
click on the lever review. I did really a piece here that if you have any
doubts or queries, you can ask me in the
discussion section. Also, if you have drawn
any of the project, please upload it in
the project section. Don't underestimate
leaving a project work. I personally in there,
all your project. Thank you again, and I hope to see you in my other classes.
 Vishal Munshi