Transcripts
1. Introduction : Welcome to this class on 14 days of Alan times with oil pastel. In this class, we'll be painting 14 different elements
are well at time, starting with hertz, then we'll
be mainly flower bouquet. That balloons. After that we'll
be painting gifts. On the 5th, we'll
be painting left, but the sixth remaining, food and drinks and
for the rest will be following well n
times weak elements. For the real estate.
Propose the chocolate day, 30-day promise day hugging. And finally the valid timestamp. For this, we'll be painting two to three paintings each day, starting with a simple one and then adding more elements to it. So join me for this
14 days of Valentine. Let's paint.
2. Class project : For the class project, I would encourage
you to attempt, and you have the seven pointing
out of the 14 paintings.
3. Supplies : For this class, you will need a pencil and an
eraser for escaping. We still paper any paper if it's more than 150 DSM,
we'll do their work. I'll be still for the blending, be using piece of paper,
blending stump, Q-tip.
4. Day 1 hearts: The demon, we will
be painting Hertz, starting with a single one, then finally, a cluster of
5. Single heart : For this first painting, I'll be drawing a simple hurt. I was starting with pencil
to draw the outline for the video is in real time
so you can follow along. There will be two points, so highlights on this hurt. I'm lightly sketching
with a pencil to represent the point where I'll be highlighting with white. Know what painting the hurt. I'm starting with to define
the outer edges of the hut. This simple single hurt, I'll be using three colors and two layers represent highlights. I'll be using white
and that's where the saddle reasons I'll be
using a darker shade of proud. You could use black or any
other follow-up dot fixates. Outlining the highlight part
of the hut with the red. Now, what does that
origins of the hood? I'm using a darker shade of brown near the
bottom of the heart. And on the right
side of the heart. Using light to cover the
darker regions of the heart. The final layer, I'm
using the same rate that I use for defining
the outline of the heart. With this rate, I'll be
completely filling in the heart. The heart does not
clearly defined. I'm using blending stump,
redefine it clearly. I didn't write for
the highlights. Now to represent the shadows
cast by the hood, I'm using using blending stump to
smooth and the shadows. First part is complete.
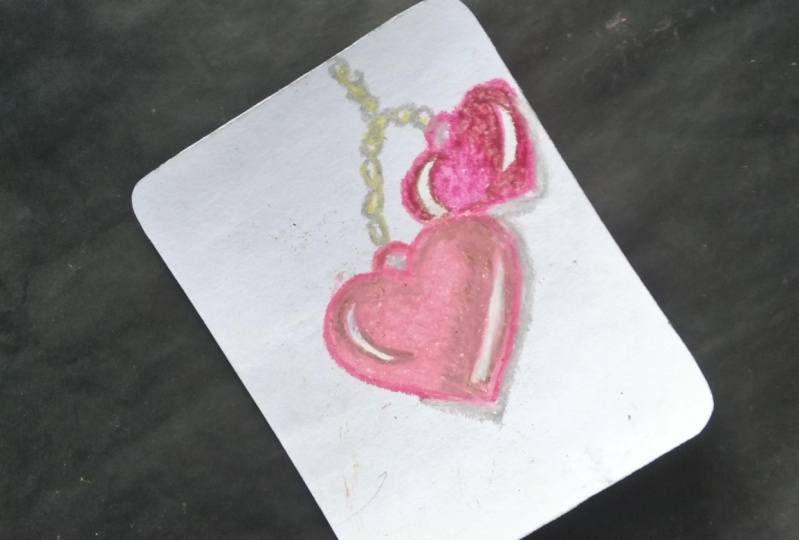
6. Double hearts : For the second painting, I'll be drawing two hertz. I'll be following
the same procedure as I did earlier with a single, starting with the sketching
the outline for the heart. We do it in real time. So you can follow along outlining the shape of the
heart when the red color. Using white to add
highlights to the hut on the top left and the
bottom right of the Hertz. Now for the origins
of the heart, I'm using dark without. Finally to complete the
hood, I'm filling in the red represents shadows of the heart. I'm using differentiate between
the two hertz. I'm using black. And defining the outer radius of the second painting is complaint.
7. Cluster of hearts : For this painting, I'm
using blackface to people and to make
the color pop out, I'll be using white
as my primarily. I'm starting with the
sketching seats of the hood. I am wearing a sequence
IDs of the hood. And after that, I'll be
following the same procedure as I did earlier with a single
hurt and the double hood, starting with adding the
highlights on the hertz, on the top left and the
bottom right of the Hertz. And then I'll be using white
as my primary real-ear, applying it gently to
cover the whole surface of the heart by leaving some of
the black of the paper too. So we do it in real time. So you can follow along highlights with the
white on the top left and the
bottom-right of dots, defining the shape of the
heart with the same white. And after that,
I'll be using the same white as the
primary layer for the following the same steps
for the desktop, the heart. Now for the shadow regions of
the heart, I'm using that. I'll be adding red on
top of the white and the green while leaving the
highlighted portion of the heart untouched. I would first heard
this company. I'll be doing the same for
the rest of the heart. Born whites on the
highlighted vote, since I am using the ring. Now, I'll add final
hardware company.
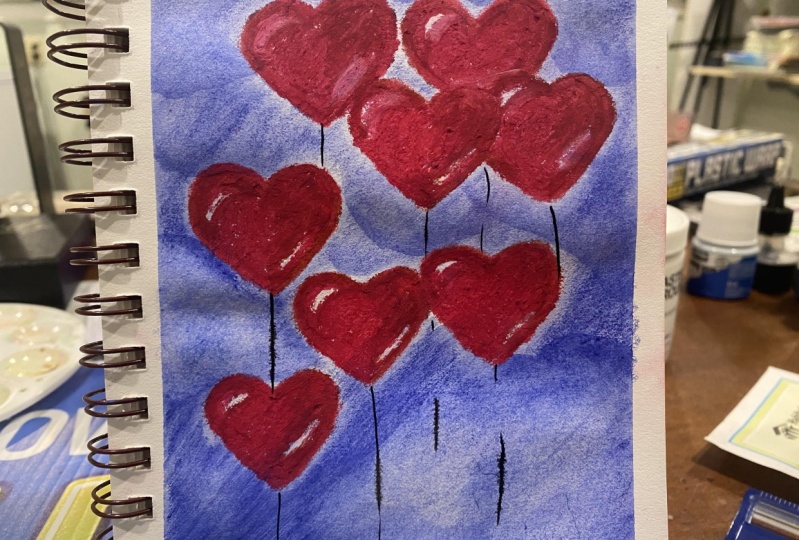
8. Bonus (heart balloons): Let's review. I'll be
following the same steps as I did add yet, it's a genius. It didn't really. So you can follow along.
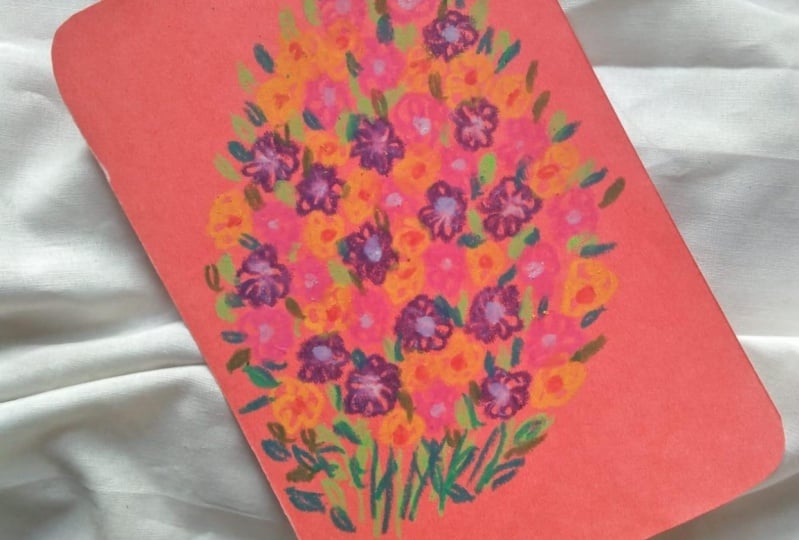
9. Day 2 flowers bouquet : Day two will be painting
a flower bouquet. Painting three flower bouquet.
10. Simple flower bouquet : For this simple flower bouquet, I was starting with white to draw the guidelines
for the flavor. Here I am drawing
the guidelines for the fibroblasts lever for
the interior of this lab, I'll be using light-blue. For this simple flower bouquet. We'll be drawing four
different colored platelets. Now going in with the light blue for the interior of
the flower petals. And I'll be leaving empty
space for the center. First blue flower is complete. Knowing, seeing for the
rest of the flower. The center of the flower, I'm using the blue. For the second flower. I'm using audit to draw the
guidelines for the flower. Bringing more guidelines
for the orange Glover feeling in the period of the orange flower
with yellow ocher. Doing the same for the
rest of the flower. For the third flower, I'm starting with dark grid to draw that guideline
for the flower. This will be five
petals, red flower. Filling in the light rate inside the petals while leaving
the space for the center. Adding yellow ocher photos until finally adding pink
near the edges of the petals. For the fourth flower I'm using. And for the center,
I'll be using yellow ocher. With olive green. I am connecting stems to the level with the same olive green earnings stems to the rest of the flower. With light green, I'm adding small leaves to
the extended stay. I'm adding motor stems
with a deep green. I'm adding what stems and
leaves with a light green. Again, I am going
with deep green to add more diamonds into
the leaves and the stem. Finally, with the red color, I'm tying up the flower booking. Simple flower
bouquet is complete.
11. Wild flowers bouquet : The second wildflower bouquet, I'm starting with
yellow flowers. I am drawing three
petals, yellow flower. Now for the second climate,
I'm starting with a. And for the second
layer, I'll be adding light purple on
top of this purple. Flowers are the imitation
software level endless. Maintain two mode
purple flowers. Now adding light purple. The audit, I am
adding the center for the yellow flower with the same on an album
drawing the flower. The third flower,
I'll be starting with drawing the small circles. Going in with the orange flower. The fourth flower, I'm
starting with big pink. For the bottom of
the pink flower. I'm adding magenta. For the fifth white flower. I'm going in with
the light blue. I'm using the white to
define the center of this blue flowers
with yellow ocher, I'm sketching the root. Would the flower
bouquet. Starting with light green to add
styles to the flowers? Steps in between the flowers. Deep green, I am adding small leaf to the
extended instance, adding more distance,
but the deep green. Our second flower
bouquet is complete.
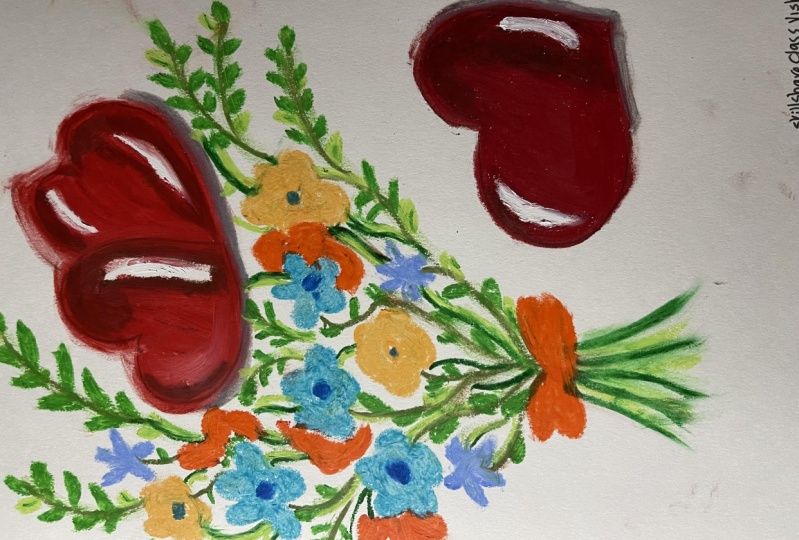
12. Bonus (flower bouquet with hearts) : For this bonus video, I'll be drawing a big
flower bucket that hurts. So you can follow along. Okay. Flower bouquets company.
13. More ideas (flower bouquets) : For day two, we painted
flower bouquet. Apart from these
three flower bouquet. Here, a few more examples of the flower bouquet
that you connect.
14. Day 3 ballons: The third day we'll
be painting balloon, starting with a simple one, then we will move to
more complex ones.
15. Single balloon : This first drawing will
be painting a balloon. I have already sketched out the guidelines for the pencil. I'm starting with white. Using this white to represent the highlighted portion
of the balloon. After this, I'll be
using the same way to completely fill in the portions
of the balloon lightning. Now let us define the outlines for the balloon with the white. For the Doctor reason
I'm using that. You could use any other dark colors with this dot, but oh no, you would have
presenting the shadow regions of the balloon in the
bottom right side. The highlighted and said
origins are complete. I'll be adding light blue on top of it to complete our balloon. Light blue on top
of dark down and white while leaving the
highlighted person. Simple and easy
balloon is complete.
16. Two ballons: For this second painting, I'll be drawing two balloons. I'll be following the
same procedure as I did earlier with the
single Belleville. This type, the side of the balloon will be
smaller as compared to the earlier when I
was starting with Y2, draw the highlighted portion
of the class balloon. And now I am using dark tone to represent the shadow
regions of the balloon. I'll be using dark brown for
the bottom right corner of the balloon and the top
left corner of the balloon. You could use other states
have darker color to represent the shadow
reason, like green. I'll be using light pipette
to paint this value. And for the second balloon,
I'll be using black. That's sad. Origin of
the balloon is complete. And I also use the same route to draw the outline
for the balloon. Going in with the light part ML. To complete the first value, I'll be covering the whole
section of the balloon, just leaving the
highlighted portion. Let's finish the first volume. Carefully filling in the color near the edges of the balloon. Our first balloon is complete. Now for the second balloon, starting with white
and represent the highlighted section
of the balloon. I'll be using dark
black for this balloon. I am adding white in the middle of the balloon to make it look, Let's start as I'll be
adding black on top of it. Using black to finish
the second balloon, starting with drawing the
outline for the second balloon, then I'll be filling
in the black. Now filling in the black
for the whole section of w. This leaving the
highlighted portion. Second balloon L second
painting is complete. And to add more details to it, I'm using paint to add
traits to the balloon. The next section we'll be
painting cluster of balloons.
17. Cluster of balloons : For this third painting, we'll be drawing
cluster a balloon. Starting with the sketching out the guidelines for the balloon. I have grown tall by Zooms. I'll be following the
same procedure as I did a little bit of a single
and a double balloon. For the first balloon,
I'm starting with drawing the outline with a
darker shade of brown. I'll be using light blue
color for the first balloon. Leaving out the space
for the highlight. Filling in the rest of the balloon with a
light blue color. The second balloon,
I'll be using black. I'm starting with white drought
the highlighted portion, as well as the guideline
for the balloon. Now going in with the black to completely fill the balloon. Fully defining the
outline of the balloon. I'll let second
balloon is complete. For the top balloon, I'll be using yellow
ocher and deep yellow. I'm starting with
yellow ocher to define the outline
of the balloon, as well as defining the
highlighted portion. Won't be intimate that VPL or to completely fill in the balloon. The fourth balloon, I'll be
using beat pink and pink, starting with a deep pink to draw the outline of the balloon, as well as defining the
highlighted portion. Now going in with the light pink to completely cover the balloon. Now artwork Malone is complaining
for this left balloon. I'm starting with dark brown to draw the outline
of the balloon. Non-living outlets piece
for the highlight. I'll be using a red color
to fill in the balloon. Going into the red color. Now our fifth
balloon is complete. That's why the sixth balloon
I'll be using starting with the dad could set it
up audit to define the outline for the
highlighted Watson. Going in with the
lighter sit up on it to completely
cover the balloon. Well, loon is complete. For the seventh minute, I'll be using a darker shade of blue. Starting with drawing the
outline with the balloon, as well as the binding
that highlight the person. I'll be using the same
color to fill the balloon. Now, I'll let seventh
balloon is complete. While the balloon I'll be
using light yellow and BPI. Ms, starting with the
light yellow ocher defined outline as well
as highlighted Polson. And I'll be using yellow to
completely fill the balloon. And on top of that,
I'll be adding BPM, adding beep yellow on top of the light yellow to
complete the loop. The desktop, the balloon,
I'll be following the same procedure and starting would be finding the
outline of the balloon, then defining the
highlighted portion, and then finally
filling in the color. I'll be using red,
yellow, green, and violet for the
rest of the balloons. Now, I'll let final ballooned
into almost complete. After that, I'll be using
paint to draw the outline for all the balloons as well as
threats to the balloons. Adding in the final threats. No odd painting is complete.
18. Bonus (balloons silhouette ): This bonus video,
we'll be painting a silhouette of a
god and a balloon. This painting, we'll have a gradient background
starting with white, lemon yellow, dark yellow, yellow ocher and audit. And that's what a blinding.
I'll be using digital paper. Then we do it in real time
so you can follow along.
19. Bonus 2 (couple with balloons) : For this second bonus video, we'll be painting
coupled with balloons. Balloons will be of various
shapes and sizes and colors. I am starting with the
sketching them balloons. Then I'll be skipping
a couple after that's getting partner
painting part is in real time. So you can follow along.
20. Day 4 gifts: The fourth day we'll
be painting for gifts.
21. Chocolate box gift : For this first painting, I'll be drawing a red
heart-shaped chocolate box with yellow ribbons, starting with white to sketch the lead of the chocolate box. After that, I'll be drawing them in Container for
the chocolate box. Basic guidelines for the
chocolate boxes that enough, at least getting the compartment
for the chocolate as capital letter guide me for
placing the chocolates. Drawing outline for the coloring in the chocolate box, I'll be using three
layers of colors, white without starting with white to partially
covered the surface. On top of that, I'll be using bound to represent
the solder regions. And finally, I'll be using
the rate as my final layer. I said ground, but I am using a darker side
upgrade to represent the shadow regions. I'm using BPM. Now going in with the right to complete the chocolate box lead, carefully filling
in the red color while avoiding the
yellow ribbons. Adding some black
on the sides of the chocolate box lead
to the present saddles. And on top of that
I'll be adding red half off our chocolate
boxes, almost done. I am using paint to clearly define the edges of
the chocolate box. Outlining the ribbons. The second part of
the chocolate box, I am starting with black to
define the shadowy regions. Covering in the base of the
chocolate box with white. For the sides of
the chocolate box. Represent chocolate. I'm starting with
beep yellow circles. On top of deep yellow. I'll be adding yellow ocher. And finally, I'll be
adding burnt sienna, adding yellow current top of it. For the final layer going
into the one siano. What makes I'm using
a light green. I less not satisfied
with the chocolate, so I decided to add some deep down Chocolate, some diamonds, and
I'm using white to add highlights on top of it. Finally, to make it look
more clear and distinct, I'm using paint to
draw the outline. Our first painting is complete.
22. Simple gift: For the simple gift, I have already sketched out
the deadlines using pencil. And now I'm starting
with the heart. Put the outline of the hurt. I must have read enough to add highlight. I am using white. After that, I'll be using the scene
where to partially fill the heart and that's
what the shadow regions, I'll be using that down on top of that to
complete the hurt. I'll be adding red, the dark brown to add
the site origins. We do it in real-time, so I encourage you
to draw with me. Finally to complete the
first art I'm going in with the rest of the hearts. I'll be following
the same procedures starting with adding
the highlight, then what does I'll
be using dark route. And on top of that,
I'll be adding later. To make the highlight more
pronouncing, I've added more. Following the same procedure for the second origin, you could use any other color
of dark gray or even black. Let's print our
first. I'm starting with yellow ocher to basale, further left side of the top of that I'll
be adding deep yellow. I'm starting with
yellow ocher to present the side
origins of the first, we're adding deep yellow
on top of the yellow ocher For the top of the gift and
the lead IMU, the piano. For the second
group, I'll be using deep blue, light blue, and that's what I'll
be using black or even starting with light blue to define the outline
for the second gift. Using be blue to represent the shadow regions of the gift. And on top of that I'll be like look complete
the secondary of going in with the light blue. Since that deep blue part and the outlines I drew earlier
is totally covered. I'm adding the outline for the gift using a
deep blue color. Lookup it the second grip
I'm using black to add, really went on top of it. Secreting gift boxes complete
along with the ribbons. What the tag gift, I'll be using three colors for three
different layers. I'll be using purple, viola, starting with white to partially kill most of the
portion of the gift. On top of this white, I'll be adding wet bulb. And finally, I'll be adding
violet on top of the box. First layer of
white is complete. I'm going in with the violet
for the top of the box. I stopped the box I'll be using, but adding it on top of the white colors for the gift boxes step, I'm using black to draw
the outlines for the gift. For the fourth and
the final gift box, I'm starting with yellow ocher
to represent the events. Starting with yellow ocher was a mistake later on when I
add it right on top of it, it was completely covered. So there is no need to start
with yellow ocher in Steve, you could start with a darker
shade of brown to represent a set of reason being laid
on top of the yellow ocher. It was getting hard for me to
not paint a yellow ribbon, so I decided to cover it. The black to add the finite to be following the same procedure as I
did add a little bit. Complete this
painting, I decided to add cell outlines
with the pen. No other painting has witnessed.
23. Gift with flowers and a message : Painting. I have
already sketched out the guidelines
using a pencil. I was starting with deep down to add shadow regions
for the first curve. Then I'll be adding coordinate
on top of the dark brown. For the cap of the GIF.
I'll be using red. I'm going in with the audience while the lower
part of the deaf. For the lead of the
gift, I am using red. This painting, we
have three gift box. One flower in the middle of our class, gift is
almost complete. The second gift box, Simon, starting with yellow
ocher to draw the outline for the gift
box as well as earning. Reasons. Outline consider
regions are complete. Beep yellow on top of it. In yellow ocher on all
sides of the gift box. Somewhat gift box. I'll be
adding audience driven. I'll be following the
same procedure as I did earlier with all the hugs. With the help of paint, I'm adding outlined
for all the gifts. Now for the first flower, I'm using DPLL to draw
Pipe petaled flower. The flower. I'm using big brown. For the third and final gift. I'll be good in light
blue. For that events. I'll be using people
who are on top of it, starting with a
light blue to draw the outline for the gift box. No feeling a booklet for
the desktop, the gift clausius, me filling
in the color flower. I'm starting with
drawing the outline for the flower and then filling in the blue-colored loud. Firstly, it would attack
gift boxes complete. I'll be adding
blue on top of it. Black to add outlines what that gift and that
even as well as sex important painting,
It's almost complete. Our outline for the Gibbs
exhibit is complete. Now adding outlines what the
envelop for the envelop, I'll be using the skin tone and on top of it as we are
adding a small heart. I think that I need I'm quite sad those I'll be
using green and white, starting with grid
to add sandals. And on top of the screen,
I'll be adding white. A small flower.
I'll be following the same procedure as I did earlier while I was painting this float leverage
for the bouquet. That's for the leaves
and the stems, I'll be using light
green and deep clean. And for the flowers I'll
be using red and yellow. Our third complaint.
24. Bonus (gifts and envelopes) : This bonus video, we'll be
painting gifts and envelops. That's what I'll be using. White, black, red, yellow ocher, yellow and dark brown. And I'll be using permanent
markets put outline. Didn't real time. So
you can follow along. It
25. Love birds silhouette : For this first Wednesday, we'll be drawing a
simple silhouette apart. I have already sketched out the guidelines using a pencil, and now I'm going
in with the right. I'm starting with that red circle with a red link in the red color by trying to
avoid that box in the tree. Now that's a complete
circle is complete. That's what the background
I'll be using black separate. And that's what Becker
I'm not butene for. Starting with the black, dark brown, yellow ocher,
and finally yellow. And now we're starting with
a black for the gardeners. Going in with a darker note. Okay, right after after the yellow ocher, I used yellow. And now for the
blending, I'm using Q-tips to blend the
coordinates with the black. After completing the
blending of the comments, I'll be blending
me at the center. Now to completely bled music. As security process mark, this disappears because they're
doing cavity larger area. They said to blend these colors. There is no need to preserve the brightness or the batteries are not satisfied with them. Let me too, I decided to
add some more yellow ocher. Then after that
I'll be blending. Adding not just with the black, adding more branches
with the black. Using the rate to finalize this and going in with the paint will defined
outlays for the birds. Outlaid where the center. To complete the painting I have building in the
Blackboard about. Now, our second
painting is complete.
26. Day 5 love birds : The fifth day we'll
be painting love, but starting with a simple one. And then we will move
to more complex ones.
27. Love birds : The second painting
we'll be painting actual lab birds that we
deal with somewhat lungs. So stay with me that we do after this heating
section isn't real time. So you can follow along. The second painting. I
have drawn two left, but what this lab works, I'll be using blue, black, light green, and dark green. This main thing we'll be
using a lot of blending. So get your blending stump, Q-tip or cotton reading. I'm starting with
the byte to draw the guideline for
the whole picture. Using the light to define the outline for the
lab words and advance. The background of this picture will be drawing a gradient. I'll be starting with white, yellow, light green,
and sap green. I'm just starting
with the white. Filling in the white. You can refer to the finished painting. For drawing the gradient
for the background. I'm almost done with the light. After that, I'll be
using lemon yellow. Adding lemon yellow.
I'm adding a little bit of lemon yellow
on top of the right. To make the blending
easier and smoother. I'll be adding light
green for the background. Like earlier, I'll be adding some of that green on
top of the yellow. And that's what the final color
I'll be adding sap green. Like earlier. I'll be
adding some of the sap green on top of the light
green that I painted earlier. I was not satisfied with that consistency of
some of the colors. So I am adding
some more white on top of the earliest printed by Albert doing the
same for the yellow, light green and the sapling wherever the consistency
is not enough. I think PSM mode
yellow on top of the blend in with the green to increase the
consistency of the color. Now let's blend. I'm using
Q-tip to blend the colors. Blending. You could use your
finger tip blending stem, tissue paper, or even gotten the blending person of the video is falsified. We're done. Melania blending
parties, almost done. Let's move to the
left, but for the lab, but I'll be starting
with white as my primary willing and white for
the rest of the board. After this white,
I'll be using light green for the lab work, as well as the rings. Going in with the light green for the Macpherson
of the lub been the same light green
for the wings. I'm Xin darkroom for the lower part of the
stomach of the bud. The heat Watson of the bird. I'll be using blue and black. I'll be starting
with a deep blue, then black in the middle, and then again, Deep Blue. Lincoln, the black in-between, the deep blues for the
head section of the bird. We applying some of
the deep blue on top of the black to
blend these two colors. Using yellow ocher for the eye. And to add eyeballs,
I'll be using black. Editing some more
black on top of the head to blend it
with a Deep Blue. Deep Blue on top of the
Blackfoot blending purpose for the stomach and the
Teach portion of the heart. I'm starting with dark brown to represent the side
origins of the bug. After that, I'll be
adding it on top of it. And finally, I'd be blending
this rate with a dark brown, dark brown near the
bottom of the dot. Then I'll be adding
this dark brown on top of the dark that I
painted earlier. Deep green on top
of the dark brown that I painted earlier. And using the same
deep green to blend it with a dark brown
on top of the branch. Blending that deep
green with a dark. Now for the suggestion,
the stomach park. I'm going in with that right. After completely
filling in the red, I'll be using the
same rate to blend it with a light green
and dark brown. That deep green get fully filling in the
color near the ice. Now for the bottom feeder to the word I'm starting
with a dark tone. For this bottom feeders, I'll be using dark
ground, beep green. And finally on top of it, I'll be adding some other
deep blues going in with that deep ring and adding it partially on top
of the dark rum. For the final layer, I am going in with a deep blue, adding it lightly on top of the dark brown and a deep green. Now to finish the painting, I am going in again
with a light green, using the light
green to blend it with the right and the bones. Adding some of this light
green on top of the tip link. That's what the beak of the
bird I'm using yellow ocher. Love by this complete,
I'll be following the same procedure for
the second lab one. Painting, I'm using a paint to clearly define the arc length. I forgot to pain
loss for the bird. I'm using yellow ocher
to paint the class. And that's what I'll
be using. A beep. Beep down for the
branch of the tree. And the love birds are complete.
28. Day 6 food and drinks : Today we'll be painting three
simple food and drinks.
29. Cup cake : For this first drawing will
be painting a cupcake. I have already sketched out
the guideline using a pencil. I was starting with
light to draw over the sketches that I have drawn
earlier with the pencil. This white length will
act as highlight. Adding more white lines
to represent the clean. Adding small hurts. Let alone, I'll be adding rate on this. Small white circles to represent the spotless cleaning part for the athlete is complete. Now let's add the
bottom for the cupcake. The top of the cupcake,
I'll be using three color. I'm starting with white to
partially cover the cupcake. This white male act as the
first layer on top of it, I'll be adding light pink. And on top of that, we are not going in with the light pink. While I'm ordering the
highlighted portion that I drew earlier
with the white while filling in the light thing I'm already in the white circles that I drew earlier as well
as the lines and the heart. The whole we do it in real
time so you can follow along, adding a particular lighting throughout the green
portion of the cupcake. On top of it, I'll
be adding back. Melody, lightning, sex and not the Coptic is already complete. I'm going in with the beeping. This deepening below the white highlights
that I drew earlier. Adding some beeping me at the bottom section of the green. Mix the light pink
with a deep pink. I am adding light pink
on top of the deep pink. Now to complete our theme
section of the cupcake, I will be adding more
highlights with the white. I didn't write up on the sketch lines that I drew earlier. Now for the little hearts,
I'll be adding red, adding highlights for the
cupcake, using white. For highlights. This excellent, I'll be using burnt
sienna and dark. I'll be starting with
burnt sienna and further.gov section I'll
be using dark brown willing in the burnt
sienna by leaving the highlighted portion
mostly untouched. Now we get to mostly
done with the bunch. And after that I'll
be adding dark brown near the top of this
cupcake me at the bottom. I think some of the
highlights also. Painting and look up
package almost complete. All that is left is to add some shadows. What does that do? I'll be using green and some of the burnt sienna setting with greater draw the
outline of the setup posts and then filling in the gray. On top of this great, I'll
be adding some burnt sienna. Me get the bottom. Adding some burnt sienna
near the cupcake. On top of the main
thing is completed.
30. Valentine's Day beverages : For the second painting, I'm already escaped out the
guidelines using a pencil. I'm using labels to paint
over the pencil marks on the left-hand side and
the right-hand side, I'll be using rain. Adding gray on top of the pencil marks on
the right-hand side. The outlines I drill
with the rules and then we represent
the shape of the bottle. And that's what the
highlights water bottle I'll be using white. Now going in with the right to represent the highlighted
portion of the bottle. Sketching lightly
with a white dot represents the level of the
drink inside the bottle. For the drink inside the bottle, I'll be using two
different layers. The first layer I'm
using this white, and that's what the
second layer I'll be adding right on
top of the swipe, adding some more
highlights with the white. Blending in with the red to represent the drink
inside the mortal. I've added this rate
on top of the white. Using this rate to completely cover the first
layer of the white. Our drink portion of
the bottle is complete. After this, I'll be
completing the heart. For the heart, I'll be
following the same procedure as I did earlier with all
the rest of the herd, starting with my present
outline of the hut, then adding highlights
on top of it. And then for the shadows, I'll be using a darker shade
of brown. On top of it. I'll be adding, adding the highlight for the hurt with a thick consistency of white. Unless what the rest
of the heart I'll be applying a light
consistency of the white. Adding in that brown on top of the vital represent the
sideway regions of the heart. Finally, to complete the
hurt I am going in with our heart is complete. Going in with the graders to thicken the edges of the bottle. Using the same graders to
add the outline of the heart going in with the white to increase the intensity
of the highlight. The cap of the bottle
I'm using burnt sienna. The grid rules I
used earlier for the outline is
appearing to strike. And so I decided to add
some more red on top of it. Now for the glass,
I'm starting with the why to draw the
outline for the class. And then I'll be using
railroads and green. On the water, the glass. And after that I'll be
adding the same way on the top left
corner of the glass, right beside the green. And then filling in
the rest of the class with the pink
consistency of white. And after that I'll be adding
rate on top of the white, filling in the light
consistency of white. Now to compute the drink, I'm adding it on
top of the white. To add more diamond
tickle the glass bottles. I'll be adding some great to complete our painting
and give it a thought which I'll be using black
pen to add outlines. Do it with the black
went to it outlines. Our second entry
painting is complete.
 Vishal Munshi