Transcripts
1. Introduction: Did you know there are more than 200 varieties of potato sold in the
United States. More importantly, did
you know that you can use any of them to
print your own Napkins. Napkins you can use for fancy dinner parties or
slushy couch dinners, Napkins to give to your friends, or to put on your lunchbox. The best part is you probably have a potato
in your cupboard. If you don't, you can go to
the store and pick up a few. Hi, I'm Kristi Westberg. I'm an illustrator living
in Pasadena, California. I have a habit of starting to many projects and using
lots of different mediums. So in 2022, I decided
I wanted to develop a new Art practice where I spent an entire year working
in one single medium. And for me, that medium
was Block Printing. If you ever wanted to
try out printmaking, but felt like it
was too expensive, required too much space
and equipment or time. This class is for you. Together, we're going
to learn how to use knives to cut potatoes
into stamp shapes. If you're knife averse, we can use a cookie cutter instead. We're gonna learn a few
ways to apply paint to our potatoes and then
test print them on paper. Then we're going to get
loose and Create patterns using different directions,
colors and layouts. And when we're feeling
really confident, we're going to finally
print Our Napkins. Once you've made your
first set of Napkins, the world is your oyster. You can use the skills
you've learned in this class to create your
own custom wrapping paper, a tote bag for a friend, or a bandana for your pump. It's time to start
your creativity.
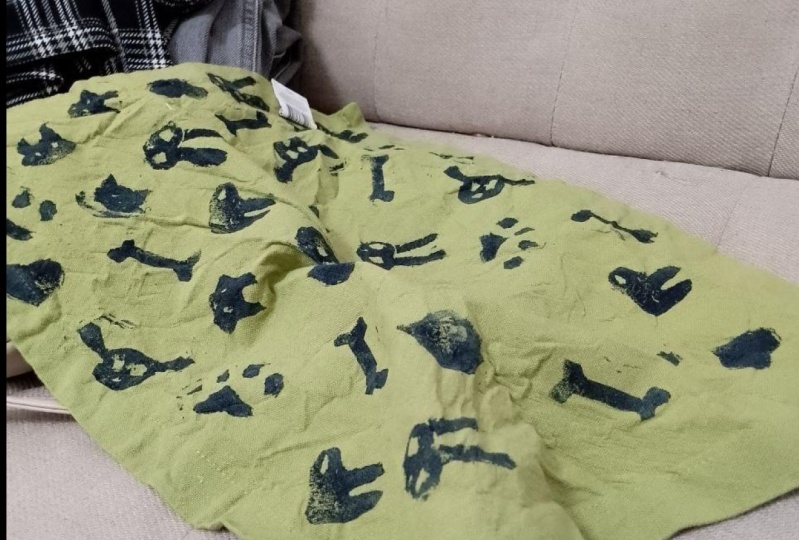
2. ClassProject: The project you'll
be creating for this class is a set of
potato printed cloth. Napkins will be practicing printing on paper before
we print on cloth as well. So you could make a
sheet of wrapping paper or a small art
print along the way. Remember to document
your process. That's one of the best
ways for students view in your project
to learn and connect. To share your work.
Go ahead and hit the Create Project button
on the right-hand side. Once you're there, you can
upload a cover image and just keep in mind that
that's a preview image of what your project
will look like. You can put in your project
title and description and you can add images of your process in the project description area. We're all love to
see what you make and I can't wait
to see it myself. In the next lesson,
we'll go over all the materials you
need to get started
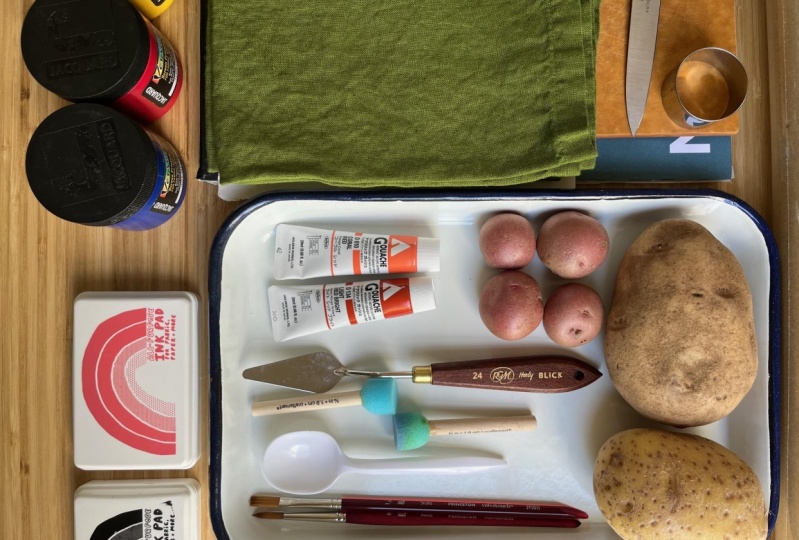
3. Materials: The first thing we're gonna
do is gather our materials. You need a potato and
you can use any kind. You'll need a kitchen knife and some kind of
a cutting board. And if you are a knife averse, then you can use cookie cutters. I have this set here, but you can use any
shape you want. You will need some
paint or an ink pad. This is just what I
already had on hand. So this is acrylic
wash. And then this ink pad is really
great because it can be used for paper or for fabric. You just heat set it and
then it won't wash away. You could also use
screen printing ink. This is versa texts, but you can use any
brand you can find. Just make sure that
you can heat set it, and then it won't wash
away when you wash your napkins because you will
inevitably need to do that. I also have a plastic spoon here That's just to scoop out
the paint where I need it. This tray that everything is on is what I'm going
to use as my palette. You'll need some paint
brushes and you can use any shape or size that
you have on hand. Or you can use this stapler, which is basically just
a sponge on a stick. If you don't have a stapler that even
use a kitchen sponge, that would work just as well. We're gonna do our
first prints on paper. Any kind of paper
you have on hand, it'd be like this art paper. It could be a role of
brown paper that is nice to tape your paper or your fabric to
your work surface. So I just have this
low tack masking tape. You might want some
wastepaper or scrap paper, so I just have this
pad of newsprint. But again, you could
use printer paper or any scrap paper
you have on hand. You might also want a
piece of this craft foam, which I just picked up
from Michael's for $0.99. And it's a great way
to add a little bit of cushion underneath
your printing that way your potatoes get really good contact with
your napkin especially. And finally, you need
your cloth napkins. So these are just a set of four linen napkins
that I bought on Etsy. So that's all the materials
you're going to need. In the next lesson, we're gonna go over a few
different ways that you can cut your potatoes into the shapes that you want to do
your prints width
4. Cutting Methods: Knife: In this video, we're
gonna go over how to cut your potatoes using a basic kitchen knife
and a cutting board. Before we do any cutting, I wanted to show you
one of these prints. This print was made literally just with a potato
that I cut in half. And then the way I printed it, it creates this kind of
bubbly zigzag shape. And then the big line is just
a potato that I cut into a big matchstick shape and printed over and over again
to make a straight line, the easiest thing
you could do is to just literally cut
your potato and half. And then you could
use it like a dot, like kinda funky shapes dot. You can also take that dot
and cut it in half again. And then you'll end up with that scallop shape that I
showed you in the first print. So if you print that
one next to the other, then you end up with a nice
kind of scallop shape print. You could also cut your
potato into a square. And I'd say that you can print
with any of these shapes. So then you can use that
square to print something. I have a lot of example
prints here that I'm going to flip through. This one. You can see I used
a square and I turned it so that it's
kind of triangle shapes. And this one here is
just a square where I cut away some bits of it to make this shape
and this pattern. I'm going to show you
how to do that one next. For this one, you're
going to want to use a bigger piece of potato. I'm just gonna go ahead and
cut this big russet in half. And I will say that it's kinda nice to have
a bigger piece of potato when you're
printing because then you really have something
to hold onto. So then you can just cut this big half of the
potato into a square. And it does not
matter if it's wonky. That's not a totally
square square, but I could go back in and trim it off a little
bit. So I'll do that. You could just print with
this square and you could print it as diamonds
are squares. And in a future lesson, we're gonna go
through how to use simple shapes to make really
interesting patterns. Now we're going to
work on cutting away these areas
that Printed white, which I'm going to
just call it the void. If you go in and
start cutting at an angle in your potato, then you can start
carving away material and those areas are gonna be
white when you do your print. So as you cut in at an angle
that really helps you to be able to pull out those
pieces that leave that void. I was talking about. The other thing
that I've done is sometimes I find it hard to really cut with precision when I'm using a kitchen
knife like this. So I will often just pull out like an alpha knife
or a craft knife. And that helps me to be able to cut really smaller details. And I can be a lot more
precise when I'm doing that for me using the exacto
knife is much easier. So I'm going to cut the rest of this stamp using
the exacto knife. I'm just going to keep cutting and carving away and pulling out the areas that I want to
be white when I do my print. And you might need to
do a few cuts to get everything out that you're trying to get out,
but don't worry. So now I'm gonna do another
little row of cuts. And I don't care that
these cuts aren't perfect. I mean, we're printing
with potatoes. So this whole thing
is gonna be kind of casual and I'm gonna do
a third set of cuts. And this one, I'm going to cut everything from
here on over away. I'm going to cut straight
down on these two lines. And then I'm going to cut
inward from the side so that I can just pull away that whole
little square of potato. Now I have a similar
shape to this print. I would say this one is
a little bit bolder, but it's still the same idea. Okay, So that's
the knife method. In the next video, I'm going to show you how to
use a cookie cutter to get a very precise shape out of
your potato. See you there?
5. Cutting Methods: Cookie Cutter: In this lesson, we're
gonna go over how to cut your potatoes into a shape
using a cookie cutter. This method is really great
if you're doing this with kids or if you're afraid
of using a sharp knife, using a cookie cutter, there's very little chance that anybody's gonna get
hurt in this process. This print was made with a shape that I cut out
with a cookie cutter. It's a lightning bolt shape. I have this whole set of cookie cutters that
is all weather based. But I thought this lightning
bolt would be really FUN. So I'll go ahead and show you how to cut one of
those shapes out. You obviously need
your potato to be the same size or
hopefully a little bit larger than your
a cookie cutter. That's too big.
That's also too big. So maybe we'll go ahead and cut out this little
droplet shape. So when you're using the
cookie cutter method is easier if you have a flat shape
that you're cutting into. So I'm gonna go ahead and cut this round side off
of this potato. So then you just put your
cookie cutter on your piece of potato and you can use
your hands to press down. Now this might hurt your
hands a little bit. So what I like to
do is just take a cloth just like a
kitchen towel and put that over the cookie cutter
and then I pushed down so that nothing is hurting
my hands and the process. So we've got this cookie cutter kind of wedged into our potato. So now you're probably
wondering, well, how do I get this out?
There's two ways. So you could either use a
knife or you can actually just kinda break the potato
away from the cookie cutter. Now, you just have to
kinda push your potato back out from the cookie cutter and
then you're good to go. Let's do one more. Just for Fun. I really wanna do
one of these clouds. So I think if I cut
it down this side, it'll be enough
surface area for me to use this cloud Cookie Cutter. And again, it is kind
of nice if you can, to keep some of the skin, the potato skin to hold onto because it just prevents it from getting slippery because
this droplet shape has none of that skin. And I will say that I
have dropped some of my stamps when I've been printing because they kinda
get a little bit slippery. I'm going to start and just
push it in with my hands. And then when it kind of as deep enough that I can't really push it further without
hurting myself. I'm gonna go ahead
and put that cloth on top and then push
it down further. And just like before you can
free here cookie cutter by either cutting away the potato along the outside of the cutter, or you can literally just
break the potato away. And then you just push
the potato back out. And you have this
little cutie cloud. In the next lesson, we're going to learn a
couple of different ways to apply paint to our potatoes. And we're gonna do a few little practice prints
before we really get going and doing a lot of the pattern Play that I'm
so excited about. So I'll see you in
the next lesson.
6. Applying Color: In this lesson,
we're going to learn two different ways to apply
paint to our potatoes. I'm going to start out using
this acrylic wash. And this color is called light red bright if
you're interested. And I like to use this
tray to hold my paint, but you can definitely
use a ceramic plate or a paper plate or even a piece of plexi if
that's what you have, just whatever you have on hand. I'm just going to dab out a
little bit of this paint. I'm also going to put
a dab of this one on this one is called coral red. I have played around with two different methods
of applying the paint. The first method is
just a paintbrush, any shape, any size
paintbrush that you have. I will say that if
your stamp has lots of these little crevices than the paintbrush is probably not the best application method. And that's because it's
hard to keep the paint from gathering in
those little crevices. But when we use the stapler, I don't have that same problem. So if you have a
stamp like this, I would say go with a
stapler or a sponge. A kitchen sponge will work. We're just going to
dab a little bit of paint on this stapler. You don't need a ton, so just tap it in the
paint and you just tap, tap, tap, tap, tap,
tap, tap, tap. And then you're ready to go. And I usually just leave the stapler in the paint so you can just set
it right there. It'll be fine. We may as well go ahead and print this
to see what it looks like. I have this piece of newsprint. So we'll just go ahead
and print it on here. You can use printer paper or any kind of paper that you have. Now you just take your
potato and put it straight down on
the paper and apply a little bit of pressure
and then lift it straight up. There we go. So that's our first
paint application method and our first test print. The next way to apply the paint is just to
use a paintbrush. And this is very simple. You just literally painted onto the surface of your stamp. As you practice
stamping on paper, you'll kinda figure
out the sweet spot of how much paint you want to
be actually on your stamp. So just kinda pay
attention as you practice to what works well and what doesn't
work so well for you. What we're going for
is just good coverage. So we want the paint to cover the entire stamp with no little areas where
we can see the potato. Let's go ahead and print
this one really quick. So it's the same as before. We just take the stamp and put it straight down on the paper, apply a little bit of pressure, and then lift it
straight back up. You can see here
that that print is not perfect and that's fine. But out of interests, I'm gonna go ahead and put a little bit of the
paint back on top of this using the stapler and print it one more time
to see how it goes. I'm going to print it again. And this time I'm
going to print it in a different orientation
and I'm just playing. This whole class
is about playing. So let's see what happens. So you can see I
didn't quite get the pressure right,
but that's okay. Again, these are all test
prints were learning. This is supposed to be fun. It's low pressure. Don't freak out,
everything's fine. Now let's try this droplet
shape and I'm going to use the paintbrush application
method for this one. And I'll just do the
same thing painted out, make sure there's good
coverage on the print area. Seems like that's
pretty good coverage. So let's go ahead
and print this one. So set the stamp straight down, a little bit of pressure
and pull it straight up again. That's better. That's two ways we can apply
our paint to our potatoes. You could use the
paintbrush method or the stapler method. You could even
roll the paint on. Although truthfully, I have
not tested out that methods. So you'd have to kind of try it out on your own and
tell me how it goes. In the next lesson, we're going to get
loose and start doing some pattern play and
printing our potatoes in lots of different directions and orientations to
make all sorts of patterns that we're
going to hopefully use later on when we
print our napkins.
7. Pattern Play: In this lesson, I'm
going to show you a bunch of examples of how I printed single stamps in different ways to make
interesting patterns. You can see in this print, I used one single shape
and I stacked the printing one on top of the
other and moved from left to right
along the page. Doing that created kind of
a zigzag shape as well as a line that goes between
each row of shapes. That's one way you could print this shape to make a pattern. In this print, I use the same exact shape
as the previous print, but I stacked the prints really close together and
printed them at a dyad. In this one, I use
that same shape again, and I use two different colors and two different directions. In this print, I used one triangle to create all
these different shapes. So I put the two prints together
to make little squares. I turned it on its end
to make diamond shapes. And then I also added this little dot to add
additional interests. This print, I'm trying
a lot of things out, so I've moved the
shape around a lot. I've added additional
shapes, additional colors. In this print, I cut
this star shape and then I printed that
same dot again on top. So it kinda makes son shapes. So you can combine
to stamps together to make interesting
shapes and patterns. You can take your shape and turn it up and down and sideways. And that's how I created this really wavy
pattern. And this print. I just threw everything at it, all the shapes, all the colors. This print is made up of one single stamp that I printed
in two different colors. And I kept the Printing
kind of sparse, which I think is
nice for this one. So as you're trying
different printing you can use either are really packed
pattern like this one, or you can keep things sparse. So that's another way to keep things interesting and playful. And then finally, this
interlocking shape, which I've shown you before. There are tons of
options of ways to print your potatoes into lots
of interesting patterns. I have this large sheet
of brown paper and I have taped it to my table. Some tips for printing. It's really good
if you can stand directly over the area
you're going to be printing, being able to look right over
top at your stamp will help you keep everything in the alignment that
you're hoping for. As you play. Just try to fill up an entire sheet of paper with
lots of different options, lots of different experiments. I'm gonna go ahead and speed up the video and show
you a bunch of different ways that I printed this one single shape to
have different patterns. So let's beat her up. As you can see, I kinda
ran out of space, so I flipped my paper around and I start printing
with other shapes. So I started printing with that where puzzles shape that we may. And I started printing
with tiny little potatoes to see what happens when I stack things in different ways. I also use my cloud stamp and try doing it in a brick layout. So a little bit off, like when you would lay bricks. And then I also
try just combining those shapes together
to see what happens. The real point of this
lesson is to give you some ideas of how you could
print your simple shapes. I hope that all those
examples were really helpful. And I really want to see what you guys do when you
do your pattern Play. So be sure to post your pattern plays in the project area. I can't wait to see
what they look like. In the next lesson,
we're gonna do it. We're going to print on fabric
8. Printing Our Napkins: In this lesson,
we're finally going to print our cloth napkins. Well, before we get started, I wanted to show
you my print setup. And you can use the same setup or not do whatever you want. I just wanted to show
you what I do to make sure I get really
good solid prints. I have some brown paper
and I have that because sometimes the printing ink
will go through the fabric. So I like to have
something behind the fabric that can
absorb that excess ink. I have two pieces of craft
foam and that's gonna be the cushion to help make sure we get good contact when
we do the Printing. I also have some low-tech tape because I'm going to tape
everything down to my table. And then of course,
I have my stapler. I have my potato, which is already to go. And I'm going to print my
napkins with this white ink. And then I also just have this little plastic spoon to dish out the
ink from the pot. The first thing I
like to do is taped my two pieces of
craft foam together. And I do that
because I don't want them to slowly drift
apart and that would create a gap that
would make an uneven spot and the Printing might not
come out clean in that area. I usually just put one
little piece of tape at the top and another one at
the bottom and call it good, make sure that the tape isn't in your printing
area because that will also create an unevenness and it could affect
your printing. The next thing I do is
I put my brown paper down and I taped that directly to my table
just in a few spots. Next, I put my napkin
down on my paper. And when you set
down your napkin, make sure it's not where
the tape is that's holding the craft foam together and
make sure the whole Napkins, the whole area you want to print is on the foam and there's no unevenness and napkins are
fabric so they move around. So I just tried to make
sure everything is in the right shape that I
want my Napkins to print in. So I just kinda get everything
squared up and then I gently press it down to make sure it's
flat on the surface. And I don't want
my Printing to go over into where
the same area is. So I'm going to use
the masking tape to actually mask off those
areas of the napkin. And so when I put that
mask border around, That's also going to be taping
this napkin to the paper. Just get a nice long piece
and I'm going to use the same as my guide
and set that down. And since my tape isn't quite wide enough to cover
the entire seam, I'm gonna put a second
piece of tape down. If you have wider tape than you might get away
with just one piece, but this is what I have. So I'm gonna put
two pieces down on each side and then I'm going to jump ahead and you can
see what it looks like. Okay, so the napkin
is all taped down. I'm going to print
my napkin from the middle and
then move outward. You can print from
any direction. So you could go from one
corner to the other corner. You can go from the top to the bottom or the
bottom to the top. Any direction that you want
to print your napkin you can printed. Let's get printing. So just like every
other time we Printed, we're going to use our stapler
to tap, tap, tap, tap, tap our paint directly
on our potato. And then when you're ready, we're gonna set it
down on the fabric. And I want you to push
down a little bit harder than you did when
you are printing on paper. And then once again,
you're going to pull the potato straight up. That's our first print. I'm going to keep printing
and I'm going to speed up the video so you don't have to watch every single print I make. And then I'm going to stop
periodically to give you a few Printing tips
along the way. So let's beat her up. If you start to notice areas
where your ink is pooling, like along the
edges of the stamp. What you can do is either
wipe off the paint gently with a paper
towel or you can take the potato and actually
rinse all the paint off with cool water and then
dry it with a paper towel. And start again. That's
our first Printed napkin. We're just going to repeat
that same printing process for me three more times because
mine are a set of four. And then you'll
have a whole set. Remember to apply good
pressure with your potato. If you need to rinse
off the paint, rents off the paint. And I hope you have FUN. Let's go ahead and
do a tape pole. Because who doesn't
love a good tape poll. And we'll see how it looks
without this tape border. There she is. Once the ink
on your napkin is dry, make sure to read the information on the container for the ink that you use. For our versa text, it says
to iron the backside of the napkin at the highest heat setting that you're
fabric can take. And then once you've
set the ink with heat, you can go ahead and wash it just like any other
piece of linen. And then you're going to have
a whole set of Napkins to use at dinner parties
to give as gifts. It's gonna be great. At, in the next lesson
we're gonna wrap things up and I'm going to tell you
how we can stay connected
9. Conclusion: You did it. I hope
you had so much FUN. You can on your inner child and made prints with
root vegetables. You learned how to make patterns with simple shapes and made something you can use every day in your home or a
give us a gift. Be sure to take a picture
of your printed papers and napkins and share them in
the class project area. We can't wait to see
what shapes you chose and how you printed them
into different designs. If there's one thing you
take from this class, I hope it's to loosen up
every once in awhile and make something with your hands
if you enjoyed the class, I'd really appreciate it
if you left a review. If you want to get updates
on my future classes, be sure to follow
me on Skillshare. And if you want to hear
from me more often, go ahead and follow
me on Instagram at, at the dot Design. I'll
see you next time.
 Kristi Westberg, Artist at At the Dot Design