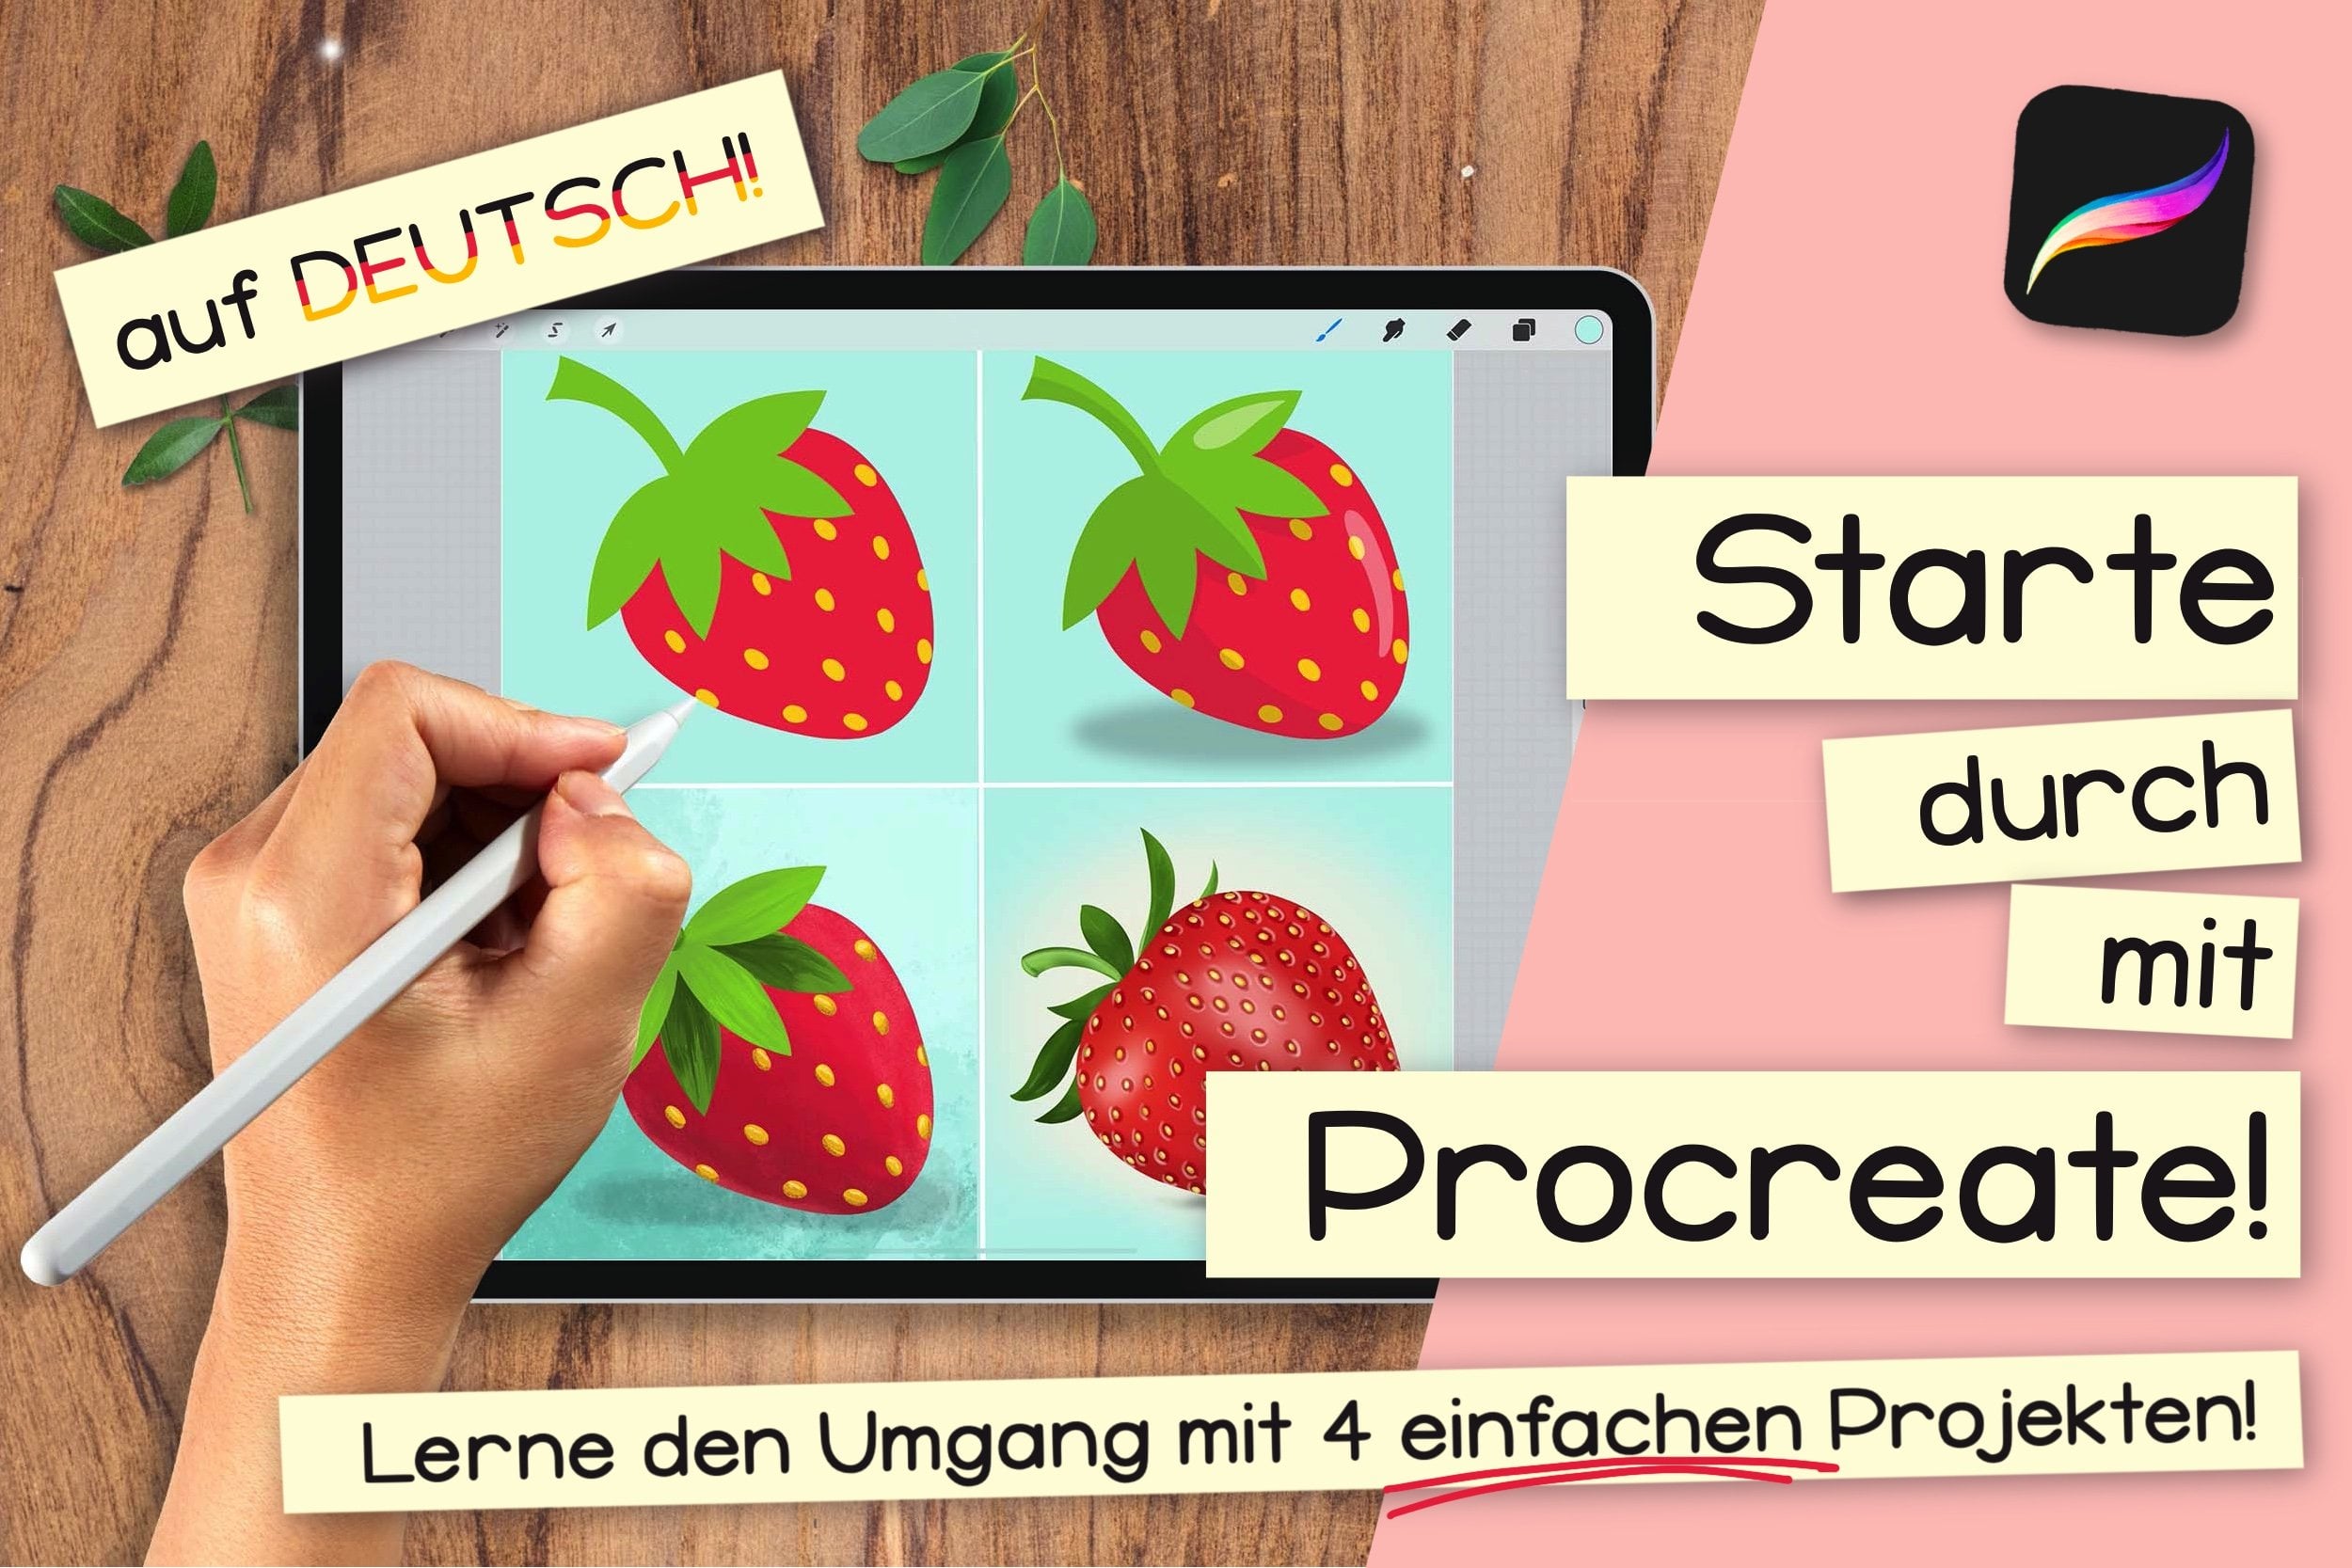
Transcripts
1. Welcome: We all live in a world
bursting with possibilities. Every day brings something
new to discover. And the flood of
impression seems endless. However too many impressions
can be overwhelming, making it hard to switch off. Hi, I'm Tania, a teacher, illustrator and designer
based in Germany. And in this class,
I invite you to join me in slowing down
and relaxing together. Today I'll show you
a creative way to unwind With my method called
mindful azulesudrawing. You cannot only relax and
find your inner calm, but also awaken your creativity. I'll show you how
therapeutic it is to create simple colorful
patterns in procreate. First, I'll share a bit
about the history of azules, then we'll dive right into
the creative process. I'll guide you through five different ways
to decorate a tile. From basic geometric shapes
to delicate floral patterns. I'll teach you the various
symmetry functions in procreate and provide a brief introduction to the world of seamless
repeating patterns. Additionally, I'll
show you how to depict the joints and add shading
for a more natural look. I'm confident that once you
grasp these techniques, you will feel the calming
effect of painting azulejos. And it'll be as challenging for you as it is for me
to stop painting. Plus we'll have created something
beautiful that we might use to enhance our homes or offer on print, on
demand platforms. This class is for anyone who is looking for
ways to relax, who wants to boost their city, who appreciates Portuguese
Spanish ceramics, and who enjoys painting
on the ipad in procreate. So are you ready to slow down your daily life and find inspiration in a
creative way with me? Then let's get started. I will see you in class.
2. Class Project: You know how class
projects are, right? They're like the
glue that sticks, all that knowledge you've
soaked up in class together. It's where you get
to dive deeper and really put those techniques to work for future adventures. Now I get it. Sometimes it's a bit of a struggle to find the
mojo to finish a project. But guess what? This class is a whole different ball game. I'll be presenting you with
five distinct tile versions. And I dare say, you might find it hard to resist the urge to dive right
into your own designs. So here's what I'd
like you to do. Upload one or all
of your creations. You can even showcase the
big picture you've painted. Just follow my bonus video
for step by step guidance. To upload your images, head over to the
projects resources tab on the Skillshare.com website. Just a heads up. This feature doesn't work on the
Skillshare app. It's website only. Click the Submit project button, add a caption and upload
your image or your images. Remember though, to save
your artwork as a J pack, it keeps the file
size manageable since Skillshare only accepts
media under eight and B, if you feel like sharing
how you felt while creating your Azulejos and whether that sense of relaxation
kicked in for you, go ahead and finally
hit Publish and Walla. Your artwork is
out there for all of us to admire in
in project gallery. By the way, your
fellow students would appreciate it if you left a friendly comment on
their projects too. I can't wait to see
what you come up with and hear all about your
drawing experience.
3. Download Resources: As you might know, my classes usually come with a
lot of resources. And this class is no exception. You find all my resources
on the projects and resources tab on the
Skillshare.com website. Please know that here as well. This is a website only feature. You won't find the resources
on the Skillshare app. We're here on the Projects
and Resources tab. When we scroll down, we find all the
resources of the class. This class comes with
nine different resources. We have seven grid images, which we will save in a second. And then I will show
you how you will get access to them and use
them in procreate. The other two files
is azules brush set. And also my azules
watches my color palette. Let's get started by
downloading these files. I show you with the first
grid complete file. I just tap the arrow
that points downwards. And then I get asked
by my ipad if I really want to download
it, and yes I do. So I hit load and as soon as
the arrow here has bounced, the download is complete. If I open my files app
now and had to download, this is the place where I
saved my grid complete file. However, I suggest you
create a special folder for your downloads because
sometimes if you accidentally delete all the
files in the download folder, they're all lost and you
need to do everything again. It's always good to
have them all tidy and cleaned up in a space
where you can find them. Now, if I head over to procreate
and I open a new canvas, then I go to the wrench tool, I go to add and insert a file. Then I head over to downloads. Again, this is where
I find my saved file. Now I've imported
it in procreate, it's being saved as
a separate layer. I don't want to draw on
this layer for sure. I need to add another layer
and then I can draw on top. Let me show you now how we can import the brush set
and the color palette. They both work the same. I'm only showing you
with the brush set. I again tap the arrow. I allow the download. I wait until the arrow has bounced now I just
tap this arrow here, then I tap the
file here as well. In downloads, the azules brush set file has appeared
when I tap it. Now it's just been auto
imported into procreate. Newly added brush
sets, by the way, are always added to the
top of your brush library. Color palettes are
always added at the bottom of your
palettes library. So I need you now to go ahead
and save all the files. And import both the brush set as well as the
swatches in procreate. And in our next lesson, I will give you a
brief introduction into the word of azulejos. See you in the next lesson.
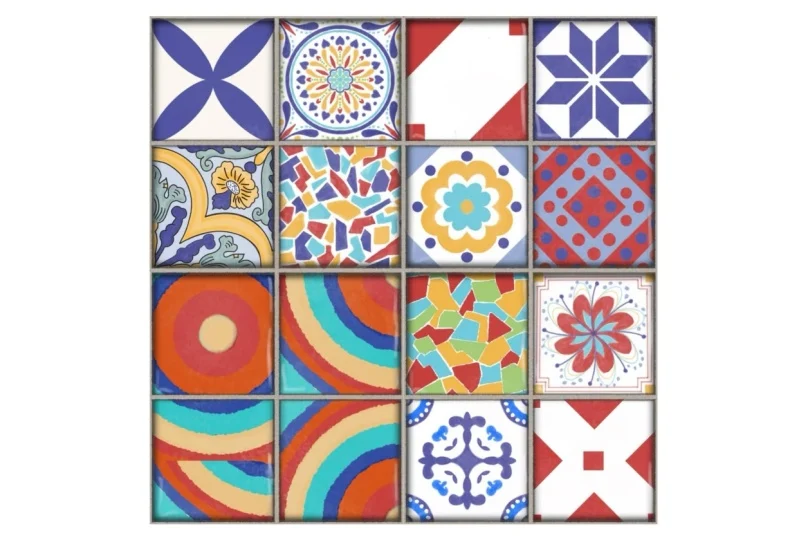
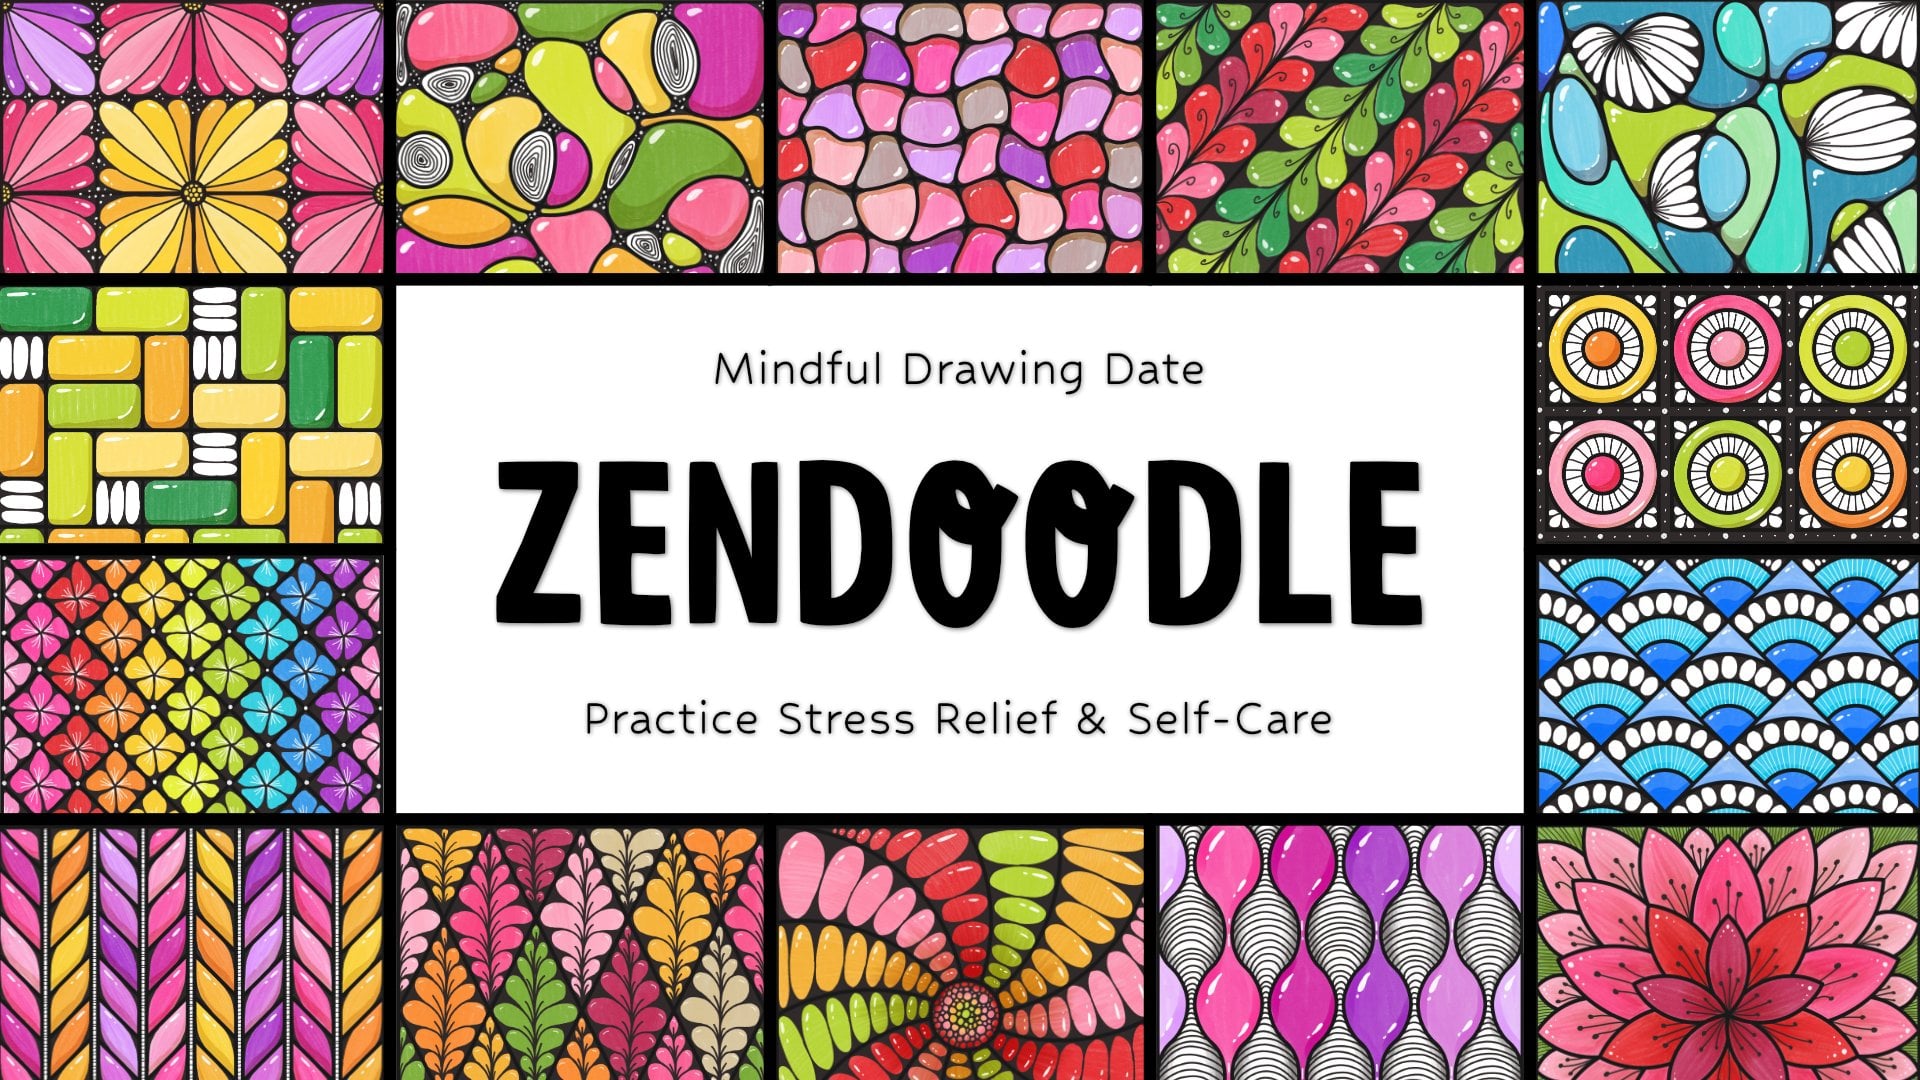
4. What Are Azulejos?: ***** are traditional
ceramic tiles that are commonly found in Portuguese and
Spanish architecture. These tiles are known for their intricate and
colorful designs, often featuring
geometric patterns, floral motifs, and
narrative scenes. They have been used for centuries to decorate
walls, floors, and other surfaces,
and they hold significant cultural
and artistic importance in these regions. Suns first gained popularity in Islamic art and architecture, particularly in the
Iberian Peninsula. Over time, they became a prominent feature of
Portuguese and Spanish culture, adorning buildings
such as palaces, churches, monasteries,
and public ******. In fact, these tiles were not only used for
decorative purposes, but also to regulate temperature and acoustics in
interior ******. The production of
azulejos involves a process of glazing and
firing ceramic tiles, resulting in a glossy
and vibrant finish. They can be single colored or hand painted with
intricate designs, and they come in various
shapes and sizes. Azulejos played a
significant role in influencing the development
of Delft pottery, also known as Delt ware, particularly during the
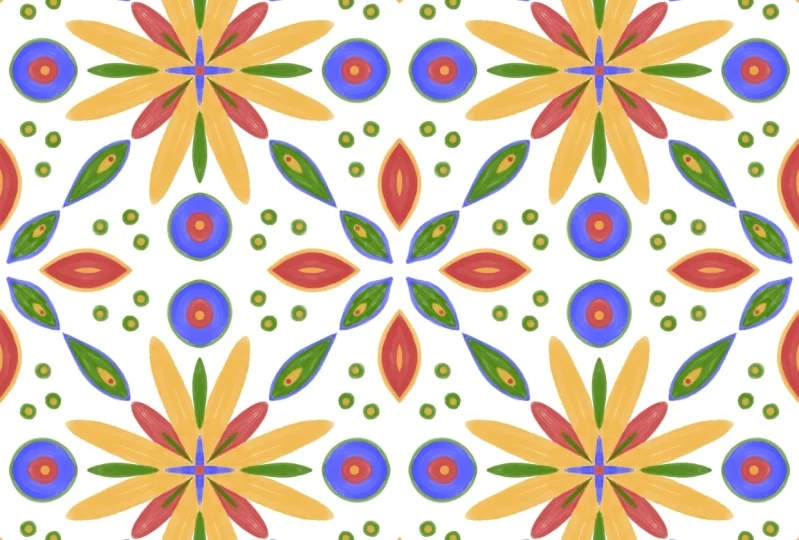
17th and 18th centuries. In we are mainly focusing on simple floral and
geometric patterns that are influenced by azulejos, but can be transported into
modern nowadays environment. Now that you have some background information
about azulejos, let's dive into our first
mindfulness practice see in the next lesson.
5. Practice 1: Blobs: Here we are, already
for our first exercise. What we need to do now is we
want to open a new canvas. We just want to make
sure this canvas is a square one so that we can
later on combine our tiles. If you want to go
to the plus button, you either choose a
canvas that you've already built up or you
tap the plus button. And here we get to the
canvas panel Here we can just fill in whatever
numbers we need. If you fill in with pixels
3,000 by 3,000 pixels, I will be receiving 70 layers, which is plenty for that style. If, however, your ipad is
not as powerful as mine, you might receive less layers. As long as you have more than, let's say 30 layers,
you're good. If you don't, you just go
with a smaller number. If you just type in,
let's say 2,500 by 2,500 and that gives
you 103 layers. It depends on the size, how many layers
you're going to get. What you need minimum
is let's say 30 layers. All right, since I already
created my canvas, I say cancel here, you would say create. I'm going to open my 3,000
by 3,000 pixel canvas. Our first exercise is already super relaxing without
a lot of thinking. We just want to fill our canvas with
whatever shaped blobs. If you imported all
the resources already, then you will find
the brush set here. For this exercise,
we're going to use either glaze sensitive
or glaze equal. The sensitive is just
pressure sensitive. It starts with the thinner, and the more you press, the thicker the stroke gets, the equal glaze brush is
equally white in its stroke. You just decide what you prefer. I guess I'm going to start
out with a glaze sensitive and another little side
node for our bonus project. I will show you how
you can combine all the tiles you
created throughout the class to a big picture, to a big tile collection, which you could then print out and even stick
in your kitchen. However, that's not the
main focus right now. I just wanted to let you know that if you
want to do that, it would be nice
if you would use the same colors throughout
the whole class. If you would go with
the same color palette, and that's what I'm going to do. I'm going to use the Azuz color poulette here
that comes with a class. And I will use that
in all my projects. Now for our first exercise, I want you to just relax and draw what
comes to your mind. You take your time.
You just watch what I am doing and listen
to the instructions, and then you grab your
own ipad and get started. What we're going to
do is we want to fill our canvas here in
a diamond shape. Let's go get the sketcher
first to show you what I mean. We'll just fill this
area here for now. And that's really
important without touching the edge here. All right, that's super simple
and we are going to fill that with whatever shaped blobs. I'm going to go ahead and just
draw something like this. Later on I'm going to clean up the edges because
I don't like them. Super blobby and messy. That's what I'm going to do. I'm just going to take my time. That's enough of
green shapes for now. I will start the
cleaning up process by just going to my eraser on. I will pick the nice liner here. I'm going to clean
up the edges again, this is a very mindful exercise. I'm just taking my time. Don't think too much, just clean up what I don't like. All right, I cleaned up this layer
and now I'm going to add another layer and pick
a different color. I want to go with turquoise. I guess I will add
more shapes now just on a separate layer so that it's easier to
clean them up later on. And as you can see, the
is just beautifully adding a nice texture
without us doing a lot. And also here I
will be cleaning up the edges of our shapes. Okay, our next layer is done, so we're going to add a new
one and pick a new color. I think I want to go
with the Jack blue here. And I'm just going to add more
shapes on the next layer. And as well, the cleaning up
of the edges is important. What I really like
about this process is that I can just let go. I can just stop thinking overthinking where to
draw, which stroke. However, once I start
cleaning up the edges, I feel so satisfied because
it just looks so cool. All right, I think we're
missing one more color. And I guess I want to
go with the yellow now to fill those gaps here. And on the yellow
layer, of course, we're going to clean
up the edges as well. All right, without us doing
much or overthinking a lot, we created our first
pattern. Let's move on now. What we don't need any
longer is the sketch. I'm going to delete that by
just swiping to the left and tap delete those four
layers that are original. We want to keep them
as they are for now. I'm going to just swipe all of them to the
right to mark them. Then troup now I have a layer
group which is my original, which I won't touch for now or later on in case I need
to do any adjustments. And in our next video, I'll show you how to turn this diamond shape into a
seamless repeat pattern. See you there.
6. Make It A Pattern: Now I will show you how we can turn that into a
seamless pattern. Let's get started. What I'm going to do now is I'm going to duplicate this group. I'm going to say flatten. Now I have all our
shapes in one layer, which is exactly what we need. We need four of them because we're going
to move them around. Now that's a little bit of seamless pattern making, Basic. I want to duplicate this
layer three more times. For that, it's important
that we keep in mind when we duplicate a layer, the duplicate is added on top. Unfortunately, whenever
you duplicate, the duplicate loses a
little bit of quality, which means the edges
start to get blurry. Eventually we want
to avoid that. We want to make sure
that we always duplicate the original and not an
already duplicate version. Let's swipe this to the
left again, say duplicate. Now we have three. Swipe another time duplicate. Now we have four
times our layers. What I want to do now is shift each layer into one
of the four corners. It's hard to explain. It's better when you just
watch what I'm doing. Let's start with the top layer. But I'm showing you what happens now if I select the layer, I'm going to tap select. And now we see not the
whole canvas is selected. And that's because our shapes don't reach the
edge of the canvas. That's not what we want. What we want is that we are
going to be able to shift the complete 3,000 by
3,000 pixel canvas. For that, we need to
make sure that we have some pixels reaching the edge. And I'm just going to
draw on this player, not with the eraser,
but with our brush. I'm just going to draw
a.in this corner. And in this corner now we have pixels that go until
all the four edges. And I can prove you
by tapping the arrow. And now we can see the whole canvas until the
very edge is selected. The next step is that we
are enabling snapping. That's really important
because what we want to do is using the
help of procreate, we are going to touch our
layer and just shifted in the top left corner until we
see yellow lines appearing. Sometimes it's just
a little bit of a trial and back and forth, but now you can see we
have a yellow cross here. The blue dots marking the center of one edge
are touching the edges. Now that's exactly what we want. Layer one is shifted, we can toggle off the move tool. Let's move on to
layer number two, going to turn off the
visibility of the first layer, the second layer from the top, we're going to move into
the top right corner. Again, we need to draw
some dots in the corners. This time I'm using
the opposite corners. Not these ones but
these ones because that helps us that we don't have
to erase anything later on. Again, we tap our move tool. We grab our layer and move it to the side until we have the
yellow lines appearing. Sometimes when you
see it's not working, just as it is with me right now. It is helpful if you turn all the other layers off because sometimes the snapping snaps on a weird place and that's easier when all the other
layers are turning off. That doesn't give the snapping tool too many snapping points. Again, go to the move tool
now, it's fairly simple. Now, it's also better to see the yellow cross here in
the center of our canvas. Right, turn it off, and go to the next layer. This is what we received so far. It looks are fantastic. Let's move on layer
number three, but toggle off the other ones. This one is going to
go in this corner, in the bottom right corner. Let's add our dots first. Here, there this time, because then they're
going to vanish and we don't need
to erase anything. Here we go. Just move
them to the right, to the bottom, until we have the yellow cross
appearing. Here we go. Toggle that off the last layer which goes in this
bottom left corner. Let's again draw our dots. Go to the move tool and
move it to the bottom Ta. All right, let's toggle
everything on now. What we have now is, as you can see, this one
was in the center before. And it is cut into pieces, but will match once you put
those tiles onto one another. So that's the basic step of
a seamless pattern making, which is super handy
also for our tiles. What we now need to do, the last step, is just fill
the center with more shapes. I want to add a new layer
and I'm still on my yellow, I guess I want to start
draw a shape here. Let's go and add another layer. Choose green on another, I want to have some dark blue. I guess on the last layer we're going to add the
tier one like this. And of course, we still
need to clean up the edges and our first tile is done. Our first Azure
looks really nice. I'm really happy with
the result and I'm also very pleased with what this
drawing process did with me. I didn't think too much. I could just let go
and draw without overthinking and without having the result in mind all the time. I could just focus on my
blobs and what I thought, which color is missing? Where that's really nice. What I also enjoyed is
the cleaning up process. As it feels so satisfying, the image comes to live right away and that's
what I really like. In our next lesson, I will show you how
we can proceed from here to make this pattern
kind of even tile looking. See you in the next lesson.
7. Texture And Joints: Okay, let's move on from here. The next step is similar
to pattern making, to seamless pattern
repeat making. If you did that already, you know what's going to come. What we want to do now is we want to mark all of our layers. And group them again. I'm going to duplicate
this group once more to tell them to platin. Now we have all the shapes
on one layer just like this. I want to make them
smaller and put them in each corner
of our canvas. That means I need
this tile four times. I'm going to shrink it
by half of its size. Then we need four of them
to fit in all the corners. That's just a simple geometry. I'm probably just being
bad in explaining. I'm just going to
show you what I mean. Let's duplicate this
layer three more times. Again, touch the top one, grab the corner and
move them towards the center until we again
receive our yellow lines. You see the width and
height is now 1,500 pixel, which is half of 3,000
The math is correct here. What we could also do is I'm going to show
you another trick. We're going to go
to the next layer. I want to make it small and
put it into this corner here. There's also a super trick, I'm just going to tap node
here in the corner and tap in the number I want to achieve since I've activated
the chain here. That means when I
change the number here, it also changes
the number there. That's basically what
it is with a square. Yeah, the dimension, both
sides have the same length. That's what we did here. It shrunk by itself
into the right corner. I'm going to show you on
the next layer once more. So I tap the move tool, tap the bottom right node, type in 1,500 and it snaps right there into the corner where I
want to have it. Okay, and now we
need the last one. I'm going to grab that again. It moves into the center, and now we can see we
work perfectly well. There's nothing,
there's no mistake, it looks just wonderful. And I really like the
outcome of this tile. It looks fantastic. What we could do now is to have it even more tile looking, Of course tiles have
this joints in between. This is something we
can draw as well. Let's add another layer on top, on top of the top one, then we can just think about it. How do we want our
joint to look like? Do you want to have it
gray in black or white? I'm going to go with this
medium brownish gray for now. I'm going to pick my
nice liner rough. Let's see what's the size. I'm just going to draw a
line here in the center. Tap with my finger to make
it perfectly straight. Add another one next to it, a third one, to make sure that we don't have any gap here. All right, that looks
like a nice joint. We just need to make
sure we're going to move it into the center
of our canvas. Maybe we need to make the
canvas a little bit bigger. Here we have the yellow line, so that means everything
is in the center. Wonderful. All right, we can just duplicate this line here. Swipe to the left duplicate. Go to the move tool, and now we rotated
by 90 degrees. Then this joint is also
right in the center. That looks good already. However, if we want to have them matching
seamlessly later on, we also need half of
a joint on each side. On each edge here. Let's go to our vertical
one and duplicate that. Shifted to the side here. Now we need to make sure we have the center matching the
edge. It looks good. Let's duplicate this once more
and shift it to that size. I don't want the edge to
meet the edge of the canvas. But the center, this would be
the edge meeting the edge. But that's not what we want. We want the center
being on the edge. That's exactly what we did here. All right, now we can just basically group those layers
here and duplicate them. Rotate them by 90 degrees, and then we have them on the
top and bottom of our canvas to we don't need all those
lines on extra layers, we just pinch those
layers together and now we have our joints
on one layer separately. All right? It looks
already more Tylis but still a little bit
boring and digital, If you know me and took
some of my classes, you know that I'm a
big fan of texture. That's what the rest
of the brushes is for. Let's first of all add
another layer on top of our four colorful layers
underneath the joint. On top there, we want
to set this layer, let's say two to
either linear burn, color burn or multiply. We can check that later on. Then I want to pick
this light beige, gray tone here,
The cloudy brush, we can make it re really big. Now I want to just
add a little bit of texture on top by just
tapping here and there. And that just adds
a subtle texture, it just makes it
a little bit more cloudy and less digital looking. What I'm going to add
next is I want to add like a bit of
a shadow next to our joint lines to just
indicate that the tile is curved a tiny little bit towards the outside because this is how tiles really look. You can check in your bath room. I want to pick the
darkest gray tone, and now I'm going to go
and pick my shader gentle. Let's check the size. I'm just going all
around the edges here just indicate a
little bit of a dip. I'm also going to play
with the opacity. I will tone it down a little
bit to have it there, but not really like
jumping in your eyes, just to be subtle. Of course, now it's
like really harsh. Let's turn down the
opacity by tapping the N and just moving the slider to the left until we're
happy with it. That's already nice,
but where's a shadow? There's also a high light, that's also super important. Let's add another layer on top of the shadow layer
we just created. I'm going to pick
this whitish tone, I guess I'm going to send the blend mode to screen or add, maybe that's an
important information. We usually, if you
add another layer, the blend mode is set to normal, which doesn't change
anything on the colors. Once you go up to
linear burn color, burn dark and multiply
it turns the way they match with the colors underneath and they turn everything darker. However, if you go down to
lighten screen color or add, it makes the color
appear even lighter. That's why I am picking
for the shadows. I'm going to pick the darker blend modes for my highlights. I'm going to pick the
lighter blend modes. I go into more detail in regards to the blend
modes in my class. Master shading in Procreate
Draw a Fury Monster. If you haven't seen that, you can check that out too. You will hear a way more
about the blend modes. What you need to know for
now is for the shadows, we're going to pick
either linear burn, color, burn, or multiply
the highlights. Were going to pick
the blend mode, screen color, Dutch, or you can check how
that looks for you. It just makes everything
lighter for now. That's what I want.
I'm just going to draw like subtle lines here and there just indicate
that the tile, our asu leju, is flat on top but curves downwards
on the sides here. Again, we can play with the opacity of our
layer later on. That's all it needs so far. A last step, I want
to bump up the size. I just want to add some
light reflection side, some diagonal lines, not
really visible but subtle. They are there and they create
way more visual interest. All right, our joint needs
a little bit more texture. I'm adding a layer on top of our joint layer and I'm going to send that to linear burn now that makes it a
little bit darker. And I'm going to pick the
same medium gray tone. I guess I want to use the shader speckled for now and I'm
just going to draw a long, oops, we missed one
important step, we need to turn it
into a clipping mask. And what that does is, as you've seen right
now, when I was drawing, I meant my stroke only to
appear on the joint layer. But it also, yeah,
drew everywhere. And this is not what
I want for sure, Not when I turn this layer
into a clipping mask, that means this layer is
clipped onto our joint layer. And now you can see
the speckles are just appearing on our joint, but not on our tiles next to it. And that's exactly what I want, so I'm just going to add a little bit of texture
here and there. And now we have a great
set of two by two tiles, Like four tiles that already
really look nicely together. I would add this kind of joint
layer on top to just have it more tile looking in case I want to
print it out later on. But for now, I will call that good and it
looks fantastic. And for the minimum of like thinking effort we
put into this design, the outcome is fantastic. I feel way more relaxed now. It gives me like the
sense of achievement. I created something
even though it didn't cost me a lot of energy. I really encourage you
to use this technique as a warm up method before you get started with real
illustration work. Because it loosens you up and it just gets your creative
juices flowing. Every time you don't know
what to draw, just sit down. Draw whatever shape.
It could be circles, it could be squares, it could be triangles, it could be flowers. Whatever you can think of, you just make a
pattern with that. And that already kicks off your creativity,
I promise you. All right, so let's move on to our next
mindfulness practice, and we'll see each other
in our next lesson.
8. Practice 2: Sketch: All right, let's
get started with our mindfulness
practice number two, which is going to be a geometric pattern containing some of the typical as elements. We're going to have
a dot, a flower, maybe some square lines
in diamond shape. For that, we need a
little bit of a help. I'm going to go ahead
add one of the grids. Now you found in my resources. Let's go to the Wrench tool. Let's say Add, let's say insert
a file or insert a photo. It depends on where you stored the resources that
came with the class. If you followed my instructions, then you stored your PNG
grids in your files app. That means you need
to insert a file, that's what I'm tapping here. Then I am going to find
the proper folder. Here we can see
all the grids that came with the class
for this practice. I think I will use the
grid lines and diamonds. I'm going to go with
this grid right now. It's gotten imported and you
just see those grid lines, of course, they
are way too harsh. I'm going to turn
down the opacity quite a lot of this layer so
that I barely can see it, but it's still there. Before we get started drawing, now we want to start
our drawing assist. We want to use the help of procreate to make
sure our tile turns out equally without having too much of an effort for that. I'm going to go to the
wrench tool again, and this time I'm
going to go to canvas. I toggle on drawing guide. This gives me the
grid right now, which helps me draw
lines along the grid. But that's not what
we need right now. What we need is a symmetry tool. We will find that if we tap
here, edit, drawing guide. Then we're going to go over
and toggle on symmetry. Right now we toggled on like the vertical symmetry I draw on this side is going to be
seen on that side as well. But that's also not
what I want for now. What I want right now is
the quadrant symmetry. I will find that
if I tap options, then I toggle on quadrant here. This is going to make sure that what I draw in this corner
will be drawn here, there, here, and there as well. We tap done. We could
get started drawing now, but we don't want to
draw on our grid layer. So that means we need
to add another layer. That's what we're
going to do now. Now you will notice the word assisted below the
word layer one. That means on this layer the
drawing guide is enabled. And this is what we see now. Yeah, we draw here. What I draw here is going to be seen in each
of the quad runs. However, we don't want
to draw on that layer, we want to draw on
the next layer. When I start drawing here, right now, there's no
symmetry happening. Why is that? It's very simple. We need to enable the drawing
assist for each layer. This is just simply done
by tapping the layer. Enable drawing assist. Now we see the word assisted. Now what happens here happens on each of the
other layers as well. There's even a simpler method, and this is what
you see me doing. Now throughout the class, I went to the wrench tool, and then I went to preferences
and gesture controls. Now I toggle on
assisted drawing. Now what you can see is when I tap this little square here, this will turn on and
off the drawing assist. And I'm going to show you what that means. I toggle that on. All right, let's
go to the layer. Let's turn off
Drawing Assist again. But when I tap this button here, this little square and
Drawing Assist is on. But when I tap the button again, you can see Drawing Assist is off and it only draws in
one of the quadrants. That's super helpful. That's why I put the symmetry
tool on this button. All right, let's get started. I guess in the center I want something like a flower, maybe. Let's see, Like a very nice and round
flower, something like this. I want to duplicate this. I just duplicated the
layer because I want them to be the same equally. Let's rotate it by 90 degrees, and that gives me a
super cute flower. Very nice. All right, that looks super cute. Let's merge those two layers. All right, on the next layer, toggle on drawing assist. I guess I want to add
some squares here, just make sure that
they're really square. I want the same here. Let's duplicate
this layer again, rotated by 90 degrees. Now we have those
squares in each corner. All right, and now I guess it would be nice if we
would have like lines here. Let's see. I guess I want like a circle in the center because just the flower
is such a huge blob. That's a bit boring. I like that. What I want now is
that this flower appears in each of
the corners as well. We're going to do
the same trick with this layer we did with
our pattern previously. We're just going to move that into the
corner until we see the yellow lines here
and duplicate again. All right, this is a super
acute pattern already. In the next lesson, we will fill that with color.
See you there.
9. Practice 2: Coloring: All right, so let's start
filling it with color. I guess we need to add another layer underneath
our sketch layer. And I want to turn down the
opacity of my sketch as well, because it's really destructive. All right, my layer. Now I want to toggle on
the drawing assistant. I want to start with the
circle in the center. However, maybe I want to turn off the drawing assist for now, because I noticed when you
want to have a real circle, it doesn't really work well
with the drawing assist. Let's pick a color. I guess I want to go with my
dark blue. Let's pick our. This time I'm going to go
with the glaze equal brush. I'm just going to draw a
nice circle in the center. And I really like this kind
of texture this brush adds. It looks like you've drawn under tile with a real brush though. Really nice. Let's now clean up the edge of our circle because
it's a little bit too big. So I'm going to
go to the eraser. I'm just going to draw a
circle with my eraser. Let it snap, put my
finger on screen, then I tap the word
circle to move it into the very center until
I think I found the center. Yeah, I go somewhere. Here is the center. Awesome. Now I'm just going to erase everything
was all around it. All right, so our
circle is done. What else I want to
do in dark blue is probably those squares here. Let's go ahead and toggle on the assisted drawing again
then what I'm going to do is I'm just going to go back
to my brush and start drawing here and
there, All right? But of course I want to
clean up the edges again. When we put those
tiles onto each other, this end is meeting
up with this end. Since we drew that in symmetry, they're going to
match perfectly. So that's super handy, I guess that's all I
want in dark blue. Let's move on and add a layer. Turn drawing, assist on, I guess my next going
to be teal again, I guess we're going
to go with the circle here and draw them in teal. Just want to do it once more and clean up the
edges a little bit. I guess what I want
to do next is I think I want the border here around my flower to
be teal as well, but not the flour. The flour is supposed
to be white, the border is
supposed to be teal. Let's go ahead and do that. Looks fantastic. Go ahead
and back to my eraser. If you go closer to, especially as you will see
that none of their edges are really perfect, don't
be sophisticated. And to make perfect edges, that's totally not
necessary. Here we go. All that looks so cool already, even though we
can't really see it due to all those lines
that are distractive. I guess we could turn
off the grid already. Yeah, that looks so cool. What else we're
going to need is, I guess these colors here. I think I want to
have that in yellow. Let's try yellow. Add another layer. Pick yellow, and don't
forget to turn on drawing As and go ahead and clean up the line. A little bit that
looks super cute. We go to our range tool. We go to Canvas and toggle
off the drawing guide. We also toggle off our sketch. This is how it looks
for now. Super cute. I'm going to show you
if we work properly, we have now like a
seamless pattern. Let's check all the three layers with our colors
are going to be in a group and duplicate it. Then the duplicate is
what we are going to flatten and we turn
off the original. Then we duplicate our group three more times to have
four of them again. Then we're going to
start with the top one. Tuggle on the move tool, grab the bottom corner and move it towards the
center until we have the yellow lines appearing here. We have such a cute pattern. Look at that. It is
adorable. I love it. And there's no lines,
there's no gap. So we worked really well. How cute is that? If you want to add
the same joints as we did in our
previous lesson, then we're just going to go
back to our first exercise. We're just going to
the layers panel. And we group these two layers, Then we duplicate the
group and flatten it. Now we just grab this layer until it's taken out
out of the panel. Here we go to gallery, we go to our recent work here, somewhere in the center. We let go, and it's
going to be important, it's just not on the right spot. Let's move it up
until the very top. We have our joint here. All we need right now is shading underneath and the
high lighting of course. Let's go ahead and this time we're going
to choose multiply, and I'm going to pick
this beige color here. This time I'm going to go
with the soft scratches. Just sun, a little bit
of a texture here, turn down the
opacity. Very subtle. You see it's not just white, but it is a little bit cloudy. That's exactly what
I want achieve. On the next layer,
I'm going to add the shadow with my cloudy now, with my shader gentle, just like here as we did before. To mark a little curve towards the end and also some
highlights on top. Let's go to add this tile
and pick whitish color. Okay, so another great pattern
done this time. We have those diamond shapes pattern and I think it
looks really amazing. So let's move on to
practice number three. See you in the next lesson.
10. Practice 3: Full Tile Design : Here we are with
practice number three, which is even simpler, you won't believe it, but it's just a let
go exercise as well. However, I want to add a
little bit of a guide again, and let's go and add a file. While I'm looking at it, I guess I want to
add grid lines and circles for this one as
well as we did previously, we're going to turn down the opacity quite a
lot for this exercise. We're also going to use
the help of procreate, again, with the drawing assist. But this time we want
to toggle on and see how it works with
the radial symmetry. Let's go to the wrench tool. Go to canvas. Go to drawing guide, Added drawing guide symmetry. This time we're going
to pick the bottom one, the radial symmetry. You see now we have the diagonal lines
and the center lines, the horizontal and
vertical lines as well. Tap done. Now let's
check and see what happens if we draw
in one corner. Nothing happens now. We just can't see it
because we turned down the opacity of
this layer quite a lot. Let's add another layer
and turn drawing. Assist on what I draw in this area is going to be repeated throughout
each other triangle. That's good to know. Okay, let's start with a sketch first. I guess I want to start with a nice flower
here in the center, as flowers are like the
typical element of an assu, but I don't think
it's in the center. Let's go and do it once more. Yeah, that looks wonderful. And then we could add even
something in the center, maybe a star here, I guess. I want to add a little
bit of diamond shape. What about we add
some swirls here like this and maybe something
like a border all around, and then we can add
some embellishment. What if we were add
just a lot of dots here and maybe even
another flower? No, but what about a leaf or another from
these swirls here? Maybe like this. Oh
yeah, that looks great. I guess that's
already super simple, but since we have the
symmetry enabled, we don't have to do,
let's get started. Turn down the opacity
of our layer, of our sketch layer, and add another layer
on top of our grid, but below our sketch. And turn on the drawing assist. Then I want to start
with my flower, and this time I think I, I want to pick the red color. I guess I want to go with my
glaze sensitive brush again. Then I will start with the
first petal of my flower. Of course up the shape again. No, I'm not happy with
the shape of the star. Maybe I'm just going to add
another flower in the center. Beautiful. And then we can
even add like a.in the center. This time I don't think we really need to add
another layer, so I'm just going to add
a yellow.in the center. Pretty all right. Let's think about what
else could be in red. What if we would add
the border maybe in? Let's go back to our red color. That's something else you
need to keep in mind. If these brushes snap here, unfortunately lose a
lot of their texture, they can't be used with
a snapping function. Yeah, it looks super messy now, but don't worry, we're
going to clean that up now. Then of course, we
want to erase in here, we want to erase
those little swirls you see, once you get started, you start adding here and there, getting a new idea. That's exactly what
this practice is about. Oh, how pretty. Oh, I love it. All right, that's really nice. I want to clean up this
line here as well. I'm not very fond of having the yellow dot on the same
layer as the red one. I want to erase that again and give it its own layer
because maybe you want to add some more yellow
later on and clean up. You remember I didn't
enable the drawing assist because drawing circles in the center works better
without the drawing assist. So let's think about what else
we want to have in yellow. I guess I want to go
with those leaves here. All right. Pretty. Okay, let's
erase when we don't lie. I guess my next color is going to be dark blue
because I think it needs a pop. I will probably add
the dots here in blue. I guess we're going to go and fill our diamond here as well. Then I guess I want to
introduce green as well, and make those little stems
or leaves here in green. And then let's see what we have. Add another layer, go to green
and turn on drawing guide. Now let's turn off
all the layers. We don't want to
see the sketch and also the drawing guide and
look how cute that looks. What you could do now is you could go ahead and draw just as simple as this is a huge
variety of different tiles. They would be super
easy to combine and would create just such
a lovely big picture, like a wall with different tiles would
just look fantastic. Now let's move on to
our next practice, where I show you how you
can design a quarter of a tile but make it
look like you've created a huge variety
of different tiles. See you in the next lesson.
11. Practice 4: Quarter Tile Design: All right, here we are with our mindfulness
practice number four. Again, this is again a
practice where we just can let go and see what
happens with our drawing. But first I want to
import another grid. Let's see what we have here. Insert a file. I guess this time I want to
go with the grid complete. The grid complete has all the grid lines on
top of each other. I try to mark them differently with different colors
and different dashes. Let's go ahead and turn down
the opacity quite a lot that it's not so
super distractive any longer for this way of drawing. Even though I'm only drawing
a quarter of a tile, it's going to be super
versatile and put together, it's going to look
like a huge picture. You will see what I mean. Let's add another layer
and go to our range tool. Again, go to Canvas. Drawing guide, Added drawing
guide and go to Symmetry. Now we want to stay with
those with this symmetry. However, I want to rotate
the axis a little bit. I want to make it diagonal. We need to grab the
green dot here. Then we can just rotate the axis of where
we want it to be. And I want it to be
right in the corner. That's enough more
we don't need. What I'm going to draw here on this layer is going to be seen
on the other side as well. We keep it fairly simple. Let's go and pick the
glaze equal brush for now. Just start in this corner. Just draw something like lines here that
meet in the center. As you can see, what I do on one side happens on the
other side as well. Awesome. All right, let's
move on to this corner here. This time I guess I
want to pick orange. I want to go and get a
little bit bigger with both my brush and the length
of my lines like this. All right, that looks
very nice already. Let's put something
in the center and we just stick
with that pattern. Why not using, Let's
say we go with steel and do the same kind
of flower in the center. Now that doesn't
really look nice, let's try once more. We can add something
else in this corner, which will be then put into
the other corner as well. I guess this time we
can go with dark blue. Now once more, let's
make it really fat. We can fill these areas as well, maybe with some yellow dots
that looks really nice. What if we would add some more orange
here around the green? I guess we could even
change the center of our flow here by
just deleting it. Let's add maybe
orange in the center, on the opposite side. We're going to do the same. You see, I'm not
even doing a sketch. I'm just going to go and do
whatever my hand tells me to. All right, and maybe some more yellow in the center
of our blue flower. This is a super simple
pattern as you can see. I drew everything in one layer because that's all we need. Let's turn off our grid, and let's turn off
the drawing guide to see it in its full beauty. However, if we want to
put it into a pattern, we really need to do a little bit more of a work than usual. Let's duplicate this
layer quite a few times. Let's make sure we duplicate
it four more times. And then toggle off
the bottom one, which is our original because we don't want to touch that in
case something went wrong. Let's start with the
second layer from the bottom and make it smaller, and then we'll see what happens. Oh, I turned off snapping. That won't work. Let's toggle that on once more. Here we go. All right, then let it snap in the center until we see
our golden lines here. Great. Now let's
move onto the layer on top and move it next to it, and now you see what happens. Oh, wait a minute, let me turn of the other layers. It doesn't match. Why is that? Because we drew a quarter of a tile and not an entire tile. So that means we just
need to rotate this one. Go to tool and tap rotate twice. Now it meets in the
center perfectly well. Let's go on to the next layer. Didn't mark. Let's go onto this
one. Make it small. And here we have
the same problem. We are just going
to rotate until the orange flower
is in the center. How cute, I love it. I really love it already. All right, let's move
on to our next layer, the last one small, and rotate it until the orange
flower is in the center. Now everything meets
perfectly well. You could just go and
make sure in your original that all those
circles are perfectly round, but I don't really care
about that right now. It looks hand drawn. I just didn't have to put too much effort in it because
I just wanted to relax. That's what we achieved
and I really love it. In our next step, I want to just check if we could get like
a seamless pattern with it. Let's all the four
layers, We rotate it, group them, duplicate this
group and flatten it. Turn off the original as usual. And then duplicate, duplicate
once more once more. Then we can start putting these together as
well to just get like a feel how it would
look if you would just tile a whole wall with it. Look at this. Oh man, I love it. It looks so Portuguese. And it wasn't a lot
of work, right? It wasn't a lot of effort or
thinking process necessary. It's just super cute. And then let's move on
to our last exercise where we going to practice a little bit of a
delved war design. See you in the next video.
12. Practice 5: Delftware Design: All right, let's just move
on to our next practice, our last one in this class. And this time we try to mimic the Delt ware or Delft pottery. The main characteristics
of this design is that all the colors are just basically different
types of blue shades. And Delta is usually
way more delicate. Most of the delve were tiles
were either single pattern, like a real illustration
on each of the tiles. Or like a florals design
on a quarter of a tile. Like one tile is a
quarter of a full pattern to create more of variation when you put
all those tiles together. This is what I want to focus on. I'm not such a big fan of like an illustration in
the center of a tile. I favor those delicate
patterns that you can put together to create
like a huge pattern. And this is what we're
going to do in this class. Let's go ahead in
our new canvas, add again one of our grids. Insert a file. I'm going to go again with the diagonal symmetry I showed
you in the lesson before. I guess I'm also going to
go with a grid complete, again to just have
all the lines I need. I might need turn
down the opacity. Add another layer and a drawing, The drawing assist canvas. Drawing guide. Added
drawing guide. Let's go to symmetry and
just rotate the center axis. Tap done. And here we go. What I want to do
now is even though I'm just creating one tile, yeah, I want to create
several designs in one tile. When we put it together, we see all those
different designs come together and create
a holistic design. Let's go and do that. This time I want to go with
a sketch again. Let's see, we have the
diagonal symmetry enabled. I guess I want to have a center line going into
a square like this. Maybe I want to add a little bit of an
embellishment here. And also the make sure
that it looks equal. Although not two
equal as we know. Most of those soleus or
delta is hand drawn, it won't ever fit
perfectly well. Let's have something
here in the center. Maybe something like this with maybe we'll see how that
looks later on here. I guess this time I want to
go with more angular shapes. What do we do that way here? Then we pattern in the center. Maybe maybe we just erase a line in between.
Maybe like this. Let see here, we definitely need some
pattern in the center. I guess this is too long. What if I just add
something like that? I guess the same ish, kind of here and maybe a dot. Oh, that looks very pretty. I guess we can have like embellishment
here all the round. Gorgeous. And I
guess that's all it needs here in this tile. So this kind of tile is
going to be a little bit more empty, but maybe What if we add a cat
leaves here as well? Maybe this shape here as well? To just have a repetition of what we drew in the
center. Oh, yeah, like that. I like that. I guess
I want to have dots here in the center of
our line, erased dots. Maybe add another thinner
line here, also here. Oh yeah, I guess that
comes together very nicely on this layer here. Let's see if we can
go with a little bit of a scale pattern because this is something I saw quite often during my research. I want to copy this
shape here and put it here and there so that
it's equally looking. I guess I'm going to
just duplicate it. Copy and paste. Paste it. We are on a different
layer so we can merge these all together. All right, and here we have
something coming out of it. All right, I guess that's
enough already. Super nice. So let's go ahead and just fill that with color this time. Since I drew everything in blue, I want to turn my sketch into multiply blend mode and then add a layer and
put it underneath. All right, I'm going to start
filling the areas with my, I guess I'm going to go with
a glaze equal this time. I'm just going to use dark
blue and light blue shades. But I need to make sure that
I turn on my drawing assist. And we keep in mind
that delta as well as azole sus is hand drawn so we don't need
to be too perfect. Oh, all right, let's clean up our, our lines. And I really like this kind of coloring book experience
when drawing us less. It's really nice. Okay. And on the
layer underneath, I'm just going to add like
a little bit of light blue. That's what we have the
light blue shade here for. I turned on the sketch again and then I'm just going
to fell underneath. However, the sketch is
still way too opaque, I'm going to turn
down the opacity. And I didn't turn on
the drawing assist, so I'm gonna do that now. And as well, we need
to clean up the edges. All right, I guess that's
all we need to do here. So let's turn off our grid. Let's, oops, let's
toggle off our sketch. Turn off the drawing guide. Now we see we have a
quarter of a tile. Again, we have the same process. Now we're going to duplicate it, make it smaller, and rotate it until it fits
together. Let's see. Mark them both, group the, duplicate the group, flatten it, turn off the original in
case we need it later on. And then just
duplicate what we have here three more times. Now we have it four times. All right, let's
get started with our top layer and make it smaller until we
have the yellow lines. How gorgeous looks
that such a wonderful, delicate pattern. Really nice. And we could add the joints. Now as we did in our
previous lessons, let's go and get this layer. Go back and fill it in, make sure we have it on top. Great. Then we add a little bit of our
shading underneath. Wonderful. And now
what we're going to do now is let's just mark
all those layers. Turn them in a group. Duplicate
the group and flatten it. And then duplicate this layer. Yeah, three more
times, you guess it? Great. All right, turn the
original off. Here we go. Now, as usual, we shrink
them in each corner. I love that process,
I really do. Then we'll see how
our pattern evolves. We're almost there. Here we are. Here we have our delved
ware and it looks amazing. I love it. All right. I hope you liked what
we came up with too. I hope you also find
it soothing to have this drawing process
and you go ahead and draw many more patterns. And in the next
lesson I promised you I'm going to add a
bonus lesson on how to put together the different
kind of tiles to create like a nice and
colorful big picture. Which we could even print
out on a sticky foil. Maybe to stick it
on another surface. See you in the next lesson.
13. Bonus: How To Combine Tiles: All right, I promised you
a bonus video where I show you how you can collect your
designs into a big picture. Which you could then offer on
print, on demand platforms. Or even print it out on a sticky foil or on
a sticky wallpaper, which you could then use
to decorate your home. For that, we have to have a
little bit of a preparation. We need to save our
single tile patterns into our photo app by just
picking some of our designs, the single design size. And here's a little hint, if you worked a lot of
quarter tile patterns, you can just put four tiles
together as I did it here. Here we have a single
tile pattern which we can then just save
in our camera role. We save it super simple. We go to the wrench tool, we say share and share it
as either Jpeg or PNG. I did that already. We can go back to the gallery and start
with a new document. By now, you need to think about how you want your
design to look like. Do you want to have it square? Do you want to have
a rectangular? I think I want to
go with a rectangle with five by 4,000 pixels. I'm going to create a
new one with the width. I say 5,000 With the
height I say 4,000 pixels. Right now I tap Create
and the new canvas opens. Now we need to do
a little bit of a calculation to make it simple. I want to calculate with
thousands of pixels. So that means the canvas
is 5,000 pixels wide. So I can put five different tiles horizontally
next to one another, and four different
tiles vertically. Four multiple five makes 20. I need 20 different tile files. Now I want to go and say, add. Insert a photo. I saved my designs
and it is ten. And that's super simple. That's pretty easy. I want
to add each tile twice. Let's start with
this design here. Now we're going to do our
resizing cropping trick Again, I will tap this corner and this dimensions
panel will open. I make sure that the
chain here is blue. That means it's activated. When it's activated, it
changes both the size of the height end of the
width at the same time, which is really handy, especially when
you have a square and it keeps all
the resolutions. I want to insert 1,000
and my tile has shrunken. Now I'm just going to put
it up here in the corner. All right, that's
tile number one. Now we proceed the same way
and add all the other tiles. All right, our first set of ten tiles is already imported. What we can do now is just
duplicate all the tiles we have already and then move them around where we think
they might be nice. All right, here we
have our big picture. Since we've used
all the same colors throughout all the designs, they will match
together our ways. If you want, you can
add more joints. For now, I will
leave it as it is. Remember, you can always change and make some
tweaks because I think this here doesn't
really look nice because they're in the
same as they here. So you make your tweaks and then you might want
to add the joints. I'm going to keep it as it is. I hope you liked this
bonus lesson and I hope to see a lot of your
big pictures as well. So join me in the last
lesson where we going to wrap up the class.
I see you there.
14. Conclusion: Well my fellow artists, we've arrived at the end of this mindful
drawing experience. I hope you've relished
every moment of exploring the world of azules as much as I've enjoyed
being your guide. Remember the beauty of this art form lies not only
in the final creations, but in the process itself. As you continue on
your creative path, don't forget the
therapeutic power of art. Whenever life gets
a bit too chaotic, let those brushes dance, let those colors soothe, and let your imagination take
you to a peaceful realm. With this class, you have
all the tools you need. Feel free to revisit
our class materials any time you crave that moment of
relaxation or inspiration. If you ever want to share your future projects or simply chat about your
artistic adventures, the creative community and I
will be here with open arms. Simply share your work
in the project gallery, also on social media. Feel free to tack
me when posting, as it helps me to find
your art out there. I am always so excited to
see what incredible artworks my students come up with with what they've
learned in my classes. And I love to feature student art in my
Instagram stories. Make sure you follow me here on skill share as well
as on social media to get firsthand notice of whatever new I am
up to remember. Art has the incredible
ability to calm our souls. And you've experienced
that firsthand. Keep drawing, keep creating. Above all, keep finding
peace and joy in your art. Thank you for joining me
on this creative journey, and I hope our paths
will cross again soon. In my next class and of course, on social media. Bye.
 Jutta Schneider, Artist | Educator