Transcripts
1. PORTFOLIO ORGANIZATION SYSTEM FOR SURFACE PATTERN DESIGNERS - Presentation: Hello everyone and welcome to this class about portfolio organization for surface pattern designers. My name is Beatriz Pascual and I am a full-time illustrator and surface pattern designer from Madrid, Spain. For me, the organization of my digital files is one of my top priorities in my work, because knowing where my things are, gives me security and confidence. But like practically everyone else here I started off by organizing my portfolio in, let's say, a non very efficient way. So it took me a while to realize about how important it was to establish an efficient and coherent organization system in order to have my work organized and to be able to locate any file quickly and easily. In this way, I developed a method that I will share with you in this class that it's going to help you enormously to establish routines to first become a more organized and efficient person in your work, and therefore to improve your productivity processes, saving you precious time. So in the next few lessons, I am going to teach you step-by-step how to create your own portfolio organization system and how to support it in an incredible database that will also become the most efficient option to show privately your full portfolio on your own website to potential clients and brands. This class is especially designed for surface pattern designers who want to start the portfolio organization system from scratch and for those surface pattern designers with a weak portfolio organization systems already created and experiencing at the moment difficulties to store, track, and locate easily their digital files. First, we will talk about SKU numbers and pattern descriptive attributes. Next, we will create our folders structure with parent folders and children's folders. After that, we will find out which documents and files should be created for every single pattern. I will give you some tips and I will share the tools that I normally use. Finally, we will create our database using Airtable and I will show you how to publish your portfolio on your website. So if you desperately need help getting started organizing your portfolio, I will be very happy to show you how to do it. So come on, let's dive in and I'll see you in the next lessons.
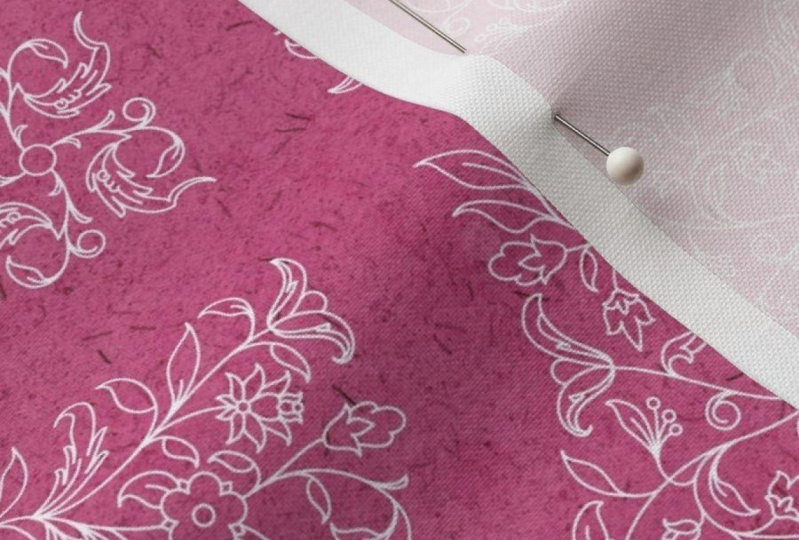
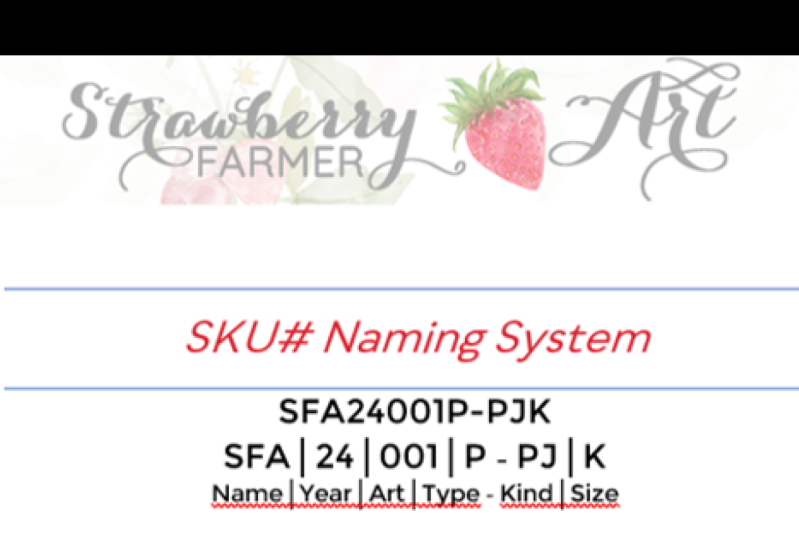
2. DEFINING YOUR SKU #: So in this lesson I am going to explain to you what is the difference between SKU numbers and pattern descriptive attributes, as this is a fundamental pillar to organize our portfolio in a proper way from the very beginning. And to make the explanation easier for you, I am going to show you an example about a very common portfolio organizational mistake that I see lots of times. Surface pattern designers tend to organize their portfolio main folders by themes or categories. Well, this is a big mistake and the simple explanation is because a theme or a category is just a descriptive attribute or characteristic of the designs. And therefore, sometimes we can find that our pattern could easily fit in more than one category or theme. But let me show you an example to illustrate it better. Let's imagine that we have a portfolio organized by theme with different main folders, such as Floral, Animal, Christmas, Geometric, Children, etc. Does this sound familiar to you? Well, I bet it does. Now, let's think about this design that we have just completed. In which folder, would you keep this design? In your floral main category or in your animal main category? Do you see what I mean? Exactly, we are facing a problem as this design could perfectly fit in both categories. So what is the solution to this problem? It is very important that we understand that our portfolio has to be organized by SKU numbers and never, never, never by pattern descriptive attributes. Then the question is, what is a SKU number? Well, a SKU number is just a unique code for each design. And what are the pattern descriptive attributes? Well, these are all the characteristics that we use to describe the pattern, such as TYPE, if it's a vector or a raster. The LEVEL, if it's a hero, coordinate, a blender. The THEME, if it belongs to Floral, Christmas, Geometric, Children, the colors, the REPEAT TYPE, if it is a half drop, a brick layout, diagonal, straight. The INSPIRATION can be an attribute too, SUBCATEGORIES, COLLECTION NAMES, etc. So in this example you can see how we identify the SKU number and the attributes for this design. First, we have the SKU number and SKU references are normally formed by numbers and letters. I form my SKU numbers using the letter P, which stands for Pascual. Then the next two numbers, 20 in this example, refer to the year. And finally, the last three numbers refer to the pattern number. Then we identify all the pattern attributes for the design that are relevant to us. And all these information gathered together, SKU plus attributes will be later introduced in our database and will be very helpful to locate any design quickly and easily, filtering using any of them. But we will dive into that soon in the next lessons. For now, what I want you to start thinking is about how you're going to define your own SKU numbers. And you can use mine as reference or create yours according to your preferences. Remember, it is your portfolio so you decide. Okay, so with these first assignment set up, let's move now to the next lesson.
3. SETTING UP YOUR FOLDER STRUCTURE: So in this lesson, we are going to find out how to build our portfolio, parents and children's folders structure. So until now we have learned that every pattern, has got a unique reference, the SKU number. And these SKU uniqueness applies also to each color way that we can create for any design. As each color way counts as one pattern in our portfolio. But we have a small issue here because we cannot forget that our main portfolio structure has to be a correlated sequence of SKU numbers. And it happens that sometimes we can create more color ways for a design and sometimes we can create less. So we need to find a coherent way to integrate all those variations in our folder structure, regardless of the fluctuation of the number of color ways that we can create for each design. So how do we do it? The solution here starts by setting up a structure using main or parent folders with SKU codes correlatively in groups of 10, like in the example. And by using subfolders with the numbers from one to nine that belong into those groups of 10 for all the potential color ways, as I show you here in the presentation. However, it is quite unlikely that we will create them all as normally, we will produce two or three color ways on average for each pattern and therefore, we would only have two or three sub folders into the parent one. So the idea here is that the parent folders are the big directories of the sub folders which allocate the different color ways for one single design. Let me show you how this process works. So as soon as we start or plan and new design, we immediately create a parent folder which will be assigned with a sequenced SKU reference that has to end in a 10. Let's imagine that our parent folder SKU code is P 20030. Once we complete our latest design, it will be placed into that main directory inside a new sub folder. As this design is the first color way, I will assign it with the SKU number, P 20031. Let's imagine now that we create another color way for that design. Then into the main parent folder, we will have in total two sub folders, one for each color way, and these will be named as P 20031 for the first color way, and P 20032 for the second color way. So as you can see, the parent folder is the directory of the children's folder that will include every color way and still having a unique SKU number. The following could be an example of the numerical SKU sequence for main folders and sub folders that represent the color ways that we have created for some designs. With this system. at a quick glance, you can see how many different designs and total color ways you have got for each pattern, right? So in this example, we have five new designs. But as we consider each color way as a unique pattern with a unique SKU reference, we have got 11 total patterns in our portfolio that we will need to include properly in our database. As you can see, the main folder sequence remains clean and organized without having any gaps between numbers. Okay, let me repeat this again. The idea is to have an organized sequence of SKU numbers ending in tens. Obviously the folder structure needs to be supported by a database that will include the SKU numbers, plus all the pattern attributes that we briefly mentioned in the previous lesson. We will dive into that very soon. But first we need to know what has to be included into each children's folder. So come with me into the next lesson.
4. FILE CODIFICATION SYSTEM: So up to now we have learned the importance of the SKU numbers to organize our portfolio and how to distribute our parent folders and subfolders. We agreed that parent folders contain the sub folders. So in this lesson, I am going to teach you which documents and files should be included inside these children folders. Particularly, I really recommend to keep everything related to a single pattern inside the corresponding parent and children's folder. So in order to organize correctly all these documents and files, we need to establish a file classification system. First of all, it is a good habit to create in the main corresponding parent folder, a subfolder called references. In this folder, we will keep our visual or written references if we have them, such as images, poems, songs, or anything else that has been a source of inspiration for us to create a specific pattern. We can include as well the initial sketches, mood boards, and motifs development files. In the previous lessons, I explained that our patterns will be placed inside the children's folders, numerated with correlative SKU numbers. So now we are going to see which documents and files should be created and placed inside these subfolders. So we have already created our children's folder inside our parent folder. As surface pattern designers, our workflow should start with the first file where we have our raw pattern. And I call it raw, because whether we work on Illustrator or Photoshop, our pattern is not trimmed or clean yet at this point, because the art board can include still our notes, ideas, different color tests, and so on. This first file is very necessary to save because if we need in the future to make any variations, we can easily go back to it and make modifications. So it is important that we find a proper way to name it. My suggestion is that we use the corresponding SKU number and add an ending that could be SEAMLESS, RAW, INITIAL, or anything else that you can come up with. This is an example of how it would look in our subfolder. The second file would be our pattern, totally clean or trimmed, ready to use or to send to a client. To trim your patterns. you can do it manually using a clipping mask or using the script such as super magic eraser. as I do in the example. Scripts make your processes faster and smoother. so they are very handy to have. If we are working with Illustrator, our color swatch panel will just include the color palette that we have used for that specific design. And we will have the symbols panel empty. This is a good habit to keep, as our file weight will be lower this way. If we are working with Photoshop, we will only have one layer with the trimmed and final pattern. We will name the second file using the same SKU number and the previous ending that we used in the first raw file. But now we add a new ending that could be END, TRIMMED, FINAL, STOCK or anything else that you can come up with. This is an example of how it will look in our sub folder. Next, we will save a thumbnail of our pattern that will be later used in our database. So I recommend creating a rectangle of 800 by 600 pixels where we can apply our pattern on and save it for web optimize in a JPEG or PNG format. Try always to be under 300 kilobytes. In this way, the image weight will remain low. As we will save this image directly from the second file, we can name it using the previous name and adding the suffix, LOW, PREV or similar. This is the example of how it would look in our sub folder. I recommend as well, saving always another image, JPEG or PNG in high resolution, 300 DPIs and in CMYK color mode, with our pattern applied in a larger rectangle of 297 by 420 millimeters, This image could be later included in portfolios to be printed. My suggestion here is to keep always the SKU number and then save them with the same name as our second file. (the clean pattern) ending with HIGH, HIGH RE or similar. This is an example of how it would look in our sub folder. I suggest creating a portfolio sheet for every single pattern that we complete. For this purpose, it is recommended to work with templates to speed up the process. You can elaborate your portfolio sheets using Illustrator or InDesign templates. Save the new pattern portfolio sheet in both high and low resolution. The high resolution should be a PDF or PNG for printing. So you should save it with CMYK color mode, we can add the suffix PORT to identify it quickly. The low resolution one is meant to be attached to potential companies in your pitching emails, for example. So save it with RGB color mode and add the suffix PORT LOW. This is an example of how it would look in our sub-folder. If you normally work with collections, now you can create another portfolio sheet using another template with all the designs that are part of that collection. In this case, I suggest exporting both high and low resolution portfolio sheets into the sub folder that belongs to the hero pattern of that collection in particular. And to identify them correctly, we can name the files including the name of the collection or similar. As you can see for the Low Re, you can export as a JPEG, PNG or interactive PDF with the same presets as before. For the High Re, I always export as a PDF for printing. Keep this CMYK color mode. Finally, we will include as well all the social media images or other visuals that we will need to use in our website, for example. For this purpose, it is again very recommendable to use templates to speed up the process and save you time. These template should be set in RGB color mode. My suggestion here is to keep always the SKU number when exporting them as JPEGS or PNG. Those images that will go on your website should be already optimized for SEO by including keywords that will help us to improve our presence on Google. This is an example of how it would look in our sub folder. So this is how our sub-folder content would look according to my recommendations for your file classification. The important thing here is that everything related to a single pattern is in place. And at the quick glance, you will know exactly which file, is each one of them and what is their final purpose. So whenever you need them, they are already there for you. Not bad, right? If you are consistent with your file classification, whenever you finish a pattern, you will see and believe me, that your workflow will improve tremendously. Your task for this lesson is to decide which suffixes you're going to use for each one of your files and documents in your subfolders. I gave you already some ideas in the lesson, but it's useful you have to decide for yourself what best suits you. Alright So now we're ready to move to the next lesson.
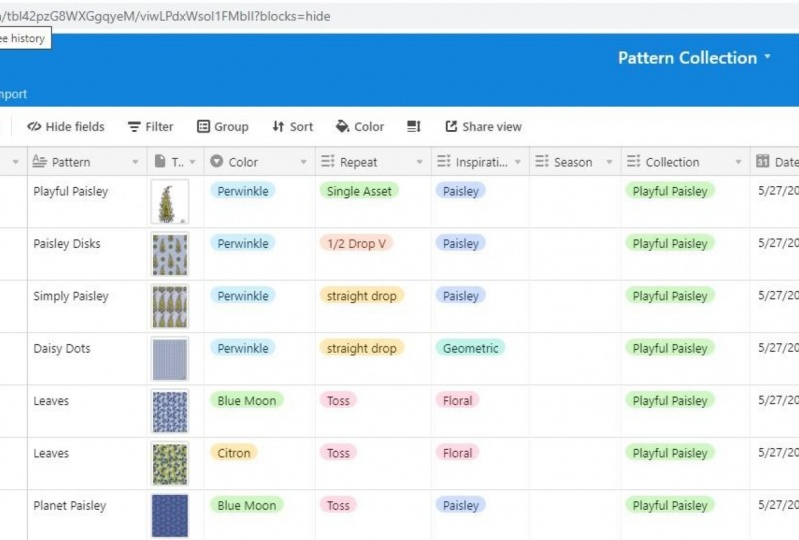
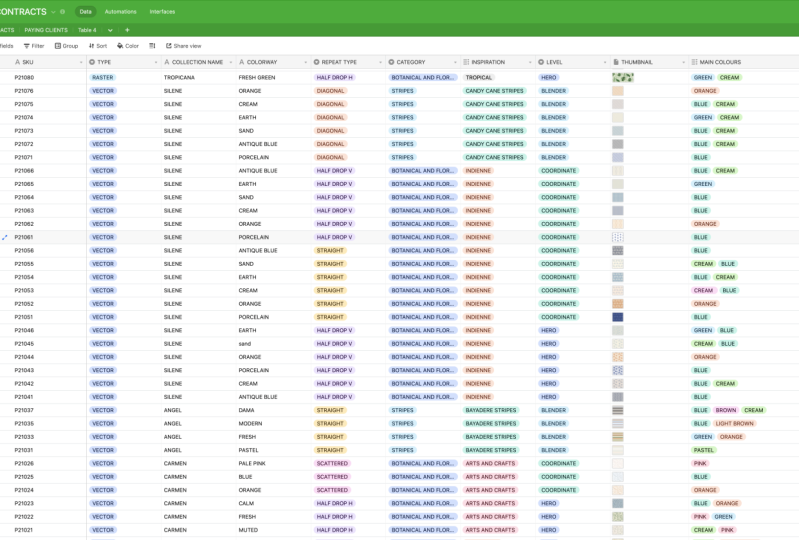
5. CREATING YOUR DATABASE: Okay, so now in this lesson we are going to create step-by-step, an amazing database for our patterns. And as I mentioned in the previous lessons, the database is the support for our folders structure. So it is very important to dedicate time to create a tool that really suits our needs. When I discovered Airtable, I found out that this amazing tool is what I needed to complete my portfolio organization system. Airtable is a spreadsheet, a database hybrid. with the features of a database, but applied to a spreadsheet. Well, this might sound a bit intimidating but when you see how it works, you will understand it very quickly. You can start by creating an account for free. If you remember, in the first lesson we already mentioned which pattern descriptive attributes could be integrated in our database to locate quickly any record. Let's review now what we need in the following scheme. Our first column will be always dedicated to children's folders SKU numbers, as those contain our final patterns. And remember that each colorway counts as one single pattern in our portfolio. The next column will include the Type if it's a vector or raster. Next one, the Level, if it's a hero, a coordinate or a blender; the Repeat Type. If it's a vertical half drop, horizontal half drop , diagonal, straight, tossed, etc. The Theme or Category will indicate the nature of the motifs that make up the print. Could be geometric, floral, animal, etc. The Inspiration or Subcategory, will show the historical influence for the design, such as Arts and Crafts, Toile de Jouy, Damask, etc The Name, Collection Name, or Colorway columns will include a specific text to define the print. The main colors are also a good idea to include in the database but just keep the color's name simple. The thumbnail column will include the low res images that we have saved in our children's folders. Then we can also insert other automatic columns, such as date of creation, month, and year. Finally, I suggest including as well a column for the price that you initially consider for selling or licensing your designs. So now with this draft in mind, let's create our database in Airtable from scratch. After signing up, you will see the dashboard with some standard bases. You can give your workspace a name now. As you can see, mine is just patterns portfolio. Now click in "Add a base" - "Start from scratch" and give it a name. You can customize the appearance of your base with colors and icons. First thing we see in the spreadsheet is a main menu where you can read Views, Hide fields, filter, group, etc At the moment Grid View is the active view that we are using. And if you are familiar with spreadsheet programs such as Excel or Numbers, in this grid view, we find a similar spreadsheet look with columns and files. In the first column if you click on the little arrow on the right, we can rename the field as SKU number. If you click on customized field type, a new window will come up. If you select the little arrow in the blue rectangle, you will display all the possible types of fields that we could select for a primary field. We will keep our single line text field type and we click Save. For the Type attribute in the next column, we click in the little arrow on the right. Then click "Customized field type" and a new window will come up. We give the column name, and if we click the little arrow in the blue rectangle, it will display all the possible field types. We choose, single select, we add now the two options, vector and raster and click Save. For the Repeat Type attribute, we do the same as in the previous column. The field type is a single select, and we include all the repeat types as options. If you forget to include any option, don't worry very much because you can enter them later at anytime. Our database is very flexible. Do you remember when we previously agreed that a pattern can belong to more than one category?. Well, with that in mind now for the category column, the field type is multiple select. And we enter all the themes that we can come up with as options and we will be able to add new options whenever we need. For the Inspiration attribute, we'll choose multiple select field type, as a pattern could be inspired by more than one style. Enter the different options and save. For the next three columns, Collection Name, Name and Colorway, we select single line text field type and Save. For the Level attribute, we select a single select field type, enter the three options, and save. For the Main Colors attribute, we choose multiple select Field time, enter some options and save. For the Thumbnail attribute, we choose the Attachment field type and click Create field. The next three columns are a bit different as they'll give us automatic values. And this means that we won't need to enter any data. To configure it properly, name the first column "Created Time" and now select "formula" in the field type options. Enter the word "create" and Airtable will give you the full formula. Now select and click "Create field". For the Month column we select "formula" as the field type and write the word "month" to find it among all of them. Now, click in between the two brackets and select the option Created Time -field, that you can see in a list below. Now, create the field. Finally, for the Year column, we select "formula" as type field and enter the word "year" or find it among all the formula options. As before, click in between the brackets and select the option "Created time -field" that you will see below. Then create the field. Our last column is the Price. Select the Currency field type and choose your currency. Click on create the field. With our database ready, now it is time to enter some data. Remember that you will be able to add more columns according to your needs, or some more options inside the columns that we already have created. Airtable is very flexible. I will show you now how to enter the records. For this example, I will use the two color ways that I have created for a single design. In the Thumbnail column, you can drop files or select them from your children's folders. Remember that we will upload here our low-res images. When you have attached them, if you click in the small blue icon on the corner, you can expand the cell. We would include every single attribute of our design in the corresponding column. If you need other options in the columns, you can just add them now. As you can see, the Created Time, Month, and Year columns will be automatically refilled. Airtable allows you to select and drag the cells to copy the content quickly. When you have finished entering your record in the SKU number cell, you can click the blue icon in the corner to expand the record and see all the details that you have included. Now we are going to include another view for our database, the gallery view. And in this view, our records will show up in a beautiful way, which is perfect to approach visually to our portfolio. If we go to Customize cards, we will have the option to select the information that we want to display in these view. We can move from one view to another quickly, just clicking on them. This is the current gallery view of my portfolio. We have already talked about the options to customize the cards. And now we are going to see what the filters can do for us. And here is where we will notice that our hard work and effort in entering all SKU numbers and pattern attributes will pay off. If we go to Filter in the menu, we can now use all the pattern descriptive attributes as filters to locate the records that we might need for a specific matter. Depending on our needs, we can apply more than one filter in our search. Let me show you how it works. The database will give us the records that apply for those filters. And we will be able to locate them very easily in the corresponding parent and children's folders. Not bad, right? So when we have our database ready, the whole portfolio organization system makes sense. All right, so now we are ready to go into the last lesson.
6. PUBLISHING YOUR PORTFOLIO: Okay, In this last lesson, I am going to show you how you can publish digitally your full portfolio online. Publishing your full portfolio online in your website, for example, could be a really hard work if you're using other methods. For example, I work with WordPress and I know many plugins that allow you to upload your portfolio in your website. However, most of these plugins force you to upload the content manually. But if we have already done these hard work creating our amazing database in Airtable. We should take advantage of it. I suggest displaying your full portfolio in a private section of your website, password protected, and only available for potential brands and clients. You can always use some of those plugins that come with more features to showcase some of your works publicly in your website, but keep Airtable to display effortless, your full portfolio online. Airtable allow us to share our database in a gallery view mode. We have seen in the previous lesson how to create a gallery view and how we can customize the cards to show different attributes. We can create more gallery views in our database for different purposes. For example, we can create a gallery view to showcase our full portfolio in our website. Making visible only some of the patron descriptive attributes that we consider important for our potential clients and brands, such as SKU numbers, collection names, category, inspiration, level, or type, for example. We can also sort our patrons by different criteria. If we click in the option "share view", a new window will come up. Now we can go to "Embed this view on your site". We will see now a new window with an embed code that we have to copy and paste in a page in our website. The full portfolio should be displayed in a password protected page only available for your potential brands and companies. This is the final view that somebody with a password will have when entering in your portfolio page. They will be able to filter and sort your patterns by the attributes that you selected in the cards for that gallery view. You can rename this gallery view to avoid confusions with the other possible views that you can create. If you customize the cards for that view, again, the changes will apply automatically where you have embedded the code. Every time you enter a new record in your Grid view, your database will update automatically in all the views that you have created, including the gallery views. As you can see, Airtable is the perfect portfolio database for our patterns, saving us precious time. Alright, we are coming to the end of the class. So let's move now to the next video where I will talk about your project.
7. YOUR PROJECT FOR THE CLASS: So we have come to the end of the class, and now it is your time. You project for this class is to create your own portfolio organization system following the recommendations I have given you along the lessons. If you have any doubt, you can leave them in the comments below. I'm looking forward to seeing pictures of your project. Thank you very much for your time and I hope to see you very soon.
 Beatriz Pascual, Pattern Designer & Entrepreneur