Transcripts
1. Welcome: Well, hey, everyone.
Welcome on into my studio. My name is Carrie Sanders, and I'm an artist, a teacher
and a creative here in Utah. I'm so happy you landed
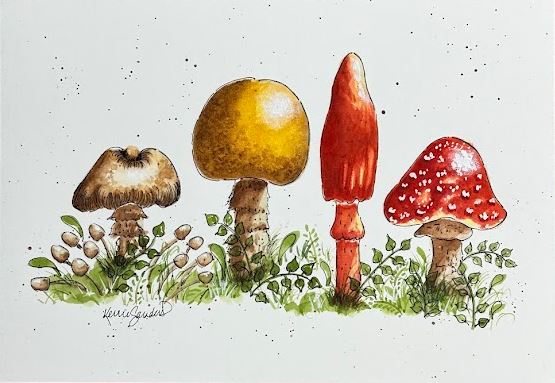
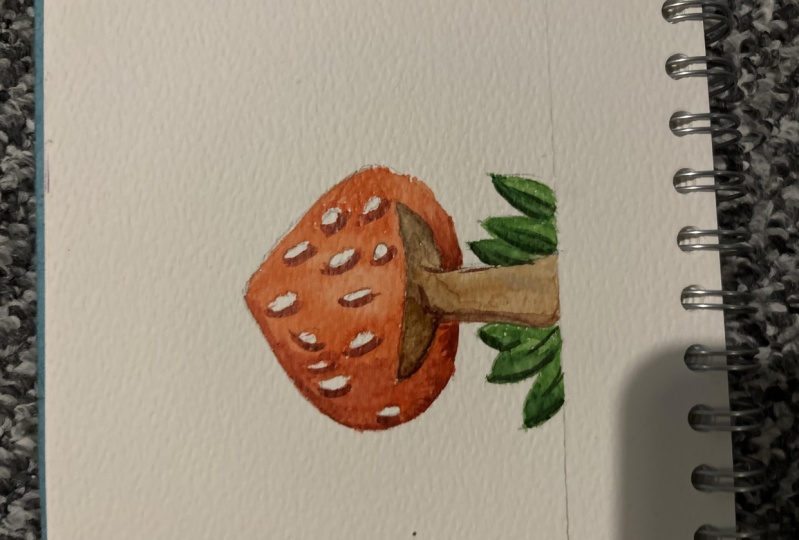
on my page today. This is such a fun piece, this mushroom scene
with watercolor, and then we outline it with
some pin ballpoint pen. It's past. It's easy. It's fun. It's relaxing. It's something you can
do in your sketchbook or you can do it on some
art paper like this. And it's for people
of all abilities. Even if you've never
painted before, you're going to have a good
outcome with this piece. All you need to do is follow
my video, step by step, beginning to end, and I walk you through everything
all along the way. If you're more experienced, you can speed up the tape. If you need to
stop and start it, go ahead and stop and start it. You're in control, and
that's a nice thing about the way I post
these in real time. You know, I've been teaching
for many, many years, and I absolutely love
sharing art with others. I love instilling that in others and helping them
learn new things. Today, we're going to be learning some things
like color mixing, and washing, blazing, highlighting,
shading, splattering. We learn how to put a pattern on if you don't know
how to do that. I like to instill knowledge and a love
for art in my students. That's my main goal. I want you to have a good experience. You know, I was fortunate
enough to be picked up by a big box store
over the years and push out a pattern
book that went to 10,000 copies sold
across the country, along with pattern packets. I've also entered many contests over the years and
won some aboard, it's like People's
Choice and first place and second place and others. And, you know, I only share
this with you so that you understand that I have spent
my life in the art world. I absolutely love teaching
and sharing it with others. And I would love to
have you join me. In fact, I'd love to have you join me for some of
my other classes. And if you want to click
the follow button, then you'll get a
little notification when I pop out a new class, and you can see if that's
interesting to you. Or you can just type in my name, Carrie Sanders in
the search bar, and all the classes that
I currently have on Skillshare will populate and you can see what's
happening there. In fact, I've
actually posted a few of my classes that might
be of interest to you. These are all ink and
watercolor classes as well. I've got some
Halloween, some fall, and of course, lots of Christmas classes right
here on Skillshare. And I'd love to have you
join me for another class. Today, if this class
looks interesting to you and you'd like to do
some fun mushrooms with me, then grab your supplies, and let's get started together.
2. Class Project: All right, my fellow
artists and friends. Your class project
today is to complete one mushroom art piece
using watercolor and ink. And following the videos that I've outlined for
you step by step, I'll take you through
from beginning to end, and I promise you're going to end up with
something that you're really proud of and that you
enjoy having to look at. When you have finished, if you could please take a moment and upload that into
our class gallery by looking for this button. All you need to do is click on that and it's easy to upload, but that's such a
great place for us to communicate back
and forth together. I can answer questions for you. I get to see your art piece
and make some comments on it. And don't worry, no judgment,
nothing but love here. And it's really important, I think for us artists
to support one another. And I think it's really fun for us to see what each
other's pieces turn out. You know, I've said this before, but it's kind of
like baking a cake, and you give everybody
the same recipe, and they all turn out just
a little bit differently. But that's because
you are unique. You are talented.
You are creative, and I really do want to
see how your piece turns out because each will
be unique to you. Each will be special
and different. So please take a moment to share your piece in
the class gallery, and I'll see you
in the next video.
3. Paper & Pattern: Okay, let's talk
about the pattern, and then we can go ahead
and talk about the palette. So I am going to be
applying my pattern today using some graphite
paper and tracing paper. So I have given you the pattern. It's on this page of Skillshare. All you need to do is
download that, print it out, and then use a piece of tracing paper to trace that so that you can kind
of see through it. And the paper that
I'm going to be using today for our piece
is 100% cotton, which is not a requirement, just so you know what
I enjoy using it. But what's really
important is it's 140 pound watercolor paper. I highly recommend you use 140 pound paper or better on all of your
watercolor projects. You'll have a much
better outcome. To me, that is more
important than good brushes or good paints. It starts with the
watercolor paper. I am going to be using
a smooth finish. This is a hot cress
watercolor paper. So it has a smoother finish
that makes it a little bit easier for inking to
go on nice and smooth. But you don't have to. You
can use a cold pressed paper, and you'll be just fine. All right, let's
go ahead and get our pattern applied so
we can start painting. I'm so excited to do this. You should have a trace to your pattern onto
some tracing paper, and then I've just attached
it with a Pest tape, and you just slide your
graphite paper underneath, making sure that the
matt finish is down. But just go ahead and make a
little mark and test it out, make sure that you have
the right side down. Now, I'm going to apply
very sparingly, meaning, I'm not going to show every single leaf that I've done here, and we certainly don't want
to apply the pattern for all the graph grass and the things that are in
the background and whatnot. We'll be doing that together
as we work on our piece. So I'm going to go
ahead and speed up the camera as I
apply the pattern, and you apply your
pattern as well. Let's go over our
palette real quick. Before we start painting, that way will be all
set up and ready to go. We won't have to
hesitate once we start. The colors that we're
going to be using today are yellow Ochre, burnt umber, buff titanium,
gamboge, Quinn Sienna. You could use a burnt sienna. I would just be a
little bit more brown. Cad yellow medium, maple
yellow, cad red light, azarin, crimson, sap green, and Hooker's green, which
is a little bit darker. And if you were to treat
yourself to one new paint today, I would say, make it
the bleed proof white. We'll also be using this
for our highlighting and the white dots
on the red mushroom. This goes on very opaque. You can use white guash, but white guash doesn't have the opaqueness that this does, and I really enjoy
using this a lot. And as far as our brushes go, just use a variety
of flats and rounds, you know, small to medium. Same for your flats. I
only have two out here. And so just use what you have at home. That
would be fine. A couple of waters, one for
dirty and one for clean. And some chop towels. You don't have to use a palette if you haven't painted before. You can just use a plate. That would be totally fine. And as for our inking, I put down two different pens. These are my two favorite
pens whenever I do inking. This one's a Uni ball, fine tip. It's a ballpoint pen, but it goes on quite nicely, and it's also waterproof. Waterproof is the
key here, guys. And the other one
that I use quite frequently is a Mogi pen. And same thing,
it's ballpoint pen, and they're both
categorized as fine tip. But you can see here
in the sample I've given you The Uni ball goes on a little bit thicker than
the Muji and that's why I tend to use them both
when I'm doing a piece. But again, the most
important piece to this is that they are both
completely waterproof. So test whatever you
use out, test it out, make some marks, paint over it and see if it
smears or billiards, and if it does, you
don't want to use that. You need something
that is going to hold fast underwater and paint just in case it ends
up getting whipped. Now we are going to paint
first and ink second. That's what I usually prefer. But you never know
when you want to go in and just
touch something up, and you don't want to have to worry about whether
that's gonna bleed out. Now, we are going to neme
my favorite tool ever, the handy dandy tissue.
We'll be using that. Of course. Go ahead and
gather all your supplies, guys, and let's go ahead
and get started painting.
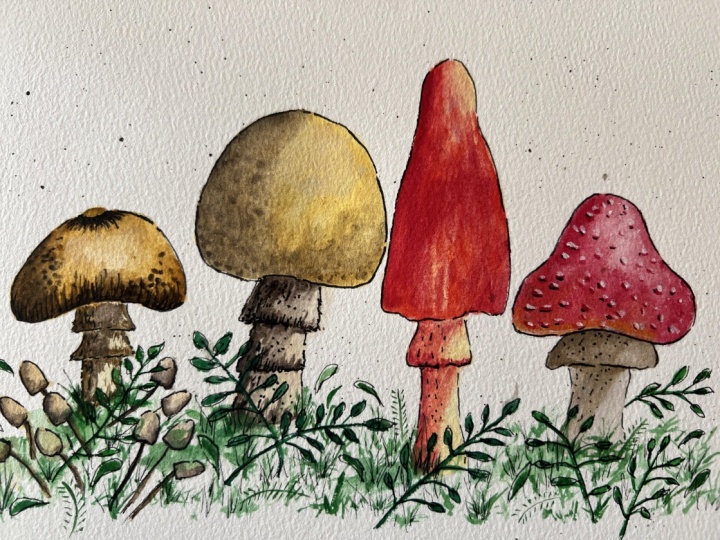
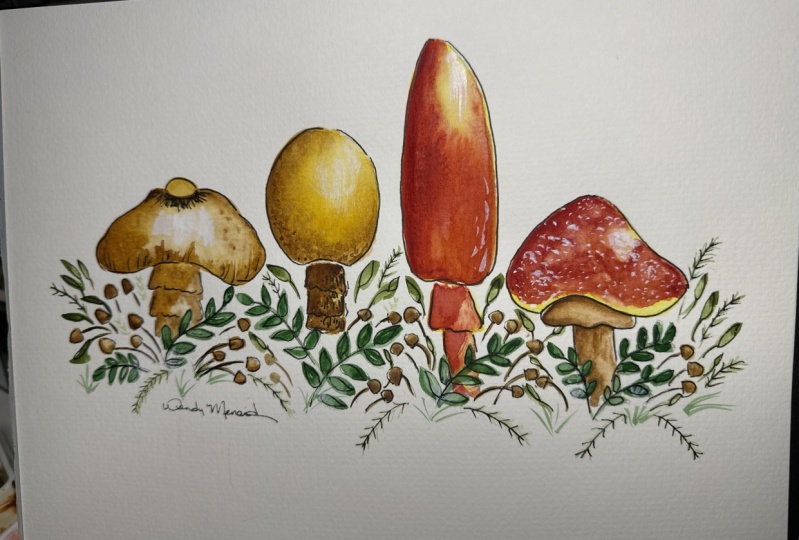
4. Washing In Mushroom 1: We're going to start with
our first mushroom here. So I pulled out
some yellow ochre, burnt umber, and buff titanium. And let's go ahead
and do this together. I'm going to start with a flat and just pick up
some yellow ochre. We're going to do
what's called a wash. That means we're using
a thin layer of paint, and it's all one value. So it's not going to be darker
here and lighter there. It's basically just going to be all the same value
of this one color. Oh. While that's still wet, I'm picking up just
water on my brush, and we're going to pull out
a little bit of a highlight. We're just going to
touch, press, and lift, and you can see how the
paint comes right off. If your paint is being
a little bit stubborn, then you can get that wet with a water brush and lightly
touch it with your tissue. And that will lift off as well. So try both of those techniques. Now, I'm just going
to soften that edge with water on my brush. Good. And we're going to let
that dry a little bit more. I'm switching to a smaller
flat than I was using before. I'm gonna pick up a little
of this burnt umber. I'm going to make this
pretty thin down. This is probably 90%
water, 10% paint. And you're going to
hear me refer to ratios throughout
this class because I think it helps you understand how to work with the water
and the paint together. Now, you'll notice I'm
staying on this outer edge. I'm just floating that
in along the outer edge. I'm not going to go all the
way to the top over there. I'm going to rinse out my brush. And just again, I'm
going to soften that edge a little bit
with water on my brush. Oh, Great. And I'm gonna pick
up a little bit more of that 9010 mixture. And I put it up here
around the button. Cute little buttons. Oh. Alright. I want that to look like it kind of
dents in a little bit, which, of course, we'll
emphasize when we eat. Great. Alright. Now, again,
while it's still wet, let's pick up a
small Smalls round. This is a number four. A little more of this 9010
mixture. Root number. When you see me do that,
I'm just pulling some of the moisture off the
bottom of my brush. No, I'm just going to lightly touch a little bit
here and there, especially in this darker
corner of the mushroom. Lights seem to be coming from
this end for the most part. And we'll put a few little freckles
over here on the side. And because we're
putting wet on wet, they're gonna blossom
out a little bit. And that's awesome. Because
then it looks more natural. Doesn't look like we're
going dots on it. You know how mushrooms have all those little
textures on them. And that's what we
want to emulate. Oh. See how pretty that is. Now, notice I didn't get right on our strongest
highlighted area. Let's go ahead and
leave that area now and come to where
that little button is. And I'm just gonna
add a little bit. Down here. And
again, it's still a little bit wet, which is great. We want that to be pretty dark, and it's great that it
moves out a little bit. Now, if that happens
to you and you saw what drop of
water just came down, just gently touch it with
the corner of your tissue. I'll be just fine. Okay. Super. To touch more because
my drop of water attracted. There we go. Great. Okay.
Let's move to the next part. We're going to let that
settle for a minute. While that is, let's pick
up some of our buff. Again, this is a 9010 mixture. We're going to wash in
wash all one value. I'm just sticking with the round that I already had in my hands, you could switch to your
flat if you want to. If you've ever taken any
of my classes, you know. This number four, we are best
friends, and number four. Alright, so I rinsed out. I'm going to pick up some
of this foot number. Going with a 9010 again. And while it's still a bit wet, you come over here
on the darker side, away from the sun. Ich a little. Hm. I'm not touching the mushroom
cap 'cause it's still wet. So you can see I've left
a little blind there. That's okay. Going to pull out a little I
don't know what that is. Little fringe or something.
Just a little texture. I guess. I will emphasize
that when we ink. I'm just doing it with
the tip of my brush. And add a few little
feeling of texture here. Alright, let's look that dry. While that's drying,
let's go ahead and wash in these cute
little baby buttons. They're going to
be done in buzz. So let's just float those in. Washing them in, all
one color. A one value. Good. And while those are
still a little bit wet. Mot number 9010. And just on the bottom
and the dark side. I'm gonna touch it.
And because it's wet, I'm gonna let it kind
of mix for a minute. We'll do that little bit
of the wet on that techne. What might look
funny for a minute. Oh. Because it does,
and that's okay. We're we're gonna come back
to it, but let's just see. You know, it just
depends on your climate, how much moisture is in the air, how much moisture you
had on your brush, and how much was in your paint. All those things are variables. And so yours might
react a little bit different than
mine. That's okay. Now, I've picked up
just water brush, and I touched most
of the water off. I'm just going to
gently touch and blend. I go to try and keep the top half of the mushroom,
keep that highlighted. We're just going to
soften the shaded part. Yep. How you doing? You know where to keep the
shape of your mushroom. We can tighten up the shape
when we're doing our inking. Just try to keep the
shape for the most part. While you're painting,
it's easier. Great. Great, great. All right. Let's see if our mushroom
cap is dry, if it is, we'll come back up to it. In.
5. Washing In Mushroom 2: My mushroom cap is dry, so I'm going to put water on my brush and come into
this burnt umber. Again, just a 9010. And we're just going to
deepen that bottom edge a little bit. By glazing. Now glazing is when you put
a thin layer of paint on top of dry paint to
change the value. It can be a different
color, be the same color. We're using the same
color, obviously. You can see how it darkens it because we're putting
brown on top of brown. So I'm starting to indicate here just little creases
in our mushroom, which we want to have
different heights. I'm going to bring
this up higher on this darker side actually. And I'm going to go a little bit lighter over here
on our sunny side. That maybe right on the bottom. Okay. And the same thing around
the top of this cute button. I'm just going to indicate
a little bit of contouring. Contouring is where you follow
the shape of your object. So if it's brown, you're going to make it curve. If it's straight,
make it straight. I'm going to bring
it up a little bit. I don't want to
lose my highlight. I'm going to bring a little shadow down to the
bottom part of that button. Softening water on my brush. Good. Can you see how
that sinks it in? What we want. All right. Now, I'm just using
water on my brush. I'm just going to noodle
this a little bit. I'm just going to soften
that edge right there. Here and there a little bit. Okay. Now, we're going
to be really brave, and we're going to
add the shadow to the stem and it's going I say brave because you're
going to be like, No, I have to paint right
over what I did? Yes, you do. So I have a 9010
mixture on my brush. And we want to
create this shadow. This is what gives
your piece depth. It's going to come down. And then I'm going to lighten
my brush a little bit. Yes, we just painted over
what we already did, but use a nice light touch and you won't lose all of that. If you do lose it, we'll come
back in and add it again. It's okay. We just wanted
to create that shadow, the lights here coming down. I know I'm explaining a
lot on this first one. I won't I won't be so
chatty on the other ones, but I want to make
sure you understand the concept of what we're doing. We're going to let that dry completely and come into
these caps over here. Remember we washed
them in or buff. O Actually, the winds and stems. We're going to put two
colors on our stems. So we'll start with our light
one, which is the buff. Make them curved, so they
look a little more natural. Looking different lengths. We cross over. All right. Now, we're going to add some
of that curt number 9010. And this time the other
edge the bottom edge, the edge closest to
the ground, right? Okay. Here, I'm just going
to use water on my brush. That soften that out
just a little bit. Being careful to not
lose that highlight. Notice I pull water off onto my tissue
before I come down. These mushroom caps are so tiny. I don't want a big blab of
water. Get me in the way. And then we can take we
can take some of that. Now, if you're
using a round brush that that has a fine
tip like this one, you can use this for the stem. If not, I would recommend
we go to something smaller. We're just going to
add a little umber to the bottom side of that
stem that we just put in. We don't have to
be super careful. We're going to have
grass and leaves, and all kinds of great things
going on here. All right. Good. Okay. Deep
breath. You did it. You got your first
mushroom done. Okay, let's move on
to our next one. I have pulled out some maple
yellow and some gamboge. We're still going to use our
burnt umber and our buff. And I've switched back
to my larger. Flat. And we're going to
wash in some of this maple yellow 9010 mixture. Oh I'm just equalizing the value and the
amount of water that is on this mushroom
before we move on. Isn't that a beautiful yellow? I love Naples yellow. I use it all the time.
You can use it for. The beach, the sand, for rocks, and cliffs,
and buildings. Oh, so many things. Okay. Let's go
ahead and pick up. Just a touch of this Uber. 9010 Again, we're going to
honor that highlighted side. Tech. Following the contour. We can always add more, but it's a little
tricky to take off. So this is a much
lighter mushroom. Look at the reference
picture that I have. I'm screening for you. So go gentle. Add
more if you need to. Now, I'm just going to use
water on my brush to soften. Sch a little bit. Remember that watercolor
dries one value lighter. I'm pretty sure I'm
going to come in and add some glazing on top of that. But I'm going to stop now. Let's go ahead and add our buff. Now, notice I came right
over that vine line. That's just what we
want. The mushrooms gonna be in the background. Totally fine.
6. Washing & Glazing Mushroom 2: Alright, well, our
buff is still wet. We're going to pick up
some of this number. Alright. Here we go
9010, smaller, flat. I'm not going to go up into the mushroom cap. This
is the shaded side. You notice I'm putting
a real rough edge on that because it's textured. So I don't want a
real smooth look. And jiggle some here. Giggles a technical term. And a little bit
there. Now, notice I'm using the bottom
corner of my brush. Just that corner. Flats are so awesome because you
can use the whole sp. You can use the chiseled
edge, you can use the corner. Okay, I am going to
just soften this edge, a tin bed with
water on my brush. I'm not too worried
about it because we're gonna bring that same
how we did the shadow. We're gonna do the same
thing all the here. But I do want to add just
a couple of marks with it. Just adding a little texture. I'm just gonna be touching a
little bit here and there. That's all. Just a tiny. Now. Let's come up here. H, that's feeling pretty good. So I am gonna switch back to
my larger flat now. 9010. Adder on the desh. Using the lightest
soft, feathery touch, because if you press hard, they'll end up lifting off. Now, while we have
this, let's go ahead and coming up on the corner
of that brush again. It's gonna add a
little bit underneath. Little here and there.
Can you see that? Okay. And when that's
a little more dry, we're going to go ahead and
put in that big shadow. And we need this
to be completely dry so we can come
in with our gamboge. I went and used my dryer so that that would
be completely dry. And now we're going to come
in with some of our gamboge, which is an awesome color for glazing because you can
see how transparent it is. And it's going to just
give this mushroom a pop. Can you see how that just pops
the yellow so beautifully. I'm trying to keep a little
bit of highlight without it. And also, I'm staying
at the contour. I'm going to go ahead and
come right over that umber. The lightest lightest
touch again. We don't want to
lift anything off. We're just adding a
layer of glaze on top. I'm just using water
on my brush now, softening this a little bit. And scrub out a little high
light there. Soften that. Perfect. You leave it. Okay. Let's go ahead.
Well, how did you do? First of all, how did
you do with that? I hope that was okay. That was kind of a
lot all at once. But you can see how it
changed the whole value and color of our
mushroom so awesome. Now, while that is almost dry, so it's still a tiny bit wet. Let's go ahead and
come in and add some of the little texture nodules, our mushrooms, the 9010. I'm going to use my number four. And these are going to blossom out a little bit. So be careful. Kind of ginger.
See what we'll do. I go to put them
in kind of random. My paper was more dry
than I realized. Okay. So if your paper is really
dry like mine was down here, here, they're blossoming
out down low, they're not. I'm just going to
take a water brush. Yeah, just touch here and there. And that will help
them bloom out. And soften 'cause I don't
want them to look like specific dots. Add a few more. I go soften these
with some water. As more. Soften those. Again, it will depend
on your paper, your humidity, all the things
you mentioned earlier. But if you need to touch them
with water, let's do it. That's okay. Awesome.
I'm having so much fun. I'm going to do just a few more. Stop, Care. Stop. Hm. It's
almost like splattering. If you've taken my classes, you know how much I
love to splatter. And yes, we're going
to do that, too. Yeah. Oh, I like that. Alright. Let's look that dry. Oh. While this is drying, I'm switching to a small flat. Some of this front number,
and we're going to put that shadow in
underneath on the stem. 9010 mixture. I want a fully loaded brush
because it's a big long stem. And remember, we don't
want to press hard. Kind of start with my d here. There we go. Lightly that in. There. That's all we needed. B. Awesome. Now, I want to just the corner of the brush. Nice and dark right
underneath that cap. Okay. We are ready to move
on to the next mushroom. S.
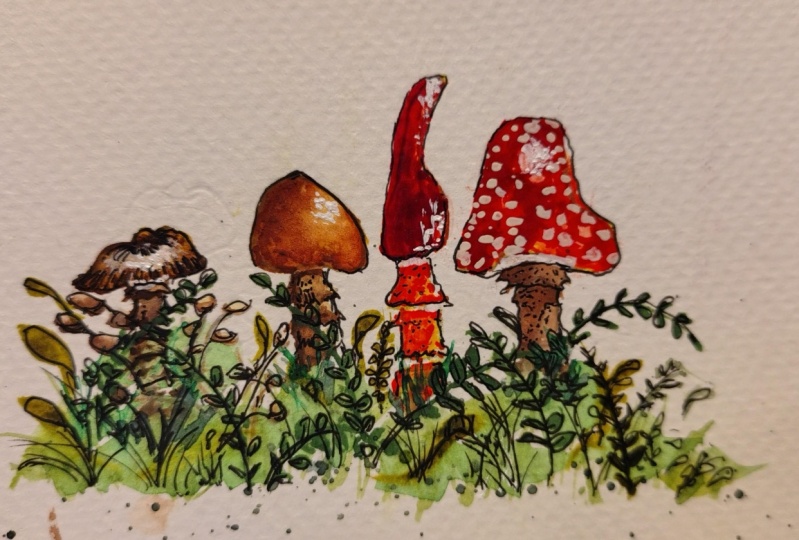
7. Washing & Glazing #3: I've put out on my palette, some of the Quinn Sienna, which you can see, it's kind
of a burnt sienna color. But it has it's
more transparent. It's kind of like the gamboge. It's gonna be a nice glaze. Cad red light, liz and
crimson, cad yellow medium. I'm going to go
ahead and do this tall little fella over here. And we're going to start by
just putting in a wash of our cad med and a 9010 mix. Actually, I'm gonna
go 955 mix on this. It is surprisingly a
strong, pigmented color. And I don't want it
to look super yellow. It's going to be
a nice undertone, what we put on top of it. Especially at the top, where
the sun is hitting it. And also on the stem, if you look at the picture, the stem was quite light. So we're going to go ahead. And actually, let's leave the
stem for a minute, sorry. Because while this is
still wet at the top, this is when we're
going to want to add some of these colors. So, let's go ahead and pick up a little bit of
our cad red light. This is such a great color for all things, Christmas, guys. If you want to do some fun
Christmas classes with me, we will be using
this color a lot. But it's also just a great red. Fire engine red. Now, I'm going to leave that spot
right there as a highlight. So I'm starting kind
of on the chisel edge, which is the tip of my
brush as I bring it down and make sure you have a
lot of water on your brush. 955. I'm going to
bring it across. Make it wavy. Bring it up, of course, but not all the way. And now I'm using
my chiseled edge. Bring it up a little bit. I know it looks wonky. Okay. Wonky is another
technical term. But we want to kind of indicate some curvature and that
there's some indentations. And you have to start that
right from the beginning. Inking will help, but it
doesn't do everything. That's why we're painting. So Ah, it's okay to let
some of this show through. I'm gonna lift it up. Just
using water on the brush, and I'm touching, you can see
it can soft on the tissue, using a chiseled edge. Bringing up some highlights. So it looks rounded. And
while this is still wet, I have water on my brush. Soften this edge just to touch. We're gonna come in
with more on it. I don't want hard lines. Here. Can you see that? And it's okay to
leave it kind of textured looking because
that's the way it is, right? And I don't want to
lose that highlight. I'm going to come
in with more red. Touch it. So pretty. I love red
on top of yellow, so great for flowers
and for blending. Apparently for mushrooms. I can see I'm using that
corner of that brush again, and I'm holding it way back at the end so that I
can do it loose. And that's a good tip. Hold your brush at the end, the back end for loose 18. Hey, water on my brush. So this to touch. Right. Okay, let's go ahead and add
some of this sard crimson. And you might think, Whoa, that's got a lot of pink. You know, It's kind of
got some blue in there. When we glaze on top of the red, that fire engine red, it's just going to look
deep, which is awesome. So this is a 9010. And I'm going to go ahead and just blaze it and see
how beautiful that is. The red underneath it calms
down, the lizard and crimson, takes away some of that bluish, pinkish and yet it deepens
it so beautifully. Now I'm going to rinse out
and just play with that. Let's noodle it a little bit. And bring some up. Back on that chiseled edge. Beautiful. Let's move
onto our stem while we let the top dry before we come in and
add more glazing. So we're just going to go ahead and wash in all one bound. C yelluminium. I'm going to use
this number four, even though it's kind
of a long piece here. All right. I'm
coming into C light. 955 on the guys. Super light Sperlight. A. This mushroom
has little spots. So, I'm actually going to start with just some
shading over here. While it's still pretty wet, I want those to bloom out. Some spots. Some shading
underneath that cap. You see how that's blooming out? To will soften and
they'll look natural. It's gonna be great.
Hey. Let's do the same thing on the
bottom before it dries. Yes. Mine's a little
bit dry down here. You know, I live in Utah, and it's kind of a desert state, I guess, we call it,
but it's beautiful. I'm up here in the mountains
in Salt Lake City area. Anyway, it dries very fast. We have very dry air. So if you're in a
more humid climate, maybe you're stayed
nice and wet. But if you're dry like mine, then go ahead and just
add some water to it. Now I'm coming in
with some more color. Intensify the shadow
underneath. This to touch. Good. Now, we're going to
let that dry before we come in and put the shadow across that we've
done on the others. I'm going to use my
number six round. And I'm going to pick
up some of this quinoa. 910. This has to be completely
before you do this. I'm gonna add some water. Soften that up a little. Love it. Can you see how that
just intensifies the color? It's so pretty. I'm
gonna bring some over. And from the bottom, I'm
gonna pull up a little bit. I don't want to lose
those little highlights. Gorgeous. Alright, now, I'm
just gonna soften this Tad. Got to rinse out really good. This is why I have two
cups of water today, guys, because some of these reds and greens are gonna
be super strong. I sure I have a nice clean rush. Noodling this ale b. And I'm gonna add
just a tiny bit. Yes. While it's wet, I'm just adding a
couple of spots. Like we did the stem. They don't want plain
plain yellow up there. Sure. There. Beautiful. Alright.
How you do? How you do? Let's go ahead and let
that top part dry, and let's add in our shadow. This red. I'm gonna mix it with
a little crimson just on my palette. And then I'm going to
water it down in ten. Mine 55. We can always make
it darker, right? Go ahead and
intensify the shadow. Going to get a little
bit rounded to slightly rounded
on that top part. Pretty straight up here. Great. Let's let that dry and see
if it needs more or less, and we won't be able to
tell until it's dry.
8. Washing & Glazing #4: Sticking with my
number six round. I'm going to pick up
some seran crimson. I'm going to noodle
it a little bit. So I'm going to play
with the shadowed edge. I want it to be a
little bit darker. A glaze over a little bit. Oh, yes, go to see
that stronger. So it was so fun for me to do the research
for these mushrooms. These, of course, I've
seen lots of times. But honestly, I
don't even know if we have red colored
mushrooms in Utah. I've never seen them. And I saw them when I was back in I was traveling to
Connecticut last year, and we were in this forest in the most beautiful
red mushrooms, and I was fascinated. So I started doing
some research and I found some that do not have spots like the
one we're doing here, and some that have white spots, like the one we'll
be doing there. And I thought it was, like,
straight out of a fairy tale. It was amazing to me
how cute they were, how beautiful, and
that they were real. Wow. We're missing
out here in Utah. I want some red mushroom. Oh. Alright. I'm just using the tip the
fine tip of my number six, and I'm pulling up a little
bit of shadow here and there, just because if you want
something light to stand out, you have to put something
darker behind it. And that's what we're doing here is intensifying
here and there. Some of this highlight. I putting dark behind it. Sun at the top. That should be a really strong
highlight in the sun. I want to know where it shine. I see self in the editing. Love it. Alright. Now,
I need to this mixture. The crimson and the pad
red light mixed together. And just deepen a
little bit here. You see if yours needs it, too. That shadow, too.
Really the statement. I this okay to make it
a little bit darker at the bottom because we didn't
have grasses and whatnot? And of course, that
would cast a shadow. Okay. Coming back to my
larger flat and tabla medium. I wash in this glass
in my sem over here. Not not the stem, just the cap. The stem is actually
a different color. I'll show you the actual
picture I took this from. It's a free stock photo. And to use buff on that stem. Which I'm kind of glad
about cause it will help distinguish from
this be here too. Alright, I'm going to just add a little water a little fry. It's only 107 degrees
outside today. That might have
something to do with it. What do you think? Okay. Well, that's
still a little bit wet. You guys know the
red line now, right? We're going to pick
up some of this. A red light. 955 sure I light. Now, I want to point
out on this one. We leave a little yellow
showing on the bottom edge. So you aware? That's
what we're gonna do. And I wanted it a
little more wet. I s to go in and put
a little more water on before I put this red. I want it to bloom downwards like that because
it'll look more n. I'm going to be careful to not go all the way
to the bottom. I'm gonna give it room
to bloom, room to grow. Of course, we'll come in and
with the tucker here and there. That's a good start. Let's let that
ride for a minute. While we're letting
this ale bit, let's go ahead
with f. Washing on the stem and they don't want
to touch our cap be careful. You know the girl. Right?
I think some of this for ember. Catching it. And I want this edge to be
quite light right there, so Ma is under it. Me a little bit of texture
there. Is that, C.
9. Detailing Mushroom #4: Sticking with this small flat. I'm coming right back into the cad red light
out a 955 again. And we're going to
put a glaze on top of what we already have
has to be completely dry. And you don't want
to press hard, you don't want to
take anything off. Lightly put in. I'm moving kind of a little
highlighted area. And now, what I'm
going to do is take my number four round. I'm going to just
util it a little bit. Before it gets dry. I
didn't want to use my big clunky flat for
this because I want it to look textured very gently. I don't want any harsh edges. I don't want to
lose that blooming that we got on the bottom. I'll let it look
kind of mottled. Bumpy. Remember we're gonna put all these white dots
on top of it, right? Oh, it's okay to have it
look a little texture and a little light and dark. And my number four round just lets me play with a
little more easily. I'm good. How you doing? If you're holding your
breath, take a deep breath. Alright, try not to lose your
yellow on the bottom edge. Oh. Right. Okay. I think I'm
going to leave that alone. And I'm gonna come
over to the stem. I'm gonna come over to the stem. I'm sticking with
my number four, picking up some burnt
umber 9010 mixture. I'm just going to taken that shadow right up under the cap. I up with water. And then again right underneath. For some reason, mine
went straight across. We don't want it to
go straight across. So I'm going to bring it down. I need to pick up some buff. Guys, if you haven't used
buff titanium very much. I highly recommend that
you experiment with this. If you want something to look
kind of Boho or Victorian. Mix it with buff, take
violets and mix it with buff. Take blue, Serian blue
or ultramarine blue. Take your reds, take
your pinks, opera pink. Mix anything with buff, and it tones it down and gives this beautiful muted color. And it looks Oh, so gorgeous. It looks kind of
Boho or Victorian. Now I'm just adding in
the shadow right here. Here we go. Keeping
the highlighted edge. Buff is another color that I use all the time for
a base on rocks, the beach, cliffs, rock walls, rock buildings, flowers, mixing. It's such a versatile color. I highly recommend to become
best friends with Buff. Make it your new best friend. Alright, I'm going to add just a touch of the fencing now. 955, over here on the dark side. And again, I'm keeping it
very textured looking. Can you see how I'm just
using the tip of my brush? So it goes in uneven. I don't want it to be smooth
like the one next to it. It will help us with
those white dots. I'm not gonna bring
it all the way over. I'm going to stop it
down there. Great
10. Painting Vines: Okay, guys, we're going to
move on and take care of some of the grassy area
below our mushrooms, while everything dries totally, and we kind of focus
somewhere else for a minute. This is just a Chinese brush, and there's no number
on it or anything, but it's about equivalent
to a number one liner. You're just going to
need something that has kind of a finer tip like this. And we're going to start with some beautiful sap green and follow the guidelines that we put in with our pattern. That will give us the stems. So we can go ahead
and just put that in. And then we're going to put in the little petals. Like that. I like to leave a
little white spot on the leaf if I'm able to. If you're not, don't worry
about it. It's okay. And I didn't put in the pattern for the leaves because I like to
free hand them, but just make sure
that they're going in an outward direction, and we're going to
go right across from them on the other side. Go ahead and turn your
paper if it's easier. I think you can just detach
them with a little stem. Let's. Alright. Let's go ahead and do some more
gulls. Over here. I'd like to start with the
bigger vines like this, and then we'll fill in
with the other ones. Oh. And this is just
straight, sap green. I'm not mixing it with anything. I'm not going to come in
and fancy him up too much. Remember, we're going to inks. So that can be very forgiving. If it's a lot of
things with ink. So just relax and enjoy the
process here. Don't stress. If you haven't painted
before, and this seems like, Oh, if this is tiny detail work, I'm not sure I can do it. You're gonna be fine.
It's gonna be fine. Well, I don't think I mentioned, I've probably got a
85 15 mix on this. Ing this one a little bit bigger just because
it's in the front. So it's closer to you,
it's more dominant. Alright, I keep turning
my paper, guys. But I do want you to get used
to just turning your paper, your canvas, your board,
whatever you're working on. Vn your sketchbook to the
direction that works best for what you're doing. Oh Nice. Just a couple more. And then we'll switch to a
different kind of greenery. Or as many as you want. I
mean, this is your piece, so you don't have to do it
exactly the way I'm doing it. I just go right on top
of the mushrooms or whatever else is in the way
because these are in front. O. No. All right, I'm going to do one
more peeking out. This one I am gonna do kind
of behind the mushroom. Just to mix it up a little bit. And so I'm gonna do smaller
leaves. It's further away. Great. How'd you do? Now. Let's go ahead and do a
couple of Back in the day, we call them petal
strokes or comma strokes. And what we're going to
do is pick up some of the leaf green sack
greens, right? But what you do is you
touch, press, and lift. So you're going to touch. I'm using a small round, press. And then as you pull up, you come to a fine point. And I want you to
practice this a few times if you
haven't done it yet. These you can use in all
kinds of things, flowers, designs, Everything you can think if you
want them fatter, you can do two like that,
make it into a leaf. So we're just going
to be doing a few here and there as filler, which is kind of fun cause there's no indicator
on the pattern. Just throw them in
where you want to. So this is how I touch,
press, and lift. And trust me when I
say, these are going to blend right into
the background, and you're not even going to
remember that you get them. But that's the beauty
is they don't attract a lot of attention in
this type of situation. That down. But they
fill in, which is nice. Do we want to keep
this nice and light? I don't want to I'm
going to make this a little bit figure out in here. We don't want to fill it in
with a lot of dark grasses. But this want to keep
it nice and light. I'm just going to throw
a few in here and there. Hey. Like so.
11. Greenery & Splattering: I'll switch to my
five aught ner. We're just just a more
fine detail brush, and I'm picking up some
of this sap green again. I just want to show
you a different little filler that
we're going to do. It's similar to the
first one we did, but it's very fine, and we're going to
do this petal strop or more water going in here. Here we go. And bring that down. So there's not going to be any stem to it. I'm not going to do
any filler with it. Like we did with these leaves, we're not going to fill that in. You can see the
difference, but it's basically the same stroke, just using a smaller brush
and keeping it nice and fine. I'm going to mix up a better well here so that
I'm just good to go. When you're using a
small brush like this, this five or any small
brush that you've got, you have to dip into
your pate frequently. Because it doesn't hold
much pain. All right. And I'm not going to do a
lot of these because, again, I don't want it
to take over, but I am going to throw in a couple. I think I'm going to
have it this direction. And I don't even bring the leaf all the
way up to the stem. I just keep it open and ay. Okay. I'm going to throw in back here, that's kind of Oh. Tiny and quiet back here
in the backgrounds. It's nice and delicate. And here. I use these as
fillers on wreaths. If you've taken my Christmas
wreath class, we did this. It's just a great little vine
for lack of better word. It's the vine to fill in with. All right, I think
that's going to do it. I'm going to stick with
my five and pick up a little more of the sap
green 9010 mixture. And we're going to add in
just a little bit of grass. And this is going to be just kind of sorry,
I'll try to keep my hand. I'm going to hold it back here. Try to keep my hand
out of the way. So we're just going
to, just fill it in, make some of them curved. That. Practice that a little
bit if it makes you nervous, but again, guys, this is
fading into the background. It shouldn't stand out, especially now that we have all these others growing here. Sorry. Excuse my hand. You can see how soft and gentle I'm not making
it really big. I just making them
go every which way. I like to start on one side and work my way across so I
don't smear it with my hand. And I particularly, now if
it's too strong like that one, just touch it with your
tissue while it's still wet. And you have to let it dry before you can come
back to that area. But I'd like to put a few around the base of each
of the mushrooms. Maybe a little bit taller. Now, I should have pointed out, but notice I'm always starting at the point that it
comes out of the ground, not the edge of the leaf down,
but from the ground out, and that's because it keeps the edge of the leaf that top edge nice and fine and clean. Because generally
where you first touch is where
you're going to have the most pressure and
the widest point of your mark and for grass, we want it to be at the base. Great. How'd you do? This
one keeps bothering me. It's a little bit stronger
than I would like. I'm just going to touch
it with some water, and then I'm going
to touch it with my tissue and that
will lighten it up. That's better. Then of course, it will dry one value lighter. I'm just going to do
it one more time. I'm going real gently. That's why I'm
sticking with my b. I g it happened so I can show you how to
lift it off nicely. Let's stick with our sack green while we're here,
a 9010 mixture. Now, I'm assuming
all this is dry. Your leaves have to be dry before you can take
this next step. But because we have our shadow on our mushrooms, guess what? We need a shadow on
the ground as well. We're going to go ahead
and just kind of it in. What I mean by that
is we're going to remember our grass
is lumpy bumpy. This is a shadow, so
we'll just bring it out. The important thing
is you start right at the stem mushroom. I'm not going to bring it
down into the white area. That's where I'm stopping. Great. Okay. And now
we can go ahead and add in just a little bit of emphasis here and there
with our hookers green, which is this beautiful,
darker green. It's a little more blue in it. This will be a 9010 mixture, but it has a lot of pigments, so you can see that even at
9010, that's going to be. And only going to add a little bit around the
base of these mushrooms. And it's okay that
it's a little bit wet still from the shadow that we just put in because that's going to blend it for us. Get a little wet
on wet technique going there, working for us. Softens it for us. We
don't have to do the work. Great. That looks better. Then I like to add just a little bit around
these little fellows here. I have a lot of white
space, which I like, but I'm going to add just
a bit here and there, a bit of grass. It's dark. Very little. We'll have two more steps guys before we're finished
with our painting. I'm going to take my number and dip into the burnt number. This is going to be
about e f ratio. And we're going to splatter, which I love to splatter. And we're going to
go sparingly though, because again, we're trying
to keep it real simple. We don't want a lot going on. So I've already tapped
twice over here. I'm just going to bring it
over here and gently tap tap. Now, I don't want a
lot on my mushroom, so I have a tissue handy.
All you have to do. Don't swipe, but all
you have to do is touch it, and it lifts off. I don't mind if it
gets on the stem. I just didn't really
want it on my cap. H. We have this bit more on
the bottom. And that's it.
12. White Spots & Highlights: I like to when I'm working
with the blue proof white, I like to put it on a piece of heavy duty watercolor paper, rather than my palette just
so I can keep it close to me because you have to dip
into it quite frequently. Now, this will be the
opposite ratio as watercolor, meaning we will be
using 90% paint and 10% water rather than the other way around that we have been doing all along. This will be a 90% paint, 10% thin down,
using my five outs. What we're going to
do is just put in these cute little white nodules, and they aren't dots. If you look at the photo, I'll put the actual photo
that I got for you. And you can just take a
look. They're random. And they're different size.
They're different shape. And we're going to
come in and give them a little shadow afterwards. So we're being intentional. And even though, you know,
I realize we're not doing endings like an actual painting, meaning realistic, it's
more illustrative. We can still do a lot of
things that look just like it. And then we have a little
freedom to do things that don't look like the picture, so. They didn't seem to be in an
exact pattern of any kind. So I'm going to put some
on these yellow dots, some on the red, and
just kind of random. Although they did seem
smaller at the top. And they did seem to have
some along this bottom edge. So let's not forget to put edge. You can see why I like this
Blee proof white so much. It's opaque, especially
when we're doing on white on something that's
really dark like this red. You don't have to go over
it time and time again. One time does the job nicely. All right. Let's go ahead
and pick up our small flat. I'm going to pick up
some of this paint. And then I'm going to brush a
lot of it off on my tissue. And then we're going
to come on. Let me see I can do it over
here where it will show. We're going to
lightly stroke it on. You see how that looks
like an old barn door, kind of finish, an old fence, something like that.
It's kind of streaky. That's the look we want
when we're dry brushing. And so it just looks like dry
brush strokes were added. That's what we're going to do just a little bit
here and there. Just to emphasize
this highlight. You can see it's very
subtle, very subtle. But it's going to mean a
lot. It's going to help. And remember where we have
our highlight up here, we're going to do it contour. We are going to curve that line. Then I'm going to just
kind of block block blot. Ie. I just a tiny bit. Almost using a side edge here. Additive right there. All right. And here this curved. Nice and dry. H you
want that apache look. Beautiful. Nice job. How to do? Alright. Now, we're
going to take some of this with our I'm
back to my five t, back to a 9010 mixture. I'm just going to emphasize with a couple of little lines. Notice they're kind of
patchy. Here and there. But that's where the
light picks it up. The high light hits the sunlight hits it, makes a nice highlight. Great. Now, sticking with
this 9010 mixture, I'm going to just add a couple
of blades of grass that are white that might be picking up again that
picking up that sun. Just a few, very few. You see how that just adds
a tiny bit of sparkle. That's right. You have to say sparkle
really high like that. Go ahead. I make fun of
myself all the time, so go ahead and laugh at me. Laugh with me. How's that? If you want to, you can have a little bit of a
highlight on some of these little guys. All. He. Okay. Let's step
back six feet and see if we've missed anything before
we move on to our inking. We are so close to
being done guys. We are going to go
ahead and just add the tiniest little shadow to help emphasize some of
these bigger white spots. I'm using lizard crimson, 9010, and my five brush. I'm only putting a little hint
of this on the dark side. I'm not putting it on this
side where the sun would be, it's on the shadow side. Great. And see how
that makes it look like those bumps are a
little bit more raised. And while we're doing this, let's just add a few little
texture marks on this. Now let's go ahead and step
back six feet and see if there's anything
else we want to do before we start our. O
13. Ink & Sign: I think we're ready
to go ahead and start our inking.
This is so exciting. We are almost finished, and it's so adorable. Thank you for doing this with
me. I appreciate your time. I'm going to start with my Mogi. That's M U J Mogi. It's a ballpoint pen, and I always keep a scrap of watercolor paper handy because
sometimes you have to just come over to the
side and give it a little encouragement if it gets clogged up with
paint or something. I like to start in an inconspicuous place while
I get used to the paper, the pen, all the things. So that's what I'm going
to do is just start with these little guys
down here at the bottom. And you notice that
I broke up the line. If you've ever done
any urban sketching or would like to get into it, you'll notice that we break
up the lines frequently. This is along that line of work where we're
doing an outdoor scene. You don't want to have
solid lines everywhere. All right. And you notice I
didn't stay on this stem, and you don't have to. Your eye is going to
take care of that for you and your brain, and it fits it all together
and it'll be just great. I'm going to continue on
with these little mushrooms. Go. Now, it's up
to you if you want to outline those petal strokes that we did, the comma stroke. I'm going to, but
when I do them, just, I rarely stay on the lines. I want it to look
loose, like that. I like it to look free and and not stilted like I was really trying
to stay on the line. Then for the grass, it's
like a paint brush. I'm going to hold it
towards the back of my bin and just bring
out a few strokes. No may, just a few Now, if you're not using the
pens that I'm using here, they're Gabo and the
Muchi, then I really, really hope you took
the time to test it and make sure
that it's completely water resistant
because if you want to come in and make any
changes or additions, you don't want to be
worrying about water. Notice, as I'm putting
these vines in, I am making a little
vein. Just a little mark. I didn't want these
to be floating. Oh. These little guys here,
I'm not going to touch. I just kind of background, filler. H. V And do? Now, if you've lost your leaves that you originally painted in, like I have right here,
that's okay. J in come in. O. All right. How did that feel? Pretty good? You're ready to move on to a mushroom.
You have your courage now? Okay. Let's go ahead, and we'll just start with
this little guy over here. Now, I like to make it
again little broken lines. Keep it light and airy and especially broken
lines coming around. I had a flat spot with my paint, so I brought it up with my ink. In makes it very forgiving. And you can fix things,
change things a little bit. Oh. Now, I'm going to put
some contour lines, that staying with the shape of whatever it is you're inking. In this case, it's going
to be curved on that side, on this side, and different
lengths and don't overdo it. Don't put too many,
but just a few. But you can see
how it sinks down. I'm going to a little
ink right here. It sinks do that button. And then if you want, and I
did it on my sample piece, and then we will do
it on this one too. I'm just going to add a
few little contour lines. Good. Deep breath. We finished our first one. All right. Let's move
on to the next one. Now, I'm keeping this
tucked behind my vines. So be aware. Let me get
down towards the bottom. Just a little grass
right there in front, just to remind me. All right. And then I don't do anything
with the shadow, guys. I don't know if I
mentioned that before, but I'm just going to put a few indicators of those layers. Also, I'm just going to put a bit I don't know if
you can see those dots, but just some little
lines here and there. It just adds some texture. I forgot to do it over here. That's just a little bit
of texture to the stem, which is nice. All right. This button mushroom
is quite smooth, but I'm still going
to do a broken line. And we won't do any
contour lines with it. That's it. Leave it. Okay. And let's do our next one. Same thing. This one
is quite smooth. And I'm not going to do
any contour lines on it. We left those painted in. And that is enough. I want to add some jagged edges on that even though we
didn't paint them jaggedy, Inc tells the story for us and keep that tucked
behind that vine. Just add a very few texture. We don't want to detract too much from what we've
already done. Okay. Here we go. This is going to
have a smooth outer edge. Right. Hey. And I'm just a few here. I Great. All right, Let's step
back six feet and look closely and see if there's any other inking
that we want to add. I'm going to add just a
few more contour lines. I'm going to turn
my board upside down because it's easier for me to do it sideways like this
than to try to push it up. I don't want to get
too carried away, but I just wanted to emphasize, this is, kind of lumpy bumpy
dark pin on the end here. And when something's darker, it needs more ink
to support that. Yep. I like that
better. All right. If you're happy with yours, I'm happy with mine. Let's go ahead and sign
our name together, guys. Please always claim
your artwork. Always be proud of
what you've done. Remember that you have a gift and a talent that most
people don't have. How many times do
people say to you, Oh, I can't draw a stick
figure? Well, guess what? You just did this
amazing mushroom piece, please be very proud
of it and be excited to put your name on it
and claim your artwork. Let's go ahead and
sign our name. T hank you so much for
taking this class with me. I know your time is valuable, and I really appreciate you selecting my class and
spending this time with me, and I hope we get to
do it again soon. I will see you in the final
video where we will wrap up.
14. Congratulations: Well, congratulations,
guys, you did it. You finished your
mushroom piece, and I'm so proud of you and
so happy that you were able to take this class with me?
I do appreciate your time. I know it's very valuable. If you could take just a
moment and snap a picture of that and put it in
our class gallery by looking for this button, it would be so awesome for us to see what each other has
accomplished and be able to make comments and hit that cute little heart
and support one another. That would be amazing.
If you feel like this class was a benefit to you and you learned
something and enjoyed it, and you know someone
else that might as well, would you mind sharing
the link with them and both you and your friend will
benefit from skill share, which would be pretty cool. Also, if you would
like to follow me on some other platforms and take a peek at what's happening
in my personal art life, see some of the other more intricate pieces
that I'm working on, you can see me at Carrie sandersrt.com or on Insta
at Carrie Sanders art. Alright, don't forget to
click that follow button, and that will allow
you to just get a little notification whenever
I pop out another class, and it might be of
interest to you. Also, here are some
classes that I have going for fall and
holiday season. And all you need to do
is type in my name in the search bar here on
Skillshare, Carrie Sanders, and all the classes
that I have here on Skillshare will
populate for you, and maybe something that
would be of interest, and I would really enjoy
spending more time with you. So thank you for
taking a look at that. And again, thank you for
sharing your time with me. And until the next
time. Bye bye.
 Kerrie Sanders, Artist, Teacher, Creator.