Transcripts
1. Welcome!: Well, hi everyone. My name is Carrie Sanders
and I'm an artist, a teacher, and a creative
here in St. George, Utah. I'm located just outside
of Zion National Park. And it's so beautiful here. You just can't help but want
to go outside and paint. In my workshops here we
do plein air painting. We do urban sketching. We also do some
workshops here in studio that are unique and fun. So if you're ever in
our part of the state, Please come look us
up at Kerry Sanders, art.com and see what we have
going on and come visit us. We'd love to have you
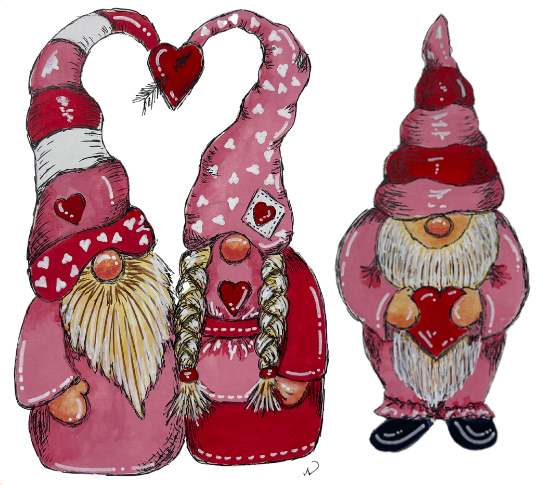
join us some time today. I have for you just a fun
little relaxing keys. It's all about Valentine's day. These cute little
Valentines norms are for people of all abilities. Even if you've never
painted before, you're going to have good
success with this piece. In this, we're going to learn
how to use some watercolor, a little bit of gouache. We're going to mix
the two together. We'll be just doing
some basing in a tiny, tiny little bit of shading. And then we'll be doing
some fun ink work with our gel pens to give them
some pop and some character. And I've done these
just on a piece of watercolor paper
just for fun. But you could do them in your
sketchbook or your journal. You could also turn them
into valentine cards for someone special and just
have some fun with them. You can even cut it out, put it in a frame and have some Valentine
display of your home. If this looks like it's something fun that you
would enjoy doing. Now I hope you'll join me
today. What do you say? You grab your supplies
and let's get started.
2. Supplies: Welcome everyone. We're going to paint these
darling Valentine nomes. And I just wanted to review
the supplies list real quick. There aren't very many plants required for this or
brushes for that matter. It's going to be a
fast and easy class for people of all abilities. So let's get started
with what we need. First, we're going to be
using some white gouache, and then we're going to be
using some Payne's gray. These are watercolors,
so Payne's gray, Burnt umber, bright
red, and Naples yellow. And we will be mixing some
of these with the white to prepare some of the softer
pinks that we'll be using. So you'll need a pallet
to prepare those in. As far as brushes go. I am not going to specify
what brushes you'll need. I would just say
have a variety of smaller rounds and a
couple of small flats, then use what's
comfortable for you. You'll know it when
you get to that point, you know what you'd like to use. And as far as our inking goes, what I am going to be using
will be this black Muji pen. It's a ballpoint pen, but it's specific for art, It's really awesome gel
pen that flows well. But you could also use
a micron pen that is a permanent marker
as long as it's waterproof, permanent,
That's great. If you do use that, I would recommend maybe
about a size three. Don't go any larger
than this size five, I think it would be too bulky. Then for our white highlighting, we're going to be using a white, I'm probably going to be
using this white posca. It is also a very fine tip. Let's see if you can
see it over the dark. It's a fine tip one. But you could also use
a fine tip gel pen. This is the signal. Let me turn it this way
so you can read it. It's a signal, it's
made by unit ball. It flows really well. I love these pens,
they're really great. And so that would
work really well. Then for transferring
our pattern, I'm going to provide
you the PDF. It's on this page. You'll want to download the
PDF and print that out. And then take some vellum or some tracing paper
and just give that a quick trace and cut
around it so that you can place it on whatever it is you're going
to be painting on. So we'll have these
two in this lesson. And then you'll also need
some graphite paper to transfer that onto your paper. Or you could use a light box if you would like to do that. And then also, I always recommend
using watercolor paper. It doesn't matter if
it's hot or cold press, but it needs to be
140 pound or better. You will never be upset
with yourself on spending a little extra money
if you're able to on some good quality paper. Because you're gonna put
all this effort into your project and you want
to have a nice outcome. And your paper makes all the
difference, I promise you. So that's what I
would recommend. 140 pound or better. This is the piece
I'll be painting on today for the demonstration. I have just taped it
down so that it will let me manipulate it
easily for the camera. You can painting this on greeting cards or
in a picture frame, or just have fun with it, doodling in your sketchbook
or your journal. It's just gonna be a fun, lively little piece, and I'm
so excited to get started. So grab your supplies
and let's get started.
3. Pattern & Light Pink Base: The first thing we
need to do is transfer our pattern to whatever it
is you're going to pay. And if that's a card
or watercolor paper, I just tack this down,
hold it in place. I'm going to use a stylus
to rub my pattern on. That just allows me
to use my pattern over and over without
ruining, ruining it. But you can also just use a
pencil that would be fine. And then you take your
graphite paper and lay it underneath and start going
around that pattern. And I always do just
a little bit and then check and make sure I've
got my graphite down, facing down the correct way. So that way you don't go out through a whole
bunch and then go, Oh dear, I messed up. So alright, I'm going
to fast-forward the camera now and I'll
apply the rest of this. And you can do yours as well. For you. Remove your pattern, just slide your graphite paper out
and leaving that in place. Just double-check and see if you got everything on
there that you would like. Of course, you don't
need every single detail because you can look at the pattern and add
some things in. It's quite simple. But if you want to add
anything else in, then go ahead and do that. Now, since we're using
the same paint palette, I'm going to go ahead and add
in this cute little gnome. That's all by his lonesome over here with his little
valentine to give away. I'm just going to paint him
right next door, right there. So I'm gonna go ahead
and speed up the video. That pattern. I realized I might have some beginners in this class that have never painted before. And I just wanted to touch
lightly on why I have these. When you dip into your water
to rinse off your brush, you need to touch it
lightly onto something to absorb some of the
water in most cases. And some people use a
sponge, which is great. Some people use a shop towel or a paper towel which is great. They're very absorbent and
they don't fall apart easily, so that works well. And I prefer to use a washcloth
because I can throw it in the washing machine
and use it over and over and it doesn't
cost me anything. And then also, I always have my favorite
tool is the role of tissue because it's inexpensive
and it's very absorbent. And you can use it to
pat up any mistakes or dot offline for doing highlighting and
lifting and whatnot. It's a great tool, it really is. So these are some great things that we don't often talk about, but I don't want to take
it for granted that you won't have these
nearby in handy. So you will need something. If not all of these things
and I will be using them. Okay, we are going to go
ahead and get started now. And we're basically going to
do what's called basing in. Meaning we're not going
to do too much shading, we're just going to drop in
the color, which is great. Let's go ahead and start with
this little guy over here because he's quite
basic and simple. I have added some water to my paints to do what we
call reconstituting it. If you're pouring from, if you're pushing
paint out from a tube, then you don't need to do this. But if you're using a pen
like this, you will want to. So I am just picking up some paint on my brush and
this is the bright red. And I'm going to go ahead and add the bright red
to this heart. I'm just using a
number four brush. And then we'll also use the same color to do the
two stripes on his hat. Great. Okay, now while that is drying, I'm going to take
this same bright red. And I'm going to come over
here and do this heart. Now we're going to
take our white. You notice I rinsed
out my brush so I'm picking up clean white. I'm going to mix a
little red with it. Alright, let's go ahead and
face in the rest of this hat. Now, if your red is still wet, either wait for it
to dry or don't come all the way down to it to leave the slightest
little space. All right. Very good. Okay. Keeping with that coloring now, I'm going to pick up some
more white put in here. Just because I was getting low. And we're going
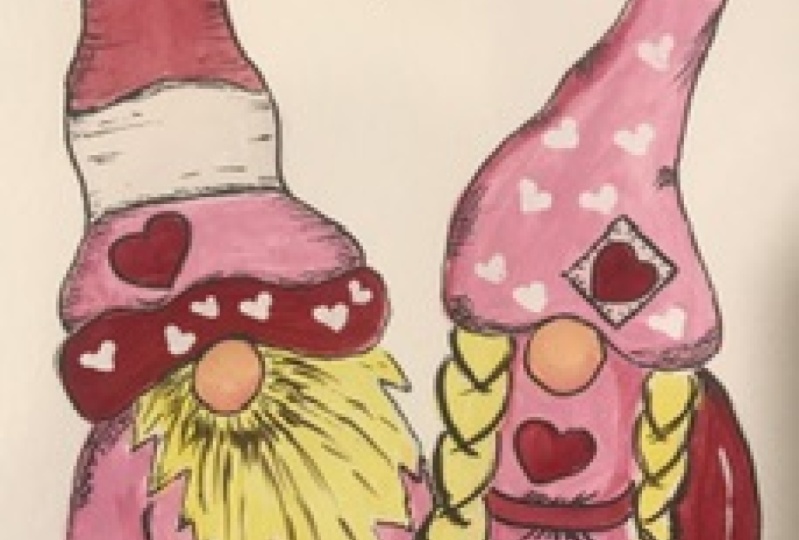
to move over here to this cute little girl. Now this is going to
be the lighter pink. So it's going to
be her entire hat. See, I went over the heart. That's okay. We can fix that. Okay. Take a deep breath.
4. Dark Pink Base & Skin: Alright, see if
you have enough of this pink to move on
to Mr. gnome here, Mr. Valentine known,
and we're going to do the stripes in his hat. Don't worry, we're
going to reshape that. It's kinda tricky to do it on camera because they can't turn my arm the way I the
way I would like to. Let's go ahead and add
our flesh tones here. Will it take some of
this Naples yellow? We're going to add just a
touch of the bright red. Not very much. I'm going to actually
start on this side here, because you can see
how just the smallest amount makes a huge difference. So now I'm just going to work
a little of that pink in. So I'm gonna go ahead and
do his face and nose. I'm just gonna you can see
the pencil right through it. So I'm gonna go right
across his nose. It's okay. We'll come back in and
add some more rosy on that knows grid. Okay, now, I'm going
to pick up a little of that pink little goes
a long ways, guys. And I'm just going to dot on the bottom edge of that nose. Can you see the
difference that makes? And we'll let that dry if we need to come
back and add more, we can add more. I'm just picking up
a little bit more, mixing it with more Naples. And I'm gonna do
that same technique, just touching it
lightly with the tip of my brush to add in a little bit of contrast or shading on the bottom
edge of his hand. And let's do the same thing. Are Mr. and Mrs. know
while we're here. Okay. Now, when that's dry, we can
come back in with some more pink and pink and those
noses up a little bit. Let's go ahead and mix our dark pink for the
rest of their clothing. And just a small amount of
weight goes a long way. I think this is about right
where I want it to be. I'm just not sure
I'm mixed up enough. So let's see how it goes. I might have to mix
up a little bit more. Alright? And then we're going to use
this same shade on his hat. But I think I need to mix
up a little bit more. I would feel more comfortable. Alright, our skin should be dry. Let's just pick up a
little bit of this pink. Wonderful. Let's let that dry.
5. Beard and Hair: Believe it or not guys,
we are almost done. So as far as painting goes, the next step that we're
going to do is the beard and the hair and the
white of the cap. So if you look at my palette, I have cleaned up
my Naples yellow. There's no more pinky anymore. And I have cleaned
up my white gouache. There's no red or anything
that is mixed in with that. So we're going to just pick up some straight
white gouache. I am going to thin it
down just a little bit. What we're going to do
is Bayesian our beard. Now remember basing in
is just straight color. Great. Now let's do the same
thing over here. You're going to want
to go carefully around that cute nose. Now while that's drying, let's go ahead and pick
up some of our Payne's gray and throw in some
boots for this little guy. Okay, Let's let everything dry and I'll see you
in just a moment. As I was putting in the boots, I realized that I
missed the bottom part of his beard in white, so you guys probably
caught that. And I need to hurry and just put his little bear it in down here. This is why it's always
good to stop and step back and take a good look at your
piece from a distance. And you see things that you might have missed
or that might be misshapen that you want to kind of take care of before
we move too far along. That's better now that
his boots are dry, I'm going to add a second coat because mine
went and quite light. If you just need a second coat, this would be a great
time to do that. Speaking of second coats, if you're bright red, needs a second coat, then go ahead and pick that
up and add to your stripes, your hearts, if
that's what's needed. Also, if you're white, needs a second coat. I'm going, I'm not too worried
about this edging here. We're gonna go in
with some coloring on top of that in just a moment. But go ahead and step back, take a look, see what it needs. And we'll start up again
with our Naples yellow. I'm going to pick up some of this Naples yellow mixture that your palate
is nice and clean. We don't want any pink. Just pure Naples, yellow. We're going to take
this and go right on top of the white. Now, if you want a white beard, you can keep a white beard. But that felt a little
Christmas C to me. And when you go on top of
gouache with watercolor, it actually stimulates
that white gouache and they blend together. Great. Okay, Let's let that dry. Okay, let's go ahead and
add our heart to our patch. Since we have nice
clean, bright red here. So the key here is
Don't play with it. So I'm basically putting two dots for the
top of the heart. And then I'm going
to pull it down. And I'm just going
to let that sit. And it's going to take quite
awhile to drive by the way. So while that's drying
and that's okay, we're going to work on
the buret a little bit. I'm going to get a little
bit thinner brush. I'm going to use a
scroller and I'm going to pick up some
of this burnt umber. Make sure you can
see my palette. I'm going to thin it down a bit. And I'm just going to add a few wisps of hair
and the beard. You don't have to do this. You can just do it
strictly in ink. We are going to
emphasize it with ink. But I don't want to
add some dimension to our cute little gnome like that. I don't forget, we're going
to do this with some pen. So I promise you it's going to look just fine when
we finish. Okay. So same thing with
his beard over here. I am going to we are going to do a little bit around
almost like a mustache, but not quite a mustache. Or if you want to
add a true mustache, you can absolutely. But I am going to
branch these out. So if you want to
watch first you can. So you can see I'm
curving them out. As I come down the center. They're gonna be more straight. Now. I'm going to curve
them the other way. And then I am going
to come around. It's cute nose. This little list three. Isn't that cute? And we will give us more
definition with the pen, but I just wanted to get
some lines going in there. You can actually
stop painting at this point except for her
little bands right there, um, which I'm going
to do in red. And if you would
like to take it a step further than you can add just a touch of shading right there on
the inside of that hat. We are going to come in with ink and do some things there. But if you'd like to, I'm just going to
add a teeny bit. Not much, but just a
little bit of shading by just putting a
little bit of a wash, picking up a little bit darker. I'm being very gentle and light. You can't overwork this because
it's on top of gouache.
6. Inking Our Single Gnome: Alright, once your
paint is 100% dry, you can start inking in. As I mentioned before, I'm gonna go ahead and
use this Muji pen. You're also welcome to use a
micron or something similar, which has a tip like this. And I'm gonna go ahead and
speed up the tape so you can watch quickly as
I ink things in, just keep in mind
that we're going to do the black and then we'll come in and highlight
with the white. And also, I never do, you'll never see me do
a straight outline. I'll always be doing
little strokes to keep it loose and free
and natural looking. And that's what I like to do. And then I'll point
out some of the ways to add in some shading with contour lines and
crosshatching and such. When we get to that point, before we dive into the
rest of our shading, I'll just show you a couple of techniques that
are pretty basic. So you might be familiar
with them already, but just in case you've
never done this before, we're going to be doing
some crosshatching, which means we have our
lines going vertically and then we'll take them
horizontally or diagonally. And you can see if you
do them wide apart, you get a light
amount of shading. If you do them closer together, you get darker shading. And so you're going to want
to vary the length of your, of your strokes
to you don't have a square and you'll see the areas that we're
going to be doing that. Also. In some areas, Let's say that
we have his sleeve here. We're going to just be doing some contour lines like that. Now contour lines
just means you're following the curve of
whatever it is you're doing. So obviously, this
is a curved line. We would be just doing
some soft curved lines underneath just to add
shading underneath his arm. So areas like that. Then also there will be
some areas like his hat. So we've got a hat and
we're going to add some lines to that just to add some curvature to it
and some shading. So if we have our
darker side over here where we've
added this shading, we are going to add some rounded lines,
just slightly curved. Again, we want them
different lengths. And we want to start with that curved edge so it looks
like it's coming around. So you might want to
have a piece of paper on hand to practice a
little bit first. Also, sometimes it depends on what kind of pen you're
using your marker. It can start getting
a little goofy with some of the paint if
it's picking up paint. I don't really have that
trouble with a Muji pen, but depending on
what you're using and you're going to
want a scratch paper, scratch piece of
watercolor paper so that you can kind
of get that edge off. So I'm gonna go ahead and fast-forward the camera
now so that you can see me add the remainder of the lines that we're
going to be adding to our cute little Cupid
here with the black. And then we are going
to come in with our white and finish off
with his highlights. How did it go for you? How did your inking
go? Isn't that fun? It's just so relaxing. There's no right or wrong. Just kinda go with the
flow and do what you want. Now, I'm going to use
this Posca white pen and I'm using a fine tip. You can see it goes
on nicely covers. Well, it's almost like
painting with gouache really. Then on his shoes, this is where I'm going to
actually put the soul in. All right, I think he's done. Let's let that sit for a minute. We can always come back to it if you feel like
you need to add more or if you realize
you've forgotten something.
7. Inking Our Gnome Couple: Let's go ahead and come over to our cute little couple here
and get rolling on that. I'm going to stop using the black for a minute because
we've reached the point where it's time to add our
white hearts on her hat. And then we'll put the
black on top of that. So let's set that
aside for a moment. And I'm going to do these hearts the same
way I did that one. Which is basically if I do it on a black spot, maybe
you'll see it. I'm going to make a dot, the
dot and then pull it down. Sorry if you can't
see that very well. But I think we probably didn't know since we were in
elementary school, right. So you probably
know what I mean. So here we go and we just swap these to be going in all
different directions. There's my two dots and I'm
just going to pull that down. And there's a cute
little hearts. Okay, so we're gonna put these scattered
around on her hands. And I tend to go all in one direction but
spread wide apart. And then I'll turn
my board around. Okay, I think that's good. Let's do the same thing
for the band on his hat. And then we will finish
out our contouring. We need to stop and
let our white dry, and then we'll come in
with our black again. So let's give that
just a moment to dry. My white dried and when it dried I can see
some of the red through. And so I went ahead and put a second coat on
my white hearts, just on my gentleman gnome here. The white one was the
little girl here was fine. Then I, just to let you know, I added some more
white highlights in the his beard over here. It was just a little bit
too dark for my liking. So the whole precipice of all of these fun
little paintings is to make it how you like it, and make sure that
you're happy with what you're doing and
enjoying the process. And so if you wanna do
something different than what I'm showing
you, that's totally fine. Make sure that you are
being creative and expressing yourself
in your artwork and being true to yourself. And that's all that
matters really. So anyway, I'm gonna
go ahead and start now with some more of
that contouring with the black Muji pen. And I think I'll speed up the tape so that
you can watch it in fast motion and go ahead
and do yours as well. So I'll talk to you
again in just a moment. Guys. We are so close
to being finished. I can't believe how
fast this has gone. I have stop the tape so that we can take a moment
to just kinda step back. This is a great time to take a look and see if there's anything that you've missed. Any place that you want to add. You might have noticed
that when we're doing our contour shadowing, I always try to deepen corners. That's always one of the
first places that I go to and then always try to
keep those lines rounded, especially around the
corners, of course. So keep that in mind
as you do your piece. And also I wanted to point out, you may have noticed
that I didn't do any black on the mid
section of his beard. I just wanted to keep it a little bit lighter
and a little bit more blonde for this little guy
so that it matches her hair. I'm going to speed up the
tape now and do her braids. And then I will stop and
we'll go ahead and switch to our white and do our highlights and
we will be finished. Okay, How do you do those
braids are a little intense. I, I'm going to admit to
holding my breath a little bit. But now we're going to take our, either our postcard
or white gel pen. And we're going to add in the highlights and then
we'll wrap up together. So I'm going to use my posca. That's what I'm
using today. And I'm going to speed up the tape
and you can follow along. And let's finish off
with our highlights. Nice job, everyone. I hope you enjoyed this piece and the last
thing that we always do is sign our name. I want you always
to take credit for your artwork and to be proud of what you've
done and accomplished. Thank you for doing
this piece with me. I really enjoyed
being with you today.
8. Class Project: Okay guys, your
class project is to, of course complete a set of darling little Valentine numbs. You can use watercolor paper like this or put it
in your sketchbook, or put it on a
Valentine's Day card, whatever you want to do it with. And then snap a
picture of that and share it with us in the
class gallery below. Look for the green button
that looks like this, and click on that and makes
it very easy to upload. But that will allow me
to communicate with you freely and comment on
your piece of art, which I would really, I appreciate the
opportunity to do that. It also allows the students to see what each other is doing. And that's always
so fun because they turned out just a little
bit different for everyone. Then if you could also take just a moment to leave
a quick review for me, I would really appreciate
that it helps me as a teacher learn and
grow and become better. And it also helps with my algorithms within the
Skillshare programs. So thanks for taking a
moment to do that for me. Alright, I will see you in our last video as we
wrap up together. And thanks again for taking the time to do this
project with me.
9. Congrats!: Well congratulations,
you did it in, finished your piece and I'm so proud of you and happy for you. I hope you enjoyed
doing this piece as much as I did at self band. If you wouldn't mind just
taking a moment now, just snap a quick picture
with your cell phone and look for this button on the page and click
on Create, project. Upload that and you
and I can communicate freely there and the rest of the class can see what
each other is doing. It makes it so much
more fun for everyone. Also, if you could look for this button on the page and
leave me a quick review, I would be very
grateful for your help. Also, if you know
someone else that you think would like
to take this project, then all you need
to do is look for this button on the page and
share this project with them. And both you and
your friend will benefit financially
from Skillshare, which is pretty cool. If you enjoy being on Instagram, then I would enjoy being part
of your art journey there. You can find me at Kerry centers art and we
could also communicate there. So keep that in mind and also my website, carry
Sanders art.com. We would like to see a
broad range of my profile. I'm in oils and graphite and all different types of mediums and types of art. I would love to have you
visit my site there. And that's also where you can see the workshops that we have going here at Kolkata
studios in St. George, Utah. Alright folks, I'm going
to let you go for now. I'll see you in the
next Skillshare class. Thanks again. Bye.
 Kerrie Sanders, Artist, Teacher, Creator.