Transcripts
1. Introduction : Hey everyone, this
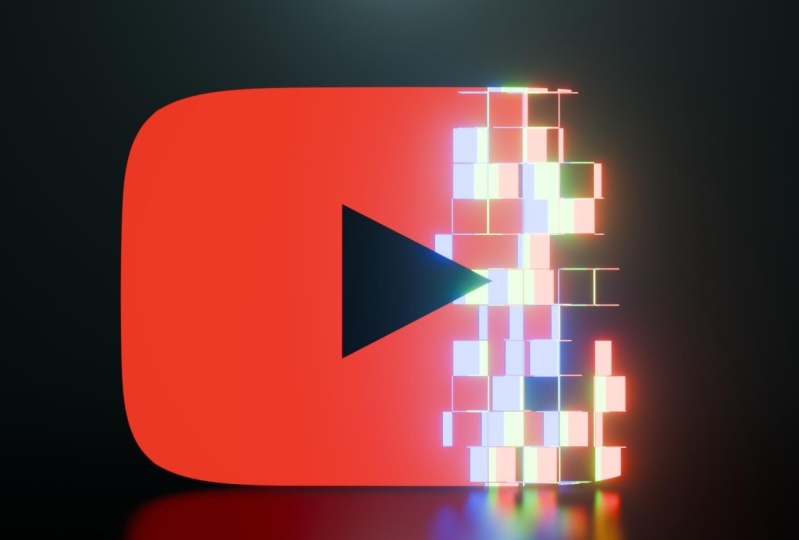
is Nthm Patel. In today's class, I'm going
to teach you about this amazing pixel grid scan
animation of the logo. Basically, this class
is divided into five episodes which are going
to be modeling of the logo, adding some nodes in
the shading tab where I'm going to teach you
about each specific node. How to set up key frames and
camera for our animation, the background and lighting
for our logo at the last. What will be the best render and output settings
for our animation. So get ready to learn this modern day
animation in blender. See you in the first episode.
2. Modeling of the logo: In this video, we are
going to model the logo. First of all, select all
the objects and delete it And press numbered one
to go into the front view. By pressing Shift in the mesh, select the plane
and press R x 90. I will provide reference image
in the project resources. Now again, pressing Shift and going to the image
and the reference. To select a logo, just go into x ray mode. You can take any logo of
your choice as your wish. Now select the plane, and by pressing Tab, go into the edit mode. Now I'm scaling towards
the x direction. By pressing X, now zoom in and adjust
according to the image. Now select the upper
vertex like this. And by pressing at, grab it towards the
set direction and align perfectly with
the image like this. Now again, select
the bottom vertex. By pressing, grab it towards the set direction per the image. Now again pressing Tab. Going to the object mode, now you have to apply a vision modifier and change
the level of put to two. Now you have to again, select the plane and go into the edit mode
by pressing Tab. Now by pressing control R, you have to add two loop cuts on the horizontal axis
and the vertical axis. While adjusting the loop cuts
by pressing right click, it will automatically align the loop cuts at the
middle of the Meow. Change the level
we put and render to in the subdivision modifier. Now select this H and press X, scale it according to the image. I'm scaling it a
little bit lower. Now again, you have to select
these bottom vertices. And again press S X, like this. Now you can apply the
subdsion modifier. Now for the play
button of the logo, just again go into
the x ray mode. Now I'm adding another plane. Now, selected plane
and press R X to rotate it towards the 90
degree of the x direction. Now by pressing Tab again, go into the added
mode and press X to grab it towards the
X direction. Like this. Again, press in Set to grab it towards the set
direction like this. Now again, you have to
select this bottom vertices, press to grab it towards the
set direction like this. Now you have to select
this upper edge, press M, and at the center, it will automatically merge. These cuts at the center. Now press X to adjust the
mesh according to the image. Now by pressing to select all and grabbing it
towards the Y direction. By pressing Y now to exclude it towards
the direction like this. Now press Tab to go
into the object mode. Now press and Y to grab it at the middle of
the mesh like this. To remove this particular
part which we have created, we have to add bullion modifier. Now select the plane or the play button
which we have made, which is plane 001. Like this. And just go to the fast option in the solver
and just hide at plane. Now you can simply apply the bullion modifier and just
simply delete a plane 001. Now our Youtube logo is ready. Now we can move on
to the sailing menu for the further animation.
3. Setting up some nodes in shading tab : Welcome to the
episode of shading, where we are going
to add some notes to our logo, Select the logo. Just going to the shading tab. Now what I'm going to do
is just here to delete the principal SDF select
and press delete. Make sure you are in the
material more shade. Add a make shader. Press shift A at the
shader and attach the shader to the surface of the O what Mkshader
will basically do. That it enables two
nodes to mix together. The use of Keshad is
to blend two nodes. Which two nodes we
are going to use? The first one is
the emission node, first one is the emission node, second one is the transparent
SDF and attach to shader. What emission node will do, It will create a light
effect which will be emitted from this logo which will emitate from
the surface of the logo. The transparent BSDF node
is basically used to add transparency without
reflection passing straight to the surface, as there were no geometry there. After adding these two nodes, I'm going to add a color node. Simply sit and search
your color ramp, you have to attach
this color to the Fac. Basically, color node
is used for mapping the values to colors
with the use of a node. What I'm going to do is just add the gradient texture
and attach color to basically what gradient
textures will do. That it will generate interpolated color
and intensity values based on the input vector. What I'm going to
do is just select this gradient texture
and press control. It will automatically
add these two nodes, texture coordinate
node and mapping node if these two nodes not appear
after pressing control. The simple solution
of that is just go to the edit and go
to preferences. Now in the add add
ons to search here, Node Wranglara enable
it by ticking, mark this box After
ticking, mark this add on. Select this gradient
texture and press control. It will automatically
add these two nodes. Now what I'm going to do
is just select this logo over here and press
control to apply scale. And now apply scale. When you have applied the scale, what you are going
to see is if you change the value of X like this, this will affect
the logo like this. You can play with
this value like this. Now what I'm going to do
is just select the Rogo. Just go to Materials and just set the blend more to
alpha clip like this. Now you can see that our
black background is removed. You can play. If you
select the alpha blend, it will appear
somewhere somewhat like this shading color like
this. But I will prefer. Before adding the
Voronoi texture, what you are going to do is
just select this vector. Just select object and
connect it with the vector. Now this texture
coordinate over here. And by pressing Shift, add a Orino texture and
place it over here. Now what Orinoi texture
will do is that it will add a procedural texture producing a Orino texture pattern set. The dimension to 40 and set
this feature output to two. Now set this endumness value
to all the way to zero. Now we have to play with
this value of and scale. I'm setting it to somewhere
or -2.80 and scaling a little bit until
and unless you find the box or checks
effect in the logo, you can adjust it
according to your wish. You have to play with
these two values, the value and the scale value. What I'm going to do is just
select this mapping node and press Shift to duplicate it and place it over
here like this. We are going to adjust this varinoid texture with
this mapping node like this, just simply set to zero. I'm going to adjust the value of the gradient texture with the help of this
mapping node like this. Okay, What I'm going
to do is now what I'm going to do now is just add the mixed color node between
these two Noi and mapping. Press Shift and type mixed
color and attach it over here, just in the texture coordinate. You have to select
this object node and simply attach it to what this
mixed color node will do. If you change the
factor value to one, it will bypasses
all three nodes. If you set the structure
value to zero, all three nodes will
affect these values. Okay? The factor will be the value which will be adjusted according to
the logo animation. I will prefer to set it as 40.5 Now to see the node connected, we have to simply, first I will track it to some persons cannot see these
two nodes connected easily. What I'm going to do is just press hold shift and just right and
drag it like this. Same with here, like this. Select this point over here. By pressing to grab
here, like this. Again, select this point
to grab it here like this. Now you can simply see that these two nodes
are connected. Now what I'm going to do is select Transparent and place
it over here like this. Select Emission. No, and place it
over here like this. Now what I'm going to do is
just select Make shader, press shift to duplicate it. And place it over
here like this. Now what I'm going to do is just place this emission
node over here. Again, select this
emission press shift over here and just
connect it to shade. We are going to add the two colormet press shift and type here color
M, first color. We are going to attach it
with the mix shader like this and the second color nel, we are going to attach it with the first emission
node here like this. What I'm going to do is
now drag all the oh yeah. Now what I'm going to do is just connect this
gradient color value to this color ramp and again, this gradient texture
color to this color. What I'm going to do now is
to change the emission value, this bottom one emission
node value completed. Just track this green
and blue value to zero. That perfect red color will apply and give this
strength of two. Now what I'm going to do is just play with the color first. We have to select this
interpoltation to Constant. Now what I'm going to do
is just track these over here like this and select
color to complete red. Now I'm going to
add two more now. We have to adjust it over here. I'm going to set it to
the complete green. And set the second
one over here. And set it to complete blue. Yeah, I have set
the color colors. What we are going to do
with these color is just simply flip the
color M like this. And just set it to, and adjust it until and unless
you see this black sheet. Okay? This black shape. What I'm going to do
here is the black shape. I'm going to place it
over here like this. You have to keep the
first emission strength, but I'm giving it a 24. If you can see the value x, you will see the animation. Or it will work like this. Now it's almost done, but we have to set up some
key frames for this logo. I will teach you how to set up the key frames into this
logo in the next episode.
4. Setting up keyframes and camera for animation : So in this class I'm
going to teach you how to set up the key
frames and camera. So first we are going
into the lay out to you. So in the layout to you, this is basically our time line. You can see that to
0200 is our time line. My animation will start from the first frame
until 100 frames. What I'm going to do is just select this
logo first and place our timeline to 15
here like this. Yeah, I'll just
simply type here 15. Now, going into the shading tab, this timeline does not appear
in your laptop or desktop. What you're going to do is just until and unless
you see this arrow suppress right click and
press horizontal split. And drag it over here like this. Now in the shader editor type, just simply select
this timeline, the timeline will appear. I'm now at the 15th frame. At the 15th frame, I want to start my animation. You have to play
with this location. I'm setting it here like this unless the
animation disappears. Yeah, 1.7 is the value where
my animation is starting, where this is completely empty. By pressing right click and you have to insert
a single key frame. If you insert this
first key frame, it will apply the keyframe to all three direction,
x, y, and z. We want to give keyframe
in only x direction, just here, and insert the
single key frame here. If you select this mapping, you can see that our key
frame is added at 15 frame. Now jump into the 85
frame. 85th frame. At 85th frame, I want to see this logo
completely animated. Change this X value.
You like this? Yeah. -1.5 meters. My logo is completely animated. Animated. Just simply
right click here and just add insert single key
frame in the layout. Just go to this rendered menu. You can see the Or
animation set up. First we are going to add a camera press dumped one
to get into the front view. Now you can delete this image, there is no worry about it. Press shift and add camera. If you press control and zero, it will automatically align the camera to this
viewport view. Or you can simply go into view. Align view and align
active camera to view. Here is a shortcut which I
would tell you control zero, press and grab it
over the y direction, like this for the
better composition. For the better composition. Just and go into the
camera data properties. In the composition guides, you have to select
the third and center. You can perfectly align this camera according
to these Xs. I'm grabbing it towards the X direction,
somewhere like this. I'm again grabbing it towards the set direction
here like this. I think this is
perfectly aligned. You change the value of pass, pat out to completely one. You cannot see the area
outside of the camera. I like this type of view. If you go to this rendered
view and play this animation, you can see the animation
is perfectly working. Before rendering the animation, you have to go to the
world properties and just set this to color to complete
black and strand to one. In this volume, you have to select the principal
volume here, like this, and set your density to 0.050
If your density is zero, this will create a
more prited logo. But you have to set this value
to 0.050 You can play it. This is the end of the episode. In the next episode, I will show you how to set up the background and
lighting for this logo.
5. Setting up background and lighting: In this episode, I'm
going to show you how to set up the background
and lighting for our logo. I'm going to simply
add a plane by pressing Shift A
and add this plane, scale it according
to your reference. I'm scaling this here like this. 27.34 meters. Now press zero to go
into the camera view. Now I'm going to add a
material of this plane here. To select this plane, go to the Material view. Add a new material and set the base color to
complete black like this. And change the
metallic value to one. And change the reflex
value to 0.3 like this. If you go into the
rendered view, it will appear like this. What I'm going to do now is if you want the shadow to
appear a little bit more, just go color and set it to
complete. White, old here. If this shadow is not appearing
on your textop or PC, just go to the
rendered properties, select EV and make sure
all options are enabled. The ambient
occlusion, the plume, the screen space reflection, and the motion blur. If your screen space
reflection is disabled, you cannot see the
shadow of the logo. Make sure all
options are enabled. Now I'm going to set up
Point light over here. Just press Shift A, you have to add a point light. Now press and set to grab it towards the set
direction like this. Grab it until it disappears
from the camera view. Like this exit from
the camera view by pressing zero on the num pack, grab it towards the Y
direction like this. By pressing, we have to increase the to
somewhere around 15250. Yeah, I'm setting this to 2200. I'm giving it a color, slightly blue like this, as you can see in
the camera view. Just select the serial light
and press G said yeah, this looks now perfect. I'm giving it 200. Yeah, this looks perfect. Now our background and
lighting is all set up. See you in the next episode, where I will teach you about the render settings and the
output quality of the video. So see you in the next episode.
6. Render and output settings: So in this episode, I'm going to tell you about the render settings
and output settings. Go into the render setting, make sure you have this EV
render engine selected. I'm setting this render value
to 300 and view put to 16. Make sure that the
ambient occlusion, the bloom screen space, reflection and motion blur, all these four
options are enabled. Now what I'm going
to do is, yeah, this color management, you have to set this look to
medium, high contrast. Now for the output settings, these 260 frames per second. According to my opinion, 60 frames per second will be the good animation
for this logo. If you have default 24 FPS, it will appear a little
bit slow like this. I will prefer you to select
the 60 frame per second. It will be more
smoother and make sure that your resolution
is 1920 into 1080 pixels. For the output,
you have to select specific output for
your animation. For the output. I'm going to create
a new folder over here, animation like this. And going into that
folder and accept it. Make sure your file
format is F impact video. It will render your animation
into a video file format. Make sure your encoding in the encoding impact
four, this container. In this container, make sure
you have selected this mpact four in the quality output
output quality. Make sure you have selected the perceptually loss less
or the better results. Just check your animation
before rendering it. Yeah, this looks perfectly good. Now what you are going to do is just make sure that you have a frame range of 1200 where we have set up the
key frame here, over 15th frame and 85th frame. To render the animation, you are in the
layout you that it will render the
animation faster. Just go into the render and
select the render animation. It will take some time to
render you an animation. Here is my final results. Make sure you leave
a comment down below whether this class meets
your expectation or not. See you guys in the next class. Till then, stay safe
and stay healthy.
 Nityam Patel