Transcripts
1. Introduction: Hey, everyone, welcome to the new series of infinite
looping animation. In this series, we will
cover an animation in such a way that it
become an infinite. This series is total divided
into the seventh episode. In the first episode, we will cover the
basic modeling of the food item like a
burger sake and the boxes. In the second episode, we will apply the
material to that object with explaining each
node that time used. In the third episode, I will make a rolling built, and from this one, we are
start animate things. In the fourth episode, we will make the
rest of the scene and complete the setup. This episode is totally
about the modeling. The fifth episode, we
will give the animation of the food item
and the boxes in such a way that it become an infinite and also
explaining about the graphs. In the sixth episode, we will complete the
scene by applying the material in the
rest of the scene. And lastly, I will show you the render property to make
three D object to video. If you are the beginner
of the blender, then you should
work the video for the modeling likes how the different shape of
the model can be done. So let's dive intwen and meet
you in the first episode.
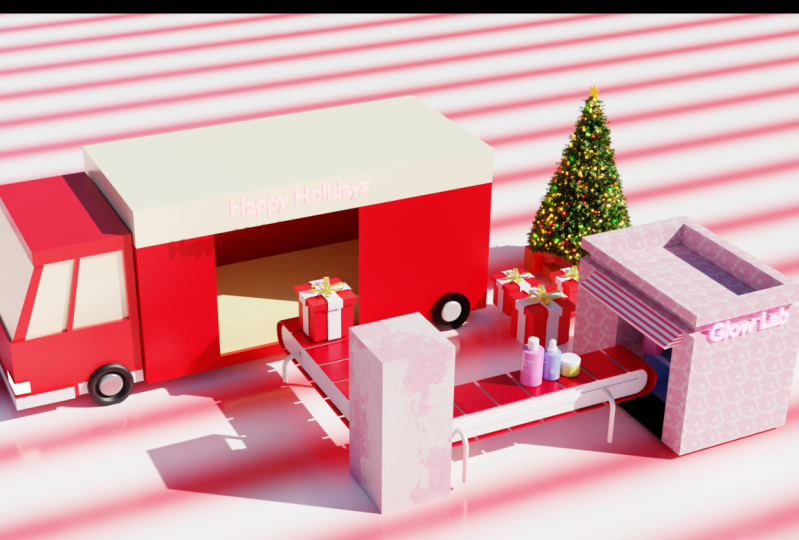
2. Modeling of Low Poly Food Items: Hey, everyone. Welcome
to the first video. In this video, I will make low poly food items
like a burger and sake this food item I will use in the
factory as a production. So I start with by pressing a select all item and
press x to delete it. Now, first, I change the name of the
collection to burger. And here for burger bread, I'm first using a UE pier. And to give the shape. First, I decrease the
scale size in Z direction by S and increase
the scale size, except Z direction by
pressing S N sap Z. Now I will create the shape like the umbrella
shape from above. So if I select the single
vertss and grab it, so it cannot properly work, but if I turn on the
proportional adhering software, then I can easily
make that shape. So here I select the spear shape for the proper umbrella
shape from the above. And now, if I select
the vertices and easily grab it by using the
proposal editing software, and here I adjust the
size by mouse wheel. And yeah, I need this type of shape and do it sit smooth
by pressing rightly. So I think some little changes. I made the shape proper. So I again go to the
edit mode by bracing tab and then adjust the size, and by selecting the one vertss, I select the nearest vertices
by using the control plus. From the top, the sap is fine, but I have to ajust
sap from the bottom. I again go to the edit mode
and select the one vertss, and by using the
control plus plus, I select the nearest vertices. And by turning on the
proportional editing software, I grab the vertss by using G. So I think the shape
of the top burn is fine. What I do, I select the burn
and by pressing sift D, I duplicate the object, and then rotate this another
bond by using r x and 180, and then grabbing it z direction by G with little distance. Okay. So first, I hide
the upper one bond, and now I'm adding and spear again and decrease
the scale size in z direction by S N Z for making a lettuce
or maybe a salard. So first, I make the shape
like totally flat and increase the scale size like
the bon size by S N shift z, and to give a random sard shape, I'm adding a modifier, which is a displace modifier. I know it haven't
take the shape yet because I haven't add any
texture on the displacement. So to add the different texture, I'm going to the
displacement section and here I select the cloud. I know it doesn't look good, and this is in the x direction. You can see that if I
increase the strength, then it can move in
the x direction. Here I change the direction
like y or maybe a z. I think the z should be fine for us because of the random
movement of up to down. For the checking of the texture, I simply hide the bur and
check the different value of the texture by
changing the value of size and depth and
maybe the whole texture. I select another textur like a distorter noise and
changing the value. For smoothness, I'm
adding another modifier, which is a subdivision surface, and here I'm increase the level like two
or maybe a three. I think we got the
shape and I unhide the burn and grabbing
the salad above the bon. Here, I changing or messing with the value to get
the perfect result. I mostly change the value in
amount value and I increase the little size in x and y direction by
pressing a shift said. Here, I suggest you to
messing the value by yourself or maybe try the different texture to
get a different result. I'm just making a shape of random like a salad
of the leaves. So yeah, I think it's look fine. Now I will make a meat
or maybe a ticky. I'm adding a circle and
grabing over the salad, increase the scale size by S, and to fill the surface, I'm going to addit
more and press F. Now, I'm extruded in direction by E and give the shape
like a cylindrical. It's looked too much
hard to make a smooth. I'm adding a modifier, which is a level modifier, and here I increase the sagment, and then exit the amount value. For total smoothness, I select the stage smooth by right leg. Here I slightly increase the amount value to get
the required result. So it take the ticky shape, but here I'm insert
the vertisis, by placing I from the top side by selecting
the top vertiss, and also the bottom side. Yeah, it's looked totally fine. Now here, I will make a slice
of cheese and here I take the cube because
I need to require a square set and here I
decrease the z value, so it become a flat. By the way, it can
be also be made by a plane instead of the cube. So now onto the cheese, I increase the scale size. So it can be slightly
outside of the burger and here I slightly decrease the ad value because the slice of the
cheese will be thin. Now, in edit mode, if I grab the vertisis
without subdivide, so it cannot be cove properly, like a slimy cheese. Here, I subdivide
multiple times, like 15 or maybe a 35. The more you
increase the number, the more you get
the better result. But the 35 should be the fine because we add the
subdivision later. Now in the edit mode, I turn
on the x review and here, I simply select
some of the part, and by proposional
editing software, I simply rotate it and
grab it downwards. Here, I try to make the
safe like a co part. Here I simple select some
part and rotting by R and grabbing in
downward direction with the proposional
editing software. The other vertices near to
its are also be grabbed. Here, I manually
manage or adjust some of the part and
grabbing properly. It's look like a cove cheese, and to look like smooth, I'm adding a
subdivision modifier and give it to level three. And here I'm also adjust to the side part of cheese
to a little randomness. So it should be fine, but here little downward, and yeah, the one sided
corner look fine. And here I use the
mirror modifier to directly copy the
one sided corner. In the top view, I select the remaining three part in the x ray mode and delete
the verticis, by pressing x. So now we have only
this one sided cheese. So I'm adding a mirror modifier and simply make the
copy of that one part. So I need x and y direction. And here you can see
that a little cut off. So what I do. I simply select some of the vertices and grabbing
towards the direction. And yeah, now it's look fine. And lastly, I'm adding
another ingredient, which is a slices of tomato. This slice are circle, so I'm adding a circle grabbing above the cheese
and decrease the size, so it's look like the
slices of tomato. Now, to feel the circle by
pressing F in edit mode and then extruded in z direction
by e to make thickness. And by selecting upper part, I'm insert by pressing, and then trod under
the set direction, so it creates a
little border type. Here, it is two surf. So I slightly decrease
the scale size, and then to smoothness, I'm adding a modifier, which is subdivision surface. So The sap is slightly changed because the
lack of fertiss. So I'm adding a bevel modifier and place above the
subdivision surface, and then increase the
sagment like two, three, or maybe four and then slightly increase
the amount value. Now it's look a little smooth. F to give little sharpness, I'm adding a loop cut by
using controller and placing close to another vertss and also give little arpness
to the top of the surface. I select the top of the surface, and then tracing I. So I think I pick
up the wrong one. S be inner vertices,
y, then place. So now from the top, it's the SR page. But for the tomato, I have to mess with
the inner shape. So I'm using the
scupting for this. So by selecting that circle, I'm going to the sclpting mode, and if I select any shape from the left side
and give it to them, but you can see that
there is no properly work because of lack of vertiss. So I'm adding a vertiss by using I to insert
it again and again, and I can easily
change the shape. So yeah, the number
of tases are enough. Now I'm using the sclpting. Okay, so I'm already
in sclpting. Change the layout and
sclpting again, and here now, I'm changing the shape of the top surface randomly and
create a messing effect. If somehow it's
created too much, then you can simply use the control to back
to its original form. Yeah, that's look fine. Now, here, I'm slightly
increase the size by S and place at the
one corner of the burn. Okay. So I'm placing
slightly outside, so it's look like a loaded
to the ingredients, and I'm simply use simply to duplicate it and place
at four corners. So I think it's look fine, but here, it's
slightly on the air. So I'm going to side view, select all the tomato slide and placing on the cheese
slides by GSD. And now I unhide the top one and same way placing on
the tomato slide. Okay, so it's look fine, but the bottom one burn
is slightly to be flat. So what I do, I
select the vertices, and by turning on the
proposal edding software, I make the slightly
flat shape by craving the vertices
and nearest vertices. And whenever select
the whole group, so make sure you are
turning on the x ray mode. Yeah. Now it's look
like a low poly burger. Now it's the same way, I create the new
collection by right and new and here change
the name to a sake. For now, I select the whole burger and
place little right side. Now for the sake glass, I'm adding a circle
and by pressing tab to go to edit mode
and press F to feel it. Now here, I increase the
slightly scale size and extrude it in z direction by E D. And here for the bow part, I'm slightly increase
the scale size, so it's look like a glass. Okay. Here, the height
should be fine. If you want to
increase the height, then you can simply
grab in that direction. Here I'm making a little strip. Here, first, I'm
extrude it and place right to place it
original shape, and then scale in size. After scaling it, here I'm extrude again and make
a size like a strip, and then insert it to
its original shape. Now here, I have to make
a half circular shape, so I'm extruded like half
circular shape height, and then control b to b. And increase the sage mad by using increase
the mouse wheel. And yeah, it's look fine. Now I do sad auto smooth
by placing rightly. So now the s cup is completed. Now we have to make a straw. So I'm adding a
cylinder for that and then reduce the size by a to
make a thinnest like straw. And then increase the scale
size in order in z direction and place it like half of the straw is
outside to the cup. Now here, we have to give the shape of the
straw like a curve. I mean to say this type of
shape. For making that. If you go to the
edit mode and select the top vertiss in x ray mode, and if you add a vertiss
manually like trod rotate, trod rotate, it won't
be work perfect. Instead, you can
use the spin tool. Here, we are inside view of x, so I select the x, and whenever you're
moving the spin tool, it can be considered the
radius to three d cursor. Here, to make the cow shape, I select the cursor from the left bar and then place
in such a way that it can be considered as a radius and here I need a total
six or maybe eight steps. I change it and use the spin
tool to make the cow shape. After that, you
can easily select the outer vertices and
a ten in this way. It can look like a straw shape. Here, I slightly
decrease the scale size, and then here by phase
selection in edit mode, I select that phase
and deleted by pressing x and also
do a sad smooth. Now our straw is ready. For making the hole to the cap, I select that
particular phase and delete that phase in added mode. And to create design, I select the extrude
phase along the normal to nearest
vertices by using lt E. By the way, I will
apply the material to that cup to like
a glass shape. So for inside liquid, I'm using cut by using control r and place at this level to like a cup filled
with the juice. And by phase selection, I select that phase and
sap to duplicate it. And placing its original shape. But you can see that there is a single object to make
it another object, press P and select by selection. So you can see that there
is two different object. First, I hide this
curve and in edit mode, I select the vertices
selection and select the upper part
and press F to feel it, as well as the lower part
and press F to feel it. Now it covered the whole area and it become the
inside juice part. Here, I slightly decrease the scale size so it can
be fit inside properly. Now, the model of the sake
is also be completed. Now I select the burger
and place close to the sake because now I'm
making a plate for the combo. To make this, I'm adding a plane and placing
under these two things. Then increase the scale
size to like a plate size. I think it should be fine and slightly decrease
in parallel direction. Here I'm going to add a little
curve to the outer rate. I select the plane and x to d, then scale it, and then in the phase selection,
I delete the phase. And it's looked too sharp, so I'm adding a modifier, which is a subdivision surface
and increase the level. Okay, so there is lack of
patiss it's changed the shape. So I add a Bavel and
place above it and slightly change the
amount value to get the proper square result. And to add a thickness, I'm adding another modifier, which is the solidify modifier, which is used for
adding a thickness, and here I'm slightly
increase the thickness and tick mark on
the even thickness option. Lastly, do the sad
smooth option. Now it's look fine. We have completed the
burger sack and the plate. I think the plate
inside the sack, so I'm placing outside, and now only thing
remaining is to make a box. So to create a box, I'm adding a cube and increase the scale size in
corresponding to the combo in particular
x y and z direction. So I think the heights
would be fine. And here I turning on
the x ray mode to see proper to the width of the
combo and make the box sa, which like a combo is
contained inside it. Now we have given the
shape of the box, but it's not look like it
to give the proper look. I'm adding a loop
cut at the middle and adding two loop cut, which is close to the center one by using control R. Now I select that middle one lo cut and slightly grabbing
in that direction, so it make a little cut off. And to make the tape sap, I'm also adding a cut with
keep distance by using control r. And also add a look cut
horizontally at little top. Now by selecting
the fase selection, I'm select that
particular tape area, which is just made
by the look cut. In both the direction
and then E and trod along with the normal and then add
a little thickness. It's look like a particular
tap is attached to the box. Now our box is also ready. In this video, we are
made four things, a burger sake plate and the box. If you want any other thing, then you can simply
make it in blender. There is many
possibility to make a single object
in multiple ways. In the next video, we are apply the basic colors and material to that object that we just made So meet you in
the next episode.
3. Appling materials to the Low Poly Food Items: So, hey, everyone. Welcome
to the second episode. In this episode, we
are going to add a materials and color
to that object. So first, I'm going
to the rendering view so that I will see the
colors and materials. And then I'm going to the rendering view and
change the gene to cycle and change the
device to GPU compute. And here I'm changing the maximple to like
a 50 in the viewport. You don't have a
GPU in your device, then you can simply use the CPU. Now I'm going to the
wall property and change the color two environment
Texer here by pressing open, I'm adding an HDRI, which I already provided
into the resources. I'm just using an HDRI
for 360 lighting. Okay, now to add a material, I'm first go to the
ceding view and here, the material view
is open by default, so I change it to render view. Add a material on the bun, I select the bun and here, click on you to add
a new material, and I'm simply give a color. By changing in the base color, I simply give the one color
in the whole surface area. So I'm simply add some note
to give the sad on the bun. So in the material area, I'm adding a node by using a site and serves
for a color ramp, and by selecting the color m, I connect the color
to base color. So basically, the color ramp is used for adding a two color. Here you can see
that the mixure of black and white is
become the silver, and that silver color is
become the output of the burn. If I change the color
like a brown to one side, so it can be mixure of these two color like a
black and that brown. And you can also increase the strength by
exhausting their bar. You can see that the
black color is more powerful than before
by exhausting its bar. And as the same way, I can also exhaust
another color. But you can see that the
both color are mixing. If we give the particular
input like particular texture, then it can be work
according to it. Here, I want a particular
sad on that bar. What I do, I simply
add a gradient texture by sift and then connect
the color to factorial. And you can see that it
generate a little shade, and you can also ajust the
sad by exhausting their bar. So it's just the
example of the sad. So what I do, I simply
delete it by x and add a noise texture and connect
the color to factorial. So by adding the noise textur, these two color of
the color ramps are distributed randomly
on that surface. And also adjust its softness of the color by
exhausting its bar. Here, I adjust the gray color is comparatively more
compared to the white, and here I also slightly
decrease the roughness to slightly attraction of
the light on the surface. Now just remaining thing is
to set the color and ajusting its value to it look like a braid or the burn
of the burger. If you try by yourself, then you have an idea which value is effect on
the beach of the part. Okay, now or burn look fine, and I rename it to like a braid. And, so here I change a
slightly darker and yeah, fine. Okay, so what I do? I select another bun and give it to directly
bred material. So if I change the color, then it can be effect on both. Now onto the salad. I'm select that salad, give it to new material, and simply give the
dark green color. Here, I'm just giving a
normal color like lime, which is look like a leave and then change the name to it. Okay. Now select the meat or ticky and change the
dark brown color. Yeah, it's fine and
also rename it. Now onto the cheese,
I select the cheese, give it to new
material and change the color to like a
yellow or maybe orange, and here I slightly
decrease the roughness. So it's look reflective. And at the last
ingredient of burger, select the tomato and
give it to like a red. Or maybe a dark red and give the same color
to any other slices. I think I forget to rename it, so I first select the
cheese and rename it and then set the color
to tomato slices and also rename it so that I
can easily figure out when I give the same material to other slices by just
finding the name of it. So yeah, by selecting the
all tomato slices one by one and give it the same material so that our burger of the material is given
now onto the sake. First, I select the cp of the sake and give
it to new material, and here, I increase the
transmission value to fully one and decrease
the roughness value. It's look like a glass material. Now we have to give the material to the inside of the sake. I select it and what I do, I simply use the noise texture. I first copy the
material of the bread. But if I change the color, then it can be also
affect on the bread burn. If I change the pink, then you can see
that the burn is affected to identify separately, click on the number icon. And if you now change the color, then it can be only
affect on that part. So now for the sake, I simply use the two color
like white and pink. So in the bar, here I keep
distance between two, so both color can be appear. Here, I slightly increase the
pink bar more than white. The pink part in
the glass is look attractive and look like a sake. Then onto the straw, I slick the straw, give
it to the new material, and give the color
like a dark pink, and then change the
name to a straw. Okay, so now I have to give the material to that
class of the border part, which is the single object
with the different material. So what I do, I'm going
to the edit mode, and in the face selection, I select that particular row and by using the control plus, I select the nearest
phases also. After selecting that area, I'm going to the material, and here you can see
that the class material. Now by clicking
on the plus icon, I create a new material, and let me go to the
first tender view. Okay, so now by
selecting that area, click on the new material, and here you give whatever
the material you need. So Here I select
the milk material. But you can see that
there is no effect because here you have to
click on assigned button. Now that material is to be assigned on that
selected part, and that's how you can assign the different material
in the same object. And lastly, I changed the
name of the material to milk. Please do not forget to save the file after you
made the progress. Okay, so now on to the plate. The plate look nice,
but I slightly increase the white color,
so yeah, perfect. And the last object is block. So here I give the new material and give it to like
a brown color, like a cardboard type. So yeah, the slightly
orange is fine. And as we did in the cub border to give a different
material in same object, I also select the tape in
edit mode and give it to new material and assign it and slightly give the dark
color compared to the box. So it's looked fine. But here I play a little
adjustment with the colors. So here I'm just
trying to deferent darkness color and mess with the values and color to
set the proper two box. So yeah, now it's look fine. But here I notice the left side of the area can
contain the too much part. So what I do, I simply go to the top and by turning
on the x ray mode, I simply select the left
side of the vertices and grabbing by G
Y and set proper. This may have been
slightly put aside by when we add the
cut, never mind. This now be perfect, and the material has to be
given in all of the object. Okay. So now here I
do one more thing. O burger fine, and I don't want to change the
value in the modifier. So what I do, I
select each object and apply the all
modifier one by one. And also apply the all
modifier in the plate as well. And that one thing is, I duplicate the whole combo
for the factor input. So what I do, I select
the whole combo and press S D to duplicate
it and place right side. So now, a burger has a many object like
a many ingredient. So what I do, I simply select all the burger part and
then control j to join it. And as the same way, I also join the stro and
their milk part by control J. Here, I duplicate the
whole combo because the first one is used for
the emergency purpose. Okay. So now our three object
with the combo is ready. But you can see that if I want to give a key
frame for the animation, then I have to give
the three key frame for the three different object. So what I do, I simply add
an empty and then parent it. Before I do that, I
select each object and here I create the new
collection and rename it plate so that I can
put all three object in that collection and also put a empty object
to that collection. So it is easy for the moment. So now in the collection, we have the three object, and what I do, I simply
add an empty object. So I'm going to add
and in the empty, I use the one of the
empty like a plan axis. And after that appear, I can place at the
center of the plate, increase the scale size
so that I can easily select it and place
proper at the center. And now I select the
all three object and lastly select
the plane axis, and then control P and
object with keep transform. So if I move the plane, then the other three
object will also be moved. So in the animation, instead of select
all three object and give the key frame, I only give the key
frame to a plane axis. Okay, so in the next video, we will start
creating our factory and meet you in
the next episode.
4. Creating a Rolling Conveyor Belt with Animation: Hey, everyone. Welcome
to the third episode. In this episode. I will make the ruler for the factory
with the emission. So I start with deleting all the stuff and first
I'm adding a plane. Actually, I want a cow, but first I'm give the shape to plane and
then convert to Curve. Here I select the
plane and rotate in x direction by r x and
directly right 90. So it become the proper
standing position, and by G D, I'm grabbing in 1 meter
above by pressing G and one. Now here are the main
thing. I'm going to edit mode and then select
the top two overss, and then grabbing in downward direction by G D and
make a safe bi rectangular. And by selecting all vertices, I'm scaling in x direction, so it become the
shape like this. And then pressing Control B and and increase
the mouse wheel and make the safe like a circular
from the side. So yeah. Fine. Okay, so why I
call the main thing? Because if you give the safe without using
edit mode, like, suppose I'm adding a plane and then give the safe without
using an edit mode like manually by using S and
z and also S and X, then the shapes become the
rectangular like the left one. But if you give the bawl, it cannot proper work, cannot perfectly
circular from the side. You can see that the
difference between these two. Suppose I wanted to decrease
the scale by S and x, then you can see
that it's slightly stretching and cannot maintain the circular shape
from the side. But if you select any
one side and grab this, then you can see that it perfectly moving without
changing any shape. Make sure you are grabbing the voltaics instead
of scaling it. Here, I do right click
and convert to the cove, so it become the cove and place
yellow dot at the center. Set origin and origin to center of the mass so
that the origin point, which is the yellow dot
is placed at the center. Now I'm adding a plane
for making a slab. My slab is also rectangular, so I decrease the scale
size in x direction by S X, and which are later
rotating on the cove. Yeah, fine. Slightly Yeah. And here, I'm adding a modifier, which is a A modifier. Here, I'm increased
modifier numbers and slightly increase the gap, so it can be separate
from each other. This gap is fine and
increase the number, but it cannot follow
the path to do this, I'm adding another modifier, which is a modifier, and in the object,
I select that. Okay, so it follow the cove, but you can see that it
cannot maintain the length. Like from the side length, it can more compare
to the bottom one. So before I sol it, I'm first adding a modifier, which is a solidify modifier
to increase the thickness. In the side view,
I can better see. And here, the length
problem can be solved by the gap between the slab
and the array modifier. You can see that there is
a little gap between them. So if I select that object and
place totally on the cove, so the problem can be solved. Here, the lengthy
problem can be solved, but you can see that it cannot bend because of the
lack of subdivide. So I'm going to the added
mode and by zing control. I'm adding a multiple
look cut like around 13 or maybe 14. And if I go to the object mode, then you can see that
it properly bend. And another problem
is the thickness. If I increase the thickness, then you can see that it cannot
be thicker from the side. To solve this problem, I'm placing above the curve, and yeah, this problem
can be also solved. So basically, we tell
the blender to first increase the thickness and
then follow the curve. And yeah, now that's look fine. So now onto the
array again, here, I'm increase the array
number to complete the cow. Okay, so it's look fine. But here, the number
of slabs is only 14. So here by selecting the cove
and go to the edit mode, I'm simply grab the vertices
and increase the space. I think the 18th slab is fine. I'm slightly increase
the cow size to feed the 18th slab properly. Okay, so now fine. But if you rise the problem like two slap is overlap at the end or maybe the
gap between them, then you can
adjusting by two way. Either you can adjusting
the cove like we did in before or you can adjust
the slap size like me. Whenever you at the
size of the slab, so make sure you can at the size in only in x
direction by S and x. Whenever you try by yourself, then you have an idea
which value actually do what. Yeah, it's fine. Now if you grab in x direction, then you can see that
it's look like a moving. And by using the grabbing
keyframe, we can animation. Now for totally smoothness, I'm just adding a modifier, which is a bevel modifier and
grab above the curve here. I'm increase the segment
and ext the amount value. And here, I'm slightly
increase the thickness value. And just nothing but the messing with some value until
it's look fine. Okay, now for animation, here, I pull up the bar, which is called the timeline. And by racing space, the timeline start moving. So I think the 40 frame is
enough for the one plate. And just for extra moment, I'm taking a three
time like 120 frame. Okay, so don't be
confused for this. I'm explaining it later
whenever we rendered it. Because we have to make an
infinite loop animation. Okay. So before I do that, I first set up the camera. So I'm adding a camera and
by pressing num p zero, I'm going to the camera view, and by pressing shift and tilt, I can move the camera
by using W A S and D. By using W A and D, I can go forward, backward, left and right, and by using Q and E, I can go upward and downward. So here, I'm placing in camera
in such a way that it can cover the whole factory and also exist it
whenever we required. Okay. So now we have
to animate the path. Okay. So here, I assume that the three dcursor is
my starting position. And at the first frame, I give the key frame
by pressing I. Now I'm going to the last And by tracking my
first lap manually, I changing the location of x and place in such a way that it
can repeat its position. So Frame zero to frame 120, the loop is moving to one round. And after setting
up its position, I give the key frame
again at 1:20. So if you play the animation, then it can be moving. And here at the timeline, I press t and select the linear. So it become the
constant movement. So now I have to make another. So I simply select the
path and the slab, and then press C d
to duplicate it, and then rotate in in
z direction by R z 90 and place in such a way that the one loop is ended and
the second loop is started. Here, keyframe is
also be duplicated. If I change the frame number, then it can be overlap
the first one. Cause the keyframe
is also duplicated. First, I give the keyframe
at the first location. Now if I play the animation, then it can be moving
on the x direction. For this loop, I have to give the same key frame for
the first and the end of the position for the x location because we cannot
move in x direction, and then I have to only set up the key frame
for the y location. As we did in the first loop, we have to set up the y
location for this loop. Now here for the one slab, I suppose the startm position
at the three dcursor, and here I give the key
frame at the first position. Okay. So it's somehow a little
moving. So what do I do? I simply copy the key frame at y location and paste it at
the end of the position. So it become the static. And now at the last frame, I change the position of the y location by
keep tracking of the one slap and placing at the same position
after the one round. Okay, so my slab is
returning its position, and here I adjust it properly
from the three D cursor, and then give the key frame. And in the timeline
by pressing key and selectively near,
it start moving. Okay, so now it's look fine. In the next episode, we will do our rest
of the modeling part by making the factory
and some other stuff. So meet you in the next episode.
5. Modeling of the Scenery: So, hey, everyone, welcome
to the fourth episode. In this episode, we are
making some another stuff. This episode is totally
on the modeling based. In the most of the episode. We will add the
object and giving the shape by using the
method like a grabbing, scaling, extrude and insert. So I start with the
making first factory. So I'm adding a cube and placing at the start
of the first loop. Now here, I'm increased
the scale and giving the shape like
the factory hale. Here, I'm slightly
placing inside of the first look
because the main door of the factory start
with that area. And now by going to edit mode, I simply select the side of the vertices and then
grabbing in wide direction. So it become a
little rectangular. So the main shape of
the hole is given. But before I do that, first, I'm making a support
for the rolling slab. For the support, I already
have the shape of the cove. So by placing CFD, I duplicate the curve, and just for time, I hide the main hole. Now, onto the cove, I first convert the cove into the mace because the cove
cannot model the save. So by selecting that cove, I'm going to edit
mode, select all, and then extrude in y direction
and place just like that. Now I'm select another
part and same way, I'm grabbing in y direction
in opposite side. With is fine. And now
by selecting that part, I'm pressing F to
fill that area. And yeah, make sure that the modeling part can be done
in the duplicated curve. Okay. After giving the shape, I'm simply decrease
the scale size in x direction first by using
S and x like this. And now I'm decrease
the size in z direction by using S N z. Yeah, it's fine, but increase
the x direction. Okay. So now it's fine. Now to give the design, I'm simply select the area in edit mode and by
pressing to insert it, and then extrude in y direction. So it make a little shape. And by the way,
it is in the air. So I'm making the
leg part to do that. I'm first adding a circle. Okay, so I'm in the mode
by placing type again, I'm going to the object
mode and then add a circle. Now here, I'm rotate the
circle in x on by r x and 90, so it can be stand
proper and then place at the design
part of the support. Now, first I turn
on the x ray mode, so I can see across it and decrease the size by and
placing at the left corner. Now here I'm just bringing
forward by G Y And by ese, I'm just existing its
placement proper, so it can become the
center for the width. Yeah, fine. So what do I do? I simply go to the edit
mode and then extrude in y direction so that it's look like the
part of the support. And by the way, it's open, by turning on X ray mode, simply press F and
fill that area. So here, I have to make the
cove leg. Here, what do I do? I simply go to the
side view and then selecting the outer vertiss and turning on the X ray mode. I place the cursor over here because by using the
support of the cursor, I'm using the spin tool. Here in the spin tool, I need only the six or eight steps, so I write it and then
use the spin tool, so it become the cow leg. That's how by using the
cursor as a radius, you can easily make the cove. And yeah, it's look fine. Now here by selecting
the outer edges, I extend in that direction and make a length like
it touch to the ground. It's look too much white, so I simply decrease
the size and then after do at a smooth. Okay, now instead of making
this all four corner, I'm using a mirror modifier. So I'm going to the modifier and simply add a
mirror modifier. Okay, so there is no support. It is self dependent. So what I do, I select the
object by the eye drop tool. But you can see that there
is no perfectly aligned. So what I do, I add a
plane as a support. Then here I rotate in 90 degree and try to place
center bi manually. Here, instead of taking the
support of the machine, I simply take the
support of this plane. In the mirror object,
I select the plane, so I can easily
change the movement by changing the
place of the plane. Here you can see that if
I change the direction, then I can adjust its
movement or place. And yeah, also check
in y direction to the lax part are not
very far from the machine. By the way, you can hide the
plane if you don't satisfy, and if you're okay with that, then you can simply apply the modifier and
delete this plane. And once everything is set up, I simply select this
both part and by CFD. I duplicate it, and then
rotate in in z direction by 90 degree and place properly
for the second machine. And yeah, the first leg of the second machine is
overlap to the first one. So in X remode, I select that leg part. So instead of selecting
that box type, I select the last one vertises, and by using control plus
I select a leg part, and then by pressing x
to delete its vertiss. So yeah, fine. Okay, so now for the floor, I'm adding a plane by grabbing, it placed a little blow area and then increase
the scale size. Okay, so now in the
sine collection, I simply select that
part which I have just made and place in
the sine collection. By the way, it is not necessary, but it's used for id confusions. Okay, so now I'm adding a
cube for the delivery truck. So I'm placed the cube at the left corner and slightly
place in upper direction by G ZD and then give
it to save like a rectangular box by increase
the size in x direction. So In the side view, I can't see the floor properly. So what I do, I
select the floor, and in edit mode, I simply slightly extend it. So I can see it. And yeah, I think
the height should be fine for the upper area. Okay, by selecting
the front part, I bring the cursor over here by shape test and
cursor to selected, and now I'm adding a
object, which is a cube. And then by increase
the scale size, I simply make the shape like
the engine of the part. So I think, yeah, that's fine. And now everything
is on the cut. I give the different
shape to the truck. I mean like a window shape
or the slightly cross shape. So I'm adding a
multiple lout by using controller and place like this. So here, I'm adding
a look cut in such a way that it
covered the window. And now in the side view, I select the top
two vertices and then grab in x direction by gx. So it make a slightly
different safe. Okay, so now I continue
on the window. I simply add a loop
cut like at middle. I mean two look cut
for the with also, so it can be created two window
like the front window and the side window which
I have selected and by pressing a t select
extrude along face normal, and by grabbing the mouse, I exit the window. And yeah, it's the same way, I add another lout
at the bottom part, and after getting it, I simply select the pase area. And y. That's the same way, I press all t and select
extrude phase along normal. And by adjusting its mouths, I create the shape like this. And now for the headlighting, I simply add some
another lookert, and also add the horizontal lout by manually so that I can easily select
the headlight area. And yeah, I also do in the opposite side by adding
a lookert horizontally. So yeah, by adding
some different cut to give the shape and by trod, you can make a different
shape as you want. Now onto the wheel, I bring
the cursor over here and add a circle and then rotate
in x direction by R X 90. And at this place,
I slightly place below and decrease the size. Now to make mas, I simply
go to the it more by placing F to feel it and to give thickness,
extrude it by E, and then insert by I
after inserting it, extrude again to that cut
out the thickness of inside, and then by placing I to insert
again and extrude again, and by using control B, I give the slightly co sp. And yeah, also place little
inside to the truck. Okay, so what I do exactly. I'm just adding a circle, but the circle is
empty from inside. So I edit mode, I feel the circle
surface by pressing F, and whenever I want a
thickness or extra part, then I can extrude it and whenever I want to go
inside to the surface area. So I simply pres I to insert it. And now I'm just
nothing but giving some rectangular shape at
the top of the surface. So I'm adding su loop cut. Like two or four and then scale in particular y
direction so that it has a little space and
then select some part and extrude it by T. Okay, so now here, I make a door. In the phase selection,
I select this phase, and by adding a loop cut, I simply make a
shape of the door. And after giving the shape, I simply delete that phase, so it make a little
gap over here. So yeah, select this
face and wel this face. Okay, so now I select the wheel and duplicate it and
place behind it. The low ply of the modeling
is not too much complex. In object mode,
we can mostly use the scale, grab and rotate. In edit mode, we
mostly use a cut to give some safe
extrude for adding some extra part and
insert it and also use the professional editing
software. Extrude object. If you press T, then you can see the multiple
option for the extrude. If you are try by yourself, then you have an idea which
value can actually do what. Also in the edit mode, there are multiple options for the shortcuts like
a spin tool as we use in the path or
maybe the knife tool. And yeah, the Bavel
is also important for the giving the
smooth transition. And yeah, some of the modifier
is also very important like A modifier or
mirror modifier, and subdivision surface,
solidify modifier, and not only this one, but other are also important if you learn
to use in good manner. So now onto the factory model, I simply use the loop cut to
give the shape of the door, and then in the face selection, I extrude inside it
and delete the face. So it becomes the
shape like this. Now in the top surface, I insert it by pressing and by selecting the
rest of the part, I simply extrude in
upward direction. So yeah, it's look
like this. Okay. So what I do, I simply select
the le part of the support, and then duplicate it. And after that, I place at
the corner of the factory. And since it is
duplicated object, it can be the connected
part with the leg. So getting different object, I place P and select
by selection. So now it is separated
from the leg. And after getting that position, I simply duplicate it again and slightly placing left side. So it make a little design type. And by pressing sift tent tail, I can move the camera, so it's look fine. And yeah, also scale the plane so it can be cover
the whole area. Okay. Now at the corner of
the factory wheel, I simply make a
rectangular box type where the food plate can
be replaced by the boxes. And here I don't
want the leg part, so I simply delete it. And since I want a rectangular, I simply select the part
and grab in that direction. Okay. After giving the shape, I go to the top mode
and adjust it proper, so it can be placed at center. And here I make a little
window type so that the food plate can be entered
and the box can be exit. By the way, it is not necessary, it can be not viewed
in the camera angle. Yeah, maybe it's fine
it's unnecessary work. Now here, I use a food
item to little sew up. So here I open that file in which we have made a
burger and the sake. So what do I do? I
simply the burger and then press Control C to copy it and then go to our main file and here by
Control V to paste it. So here you can see that the constraints are
automatically copied. And I can do moment easily
by using the constraint. So in the top view, I first placing the
burger at the sop. I mean above the sop, and I perform all the tasks like the scaling and grabbing
by using the constraint, not on the real object. Now here, I also copied the sake and also
place at the sop, and here I slightly rotate to
make a little stylish look. And here by little
scaling and grabbing, I ages it's movement. So yeah, fine. And now it's the same way. I also copy the box and
use in the main pile. Here, I slightly place
behind the truck, and by pressing CF
d to duplicate it, I simply make the copy of the two or maybe four box and to give a little randomness. I simply make one box above it. So, yeah, fine. In the next episode, I will do the animation
of our main object. The food items are entering in the coat and
replaced by the boxes. But for that, I give the key
frame in such a way that it become the infinite
by using only 40 frame. So meet you in the next episode.
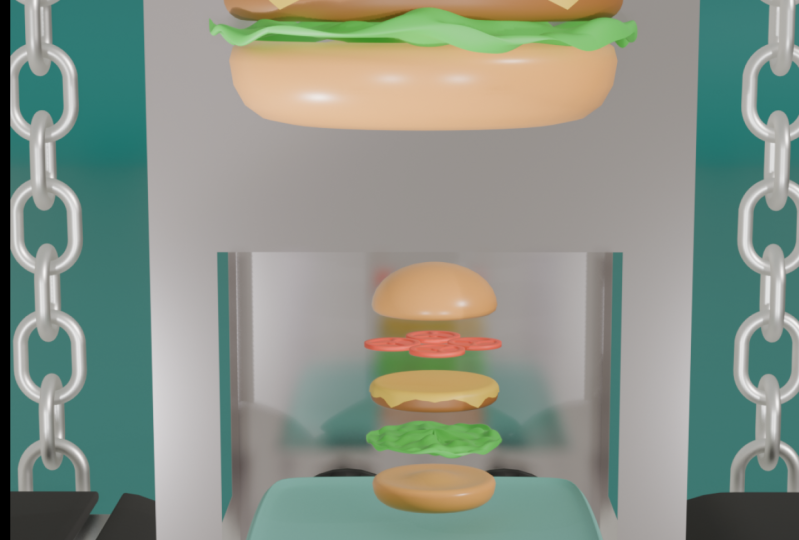
6. Creating an infinite looping animation: Hey, everyone, here's
the fifth episode. In this episode, I'm going
to give the animation of food item in such a way that
it's becoming infinite. To do that, first, I copy the all three
items, include burgers, sake and plate, and
paste it over here, and here, all the adjustment I do by using the constraint. I start with decreasing
the scale size and place at the treadmill. Yeah, it's still dark. Here, I decrease again by using S and match pit the treadmill. And here I also
exit its place by going to the top view and
slightly decrease it. So yeah, I think it's
perfect and place at middle. Here, I'm just
nothing but adjusting its position from
the first place where the animation
should be started. So I'm placing slightly
inside to the factory, and after placing it, I place at the screen and then give the key frame for the
location rotation and scale. Make sure you are at
the frame number one. And after giving the key frame, change the place of the object, where the animation should
be. Here you can see that. I change the place
of the object. At the left corner box. And I forget to change
the frame number. So here I change the
end frame and then place it at the left corner box. And then by pressing, I
give you the key frame. So if I hit the space bar, then you can see that the
animation should be start. By the way it is baser. So the timeline, I press
t and select linear. And because of the
animation is too slow, I select the last keyframe
and grab at around 50 frame. Okay, so it too much fast. So I think 65 or
maybe 70 is fine. So Yeah, I'm almost there. Okay, so I try around
a closer one whether to check it match with
the built or not. And I think it's
yeah, it's fine. Okay. So at the left bar, I press right leak and
select the vertical split, and at the right window, I select the graph editor. Here, you can see that
it is the linear graph because we earlier select
the linear in the timeline. So by selecting the one vertss, I changed to baser
by pressing t, so I can easily change its
movement, whatever I want. So at the starting,
I wanted to like it forced come out
and at the end, it's commonly follow
a linear path. Forcly come out, I change the graph like a little
cove at the below. Now if you hit the space bar, then you can see that it's
slightly forcly come out. Okay. So by changing
in the graph, it reduced to match
with the built path. So here, what I do. I simply try the
nearest vertices and also changing in the graph
to match with the built. Okay, so keep in mind, whenever you change the
graph of the object, try to make a linear graph by manually at the end keyframe
and at the start keyframe, try to make a little type graph so it can be a little
faster than before. In the graph editor, the vertical movement
of the object is faster compared to
the horizontal movement. After changing in
the graph editor, adjust the keyframe
by grabbing in forward or backward in
the closer distance. And, so now it's look fine. And you can see that
my key frame is starting from the one
and ending it 70. Okay. So what I do? I simply select both of the key frame and
grab by one frame. So instead of start
with key frame one, I change to start with
zero. Why I do that. Because in some time, I will have a multiple
copy of the object so that every object of the
key frame start with the even number,
instead of order. Okay, now make the
copy of the object. I simply select the
constraint along with the three object and by pressing si d to duplicate it and by pressing right leg to
place its original place. So you can see that the key
frame is also be duplicated. So by selecting that
duplicate object, I grab the key frame
at the frame 40. First original object at the key frame zero
is started and then it followed by the duplicate object
at the key frame 40. Here, I have to do it
around two to three times. So I duplicate it again and grab the key frame
at the eight frame. Now duplicate again and grab the key frame at the
last position at 1:20, and by also duplicating
here I place at -40, at the starting moment, it's look like a
continue moving. Here I select the time between the two object is
around the 40 frame. There are total three
objects which are fully travel between
the 120 frame. I have object because it
start from the half position. So now as we did in food item, I also copy the box and do the same thing
for another direction. Simply copy the object and
past in this side over here. Now, properly place at the starting position from the all the direction
like x y and z, and whenever you can't
able to see behind object, so make sure to turn on
the x remote to C proper. Okay, that's fine. What do I do? I simply go to the first
frame and give the key frame. And before I change the place, I first go to the 70 frame, chat his position and
give the key frame, and also make it linear for
the constant animation. And after that, I play
the animation and see whether the box is faster
or slower than the built. If the box is faster, then I set up the
keyframe slightly far, and if it is slower, then I place it slightly closer. So yeah, after finding the keyword with
the proper moment, I simply duplicate
the object and then by keeping in
40 frame distance, set the animation of
the duplicated object. Here, I duplicate the object around four or five
time and place the keyframe at 40
80, 120, and -40, and also place it -80 because
the starting animation, we already see the box
placed at the end, and after that, if you
hit the space bar, then you can see that
animation is start working, and also the end of
the animation is directly connected to the
start of the animation. Yeah, another thing is, you can see that my collection. Here, I make the two collection
for the food item and the box because of
the four fi object to avoid the confusion. Okay. Setting up the keyframe
is almost completed, and here I simply
do the two things. First thing I notice
from the camera angle. Our food item is
almost in there. So here I adding a cube
and make a table for them. Okay, so I think the
height should be fine. And yeah. And here also aj the size by using
scale and sip z, so it cannot affect
in z direction. And after that, to make
a simple design type, I'm going to the dit mode and by pressing to insert it
and delete the face, so it can look like this. And here, I select
all the element and slightly place
closer to the built. And also adjust the
position of the box. So by selecting that box, I grabbing in Ci Z direction, so it cannot be effect
on the C direction. Okay, so it's fine. And the second thing is, I make a roof type at the top. So what I do, I simply add a look cut and in the
phase election, I'm extrude a little area by using t and extrude
along with normal. And for making the roof, I'm adding a cube, then
decrease the scale size, place it proper and scale
in only wide erection, for adding the width, and then in edit mode, I simply give the
shape of the roof. So by turning on the x ray mode, I simply select the
both of the axis like behind the axis and grab X direction, so
it look like this. Okay, so now
everything is set up, and only thing remaining is to do adding a material
to the object. So now we are almost there, and in the next episode, I will adding a
material to the object. So meet you in the next episode.
7. Applying material to the scenery: So, hey, everyone. Welcome
to the seventh episode. In this episode, I will give
the final touch up like a proper camera angle
and set up the material. Okay. So here I start with existing the camera by
using shift and tiled. And here I cannot
give the animation to camera because it doesn't
look like an infinite. Okay, here in the
rendered property, I change the render engine to cycle and device to GPU compute. And in the viewport, I set the sample to like 50. And then open the render view. Here, I'm adding an SDR to
eliminate this darkness, going to the wall property and change the color to
environment texture, and in the open folder, I select the HDRI, which I provided
into the resources. Here in the wall property,
you can see the strength. By changing the strength value, you can increase or
decrease the SDRI power. Okay, now give you
to the material. Here, I'm going to
the selling menu. And here I turn on
the render view and select each object and
assign the material to them. So first, I select the
floor and then give it to new material and
assign to a color. In episode two, we already give the color to the food
item and the boxes. So now we only have to give
the rest of the object. So this episode is nothing but just assign the
material to the object. It includes assign the
material directly to the object or assigning
more than two material to the same object or maybe use the help of the
different texer to assign the material. So here, first, I
select the store and then assign a dark
red color to them. And now I select the head of the truck and give to
like a dark blue color. Okay, here is the
object where we can assign the more than two
material to the single object. Okay. So now if I want to give a different
color to the window, so I'm going to the
edit mode and here, select the window part
in the face selection. And after selecting
the window area, here, I'm going to the
material section and create a new material and then hit a sign so that I can create a new material
to the same object. And now as the same way, I select the third material
to the same object. In the edit mode, I select the below area in
the phase selection, and then create a new
material and then assigned. If I now create a new material, then it can be only
effect on those parts. And in the new material here, I select a silver type color. And after giving that here, I select another part of the same object for
the headlight area, and then create a new material
and then it assigned. So it can be
different from other. Okay so now here, I
select another object, which is the other
part of the truck, and instead of giving
a new material, here, I directly assign
to like a material 0.9. So here, if I change the color, then it can be effect on both because it is the copy of
the head of the truck. And as we did in the
head of the truck, here, I select that upper part of the truck area and
assign the new material, so it can be
different from other. And for the tire, here, I give the black color
and the inner part, make the silver type
color and hit assign. And for the roof of
the factory, here, I give the material 0.09, which is the truck head
color and assign it. Okay, now here, I select the le part and give it to
new material, and here, I increase the metalic
value to look like a metal part and also change the name to identify
as like a steel. Now here I select
another leg part and directly give the material, which we just made and
dename it to steel. And as the same way, I also select the two pipe of the factory and give
it to the same material. After that, here
I select the belt and give it to new
material and also give the same color like a pink type and for the metal support here, I give the same material which we already did in
a truck had part. Okay, so for the
roof of the factory, here I give the lining color, and in the lining color, here I want a two color. For adding a two color, here I'm adding a color m, so I can easily add a
two different color. Okay, so for the right area, I'm changing into red
for the left area, here I change to white. But the color will mixing both color and make
a pink type color. To identify different,
here I'm adding a wave texture and connect
color to the factorial. Now if you are zooming in, then you can see that there are some lining or
printed on the roof. I think it's disconnect. Here I connect again, and you can see that and
to print vertically, here I change x axis to axis. By changing in scale value, you can aj its thickness
as according you want. Okay. So here I
slightly decrease it, and I think it's fine. And if you are placing a color value closer
to another color, then it can become a sharp. And to make a properly sharp, here I change a two value
to like a 0.5 and 0.499. And after that, here I
changing the color of the box and the siren
type, which is above it. So yeah, we have just give
the material to look fine, and we are almost there. In the next episode, I will show you the
rendered property. So meet you in the next episode.
8. Render and Output Settings: So, hey, everyone, welcome
to the new episode. We are almost there to
complete the series. In this episode, I will
so the render property. But before I set up
the render property, I will show you the one thing. That is about the
number of frames. Here, I have total
120 frame and in which three plates are transferred and
become the infinite. But here, if I change the
number of end frame to 40, then it can be only sored of
the one plate and repeated. And because it is repeated, it still become an infinite. You can see that there is no cutoff between the end
frame and start frame. Tire, if I take directly 40, then we have a very
less frame number, and that is a little complex
to exhaust it because of the animation of plate can be
and around 75 or maybe 80. Okay, now we are continuing to set up the render property. But here, if you want
to change anything, then you can change
it before the render. Once you are final with the project or satisfied
with your project, then you can ready to render it. In the render property, here I change the maximal to 300 and make sure you
are changing in the render, not in the viewport. And also make sure to tick
mark on the Denise option. Okay. Now in the output
property here is my camera dissolution and verify the start frame and
end frame for the animation. In the output folder, make sure you're creating a
new folder and then change the name to like a render
or anything that you want. And after making that, simply accept the folder. Okay. In the file format, change the FF ec video
and in the encoding, change container to pec four. Okay, now we have
ready to render it. After setting all
thing. Make sure you are changing
into the viewport. Otherwise, it can be take
twice memory while render it. And now by using controllers, save the file and then
go to the first frame, and after that, heat render
and render animation. So here, it take too
much time to render it. And once it complete
to render it, our animation with infinite
loop is completed. I hope you like this video. If you have any query, then you can come in down below. Okay, so see you in the next class until stay
safe and stay healthy.
 Nityam Patel