Transcripts
1. Introduction: Hi everyone, and welcome to this fun autumn inspired painting tutorial. After taking this class, you'll have your own beautiful pumpkin paintings, perfect four cards or decorations. This all term. And you'll have new confidence for how you can approach painting 3D subjects. Pumpkins are wonderful to paint because they have such a distinctive shape and color that a perfect subject for you to practice how to use contoured brushstrokes, highlights, and shadows to create believable forms. My name's Kate. I am a professional, a credit painter, and I've been running my own art school for adults for a number of years. I absolutely love helping people to discover that an artist and enjoy all the benefits that's painting can bring to their lives. For your class project, you'll follow along with me to create your own pumpkin paintings and practice how to paint those rounded forms using the techniques I demonstrate. I hope you enjoy painting your pumpkins and I can't wait to see the results. So do please share them with being in the project section and leave a review when you finished your creations. Have fun.
2. Outline Sketch: So for this class, we're going to work without a background because I want the focus to be on the pumpkins themselves. I'm going to start just by roughly sketching in the outline shapes with my pencil. As you do this, notice that the pumpkins on to complete the round, they have squashed tops and bottoms and each one is slightly different. Do it too hard with your pencil as you do this, you will need to be able to grow up these lines out easily and adjust them if you need to. And on that note, don't worry if you don't get the shape right first time, usual rather, and just tweak them until you are happy. As always, they don't need to be the exact same as the reference photograph. So don't worry too much about trying to get them perfect. Once you're happy with your shapes, just a robot's any straight pencil lines if you need to.
3. Mixing Base Colours: Now it's time to mix up some colors. I'm going to take some yellow bread and some white into my palette here. First I'm going to mix up a bright orange for the lightest areas of the pumpkins. So I'll start with my yellow. Add a touch of white to lighten it slightly, and then add in my bread just little by little until I'm happy. You don't want to go too dark at this stage because we'll be mixing a separate darker orange for the shadows too. To mix the darker orange, you still want to start with yellow as your base. Now we don't want this color to be too dull, so I'm not using black or brown to darken it. Just a touch more red to deepen the color. And you'll see how I've ended up with this really nice, rich, deep orange.
4. Contoured Brushstrokes: I'm using a size eight round brush to paint in the shape of the pumpkin, starting with the deep orange color. Notice that I'm making brushstrokes that almost follow the contours of the pumpkin shape. I'm not just filling it in, I'm trying to describe the shape with the direction of my brushstrokes. Try to do the same as you paint your shapes, as this will really help to give them more dimension and form. Well, that color is still wet on the page. We'll pick up some of the brighter orange so we can paint in some highlights. I'm looking at where the lighter areas are on the shape and I'm just loosely brushing on that color, then wipe off any excess paint on a tissue and use that same brush to blend the edges of those colors together. As long as both colors are still wet, you should be able to get a nice soft blend. I think we need a bit more shadow in places. So let's mix up a really deep orange. This time, I'll take red is the base and just mix in some of the existing orange. I'm just going to brush that darker color towards the base of the pumpkin here. Then what my brush and blend just like before. If you overdo the shadow, you can easily go back with some of the mid orange and even it out.
5. Practice Makes Perfect: Now if you found that first one a bit tricky because we don't do full mole. So let's repeat those stages for the others. To my base color, making sure that I tried to follow the contours of the pumpkin shape. Next, I'll pick up my lighter orange and use that to brush in my highlights. Softly, blend the edges. Then apply that towards the base Onto the next one. So you should end up with four nice pumpkin shapes.
6. Cast Shadows: Even though we have a white background, we still want it to feel like the pumpkin is a 3D object. So we're going to add some shadow underneath. I'm going to start with a brown. I'm using burnt umber here. And you don't want this to be too thick, so take some water and thin it down. I've switched to a smaller size four round brush so that I can use the point and have a bit more control. I'm just sweeping that color in underneath the pumpkin. Then I'm going to stamp my brush a little to help me blend it out. I'd like to keep this quite loose and expressive. So were you some more water and really load the brush up for a thin awash. You might feel a bit nervous here because you really don't have much control over the paint, but it does give a nice free-flowing effect. I even use my fingers just to help with the blend. Pick up a last bit of your shadow color on the point of your brush just to redefine the edge. Finally, let's add a touch of that orange cover, but fairly watered down just to give an idea of reflected light. Again, don't worry if you found that a bit of a challenge because you can keep practicing on all your other pumpkins. Starting with just brushing that shadow underneath them. Then dampening your brush to help you blend. Brush with water and bend it out. Then add some water down. Orange. Redefine the edge with the point of view, brush if you need to. Now a pumpkin shaping up, well, I really like how they shuttered colors have bled out a little with the water.
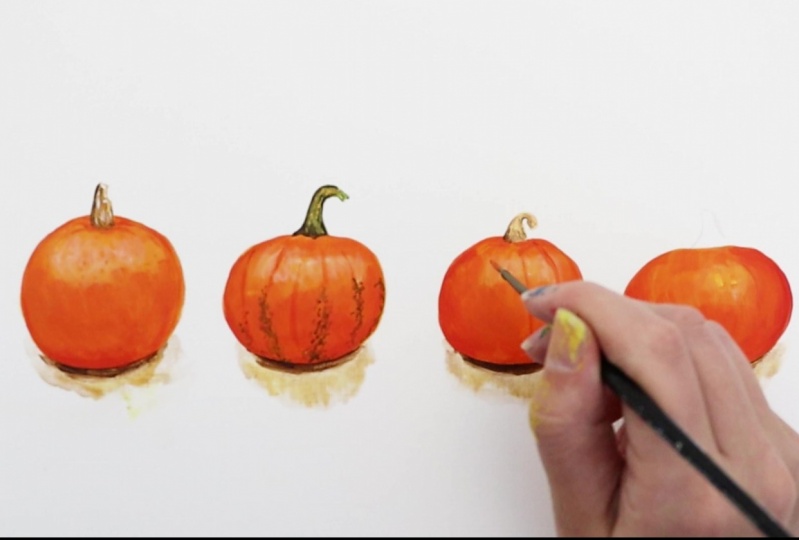
7. Adding Brighter Highlights: Looking at the photo, I think they need just a couple of stronger highlights to really bring out a form. So I'm going to pick up and just water down some white. I'm just going to very loosely dash this onto the brightest parts of the pumpkins. I'm just going to dump my brush and then use this to blend those highlights out.
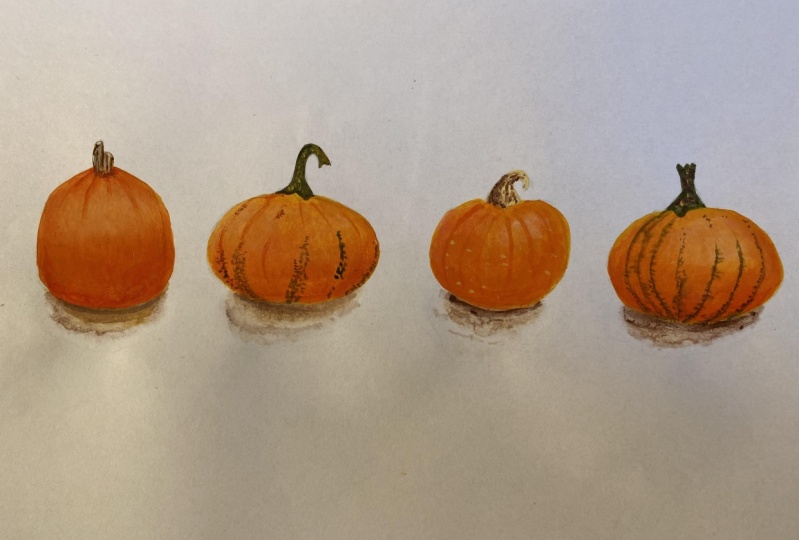
8. Final Details: So I think the form of these pumpkin shapes are looking really great now, but we need to add those final details to bring them to life. I'm going to switch to a smaller brush again for these. And I'll be using a size 0 round brush, which has a really small point. Now, depending on how many two pumpkins are, you may not need to do this step, but I'm just going to neaten up my edges with the point of this small brush and my orange paint. When you're ready, let's paint in some details. I'm bringing those pumpkins to lie. Squeeze out some not true browns and greens onto your palette. I'm going to start by painting in the store. Pumpkin. I'm going to pick up some darker brown unused that just to add in a few downward strokes to create the texture. And I'll do the same thing with white to add highlights to. I'm going to take some of my darker orange to add some shadows to the pumpkin near the stoke. Next, we want to add some dots and spots on the surface to make it look a bit more natural. I'm using some watered-down orange and light brown. I'm just adding these little dots to give the pumpkin a bit of texture. You can see how those little details have helped to bring that pumpkin to life. For my second pumpkin, I want the store to have more of a greenish tint to it. So I'm just going to mix up that color in my palette. I'll paint the stalk in exactly the same way. First, putting in a base color and then adding some texture with highlights and shadows. Make sure you have a bit of variation with the shapes of the stalks on the pumpkins as well. Next, let's move to down some of that green paint so that we can get that mottled pattern on the surface. Use a light touch on the very point of your brush, just to dab and dash marks on the page to create that mottled texture. I'm going to add some darker lines in the orange as well. Make sure you follow those calves. Pumpkin here. Let's go for a lighter brown stool. Suggest mixing in some white. Again, adding some shadows and texture. Let's go four more of those curved lines in the dark orange. Let's add a couple of spots and dots as well. Just follow your intuition with these and put them in wherever you feel like. Let's go with green again. Let's stick with the green to add a few of those curved lines. And then just stop with the brush to create that. Take a touch of yellow just to add a final highlight to the top PM.
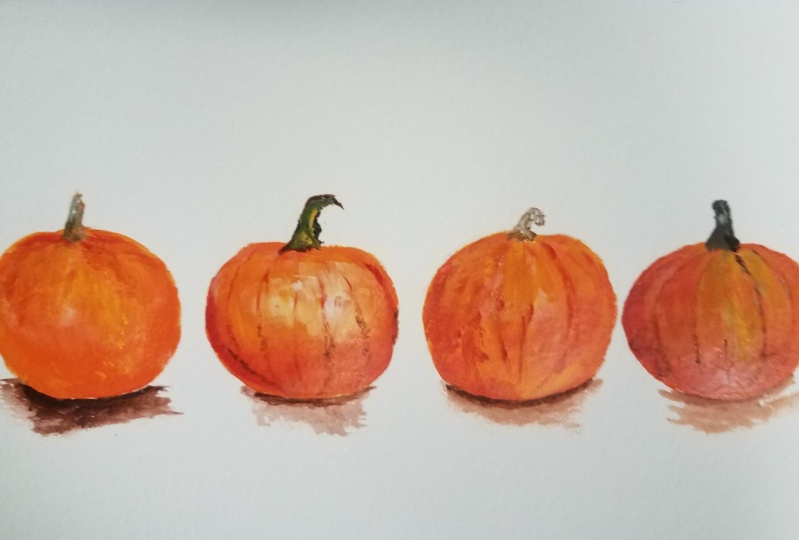
9. Well Done!: So there we have our full pumpkins lined up ready for Halloween. I hope you enjoyed creating them with me and I'd love to see how yours turned out.
 Kate Broadhurst, Artist / Painter / Educator