Transcripts
1. Introduction: Hello and welcome to my class; Brushwork for Beginners. I'm so pleased that you've joined me here and I'm really excited for you to start your painting journey. In this class, you'll learn all about the different brush shapes, sizes, and the kind of marks you can create with them. This class is all about giving yourself permission to play, explore, and just gain confidence with your materials. You'll learn how to control your brushes for different effects, try some smooth and expressive blending techniques, and have fun creating textures. Finally, you'll put all those new skills into practice by painting a beautiful sunset sky scene along with me. My name is Kate. I'm a professional acrylic painter and I've been running my own art school for adults for a number of years. I absolutely love helping people to discover they are an artist and enjoy all the benefits that painting can bring to their lives. My own specialty is in creating vibrant life-like acrylic paintings, and I'll be sharing all of my personal methods and techniques with you here. This class is perfect if you're new to painting or if you'd just like to strengthen your knowledge of paint brushes to improve your artworks. Having a good foundation in mark-making and brushwork is really going to set you up for success. You don't need to have all of the same supplies and brushes as me to get value from this class. It's suitable for everyone and I'll be encouraging you to explore whatever supplies you have in your own kit, as well as broadening your knowledge and giving you some fresh ideas. After taking this class, you will know everything you need to use your brushes with confidence and create your own beautiful acrylic paintings with ease. I can't wait for you to get started.
2. Ways To Use Round Brushes: Hello. In this video, I'm going to introduce you to all the different types of brushes and the marks they can make. There are a lot of different paintbrush sizes and shapes out there. I'm just going to talk through all the ones I know best in this video. Don't worry if you don't have all the same brushes at this point. Just use the techniques in this video to get to know your own set. You'll soon get a feel for them and you'll find that you'll naturally use some shapes more than others as your own style starts to emerge. You're going to need your brushes. Of course, water pots and some tissues. It doesn't matter what color paints you use. Just choose whatever you fancy. You can do these exercises in a sketchbook or some canvas paper, just follow along with me and have some fun. We're going to start with round brushes. This is the classic shape that would spring to most people's minds when they think for paintbrush. They're called round brushes but I really think pointed would be a better name. They have a rounded base which can hold a lot of paint and a pointed end for finer details. They're extremely versatile and they are probably the brush that I use the most. I have a few different sizes of round brushes. The smallest, like zero, are best for finer details. The bigger ones are best for more expressive work or covering larger areas. Let's just go ahead and try making different marks with your round brushes. Test out whatever different sizes you have at home and just get a feel for them. Don't think about this too much. Just start having fun by putting paint to paper. Try a range of curved lines, straight lines, and smaller marks. I want to just talk next about the consistency of your paints. You can see that the paint is quite thick when you use it straight from the tube. This is great to add a bit of texture to your paintings, but it can make it difficult when you want to paint finer lines. The nice thing about acrylics though, is that you can thin them down with water. Just adding a few drops of water here will help my paint flow more easily across the page. See how I get a much smoother application. Try watering down your paint and notice how it changes the feel. Using the paint thick from the bottle means that the colors are more vibrant and you'll get that texture coming through in your brush marks, but it doesn't flow quite as well. You choose how much water, if any, to add into your paint, depending on the type of effects that you are after. Feel free to pause this video and carry on exploring. Then when you're ready, we'll move on to different ways of holding your paintbrush. This might sound a little strange, but I want to tell you about the different ways that you can hold the paintbrush because believe it or not, it can make a real difference. The traditional way that you'd hold a brush would be like this, fairly close to the bristles. Just like you'd hold a pen when you're writing. Because your fingers are quite close to the bottom of the brush, you'll see that you can get quite a lot of control over the marks that you make. If you then shift your fingers further up the brush and away from the bristles, this means you're going to have less control over your marks. But this isn't always a bad thing. It can be great for when you want looser, more expressive brush strokes. You can feel that your whole arm almost helps to create the mark this time rather than just a small flick of the wrist. If you're doing something quite detailed and you need control, you'll want to hold your brush towards the point like this. If you want expressive flowing lines then moving your hand further towards the end of the brush will help to loosen up those marks. Take some time to test out the two of them and see if you can feel the difference. Next, I'd like you to pay attention to how much pressure you're putting on your brush as you paint. Because this also has a really big impact on the marks that you'll create. With this round brush, I'm going to start by pressing down quite a bit and applying a lot of pressure on the brush. As I move along, I'm going to start just lifting off the paper to where I'm just using the point. You can see the difference that that makes to the brushstroke. The more you press down on your brush, the wider that brushstroke will be. If you want fine details, you need to be very gentle and just use a very little amount of pressure to get that thin line. Let's practice this with a few different brush sizes. If you find your brush is a little bit dry, add some water to help with the flow. If you have a tiny round brush, like a size 0, it's possible to get really fine marks, but it can take a bit of practice. You need the paint to be watered down enough that it won't clump. You need to just use the very tip of your brush quite gently across the page. The tip of those smaller round brushes are perfect for details. Let's practice making some tapered strokes like grasses. We'll use that idea of pressure again, starting at the base and pressing down with the brush and then lifting off as you flick upwards, this should give you a nice thin end to the stroke. Again, thinned-down paint will work best for this. So use a little water if you need to. Next, we'll just do some dots. This could be great for adding texture effects. Perhaps the center of a flower for example. Again, the lighter that you press, the smaller that dot will be, the more that you press down with your brush, the bigger the mark will be. That's our round brushes. Next up, we'll look at how you can use your flat brushes.
3. Ways To Use Flat & Filbert Brushes: Flat brushes also come in a range of sizes and have this flat square shape to the bristles. They come in a variety of bristle lengths too. You can see here I have a long flat and a short flat. They're very similar, but the shorter bristles feel stiffer, which can give a little bit more control. Daler-Rowney also do these sky flow brushes, which are basically just extra-large flat brushes. If you have a few different flat brush sizes in your kit, take the opportunity to try them all out now and see how they feel. Flat brushes are usually sized in inches depending on the width of the bristles. I have sizes here from a quarter inch all the way up to one and a half inches. Flat brushes are great for blocking in solid shapes of color like your backgrounds and your starting layers for a painting. It's almost always the first brush that I'll pick up. Just try out creating nice, even areas of flat color with your brush by moving it gently back and forth. Make sure you're really loading that brush up with paint from your palette. They can be used to make thick, wide brush strokes, and using just the edge, you can make quite thin lines. You might also see Bright brushes. These are pretty much a flat brush just with shorter bristles. They are useful for shorter controlled strokes, but mostly they act in a similar way. Feel free to pause this video again and continue making marks with your flat brushes. When you're ready, I'll be showing you the filbert brushes next. Your filbert brushes sits somewhere between a round and a flat brush. They are still flat, but they have this nice curved edge to the bristles, which means it's possible to create a wide variety of marks. They come in a range of sizes. I have a small size 2 here, up to a larger size 10. You can use it flat or on its side for a thinner line. The round edge makes it great for painting curves. By rotating the brush, you can get nice circular shapes but they might take a little bit of practice to get used to. You can also just lift off the paper, which gives a nice tapered stroke. This technique can be great for leaf shapes and things like petals. If you have filbert brushes at home, just play around making different marks. Filbert brushes are also great for softer brush strokes and blending. For this, you'll need to squeeze out a second color onto your palette. If you use this gentle circular motion with your brush to blend your colors, you'll get nice soft edges and a little bit of that texture coming through. This can be a really great technique for painting clouds. Round, flat, and filbert are the most common brush shapes. Between them, you should be able to paint pretty much anything. But there are some other more specialized brushes which are handy to have in your kit for specific techniques. When you're ready, next I'll be demonstrating the shapes I use for my own paintings.
4. Specialist Brushes: Angle brushes have bristles which are cut at a slight angle with one side of the tip longer than the other. I find these really helpful for painting sharp edges and straight lines. They're great for painting corners because you can simply change direction and still get pretty crisp edges. They can also be good for blocking in and blending colors. Next we're going to look at the script and liner brushes. These are very thin brushes with long bristles. These are great for really fine lines, which can sometimes be hard to achieve with a round brush. They can be really great for painting trees or hair and grasses. They can also be helpful for signing your painting at the end. You can get lovely flowing lines, but the paint does need to be quite thinned down. I'd recommend just dabbing with a tissue to stop the paint pooling when you first start your stroke. A sword brush is a bit like the script or the liner brush, but it has this really steep angle to the bristles. You can paint a very thin line by just using the tip or a wider line by holding the brush at different angles. It's a brush that is great for lettering and calligraphy, because you can get different widths in the same stroke by rotating the brush and altering the pressure. It isn't a brush I use very much, but it can create some really lovely, loose, and expressive marks. Next we have the fan brush. I love the look of fan brushes and it can be really handy to have one in your kit. You don't need to load it with paint, because these brushes are designed to help you create textures. Just dip the edges and dab off with a tissue to make the most of the bristles. You can just gently dab the brush to get textures, which work brilliantly for trees, or drag the brush for waves and ripples. You'll get different textures depending on which parts of the brush you use. Next, I'll introduce you to my little spotter brush. There's not too much to say about this one, it's just a very tiny brush. It's another great tool for really fine details if you're working on something that needs an extra level of control. Lastly, I always think it's worth having one or two cheaper stiff bristle brushes like these ones. You want some brushes that you don't mind giving a little bit of the battering sometimes. I'll often use a brush like this for stippling, which is where you would dab off the excess paint and then dab onto the paper with a fairly dry brush. It gives this lovely texture, which is great for things like spray on waves or textures on a rock surface. You can do the same stippling technique with any of your other brushes, but it does tend to ruin the bristles, which is why I have these cheaper brushes on hand. You can also use brushes like this for splatter techniques, which is a lot of fun, although a little messy. You'll need to water down your paint, dip your brush, and then just use your fingers to flick back the bristles. The closer you keep your brush to the surface, the more control that you'll have and you'll get these really nice splatter effects, which can be used for textures in your paintings or for interesting backgrounds. Just let yourself play exactly as I've done here and try out making marks with all the different brushes you have in your own kit. This kind of exercises are great fun, because there's no pressure, but you'll still learn a lot about how to use your brushes as you explore.
5. Blending Techniques: Now you've got a feel for your brushes. We're going to try out some techniques for blending and texture. Acrylics are brilliant for this because they are so thick and versatile, although they do dry fairly quickly, you have a long enough working time that there are lots of opportunities to manipulate the paint for different effects. You might need a few separate sheets of paper to work on for these exercises. You will also need your brushes, paints, and water again. Plus if you have them some palette knives are like these and sponges. A hairdryer would also be really handy to help speed up the drying time. Get yourself set up and then follow along with me to see what you can do. Acrylic paints are great for blending, but it can take a little bit of practice. You're going to need two colors squeezed out onto your palette. A nice big flat brush. I'm using a 3/4 inch here. But any sizable will work, the bigger the brush, the larger the area you'll be able to cover it when you're blending. You want to dip your brush into the first color and make sure it's really loaded up with paint. Then you want to use the flat of your brush, just going back and forth across the page. You're aiming for a nice flat coverage, but want to make sure that the paint is still thick enough that it won't dry out too fast. While it's still wet, dip your brush into your second color. You don't need to wash your brush in-between because you want these colors to mix together anyway. When you add your second color, work back and forth a few times across the divide between the two colors. Then just work your way down until you have a nice soft gradient. This can be harder than it looks. Don't worry if it takes you a few tries. We'll try it again and feel free to pause this video and practice as many times as you like. You can see the shine on my paint here. You can tell that I'm working quite quickly. I don't want that paint to have the chance to dry before I blend my second color in. We're working wet into wet here, which is how we get this nice transition between the colors. Next, we're going to try the same technique but this time we'll use three different colors. Load your brush with your first color and apply it to the page. Dip into your second color, and then make sure you work back and forth a few times across that divide so the colors will mix together on the page. Just keep adding more of that second color. If you're covering a large area, you'll need to dip into your paint a few times. Then when you're ready, dip into your third color. Again, just work back and forth to smooth it out and blend those colors together. That technique will give you a really lovely flat gradient, which is great for things like skies or backgrounds. The next blending technique I'll show you is a little bit more expressive. This technique is called color patching, and it's a little rougher, but it can be really beautiful. What I'm going to do is just apply a few blobs of paint directly to my paper like this. Then I'm going to take my brush and blend using a crisscross motion. Your brush will start to pick up the different colors as you go along, pulling them into each other. You can see how you have much more texture to your brushstrokes, which gives this blending technique a lot more energy. One last blending technique to try, this one is called scumbling. It's great for softer edges and the filbert brush works really well for this, or even a large round brush. You'll start with just one color. This time you want to use gentle circular strokes. You want to press the brush down as you go, so it flattens down the individual brushstrokes a little. When you're ready, pick up your second color. Again, you don't need to wash your brush in-between. Then you're just gently continuing with that motion, overlapping the colors so they'll blend together. You should see that you get that nice soft edge, which is great for painting things like clouds. I was using my filbert brush for that blend but I'll demonstrate the same technique using a large round brush too. The movement on technique are exactly the same. You just might see a slight difference in the shape of the brush strokes. That's your three main ways of blending colors for your paintings, try them out for yourself and do feel free to practice as many times as you'd like at home. Then when you're ready in the next video, I'll show you some fun ways that you can create different textures with your paints.
6. Texture & Layering: Now, let's look at some ways to create textures with your paints. You'll need your brushes and some freshwater. Plus if you have them, a sponge and palette knives or just some cuts of card. To start learning about texture, we're first going to look closer at the properties of the paint when you thin it with water. Take a squeeze of paint onto your palette. Any color is fine. Then the first mark I want you to make is just the paint as it is, nice and thick from the tube. Just paint a rough square on your page. Don't worry about being neat. Next, I want you to take some of that paint out into a separate section of the palette and then mix in a dab of water. Apply it to your page and you should find that you'll paint feels a little smoother. We're going to keep going, just adding more and more water each time. Eventually, you're going to need a lot less paint in your mix. You may just want to take a little bit of your color out into a separate part of your palette again then add your water and keep going. Your paint will start to feel more like watercolor as it thins and the flow increases. There will come a point where your paint isn't really thinning anymore. Then you can just dip into the water and use up whatever paint is left on your brush. You should end up with this nice gradient going across the page and I want you to just look at the difference in the paint. You can see that using the paint thicker out of the bottle, you get more texture coming through your brush strokes, and using it thinned down with water, you get flatter areas of color. When you thin with water, you also create more transparency in the paint. You can see that the color is much stronger from the tube and dilutes the more water that you add. Now, we're going to really load our brush with paint so it will be really thick and textural. Just play around creating different marks on the page. Try a few of your brush shapes, just loading them up with paint, dabbing, swirling, and letting those brushstrokes stay visible. When it dries, the paint will retain those textures which can be really beautiful when you use them in your paintings. Next, we'll do the complete opposite and try out some dry brush techniques. Here, you dip into your paint as normal, but then dab off the excess on a tissue. Then when you apply the paint to paper, you'll see that you get this almost frayed texture. You can get lots of different marks with this technique by changing which parts of the brush that you use. It can be a great technique for grasses just by flicking upwards like this. There were lots of possibilities so just have a play seeing what different textures you can make with your different brushes. A really nice thing about acrylics is that you can layer them up. I'm just going to fill this sheet with various different shapes and colors ready for us to paint on top of once it's dry. Feel free to pause this video so you can get a similar page setup. Use whatever colors you fancy. If you have a hairdryer, use this to dry your page. Otherwise, just press pause and wait for it to dry naturally before you resume the video. When the paint is dry, you can work over the top of those colors with more layers of paint. If you use the paint straight out of the bottle, it will cover the base color underneath. But if you were to thin it down with water like we did before, then you will increase the transparency and some of that base color will show through. This is a great example of how versatile the paints are and the different effects that you can create. I want you to just try this out yourself on your sheet. Try layering different colors over the top of each other and vary the consistency with some thicker and some thin down colors. What's great is that you can keep adding as many different layers as you like without the colors muddying up, as long as you wait for the layers underneath to dry before painting on top, you can add as many colors as you like. But if the base isn't fully dry, you'll notice that your brush would drag some of that color into the mix, which is where it can get a little bit messy. This also means that acrylics are very forgiving. If you make a mistake or don't like something you've painted, it's really easy to just let it dry and paint off the top with something new. Just keep experimenting and exploring this for yourself, layering your colors, and enjoying the different results you can create. Next, we're going to look at different ways you can apply paint without using a brush. Lots of tools can be used for painting, even odd things you might find around your home. I've even used combs, cut-up cereal boxes, and cutlery to create fun textures. This is just an ordinary kitchen sponge which I'm using to dab paint onto the page. You can blend really nicely with a sponge by dipping in and out of different colors and dabbing to blend them together. You can also use it to sweep across the page to cover large areas and to create swirling textures. Like with a brush, you can use a sponge loaded up with paint or dab off the excess and use it, try it to create different types of texture. Next, I'll show you the palette knives. These aren't essential, so don't worry if you don't have any, but they can be a really handy tool. You can load up your knife with paint and apply it to your paper in big sweeps. You don't get a lot of control with a palette knife so they're not great for detail, but they can be quite fun for more expressive paintings with lots of energy or simply for covering large areas with texture. You can use the back and side of the knife to press down and create fun textures like this. One One my favorite techniques is using a knife to scratch into the surface of wet paint and reveal the layers underneath. If you don't have palette knives, you can even do this with the other end of your paintbrush. Palette knives are great for mixing paint too, which is what they were designed for. I just wanted to give you a quick idea of what you can do here. But if you have your own, do take some time to explore, making different marks and textures. If you don't have any why not try using some cuts of cardboard instead and see what different effects you can get with those. I really hope you've enjoyed getting to grips with those techniques for blending and texture. The best thing is that you can easily combine a lot of these different techniques depending on what you're painting. There are so many possibilities with acrylics so I'd always encourage you to paint with a curious mind and just let yourself experiment. You'll be constantly making new discoveries and you'll learn what you like best as you progress. Now that you've mastered some of those basic mark-making techniques, we're going to put it into practice. For your next class, you'll be painting a full sunset sky seen along with me. I'll see you then.
7. Final Thoughts On Brush Types: I really hope that you found that overview of the different brushes useful, and if you've just made your very first brushstrokes, I just want to say a big well done. Sometimes the hardest part is just getting started. As you continue painting, don't feel like you need to get too caught up in exactly what brush to use for what, treat this as just some light guidance really, there's no real right or wrong. Just keep exploring and you'll learn over time what works best for you personally. Whenever you're ready, you can move on to the next video, where we'll be looking at blending techniques and ways that you can create texture with your paint.
8. Class Project Introduction: Hello. I'm so excited for you to try this tutorial with some of the techniques that you've learned so far. We're going to be painting the sunset along with me. There's a little bit of everything in here. It's a great way to test out those mark making techniques. I'll talk you through every stage so you can follow along and it should take around one hour to complete. You'll need a painting surface, so I just used a sheet of my acrylic paper. For your paint colors, I used Liquitex primary red, blue, and yellow, plus some black and white. But if you have different paints at home, just choose whatever's your closest match. The same goes for your brushes. I used a one-inch flat brush, a quarter inch angle shader like this, but you could just use a round brush instead if you don't have the angle. For my round brushes, I used a size 4 and a size 0, and I also used a size 2 Filbert brush, but again you could use your round instead. I also used a stiff bristle brush like this one. If you don't have the same brushes, again, that's no problem, just choose your closest match. You'll also need your water pot and tissues as usual.
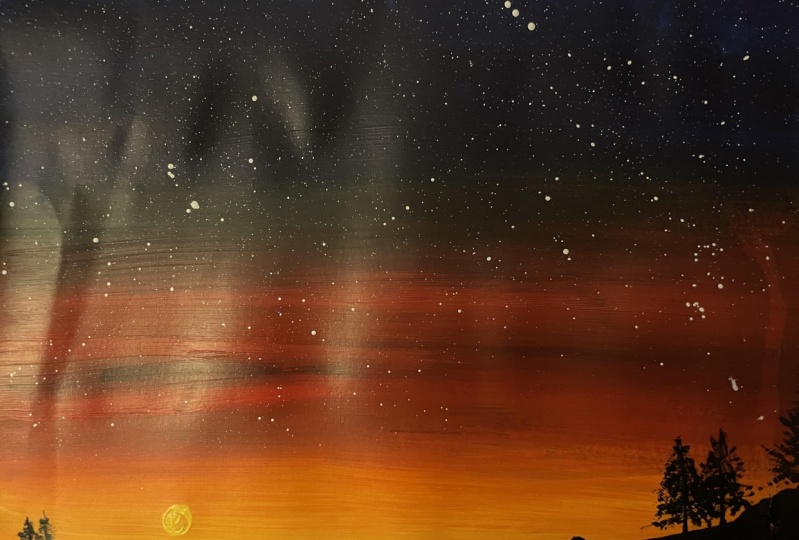
9. Painting Your Sunset Sky: We're going to start by using the flat blending techniques to paint in the background. We'll be blending three colors together. You want to start by mixing them all up so they're ready to dip straight into. Start by squeezing out some yellow, red, and blue. Because we do have quite big area to cover with this blending, make sure you mix up a fairly generous amount of each color. Now we don't want to use these colors exactly as they are, so we'll do a bit of mixing. First, you want to turn your yellow into a light orange, so we'll mix in a touch of red. I just want to mute this color a little, so I'm going to mix in some white too. Now that's starting to look a little more natural. The red is also a little intense of it is, so I want to soften that by mixing in a touch of white. Finally, I want to mix up deep purple for the darkest part of the sky. I'm going to add some of my red into the blue here. Because I'm using the same brush, I'm just going to wipe that off with a tissue so I don't muddy up the mix. I'm going to add a bit more of my red and a touch of black now to mix up that nice deep color. That's our three main colors mixed up. Now let's get to blending. We're going to use the flat blend technique to create a gradient of colors going down the page. You'll want to use a really large flat brush. Starting with the dark blue at the top of the page, just to apply the color as smoothly as you can. Remember that you want this to stay wet enough to blend into. Don't be afraid to really load your brush up with paint. Keep working back and forth across the page until you are about a third of the way down. Then without washing your brush in between, dip into your red mix and add it beneath your blue. Work back and forth where those colors meet a few times until you have a nice soft blend. To keep the colors vibrant, I'm now just going to give my brush a quick wash before picking up more of my red. Then you can keep blending downwards until you filled up around another third of your page. While still wet and without washing the brush in-between, pick up your yellow. Then apply this color like you did before, working back and forth with your brush to blend the colors together. You should end up with this nice blend going from dark to light down the page. Ideally, you want this to dry before your next step. If you have a hairdryer, you can speed up the process. Then when you're ready to continue, just head to the next video.
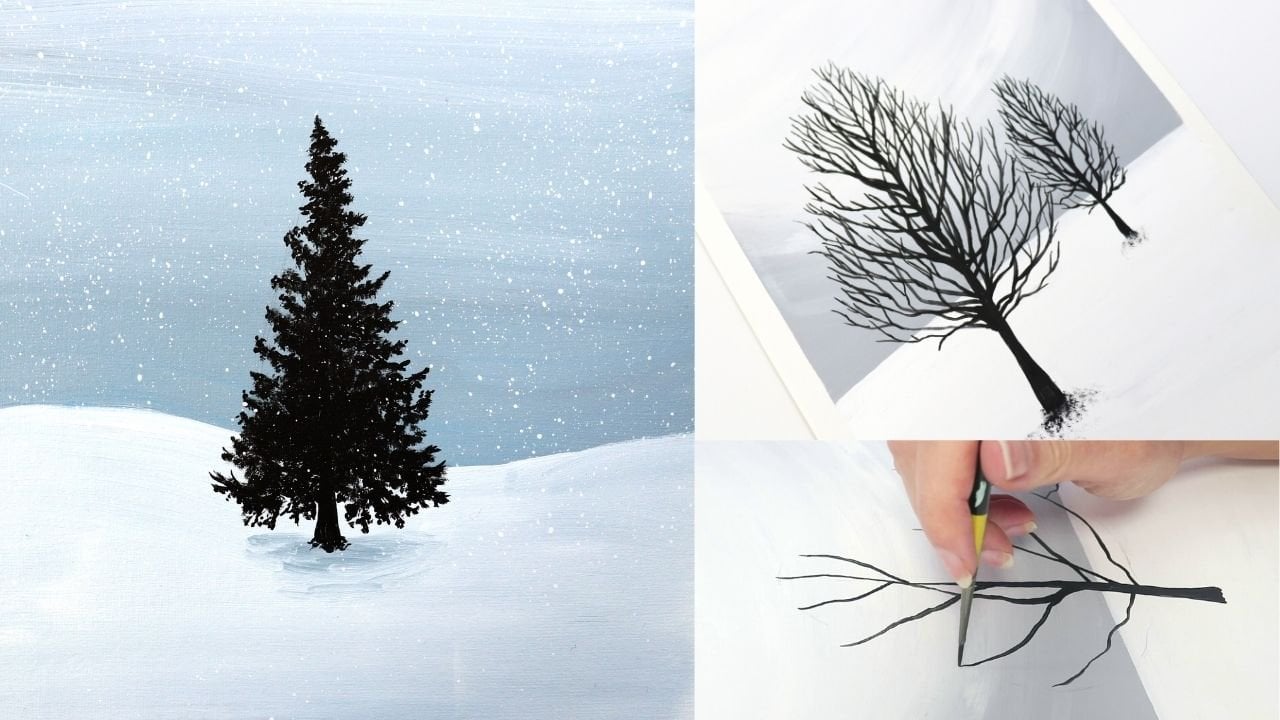
10. Painting Your Horizon And Trees: Once your background is dry, we're going to practice some brush control by painting in some land on the horizon and some silhouetted trees. You're going to need some black paint ready on your palette. We're going to start by painting in the horizon line. I'm using my angle shader brush here, which will give me a nice crisp line. But if you didn't have one of these, you can also use the point of a round brush instead. You want to add your horizon line just towards the bottom quota of your painting, so you leave enough room to add some trees later on. I'm making my horizon line have a few waves in there, so it looks like hills or mountains. When you're lines are in place, you can use a bigger brush to just fill in the rest. Next, we're going to do a little bit of dry brushwork to give the illusion of trees just coming up on the horizon. You'll need a small round brush. I'm using my size 4, dip it into your black paint and dab off the excess until you can feel the bristles are drier. Then we'll use the stippling technique to help us get the texture of foliage. You just want to dab with the brush and if it's dry enough, it should just naturally bring out the texture from the bristles. If you're getting more like blobs of paint, then the brush isn't dry enough. Simply dab it off more on your tissue and try again. I'm really just making this landscape up as I go along. You can place your trees wherever you like. Just be careful not to make these ones too big as they should look like they are far away in the distance. If you have a fan brush, you could also try using that to create your trees. You'd still want to dab off the excess paint first. You choose the same stippling technique but you can also change the angles of the brush to make it look like branches coming out at different directions. Both the round or the fan brush work well here so just choose whichever you prefer. We'll add maybe just two or three small trees. To get the tree shape, just make sure is a little narrower to the top as the branches are getting thinner. Keep going with the stippling technique until you have a few small trees sitting on your horizon line. Next up, we're going to add a couple of palm trees to practice painting finer details with your brush. Take a small round brush. I'm using my size 4 and dilute some of your black paint with a little water to help with the flow. I'm going to put my palm trees on the right-hand side of the page here. Starting at the base, paint upwards to form the main trunk of the tree. If you can't do it all in one stroke, you probably need a little more water in your paint. We'll draw two trees, so at a second trunk, in the same way, and try to vary the shape a little. Next, using the smallest pointed brush that you have, let's paint in the structure for some palm leaves. Again, I'm basically making these trees up so they aren't super precise, but it's a great way to practice making some of those finer lines. Start at the center and paint some thin, curved lines branching out. Make sure they are too close together as you'll want room to add the leaves later. You want these lines to flow easily so if your brush is too dry, mix some extra water into your paint. Remember that the amount of pressure you put on your brush will change how thick your line is. For a really thin line, you want to use very little pressure and just the tip of your brush. We're going to use some tapered strokes for the leaves. Feel free to practice this on some scrap paper first if you need to. Using the point of your brush, just flick out from the branch and make your strokes smaller as you reach the ends. Try to avoid making these too uniform and have a few leaves that crossover each other to make it look a bit more natural. This part will take a bit of patience, but the end result will be worth it. Just keep adding these leaves on to each of the branches. On the branches which curve downwards, you want your leaves to be longer on the underside and shorter on top to get that traditional palm leaf shape. I hope you're following along okay so far and that your sunset see is shaping up nicely. In the next step, we'll just add some final details to finish it off.
11. Adding Your Final Details: In our final step, we're just going to add some finishing touches. We'll add a sprinkling of stars and a nice setting sun to complete the scene. For the stars, I'm going to be a bit brave and use the splatter technique. If you haven't done this very much before, you may just want to test it out on some scrap paper first. Alternatively, you might prefer to paint your stars in by hand with a tip of the small round brush. For the splatter technique, ideally want to use a stiff bristle brush. But if you don't have one, try a large flat brush instead. Take some white paint, and water it down quite a lot until it has an almost milk-like consistency. Now for the fun part, hold your brush near the paper and flick back the bristles. If you'll paint doesn't splatter or if you get big blobs, thin your paint down more with your water. I'm just adding stars to the top darkest part of the sky here. The last thing we're going to paint is the setting sun. We want this to be nice and bright. So I mix up some white and yellow. I'll be using my small filbert brush to paint my sun. But if you don't have one of this, a small round brush would work just as well too. You want to add your sun somewhere near the center of your painting and just above your horizon. Take your time to get a nice circular shape. You can also add a touch of stronger yellow to give some variation. Just keep going until you are happy with your sun shape.
12. Closing Thoughts: Now we have our finished sunset painting. If you found some parts of that tricky, that's totally okay. I designed this painting to help you practice different mark-making skills. These things do take practice, and you'll get more confident each and every time you pick up your brush. Congratulations, I really hope that you enjoyed that tutorial, and I can't wait to hear how you got on. One of the things I find fascinating about these classes is that even though you're all following the same video, every single student will put their own unique spin on the painting. So I'd really love to see your sunset. Please do take a photograph and add it to a comment below. If you have any questions or need a helping hand, you can pop that in the comments section too. A big well done, and whenever you're ready, I'll see you for your next class.
 Kate Broadhurst, Artist / Painter / Educator