Transcripts
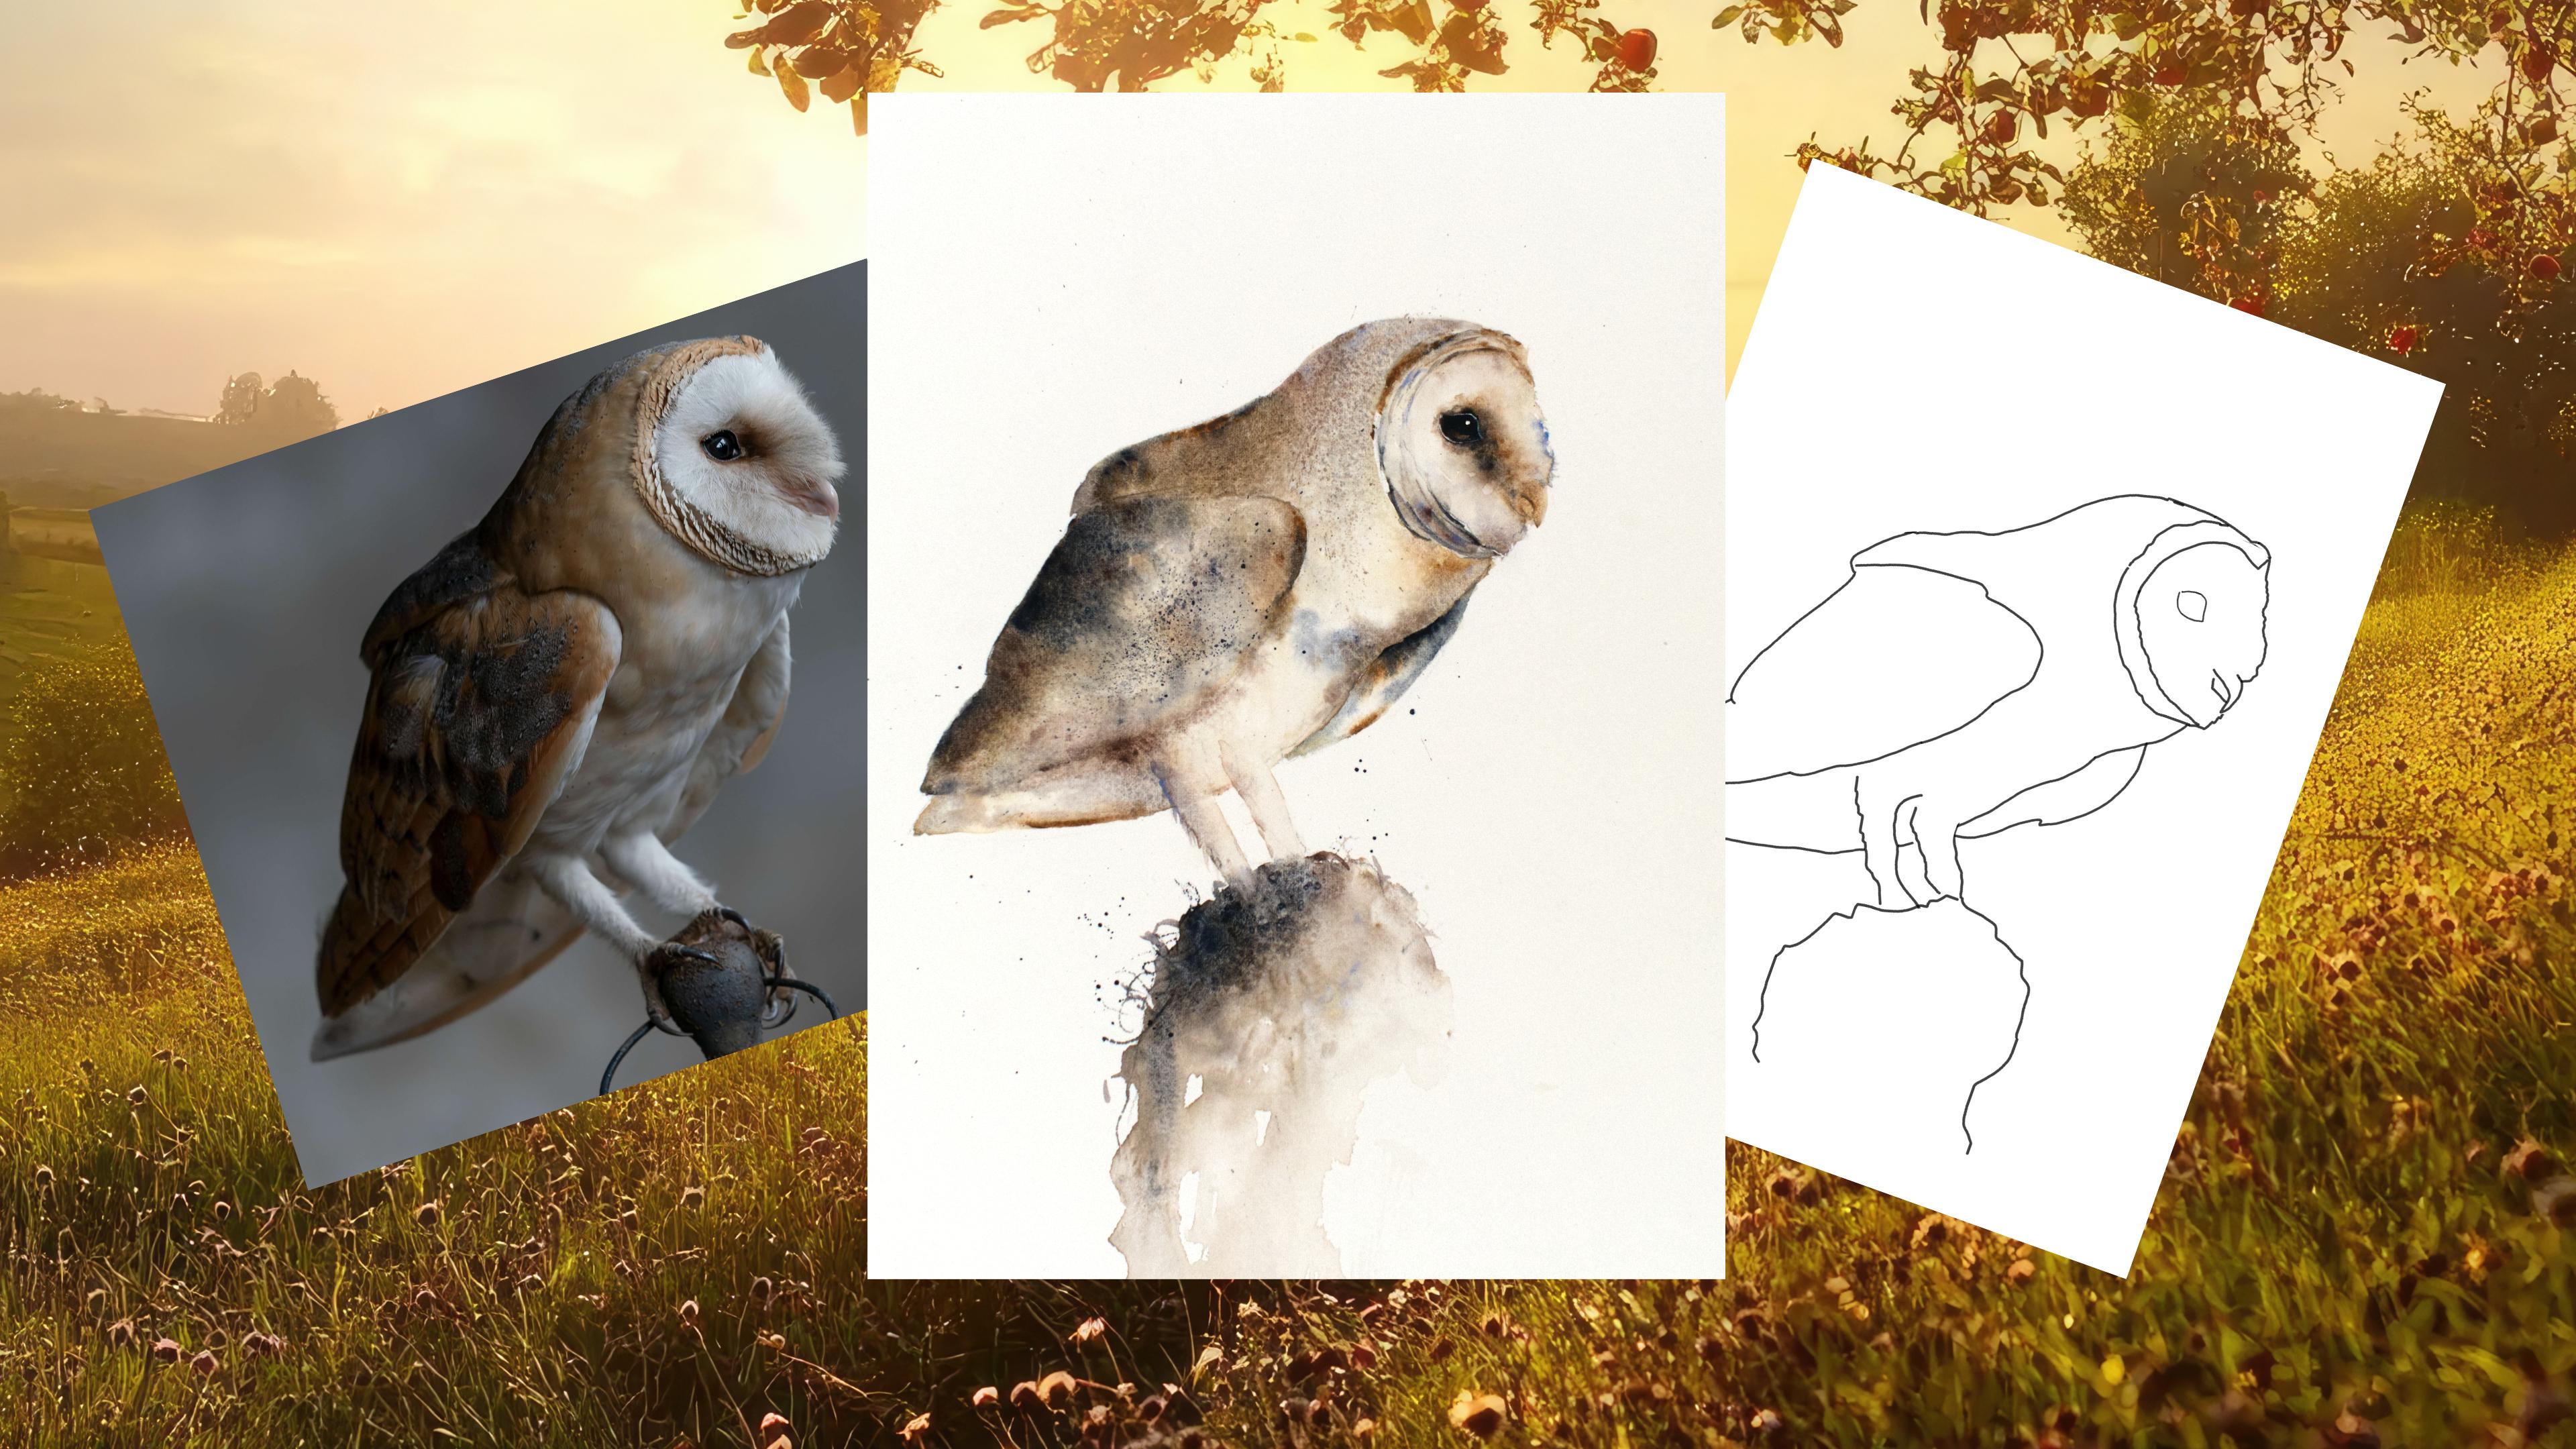
1. Introduction: Hello, and welcome to this
intermediate watercolor class. Today, we're going
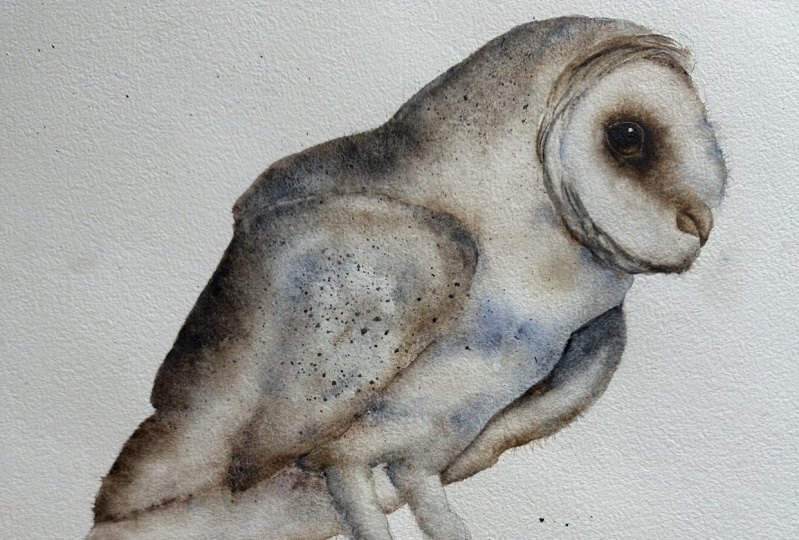
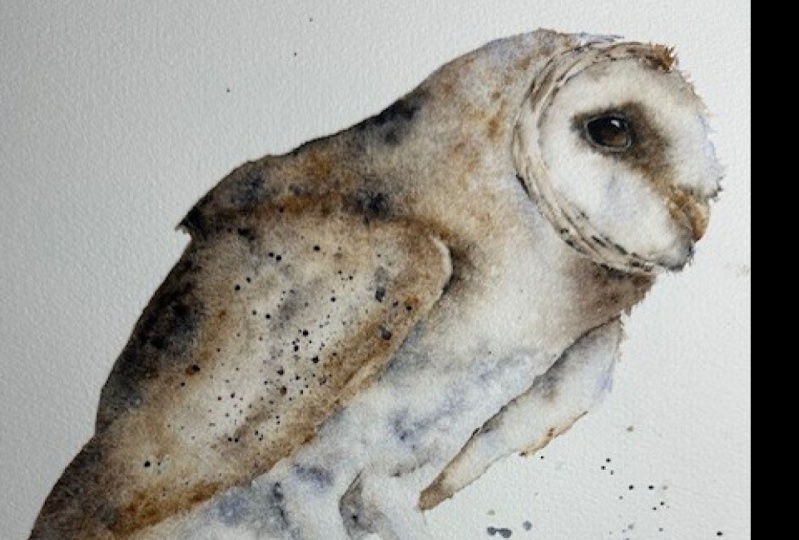
to be painting this fabulous Barnw together. Now, some of you might
recognize him already, as he featured in an
article I did for the Artist and
Illustrator's magazine. So I thought it
would be remiss of me not to show you
how I painted him. He's ever so simple. I'm Jane Davis. I live, paint, teach, and walk my lovely spaniels in the beautiful South Downs
National Park in England. Over the last 20 years, I've taught myself the free flow technique that
you see today. Not having been to art school, finding my own way has been
fun and sometimes daunting, but has allowed me to
develop my own style. This has led me to teach others either on a
one to one basis or as part of a group in a wonderful studio in the
heart of the South Dams. I also run a successful
art business where two days are never the same from the thrill
of exhibiting to painting pet and
wildlife commissions in my own home studio. In all my classes, you will follow
along in real time, where I can guide you
to keeping your work loose and fresh
without overfussing. If you're just starting out, my three beginner classes
will guide you with your first masterpiece
painted in only 15 minutes. Then you'll find dozens of
my master classes available, covering a wide range
of beautiful subjects. In each one, I share the techniques I use in
my own professional work. We'll have a lot
of fun together, and you'll gain the
understanding and confidence to
incorporate everything you learn into your own work. You'll be amazed at how
easy watercolor can be. As ever, I have provided you with a wonderful
reference photo, along with that downloadable template for you to print out. The template gives you a stress free drawing so you
can just enjoy the painting. I also couldn't help but
share this short video. I think it's
wonderful to see them and helps me to connect
with my painting. I will be showing you how to achieve that wonderful light, looseness and texture by strategically layering
paint in certain areas. We will also cover the useful
technique of sectioning areas off and how to
seamlessly join them up. Together, we'll be
painting that lovely, inquisitive eye that's
so full of character. There's a wealth of other tips, tricks and musings I'll be sharing with you as we work our way through
the class together. If you'd like to learn
more about me or my work, then please pop over to
my website at Jan Davis watercolors.co dot K. This can be found on my profile page, along with the links to my
Instagram and Facebook pages. I'm very active on
my social media, where I love to share my art, especially on stories
with many ideas, works in progress, and
tales of studio life. I really hope you will share all your paintings on the
projects and resources pages. I love seeing your masterpieces. And don't forget
I'm here to help if you get stuck or
have any questions. I want you to experience that
buzz of painting in this liberating wet and wet loose
style. So come and join me.
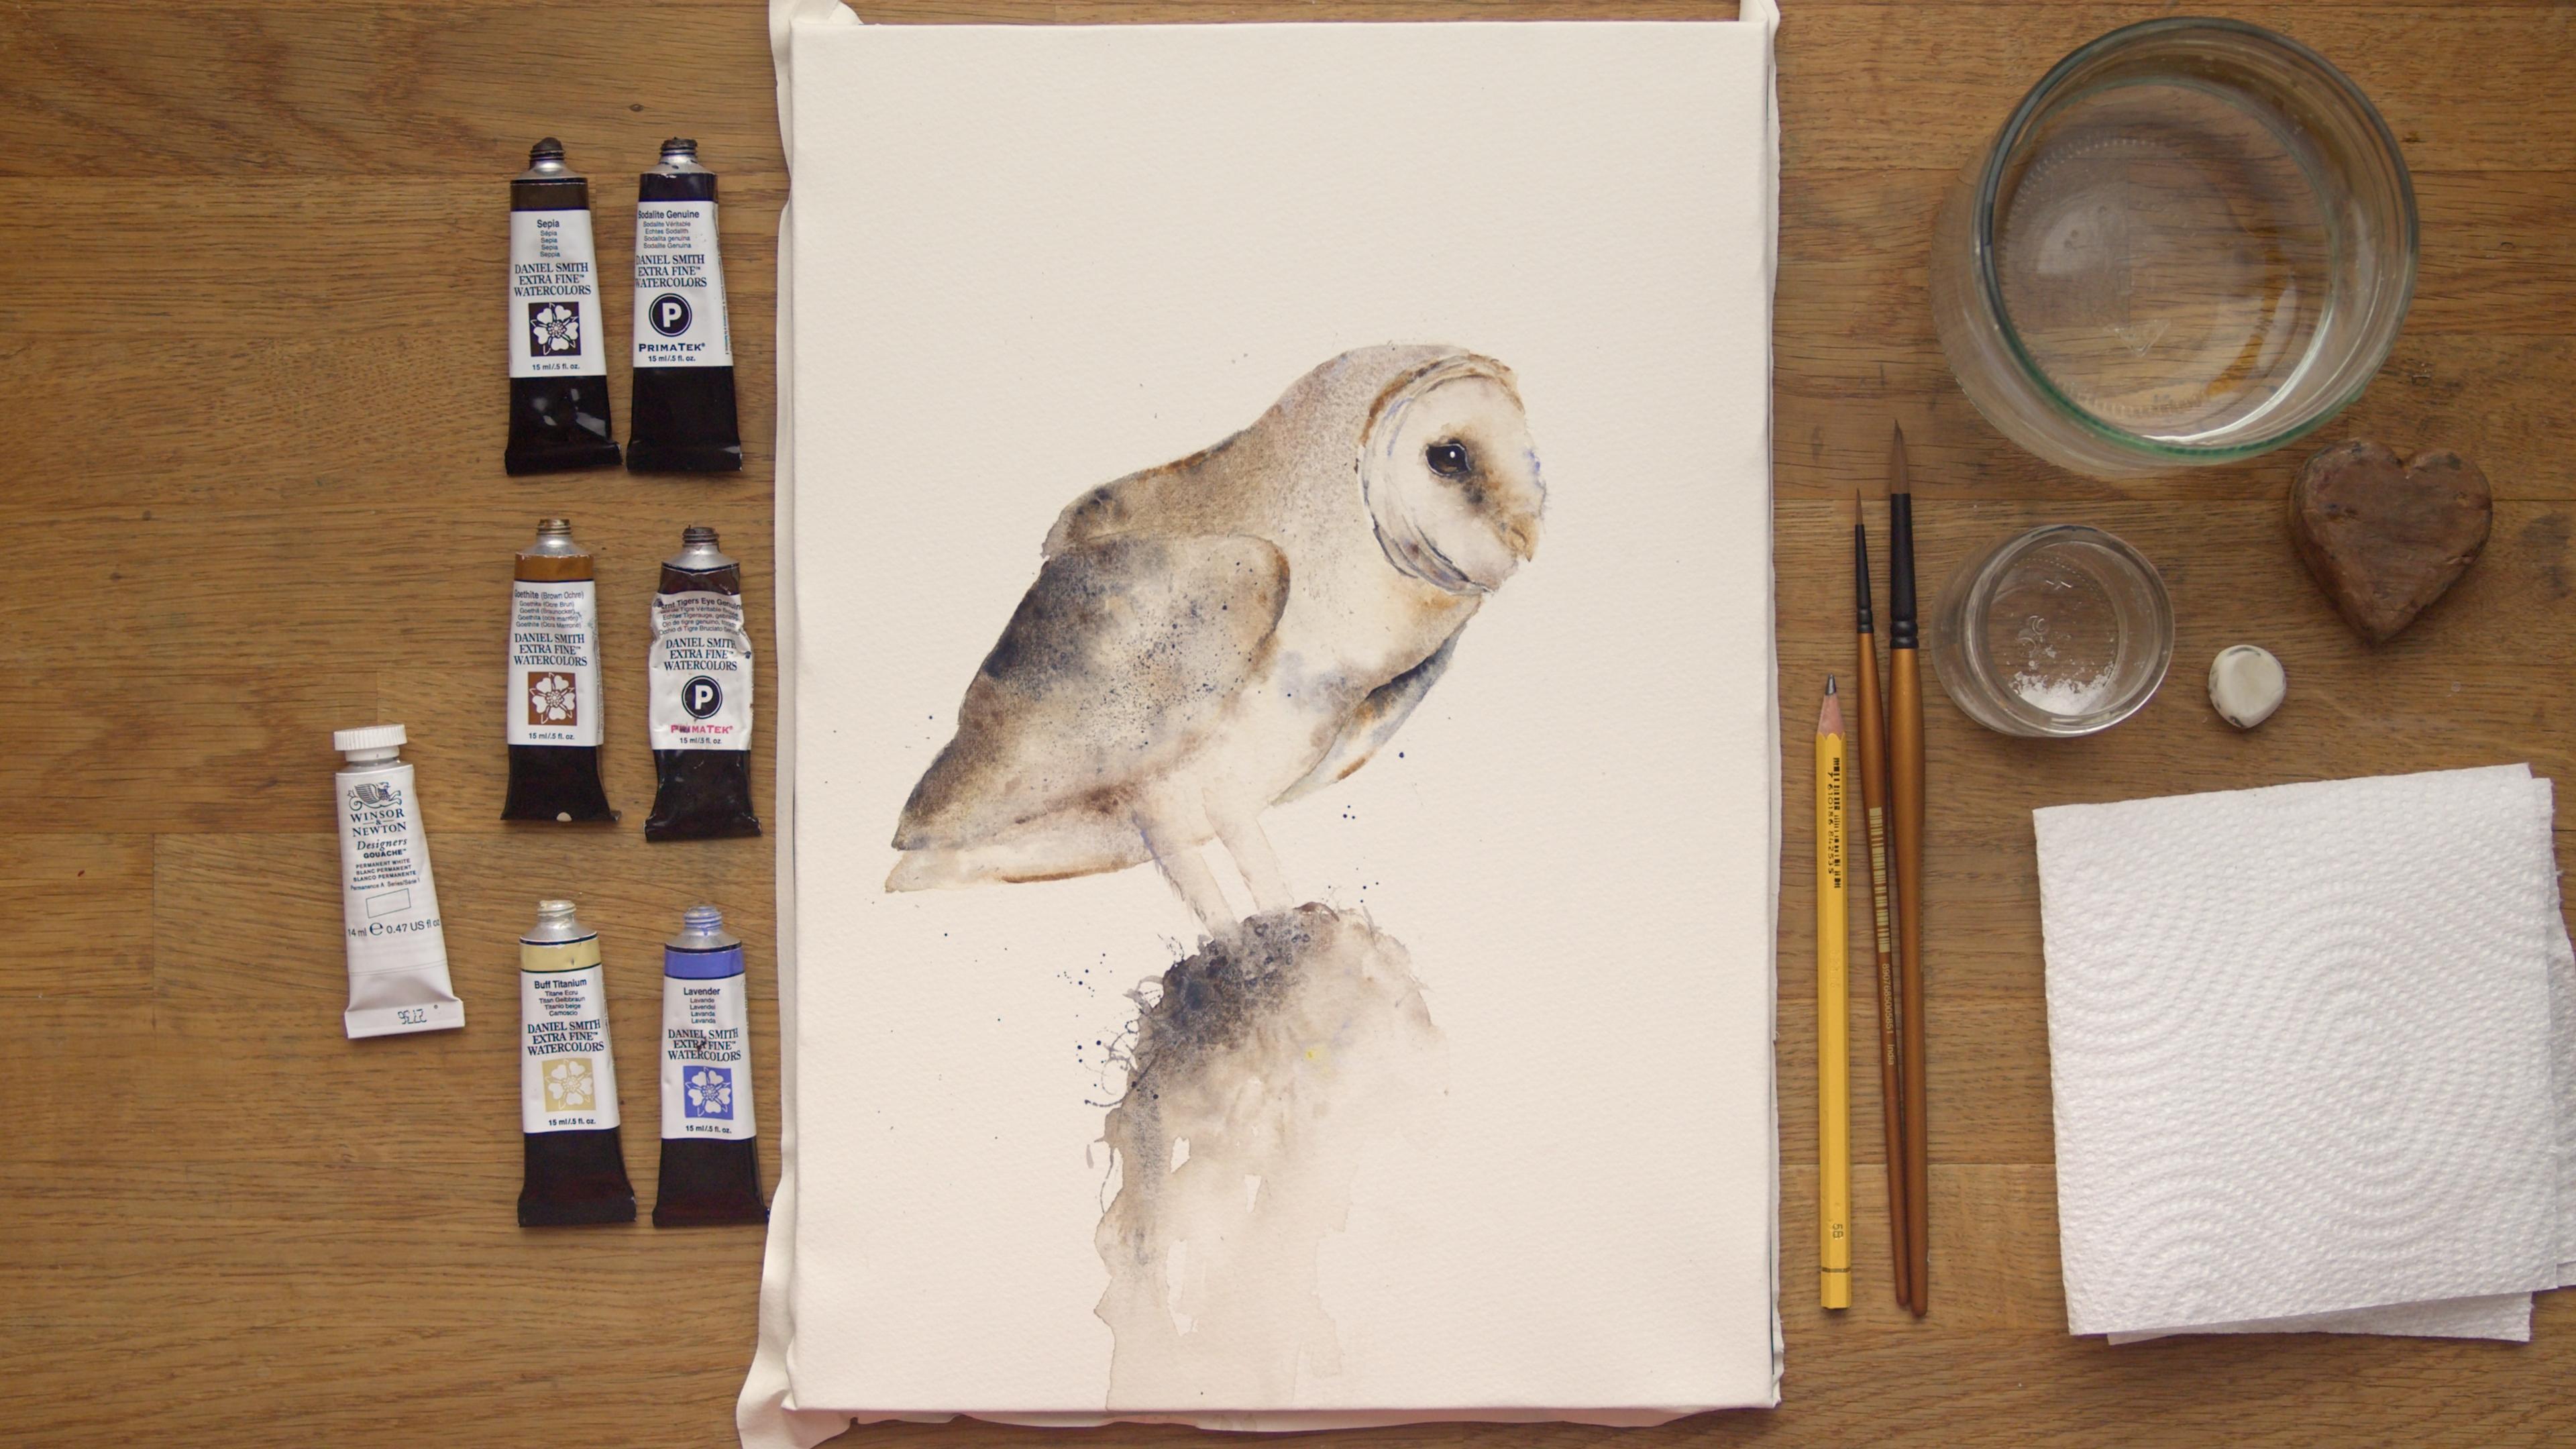
2. Materials: So let me run through
all the materials you're going to need to
paint this gorgeous bar now. So I'm going to start with
my collection of paints, and as you can see, it's my usual lovely brand
of Daniel Smith. Now, I often say to people, Don't worry too much about
what colors you use, and that's still true. So find the colors that
most match this barnew. But if you have some
granulating paints, they are fabulous
because they just help give that wonderful texture and help create that sort of illusion of that
intricate feather markings. But if you haven't. You can
always use a little bit of salt that does help to create a little bit of
interest and texture. But let me run from the top. So I've got sepia,
sod like genuine. I've got gothte,
burnt tiger's eye, buff titanium and lavender. And I've got a tiny little bit of guesh which I just
use, white, sorry. Used for the little catch light. No other no other bits. All these can be found
sort of the list of these can be found in the
projects and resources pages. So they're all there for
you to refer back to. My paper is archers, and it's 90 pound
and it's actually been stretched on a
perfect paper stretcher. If you not come across them, they are well worth
having a look at. I find them such a useful
way to stretch paper. So I'll pop that link in that projects and
resources pages for you. I got my pot of water. I've
got a little bit of salt. I've got don't laugh
at my little rubber. It's a little bit of rubber. I've got my heart, which is a little heart
my husband carved for me and the dog ren ate.
Obviously, you don't need that. You don't need a hot
card by your husband. But anything that's bad
at inch height, yeah, so you can give your paper a little tilt so we can just allow some of
that paint to run. I don't use a huge
amount in this class, but you may find it helpful. I got my little bit
of kitchen roll, paper towel, and I have
two brushes today. I've got a number size ten
and a number size two. Basically, you just want
one larger and one smaller. It doesn't matter too much. And obviously, a little pencil
to sketch her out with. And I do have a hair dryer. I normally use a hair dryer just to finish the last
little bits of drying. So that's helpful but by no means essential
for this class. And there's a lovely reference
photo on the projects and resources of pages along
with that template. So I think that is it. Come on, let's go
and sketch her out.
3. Sketching Out: Obviously, before we paint
our little barn out, we need to do a little
bit of sketching. So use that template that's in the projects and
resources pages. It's there just to make
your life a bit easier. So you can, as I say, enjoy the painting and not
worry about the drawing. It's just getting the
shapes right, really. It's quite hard to free draw. But obviously, if you're
confident, then go for it. If not, then, you know,
use that resources. And keep your pencil
marks nice and light. Mine are a little heavier. It's always just you can
see, kind of what I'm up to. Otherwise, if I do
them too light, you won't see my bar now, but especially on
any lighter areas because once we finish, we'll rub them out
and you really don't want to be
able to see them. So I would say,
especially around the front of the
face and wing area, the back doesn't matter too much because that's
quite dark anyway. Just take this home
with the drawing. Make sure the eyes
in the right place. And you have it and
you're confident. You look at it and you
go, e, that looks nice. I often go away, have
a little cup of tea, have a look at it when I
come back into the studio. Quite often, you look
at it and go, Yeah, that little bit needs
a little bit You know, you can kind of
tinker with it then. And then when you start
painting, you know, yes, I have got this dead and
I'm just going to enjoy it. I don't have to try
and tinker with it as I go, which is hard. It's quite disheartening
when you look at it and go, Oh, you know what? That eye is in the wrong place. So make sure you get
the drawing nice and crisp and correct before
you start the painting.
4. Body Legs and Stump: So once you've got that drawing nice and crisp and
you're confident, then we can get and
do some painting. So I'm going to pick
up my big brush, give it a good old, get
it wet, nice and wet. And this is quite helpful, isn't it I'm gonna pop a
little bit of color down. This is just so you can see
the areas I've wet down. So you need yours just
nice clear water, and we're going to wet down. The body' This is
like a rough here, so I'm gonna call this rough.
Obviously, that's the face. So we're going to wet
up to the roughs, we're going to leave
the rough nice and dry. Coming round round underneath. We're going to miss
out this bottom wing. So I always go, I sort of
outline it in water first, so I know I've got that nice and crisp up
against those lines. Just sit here, gently
work your way down. You keep your brush lovey
and wet and say this is colors just for you to see
the areas I've wet down. Now, the legs, it doesn't matter too much, but
we're not going to go any. Let's do it to there. So just following
that line along, so don't wet the legs
down to the stump. And then we can back fill it. So you just want it
really lovely and wet. It needs to have a good sheen. You don't want it you don't
want the water sitting in bubbles of water. You just want it good and wet, 'cause if it's not, the
paint will just won't move. It'll sit there and
go, I'm not moving because I haven't got
enough water to run into. So it needs to be
lovely and wet. Obviously if you're working
somewhere nice and warm, probably said this last time. Lucky you, 'cause it's ho
here in the UK at the moment. We're in January as
I'm filming this, and it's been cloudy for days, and it's just horr manky. Right. So yes, if you're
painting somewhere warm, obviously, your paper's
going to dry quicker. So once you've gone
round, backfilled it, just check that it's
lovely and wet still. You can sort of duck
your head up and down, you'll be able to
see whether you've got it plenty wet enough. Just doing the same. It's good. You got your little dry patches. You want it all
covered. And then we're going to pick
up, where are we? The lavender, buff titanium, I'm gonna have a little bit of gothit and we're
going to work our way down the body,
starting at the top. So a little bit of titanium, a little bit of lavender,
a little bit of the gothite we're
just going to touch. If you've got your
paper nice and wet, you should get a nice
amount of movement. Just keep tap, try not to. And if it's not moving, even
mine's a little bit sticky. You can just wet your brush, add a little bit more
water or a bit more paint. Sometimes you're just
not bold enough. So make sure I'll come white
up to that a little bit. We're only going to
do one layer here, so make sure you get
plenty on there. Let's have a little bit of
that tiger's eye as well. Why not? Wait a little bit more as
we work our way down here. But he's a lovely colour,
lovely granulating color. Okay, take your I always say, take your brush away,
have a little look. See what you reckon, add
another little bit of color, little bit of lave I'm
gonna touch more lavender just to get that nice
sort of effect up there. You see, as I'm
adding more color, it's continuing to run.
That's exactly what you want. Don't try to interfere
at all down here. Just keep adding
colour along the top. Lovely. I think
that's looking right. I'm just gonna pop those down, and I'm gonna pick up my Oh. We at Volder aren't I already? I'm gonna pick up I
so light genuine, and I've got the sepia, and then we're going to, might
have the gothte as well. So the heavier colors. And again, I'm just
going to add those. Is that so light genuine. Had a little bit more
water if it's not running. Just a little drop. You
don't want to add too much. Obviously, you don't want to
over soak your paper again. And watch out. If you
are adding more water, just watch out at
the bottom here. Because once you keep
adding more water, you're si got to go somewhere. Now, we are doing the
wing section again. There's this little wing here. So if it's not quite dark
enough around there, don't worry too much, but make sure above it is nice and you've got the good amount
of strength that you want. Yeah, that's looking alright. Just keep working your way down. Try not to come into here. We're gonna pop a little bit of colour further down in a minute. So just allow it. And if it's not moving, I'm not going to put a tilt on mine, but I can just add a
little bit of a tilt. If you find it's not moving
very much. It's another way. But again, just watch for
that collection of water. I think I might just Also, if you do get it puddling, it does sort of stop this
paint from coming down because it's finding a sort
of reservoir of water. So try not to have it
sitting in puddles anywhere. Let's have a little
bit of lavender. Can't help this off
a bit of lavender. Just a little It's a
really lovely colour, as well, 'cause it
also pushes, as well, so it's It's a useful color. Coming right down. Get
that so genuine again. If you haven't got
so light genuine, even if you just
use Windsor Newton a lot or another branch, I say, then so light genuine. Even if you just want
to treat yourself to one Daniel Smith paints
to give him the go. It's such a lovely
color. I use it so much. It's beautiful.
It's granulating. It's strong, but not too strong. It mixes well with other paints. It's just it's
gorgeous. I love it. Okay, like I said, we're going to do this
wing section again, so don't worry too
much if it's that. Obviously, we're
going to have quite at the moment, an empty wing, but say, we're
gonna redo that in a minute and one another layer. So we want to start
going underneath this chin before things start drying 'cause they do. I've got my lavender and gothie she have
the butt, as well. I want to get a little bit
of strength underneath this rough area here. Got a little bit of lavender, a bit of goth right
there with it. It doesn't matter too much.
Obviously, if you look at the reference photo, I'm
gonna call her a she. I don't know if
it's a she or a he. Sorry, but we're going
to do she today. Uh, yes, she's she's obviously
white underneath there, so you don't want
too much color, something for your eye to see. And there's a nice if
you squint your eyes, there's a nice little lump of color here like a
shadow, isn't there? And let's get even a tiny bit of It's going to see
what's going to happen. Those shapes are gonna
fall on my painting. Let's have a tiny,
little bit so like genuine and a little
bit of lavender, tiny. Let's just tap those in.
Again, I'm just happy. I'm just allowing the brush
to fall on the paper. There's no brush strokes. Just tapping. And allowing, seeing how things fall, really, and create
you something. I always say if
you get something, and I'm still fiddling
away and adding bits, but you look at yours
and go, I like that. I've got exactly what
I want. Then stop. Don't just keep following me. Squinting my eyes. There's a nice bit of colour
under here, isn't it? You see I've got a bit
too much water there. You can see it sort of
sits and swirls around. I was trying to pick that up. Alright, and a nice bit
of gothte color there. I gothite perfect for
this bin, isn't it? Um, a little bit of buff, a little bit of the lavender. I just want something
under there. See, I've got too much water. This light is tricky. I have a big flood light, so I can see my painting
nice and clearly. But sometimes I find it hard
to see where the water is. Excuse number one for today. Okay, I've got buffet
and lavender on there. Let's see if that's better. It's not sitting in
water. I can feel it. When I popped that
down, it was just sort of swimming around on top. I'm gonna take my brush
away, have a little squint. And I think she's doing alright. No more. Let's have a little bit of tigers eye
actually under there. Let's pop those for a minute. Pick up my burnt tiger's
eye. Yeah, that's nice. Sometimes you just have
to trust your instincts. Some people say, Well, you know, why did you choose that color? Why did you want the
burnt tiger's eye? I would lie if I gave
you a very clever Answer to that, that it toned beautifully or, such and such. I just have this feeling that would be that would be nice. I'd like to see
that color there. I know that's not
particularly useful for you, but well, you've just got
to trust your instinct. And it's your own
style coming out. You know, it might
not necessarily be right, correct, as they say. But it's allowing you to
develop your own style, and that's what's
lovely, I think. Okay. Okay. I think I need
to sort of down tools. Things are starting to dry, the tops beginning to dry. And I'll still
this is quite wet, but we need to run
down these legs. So let's do that fairly quick before before it
all starts to dry, so I'm going to wet these legs. Oh Tigers either.
Wet these legs. And that will pull some of this color and water
if you've got water sitting there and color out and down the legs
and into the stump. I'm gonna see how
dry patch there. I'm just going to wet
sort of halfway down, just sort of there.
Can you see that? Just there. Back fill it. That's w nice and wet, and I'm gonna have the so light genuine sepia and Tigers eye. So gonna go quite heavy here. It's not gonna be another layer, so nice and bold. And you can see the shadow. It's lights coming. Sorry, the light's coming
this way, isn't it? So you've got the shadow
running down behind. Sort of underneath
and to the left. After the reference photo, she's sitting on
I'm quite sure what she's sitting on,
but not a stump. So we're making the stump up. So it doesn't matter
what shape it is really. So make sure you get
plenty there 'cause we're going to wet
further down in a minute. Okay. Probably enough,
so clean my brush, and I'm just going
to wet further down. Just allow some of
that to run. Wiggle. It's no right or wrong. I ever ever sort of transpires. Wiggle out this way, I'm gonna put gonna hang on to
the burnt tigers, eh? The lavender and the buff. Gonna put a little bit of just a little bit
of something here. Just so you can see there's
the end of the stump, but I want there to be a
nice amount of light there. I'm also gonna put
a little bit of salt in here in a minute. So like genuine. A little bit more little
bit more boldness there. Lovely. Now, you can. Let's put that down. Now, your back of your fingernail,
this is quite nice. You can just sort of scratch
some of that paint out. It looks like it's sort of
wiry undergrowth or something. So you can do it with a little
you get a little brush, you can do something
similar with it. But I find it gets a
little chunkier, yeah. Mind I'm just gonna wet this
down a little bit further. Just want to let
that run a bit more. Obviously, I can
get it on a tilt, but I like how this
is sort of sitting. If I obviously tilt it, then I'm allowing the body
color to sort of run as well. So I don't really
want that running. So I'm just going to whip this down and pull it
down a bit further. Lovely. Right. I
think I'm there. But also going to put
a little bit of salt. I mean, they are very
granulating paints. So quite often, the salt doesn't work so well
with granulating paint, but I'm going to put
a little bit there just in case you're
not working with them. It's quite a nice
way to add a bit of texture to the salt
and a nice bit of salt down here on this stump. Perfect. And now, folks, we just got
to let that completely dry. If you are really
rushed for time, then you can sort of
go on with a head. Just be I'm always
careful or conscious, shall I say that I'm
going to put my hand in something I areas are wet, and it's too easy
to sort of lift up your paper and go,
Oh, that was all wet. So I like to leave things to dry before going
on to sections. But as I say, if you
really need to get on, then we are doing
the head area next, which is quite isolated
from the rest. But yes, I'm going to
leave mine to dry.
5. Face: So once lovely and dry, we can then crack
on with the face. What I didn't mention in the sketching out part,
and it's not critical. But we're going to try and
be really clever and leave a tiny little white line
all the way around. And it's probably
easier if there's a tiny little line just so you can see where
you've got to wet up to. So either pop that in
or be ever so careful. And that allows us, I'll show you a bit
easier trying to explain. If you can see on
this barn here, you see the little white
lines all the way around. And that's just I've
just reserved it. So that's what we've
just penciled in. So when we do the eye, we just leave that lovely and clear. Alternatively, we can put
that in with white gouache, but it's quite nice another
way of doing it, really. So let's let's give that a go. Try to pop that back up
without it falling anyway. Lovely. Right. But pencil to one side and
pick up a big brush. Right. I'm going to same gain, I'm just going to use this color just so you can
see why I've wet down. Go careful. A against your little penciled line
you've just popped in. So, this color is just for
you to see why I've wet down. And then we're going to go
up against this sort of rough right up the front, we're going to
miss out the beak. You just come down there. So you're filling in
the face, really. It's not too complicated. And again, just make sure
it's lovely and wet? Fab, no you can see on
that reference photo, there's not a lot
going on, so we just need to add a tiniest
bit of colour. I'm gonna use the buff and also going to use
this tiger eye, 'cause that's nice and soft. And of course, I'm going to
use a tiny bit of lavender. So let's start off
with those two colors at the top. It's quite bold. Put me a little bit too bold, so I'm going to pop a
little bit of buff on top, if I can soften that
down a little bit. Again, if it heats too much, you can always Daniel Smith
paints lift out so easy, you can just literally
take it out. But that's now going
to take too much out. Add a little bit more water. And don't forget it always dry watercolor
dries a little bit lighter than when you put it on. A little bit of I have a little bit of lavender
in the front there. If you want something in
the front, otherwise, it's going to disappear
and you won't be able to sort of make out
where that finishes. So it's useful to get a
little bit of color in there. We've got that lovely dark eye makeup to put
on in a minute. So that will give us a
little bit of color. Just a lagnee a little
bit underneath. Doesn't really show it
on the reference photo, but it's just nice to
get something in there. I think that's probably
going to be my lot, as I say, she's got
her lovely white face. Picked up my little brush. I'm just going to do some
tiny, tiny little flicks, and I'm going to start
a little way in not to the edge just too lightly to do long um, flicks. So just a few. They're
barely visible, actually. But once you rub that
pencil mark out, you probably just get
a little idea of them. There's a few down here. Right. And as that begins to dry, we can add that eye makeup on. Now, have a look.
If it's too wet, just give it a minute or so, just to let it dry a little bit. You just want it where
it's got a lovely sheen. There's a really nice stage with watercolor paper as
it begins to dry, where it's just perfect. You put the paint down,
just moves a little bit. But SEP is a great one
cause it doesn't it's quite sticky and doesn't really move very much. Let's give it a go. Let's let's start up
to the top there. I try not to go
over my white line. I've carefully put in. Reserved,
shall they? No put in. Yeah, that's moving beautifully at the moment. It's just right. So I just kind of carry on. It runs down, but tiny
bit of so like genu. I'm gonna be a little
bit cautious there, 'cause it's quite
a whizzy color, so it will push the
sepia around a bit. But let's see how we go. Much to the back there is, it actually have a little
bit of gothite as well. That's a nice it's a nice color. Definitely got a little bit
of gothite going on there, hasn't she on that eye makeup. So me come out a little bit. You can always gently, if it moves a little
bit too much, very gently, wait your brat, wait your brush,
take the color out. Take a little bit of the
excess moisture off, and then you can just
very gently sort of maneuver it
around a little bit. So I had a little
bit more down here. I get a good old squint. It's lovely and dark at
the front of the eye, so let's go back and
grab a bit more sepia. Okay. Did any of you manage to get the magazine from this
Because this was a, I did a step by step article, as you probably watched
maybe on the intro. I was quite an honor to be asked and a lovely
thing to go into the if UK people will
know what WH Smith is, but it's like a
stationary sees magazine, so it was quite fun to go in
and buy a magazine and open the pages and find
little old me staring back at me with my
little owl staring back. Yeah, quite a quite an honor, quite a quite a moment. So I thought I would
share because I see a lot of a lot of you guys wouldn't have been able
to get the magazine if you're not in this country, so it seemed a good
opportunity to share. Just put a little bit
more lavender there. I wanted something a little bit. Again, I couldn't tell
you particularly why. I'd just take my brush
away, have a little look it just needed something
there, I think. Okay, I think that's
worked wonderfully. I don't think I need
to do too much, but we're going to put that
little bit of rough in there. We're just going to do some
little sweeps to start with. If you've done the owl class, the Eagle owl class,
not dissimilar to that. So I've got some little
bit of so light genuine, a little bit of gothte, little brush, put
your hand there. I got a little bit
too much there. We're just going
to do some sweeps. Don't think too much about this. We will soften it down, as
well, a little bit later. So if it marks look a little hard, don't
worry at the moment. And there's always there's
a little gap here. You can see that on
the reference photo. If you squint your
eye, I've probably gone a little higher
with that one. Give that a little soften down. Then I probably a
little bit more go fty and less so doing
it up the top here. A little bit just to
marry it through. You can touch. If you touch the face, that's
absolutely fine. It just allows it to sort
of soften a little bit. It's probably enough,
'cause I've always got the opportunity when I'll
re wet that in a minute. I can always add a little
bit more or soften it down, but it's harder
to take them out, so go easy, right, and put your brush down, Jane before you completely
cover it up. Right. Yes, I think
at this stage, we just need to let it dry, and then we're gonna
do the little wings. So yeah, best thing
to let it dry.
6. Wings: Right. Before I start this wing, I'm just going to
brush this salt off just Just there's some
salt sitting on the wing, so I just want to make
sure that's away. You can leave this on the
stump, it doesn't matter. Sometimes the crystals
take a long time to dry, so I tend to leave them a little bit longer as
much as I can, anyway. It's worked a little bit. You can see a little bit of
texture in there, can't you? But, as I say, the
granulating paints don't work as well
with the salt. So we're going to do this wing, and we're going to
do the lower wing. So I've got my big
blush. Nice and wet. Now, if you're
working over another, you know, on top
of another layer, you need to wet down as gently and place your
paints down as gently as you can hopefully you've created something lovely and you don't want to sort
of disturb it. So if Is was sort of do a
lot of scrubbing, obviously, I'm going to lift that
color out and yeah, lose some of that nice texture. I ever so gentle. The brush is just
falling on the paper. Go and go round, outside
and then backfill it. I'll find it's the easiest. It's always a bit
harder when you. You've got color there. It's harder to see, isn't it? But just drop drop
your head up and down. Bobble your head up and down. Make sure you have
no eye patches, 'cause paint will just run
round and look a little odd, so Okay, I think that's
nice and that's all wet. A little bit extra
for good luck. Now, I'd like mine to be
a little bit stronger, so I'm going to add a
little bit more strength. If your wing is quite
strong already, especially on the back, then, you know, don't add as much. Be a little bit of
guide how yours looks. You probably haven't
got an awful lot here, so, you'll probably want
to add a bit there. I wish I could see
everybody's. It's so hard. You'll have to try and second guess how people's must look. Right, I have got the
three stronger colours. I've got Sepia, gothit
and so like genuine. So I'm gonna go a
little bit bluer. This is just me because I said, I want a bit more
strength, really, so I'm just going to
go and tap. Careful. You don't don't upset the colors you got
underneath. Just go gentle. Might be a little bit
tiger's eye just 'cause it can help move that around. It's a nice soft sort
of color, as well. Tab, tab a little bit. Tige's eye in there, sort
of squinting my eyes, having a little look at
that reference photo. A little bit there. Watch how it goes. You say, we're not doing a lot
of tilting here today, but you can always give it
a little bit of a tilt. Let's do that, just so I've used this my little heart here
that's sitting on the desk. Pop that up. So
I'm just giving it a tilt so it's running
down into this corner. Going to flip around?
Again, just be careful. You be careful. You can get water
sitting at the bottom. Let me let me just have a I think I'm alright
and up there. Okay, I don't always
have a little bit of this gopher on this
edge of the wings. That's a really nice shape. I love the shapes
of bird's wings. You can see how a little
wasn't that careful. I didn't wet everything
down, but you can see a little dry patch there and see how the paint running around it, and just just
gently wet it down. Have a little squint.
Obviously, the Barnw feathers are so beautiful
and so intricate. Obviously, we're not
going to do any of that. But you just want sort
of an idea of the color. I did see somebody's
pencil drawing, I think, on social media, and she'd done the most exquisite burn out. It was beautiful. But it
must have taken her so long. It was so beautiful, though. A little feathers have
been penciled in. The colored pencil.
I was lovely. I'm not sure I'd have
the patience to. Okay, just dibbling and
dabbling, taking my brush away. If you're sitting, just
try standing just for a little minute and
have a overview of it. It's good to get above it
and get a little way away. 'cause obviously you'll
view your piece, hopefully, on the wall, so you won't
be this close to it. A little bit there a little
bit under here. Wing. I'm gonna pop a
bit of salt down. Again, it may work. It may not. And say the paper you're
using or the paint you're using may have
a better effect, so I will pop it down. I think that's looking
alright, actually. I don't want to keep
fiddling, 'cause I'll, um I'll ruin it. I don't want to keep
'cause all you're doing keep potting paint
down and keep fiddling, you're sort of
mixing all the time. I'm just going to put a
little bit of buff there. 'cause I still can't help doing
a little bit of fiddling. I'm not sure if that's made
you made much difference, but there we are. Okay, I'm just gonna
leave pop this flat, 'cause it's wiggling
a little bit. I don't want it to be don't want the video to look a bit
odd 'cause it's wiggling, but if you're quite
happy leaving yours on a tilt and you want it to
leave it on the tilt, then do. We're only going to do
this little section here. But for the sake of
that video quality, don't say I don't think of
you Ben who does all the Ben, my husband does all the editing, so make his life a bit easier rather than
the board wiggling around. Okay, so we're
just going to wet. So the lower part of the wing. Nice and wet again,
and we're just going to pop tiny
little bit of color, 'cause it's it's white, isn't it pretty much
underneath there, so we don't want to
add a huge amount. Could you ask a little bit
up against the edge there? Go sorry, a little bit go fight. Let's have a little bit of
so light genuine, as well. Just a little bit
of darker there? With reference photos, sometimes you have to use them
as a guide sometimes. If you think it's going to work better to put a
little more strength somewhere, or leave
something out. You let them be a guide to you, not a slave to them. Again, just having a look, take my brush away a little
bit of buff there. On top. This little owl was actually a warm up exercise in my first summer
workshop I ever did. So it was a little more
simplified than the years now. He seemed a prime candidate
for the magazine article. Yeah, I think that's
looking alright. All I'm gonna do is put a
tiny little bit of go thigh. She says, Just there, again so you can see that
that wing's just there. Make sure it's all nice
and tidy and neat. And that, again,
just needs to dry. Didn't put any
salt there, did I? I'm just gonna squizle a
little bit of salt over there, see if they knew
that has any effect, but I imagine it's not going to, but say, have a go. Fab. Again, that just,
again, needs to dry. We will be doing the
eye in the rough, so you could continue, but
I'm going to let mine dry.
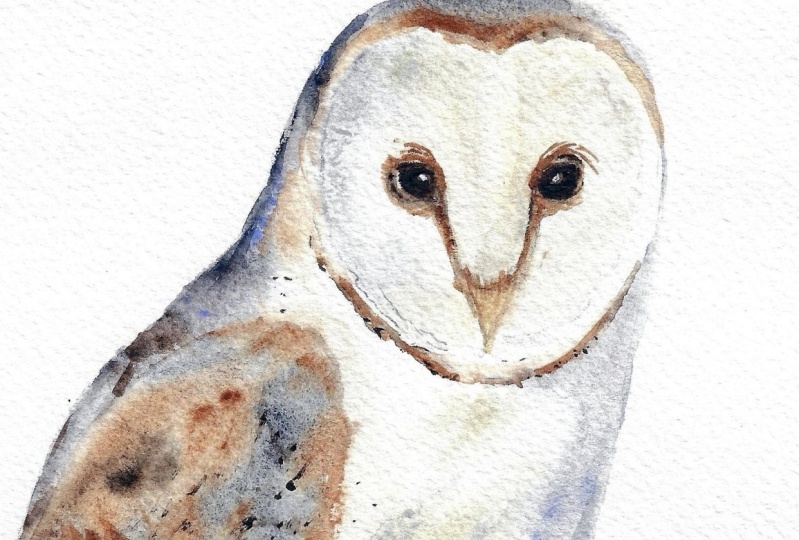
7. Eye and Beak: Right, let's do this eye. So I'm going to use
my little brush. As it ever, I'm
gonna wet it down. Just wetting down just allows
the colours to run rather than you could paint
this in because it gets a little bit
sticky, then, doesn't it? So I'm gonna wet it down. Barn out eyes are
ever so kind on us, 'cause they're very dark, so we can just add, you know, almost dark colour,
pretty much dark colors. So she says, Let's start with a little bit of
gothite 'cause it's gonna be nice to take a
little bit of light out, so I'm just going to
put that gothite there. So when I take the color out, that should go on that
should be the color sort underneath. That's
the plan, anyway. A little bit sepia,
a little bit of so, like, genuine, and
then we're just going to add the color so they're
ever so dark, the eye. We don't need to um not doing pupils or
anything like that. Nice and straightforward. Now, obviously,
it looks a little bit odd at the
moment because we've got that very obvious
white line now and there. Now, the trick now
is, is to come outward and just make that
line as thin as you can. And actually, in parts, I will make it disappear. So the very back here, I will probably lose, actually. Come down here. Until
it almost disappears. Make sure I don't
make the eye too big. What I'm going to do, actually, I'm going
to leave that here. That's quite thick
still, but I'm going to probably wasn't careful enough with where I wet up where I wet up to, so
that's quite chunky. I don't want to make the eye
any bigger at this stage. So once I've done these
little tinky bits, I can then just
come in here and go underneath and then close
it down a little bit more. Hope that makes sense.
But you may have done yours just the right. Thickness. Again, I'm just gonna keep
taking my brush away. Actually, that little
bit of color there has been bobble of water. Probably won't need to take
an awful lot of light out 'cause I still got that little bit of go underneath there. Yeah, that looks alright.
The colors nice. They say, the lines
a bit chunky, so I don't want to make
the actual eye bigger. I just need to
close this down by coming in to the face
area and closing it down. It all makes sense in
a minute, I'm sure. Okay, let's do the beak while
that dries. Really simple. You're going to wet
the top area first. It almost gets hidden
there, doesn't it? They have funny little beaks, and it gets hidden with I know it's not hair, but the fluffy, feathered uh, fluffy
feathered feathers. Kind of come in
there, don't they? The beak does get a
little bit hidden. So we have a little
tinker of that as well in the minute and just draw
that down a bit more. I'm just gonna get
that color in there, just leave a little
There's a buff underneath, go more to the edge, and then we can take that
little bit of color out. I'm just going to go
straight underneath. Leave a little
white line just for a minute. So wet that down. Using the two colors again. You see there's a little
white line there. And then we're just
gently move inwards. So we touch the top part. Yeah. But then we can fairly quickly just take some of that
color out of the top. And we're going to do a little
bit of tin cream aun here. At the moment, it looks a
little stuck on, doesn't it? But we'll give it a
little a little salt out. Okay, while that dries, we're just going to
soften that rough down. So I'm going back
to my bigger brush. I'm just going to very gently, just getting gentle, just like we did with the
layer over that wing. Go gentle. But even that, just adding that water, you can see that soften
those harder lines down. Taking my brush away. I'm
gonna have a little look. I might put a little bit of gothte Just run a little
bit around there, if you squint your eyes
at a reference photo, that's very gothty,
isn't it? On that edge. I'm just gonna pop
a little bit down. Just keep taking
that brush away. Don't lose those lines, though. It's very easy to scrubbing and adding bits of colour,
and you'll lose that. They're quite nice,
those roughs. It gives that impression of the Obviously,
they're not lines. They're very intricate feathers, but we're not going to be
doing intricate feathers. Putty bits of
lavender just there. Yeah, I think that
is enough. Lovely. Right, I'm just gonna get a wheeze a hair dryer over that. So the eye is definitely dry, and then we can do those
little tinkers around the eye and close
white line down. Okay, I'm actually going to wet. The whole face down again. Wasn't quite my plan, if I'm totally honest with you, but it will allow me
to then soften that. So I'm actually going to go
close that in a little bit. Is wet the rest down
really gentle 'cause I like how these eye
markings have formed. Just going to come
down a little bit into the beak area as well. So Okay, make sure
it's nice and wet. Never so gentle. Now, this
gives you a bit of a chance. If any part wasn't
quite strong enough, you can add a little
bit more strength. I'm just going to say,
close that white line down. It's a little stark, isn't it? So I can go right 'cause I've got sepia
here, little brush. I'm going to lose
that white line on the top there. Very gentle. I'm just going to make
it thinner, basically. It's got a little bit. No more concentrating, it goes
quiet, doesn't it? How's that look? That
looks better, doesn't it? A tiny a little bit
more gothit a top here. Did I get that kind of Look
what a dry patch there? Bring a little color here
give the impression that eyes kind of looking
upwards a little bit. I take this a little
bit of colour. Soften that little bit colour down towards the
back of the eye. I must have painted this
bar now so many times, and every single one is just
a little bit different. It's just a slightly
different character. It's funny, isn't it? There are such beautiful birds. I don't know if you've been
lucky enough to see them. We have a pair somewhere
around where I live. Occasionally, I will see them
hunting around the fields. I'll see them for
a couple of weeks, and I might see them again for a good sort of fortnight again, and then they reappear,
so they must work on different areas and exhaust it and then
come back again. Okay, that is
looking quite good. Just gonna have this
little line here. I want to make a bit thinner. Say, be a judge of
your own piece, 'cause we're all going to
be different at this stage. So if yours is lovely and dark, you don't want to be doing
any of this fiddling, then you can just
sit and watch me. I think I'm there. I
know I'm getting to that little stage
where it all can be ruined because
you just fiddle. And quite often, when
you get to this stage, you enjoy doing it 'cause it's a pleasurable
thing to be fiddling. But it doesn't always
help with ward colour. Make sure it's corner the edges. Lovely. And now, what I want
to do is a catch light. And actually, if you didn't make your eye
quite dark enough, you can take Sorry. If you made that quite dark and you haven't got that
lump of light there, you can just very gently
wipe the color away. Very gently. And then you get a lovely sort
of sheen of light. I've already got quite a
nice lump of colour there. Anyway, so I don't want
to take too much out. It's just gonna
look a little od. But let me just put some of
that color back in again. Cause I already had quite a
nice bit of color on there, so I didn't need
to take much out. So yes, just very
gently wipe it out, so you're just
taking color out to give light to the
bottom of the eye. It doesn't show it on
the reference photo, but it gives another
dimension to the eye. So hopefully you can
get what I mean. Okay, so with your
little bit of white, Garage, which I've
had off the table. You want to make sure you
brush it nice and clean, and it's not obviously dry, but there's no excess
water on there. And you want this to be
lovely and sticky so you get a really nice
sort of dot of white. Now I'm going to go top or
topi ish and to the front. Just one little blob
like that and done. Makes all the difference,
isn't it? Magic. Yes, that's your
little eye done. And we're just going to gonna let that little face
area dry and then we do some last little
tinkery bits. A
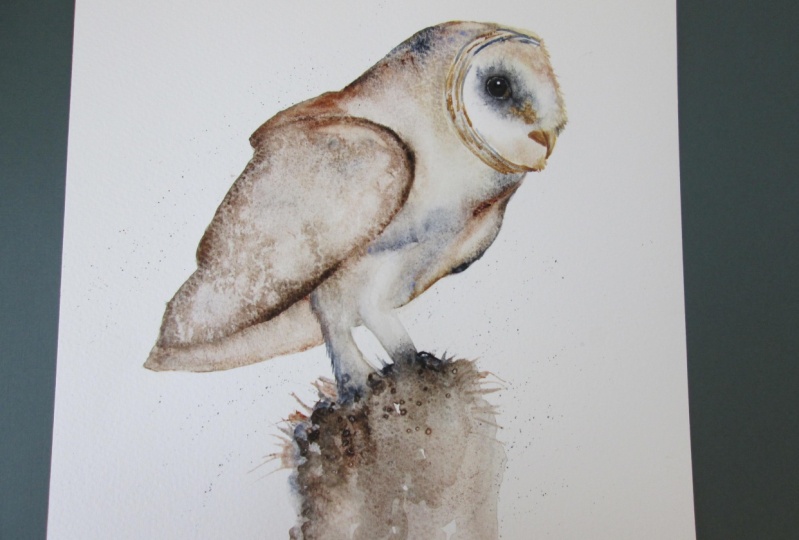
8. Finishing Off: Okay, so I'm going
to rub out the salt that's sitting on there
on my lovely burn out, but make sure it is
wonderfully dry. Bush that off. See where it's created you.
Did it Hounds your wing? Did you get some nice
salt marks on that wing? Subtle. Lovely. And now I'm gonna rub out some of
those pencil marks, but again, just really make
sure it's lovely and dry. I do too much rubbing out it wobbles the table
a little bit, I think, so let's I think that's
probably enough. So first things first, I guess you gonna do these
legs because obviously this leg she hasn't got much
sort of definition, but the reference photo, just the way the light is falling on those
reference photo, they're really
exaggerated on the legs. It looks like she's wearing
white stockings, doesn't it? So I obviously don't want
to make them that bright. So I'm just going to
wet this front leg. Just go to put a tiny
bit of shadow in behind. Not doing any feet and not going to get
involved with that. Obviously, some of you
are fabulous at feet, so if you want to have a
good go, then do so if. Then follow me we'll be
footless or clawless. Let's have a little bit of burnt tiger's eye so in a
little bit of lavender. Just just a tiny, little bit of color there. Again, take your brush
away. Minute you have something that looks
nice, then stop. And it's also quite nice to do, just a tiny, little
bit of fluff. Down. That's probably the word
I'm looking for, isn't it? I probably have down. Yeah, you can see the legs sort of
appeared a little bit more now, and it looks a bit more sense. I've left a little bit
of color out of this. She's missing a lump of her leg. So again, I'm just gonna
wet that one down. It's almost a little odd
that you can see both legs. It's just the camera angle, so I'm not going to
exaggerate that too much. It's probably one of those
things that it's worth looking at reference
photos and not being too much of
a slaves to them. So I'm just going to put just a tiny little bit of colour. Again, keep taking
your brush away. Actually, for you
feet loving people, I'm just going to do the slightest impression
of a claw there. And some of the my practice
pieces and other pieces, just the way the water
has fallen and run, it's almost created something in there and give me
sort of another wash. I haven't got any of
the pieces to hand to show you, but, again, you can then start
taking colour out and giving you the impression of that the claws sitting there, but they're quite
they're quite complex, and you can quickly sort of ruin personally ruin a piece by
getting a little too detailed. Just going to take there's
quite an obvious line where the stumps run across. So take a tiny little bit of color just to
take that line out. So it doesn't actually
looks like the leg's sort of coming
down a little bit. But I'm not to say,
I'm not going to go any more detailed in that. But it is quite a nice. I'll be working the one
way round, aren't I? Should be working top top to
bottom, not bottom to top. But as I'm here, there's a nice little line. Just runs underneath the tail. It's just catchy some
of that feather. That's probably the back wing,
isn't it? Far side wing. So just a tiny little bits
I just painted the line in, and I've softened the top. Keeping everything
nice and light. Now, I can take color out. It's always a nice thing to do if you've lost
some of that light. I quite like what I've got here, but let me show you what I mean, so I can very gently just
take a little bit of just taking one of the
layers off probably to give you that scent of
light on top of the wing. Blot it with my kitchen roll. It's going to be subtle,
so you don't want it too obvious and be careful not
to sort of go in here, personally start
doing wing details, but I saw a feather details, but I'll leave that to you if you want to
get loving and detailed. I'm sure some of you
will cause there'll be some magical projects. Yeah, you see a little
bit of light there. Again, you can sort of take a little bit out
of the top here, it's gone a little strong, quite like what I've got here, but I think you get
the general gist. So yeah, you can give that
sort of sense of light. And if there's anything if you've gone a
little strong here, I've got a nice little patch of light here that paint
didn't run too much, but you can very gently
take little bits out there, just, you know, gently dabbing. Sometimes the
fingers just enough to lift out a little
bit of colour. Always, just to have a look, your piece, step
back for a minute. If you haven't had
a break from it, step away for a minute
and see what you think. But, I don't think there's much else I want to do
regarding light, really. Again, face. If it
got a bit heavy, always take a little
bit out, squig. You can see as we've rubbed
those pencil marks out, you can see a little bit down. Those little flicks are giving
you that impression of it, haven't I'm just going to take a bit of light
at the top of this beak. I think I got a little bit, heavy handed with
a gothte there. So again, just a little
bit of a squidg. I was just looking around. My piece, if there's
anything else I want to add. A couple of my practice pieces. I did put an extra line,
just like we did here, just a little bit of a
stronger line on the bottom of that wing if you didn't
make that as defined. S, that's another option. Again, just adding that
sol a little bit of Tiger's eye. Just a touch. Just to define that light
that wing a little bit more. I'm going, I like a finger's great because
it just squidges. Rather than actually
taking it out, it sort of squidges
it around a bit rather lifting all away. So I give it a little squidge. Yeah, I don't want to do
anymore 'cause you're gonna get liny's a little line
here here and here, so I don't want to get
too too sort of liny, but it just another
another little part that I do on some of my pieces. Now, the last little thing
to do is a few splatters. This is a little bit up to
you whether you want to do any flicks and splatters. So I will do them because then you can see whether
you like them or not. I'm just going to grab
a bit of kitchen roll. So you can be clever. I'm probably cleverer
than I'm going to be at this point in time. You can shield off your owl. Hope you get the impression it should come round here
a little bit more. So with your bigger brush. And let's just use
a little bit of ti. Oh, no, let's do a bit of Sepia. It's worth practicing on a little scrap of paper
before you start this. Let me I've just got
this little scrap here, so finger underneath the
brush and just flick back. And then you then you're away. So I'm just going to
add the right ankle, a few up the top here. Sort of gives the
impression of some of that intricate feathering. It's talked off. I'm
gonna do a couple across the wing. Take that away. We haven't been as careful, but hopefully you get what I mean, so you're covering your
bar now carefully, and then you can,
you know, in theory, get right up against
the edge there, but you've covered it from
going into the white paper. You can do big splats. I'll show you some
big splats as well, so I've got a little
bit of so light genuine a bit more water. And then hold your
brush like that, you just tap the
top of the brush. It'll give you something
a little bit bigger. Again, this is up to you
whether you do those or not. Sometimes gives a little sort
of sparkle of life somehow, but I'm never sure if
I like spats or not. I do a couple more there
but they're so genuine. Uh, yeah. So really, folks, let's
get that out of the way. That is your little
bar now completed. Yeah. I hope you enjoyed
this little class. It's been I've loved
this little bar now. It's been ever so sweet to do, and like I said,
a great honor to do the magazine article as well. So, so, yes, as ever, please do share these in the projects and
resources pages. Any questions, pop that in the discussions
section in the class, and I will endeavor to get
back to you as soon as I can. And if you can give me
a review of any sort, if that's given you an
option to review this class, they are hugely appreciated and wonderful to be able to sort of share the reviews on social
media and bits and pieces. So yeah, reviews
much appreciated. So, yes, thank you
for joining me, and I look forward to seeing
all your wonderful projects.
9. Final Thoughts: So I hope you enjoyed
the class and found him a fabulous
subject to paint. How did your paint flow? If it was a little sticky, remember to keep your paper nice and wet along
with your brush. Isn't it fabulous joining
those section up and allowing the paint to flow to create you that
light and looseness? Did you manage to create
that beautiful dark eye? The shape is really important as it creates so much character. As I always say, it's worth stepping away
and coming back and looking at your painting
with a fresh pair of eyes and tweak, if necessary. So we look forward to seeing
you in the next class.
 Jane Davies, Professional Artist and Teacher