Transcripts
1. Introduction: Hello, and welcome to this
all levels watercolor class. Today, we're going to be
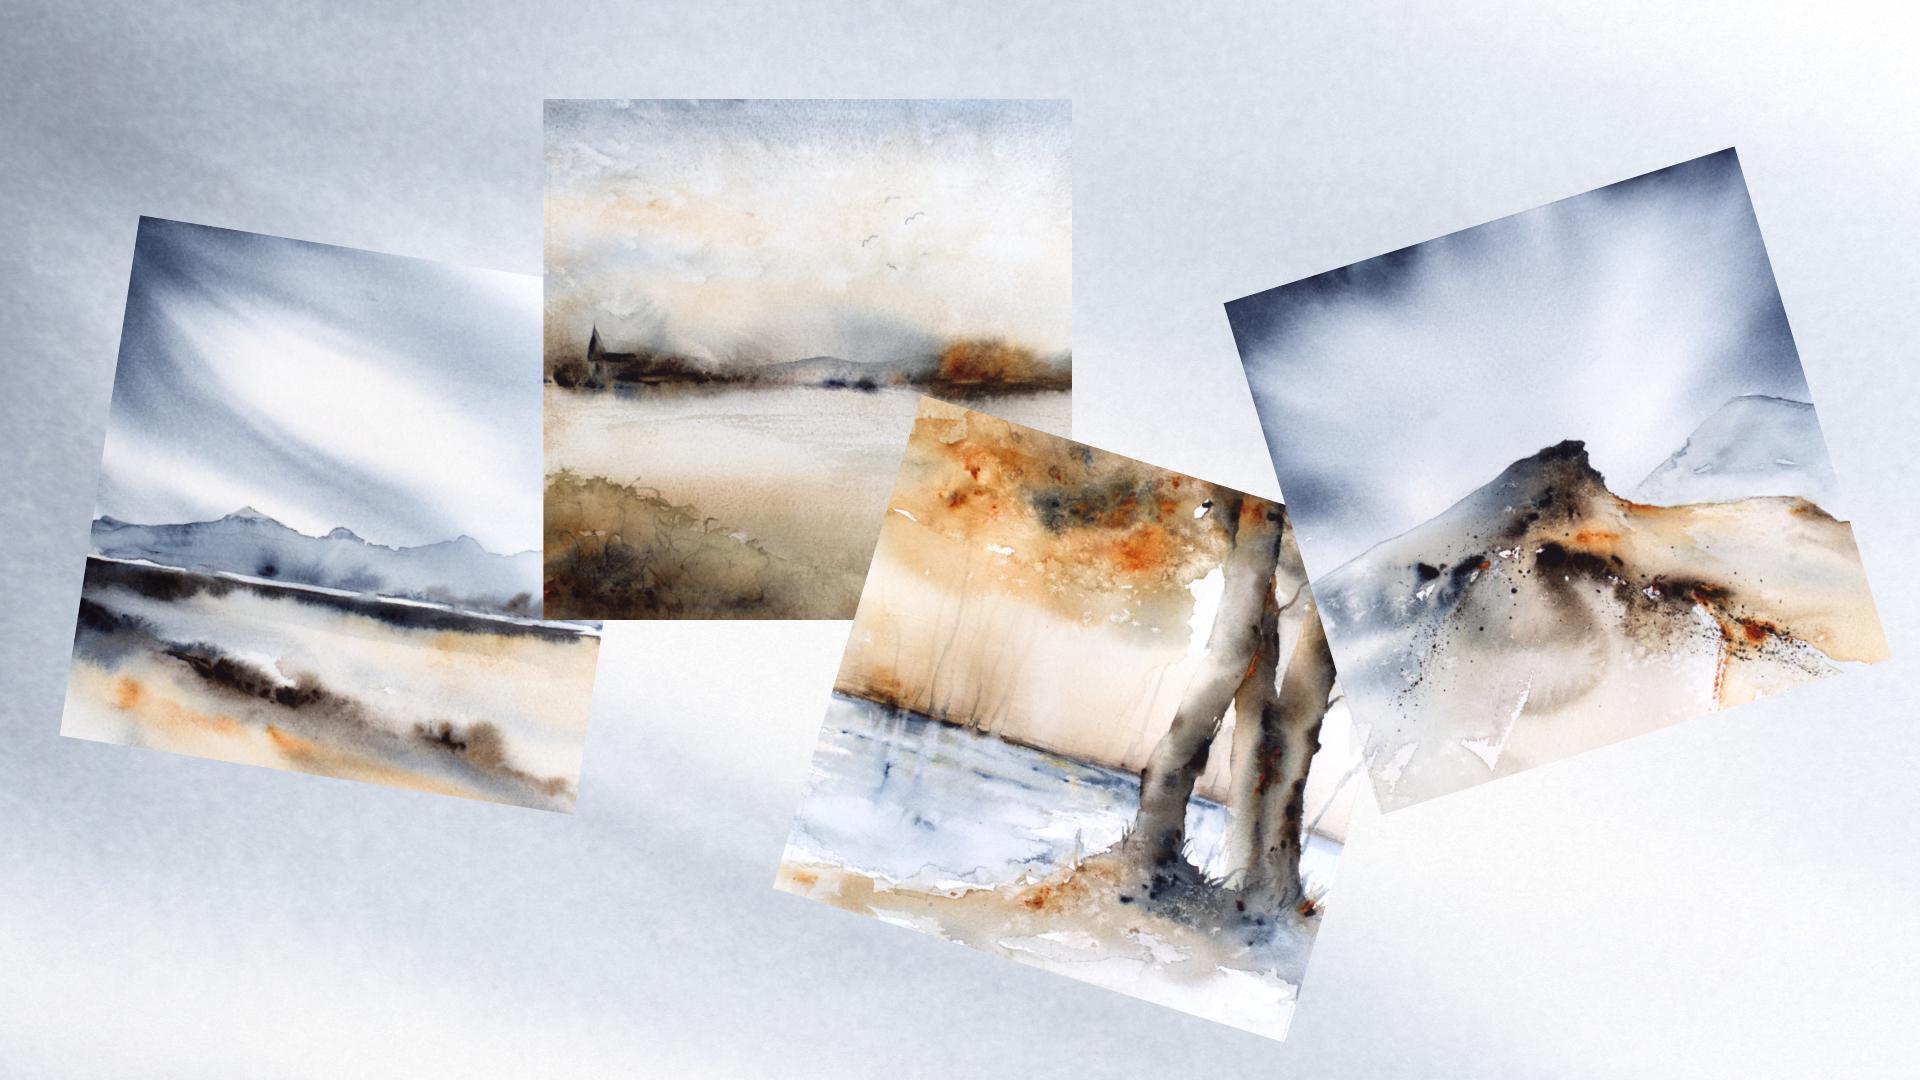
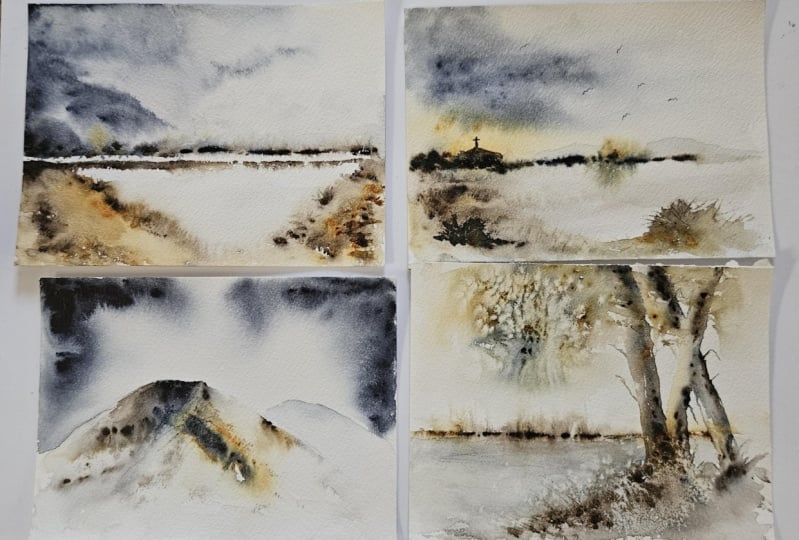
painting four mini landscapes. These little paintings
will really help loosen your workup and
ignite that feeling of experimentation and intrigue. Start off with Mountain View, the simplest of the four. Then we work our way
through Church view where you can add layers
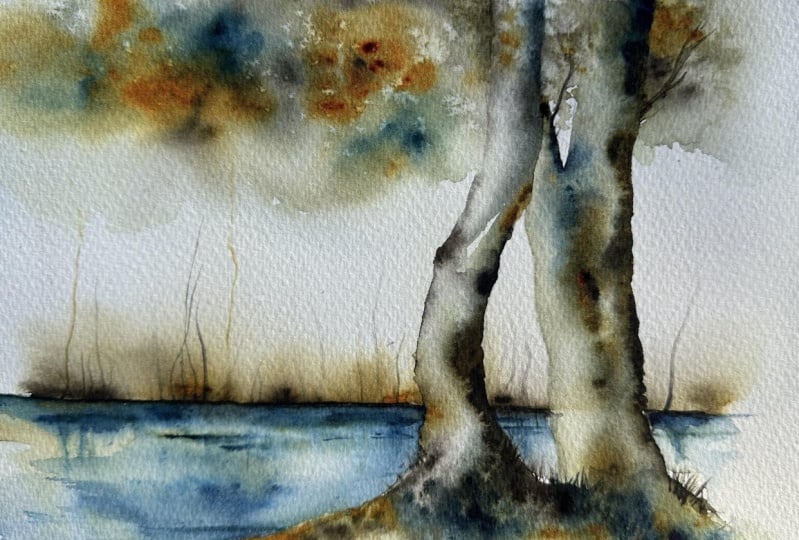
and details as you wish. Then onto lakeside trees, this is lovely with a great
sense of magic and wonder. Finishing off with
mountaintops with that fabulous texture
and Rudy clouds. There's also an
extra lesson where I explain a little about why I choose to paint landscapes as a class and not my usual
animals and birds. And there's also
a lovely show and tell from my past that I think
you'll find interesting. I'm Jan Davis. I live, paint, teach, and walk my lovely spaniels in the beautiful South Downs
National Park in England. Over the last 20 years, I've taught myself the free flow technique that
you see today. Not having been to art school, finding my own way has been
fun and sometimes daunting, but has allowed me to
develop my own style. This has led me to teach others either on a
one to one basis or as part of a group in a wonderful studio in the
heart of the South Downs. I also run a successful
art business where two days are never the same from the thrill
of exhibiting to painting pet and
wildlife commissions in my own home studio. In all my classes, you will follow
along in real time, where I can guide you
to keeping your work loose and fresh
without overfussing. If you're just starting out, my three beginner classes
will guide you with your first masterpiece
painted in only 15 minutes. Then you'll find dozens of
my master classes available, covering a wide range
of beautiful subjects. In each one, I share the techniques I use in
my own professional work. We'll have a lot
of fun together, and you'll gain the
understanding and confidence to
incorporate everything you learn into your own work. You'll be amazed at how
easy watercolor can be. I'll be showing you
how to keep things wonderfully loose and light
filled with minimal colors. How gravity, timing, and plenty of water can
create watercolor magic. I will also show
you how to layer up your paintings with the
emphasis on simplicity. There's a wealth of
other tips and tricks I share as we work our way
through the class together. If you'd like to learn
more about me or my work, then please pop over to
my website at Jane Davis watercolors.co dot K. This can be found on my profile page, along with the links to my
Instagram and Facebook pages. I'm very active on
my social media, where I love to share my art, especially on stories
with many ideas, works in progress, and
tales of studio life. I really hope you will share all your paintings on the
projects and resources pages. I love seeing your masterpieces. And don't forget
I'm here to help if you get stuck or
have any questions. I want you to experience
that buzz of painting in this liberating wet on wet loose style. So
come and join me.
2. Materials: So let me run through all
the materials you need to paint these gorgeous,
little mini landscapes. I'll start from my paints first. I've only got three, so I try to be a little more
minimal for you, so we're not having to juggle
five, six, seven colors. So there's just the three. I personally like
the combination, but obviously, it's
completely up to you. I did think if you've
got a color scheme, you'd particularly
like maybe you've got a room you'd like to
paint a little picture for, then marry those colors up. So L I always say, Don't be a slave to
the colors I'm using. But, I say, I found these nice. So I've got the sepia, I've
got Caqudme deep gold, and I have an indigo. The paper is arches, and I've really
enjoyed using it. It's only 90 pounds. It's
quite thin, but it's lovely. Lovely for these landscapes. It's not been stretched, so I know I've popped these
on a little mount, but let me show you a one
of my practice pieces, you can see it's
buckled a little bit. But I just like the spontaneity of lifting up your piece
of paper and going. I really want to keep these
nice and light and easy, and spontaneous for you. Of got my little pot of water. I've got some salt, just a
created little bit of texture. I got a little rubber to rub
and pencil marks out with. I have my kitchen roll,
paper toel, pencil, three brushes I have got a large It's not
actually a mop brush, but it's quite a it
holds a lot of water, and I found it really nice for wetting the areas
down nice and soft. I've got my number ten brush, which I do most of the
painting with, and I've got. Just a number two. I
don't use it a lot, just odd little bits and pieces. So any brush of that sort of numbering would
be absolutely fine. What else have I got to tell
you hair dryer is handy, but as ever, it's always love you to let them dry as naturally as you can, more so with these probably
little landscapes, but it is handy
just to finish off with so you can kind
of crack on and do the next little bit of
layer or next painting. Also got a tiny little
mounts, which are just nice. You obviously you don't
have to do a square. These are all done in a square. It's nice to be able
to mount your piece. You could do these larger. You could do them
all sorts of shapes and angles and aspects. But yes, I've done
a little square, and it's nice to be able
to mount these landscapes, because as you can see, from the outside
bit is quite mucky, but the minute you put a
little mount around it, it really does help them. And then all the materials and the mount sizes can be found on the projects and
resources pages. So no reference photo,
I'm afraid today. These are all out
of my imagination. Lucky you. Obviously, these are going to be the
pictures themselves. There'll be a downloadable file, which you can
obviously download and have a look and
pop those up onto your device or however you usually watch use
the reference photo. So before you start painting, there's a little a lesson. I just want you to probably
have a little watch because it's it's hopefully helpful why I've chosen
these landscapes, and I've got a little
show and tell for you. So I'll see you in
the next lesson.
3. Show and Tell: I just wanted to pop on here first before
you pick your paint, brush it up and explain a little bit more about this
class because obviously it's a slightly different
format than usual because you've got we
just got the one subject. Now, I know I'm not particularly
known for my landscapes, and they aren't necessarily
my area of expertise, but they are exactly I use exactly the same techniques as I do in my animals and birds. It's just a little
more pared down, just to keep it
lovely and simple. Obviously, you've got
four to pick from. So you can pick and choose whichever one takes your fancy. Obviously, it would be
ideal if you did all four, and each does have their own subtle way of
creating the end result. My idea with the
little landscapes. I really wanted to give
that to create that spark in you and sense of intrigue
and experimentation. You kind of like,
Oh, if I did that, W S with a little and
the little sorry, the little church landscape. You may not see a
church in yours. You may have a barn
in that corner. You may have something
similar to this, maybe the barn's here, and you got that lovely
hedgerow going down. So hopefully, as I say, this will just give
that little spark of intrigue, I suppose. And the beauty with
these landscapes is they are very simple. And the less you do, the better the results will be. And the more magical and light filled you'll get
your piece to be. Do you know that
feeling when you've done a really good piece and you're pleased with it and you know you haven't
fiddled and fussed with it, these little landscapes
really amplify that. And I must admit, when I went
back to doing my animals, I had quite a big
commission to do. And I definitely
felt more confident, a little more at ease just
putting that paint down and allowing it 'cause we
all get a little tighter, the more I know with
some of my commissions, some of them are quite detailed, and it just encourages
you to be more detailed. So these encourage
you to be looser and more expansive, I suppose. So, yes, enjoy them, have fun, and be light hearted. But before you disappear, I go, got to tidy these away because I have have a little
show and tell for you. I don't know. Many of
you probably don't know, but my dad was a beautiful
odd color artist. He did He did landscapes, only landscapes, dabbled
in the odd odd animal. If I'm honest, he
wasn't quite so good, but he excelled at buildings, in my opinion, anyway. He just had that lovely sense
of perspective and detail. So some of them are
wonderfully detailed, but he has that lovely
looseness about them. He also loved painting boats. So I must admit my first when I thought about
these landscapes, very, very first thought
was like, Let's come. We're copy one or dad so
we can do that together. But when I went through
his older paintings, they're all too detailed for me. I can't I will never be able to achieve
something like that. It's my weak point, so I can't do structures. So hopefully what I've
done is taken some of the looser parts of his work and put them into
little anscapes. So here's another
one, a little house. I do remember this
cottage in my childhood. Sadly, he passed away
quite a while ago, so these are quite old. Some of them are 1980, 1980, yes, they are. Um, yeah, scary how
time flies, isn't it? Again, another
really pretty piece. He did like his masking fluid, which I've never
really noticed before, but he's picked out little bits with masking fluid
to get that detail. But these I love this. These are the looseness I love and that wonderful crisp detail. It's wonderful contrast, isn't
it? He would probably wp. I won't say that. But yes, he probably wouldn't be that keen on me showing you these, if I'm totally honest, but I think they're
worth seeing. He never exhibited these,
never sold any pieces. They were just done
for his own pleasure. And he did love doing them. And he loved to ships, there's quite a few.
I've only got a handful. My mom's obviously got some, some of my uncles and
other family members have also have See, he
was quite prolific. And this was probably one
of the later pieces he did. A little more in my style, I'd have probably said,
a lot looser. I think this was Ink
if I rightly remember, a little cottage that
was close to us, not far away from us, again, I can recognize the scene. Um, So, yes, that's kind
of where I got my love for watercolor from we used to paint together as
when I was a kid, but we only ever did landscapes. We never did animals. It was my sort of thing
to paint animals. So I do remember him
saying I should do lots of pentel sketches. And he said to me, You need
to put some color on those. So I did. And here we are now. So, yes, I hope you found this
a little bit interesting. It's quite nice to know
where your, you know, people's where you've come from, isn't it and how you progressed through to get to
the point you're at. But anyway, let's go and do
those little landscapes. And yeah, like I say, I'm going to just say
it again, enjoy them, have fun, be light hearted, and don't take them
too seriously.
4. Mountain View Part One: Right. First things
first, let's pop. I've just got this
very scrappy mount. So a little bit marked, but it's great for
just drawing inside. You see, I've splattered and
done marks already on it. I do tend to go through
these little mounts, doing silly things like this. Right, let's lift that away, and then I've got my little
window to work with. Um, try to keep the pencil
marks as light as you can. It's just something to
guide you to work within, but try and keep them nice
and light, yeah, you could, in theory, mount it
and just go, Oh, it would have worked just
a little bit more to the, a few inches or sort, centimeters to the
left or right. So if you can keep the pencil marks nice and
light, then you can do that, 'cause it's sometimes quite
hard to rub any pencil marks out if you've got a lovely bit
of sky here and you can't. So, yes, keep your pencil
marks nice and light. Alright. Oh, actually, Bee. Do any more. Let's put a
little horizon line in here. Again, Petlmrks nice and
light. Yep, perfect. We're going to big brush. I want a nice big sky, so
that's why I've left a nice, big expanse. So big brush. It's a nice round, gentle brush. It's not going to sort of
mark any of the paper. It'll just be nice and light. I was finding. I was doing
these practice pieces, and I was using this brush
to wet the area down. And I was doing the sky,
and I was leaving marks. I'm like, Where have
they come from? I think I was just
scrubbing with that brush, so it just goes to show. You're always learning,
aren't you, eh? So, this one's a
lovely soft brush so I can apply the water. Nice and softly. Again, make sure you don't have
any dry patches, 'cause you don't want
to have this lovely sweep of sky, then fine, you've left a little dry patch
in it'll run round it and it look quite odd for this sky. And go outside the box so make sure you're
wet right outside. A good couple of
inches, I'd have said. Okay, once it's nice and wet, make sure it is nice and wet if you're walking or working in a warm environment to make
sure it hasn't dried on you or left you a little bit, um starting to dry in one corner or something,
you want it ugly and wet. Okay, I'm gonna
pop that one down. I'm gonna pick up
my normal brush, one I've probably come
more confident with. This one holds a little
bit too much water. And if I start adding,
it just needs, don't have a very exorbent brush that holds a lot
of water for this. So I've got normal brush. Indigo. And we're going to make sure now you apply this paint
outside that pencil mark. Nice and bold come
around the corner, so we're just doing
like a corner. Don't worry, it's gonna
run exactly what you want. And then fairly swiftly, once you've done
I go and give it a nice tilt and allow it to run. Now, mine's not really
moving quite enough, so quite quickly, I can add
a little bit more water. Do this really swiftly, though. Don't hang around if it's
'cause you can find it, it gets a little
bit too streaky. I hope you can see
that. It's not. And just allow it to
be, see how it's going. Say we're just every single
one will be different. You can apply exactly
the same method. They're all going to
be slightly different, and you just have
to work with it. The biggest thing
is not to overfddle or try to definitely don't
add paint in the middle. If you let me do
it a little bit. Just about time now. I'm gonna put a little bit down here, see if I can just make that
a little bit more there. But you really don't once that started running, you
really want to leave. And we'll wet down just a
little bit further down here, what this is going
to do is going to run and then run along. So I don't want it
sort of although we're going to put some
mountains above, I want to keep that
running beautifully. Right, I have got because these papers are really
thin, it's gorgeous, and I'm really enjoying using
it for these landscapes, but it's quite it's
only 90 pounds, so it buckles a little bit. I've just got a
little heavier piece of backing board, actually. So I've just popped
that on there, and it will help it hope it will prevent it
from buckling on me. And I'm just going to
leave it at a tilt. Now, however you've tilted it, allow it to dry on that tilt and try not to move it too
much because it will go. Don't lift it up and try
and see what you've got. Just leave it in the position it was in once when you
applied that paint. Now, mine, I like
how that's moving. That's going to think it's actually gonna
give me a nice look, but if it's got a little
stuck down here, yours, you can wet a bit further
outside that box and then pull not pulling, but you're just giving
more adding more water here for this paint to then run into. I
hope that makes sense. I'm glad they a bit
more down there. I don't really want much more, but hopefully that will guide you if you've got a
little stuck with that. And you just need to let
this dry. Don't move it. Definitely don't add any
more paint at this stage. If this one didn't work
out, have another bash. Grab another bit of paper,
do exactly the same. Be light and free and just
treat this as a bit of fun. It's a The lighter and the carefree you can
be, the better the result. I know it's a little scarier
when you first start adding this water and paint
and letting it be, but it's really fun. Once you get into the swing
of it, you'll love it. Oh, and while you're
watching it dry, like I'm watching it dry, I know we quite often use
a hair dryer on pieces. I would be reluctant to do
that until the very end. So let it almost dry. And if you need to sort of
finish it off the way it, it's a little bit cold still, but it looks like it's dry, but you can feel it's
just a bit damp. That's an ideal time to hair
dry. This is still damp. And if I put a hair dry over it, I really risk just changing
how that's running. If I put a head drove over here, this little streak here
could end up dipping. So it's probably more
important to give it a little bit longer than you normally
would on the animals.
5. Mountain View Part Two: So how's yours dried?
Are you pleased with it? It's always worth sticking, you say, if you've
got your mount, stick your mount over it, then you can kind of
get an impression of what your sky looks. And if you have done several, then just pick your
favorite and then carry on. So I'm going to pick up
that big Muppa mop brush. Not quite a mop brush,
but it's very soft, and I'm going to wet up to that horizon
line we popped in. Outside the box again. Nice and wet. It
doesn't matter as much if you have some dry
patches, but personally? I quite like it all wet. Now, if you've whizzed
a hair dry over it like I did just
to finish it off, don't forget the paper can
warm on you a little bit. And so then it obviously
dries the Dries the water. Right. That's nice and
wet. I'm going to pick up. I'll put mysepia and indigo, and we're going to work
on this left hand corner. Left and rights we
never my strong point. And I put a good amount
of paint on my brush, and I'm going to add the paint. Come here a little bit of sepia, go work away along here. Just really loving, gentle and work with what
gets given to you. If something happens, it's
not quite what I'm doing, but you like, go with the flow. This is When I first thought
about doing this class, I'm just going to do them
and see how they work out. And we're gonna work our
way with what we're given, it just gets a little bit a little bit hard to
try and teach that. But, yes, it's a very free flow, um like imaginary
piece, isn't it? You know, this
could be anything. We're not following
a reference photo, so if you get
something you like, and it's given maybe it's
reminded you of somewhere. Um, I think this is
what's so lovely, so it's just working with how the paint's
forming and flowing. The biggest thing is just
just not to fiddle too much. So I'm wanting to
try and get another like a it could be a hedgerow. It could be just a line of little shrubs running down here. We bushes, probably not shrubs. It's a bit gardenly
term, isn't it? This is falling down here.
I'm just gonna leave that. That might form
something pretty. Again, it's always worth
taking your brush away. Having a little having
a little glance, see what you think gonna pop a little bit of
orange in there. I just like to that when I did some of the
practice pieces. Very gentle. Say, have a little look.
Let's pop a little bit. Orange in here as well. I'm going to give it a tilt. See if we can make
something change or appear. I can see. It's got
a little dry here. See where it's going
round for some reason, thought I'd wet it all down. See how it's running. You can always being bold, I can just drop a
little bit of water in there. I let that run. Magic, isn't it? Pop that down for a minute. Shall I pop it in a
Where's my board. Crap from down in the floor. That's gonna put that
molting board underneath it, and then just gonna
give it a little tilt. I'm gonna let that
be for a minute. I just want to get rid of that. It's a little bit pubby there. Avoid any spots. Quinacodme does
leave little spots. I can see there's,
like, a watermark coming in here, but
I'm gonna leave that. I'm gonna see how that forms. I'm gonna we're
gonna start on the mound one, I'm gonna
start on the mountains. Uh towels disappeared
off the desk. I got my Indigo, and I
probably will only use indigo. Just causes mountains, I say, the mountains need to look like they're receding and
they're bluer mountains. And I'm going to leave a tiny white line
all the way along. So I'm gonna paint
that in first. What I don't really want is the mountain color running
into that horizon. It wouldn't matter
again it could form you something really
beautiful. Who knows? We'll join it up in a minute, but let's get the
mountains in first. Now, again, the mountains
are make belief. But if you've got
a mountain range near you or a hill line
you particularly like, then you could pop that in. Other than that,
just make it up, see how there's a drip just
gone there, hasn't it? Well, like I say, let it be there's
a good that'd be a good reason a reason
a good experiment to see if that Works. I think it ran off
the top of my brush. I did do a piece
a long time ago, one of these little landscapes, and I did exactly that, and it's still one of my favorite pieces. So don't get disheartened if something's
dropped like that. Let it be, I might create
you something beautiful. I've got a bit distracted now. My mounting lines
gone a bit weird. Just trying to smooth that out a little bit. Bop
another one in there. Behind the back there.
No idea where this is. That's what's so fun about this. Say, take take your brush away, have a little look.
See what you think. I'm gonna pop a little bit of sepia. Hang on to that indigo. I don't really want
to add the orange onto the mountains,
but I will put. You'll said a little
something along here. Could be some tree line coming
in here on the shoreline. I'm measuring this as
a little little shore. Um, it wouldn't be
a river, would it, but just something along the edge there, bottom
of those mountains. Again, take your brush away. Have a look. Not sure if my little blobs of water have done anything
actually there. I thought they were going to give us something
really weird. I'll give you
something really odd. I'm liking that, actually.
I think that looks alright. I'm going to put might put a little bit
more strength here. Could be risky, but
let's have a go. Gonna have put the
orange in there. It's quite strong. I need to make sure my paint
brush isn't wet. I really want to add too
much more water in there. So the paint is quite thick. I've taken straight
out of the tube. Pop a little bit in there, say, it's just bloom's
it's got a nice sense of it's just a nice
wetness there. You see that's blooming
quite prettily. What I'm going to do,
I'm just going to very gently join up
just a little bit. Now I'll make sure
I'm gonna clean a bush and make sure I've
taken the excess moisture off because I don't want to
do what I have done there and dropped a lot of water
there or added too much water. Just joining some of that up to this foreground horizon and
the mountain horizon line. That makes sense.
I'm just putting a little paint between those
that white line ready. You might get a funny
little bloom, who knows? So they should be at the stage where they're
not soaking wet now. I like that. I think
it's done right. The only thing I don't like
it actually plop there. So get rid of that.
That's Quin acre doom. Cold, leaving little
marks. You know what? A little like the animals, you'll get to tricky stage. Bits starting to dry, bit this is almost dry. This is quite wet. This is probably starting
to go off where. It's not useful to
add any color now. It's going to give
you something too. It's gonna be quite
sticky and won't move. So I'm going to down brushes, and I'm gonna leave that
and see how it dries. Like I said, they're all
gonna be slightly different. And as they drive, you've
got a lot of water, you've done an accidental
sloge like mine, it will form and change the landscape until
it's completely dry. So yeah, have the courage to pop that color down
and just leave. So how do you do it
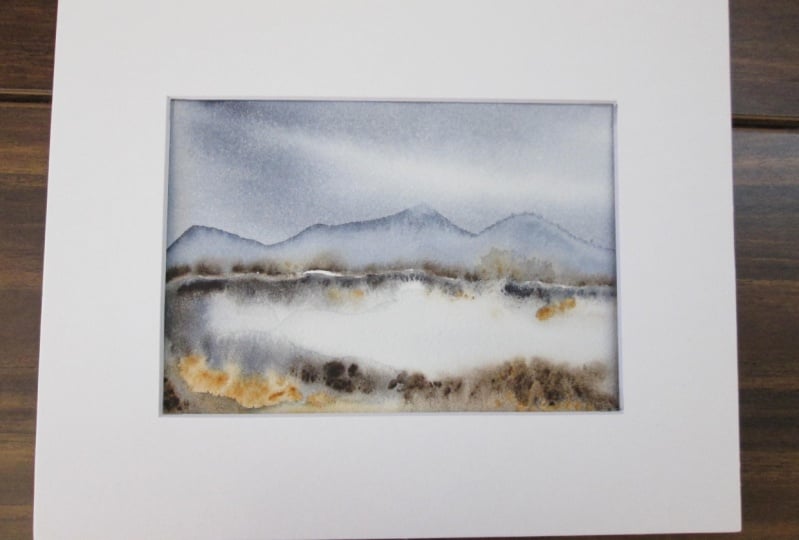
mountain landscape workout once it completely dried? I'm quite pleased with mine. Mountains probably a little
touch washed out here, but it could be a misty day. You know, I can see um you know, this could be some mists
sitting on there on the banks, and bizarrely, I seem to have got myself a snowcap
mountain there. But I think this is a
joy them 'cause you let them dry and you're
like, Oh, I see that. Oh, that's I just conjures up something
in your imagination. And actually, my drop of water accidentally fell off my brush hasn't
really done anything. I thought that was
going to create something quite unusual. But yeah, I quite like the
colour and the light there. So I hope you're pleased
with your little piece.
6. Church View Part One: Right. Let's pop that little
mount on a piece of paper, and we're just going to
go inside just to give us that little window
to paint within. G keep your petal marks
lovely and light. And put that little
horizon line in there somewhere about a
quarter way down two way down. Just about there. Right. I
put the pencil to one side. I have got that little
mounting board underneath. It just helps my
very flimsy piece of paper to give a little bit of support so it
doesn't buckle so much. Right. Big brush. We're gonna wet down the
entire little square. And wet outside
this box, as well. So nice and wet, nice and
gentle. No scrubbing. Keep it lovely and
light and make sure you don't have
any dry patches. Want this to be lovely and wet. Beautiful. Okay, I'm gonna pop this on a little tilt to start with before
you even start, so it's under there. Lovely. Gonna pop that down. Let's get that out of
the way for a minute. I don't really need it. And I've got my side ten brush, and we're just going
to do the sky first. So I'm picking up my
indigo and the orange. So I'm gonna have the indigo at the top and the
orange at the bottom. So I'm gonna tap outside that box and make sure
you go outside it. If you don't want to be left
with sort of tappy marks, you'll see what I
mean in a minute. So make sure you
just tap outside. Good amount, 'cause it's got to go all the way down
here in a minute. Don't worry it's gonna flow, so don't worry about that it. Clean your brush, and then we're going to go back in
with the orange. Same thing, next to it. Give it a good old tap. Say, the orange has got to go
a little way down as well, so be fairly bold. Okay, I'm going to give
this a good old tilt now, and I'm going to add some water. So I'm adding water
again outside that box, and I'm allowing it all to run. Keep tapping. Even be careful. You can
add water in the middle, but be careful you don't
tap and leave marks, that's the risk or
add too much paint. It can get sort of spotty then. And you can then, if it's
not running very much, either add more water here, where we started from or you can wet a little bit further down, and just this then gives the paint a bit
more room to move into. If I can lay it flat again, I might add just a tiny
little bit of orange. I know, Risky. Just a little it up there
and allow that to run. These are quite scary. I must admit these have got me
out of my comfort zone, but I have loved doing them. It's the I never know
what I'm gonna get kind of thing. Scary, but fun. So take it as a light
hearted, scary, but fun little exercise, and you will I think
you'll love what you get. So I've always just
put a little bit indigo there. Hope you saw that. And give him a little
bit of, you know, if it's looking a little
bit, not doing much. You can give you tilt
it on different angles. I think I'm going to
allow that to sit, and I'm also going to put
a little bit of salt. I'm gonna sprinkle that. No idea where anywhere
you want. Doesn't matter. Vab, and just leave it. And we need to move on fairly
swiftly to the ground. Indigo again, I'm going
to have the orange. Same thing again. Let's do. Let's do the indigo first, and then pop up a
little bit of orange on top.'s have a little
bit in to go down here. I have a touch of sepew
in here, as well. Again, same thing.
Just go to tilt. Tilt and add some water. Don't worry that blooms up into the sky.
Honestly, don't worry. Just keep adding water to here. Let's have a have a little
bit more orange here. Go if you got instinct. If he hasn't got enough,
add a little bit more. If you put a big sort of
a load of water there. It's only water. There's
no paint on there. And just keep adding that, that'll give you a real streak. Give it nice. That'll be a lovely sense of
light once that dries. So just add a load
of water there. Again, you can do the same
that we did for the sky. You can wet further down outside that box and encourage
that to run a bit more. I need a little bit more. It's getting a little
bit washed out. Let's do the indigo
and the orange again. And the outside. And then, again, let's sa and water. It's still wet here,
and I know I can sort of carry on playing
with a little bit. How's it looking? Sometimes you just
need to stop for a minute and have a little look. Let's put a little bit.
Let's put a bit more to go there. A little
bit more up there. If you've got something that you like and I'm still fiddling, then let yours be. Have the courage to go. No, I like that.
She's still fiddling, but I'm gonna leave mine.
I like what I've got. So yeah, have the
courage and put a bit more water there. Right. I'm gonna allow that just to sit still a little
bit rested on it. So it's still carrying
on a bit of a tilt. But I'm going to put a
little horizon line here, and it needs to be damp still. So I'm just having
a little look. This is probably ready because
I've had it on a tilt, so this is going to be dry.
So I'm gonna start it. It needs to be at that
lovely point where everything just
blend very softly. You don't want it
running. I'm just going to put a bit
more salt in this guy. I don't know if he's
washed off or fallen away. I just put a bit
more salt there. Yeah, that's probably
better. Right, I'm going to have a go and
start on that horizon. I've got my little brush
it was off camera. I'm going to use the
Sepia, remember, the SP is a nice sticky color, but I will use a little
bit of indigo, as well, but I'm going to
start with the Sepia because that doesn't
move too much, and it should give me
a nice soft blend. Yes, just about right.
Now, be careful. You haven't got water sitting on top of your tube if you're
working out of tubes, or if you're in pans, make sure you get a good consistency. This needs to be quite sticky. Go working on the horizon,
really, just tapping. And again, take your bush
away, have a little look. I can always put a little
bit of gold there if I want. I just want these the
little fluffy hedge line, tree line. That's
all I want to do. Say, if it's moving a
little bit too quick, you're like, Oh, no,
it's going too far, give it, eh sometimes it's just 30 seconds.
It might be enough. This is still quite wet, so
I'm gonna hang on a minute. And a little bit more sepioh
if I can slow that down. And just let this blend
and bleed and form. You can't try and stop it. Well, you can, but it won't
I won't give you anything. Nice. It will just look like you put your brush in and
tried to pull it down. So you've just got to put
it down and allow and remember that it dries lighter and it will dry differently than you're
looking at it now. So part of the fun. Let's see how we're
doing down here. Yeah, not bad, actually. That's pop a little
bit of indigo. And sepia Take the brush away. You know what I'm gonna
say? See what you think. I think because I got
this on a slight tilt, you can almost see. Yes, you kind of got a little
bit of wind going on there. It's just pushing over
because it's on a tilt. When I was planning
these classes, there were so many landscapes I kept seeing and thinking,
Oh, I must do that. I want to do that
one. How about that? How if I capture that. And
it really kind of ignites your sense of intrigue
in some ways, and how you can manipulate watercolor and how you can
do different things with it. I know I love my animals, and it always will be
my animals I love, but these are these are
fun, if a little scary. I go to do something
really really risky. I'm going to put a little
bit of water here. It's gonna give me
quite an obvious line, but I want to see if I can
get a real streak here. So I'm just again,
I'm tapping outside. You might have wanted to
do this, so you might want to just watch and
see what I've done, and you might go, I'm
glad I didn't do that. That didn't go
very well for her. Look at that. So I get lost in them. Just put. The minute you see
something you like, it's doing something
interesting, then always put it down. Got a little bit of
salt here, haven't I? I see crystal salt. That's ideal there, but I'm
sure I can get that out very, I think I'm gonna
make that worse. Right, I'm just gonna allow
that to dry, I think. I don't think I
can do a lot else. Well, I'll tell you what
I will do, actually. It's quite a little bit flat. I might see if I can raise
this up a little bit. Give a little bit more
forgot a little bit of sepia and the gold. See if I can get that
to that's better. I was looking a little bit bit something of
nothing, as they say. Right, as ever, there's
always going to be a fiddling point where you're not going
to improve things. So I think I'm probably there, but I am going to
allow that to dry on, on that tilt there, it's probably about an
inch high. I might. As I watch it, I might give
it a little bit more of a the tilt so I quite like
that salt to do something. I'm not sure if it's looking like it's going to do I
don't get any very exciting, but I've got some other
pieces I can show you that where the salt worked
a little bit better. Yeah, I think that might
be quite interesting. But obviously, be aware if you put that on the tilt
for the sky and the ground, you're obviously going to affect how these trees are
forming as well. So I might take my own advice. I might just drop that down again, just to that inch high. Yeah, and just go to
allow that to dry. But, you know, where far as
hair dryers are concerned, um, be careful not to do it too soon and
dry these too soon. A hair dryer has seemed to have more effect on these landscapes
than on the animals. So I would have probably I might have even started hair drying
this if it was an animal, but these need to dry almost
completely on their own. So you're just using it
just to finish it off and you touch the paper and
it just feels a bit cool. That's probably the good time to put the hair dry over it. Other than I would just allow it to dry on its own sweet time.
7. Church View Part Two: But so how's yours
looked now that it's completely dry?
Quite like mine. Little washed out, maybe, I'm probably not quite as bold
when I'm doing the teaching, trying to talking
and adding colors. Right, I'm going to
rub that salt out, but, again with the salt, make sure it's nice and dry. But it's definitely
give me a little subtle subtle um clouds. Very, very wispy. I will show you. Well, this
is the other little piece. Practice beet. You
can see the sky's got a little bit more dramatic. We put amount round
it. It's always nicer. These are always so much
better with a little mount. Um, so it depends a little bit. Now, where you want
to go with this. I'm going to try and
put a little church. Buildings aren't
my strong point. I'm going to confess now, but I will endeavor to do
a little church in there. Again, if you want to you
could do any buildings, it could be your home in there. It could be your favorite
barn that you see on a walk. And the foreground, again, you might like that. You
may not like it. I will put it in because then you can kind of see
what it looks like, but if you've got a piece
that you're pleased with that doesn't have
the foreground in it. Let me pop a little amount
around that cause it always looks better with amount. So even that's very soft. It's very subtle. It's
very mindful, isn't it? Very zen. From a distance, I think that would look she said from a distance,
something sarcastic, my husband would say, it's
very soft and quite pretty. But I would say,
I will add to it. Let me take that away
and we pop that flat. I will show you some little
tinkers that would even just improve if you want to leave
it at that that would help. So with your little brush, you can take little little
tiny bits of colour out, just to give you a little line. Don't want to go all way along. It's just a tiny touch
touch touch of color out. I would just probably
take it out with a brush rather
than kitchen roll. I'd give it again a little
squidg of your finger. Again, it applies to this side. Obviously, it
depends on how your paint's formed and
how it's looking. Always choose your part where you'd like to
take some color out. Reckon I've got quite
a lot of paint here. But you can see even
just taking that out gives a little bit for the eye to see that
little chink of light. And that baby, all
you want to do, you could put some
little birds in. Uh, let me find a pencil 'cause I'm not gonna be brave enough to do it
with a paintbrush, but but they're quite good doing it with
a little pencil 'cause you can kind
of rub them out. But yeah, just little Ms.
Just something like that. Um, you just got a little
few little birds in the sky. So you could choose
to do that and then just leave it like that. So you've got, I say, quite a
very gentle, restful piece. But let's let me try and ruin it completely by putting
her little church in it. Why? A little piece to look at, see if I can I can
kind of create that. So I'm trying to see where
I'd put my little church. Let me pop it up here. I'm gonna hide it right
behind the back of the trees. So I've got a little
bit of sepia. Let's start with this deep. I'm gonna go out for
the top of the roof. Gonna whip it down. Come down. It may be all I need. You can get a little
bit carried away. We're trying to make the detail. But from a distance, you
would probably just see, a little bit of steeple,
just an idea of the roof. Take a little bit of
light out in a minute. How's that look? Or
does it look like a ship that's just sunk
into the tree line? I get it. Yeah, that's not too bad. For me in buildings. I'm gonna take a little bit of light out just so it
looks like there's light hitting that one
side of this depot. Little door there. Visible. Okay, I'm going to
leave it there, 'cause it's probably as
good as I'm going to get, especially I'm trying
to teach it, as well. So you get the general idea. So the little foreground again, this would be up to you whether you want to
do the foreground, but I'm going to just wet. An area. Gonna dip it down. Again, you can let's do it to
a little more to one size, so the dips not
right in the middle. I hope you can see that. So it's kind of dipping
up here, coming up here. And then, again, just
outside that box. It's really important
to say outside that box you can see where those little marks are where
we've added the paint. So let's let's keep it
a little bit softer. I'm gonna use the sepia
and the craacrodme, those two colors for
the time being and just dab them at the bottom. Probably left the
dry patch there. You can see that quite clearly,
can't you fill that in. What Or just take your brush away. I have a look. Let's pick up the indigo saying I wasn't
gonna use Indigo. I have a little bit of
indigo in there, though. I can do some sort of flicks off here, little bits of grass. Bit more strength
there. Again, I can do the tilty bit, if I want. Let's put those down why spill the paint to
cost my painting. Give it a little swirl around careful swirling too
much because it can all just end up being,
you just mix it up. Yeah, that's quite
nice, isn't it? Again, you can what
we were doing doing a few let's go to my little brush, and do a few little glassy bits. You can have your finger. You can kind of do
some squidgy bits. Kinda get a sense of sort of, you know, I gonna say shrubs. Shrubs one word, isn't it? Bush. I should know, shouldn't? Of course, it could be
all sorts of things. And again, it's put cse down, you've got the kitchen roll. Again, you can just give that a little you want to lose that
a little bit just gently. You don't want to sort
of take any color out. Well, you don't want to,
you know, lose too much. Leave too much of a
line, I'm trying to say. I think that looks alright.
Again, fingernails great. I love a fingernail. Do sort of scratchy marks there. I think I'm going to
leave it at that. I just want to try and avoid
that water line that's gonna warm if I'm not careful, so as that dries, I'm just
gonna keep an eye on that. Yeah, I think that
looks quite sweet. I'm just going to wit rid of those little blobers of paint. I think that's
right. It's not bad. As you can do. I'm pondering,
completely ruin it, but you can a little bit
of colour from here. Just do a little bit of a
sweep across here at work. A little just a bit of texture. Right. I think I need to stop. I can see I'm going to ruin it, but as that dries, I'll just say I want
to try and stop that line being too defined. So just as it dries, I'm just going to keep
an eye on that and just take that little bit
of water line out. But, yeah, I just need to
allow it to dry, really. So, how's yours looked
now that it's drying? Let me put my little
mount round mine. Yeah, I think
that's quite sweet. I am tempted in the spirit
of adventure and all that, to put the tiniest little
hill line in the background. Shall I do it? Let's do it. Let's just go for it. So
with a little bit of indigo, I seem to have lost my bit of kitchen oil, a very damp piece. A really small bot of indigo. I might even use just
the color that sat around the rim and
really gently. I'm nervous to do
it, no. Um, just put a little mountain line mountains probably just a little
hill line, isn't it? Yeah, not do any more than that. I disguise my church
behind the hill. Yeah. That looks okay. Put a little mount around that. Again, Yeah, you can see how
that's built up, can't you? Um, you may have just left it
that really lovely, simple, sort of calm little
landscape we had, or you might have done what I've done and added to
it, but they're fun. So yeah, I hope you
enjoyed this little one. Yeah, I'm quite
pleased with that now quite a lot of
my little birds.
8. Lakeside Trees Part One: Right. Let's pop this. It'll mount down again
so we can draw inside. Same rules apply,
nice and light. So I'm almost letting my
pencil just fall on the paper. And I will put that
little horizon line in. Same sort of place
again. Such as there. Lovely. Pop that to one side. I can get rid of my pencil, and we're just going to
wet this top section down. So back to my nice big
brush again, write it down. And again, I'm going
to start along that horizon line just so I can make sure it's nice and crisp. And then back fill it. Again, same thing. You want
to wet outside that box. Good inch. And then make sure
it's all nice and wet. It's just the way my
lights falling here. I can see it really clearly,
but quite often, you can't, so just duck your head
up and down if you can't and make sure it's nice. And Whit. Lovely. Put that one down. I'm going to just use the
radone gold and the sepia. I have my little
smaller brush again. And I'm going to make it
a little heavier kind of on the left hand
side, it's hail off. So let's put those colors
on at the same time. I'm simply going
to place it along that horizon line and
hope the magic works. I just want it just
gently spread. It's gonna give me that
tree line at the back. We've got silver
birches here in the UK. And at certain
times of year, they just get this sort
of haze of color. That's kind of what
I'm envisaging. I might have one a
little heavier here. It doesn't matter too much. All right. Always with his landscape, more than ever, it
is not to fiddle. But what I'm going
to do is just to give it a little bit of a tilt. I've got that you
see slide a board underneath just to help
my very thin paper. Um, stop it buckling. Okay, it's not moving
a huge amount, so what I'm going to
do, actually going to pop some little
bits of water in here. One that will create, give me some movement, and two, it actually create
some hopefully, little stems or trunks
of silver birch. So goes the theory.
So I can whiz it up. I can also obviously tilt it the other way, let that
run back down. Just until I get
something I like, really. The thing is just not to interfere with the
brush too much, really? It's just to give
it a little tilt. Let gravity and the paint, all that lovely granulation to create you something lovely. And obviously, the
texture of the paper will give you
something if you tilt. I'm quite liking what
I've got there, I think. So I'm gonna pop that down. Yeah, just having
a little look from a distance. Oh, I
think that's okay. Um, now it's just
got to dry, really. Same thing. Just allow it
to dry at its own time. Pop a hair dryer once
it begins to go off, and then we can do
the next little bit.
9. Lakeside Trees Part Two: So once that's dry, we're
going to just very, very lightly sketching
these trees. So they go. Again, it's just my imagination, so there's no no
reference photo. Sorry. So you may have a scene that you particularly like like, Oh, I'd
like to capture those. Actually, they would be
really lovely those trees. So do those. But I'm going to do these
kind of three here. Coming down here and I've got
another one that comes in, kind of crosses across this one. Probably behind. That's not
a very good behind bit, is it? Let's get rid of it. I'm losing myself now. It comes into somewhere here, doesn't it not that's better. And then, again, that bank. I'm gonna whizzle
it right out here. Hopefully you can kind
of make that out. Now, what we do need
to do, obviously, we've got the horizon sitting in the monks the
middle of the trees, so I need to kind
of just get rid of that as much as I
can, just to soften it. What is very tricky to try and do this
horizon line and get that lovely gentle
sort of wash. Um, without going all the way along, if I was just wet it up to
here and then just allow, on that first layer, just
allow the paint to run, obviously, we wouldn't
get any here. So it's just easier to actually take the horizon
line out afterwards. At least that's what I found. Give me a good old scrub. Hopefully you haven't
got anything too, um, prominent there. Obviously, you know, we will
be painting these trees, so as long as we make them
with a little bit of strength, that will be absolutely
fine, hopefully. Well, I'm going to do
two back ones first. And I just simply gonna
follow my pencil mark. I'm gonna do both of
them at the same time. It doesn't matter if they
run into one another. It's that little dip
top up there, isn't it? Run it into just run it to
the bottom at the moment. Okay, play rules, ly and wet,
and I'm going to pick up. So I'm gonna have all three painting my hand at the
same time. Why not? Suck that one up. How do I get through a
class without finding a dog hair somewhere attached
to something? I can see it. Oh, that's it. Alright. I'm simply boldly going to had all three colors on
my brush at the same time. I'm just going to whizz that
down that right hand edge. Ideally, I probably wanted a
little bit more of the blue 'cause it's furthest away
somehow in my mind, anyway. It's a little bit cooler sitting right at
the back, isn't it? Come right down a little bit more sepier I
think now for me. We have some little
nobbles coming out. I was quite fun. Do
some little branches. Gain if you've
done simple trees, very similar. Very similar. Gain coming to the
next one along. I think that one ended up,
it's not bad actually. They'll say a little bit orange, so I'll go a little mix up just to have the
indigo and sepia, but actually, I quite like quite like the little bit of orange
in there as well. So there's a bit of
orange in there. Make sure you go right up
against that front tree. I get the top. Looks like it. It looks like it's
dried there. Maybe I didn't actually wet it
down. I can't remember now. I can pull off off the top. I can do the same with
this, just to draw some of that color up because in theory, this will be outside our
mount at this stage. And the minute as ever, the minute you get something
that looks nice, then stop. Again, it's so easy to
overfiddle these. Okay. Okay, and then we're
going to with the bank, run this down as well. Allow that color from
those trunks to run down. I'll probably end
up with two layers, so don't worry about putting color down here at the moment. Just allow the color
from those trunks to run down into the ground. Again, just have a little look. While that's still
wet, you can add a little bit more if you
want at any stage, but just like I say, be careful because it's so easy to over fiddle and you lose that lovely sense of kind
of spontaneity and magic, which comes from just putting that paint down and leaving it. But it's um be hard, can't it? 'Cause you just want
to fiddle a little bit more 'cause that's
what we want to do. Right. Let's leave
that for a minute. It just needs to dry, if I'm honest, to do
that back one, sorry, the front one we obviously
do the front one now, that's gonna merge,
and it's quite nice we make that
quite distinctive. That's in front of
these two behind. So again, just
allow that to dry.
10. Lakeside Trees Part Three: Okay, doke. Once those
two back trees are dry, we're going to wet the one. Gonna use my big brush again. Gonna wet. You can touch this trunk that's coming behind
to make sure you don't leave any white
lines. You don't want them. You don't want to have a
little dry line to touch that. And if it gently blends or bleeds from the
other trunk, don't worry. And then we're going to come
to the bottom here again. Alright, let's get
rid of that one. Just hold too much water. It's lovely for
wetting stuff down, but a little too extravagant
with the water it holds. Okay, three bushes, three painting my hand
at the same time. And again, just gonna touch. I've got a bit of orange here, so I don't really
want to put too much orange on that little
segment there. So I might go a little
bit spree here. Way down. You can kind of squiset some of
it to the front. But, I say, just
take your hand away. Oh, bosh, hand,
have a little look. Always, the minute you've
got something you like, then leave it. It's nice to have quite
a nice little lump of light on the front
of this one because I'm visualizing sort of kind of peering
through some trees, and I can see the light
hitting this front one. So if you got that I'm quite pleased with how
that light sitting there. Obviously, some of this
paint can creep forward, as well, so I think I'm
going to leave it at that. And then we're going
to wet pop those down for a second. I'm
going to wit that ground. Now, if you can hold
your brush right at the right on the
sort of side here, you can see there's a
little white patch there, where it's you
know, obviously was a dry piece of paper
there. So it's quite nice. It gives a little bit more
texture and interest. If I do this, and obviously
you can't plan it. You can't plan where those little dry patches
are gonna end up, but give it a little with scrub, and hopefully you'll
end up with something. It's always a way, isn't it
when you don't want them? You'll find them, and
when you do want them, you find you haven't
left with any. Right. Did a little
bit more paint. Let's, uh, strengthen
that back area up. I'm a little bit
cool to colours and want to put the orange there. You got a dry patch there,
'cause that's not moving. Let's move. Now I can do some
flick and some grass. It's coming up. Switching my little smaller
buses getting too chunky. Again, all these little bits, if you don't like
fancy little bits of grass and obviously
don't put them in, it's up to you. And we'll put some
salt here, as well, so I actually might
put a little bit of colour here just so the
salt can actually work. A little bit of swap of
bushes, that's too small. Put a little bit of
orange down here. Top. I can sweep that out. Right. He's put that soap down
before that dries. Ooh by not. I can see. Oops. What I haven't done. I've penciled this marking
here, haven't I for the trunk? No, I haven't. As you
know, paint's got there. It's a tiny bit of sepia there. That can look a
little od otherwise. A tiny bit of grass
here as well. I can visualize a little
animal standing here. I'm not going to, and I'm
sure some of you might, but I can I don't
know if you've done the bunny class that
I did one Easter. It was not dissimilar to the big trunks when we
put some rabbits there, so I can see that see a
little animal staring out. Alright, let's put
that salt in there. Almost left it a
little bit too late. I see it's beginning to dry. So Cop it down anyway. Lovely. Just a quick
access. You see this. I've left a little bit of a B you haven't got this
quite high enough, well that's still
a little bit damp. And I think any sort of water marks on the ground or anything little bit like
this is absolutely fine. So you can kind of
get away with moving things around a touch. Just a tiny bit. Gone a little bit. Blue.
Let's have let's round. This will probably
make you laugh. So I did. This is the
second go at this. And when I showed
Ben my husband and your lovely editor that
edits all the videoing, you look at the
first one and it's like, Oh, I'm not
sure about that. And sort of chatted over. He said, I think I can
do better than that. So you nearly had You Nearly had him demonstrating
this class at one point. Right. I think that's looking
quite pretty, actually. Again, I've just got
to let that dry. I'm not gonna put any
bowels out. You can do. I did on a couple of my practice pieces.
I just wasn't sure. I've got a few
little twigs there, or bowels, shall I say. So, again, it's something
you could put in, but I'm not going to. So, just let that dry.
11. Lakeside Trees Part Four: Okay, so once nice and dry, I'm just going to leave the salt on there
for a little bit longer in case it's a little
damp underneath there. I think I'll put
that on probably about a minute two later. You can see it's gone
a little spotty, but never mind.
Right. Big brush. And we're going to just create a little bit of
sense of water here. Need to go inside here
a little bit fiddly. And see out that side, as well. Very light. I'm just gonna
put this tiniest amount, just a tiny, tiny, tiny bit of orange. One of my lovely
practice pieces, I think I must have dropped a bobble of water
right at the end. It just created this
lovely watermark. You know, some things are
like, Oh, that was so lovely. It's so hard to recreate
these sort of things. That's a little bit too much. This is using that big
brush I put that away. I remember a bit just a
tiny, tiny little bits. So gate up, same ink in you can drag some of that out.
You can give it a tilt. Put just a tiny, tiny, little bit of colour right underneath
this horizon line. Just a diddly bit, just to give a little bit
of something there. Maybe impression of
some shadows falling. Put a little bit
of indigo there. Go take brush away. I
have a little peek. Yeah, I think looking right. Let's see if I can create
this watermark. Probably not. I think it was a big drop
fell on that practice piece. Yeah, I think that's
okay, though. Right. Now, in theory, you could almost leave it there. Let me find that little mount. So you can see a very small, sort of restful piece. I think we're going to put well, we're going to put pop a
canopy up there as well. But again, all these stages, the landscapes, you could go, I really like
what I've got here. I'm not sure if I want to
make that any more fussy. I like the simplicity of it. So yeah, you can always leave
it as you at any point, do you think I've done enough? Right, I'm just going to
pop a few little idea and twisted trees
in the back here. Today I'm just using the color that's on that
bottom of that horizon line. Wiggle them up. Not gonna
do too much detail. It's just impression there's probably
something back there. Probably enough, actually. And you can put some
on the other side, so we're not missing out again. Same thing. Once you take your brush away and you're
like, Oh, no, it's enough. 'Cause you can definitely
overdo these things. Yeah, that looks okay.
Right. Well, we'll do that canopy because why not? But like I say, if you're happy at this stage and
you like what you've got, then or see just leave it, but we are going to wet down. A good old chunk.
Doesn't matter too much. We're gonna go over the
top of these, as well. Really gently. And then
we're going to add. We'll keep holding this big
brush actually for a minute 'cause stop things
looking a bit spotty. Let's have the three colors. I want to work sort
of further up because I want it to almost
disappear down here. So we're just adding adding
a little bit of the orange, kind of visualizing a little
more autumy so you've got the autumn leaves coming
in there, changing color. Bit of blue at times. Mix with the orange.
Give a look green. That's probably got enough
water going on there, and let's swap brushes again. A bit orange there. As I just keep assessing
what you've got. I'm gonna sweep this
down in a minute. I'm gonna wet that little
edge and draw it down. But let's make sure
we got enough color up here in the first place. And I will put some salt
here, so I have to make sure I get that salt
in at the right time. Now, I did ponder, again,
like the other class, putting some cling film in here, so you could, you know,
experiment with that idea. I won't because it just takes
quite a long time to dry. It's another way of creating
some nice interest. Alright, let's swap
brush it again. As long as that's
clean. I'm just gonna pour some of this down. Really gently. Pull it right the way down
those tree lines. That should soften
those lines as well, they flow a little hard. That should just
gently blend down. Again, you can always give it a tiny little tilt
to be careful. I've got a lot of water
sitting here, haven't I? Um, careful it doesn't
weeds too much. That should. As it
gently move down, you may find you need a
little bit more colour, so I should make sure I've
got a bit of dry patch there. We need to pull these
down in between. Is a good lot. Yeah, that's looking quite fun. Just had a tiny little
bit more colour. It's always knowing when to
stop with these, isn't it? Just go over that orange to
stop those little spots. It's very spotty paint. If you're finding
the same thing, it's nothing to do with you or your paper or how
you're applying it, it's just that
character that paint. Well, I think I'm
probably there, actually. It's going to get a little bit overworked if I'm not careful. We'll just pull this out.
So when I whip that paper, I'm encourage some of that
to kind of move the top. Here, make sure I outside
that mount, as well. As you pop bit of strength
over the top of that. Front tree looks like some of the foliage is over the top. Spotty, isn't it? Put some salt over the top. Right. Let's stop fiddling. And I'm just gonna
say, I'm gonna pop some little bit of
salt. Oh over the top. I think I've managed drop
some water in my salt pot. It's very sticky. Bab. Right. The only other
thing I want to do. I just think if that's dry, probably just about Oh, yeah,
that's just about right. I just want to put a little
bit of, um, just, like, a little line little idea that there's kind of a
ripple of water or something and draw some of those that shadowy line from
those back trees as well. So I've just got a little bit of the indigo and the
anacodme on my brush. Gonna say as randomly
as you can, as I can. A nice sweep. Yeah. And then I'm going
to just draw down that line where where we put those trees in the background, just
pull some of them down. You don't want to
go all the way, make it too kind of
regimented and then just brush your your
paintbrush over the top, so it looks like
the water's sort of given it a little
bit of a wiggle. You've just got an impression. Touch on the heavier side. I think every piece I've done practice these a few times.
And there's always elements. So elements are obviously are better in this one
than the other one. It's tying together, isn't it? Stop on those edges
a little bit. Gone up against the My
watermark didn't work either. My lovely watermark that I
managed to create last time. Right, I think that is as
much as I can do without it, Ln begin to overfddled. Um, I need to leave
it put my brush down. I'm just gonna allow that to dry and see how that salt
has worked, as well. So how is yours dried? I have to confess
I had there was quite harsh indigo line there. I have to soften that while
I was letting it dry. But, yeah, I just took
the colour out and popped a tiny bit of orange in there and sort
of swizzled it around, probably starting to overfiddle. It's looking a little
bit overworked. But let me let's take some of that salt out
make sure it's nice and dry. It seems to be really
nice patterning. Lease that over to one side. I have. Right, any other thing
we didn't do, actually, which could have been handier to have done a
little bit sooner, don't rub any pencil marks out, but they can done
now, just go gentle. If you've got some lovely
patterning, go very gently. There's not many other
pieces are there. A little bit down
here, probably. I don't think you can any he I can't see my horizon lines. No, I think that's it. Let's pop a little
mount over it. Yeah, I think
that's quite sweet. As I say, it's
always worth popping a mount over your finished
piece because like I said, the other ones, you've
got quite a lot of messiness outside of it. Once you put a
little mount round, you quite often go, Oh, actually, quite like that. That's really nice.
So yes, I'm pleased. And I hope you are too.
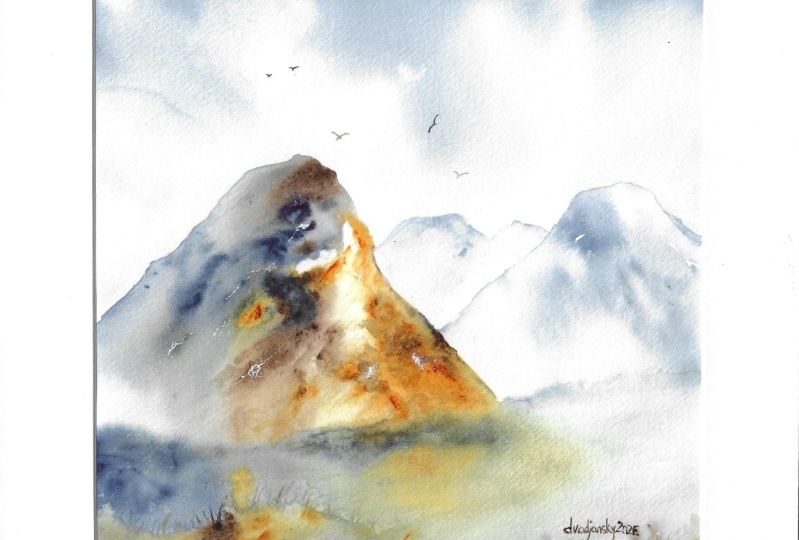
12. Mountain Top Part One: Alright, so again,
weird little amount, we are just going
to pencil inside. Gain? Same thing. Keep your pencil
marks nice and light. Alla. And we're
just gonna put very gently put that mountain line in somewhere,
somewhere like that. Don't overthink this
shape too much. I just come in
somewhere like that. And then there's
gonna be a back one behind it, something like that. Yeah, I think that
looks alright. Right, and we're going to then wet This sky so nice and wet, and we're gonna go round
the mountain line. And then we're going to
back fill it nice and soft to try not to scrub make sure you haven't
got any dry patches, so you just just bobble
your head up and down. You'll be able to see if you've
got anything that's dry. Make sure make sure it's
lovely and wet inside. And you've gone outside that
penciled mark, as well. I see a good inch because
when we apply the paint, we don't want little blobs. In your sky, 'cause they will give you some
rather nasty marks. Now, fairly quickly,
'cause you want this nice and wet and we want
this indigo to be moving. So don't hang around
at this stage. Pick up your indigo and
go outside the box, make sure you go outside it. And we're going to add the color right along those corners. It should be moving inward. And if it's not, add a
little bit more water, but Okay, I think
I've got enough. Be fairly generous. And then brush, put it one side, and
then again very quickly. I'm gonna give it a
little swizzle around. Don't worry if you
get a run like that. It's better to get these
clouds nice and soft after a nice sort of sense of light in the middle when it's the
clouds are moving in. Now, you can give it
a little little blow. I've got a straw 'cause you'll want to
see my head appearing, but I hope you get the gist. You can sort of blow
those crowds around. I won't do any more
I probably still got my head in the camera shot. So yeah, if it runs off
like that, don't worry. Or if you find you're
getting a little run, which I think you can see just wet a little
bit further down. You can see how that
draws that paint down. Equally, if it's
moving in too much, you can then come out
and wet out the box. That will encourage
the paint out. Careful you don't
have too much water. You put too much water in here, almost see that started to run, it can run back in and
leave you funny marks. Okay, just keep swizzlingO the minute you got
something you like, leave it, put it down
and allow it to dry. Don't add any paint or any
extra water at this stage. Just keep swizzling.
It's better. If I'm honest,
probably like I've mentioned some of
the other classes. If it hasn't worked,
it's better just to honestly pick up your piece
of paper and start again. That's why I quite like
having unstretched paper. It just feels a little
bit. That one didn't work. I'm just going to go again. So it's better to that.
You won't be able to rescue this if it's gone a little bit press by adding
more paint and things. Right. I think you can
kind of get the gist. I don't know how
yours is obviously looking, but keep an eye on it. Use the, you know, being able to blow that pigment's
quite a useful thing, and then just allow it to dry.
13. Mountain Top Part Two: Okay, I hope you've got
something pleasing, and you can always
put your little mouth around it just to go. Oh, yeah, not quite like
what I got. That's right. So, you know, if you're
then not happy with it, you have the option off to start again and do another sky. Or if you've done a multiples, just pop the mount over it
and choose your favorite. Right, we are now going to
wet a little section down, so we're gonna wet the
top of the mountain. Down. Is a little part here. I'm gonna come actually
gonna use that where that line of water ran from I'm just gonna use
that as a sort of a guide, but just that sort of top
section, so it's coming round. Don't worry too much Where Nice. It doesn't matter. Awfully. It's all all a mountain. It's rubble and
snow and having to do animals and eyes and get
things in the right shape, so it can be left a little
bit to your imagination. So I've got sepia and, uh, the indigo, and I'm going
to start at the very top. Now, I want to try and get this 'cause the snow snows going to be
on the cooler side, and actually the
rocks are going to be on the warmer side,
if that makes sense, 'cause the sun in
theory will have warmed things and
got back to rocks. So I'm wondering if this is
going to be the snowier side, I think, and this is
gonna be the warmer side. So I'm just gonna add a nice
bit of strength coming down here. Being a little
bit warmer here. I'll obviously pick
up the quinacidme. Cold, probably a
little bit down there. Let whatever happens happen. Get a cooler colour there, 'cause in theory, like I said, wanted that to be a
little bit cooler. Now, gonna put a
little bit more paint here. I'm gonna now? S gonna use my bigger
bush pick that up. And I'm going to very, fairly quickly sweep this down. Gonna gonna leave that little
bit there for a minute. Now, if you get any dry patches, I think that's all
part of the charm, so you don't have to go all the way up and fill all these
little bits up equally. As you draw down, you can
leave little dry patches. Any scraps scrapes with a dry brush, it's
quite fun, as well. I think you're fine.
You'll do this a few times I know when I've
been practicing this, this was my favorite
in some ways because everyone created
something different, and the less I fiddled,
the better it was, as with everything
with watercolor. Right, a little bit of
gold at the top here. I'm gonna give it
a little swizzle this way, a bit of water there. I'm gonna allow that to run. And water droplets are
great for creating sort of sort of snow effects
and any water marks that happen are quite fun
'cause they do help create that sort of feeling of snow. Now, I might leave
that there, actually. That's formed quite nicely, but I'm just gonna
with my little brush, gonna put a tiny little
bit more oof up here. Sepia and so like
genuine. No, so like Gen? Indigo. Be careful not to fiddle. Just give that a little
bit of wind rustle. Again, always just take your brush away,
have a little look. How does it look?
Pop up a little bit. I have Sepia just there
along with gold on top. Just a little bit sepia there, just give that idea this rock sort of
falling off that edge. Okay. Dutch or gold here, a little bit of a tilt for it. I've gone quiet. It's a
concentration, isn't it? H. I'm gonna leave it there, 'cause I quite like
what's happening. I'm also going to put
a little bit of salt. Uh, let's have a little
bit of salt along here. So I've salted quite a lot. So I haven't done as much salt. It depends how it's
sort of formed, really. Also, if you're wanting
to have different ideas, cling film might be quite fun, especially if you did
this a little bit bigger. Trouble with Kling
film is unless you can really
scrunch that tiny, it leaves quite in theory,
big bolder effect. But I think if you
were to upscale this, a little bit of Kling
film would be fun. Right, I'm going to
allow that to simply dry and try my best as it
dries, not to fiddle.
14. Mountain Top Part Three: Well, how is yours
dried? Do you like? I quite like mine. I think
it's worked out okay. Lost a bit of color here. So what I am going
to try and do? Hopefully without ruining it, because I quite like the
simplicity of it at the moment. I'm gonna put a tiny little bit of gold there. Lema brush. Touch the edge of it. I'm
just gonna see if I can just do a little bit of almost, it's dry
bashing, isn't it? Is it a little bit
of cooling down. Take my brush away, have a little ponder, tiny
bit of sepia and do the same. So brush is it's dry. Oh, damp. Yeah, I think that's just helped that little edge is
almost a little too lost. So what we need to do
is that back mountain. So we're going to wet it down. I'm going to be a little bit
cautious because obviously, my edge is wet, but yours shouldn't be. So I'm just gonna
leave this tiny line, but you go right up
to the edge of this, the main mountain
we've just painted. And we're going to put
the merest of colors. Even just wetting it down would
probably give you enough, especially if you like me, you ended up sort of
drawing your clouds down there's probably some color there already like mine has. But I'm going to
put just a tiny bit on the right hand side. Tiny, tiny bit. Doesn't
need to be a lot. I think I'm gonna
leave it at that. I go see I'll left a
little dry patch there. Yeah, I'm just gonna just
gonna leave that to form. It's almost a bit
too much there. I want this just to be visible, really, so it doesn't really grab your attention.
It's just there. Fab. Right. I'm
going to try and be careful and I'll rub this salt out without squidging that, so we'll rub that away. It's quite fun, though,
salt on there, isn't it? Give it a really nice
healing of brooks. But we put some splatters down, which will hopefully
create that again. Brush she off. Bab, now, you can take I liked
how that's kind of formed. That's really gentle. But you can take little
bits of color out. Careful. Minute you have
something you like, it can What are
you trying to say, really, it's always better. The more simple you can
paint this, I think. At least, yeah,
they're small pieces. We're not painting big pieces where you can kind of
take bits of color out and you've got more scope
to do some details, I think, 'cause these
are quite small, the simpler the better. Actually, before I start
doing little splatters, let me just rub out that pencil marks that are existing there. Obviously, I can't do the back of that
mountain at the moment, but this one is
actually quite nice. **** to go. You see you can get that lovely kind
of lost and found look. Say, I'm not going to go in
there because it's damp, but, yeah, taking fental
marks out always helps. Right. Let me um. Get out of the way.
Got my medium brush. Gonna use the sepa
at the moment, and then I'm just going
to do some splatters. You may choose not to do these. It's up to you,
but they're quite. They give a little bit of
texture to the mountains. I think it's come
down here a bit. Ideally, you want to probably mask off you'll at least put a bit of kitchen roll or
something over the amount sky, sorry, I can see what I'm
gonna do in a minute. I'm gonna splatter
splatter me sky. Yeah, you see how that
starts to give you a little bit of um texture. Let's give that a little knock. So get some bigger ones. It's not working?
It's wetted again. It goes on to the sky as I as me being lazy and not
masking my sky off. I think that's
done. I like that. I like how that's formed. That's worked well. I'm actually going to
do while that's dry, gonna put a little
water droplet in there, see if I can get a scent of
some snow on that corner. Fabulous. Right, um,
that my fingers off. And let's put a
little mount around that as it's nearly done. Yeah, they're quite
effective, aren't they? Kind of those rugged
mountains where that we painted
the snow leopard. I can imagine the
snow leopard prowling around here kind of takes
you away, doesn't it? Somewhere else, somewhere
remote and quiet and peaceful. So, yeah, it's been been a
fun little one, this one.
15. Final Thoughts: So I hope you enjoyed
these landscapes and found them rewarding and joyful. Did you enjoy
painting the skies? Remember to put that
paint down and have the confidence to leave
it to work its magic. What about using
that simple palette? Did you find it helped keep
things simple and fresh? How did you detailing go? That Christmas is
a lovely contrast to all that wonderful
looseness and light. If you struggled with
any of these landscapes, try doing them a couple of times and don't overwork one piece. Just pick up another piece
of paper and go again. So we look forward to seeing
you in the next class.
 Jane Davies, Professional Artist and Teacher