Transcripts
1. Introduction: Hello, and welcome
to Simple Trees. If this is your first experience
with me or watercolor, then you're in the right place. This is the first in my
three class beginner series, and you'll be painting
your first masterpiece in just 15 minutes. I'm Jane Davis. I live, paint, teach, and walk my lovely spaniels in the beautiful South Downs
National Park in England. Over the last 20 years, I've taught myself the free flow technique that
you see today. Not having been to art school, finding my own way has been
fun and sometimes daunting, but has allowed me to
develop my own style. This has led me to teach others either on a
one to one basis or as part of a group in a wonderful studio in the
heart of the South Downs. I also run a successful
art business where two days are never the same from the thrill
of exhibiting to painting pet and
wildlife commissions in my own home studio. Simple trees is a perfect
subject to introduce you to the sheer joy of this liberating
wet and wet style that I call my free
flow technique. It's a fabulous way
to use watercolor. There's no brushstrokes,
there's no mixing. We simply add paint
straight from the tube onto wet paper and allow the magic to happen with a little
help from gravity. In the second of my
beginner classes, butterflies, we'll be adding a layer to give
depth and interest, and I'll be showing
you a key element, judging when to add paint to your wet paper to give
you the desired effect. In my last of the three
beginner classes, we will put what we've
learned from simple trees and butterflies into practice to paint our first fluffy animal. There's one more
important technique I want to share with you, and that's sectioning areas off, which helps control where that
wonderful paint flows to. Then you'll find dozens of
my mask classes available, covering a wide range
of beautiful subjects. In each one, I share the techniques I use in
my own professional work. We'll have a lot
of fun together, and you'll gain the
understanding and confidence to
incorporate everything you learn into your own work. You'll be amazed at how
easy watercolor can be. Plus, I'll share a few of my tips and tricks
along the way, too. If you'd like to learn
more about me or my work, then please pop over to
my website at Jane Davis watercolors.co dot K. This can be found on my profile page, along with the links to my
Instagram and Facebook pages. I'm very active on
my social media, where I love to share my art, especially on stories
with many ideas, works in progress, and
tales of studio life. I really hope you will share all your paintings on the
projects and resources pages. I love seeing your masterpieces. And don't forget
I'm here to help if you get stuck or
have any questions. I want you to experience
that buzz of painting in this liberating wet
and wet loose style. So come and join me.
2. Materials: Let me run through all the materials you need
to paint simple trees. So, to start with, there's a lovely collection of
Daniel Smith paints. It's the brand I have used for a long time. I just love them. They're beautiful. But equally, if you haven't got
them, don't worry. Choose whichever paints you have the hand and
you love using. This is just about
the technique. There's no great talk about color choices and
color combinations. So yeah, use the colors you
like and feel drawn to. The paper I'm using
is Bockingford, and that's 200 pound knot. And all these can be found in the projects and
resources pages. So you don't need to scribble them down and memorize them. I've got my little mount. The mount isn't by
any means necessary, but it's quite nice if you have a mount because as you can see, it's quite rough underneath. So when you pop a mount round, it just frames it beautifully. And if you want the dimensions, they're in project again, in the projects and
resources pages. I got my little pot of water. I have a rubber, nothing fancy, just a box standard rubber, something that's about an
inch high that you can tilt your paper with, such as. And then I've got my
paper towel kitchen roll. Got a little pencil. Doesn't matter what pencil
any pencil will do you. I have two brushes. Again, these these are number
ten and a number naught. But like I was
saying going to say, a larger brush
you're happy using and a smaller brush
you're happy using. And that is it. That's all you need to, um, yeah, to start
your simple trees. So let's go and sketch them out.
3. Sketching Out: Right, then, let's sketch out these little trees.
Now don't panic. There's not a lot of sketching, but I'm going to use
my little mount, and I'm going to very gently, keep your pencil
marks nice and light. So just enough for
you so you can see. Now, throughout the classes, if you go on and follow
me a little bit more, I always stress that my lines can be a
little heavier than yours or yours need to be just so you can
see what I'm doing. But really, it's quite
important to try and keep these your pencil
marks as light as you can, because when we
finish the painting, you don't want to be
able to see them. We want to be able
to bob them out. Okay, so we're just going
to do the tree tops. So this is going to
be your tree tops. So very wiggly line, however you want to wiggle it. Just like that.
Don't overthink it. Just just do whatever you fancy. And again, again,
we do the ground. Again, that can be
however you like. And just as we're starting off, we haven't done this yet before. We're just going to
put some simple trunks in. Try to be random. Try not to put them
very symmetrical. So I'm going to do three,
so one, two, three. Hopefully, you can see
those a little guide, so you don't really need
them, but it just helps. And that is it. Nothing
more than that. But say, I do stress keep those pencil
marks nice and light.
4. Main Painting: Okay, so on to the fun bit, and where I can explain
a little more about my free flow technique,
it's lovely. You're going to
adore it, I think. So I've picked up
my bigger brush, and I'm going to wet it down. So it's nice and soaked. And I'm simply going to wet. So we're painting
all wet on wet. So this is where your
paper is lovely and wet, and we drop paint
into the wet paper. So I use quite a lot of water. I think when I've had
one to one that come and visit me in my studio, they're quite surprised,
I think, how much I use. So you want everything
good and wet. You don't want it like bubbling, as in it's not
sitting in puddles. If it sits in puddles, you'll find your paint will just sit on the top and won't move, but you want it almost as close. So a good trick, you can just duck your
head up and down, and you can see you should have a really good sheen
nice and wet. Just a mention I'm on
unstretched paper, you can get little pockets
of water sitting in place. Don't worry too much. This class is really just about having
a little bit of fun. It's just enjoying it's the very first
beginner class that introduces you to this
fabulous technique. So, I wanted you to be
able to just lift up, grab yourself a pit
of paper and just go. So it's the only
thing is you do have to you can end up with
your paper buckling. Anyway, before this dries
on me, which we don't want. And if you are working somewhere hot and you've wet
it down already, and it's still, um, and you can see it's
starting to dry. You can just add a
little bit more water. And so, a little word, as well. You can wet outside this
penciled marked box. So don't go right up against
this line, go outside. So if you haven't done
that already, just again, wet your brush again and
just go outside that box. Hopefully you can
see. Right. Okay. So pick up your paints. So as I say, I like to paint
straight out of the tubes. It just gives me I can hold
them all together, like such. And they're right there. I don't do any mixing. I've never mixed
paints in my life. I've just used them
straight out the tube. The colour I think
the manufacturers, whoever you choose or have, they've spent a lot of time creating these lovely
colours for you, and I just think mixing them
seems a bit of a shame, but that's just just me. I say, there's no
rights or wrong, so I'm not saying
it's wrong to mix. And if you're happy mixing, then mix, but I like to paint
them straight out the tube. I can get a nice amount,
and I can then drop. And it should be easier
if I start to show you, right, probably don't need
to clutch all of those. Now, if you're I
was going to say, if you're watching this and you've already done
these beginner classes, 'cause I am re filming
these because it's been four years since we started
this very beginner ones. And if I'm honest, I never thought they
would probably be as, um popular and Skillshare
has been amazing for me. So we are reflming these. I was only going to mention the colors are slightly different than I did that I used
in the original class. Right. On with that, you don't necessarily
need to know that. Okay, so I've got soda
genuine and I've got gothite and I'm just literally gonna that's not
meant to happen. Let's just wrap that up there. Let's take that
excess off there. Right. And we're just going to touch right at the bottom of that tree line and just
allow. Just let it run. We can put another color on top. So that's a go
fight right on top. It doesn't matter. Just have some fun, have an experiment. I actually I love this class, but I actually use
this as quite often, if I've got new colors,
I will do simple trees because it just allows
me to have a bit of fun. It's a great way to just paint down and
see how things run. Oh, I do it as a little warm up exercise just
to get me going. Let's put those two colors down. I've got the transparent brown. Let's pop that down there. Say, no right or wrong. Is whatever you fancy. But I would say just
try and work right at the bottom of those tree
lines and allow that to move. If I start coming
in here and adding color, I can show you. It will start to push other paints down
into this direction. What I want, I want
it just to flow up. I say that's going to just
prove my theory 'cause it's, you know, blending quite well. But what you want to do is just literally pick up your paint. Let's let's use the
violet, as well. And you're just placing it. Everything's very light. I'm
not doing any brushstrokes. There's no sort of mixing. Because if I start
to mix and sort of wig all my brush
around a lot, it will just become
muddy and you don't want ward
color to be muddy. You want it to be
lovely and fresh. That really is enough, actually. I don't think I want a lot, and what I normally do when I say these things is then
to put more paint on. Just adding a little bit
more, just to allow that. So the more paint I put on, you can see that's
moving further up. So that's just
carried on pushing. But you will get
to a stage where a paper starts to dry on you, and that's when
you need to stop, but it's all about just playing around and
doing this class. A few times, but I will
go into that in a minute. I'm just soaking up
some of these edges. It's just got a lot of
water sitting there, so I don't want to
have too many puddles. Right. Before this
starts to dry, I'm just going to wipe my brush. Taking the excess moisture off, just dab that on my paper towel, and I'm going to touch
the very bottom of this trunk on top of the tree, so I'm just going to wiggle
down a little bit more water. I'm just going to
pull up right down. And so the paint
from the bottom of the tree line is then
running down the trunk. Can I do the same with this one? And if he doesn't like that, he's got a little
sticky starting to dry. It's quite warm in
my studio today, and I've probably
been waffling away, so I can just add a little more paint keep everything light. Try to, as I say,
dip and dabble. So you just adding just touching the paper and
allowing that paint to run. Alright, let's get this one done before that dries, as well. It's begun to dry as well. Let's pop a little bit
of so genuine on there. You see like magic. And then again, fairly briskly. I'm gonna pick up my little
brush. I go to do some. That's obviously had some
color on there before. So just wiggle out
some little branches. Again, don't overthink
this. Join them up. Nature's all very random, especially sort of
things like this, like trunks and branches. Go from the top. You
can pull some out from the top like we
did with the tops. I can wake this up a little bit. And you can pick up my
bigger brush again, you can do some lighter ones. So obviously I haven't
sketched this one out, but if I did a lighter trunk. Pop pop up a little
bit of there, just a tiny, tiny bit. So you've got the minutest
amount of colour. That would look like one
of the trees is just receding into the background so it'll give you something
a little bit lighter. Gain all these things you
can play around with. Okay, and the next
thing to do is to, that's a dog hair there as we somehow always
normally seem to get. Okay, we're going to wet the bottom of the ground exactly like we
did with the top. Outside the box or outside
petsel mark, shall I say? Go over those tree
trunks. Right out again. And we're going to give this
a little bit of a tilt. Move some of those away? I can just pick up my Well, just be cautious,
'cause I can see mine. I've got a bobble of water. Yeah. I just want to make sure that's not going to
one here actually still. So again, I'm just touching the wet area
and soaking it up. Because if that
was still sitting there and I lifted my
piece of paper up, that bobble water
would run right down. Probably wouldn't
matter in this exercise because it is an exercise of just allowing any
patterns and runs and marks. I just create you
something interesting. Right. Pick up a little bit of color actually
before I start tilting. So I've just got the gothte and a little bit of
so like genuine. Again, it doesn't matter
what color you pick up. Sort this down a
little bit more. I can see how I'm chatting
away and it's drying. So I can just carry it long
as areas are all damp, if this is a little bit damp, this is wet, but I
want to wet this down. Again, I cn it. As long as
all the area you've just wet down is still the paper
is still wet or damp, then you can just add
more water again. Okay, let's get a little
bit of paint on here. I think so like Genuine is
lovely. A real favorite. I love this color. It's
lovely. I'll try to pick. Like I said, in the
material, sort of, colors, I use quite a lot
throughout the classes. So again, I've just placed that. Just ever so gentle, place. And what I go to do
we pop those down. I grab in the
corner of my paper, and I'm just allowing that to run into this sort
of far corner here. I can grab my brush. It's loaded up with water, and I can drop some water. So again, just drop
and allow that to run. That will just give you
something somewhat. It's just a little
more interest. Light coming through the trees. You can then having a little
dab in my tubes here. You can add a little more color again while that's
still tilted upward. I need another pair of hands. Again, everything
is ever so light. And the minute you got
something that's interesting, where you think, Oh, that's
quite nice. Leave it. That's the biggest tip or one of the biggest tips is not
to overwork watercolor. It's just to allow
the magic to happen. And once you see something
you like, then leave it. Best thing, really, I'm
going to just grab this little I'm just gonna leave
it on a little bit of tilt. By leaving it on a tilt,
that's gonna carry on allowing that to run
down into that corner. Again fairly quickly. We're going to just do
a little bit of grass. I picked up my little brush, and we're just going to flick. I would rather than working
right at the very edge, it's always very
tempting for your brush stroke then to go
quite a long way up, it's to start
somewhere a little bit further down and just flick. Say you don't have to
go all the way along. You can just do the grass at the base of one of the trees, maybe a little bit down here. Use flicks are very
they're very addictive. Let's just join that little dot. So I'm going to
leave it at that. I don't want to do anymore. And that there is
your very first, little masterpiece, and
your very first class. I hope it's giving you
a little insight into just the sheer joy of
allowing the paint to merge. Together. And just to
create you some magic, allowing popping color
onto one another, seeing how that feels, tilting stuff. It's a
very important thing. I use I call gravity
a lot to create me some interest and
sort of movement, which, if you go on to do more
of my classes, you know, we go into animal
movement and things, but it's just by tilting the paper and allowing
colours to run. Just have fun. So
let me I'm just going to get this little
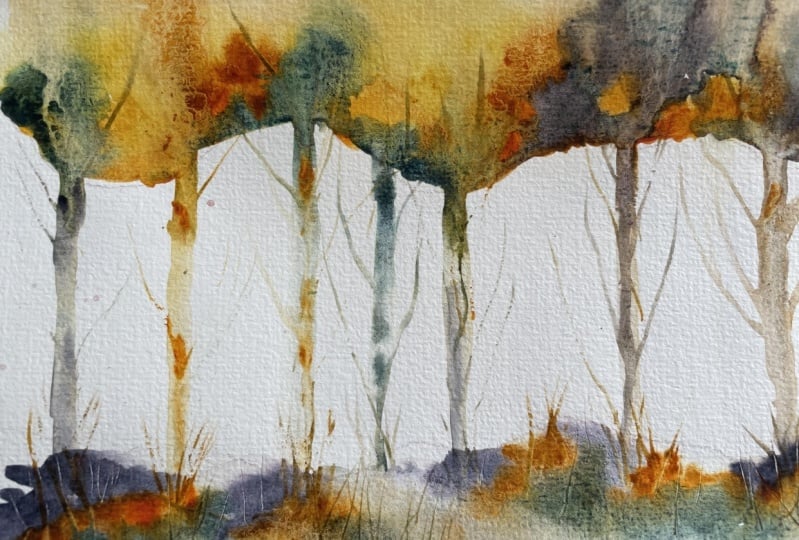
piece out of the way for a second and show you some other examples I've
done of simple trees. So as I was saying, this class I think is
quite it's limitless. There's so many
things you can do. There's so many
colors, orientations, you can do a very
long simple trees. So obviously, you know,
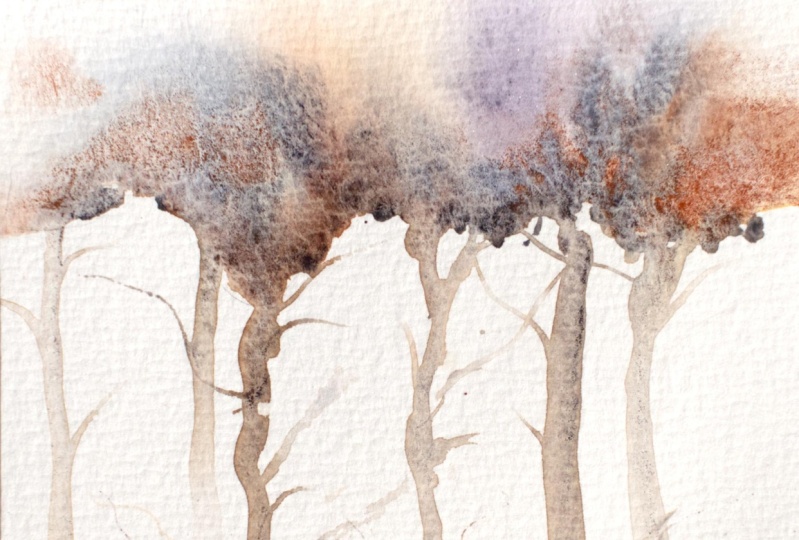
you've got long trunks. And here, if I can
sort of explain, I've done exactly the same done here when I wet the ground. I only did it in a
little strip here, and you can see
that it's just run down into that little strip I've wiggled some
other little bits I see it a little bits there. So that's a lovely way. Again, you could do
your trees on a sorry, the trunks on a tilt, so it looks like on the wind has blown those
trunks over somewhere off the moors or the by the sea with another
little chap here, which is a bit even more
exaggerated in the wind. You can see this this was painted on a
real scrap of paper, and it's buckled awfully, but Again, you know,
exactly the same. There's just the
same techniques, but I gave this one
quite a load tilt. You can see where
that colors run down. And the trunks have given you that nice movement of the
wind sweeping across, and you can sweep the grass to obviously give the illusion
of wind to the grass. They can be done in
multiple different colors. And as I say, because this
class has been filmed, there's been four years worth of people taking this
class on Skillshare, and there's lots of projects, so it's quite fun to go back, actually, and look at other peoples and
what they've done. Let me just bring back my
class piece on a tilt steel. So some people have done
little animals down here, say very simple, just a very simple sort of
silhouette of an animal, little bird sitting
in the branches. It's a say, I know I
keep repeating it, but it's such a fun class. And if you were to repeat
this five, six, seven times, you would get, I think, a fantastic grasp of this
technique in just allowing. I think the first one you do, if you've not done this before, it's a little scary and
it feels a bit alien. But once you get
into the swing of it and realize it's
really liberating, and you can just put
the color and allow. There's no brush
strokes, no mixing. It's just making sure
there's enough water. So that's a biggie, as well, making sure your
paper and your brush, actually, is wet enough. Anyway, I think I
probably said enough for this first class before I
completely bamboozle you. So, yes, I hope
you've enjoyed this, and you go on and do many
more little experiments of your own and don't
forget to put them in the projects and
resources pages. And if you get stuck or
none of this makes sense, or I haven't
explained something, you're like, What did she mean? Then simply pop a little comment
in the discussions page, and I will get back
to you. Enjoy. So we look forward to seeing
you in the next class.
 Jane Davies, Professional Artist and Teacher