Transcripts
1. Introduction: Hi, I'm Emily. I'm an artist and a drawing teacher
from New Zealand. In this fun project, we're going to
learn about how to create a three D illusion of a weaving pattern
using our pencil shading. In particular, we'll practice
controlling the pressure of the pencil in order to achieve light shading
and dark shading. So this is a great
lesson for anyone who's struggling with their
shading at the moment. Use a simple project to work
on your shading basics, and then you can put
those new skills to work in your other
drawing projects. You don't need any
special materials, grab an HB pencil and some
paper, and we'll get started.
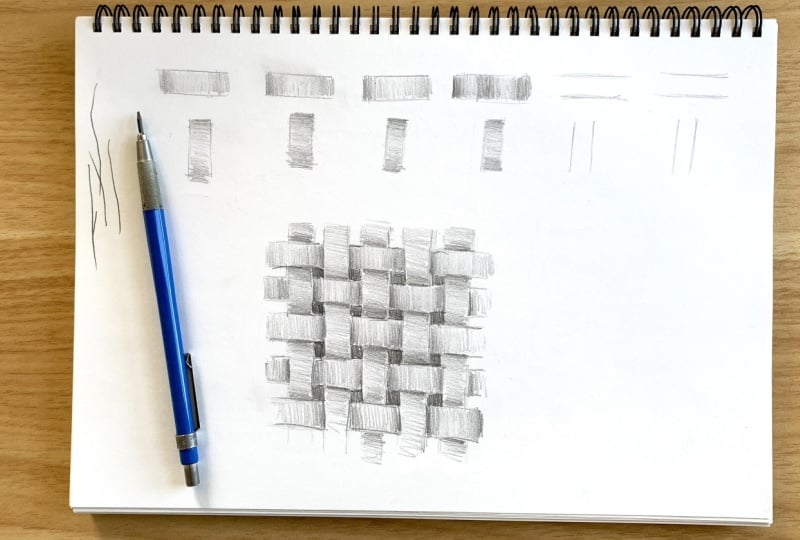
2. Warm Up: We'll start with a
warm up. I'm going to do that just
across the top of my page here and then do my drawing project
down the bottom. You could use scrap
paper for the warm up. You could use separate
pages. It's up to you. And what I want you
to do is just draw some parallel lines
coming across here. It doesn't matter which
direction you draw them in, but see if you can get a
bit of a rhythm going. Rather than using the tip of your pencil and pushing down and trying to draw a straight line that way. It's not so easy. If you can get that
rhythm going with your hand or your hand is
sliding across the page, you're more likely to
get something that is nice and smooth and straight. You might have to go over
it a couple of times to get that line straightened out. And then we're going to
practice our shading pressure by starting at one side, pushing quite hard or firmly, and then lessening the pressure as we come towards the middle. And then as we come
towards the other side, increasing the
pressure slightly. So we get something that goes
from dark to light to dark. Don't worry if you've
got little gaps and things like that at
the top and the bottom, but we do want to try
and avoid having gaps between our shading
marks as we go across. And again, the direction
you work in is up to you. If you're left handed, like me, I'd actually prefer to start at this side and work this way. If you're right handed, you
probably want to start at this side and work your
way across as if you were, you know, writing along a page. So starting again, fairly firm pressure still holding my pencil a
little bit further back. I'm not holding it down
on the tip because I want to use the side
of the pencil lead. Even if you've got
a regular pencil, I know I use this one
for demonstrations, but even with a regular pencil, having it slightly on its side, holding it a little
bit further back means you're going to get more of the lead on the paper,
lightening up the pressure, which just means sort of leaning back a little
bit on the hand, letting the pencil just
rest on the paper, which is also another reason why we don't want to be having our fingers right at the tip because then we're going
to be pushing down hard, whereas if we have our grip
a little bit further back, we can just kind of rest
the pencil on the paper. And then pushing
down a little bit on the pencil lead as
you come towards the other side. See
how you go with that. If you find that really
difficult, I mean, you can come back over
and even these parts out. Especially where it changes from dark to light
and light to dark. We want to get something
that's fairly smooth, moves in a nice
smooth transition from dark to light
to dark again. We'll do this a
couple more times. I know we've drawn quite a few
sets of lines across here, but we don't have to
fill all of those in. Because we want to
get onto our project. It's practicing
changing the pressure. See, I forgot to go dark
enough soon enough, so I could come back
this way, as well. We'll do one more here. You can do these other
ones later if you want to. I'm going to do one more here. This one will fit on the screen. And this time, I'm going to
try dark to light to dark, increasing the pressure, decreasing the pressure,
increasing the pressure. It's not easy. You see
how messy M one is there. I'm going to go over that again. Dark to light, filling in
some of these little gaps. Dark, moving into light, moving back into dark. We're going to do a few
more practices here. This time we're going to
draw parallel lines that are coming down, vertical lines. Okay, you can move downwards, you can move upwards, several
strokes, moving the hand. And this time we're
going to work from the top down, lessening
the pressure. So starting off firm,
lessening the pressure, and then increasing
the pressure. Now, I'm working with my page nice and square to the camera. It might feel easier for you
to just turn your page at an angle either this way or maybe or this way if
you're right handed. And that's completely fine. I don't want you to
turn it so that it's horizontal again
because we've already done that horizontal practice. But you could turn it
just on a slight angle if that makes it feel a
little bit more comfortable. So for me, I'd be
doing it this way. If you were right handed, you'd probably feel more comfortable
with it angled this way, but I'm going to do it straight up and down
for the camera. Just make it
difficult for myself. But easy for you to see. Again, pushing down lessening the pressure and then
pushing down a little bit. Remember that grip is a little bit further
back than normal. You might be moving your hand
just slightly on the page, or you might find it easier
to hold that hand stable, but let the fingers move freely from side to side,
getting a rhythm going. And coming back over if you
need to fill in some of those little gaps and try
to get a smooth transition. So transition is a
seamless movement from the dark to the light. You can't really see
any sort of edge. I've got a little bit of an edge here between the
dark and the light, so I can just work over that experimenting with
the pressure until I get something that is in between and then
disappears into the light.
3. Sketching Out The Weaving Pattern: That's our practice done. There's a few more here if
you want to keep practicing, but I want to move on to our project down
the bottom here. I'm going to do it right
in the center of my page. And what we're
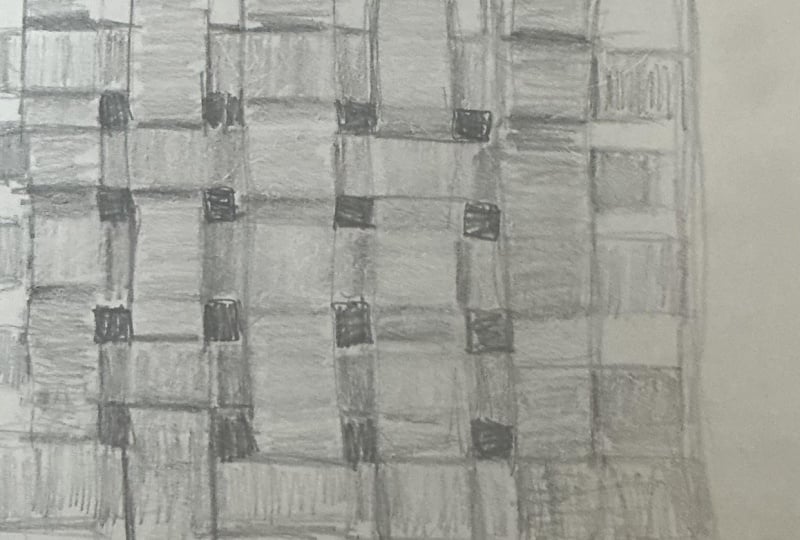
going to be drawing is the woven pattern of, say, a flax mat or what you
might see in a cane chair. And I've got some photos
here just to give you an idea of that pattern. So we're looking for a
very simple pattern that is more like this one that
is horizontal and vertical, and you can see how those
pieces of cane or bamboo, whatever they might be, are weaving in and out
of each other. It's like a grid type pattern. And that's what we're going
to have a go at drawing, and then we're going to have
a go at shading it to get that pattern to look so three dimensional like it's
popping out a little bit, like those bits that are
curving over and under are actually curving over
and under each other. Now, it might be a little bit of a brain twister as you do this. We're going to have
to draw this out first and make sure we have the right parts going over and the right parts going under. So to do that,
we're going to draw five strands coming down, and then we're going
to draw five strands going horizontally, weaving in and out of those. So have an eraser ready
because we're going to need to erase the parts that go
that are tucked under. You'll see what I
mean when we do this. So this is good straight
line drawing practice. I'm going to draw one strand. And we're thinking about
a square shape overall, and then I'm going to
have a little gap, and then I'm going to
draw the next strand. Make sure that you keep these lines nice and light because we are going to be erasing
some parts of them. See, again, how
my hand is moving down the page or on the page. I'm not just using my fingers because then I'm going
to start going crooked. But, you know, if these lines
are a little bit crooked, it doesn't matter too much because we're
thinking about this being made of natural materials. So I got one, two, three strips, and I'm going to do two more. This is less than
the size of my hand. The bigger you make this,
the more time it's going to take to shade. And
here's the last one. We can tidy up some
of these lines later, make sure they're nice
and light and loose. And we've got one,
two, three, four, five, strips, and we've got a
little gap in between them. Now we're going to start weaving the horizontal strips
over and under, and this is where
you might have to do a little bit of or give your brain a little
bit of a workout. So we're going to
go over this one. We'll start from out here
and we're going to go over and then we're going to go under this one
and then over the next one. Now, you might find that it's going to get least
complicated if you erase the vertical part of
that section there as we go. So this part is going over, which means we're not
going to be able to see that strip underneath it. This one's going to go under, so it's going to go under
and come out the other side, and then it's going
to go over this one. And again, rubbing
out that bit that is now hidden underneath is going to make your
life a little bit easier. Then we go under this one so we don't draw over the top and then over this one and erase that. You see now how we've got a strip that appears
as if it's going over, then under, then over, then under, and then over. Then we're going to
do the opposite. So this one here is going
to start on outside, leaving a little bit of a
gap. Start on the outside. It's going to go under this
one, so it's going to pop out here and it's going to go over
this one, the second one. Just to there because it's
going to go under that one. But let's rub out this part. The part that is sitting or the part that
it's gone over top of. We're going to go
under this one over this one. And under this one. So we need to rub
out this area here. So it's going to alternate. So this one goes under
means this one goes over. This one here starts off going over the next one's
going to go under, which means this one here
is going to go over. We'll do five coming down. So it's going over so I can
rub out what's within it. It's going to get to here
and it's going to go under that come out
the other side. It's going to go over. Under that one, so it's going to come out here and it's
going to be over, and that's good because
we've got over under over. Again, I'm drawing this
straight on for the camera. But if you need
to tune your page a little bit to one side as you draw these lines,
it's completely fine. So we've gone over under, over. This next one needs to go under. Leaving a little bit of a
gap there in between them. It's going to go over. Under over coming
out the other side. We're going to do one more.
So this one, let's see, we've got over under over
under. This one has to go over. It's going to peep out here and go. It's going under this one. It's going to go over this one. I'm going to do them without
rubbing them out this time, under this one, and
then over this one. And now I'm going to rub out the correct parts,
hopefully, that one. Leave that one,
rub out this one. Leave that one,
rub out this one. Okay, so have a look
and make sure you've got everything in
the right place. They should alternate over
under over under over. If we look at any of
these strips coming down over under over under O. Getting myself confused now. And you could even
look at it going from side to side over. So this one goes over.
This one here goes under over under over. Now, it's kind of important
that you get that right. Otherwise, you're gonna
get something that just looks a little bit odd once
we get all the shading in. But just go through and tidy up any lines so you might
have erased something. That needs to be
nice and strong.
4. Shading The 3D Illusion: And we're going to dive
straight into our shading. Bit of work to do with this, but you can take it to whatever degree of finish
that you want it to be. So we're going to start at
this side and start shading. As we come up and over, we're going to keep
this part lighter, and then as it comes down
and starts to go under, that's where it's
going to go darker. And it's just
because this part at the top is going to be
sticking up a little bit, so the light is
going to be hitting it as it comes down and
goes under the next one, there's going to be a
little bit of shadow there because the pressure from this vertical
strand underneath is kind of pushing up
this horizontal strip. I hope that makes
sense. And then we're going to come
out the other side. It's going to be
quite dark here where there's a shadow
cast from this one. This vertical strip is being cast onto the horizontal strip. It's going to be quite
dark, and then it's going to lighten up. As it comes over the
top and then increasing the pressure to get a shadow value as it goes
underneath this one. Now, we could tidy
these things up, but I want you to
do the best you can we tidy it up like this, but I want you to do the best you can to try
and get it done all in one go so that this project isn't going
to take you too long, but also just so that
you're really focusing on that pressure of
your pencil, pushing, nice and firmly,
lessening the pressure, keeping your lines nice
and close together. And then if you want to, you could go a little bit
firmer at the other side. Doesn't matter so much
on the outside ones. It's more of these ones
that are going under. So this one here, we can start to increase the pressure as it
starts to go under. Coming up the other side, there's gonna be a shadow there, so a bit of pressure
and then lessening up the pressure, increasing
the pressure. A few little gaps, I've
got a bit of a gap there, I'm just going to
fill that in as I go. So I hope you're getting
the idea there's shadow when it's
coming underneath. And then as it's going
over top of another strip, it's nice and light,
and then as it comes back down under the next strip, there's some shadow there. We'll do one more
coming across here, and then we might start working
on the ones coming down. Nice and light Oh I forgot to increase
the pressure, a little bit too quick, so I could come
from this direction and lessen the pressure as I
come up into the light area. My hands moving slowly. I'm sliding it on the
page as I come across, so I can keep the rhythm going. I don't need to stop the rhythm, but I'm sliding my
hand across the page. And you may find that you need
something under your hand. I'm not worrying too
much about it here, but you're getting
a lot of smudges, your hands getting dirty, then you can put just a tissue or a paper towel
or something over the parts that you are finished with or you're
not shading at the moment. Okay, so we've got
this one going over under over under over, and this one doing
opposite under over, then this one,
again, alternating. Now we're going
to start from the top and we're going
to come down, and it's going to
work the same way. It's going to be light. And then as it starts
to come under, we're going to increase
the pressure there. And coming up from
the other side, where it's very
close to this one, there's going to
be a shadow cast. Pushing quite firmly and
then lessening the pressure. Remember, you can turn your page on an angle if you want to, and then increasing the pressure as it starts to come back under. So don't panic. If you're
finding this really hard. You can go back over
and adjust things. We're trying to get
it done in one go. But if you find that
you just can't get that pressure quite right or
you've got some hard edges, you can tidy those up. I probably do it
now on each one, you know, as you go along, rather than having to do
that whole thing again, adjust everything at the end and do a whole other pass on it. We can keep the project a little bit shorter
if we do it as we go. So I've done one layer there, and it definitely needs a darker layer here with
this bit of shadow, so I can do that
straight away now. Coming out from under
this one, nice and dark, go get lighter as it comes
over and a bit more pressure. Nice and dark right under that edge of the
one that's going over it. You should have the idea by now, you should be able
to see the pattern, and you can see what's
happening as well, that this is starting
to feel a lot more three dimensional with the light and the dark in there. We're trying to keep our
shading lines nice and close together and quite soft. But if you get some lines in
there, you know, some gaps, it doesn't matter because we are treating this
as natural fibers. There might actually
be some lines and some irregularities
in there. I've got a few little
bits here to tidy up. You can take yours as
far as you want to, like I said, if you want to go back over and get
this looking really, really sharp and realistic, then you just be tidying
up those transitions between the light and the dark and filling in all
the little gaps, filling in little bits of white. I'm going to finish this one off quite quickly
and then show you the next step that you can add. Find this a little bit easier to go from, you
know, one direction, lighten up into the middle, go all the way
across and then come back dark from the
other direction. That's one way that
you can work as well. But I think that's probably
just because I'm left handed, so I'm starting with the direction that's
least natural for me. Starting on this
side, so it feels good to come back
from this right side. Okay, so once you've got your
lights to darks in there, remember the dark
is wherever it's going underneath another strip. Then we can tidy up
some of the edges. And we can also fill in these
little gaps in between. So at the moment, we have drawn a piece of weaving that has light coming through the background. You could
leave it like that. Or we could fill in the little gaps as if there is no light coming
from the background, and that's going to further
enhance I light and dark values because
I'm going to give it a really strong pop
of contrast there. I'm using my HB pencil still, but you might like to switch to a darker pencil now
to put these in, make sure it's nice and sharp. Maybe a two B or a four B. Not too soft or it'll get your edges will
get really soft. We want to have
nice sharp edges. So I'm just filling
in these squares, and I'm doing it by going around the edge of
the shape first, not changing the shape, but just looking at the shape
that I've created here, going around the
edge of it first, and then filling it in. Not quite finished,
but you can see there that optical illusion that
is created just through use of value light and dark and getting the lights and darks
in the right place and getting those
transitions happening so that things look
smooth and undulating, like they're curving
up and down. If you want to do more
work on this, like I said, you could, tidy these
up a little bit, tidy up your edges. If you really enjoyed this, you might try and find
some other patterns. This was one of the
least complicated ones, but you can find other
ones that are more sort of like a hearing bone pattern or other sorts of
patterns that might take a little bit of brainwork to be able to draw them out, but you could have a lot
of fun with those as well. Thanks for joining
me. I'll see you in the next drawing
snacks project. I
 Emily Armstrong, The Pencil Room Online