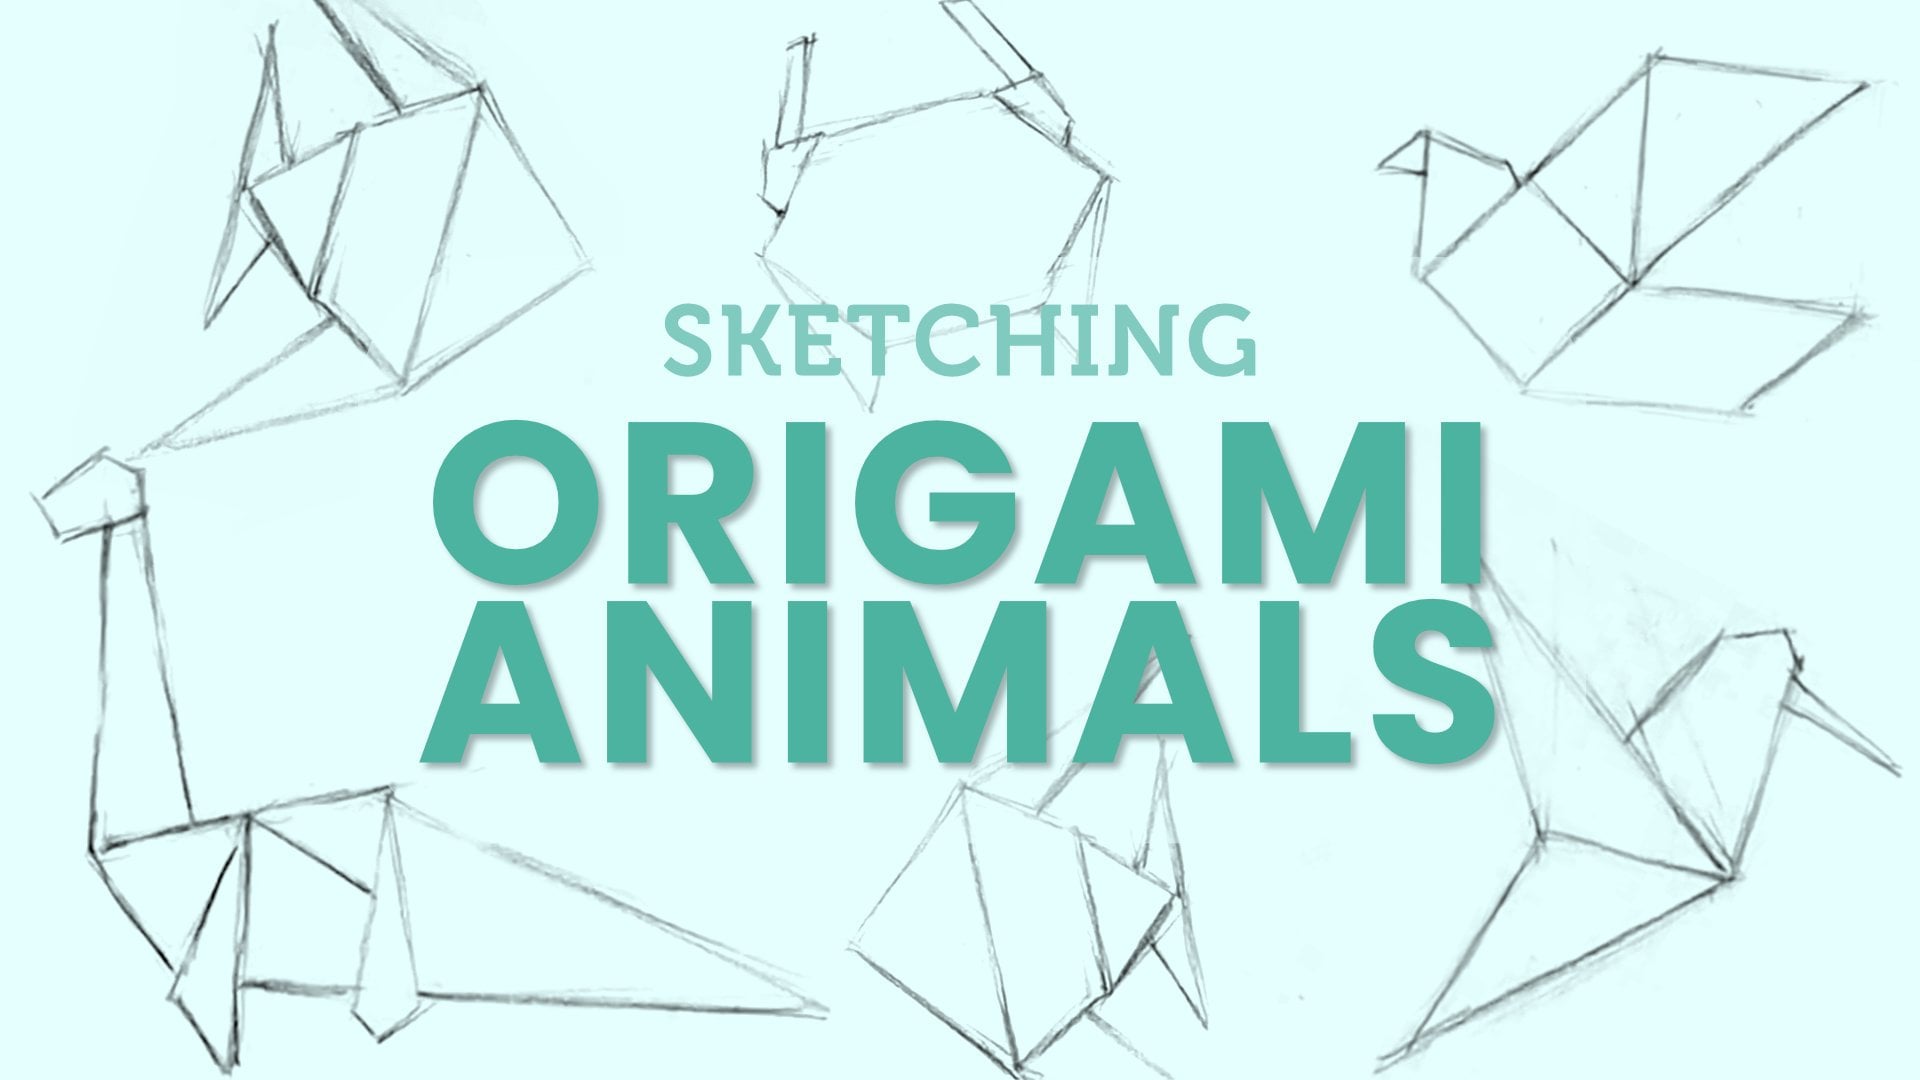
Transcripts
1. Introduction: Hi, I'm Emily from
the pizza room. And in this tutorial, I'm going to take you through
a short drawing project. We're going to draw up here. And it's quite a simple subject. But we're going to
have a specific focus in this tutorial. And the focus is how to create a illusion in illusion of three-dimensional form
using your shading, using light, middle and
dark shading values to create something that
looks like it's got some, some white and
some volume to it. Alongside that will
also be going through a four-step drawing process. We're going to start
with structure. And then we're going
to do some sketching in some shading. And then we'll finish
with some detail. This is a really good tutorial
for beginners because it shows you that during
process and you can apply that to drawing anything.
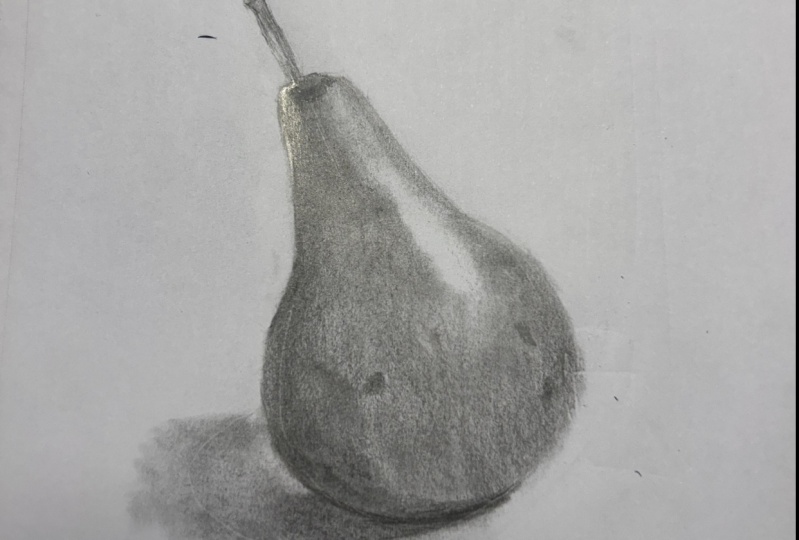
2. Materials: This is the peer that we're
going to be drawing up here. And then I've got the materials
that you need down here. I'm just going to be
using one pencil is quite a dark one so that you'd be able to
see what I'm doing. But ideally you have a light
pencil like a to H pencil, and then a darker
paints or maybe a to B pencil would be good. And then also a potty eraser as well or some kind of eraser.
3. Structure: Finding The Shapes: Let's take a look at
this photograph up here. In the very first thing
we're going to be doing, the first step is structure. And we're gonna be looking
for simple shapes. Look for simple big shapes. Don't worry about the
small details like the stalk on the
top of the pier. If we have a look at this
here and break it down, I would say it is
shaped by that. So a round circle. And then at the top here we've got this triangle shape and we could simplify it down by
finding its main edges. So 123 itches a triangle
shape with the top cut off. And then the other thing
that we're going to look for is the cross-section. And this is going to
help us just position L, position the subject on our page before we even start
drawing anything. So the cross-section is
just a straight line that goes through the center and you can see that
it's on an angle. So it's not straight
up and down like this. That doesn't go
through the middle of the entirety of this subject. So starting down,
maybe start from the top here and
then come down and you're trying to get
a line that goes straight through the
middle and it shows us the angle is on as well. That one's
a little bit crooked. Let's try that again. Start from the bottom
or natural for me. Something like that. And that's what we're going to look
for in our drawing. Let's go ahead and
get started now and leave those lines up
there for a start so we can see what we're
drawing and take them away. And we'll see if we can, you can have a look and
see if you can see those lines and the shapes
without them drawn over top. So the first thing we're
gonna do is draw that angle. The cross-section doesn't matter how sketchy your lines are. And if you want to, you could put a mark at the
top and the bottom, we think the main part
of the peer is going to go excluding the stalk. We're just looking for
big shapes at the moment. Everything we do in this stage
and the structure stage, you want to keep it as
light as you possibly can. Then the next thing is
to put a net circle. Having trouble drawing a circle, then the best thing
to do is just start by drawing light
lines like this. Create some kind of shape. And so it's really
wonky like that. You first circle, then you
are going to just eat it, the parts that it
needs to be changed. So I can see that this
pad isn't wide enough. Bring my circle out
a little bit and then you can rub out the
parts that you don't need. An inland going to add on
this triangle at the top. That shape is created
by its edges. You can look at the
angles of those lines. So this one down here is not completely
straight up and down. It's slightly tilted this way. The angle of this one here. Now if we wanted to be really
particular about this, we could look at the size of this part here compared
to this part here. And even just looking at the photograph and then
looking at my drawing, I can see maybe I've got
this one a little bit too long because this
one is shorter, but it might not be
quite as short as that. So what we're doing is
comparing this line here, the height of the circle with the height of the
triangle shape. The height of the triangle shape is shorter than the
height of the circle. If you've done a bit
of drawing before, you might even compare those, especially if you've
got the photograph printed out and you can do that, then you could take
this measurement here from here to
my finger and then compare it to that and cheek if that's the same on the
photograph or in the drawing. So in this drawing, this section here fits maybe one and maybe one-and-a-half times. And if we look at
the photograph, we've got this line here. In this one here. I'm just trying to wait that
out of my heat and I think that's probably about right. So it's maybe a
little bit longer. So it's probably
about one-and-a-half. Don't worry about that
if it's a bit too confusing for you at the stage. Let's take away all these lines here and just have a look
at the photograph with a you're looking on
screen or when you are looking at a printout and see if you can now
visualize those shapes. So that round circle for
the base of the pier and then that triangle shape for
the top part of the peer. And also visualize
the angle that it's on a cross-section,
that vertical line, that's on an angle that
goes straight down through the center
of the peer from the steam to we're a little bit on the bottom of the peer would be if you could see there. I'm going to bring up the peer over here on
the side of the screen, so it's much bigger now. It's not going to be the same. My drawing is not going to be
the same size as the pier, but it's just so you
can see it clearly if you're working
from the screen. So this was our first stage. This was the first
part of FeO stage. A few stages structure. The second part of that
is to look for it. You need other structural
elements like angles. So I can see, if I look around the each of the
peer and the photograph, I can see there's quite
a strong angle here. It's not completely round. I use the circle to just
get a basic shape down. Now I'm looking
for any changes or any significant angles
or structural elements, structural lines that are really important to drawing this pier. So this line here
and this one here, maybe I might even be a
little one here as well. And if I come around this side and I'm
looking at a photograph, I can see it's not completely
around there either. A line, something
like that here. And maybe join these two
up with a straight line. The photograph, they are here. A bit of an angle. Here. I've put a net one as well. And a little bit along
here as well, the base. And then I also
what's the other one? I put an I also put
in this one here. Then also just do one
more quick look at the photograph
before we move on to the sketching stage.
Look at the photograph. Look at your drawing, and see if there's anything that's
looking a bit MS, just in the basic
structure of it. The other thing we can
do here is we can add in the stalk or at least
the angle of that stalk. So you can see it doesn't
continue on a straight line up from the cross-section. Once you get to the top here, it comes off at an
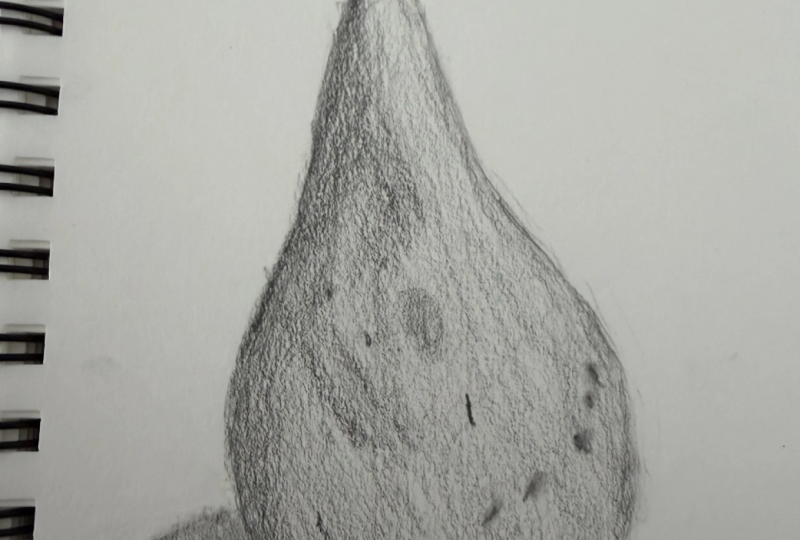
angle from that. So here's a cross-section. And then this stalk. So that's the structure stage. The next stage we're going to go into is the sketch stage. And this would be a good time to rub out some of these lines.
4. Sketching: Adding Natural Sketch Lines: I'm going to rub out
these lines in here. And maybe even some of your lines around
the outside only if they're really dark and try and keep this
stage really liked. These first few stages, really light, can always
go darker later on. But what we don't want is
a really big dark outline all the way around the peer
because the photograph, maybe the left-hand
side is dark, but the right hand
side is quite light, so we don't need a
dark line over there. Now what we're gonna do is
we're going to just join up into those structural
lines that we found. And using a more
of a natural line, looking at the
photographic gain is we do this and just curving
a few things out. We then need to be curved out. We've got the structure
there to follow. But even if you've got
structured down in a drawing, you don't want to be just
drawing over top of that. You want to keep looking
at the photograph. Because every time you
look at the photograph, you reinstate it in
your mind's eye. But you also can see
new things as well. So when I came up
with this line here, this each is a little
bit of a bump in there. It's a little bit of a
bump at the top as well. And we can sketch
in a little bit of a semicircle here for
the base of this stalk. And then put on the
other side of the stalk. Again, looking at
the photograph, looking for changes
like contour drawing. If you've ever done
any contour drawing, really slow observation. And you can see as
you come up here, it gets a little bit
wider at the top. We can also sketch in where
the shadow is going to go. The shadow that is
on the table top. Stats over here. It's past the center line
or the cross-section. Just doing this very
lightly because we, again, we don't want
a dark outline. And I'm just coming
up and looking at where the other side
of the shadow starts. So it's a little bit
above where we put in that angled line there. Here. It starts here and finishes
the ear on the other side, I'm just looking at the
main part of the shadow. The dock is Pat name that
we can look at the shape. It doesn't have to be perfect. If you really wanted
to, you could draw on the second shadow, this I could double
shadow there, but I'm just going to
draw the darker one. And also in the sketching
stage before we start shading, which is our next step, we can identify the light, the middle in the dark areas. So if you ever look at
the photograph and maybe squint a little bit
and try to find the lightest part that you
can see, the lightest shape. And when I do that, when I
squint at the photograph, I see this shape here. So all of that is going
to be the highlight. When you squint at it in try to bring your attention
to the darkest shapes. Well, the darkest shape, you can see on the
left-hand side, there's quite a dark shape that comes all the way down here, maybe down and then
all of this area. There is maybe a little bit
of a lighter pattern here. That'll be the darkest spot. The light part here is
called the highlight. The highlight. This part
here is the shadow. And then everything in between. The southern area is
going to be mid tones. And that's how we're going to think about it when
we bring our shading. But what we can do
is we can sketch out those shapes very, very lightly. What I see might be slightly different to what
you see as well. So I might see a light shape that's a little bit different, an area to what you see, but I'm just going to very lightly sketch
something down there, like they're really light because we don't want a dark
edge on our lightest path. And then I'm also going
to sketch where I think this shadow area
is going to fall. In any other shapes that
you see of light and dark. Maybe around here is a shape, it's a little bit darker. You've got to look beyond
those surface details. I'm looking at this kind
of a shape that I can see. And you might not be able to see these shapes that
I've put in on the, on the screen because I
want to keep them alive. They really just for me
to be able to use as a reference to make sure that I'm shading in
the right places. And of course, the theme is going to be quite dark as well. We could look at the
shapes and the shadow, this darkish shape
through here as well.
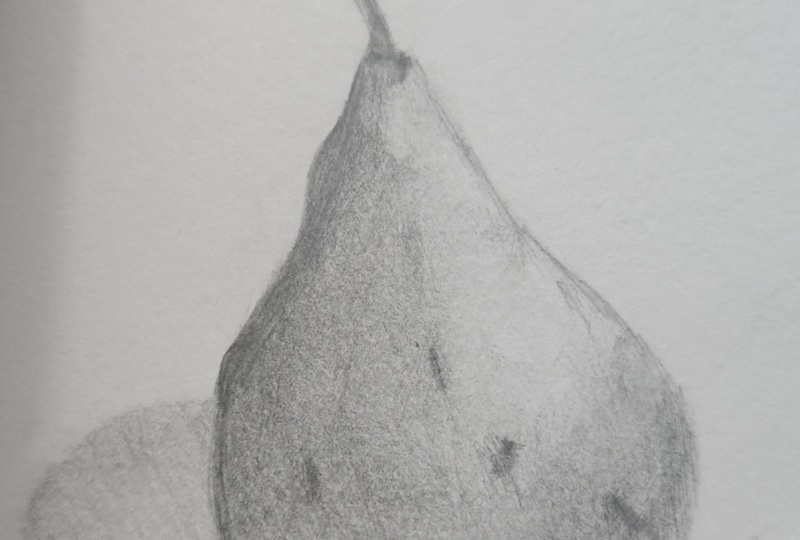
5. Shading Light, Middle & Dark: We're on to step three,
which is shading. And this is where you're
going to take you a to B pencil if you have one. And Alicia, very heavy handed, a few very heavy handed, you
might use your two H pencil, but a to B pencil gives you
a nice soft shading Mac, you're going to use
it as light as we possibly can to shade in everything except
the lightest area. And the trick to using
it really lightly, I find any way is to hold
it so that you can get as much of the side of
the pencil on the paper. And just risk the pencil on the paper and then move
it back and forward. So if you're holding
it like this, it's pretty hard to keep it. Light pressure. You can see there I've
pushed quite hard already. If you can hold it
at least like here, maybe even further back, maybe right at the end and
a little bit overhand. So it's almost in a
parallel with the paper. And just move that pencil
back-and-forth, back-and-forth. I'm using it in a linear motion. It's going up and down. This is just our first
layer of shading. Doesn't have to be perfect. Do try and keep it nice
and even in tonal value. So it's not going dark. And some places and
licensed some places, it's trying to get a nice
even coverage of everything, even the stock pot here. You should be able to
get a rhythm going. When you get to
these small areas, you just make it
really short strokes. When you come down to
these bigger areas, you can make broader strokes. I'm just filling in some
of those were whitespaces. This is where it's
especially important that you don't push too hard and that you just keeping the lightest amount of
pressure on the papers, just the pizza was just
resting on the paper. I'm not pushing
down on it at all. I'm almost like
leaving it sort of flying back and forth a
little bit of my fingers, I don't have a very
tight grip on it. If this feels really
uncomfortable, then you can use it like this, but just try and hold it a
little bit further back. Little pressure as possible. So shaded in everything except the highlight might bring
to us a little bit of shading around the
side here because in the photograph is a little
bit darker on this side. I'm also going to
shade in the shadow. Okay, and just really liked, we're just blocking the
shading and at the moment. And do really try and get rid of all of those little white marks. If you've got a big gaping
gaps between your shading max. If it's very lining and
you don't like that, you can go back opposite direction and cover
the whole thing, but I don't really mind
the lines too much. Shaded everything in. This is made our highlight stand out. So now we've got
our lightest area. Next thing we're gonna
do is we're going to bring in our shadow areas. So remember we've got
highlight, we've got shadows, we've got a cast
shadow down here, but we've also got the
shadow on the object itself. So that's the theory here. Something like that. We can build it up darker. So we might end up
with two or three, have different
values within there, but we're just going to
start by putting it down, identifying it with
a shading value that is darker than the
first one that we put down. Startup here, I'm still
using the same motion, nice, loose grip on my pencil, holding it really far back. If that feels comfortable. And trying to get a rhythm
going and shading and all of that shadow area on the pier. I start from the bottom, feels a little bit more
comfortable for me. Buggy area, broader strokes, try and get that rhythm going. Smaller, eraser, smaller,
tighter strokes. I'm coming up to that line that I identified before in
the sketching stage, the part that maps out
where the shadow area is. But I'm also going to keep
looking at the photograph. And as I come towards it on, I'm going to use a photograph
as a reference so you can think about We just a
shadow if she came up to, you'll be becoming more and more familiar with
this photograph now. So you probably
see new things in it and I can see it does
come a little bit over here. Again, try and fill in
any of those gaps when a nice even shading layer, and this is going to get darker. We're not going to
keep it. This value is going to make it even darker. If you squint at the photograph, the darkest parts almost black. It's like a dark gray. First thing is just put it down, identify it, block it in, and then we can balance
out those values and figure out what needs to be dark or what needs to be lighter. Same with this shadow down on the table top,
the cast shadow. I see it. I wasn't doing
that, so you can parte. So this is the cast
shadow that I'm doing. I'm doing this part here.
In the normal course. I'm going to put in
this darker part, not worrying about this
pot around the outside. Even within that area, these maybe three or
four different values. Value is just a way of
setting a type of gray, light or dark gray. So now we've got our
highlighted area identified. We've got our mid
tones identified, and we've got our
shadow identified. The mid tones are just
what's left after we've gone around our
highlight and we've added and now Shadow
and already we're starting to get a little bit of a sense of roundness to it because we've got a light
side and the dark side. And that's what we're really
going to focus on now is building up illusion of
three-dimensional form. And the way we do that is
just paying attention, careful attention to the values. So when I look at
the highlight area, I can see there is
a little bit of slightly darker value
in some of these parts. So I'm going to work around
that highlight urea first. I also want to
make sure I've got a nice soft transition from the mid tone through
to the highlight area. I've got a little
bit of a line there. I'm just going to dab
that and get rid of that. And then just use
my pencil as light as I possibly can to fill it in and then
lift my pencil off so there's no hard line. And as I come towards
the light path, having even less
pressure on my pencil, pencil, Listening the pressure on my pencil, That's
what I'm trying to say. And then as I come away
from the light path, I can push it a
little bit harder. So even though we've
figured out with a light patterns and
we've mapped it all out. Keep looking at the photograph. Now we're really looking
for small details and changes with the, each of the highlight
really come up to where does it start
getting a little bit darker? Along this part here
it is a little bit, comes in a little
bit darker value. Now I'm going to feed it off
the edge of that highlight. And now I'm going
to work my way down here and then work my way
over to the darkest part. So I'm working from
light to dark. Now I've got quite a
dark line along here because I started off data so that you could
see my pencil lines. If yours is really dark as well, now would be a time to just
push it back a little bit, get rid of that line. In lighten it up a little bit. Because when you look
at the photograph, there's no there's
no dark outline. It's maybe a really soft
darkening along here. But it's not a hard
black outline. And that's all really
important to getting that three-dimensional
illusion as well. So I'm going to work
my way around here. I'm not worrying about any of the little details and
scratches on the pier. I'm just looking for
shapes of value. So if you getting distracted by those little bruises
and things on the pier, then squint your eyes. It really does help
to break it down. And when I do that, I can
see a shape like this. Maybe. It's true that on
the photograph. So I can see a value here that is darker than
what I've got in my drawing. I've got light in, come down here at
school, really light. And the photograph
is light up here. And then when you
come down here, it actually gets a
little bit darker. So that's what I'm
going to bring in now some more shading
down here, not a lot, just another layer of
basically the same value, the same light gray
value over top. As I come towards the edge, I'm just gaining more control of my pencil using
smaller marks. We don't want any lines in
here if we can avoid it. And that's, we're trying to keep a really nice even pressure
on the pencil is important. If you do have, say, a line coming up here and here, like I have the focus on
the pressure if your pins. So how much pressure do
you need to fill in there? Get from here to here as well. I have a little bit of a line. I'm going to just
work my way over there that each that
I've created in lessen the pressure
of the pencil as it gets towards
the light image. The other way you can
soften off some of those shading edges
that you might have as to just
use small circles. That breaks up the line
a little bit more easily sometimes then using
a linear shading, a back-and-forth shading. With my way around here. I'm pretty happy with this. In this section here, this is sort of a darker part, might be a bit of a
bruised up here and then one above it, and then another one down here. This big light patch
I've got in my drawing, not really in the photograph, so I need to get rid of that. Can be as detailed as you want. I mean, I could just
shade over all of that, but there are a few little
slightly dark areas like this one and this one
down here as well. So you can add those in
if you want to just using small circles,
really light touch. The texture of your
paper is going to make a difference to the type of
shading you get as well. There's a slight texture to this paper and I quite like it. It's sometimes more forgiving
when you have texture, you have a very smooth paper, then probably your pencil
marks are going to show up a lot more and it can make
it more of a chore. You have to be a lot more
patient and you have to build up your
shading more carefully. I guess we're moving further
towards the darker side now, everything is still very gray. Squint at your drawing. And then squint at the
photograph and you'll see the difference in the
values at the stage, the photograph has
really dark values over on this side here. So what I'm gonna do
now is I'm going to start from that Docker image. And then I'm going
to work my way to the light age so
that I can listen the pressure as I come towards the camera away
from the Dark Age, I can listen to pressure. Hopefully you get
a nice transition from the dark to the light. Pencil is getting a bit blunt, but that's quite nice
for darker shading. Chicken nugget, less lines. I'm aiming for a dark gray. You can do this up and several
levels if you want to, especially if you are
still getting used to controlling your
pencil for shading. You might do a layer like this stack and then come back over and do
another layer this darker and just
build it up slowly. But I'm going to go
for as close as I can to what is in the
photographs at quite dark. And then fading it out. As I come towards this
middle area of the pier. You see, if you have a look
at the photograph down here, there is quite a strong
line with its shadow, Ian's, but coming through
the down the pia, there's not such a defined line. So in some ways you have to, you have to make that decision. Where is that shade I'm
going to come up to, where do you think it means? We do see it ending? Hinge depending on how your
eyes work and my eyes work, it might be a little
bit different for me than it is for you. As I look at the photograph, I see new things and
adjusting as I go. So coming up the
top here and Eddie a bit more shading and near and a little bit more
around the top. And I'm also going
to just rub out. Somehow they ended up with
a little bit of a point, too much of a point on my peer. The great thing about drawing fruit is if it's a
little bit wonky, it doesn't really matter because someone's
actually looking at the photograph you used, they're not going to go into No, it's very different
from drawing. In a set of human face or
even an animal's face. I'm just adjusting
the shape as I go. I can see it's a little bit different to the
photograph, but yeah, like I just said, it doesn't
matter too much. Okay. Coming around here looking at this bottom area of the pia, going in a different
direction now. So maybe following the curve. It doesn't matter a whole lot. Which direction you shading as long as you get
your values right, and as long as you're getting a nice smooth transition from the lights to the dark. So with this line here, it looks kind of awkward with
my shading going that way, but I can soften that off. Depends a little bit on your
own personal style as well. I mean, my art style
is quite messy, my shading style is
quite expressive in your Missy is a good
way to describe it. If you are someone who likes a lot more control
in your drawing, then everything might be
being shaded the same way. Or you could also follow
the curve around. Over here. You'd be
shading this way. As you come back around
to be shading this way, they can give quite a nice
kind of a painterly effect, especially if you have a
little swatches of shading. I wouldn't try and shade
like this all the way across because it's just
very hard to control. Okay, so getting there
with our shading, just get a nice
dark area in here. That is a little bit of a
light area on this pad here, and it's just a
reflection of the table. There's a little
bit of light being reflected back up onto the pier. I'm trying to leave
that carefully. Bring some stock in value into the shadow that partly
it comes around here. The cast shadow on the table. To start at the base of the pia, the darkest spot, and then work your way out towards
the lighter part. So when it kinda fade
that out a little bit, It's got a nice soft edge to it. Small circles helps to do. They're lighter pressure. The key to shading lighten dark is the
pressure of your pencil. Lost a little bit of
that angle there. So I'm just going to use my
shadow to help bring it back.
6. Shading Continued: Okay, so time to do
a bit of a review of the shading step before we
move on to the final state, which is detail, I'm just blocking a little bit more
of that steam up there. So what I want you to do is
have a look at your drawing, squint at your drawing. And then squint it in, squint at the photograph. Look back and
forward. So you think nothing really stands
out about value. And if there's nothing
that really strikes you, then do this exercise. You're going to look at
the lightest part in your drawing with
squint your eyes. And then you're going to look at the lightest part
in the photograph, squint your eyes and just
compare them back-and-forth, see if they're both
in the same place. So lightest part.
Then you're going to look for any of the dark
parts and you're drawing. You can see down here is Doug, and then you can squint and
look at the photograph. And when I do there, we now look at the photograph. I've got I've got this part, but I don't really have
this Pat, nice and dark. So that needs to be
built up a little bit. We now look at the lightest
parts and my drawings. I've got this pad and all of this is quite
light to when I squint. We now look at the photograph
is probably fairly similar. I think I maybe need to bring a little bit more darkness
around this part here. So do your own analysis. Look for the lightest
parts in your drawings. Compare them with the lightest
parts in the photograph. Look for the darkest parts
and new drawings in. Look at the photograph and see if they are in the same place. Shading around there. And not needs to be
darker over here. Starting from the darkest
each week in my way in. That's bringing a
little bit more volume, a little bit more
roundness to it. Just building up that dark
area a little bit more, making it a little bit darker.
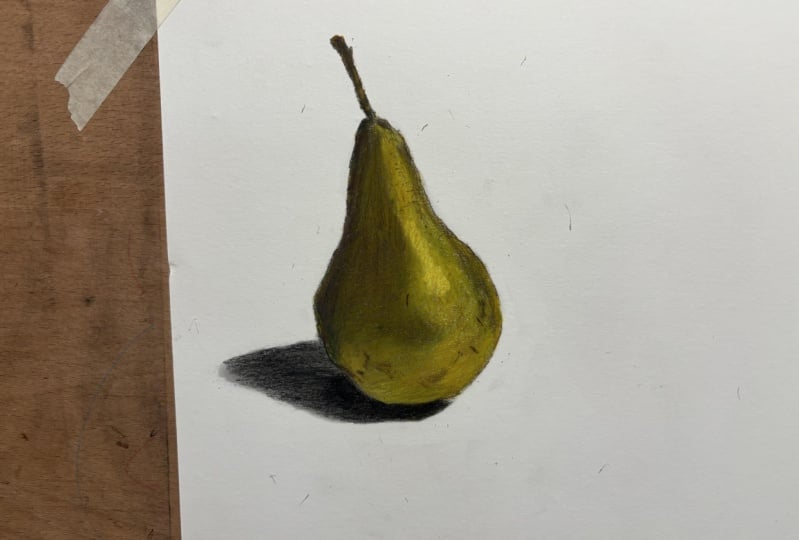
7. Adding Details: The final step is details
in a part of this is building up any of
the blackest points. Going back along
the stock, each. Making sure it says doc is a photograph of
Horace data to do their defining the edges
a little bit more. So I've lost a bit of the shape here so I can come around. It's a dark image so I
can Dark Side of the PS, I can carry on with
quite a dark line. Get the shape right in, shade that line or
integrate that line back into the drawing
with some shading. It's very dark up around
here, around the steam. And I know we haven't done
much of the steam yet. We'll do that shortly.
And it's very dark. Just at the top here. And if we really want to get
into the details is like a little tiny highlight up
here in the photograph. And then the other side of it, it's a little bit darker. Maybe can't just a
little bit too dark. If you do want to take
away any shading, then the petty erasers are really good because you
can just dab a little bit, just get rid of a
very small amount. In the steam is not
all the same value. It's got a light side
and a dark side. So it's lightest
on the side here. Darker on this side. You can see like a dark brown and then the side
looks like it's black. So make sure you've
got a dark gray first. It's going to represent
our dark brown. And then you can
go through and add a darker value on
the left side of it. So really pushing
down with a pencil, it gets a bit darker up
towards the top here. And then a few lines
through there. Might not quite have
the shape, right? So this is where you can, on that dark side again, you can adjust the
shape if you need to. But again, it's not a huge
deal because who's gonna know? I'm going to come
in with a dark, dark line underneath
appear here. So it's really, it's probably the darkest area
apart from the steam. Is the equivalent of a black or as dark as you can
get with your pencil. Put that dark line and it looks really sharp and isolated. So now I'm going
to just use some, some shading to integrate it
into the rest of the shadow. Just small circles controlling the pressure of the pencil. Lighter pressures that come
out way from that dark area. Getting pretty close
to being finished. There are some shading
things that I could just in It's up to you how detailed
you want to get with it. How far do you want
to take this drawing? We're just spending in and maybe an hour or so
on. It's better. If you wanted to, you could spend 3 h and
really refine your shading. Get it, perfect. And every time you sit
down at the drawing, you probably see
something new as well. So I can see
something down here. Can see some more shapes
within those shadows now. But what we'll do now is put in a little bit
of detail if you want some of these marks
and when we put these in, we're not going to draw them like hard lines when you
think about the line quality. So rather than putting in a straight line
like that for say, the Mac that is down here. The SMAC. We can put in a shaded line. So start off really soft and then darken up a
little bit if you need to, but then it's got that
nice soft edge around it. And I'm gonna go a
little bit lighter than what it is in the photograph
because otherwise, sometimes when you put
things on these drawings, it looks a bit like
graffiti or something. Rather than actually
being part of the peer, you can choose
which details you, Ed and which ones you leave. Down here, I'm going
to add a little bit of texture. These
quite a few marks. This I'm just again shading
but shading little sort of little dots in trying
to make them irregular. Some are long. Some small and round and summer biggest shapes
like this one here. Some DACA max over here as well. A little one up here somewhere. Again, just shading. Scribbly max or the quite tight. They're not scribbly like this. If you want to, you could do
a little bit of a practice first just to try and get
something that looks natural. Using the pencil on its side. Maybe a few little dots in here. Not too dark because it
is the lightest area. Maybe a few down the
bottom here as well as a little bit of what looks like maybe a scar or something. I mean, by shading those lines rather than drawing a line.
8. Smudging and Blending: So if you want to, you
can use a bit of tissue. This just a bit of
toilet paper actually. And you just put it
underneath your finger here. And just very gently rub over
some of those shaded areas, but just use super
light pressure. You can see already I've got
a bit of blurring there. And I don't want to do
this over the whole thing because it's just going to
make it into a big gray miss. So it might just be a few
little areas where you had say, a divide or a line between two years of shading
that you don't really want. And as you come into
the lighter areas, I'm actually using a
new area of tissue, so you're not taking
that and then putting it down on that on another area. And you just going to make it
darker then you want it to be very easy to get
carried away with this. And I can also do that
in the shadow here, because the shadow, I do want
it to feel nice and soft. You can put a little bit
more pressure on it. The type of paper
you've got us going to affect how the smudging
works as well. It's best to use it sparingly, I think, and leave
some of your max. You have got these
textures in here and I actually really
liked those and they sort of soup
that the peer as well and sending it if it
is one of the dark areas. So using the tissue
to smudge can also push the graphite into the little crevices
of the paper as well. It's graded out a
little bit so I can bring it back a little
bit darker if I need to.
9. Final Review: Final assessment, you're going
to look at your drawing. Look at the photograph. Don't worry at the stage. Now, if it's like a little bit wonky because we're past the, past the point of no return. We can't really change it now. But what we can do is
especially look at the values and see if there's anything near that
we can adjust. Squinting your eyes,
looking at the drawing, looking at the photograph. Just making those
fine adjustments. Sometimes it's just
a really small area, really small adjustments
that you make. So here I've got a light area. There's not really
in the photograph is lighter over here,
but not over here. So just getting rid
of that might make quite a big difference to that illusion of
three-dimensional form. And that's what
we're aiming for. Getting something that
looks like it's got the roundness and
volume in white to it. Just a little bit more. I wanted to add in here, I think this is
where I put the put a bit of blending with the tissue and it's gotten
rid of some of those darks. Anyway, I could keep playing
with it in my own time. That I really hope that has
given you some useful skills or useful steps on how to build a drawing, starting
with structure. And then we went through
the sketching to find some more organic shape and then shading in
finally the details. And especially you
hope it helped you to usual pencil and a way
to shade light, middle, and dark values to create the illusion of depth
in 3D fullness, what this tutorial is all about. So thanks very much and hope
to see you in another one.
 Emily Armstrong, The Pencil Room Online