Transcripts
1. Introduction: Would you like to create
magical drawings of eyes, ears, and lips with a pen? Enter the world of pen drawing, where all these possibilities
are at your own hands. In this new class, take your pen art
to a new level and benefit from hatching and
shading techniques in eyes, ears, and lips drawings. Get started now and take
your art to a new level. With a pen, your creativity
knows no boundaries. And it all starts with a pen. Hello and welcome to a new
chapter of sketching with pen. And of course, with me. Okay, in this chapter, we are going to create
different parts of face, facial compartments. For example, eyes,
ears, nose, and lips. First of all, we are going
to talk about the tools that you require
for this chapter. You need a normal pencil, a pen, and a paper or a cardboard that you want to do your
sketches on it. The next episode, we're
going to start the sketch.
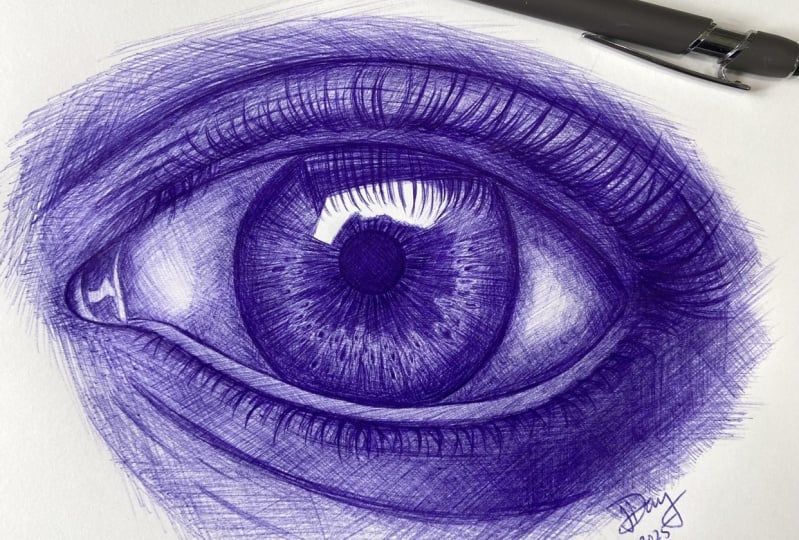
2. Primary sketching of the eye: Hello and welcome to the first episode of
Sketching with Pen. Okay? In this part
and in this episode, first we are going to create the primary sketch
for this beautiful E. The first facial part that we want to
work on is the E, which is very, very important, and at the same time
it's very attractive. Okay, let's see how we can
create the primary sketch. As you know, I'm going
to use a copy technique, so I am using my B six pencil, or the normal pencil
that you have to darken the back of
my model completely. Then I turn over my work. I start going over the parts that I need for
my own primary sketch. First, I'm going to
fix it over here. I'm going to do this
very disciplined. I'm going to use one for the
top and one for the bottom. My model will not move
copying the primary sketch. Now I go over all
the main parts in my work to do the copying. Okay, I'm going over all the main lines,
so I'll continue. And in this corner of the eye, the inner corner,
the outer corner, and the lower part of the eye lid better the lower eyelid. And it's gummy, the part where
the eyelashes will grow. I also like to work on
the pupil and the iris. I'm going for both of them, then I'm doing the upper
eyelid, the gummy part of it. Then the upper line
for the upper eyelid. In this way, I also determine the place
that I needed to be. Also, from here, I consider the area which is related
to the lower eyelid. Okay. I just create some
of my eye lashes so I would know the direction of the eye lashes when I want
to work on them. See, that's enough. Now, I also create the
general things of the, I'm going over the details of the textures
inside of the eye. While I want to work on it, I can create these
textures perfectly. I also create some of the eyebrows in
their own placement. Again, the direction
of the eyebrows. While I want to work on it. At last, I'm going to check my work so I can see if it's completely
copied or not. I've got my primary
sketch copied, and the next step I'm
going to start shading it. Okay, follow us in
next stepisode.
3. Iris shading: Hello and welcome to the rest
of the tutorial with me. Okay, now with our pen, we are going to continue
creating this beautiful eye. First of all, I'm going to start with the p
pil and the iris. Then after you took the extra ink off
the tip of your pen, you can start working
on your whole sketch. I'm going to start with shading the pupil
which is completely dark. I'll get it as
dark as I can see. I am working on the pupil. Then very slowly I apply the shades in
different directions. Okay, I'm going to shade it like this. It's absolute darkness. This is first degree darkness. In other ways, as I told
you, it's absolute darkness. So I'm just going
to shade over it in all different directions
to get it totally dark and not leave any pen traces. Okay, I'll get it where I
want it, then after that, I can work on the rest of the, I mean the iris right from here. From the center of the eye, which is my pupil. I'm going to bring out small
lines with loose ends. My highest hand pressure
is in the center, in the beginning of the line. As I come out, I try to decrease
my hand pressure as if like I'm letting them
go at the end of the line. I'll just do it to try to create the iris
around the pupil. I'm going to continue that. I'm actually taking away the border that was between
the iris and the pupil. With these lines
that I'm creating, I'm actually
destroying this border which may stay between them. I'm just doing it
very patiently. I'm spending so much
time without any rush. The outcome will actually be very soft and smooth
because it's the eye. As I told you, again, I am using these small lines to eliminate the border
between the iris and the hill. Fading it and blending
them into one another. In some parts, I have
a higher hand pressure making them darker. In some other parts
I would go lighter. That depends on your model and what you are
actually seeing. Okay. Then I would also create
the shades over here. You should have an average
to low hand pressure. Okay. So you can
actually create very light shades like this. Then again, in the
opposite direction, I'm going to shade. I try to make the shadings
of this area more cohesive. Now, I'm also going to consider a general shade
for my whole iris. Then I try to spread this general shade lightly
in the whole area. I should take the extra
ink off the tip of my pen. I don't want any unwanted
darker spots over here. It's very delicate. I should do it with a lot of caution not to go too dark here. See slowly. I am shading from the
address toward the center. But as I told you before, I'm keeping it light. Okay. Now I'll do the same thing
from the bottom as well. I'll continue this shading. I go toward the
center of the eye. See, my shadings are very light, but I'm dragging them from the edges inside
toward the center. I'll do the same thing
on the top as well. Just remember to keep this
light area on the eye. This is a reflection of the
light inside of the eye. Be careful not to work any
shade inside of that area. It's a shine reflected on
the iris as much as you can. Try to keep the whiteness of the paper for the
light areas like this. I try not to go inside of it. You should be really
careful around it, especially because
you're working with pen. You see this is the first
degree darkness in the center, which means the darkest color
that we can actually apply. The opposite of that
is the lightest one, which I'm using for the iris. Okay, Then in here, again, like the other side, I'm going to apply the
darkness on the edges. And then I go toward
the center of my iris with much
more lighter shades. This is how much you should
go dark in this step, you don't need any more
darker shades than this. This darkness is enough. I'll continue like this. I completely go toward
the center of the iris. I'll continue the shading for
the lower part of my work. From the bottom of the iris, I'll do the same thing. I just try and bring the
shades all over here. Okay. Then I would go till
the central area. And also from the top I
create the same darkness, considering of course, the lights that I've
told you before. Okay. Then very slowly I fade the darkness and spread my shades without going
into the light areas. Okay. And also from here, from this corner, I'll
continue downwards. Okay. Now I'm going to apply more darkness from the corners
with a high hand pressure. Then as I move
toward the center, I decrease my hand pressure
in order to decrease the darkness as you
can see right here. And as I'm doing, I, J. Make around my iris very neat. And I start shading in
opposite direction as well. My previous shade would
actually look faded. Okay, now I'll do the same
thing from this side. Should do the same
thing for both sides. They should look symmetrical. I'll be shading this area. I placed the darkness in their own placement
and I'm just using just a little bit more
hand pressure comparing to the previous layer of shade
that I had already applied. Okay, so here it goes, and I continue till the top. Then I would also work on the bottom part of
the iris as well, but comparing to the sides, this area would have
a lighter shade. It's a bit weaker on the
sides left and right, we've got much more dark shades, but on the bottom and top, it would be lighter because of the presence of the eyelids. Of course, here it goes. Okay. And I'll do the same
thing from the signs. Okay. Now, on the top part of my iris, this darkness is a closer to the first degree
of the darkness. Therefore, I apply this darkness with a higher hand pressure. And based on what
I see on my model, with a bit of space
between the lines, I create this shade. See again. I consider a small gap. Then over here I create a shade which is not
too light and not too dark. It's really average. But I'm going to
work on this shade, in this shape and in
this level of darkness. Okay, so I come all the way to these sites and I spread
the darkness over here. Now let's continue
in next episode.
4. Completing iris shading and creating eye texture: Hello again and welcome to the rest of the
tutorial with me. All right, now let's
get started again. And I'm going to start
from the top of my iris, for fading my
darkness very slowly. I'm doing this shading of wine. See, I am fading them into one another and
blending my colors. Actually, I'll make my shading
more cohesive. I want to drag a bit of
my darkness from here, drag it out as the
shape that it is. I'm actually going,
based on my reference, these are actually the shadows
reflected on the iris, from the eye lashes. It's like we can
see the shadow of the eyelashes
reflected on the iris. Just be careful in these areas. My darkness is really strong, see like that. I also have some
more strong darkness over here in this
area of my work. Then again, I'll fade them just as you can see. Then from here I'll
do the same thing, all right. At all times. I try to make sure that what I'm doing
on this side of the eye, I would do on the
other side as well. Because your eye should
look symmetrical. Of course, considering the
fact that you might have some spots on one side not
having them on the other side. But I'm talking about the
general way of the work. The general shadings
and all of that. All right. I work on the bottom
part of my work as well. Now I can consider a
darker shade for here. As you can see, I am making my contrast
higher and higher. I'm increasing the
contrast in my work. Okay. Then from the darkness, I try to bring some lines out toward
the center of the iris. And fading them and
lightening them. As I do that, see, I'm just bringing
some darkness out. But I'm fading them
simultaneously. I go toward the center. Okay. Now I would also create
a curve over here, because the lines inside of the iris are not
actually straight lines, they are a bit wavy. I'll do the same thing
from the bottom, trying to create these
wavy lines as well as I'm shading. Here we go. Basically I'm coming
from the sides and outer parts of the iris
toward the center. And the inner parts pay attention to the
movement of my hand. You see, I'm just creating
some random lines. And I am not creating
them straight. A bit wavy. That's how it's done. All right, Now I'm going to create some dark
spots inside of my iris. It can actually show the
texture inside of the iris. See for example,
over here I have a texture like this, a dark one. I'm showing it with my darkness. I have another one as well. From here I'm doing a
light shading up to here, which I go dark again. I'm just playing
with the colors. These beautiful contrasts are creating my texture for
me as well as the volume. All right, these are just some small patterns
inside of the iris. Very small patterns and designs. Okay, then also
from these parts, I'll do the same thing. I create some patterns and
designs inside of my iris. It also makes it more realistic. Then from here again, I come and create
these patterns. Okay? I also create some
of them as lines. Then I come over here again, I create the rest of
the patterns in the iris. And of course, inside of my eye. Okay, Now I want
to start working on the darkness which is
in the middle of my iris. You see right from here, I should have one part darker comparing to the
outer part of the iris. It means that up until I get to the patterns before
I get to the patterns, I should create a darker shade. You see one layer
of darker shade, you say, with a bit of
space in between them. But from the beginning part of the patterns that I have
just created in my iris, I would have to shade a
layer of darkness too dark, but it's darker comparing
to the other part, which is exactly what we want. Then I also shade one more time in the
different direction. Therefore, my shading would
look much more softer and smoother like this one here. I can also make
some parts darker. Okay. Now from these dark parts, I am going to create very neat and
organized hatches and shades in the direction of my
circle, toward my patterns. And I will fade them as I
move toward the patterns. Again, I say in the
direction of my circle. It's very important that
you keep the direction. I come from the sides
and I create darker shades toward my patterns that
I have created in my iris. And at the same time
I try to fade them. In this case, as you can see, we can have one
layer of darkness on the outer part or the
outer part of the iris. And then a layer of light, the patterns, and again
another dark layer. And at last we get to the pupil. Okay, I would also consider some textures for here, so my eye would actually
look more natural. Okay, also for these parts, I will not forget about
the opposite directions, because I also want all
of my parts to be soft. And in order to do that and
not leave any pen traces, I have to shade in different direction
wherever I'm shading. I also have a strong
darkness here. Again, I've got more
concentration of the darkness and more hand pressure
in this area in order to make it a
very strong darkness. You see there's also a darker shade over here. Here it goes. Okay. Then
I'll continue even more. I go over all these parts
that I can see even traces of white color lightly go
over all of these parts. And I'm going over
it once all over it, but with a very
light shade because they shouldn't be as white as the light reflection
inside of my iris. I go over all the whiteness. I can even emphasize on some
of the darkness you see. Okay, here we go. I also think these areas might
need some more darkness. So I go over them again to emphasize on
the darker shades. And I'll continue that. Okay, then I'm
spreading the darkness from the center of
the iris and pupil. And then I complete this
darkness on the top of the eye, increasing it even a bit more for creating
a higher contrast, very intense contrast between this area and the reflection of the light inside of my iris. I should also create
some lines over here to show the reflection
of the eye lashes. Shadows. These lines represent the shadow of my eyelashes
reflected on the iris. I've got to create them as well. See, now it's looking better
and better. From here. I give it a bit more
shading also from here. Okay, we're almost done. Here, and here we go. All right, it's done now. Let's see the rest
of the tutorial together in next episode.
5. Sclera shading: Hello again everyone and welcome to theanother part of
this tutorial with me. Okay, let's do the rest
of this area together. In this step, we are
going to work on the white parts of the eyeball. In general, for working
on light areas, we always start from the sides, which are deep and they
actually have darker shades. We start from there
and then we try to decrease our hand pressure as we move to the
center of the light. Okay? Now, little by little, very patiently, I am going to create this darkness
on the sides, as I said. And then I'll fade it. I place it in its own placement and little by little
I'll fade it. Just like that. Okay. Now I do it with a very
controlled hand pressure. It's very important. And I'm also doing it
very slowly and lightly. I apply the darkness and I try to spread it
a little upwards. You should definitely
take the extra ink off the tip of your pen
because this is a very light area and want any surprising and
unwanted spots. Okay, on the sides, I start creating very soft and smooth
shades, just like this. Okay? Now, very slowly I try to decrease or increase the darkness with controlling
my hand pressure. Then I try to drag and guide this
darkness toward the light, and I faded simultaneously. Here it goes. Now, as I told you before, if you cannot have as much control as you want
for creating lighter shades, I really strongly
recommend you to take your pen near to the
end of it, in your hands. Generally, you can
have lighter shades. This might be a good point for those of you who still have some troubles controlling
the pressure of the hands. Okay? Trying to make my shading cohesive as well so that you can see I'm shading in
different directions. Okay. Now, whenever you're
working on a model's eye, this is a very important hint
that you should take into consideration that even some of our students
might be mistaken. In this point, the
iris should not be, not actually have a border. You see right now, my iris has a border. Never ever, the iris should have a border between itself
and the eyeball. Very slowly, I try to create a very light shade, very faded. So I can actually blend the
iris into the eyeball and eliminate that border
that I have as a separation between the
iris and the eyeball. Therefore, it would look more natural and at the same time. It can actually create my volume so I can show
my eyeball is prominent, especially in the iris area. For this upper part, I need more darkness. Of course you can get it, even if you look at your model
that would be like this. Okay, so I'll continue right from the top. I try to increase the darkness and have more of it coming down. I still try to shade in different directions so I can fade it and make it
smooth and soft. All of your shades in the
eye area should be the same. You shouldn't have any rough
shadings in this area. That's very important. You can see how beautiful it's getting. Don't worry about it. Just enjoy while you're working. That's the most important thing. As you can see, I'm going in the opposite direction
of my previous layer of shades due to the reasons
that I've just told you. Okay. Also from the bottom, I'm trying to do the same thing. And also from the corners. And the edges. Okay. Then for this area, I try to go in opposite
direction as well. My hand pressure is really low, so I can have that faded
shape for my work. The center of our light, the concentration of the
light should be in this area. Be careful not to drag your darkness too
much into that area. Try to keep it around
it, not inside of it. Then again, I insist
on the fact that you should be careful about the extra ink on the
tip of your pen. Once in a while, you should
just check that and get it off different pens. It's a different rate how
often you should check it. Also fade this part
of the iris as well into the whiteness, or better say, lightness
of the eyeball. Now, also over here, okay. Now from this inner
corner of the eye, I'll do the same thing. I try to apply the same
kind of shaving, you see? I try to do it very lightly. This is the most concentrated
darkness over here. That's the focus of my
darkness on this corner. In this way, also in
opposite direction. It should be like this. Okay, so basically I'm repeating what I did
for the other side, but I just have to
go through it as carefully as I did for
the previous part. Therefore, again, I
emphasize that you should have complete control
on your hand pressure. Therefore, you can actually apply softer and better shades. I would also shade in
this direction also. For here, I'll try to fade the sides and the edges of my iris toward the
whiteness of my eyeball. I would also eliminate the border of the iris and
eyeball on this side as well. I just continue
that very slowly. I can fade this border
and separation. Okay. I try to focus the tip
of my pen on this area and go over here with a controlled hand
pressure or a light one, so I can actually get it to match the color in
its surroundings. If I want to have a
cohesive shade of, not for the time that I want to have a light in the
middle of the darkness. Okay. So I'm fading it upwards. And then I go and create a
general shade for this area. Also in opposite direction, I'm going all over it. Once in, generally it
would look like this. Okay, now let's see the rest of this beautiful sketch and
tutorial in next episode.
6. Shading the upper part of the eye: Hello again, and welcome to
the rest of the tutorial. Okay, let's continue so we
can complete our right. From here, from the
inner corner of Y, I, I start making
them more cohesive. See also from here, I try to go on the opposite direction
of my previous layer. Okay, And then from here I'll do the same. Now I would want to work on this inner corner
of the eye itself, not the eyeball anymore, because we have a depth here. I use a strong darkness. Then slowly, I fade this darkness into the
rest of that area. There is a strong light here. As a shine, I'll separate
it and I keep it. Then again, I shade
the rest of the area. The slowly I'll continue
with my shading, we had a strong depth there, so I went really dark. But as you can see
as I moved out, I made it lighter in this way, just like that. I'll use the same darkness in this area over here. In some parts I go lighter and in some others I go darker. All right, so here we go and it goes like this very easily. We actually completed this
inner part of the eye, the inner corner over here. I should also increase
my darkness a little. I can show that it came from the darkest area
to the lightest area. And it wouldn't have too much contrast between
the shades that I have here because I don't want to show these are
two separate things. They are of one bigger thing. I have to blend them in
with my shadings. Okay. I would also shade this area as well and I'll continue to
the bottom of my work. Okay. Now I want to work on
this upper parts of eyelid. I mean, I'm going to work on
the gum for my upper eyelid, so this would be actually
the darkest area. Again, from here, I should
lightly shade up to here, so I've got a light shade here. It's the gum of my eyelid. I am creating all of my shades with the same
controlled hand pressure. Because I want the color
to be almost a steady, I want to change it too much. Not in this step, at least. I actually fade these parts
in the upper part here. Then I get it out of its
Linar and border line shape. I fade it so they can
blend together and they would look more
realistic in the real world. You don't see any separate
or specific lines in the face or any
parts of the body. Everything is smoothly
blended together. That's what I'm going for here, to create this illusion that
they are actually real. Okay. I'm still continuing over here with controlling
my hand pressure. Of course, I am
creating my shades. Okay. Again, I try to make the shadings that I've already created more cohesive. In this way, even from here, I'm going to drag this darkness upward and
fade it simultaneously. Always keep in mind
that as you're working, you should keep one eye on
your reference and model. So you would know where you have the most concentration of
the darkness and where it's lighter in the
opposite direction. Again, I start
shading like this. Okay. Then I would complete this area, making it totally cohesive
and in one color. As you can see, I'm also shading
in different directions. That would help me as well, to blend in my colors
and fade them. Then over here, I increase my darkness a little bit because this area is actually the place that the eyelashes are grown. Because the concentration of eyelashes are more over there. That area would be darker. I go over it and I increase the darkness of
fading it afterwards. And then from this bottom
part of this area, I'll do the same thing. Okay? Then I should drag this darkness upwards
toward my lighter colors. See very slowly as I go up, I'll make it lighter. Okay. Just as you can see, I'm creating different
color palettes. And blending them
into one another until I get the shade
and color that I want. I give it that faded look, which makes it more realistic. As I told you then over here I'm going to create my line
for my upper eyelid. This is the focus of my darkness because here we
have a big depth. It's very deep, it's
going to be dark. First, I apply my darkness
in the deepest area, then I try to do the
rest of the shading. Over here I have
my eyelids line, which is the depth. As I told you, I apply
the darkness there. Then little by little, I faded as I move downwards to The rest of the upper eyelid to the center of the
upper eyelid bears, just as I go down, I faded. And as you can see, I'm coming down very
slowly and with a small shades and small lines. I'm shading with a small lines, so my shade will actually
be faded and soft. Of course, as I've so
many times mentioned to you about control
of your hand pressure. Again, I should say it's one of the key points in pen technique. If you can control and master the skill of controlling
your hand pressure, you can definitely
go really faster in pen technique and you can
actually improve faster. Therefore, I really
advise you to practice controlling
your hand pressure and do its exercises. You'll get used to it
and you get the scale. You can even warm up your hand before you
start your work. And you can actually
move your hand softer and you can
sketch better. And softer, you can
also do the warm up. Before that, your hand
will just get used to it. This is the concentration of my darkness spreading over here, right next to the darkest
part of my upper eyelid. This is of course would
be the concentration of the shadings spread here. Just as you can see, I just apply the shading very
softly and as you can see, I am using very fine
and thin hatches and very close to each other. Let's just do a review. If you control your hand
pressure better and more, and you create your hatches
and shadings thinner, finer, and closer to each other, you can see your shading
becoming more soft. Your outcome will be much
more softer and smoother. Let's continue in next episode.
7. Completing the shading of the upper part of the eye and starting the lower part: Hello everyone and welcome to the rest of the
tutorial with me. Okay, now for continuing, I'm going to start from these areas and I'll
start my fading. And I would also do my shadings in the opposite direction because
I need soft shades here. And again, I'm going to go in the opposite direction of my
previous layer of shades. I might do it several
times to get the softness that I want to eliminate
the trace of my pen there. Okay, in here I start from the inner
corner of the eye and I'll continue my shading in this way. Okay, so here it goes. I'll just continue my
shadings until I'm done with all of the upper eyelid. I should increase the darkness over here and drag it upwards. But as I'm moving up, I'm going to fade this darkness so it would be on
the lower areas. This is the center
of my darkness, the concentration
of the darkness. And also over here, these parts don't
get much of light. I can also drag more
darkness from the center of the darkness on the upper
line of the upper eyelid. And I'll bring it toward
the center of my eyelid. Just like that, I
completely faded. And get the shades to
blend in together. I don't want any separations or any borders
between my shadings. Here, you see, Okay. Now I would also shade
this area as well. And here I go. So little by little, I actually finish the shadings. Now, some of the shades can
also be seen as hatches. I try to do them with the
small hatches and shades. I try to make them more
faded as you can see. Also from here, I'll
do the same thing. Okay. So then again, I try to make
this area more cohesive. And I'll increase the
darkness of this area, just like you can see here. Okay. So in the upper area,
I'll do it like this. Then I can see the shade that has been
separated over here. I've got to fade it
because as I said before, we do not need any separation. Okay. Now, I also want to
work on the lower eyelid. We should work on that too. Right, right from this
right corner of the eye, the inner corner of the eye, I start my shading
and as you can see, I'm doing this
shading very faded. My work will actually
look very natural. Obviously, you shouldn't
rush through your work. As much time as you
spend for your work, you'll have a better outcome. This is very natural. As you can see, my hatches
are so close to each other. I am doing this shading from several
different directions. When you do this in
several directions, you're actually creating a
softer background color. Then I consider a small space for the gum of the lower eyelid. Then I start again, my shading from the
lower part beneath the eye lashes actually. Okay. So again, I am shading in the
opposite direction as well. Okay. Now, in this
area that I have a border from the lower
eyelid and the eyelids, I apply a darkness and I'm going to fade
it inside slowly. I shouldn't make
any separations. Be careful again. I'll do the same thing
on its side as well. You should just control your hand pressure so you can get the shade the
way that you want it. Okay. Just like that. And very slowly, you should work on this
area which is actually a border between the gum and actually the eyelids gum and the eyelid itself, the lower eyelid. So I'll do, it's fading just like that. Very attractive and beautiful. Then again, I will
spend more time for it to perfect it and do
my shadings, of course. So just like that, I am shading all
over this place, all over this area, In this area, again, I will do some more fading between the gum and the eyelid with moving
my pen circular. It can also be effective in the shape that
we're going to create. Okay, now again for this area, I should consider
almost a light area. And then again from
the lower part, I would actually add a very strong darkness
and started from there. See just like that. Again, a light area. And then a darker one. Do not forget about the
ending part of the eye. I just consider a very
general shade for here. And then I'll do the shadings
in different directions. I consider a strong
darkness for here, almost a strong one. Just as you can see goes
over here and there. Okay, so here it goes. As you can see very belly
and just like that it's done actually I have spread a darkness in this area degree by degree and step by step, you should definitely control your hand pressure
better and more. You should be really careful. You get the extra ping
off the tip of your pen. You'll not have a
messy work then. Okay. Then I'll increase the darkness
of this area very slowly. You shouldn't be really
rushing in any parts that they have contrast and
darkness and light. Because if you just
rush through it, the shading that you worked on, the dark area, is not
created very soft or smooth. For getting it soft and
making it more natural. You need to apply your
shading layer by layer. You shouldn't just
do it in one step. Here it goes. In each layer, I try to increase my hand pressure comparing to the previous
layer, of course, with almost a very
high hand pressure and shadings which are close to each other and
they are constant, I'm actually dragging this
shade into another direction. Okay, let's continue
in next episode then.
8. Completing the shading of the lower part of the eye: Hello again and welcome to the completion part
of this tutorial. Okay, In previous,
as you watched it, we were increasing the
darkness for this area. I'm going to continue the
thing that I was doing there. The darkness should
be almost close to this other area,
right from here. With the circular
movement of my pen, I start creating darker shades in this way. Then very slowly with
circulary movements, I'll increase the
darkness of this area. Here, we've got the
corner of the eye, so it should be darker. Okay. Now, just like
this as you witnessed, I have increased it. I also shade in the direction
of my eye lid as well. It wouldn't actually
look separated from other parts of the eye. See just like that easily. Okay. And I'll continue
all the way up, but as I move up, I am actually fading. This shading, it should be
faded now in the lower area. I've got darker shades in
this way, as you can see. Got darker shades here. And I'll continue and it gets like this, and here it goes. Okay. Now, again, I'd like to, on my lower eyelid again, I got the darkness to here. And I'll continue my work now. I'm going to increase the
darkness over here a bit more. And it s then slowly as I get
to the corner of the eye, I actually fade this darkness in the previous darkness that
I've already worked here. See what happened here. All right, here it goes. Okay. Then I want to work
on the other part. In this part, in the
lower parts of my eye, I can create the shades softer because I've got some pretty rough
shades over here. I'm I use my pen in circular movements so I can make it more
cohesive and softer. The first layer of shade that
you apply is usually rough, but you can soften. I will continue my
shading over here, just as you can see. In this way I am creating continuous
hatches. And Similar to each other. Again, on the opposite
direction of my previous layer. I will work on this
area layer by layer. I increase the darkness. As you can see, I
did not work on my shadings separated
and part by part, they started over here and then little by little they got faded. If you worked on them
separately, for example, if I continued up to here and then cut it here and then
work on the next part, it would be really
hard for me to match the colors of different
sides of my eye together. It would be really
hard to do that. I always say that none
of your work parts, you shouldn't actually create separated shades or
separated areas. You should just continue
shading in all the parts. You cannot work on
different parts of one face part or
one thing separately, unless they look
like the darker area or the darkest area
of the upper eyelid, which is actually
a line above it. Other than that,
it's better that you would work on it very fadedly. Then layer by layer, I increase the
darkness for here. All right, here you
can clearly see it. I'll continue and I increase the darkness for here. Okay, now I'll take this work until the
ending part of my eye, but the focus of the darkness is actually from the outer
corner to the middle. In this area, I
have darker shades. Little by little, I'm actually fading this darkness
into the lighter area. Okay, here it is. I'll continue like that. Just as you can see, very slowly, I come
to the other side and the other part of here
and I'll do my S. Okay. Now, exactly what I did on
the right side of my work. I'll do it over here as well. You see I have wrinkles for this lower
part of the lower eye lid. I'll work on them as
well in this way. Now, if you just create
lines and you do not actually fade your
lines in any direction, your work would look
like two dimensional. But if you actually fade your lines in
different directions, your work will not two
dimensional anymore. In this way, you can
clearly see that. And here it goes. Okay. Now, as you can see, I'm creating kind of semicircles over here to
create the skin texture, the wrinkle or the. Spots that you can
see near the corner of the eye can be
created like this. Then again, from here, I create some light shades. Very generally, without
any specific point. You should just control
your hand pressure perfectly because I
need very light shades. Then I'll do it in the opposite direction
of my previous layer. I'll start shading again
in the opposite direction. This would be another layer, of course, again in the
opposite direction. Okay, here it goes. And then I apply my shadings
on the corner of the eye, and I faded the light
that I have over here, the light and the whiteness
of the paper itself. I'll continue, I'll go over
it in the opposite direction. Once going like this, therefore I can do
my shadings and fadings in the next layers. See, okay. Now I'm also going to
drag this darkness upwards this way very slowly. Without any, I'll just wards. The thing that I'm doing is exactly like the
corner of the eye. If you see some part dark
right from the beginning, we do not work on it. We do it slowly layer by layer. From the lighter shades
toward the darker shades. We should create our
darkness layer by layer. Not all of a sudden. Okay. Then again, I start creating these light shades with a controlled tan
pressure for this area. Okay? See how it's done now, if I increase my hand pressure a little and I also go in
all different directions, I would have a better outcome now for watching the rest of the trial be with
me in next episode.
9. Shading around the eyes: Hello again, and welcome to the next part of this
tutorial with me. Okay, in the previous part we were actually shading
the lower eyelid. We're going to
continue with that. Now I'm just going to shade this area in
opposite direction, just like the previous layers in other parts that we've
worked together. I also add some more
darkness to this area. Here it goes. And just as beautiful as this. Okay. Now with a controlled
hand pressure, I try to shade from these
parts toward outside. I'm actually going to
the negative space of my sketch and I'll
just throw them off. See, just letting the lines
go at the end of them. And here we go very easily. Then I come to the lower area and I'll continue the
same thing again, just as it is in the darker parts. Of course, I increase my hand pressure in
the lighter areas. I decrease it as usual. It's necessary for you to
control your hand pressure. Now from here, I'm going to create a stronger
darkness like this one, which is actually the beginning of the curve and the depth that existing on
the lower eyelid, it's showing where it went in. Okay. You see our beautiful
eye is coming all together. All right. Then I'll come up to this bottom area. Here I go. I'll continue just as this now I should increase
the darkness over here, making this area darker. Also, from this upper area, I'll do the same. And I'll bring the
shades down and fade them through the
rest of the colors. Then I'll shade in the
opposite direction, so I can have softer shades. I erase the trace of my pen. So don't forget that in any
part that you're working on, you should create your shades, and especially your
darkness layer by layer. Okay. Now, as I told you, I should also drag
some more shades from my eye to the negative
space around my work. Okay. Now I drag the
shades of this area higher like this one. And I'll move forward. I'll do the same thing for the lower part of
the lower eyelid. Okay. I know it doesn't take
too long if you want to do it very quickly, but as I told you, it's better to take
your time with it as much as you
spend time on it. Definitely, you'll have better outcome just like me adding
this darkness layer by layer, especially on this area
on the lower eyelid. Don't forget about the
wrinkles and how you can create them with shading
and the contrast. So with creating
shades like this, I'll create the wrinkles below the eye like layer and layer. Here it is. Okay. Now, from this area
behind the upper eyelid, I should take out some darkness. You see from this deep area, I should bring the
darkness a little toward, outside of my work, I should spread the darkness
that I have here in this depth on the upper eyelid, on the top of the upper eyelid, which is concentration
of darkness. Bring the darkness and
spread it upwards a little, just as you can see. Be careful, control
your hand pressure when you're hatching
and shading this area, you should actually let
go the end of your line. It just looks like this. It would be freed at the end. And in the beginning,
this is how we spread this darkness
above the upper eyelid. See? So I spread the darkness and I'll fade it toward the
negative space of my work. This darkness wouldn't
just be there, it would be faded. And it would look more natural of just like the
shades on your skin. Okay. Now I'm going to work on
these upper parts of lid. Again, I'm doing these
parts darker and I'm moving toward
the lighter areas. See I have a high hand pressure. As I move higher and
more toward outside, I decrease my hand pressure. I have it high first and then I'll decrease it
as I move forward. You can create all of these
shadings very easily. Just, it has one condition, control your hand pressure. That's the key rule
in pent technique, as I've said so
many times before. Okay, then I'll go in
the opposite direction, just as easy as that. I've made it. I want to do the same thing
for this side as well. I'll just continue that
from the upper eyelid. I'll go and create this area again. I'm going to shade in
the opposite direction of my previous layer
of hatches and shades. It's going to get easier
for you as you do it. Several times I'll do it, I'll continue it all
the way up to here. We're almost finishing the eye area, okay? Now, from the side
of the eye lid, I'll do the same thing. I'll start shading. And then a little bit higher, I'll go in the
opposite direction. And I'm doing this with my
hatching, and I'll fade it. Okay, Here it goes. As you can clearly see that when I placed my
darkness over here, I'll do some fading
for this area as well. I'm just going to fade it. Fading this area, it's really easy job to do. Okay? Now, in the
background of my work, or basically the negative
space of my work, I'm going to fade all
of these shadings. It actually looks like the eye is coming
out of the paper. If you do the fading correctly, it will give you
this feeling that the eye is coming
out of the paper. Then you can say you've
created a professional sketch. Okay. Some hatches
after one another. Then I'm going to actually
apply some whites spots, which doesn't match the color
of the rest of my work. I'm just going to work
on them like this. I fix it. Now I consider some
wrinkles for this part of the eye as you can see, and I'll create some shading. Let's complete our beautiful
eye in the next episode.
10. Drawing eyelid and final shading: Hello again, and welcome to the rest of this
piosophul sketch. Okay, let's do it together. As you can see, I was working on this
darkness in this step, the wrinkles around the eye. And I'm working on it with
moving my pen back and forth and create hatches and
shades for my upper eyelid. All right. Then with a bit of distance, with a bit of space, again, I start from the upper area
and I'll add another wrinkle. I'll move on. Do the
same thing over here. Another wrinkle below some of these lines that
I have in my work. I'm going to shave. Therefore, I can create a
contrast and I can show the skin texture in
my work with creating some depth by adding this darkness next
to the light areas. Okay, you see, okay. Now we should apply the
finishing darkness in our work. The ones that are actually
making my work complete. Even right now, if
you look at it, it's like it's looking back at you and it's like it's
coming out of the paper. We've achieved what we wanted it really nicely done. I'm sure yours is as
good as this one. As you can see, I'm going in the opposite direction
continuously and constantly to
fade this whole area. And simultaneously, I pay
attention to the fact that the darkness over here in this
area should be increased. I'm fading it into here, but still should be
increased and faded. I should also work on
the shavings on here, the bottom part of
the lower eyelid. And I'll fade them more. So from here I create some shades to create
the texture of my eyes. Skin. Okay. Now, in this step, I want to work on
the eyelashes now. But before I tell you how
you would work on that, make sure that you fade
all of these shadings toward the negative space of your work or the
whiteness of your work. Therefore, my eyelashes would
show themselves better, just as easy as that. Now I'm going to use my upper eyelid for
creating the eyelashes. And I'm going to start with
the corner of the eye. Be careful my eyelash
doesn't come out of here. The eyelash comes out
of the eyelids gum. Meaning here I drag
and I let it go. The next one will actually come underneath
the previous one. Just like that, I create several eyelashes
in the same area. As you can see, I'm letting
go at the end of the lines. Also randomly, they are not
really in a specific order. I'm just placing
the eye lashes in their on placement as the shape. And as much as I can
see in my model, see here it goes again From here. My lines should be
sharp on both ends. It means that both
the beginning and the end of my line a sharp. I let go of my line at both
ends while I'm creating it. You see the beginning and
the end. Both are sharp. That's it. All right, I'll create this one too. And as I move toward the
inner corner of my eye, my eyelashes get
thinner and smaller. I should also consider
a shade for over here, for this gum of my upper eyelid. Basically, the placement where our eyelashes
actually have grown. It actually gives my eyelashes
a volume two from here. As you can see, my eyelashes
are basically laid down. Here it goes. Here I go. Now for some parts of the
eyelashes that I've worked on, I try to make them see. I would even fan. I would create more of them. In between them, I feel between them the
areas that have left, especially in this area. Okay, now we've got to increase the darkness
of here a bit more. My eye would get more volume. We can also work on
this outer corner of the eye as well as that part, just the way you can see. Then I would actually place
the darkness in the corner of the eye so I can show there is more concentration of the
eyelashes in that area. Now I want to work on the lower eyelid and work on
the lower eyelashes. I'm just going to repeat the same process that I have
done for my upper eyelid. Again, I start from the
outer corner of the eye with creating lines which
are sharp on both ends. I create my eyelashes. The process is totally the same. There's just a small difference that the lower eyelashes
are obviously a bit shorter and smaller
comparing to the upper ones. Okay, you can also, and I think you
should also create eyelashes on another paper before you do it on
your actual work. It's better if you
can add it like this, You've practiced it before. And then you can work
on your actual sketch. You can clearly see
what's happening here. In the same process
is in action. Here it goes just as pretty as this. You see when we work
on the eyelashes, it's like the eye is
showing itself right now. How much better it
would be if you have enough practice for
creating the eyelashes. If you have enough practice, you can create these eyelashes
much more beautifully. Okay. The same way that I had some shade for the
upper eyelids gum. I'll do the same thing
for the lower eyelid, in the part that the
eyelashes are growing. I just got to give
this place a shade. Therefore, I can give
it more natural look. It would look more realistic. Then again, right from here, I take some darkness
into my work. Or better say I'll
bring it, okay. Okay. So you can clearly see it's
fading into the paper. I just have to add some
more darkness from here and I can move on forward. And of course, some more wrinkles for the lower
parts of the eye. Up to here, the sketch of my eye with the pen is finished. I hope you've enjoyed
this beautiful sketch. And let's do the rest of
them in the next part.
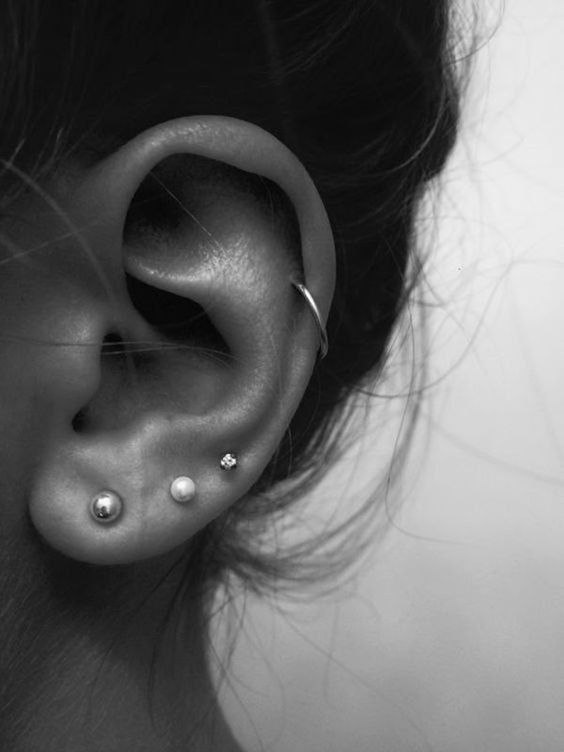
11. Drawing the ear with the hatching method: Hello again to all
of my dear friends, and welcome to a new part
of this new sketch with me. Okay, in this part, I want to tell you how you
can create shadings with big hatches exactly in the contrast of our
previous sketches. This time in this sketch, we want to work with big
hatches and big shadings. But I should tell
you this before, that the sketchings
that are created by big hatches do not
look real at all. They don't look real. They
don't look too natural. It's J for sketching
and for doing it fast. For creating a
sketch really fast. And actually the sketching style of creating your drawing. First, I will determine the
darkest areas of my work. This is an ear that I'm going to create now based on the darkness that I can see. I'll start shading in this way. Now as you can see, I'll do the same
thing from this side, from this area as well. If you pay attention. In the concentration
of white darkness, I create this hatchings
and shadings darker. As I move toward the center, the shadings would be lighter. But in all of these parts, my hatches are big. As you can clearly see, I'm not going soft anymore. It's a bit rough, but still I'm going to shade in
different direction as well. I can cover all this area, then I can move to
the next parts. Just like that, I shade
very easily and I just be careful that which part
has darker shades, in which parts I should
have lighter shades. This is the only thing
that is important here. For example, in here, my hatches and my shading
should be darker again. As I move toward the center, it would get lighter. So I'll continue. Okay, Then I'll do a
general shading for here, like giving it a
background color. Once I'm going to go in
the opposite direction, then again I'll come to create darker shades in order to create more
volume for my work. For example, in this area, I she and I come to the
lighter areas from the top. Again, I shaded, I come
to the lighter areas. Basically, I am shading from the darker areas
towards the lighter areas, all directions and
from all sides. Also from here, as you can see, they are very sharp
and big hatches and shadings that I'm
placing over here. Just by creating continuous
and constant shadings and hatches right
after one another, I'm getting this shape. I'm getting the volume
of my work based on the shape that I
have in my model. Just by following
the directions and creating these shades next
to each other, I can get it. I can get the volume correctly. Okay. I'll continue my
hatching and shading. I get the parts which are absolute darkness to
their absolute darkness, I try to keep the central area as light as I have
in my reference. It means that even
on the light areas, you shouldn't just do one layer of hatching and
shaving and that's it. You should get its color to what you see in your
reference, in your model. You might use different
layers of hatching again. Okay. It's also
the same in here. See, all right, I'm just creating very beautiful
hatches to guess, An overall shade here. I work on these hatches
upwards and I let them go at the end so I can
show it's faded as well. Now for these lower areas, I also try to
create the hatches. Here they go. Actually, it's not really
a hard thing to do. You just have to pay attention
to your reference at all times because first, the amount of darkness
is important and second, the direction of your
shading are very important. Due to creating the volume
of whatever your sketching, I just drag this darkness
toward inside of the ear. Also over here and also here K. Then I'll also create the darkness in
these parts of the ear. You see my dear friends, how easy this way
and this method is if you want to get very
strong in pen technique, in sketching with pen technique
is practice this method, the actual sketching
method with pen, your hatchings
would be stronger, your shadings would be better. You can better choose that in what places you should
create darker shades. Lighter shades, where you place the hatches next to each other or far away
from each other. Darken them, lighten them, and so on, and also the
direction of your hatches. All of these can make you
better at pen technique. And one of the ways to
practice that is actually this sketching method that you shouldn't just go
pass by it very easily. Here we go also. From here I'll create some
more hatches, apply them in this way. See over here I have a prominent
part on the ear. It's actually the middle part. I try to keep its shape. I would have lighter
shades over here to show that this
area is prominent, but I'm going to darken its
surroundings and shaped. I would also I'm sorry, I didn't understand
one of the earrings, so I shaded over it, but I'll try to fix
it lighter now, again, from the sides. From the edges. I'll try to create the shadings
with my hatches. It's not really hard. Again, I say there are just some details you
have to pay attention to. The rest is just
very easy and fast. As I told you, this is fast way to create
a sketch with pen. And I would also fade the darkness over
here on the ear lobe. And here it goes. All right, then here it goes. Now I come over here. The lower part of the ear loop per say the bottom
part of the ear loop. Again, I start shading upwards in different directions so I can get the
directions correctly. I'll finish this part
of the ear very easily. Just as you witnessed. I'll come for this
upper part of the ear because we shouldn't forget
about this area as well. From here, from behind
the ear toward outside, I'll start my just like that. From the darkest parts
toward the lighter areas. So I can clearly separate
the ear from my background. Okay, here we go. Just like that. From below the ear, I create the same darkness. Again, I say to
separate my ear from its background to show that
there is a difference. Like this one, I would also shade in the
opposite direction. I create my hatchings there, just as you can see, and I'll continue my work. So basically, I have
separated my ear from the negative
space of my work, from the background, just
by simple big hatches. Sir, this is a sketching with pent technic that as I
move towards this side, as you can see I am lightening the sketches just a
little, not too much. Okay, now let's work
on the ear itself. The main part of our work. Of course, I am shading
on the darker areas. Again, I'll also work on the
shadings inside of the ear. Let's continue in next episode.
12. Completing the ear drawing: Well, hello again,
and welcome to the rest of this
beautiful sketch. Okay, now we are going
to do the rest of the shading together
by hatching. Of course, just like that, I'm working on my hatches, creating them big
and very visible. As you can see, I'm
going in all directions. And from the side and
the edges, I go darker. And I bring it a little
toward the center of my ear, just like that. And I'll do the same
thing for over here, for the top part of the ear. Okay. So basically I'm going to
create a general shade for the ear in this way, and here it goes. Just be careful
that the center of this area should stay light. I'm going to guide my hatches from the edges toward the center and
the middle of my work. And also I'll do the same thing in this area and the top part. And also from the
outer part of the ear, we've got a dark edge
there too. All right? Again, I try to bring some
soft shades over here in order to show my hatches are more organized and they
are not just too random. Just to make them neater, see how beautiful you can
get the volume of your work. Even with hatching, it's
just important that you know how you should use
these hatches, in what parts. I'm also going to consider
a very general shade for this area, even like this. From here, here it goes. Okay. So I come over here and based on the darkness
that I have in my reference, I will work on it in this way. I can also get the shape that I want and get the volume
that I want for my work. Just like that, It's
going to be done. I'll come all the way down here. Then again, I leave
a light area here. I'll do the hatching
and the shading. That's all you see. Now, in hatching, you don't have any strict framework or
you don't have hard rules. It's just by creating some lines as much as you know where you should increase your darkness and where you
should decrease the darkness, you can actually do
the pen sketching. Some of our famous artists
work like this in general. Not only this but also they actually work on the
face, a complete face. With this method, it's
a very enjoyable. A way for all kinds of people, even for a person
who doesn't have any background in
working with pen. It can also be fascinating
for that person. Okay, here it is, and here it goes. Now let's work on creating the shine on
the earrings themselves. As you can see, I actually want to shade one side of the earring toward
outside and inside of it. I'm going to create some
of these lines here. I also consider a very
mellow shade for it. Also for this earring, I'll do the same thing. I create a smooth and
light shade in this shape. Basically, that's it. Then for this other
earring, I'll do the same. Okay, then I would do some
more detailing for my job. After that, I can finish
this sketch beautifully. I'll increase the darkness
of here a little. I want to show the depth of the ear and I want to
fade it inside of that. Also, the darkness for here, which is basically
the ears hole. I'll increase the
darkness for there too, just like that. Okay. I'm going to bring some of this darkness in this
area. On this side. I would also work
on the shadings in this area and combine it and
fade it and all of that. Then I would also like to work on the darkness
for this area. I'll get it out of its
totally white shape. I would also create the darkness for this
area and I'll bring it up to here until it
goes in this way. We're almost done here. I would also like to go over the hatches and the
shades that I've created for my background just to give
them some touch up details, making them look better, create some lines like this
in my work that it would actually show the line creation and the hatches in my
work better and more. I should emphasize
on the darkness of this area because
it's very deep. And I try to fade it and
blend it into other colors as well as you can see. Okay, here we go. Very easily, go
around these circles. Okay, that's it. You can also create
another one over here, darker because I've
already shaded over it. I created a dark earring instead of the one
that I shaded over. You can eliminate it completely. Or you can do it based on model, or you can do it as I did. Then you should fade the darkness over
here toward outside. Okay. Then I should create some curved lines over here so I can also determine
the direction of my work. It's very important. Just as beautiful as this. You've got it. Okay. I'll just repeat it again. You should actually
practice this method of pen technique over
and over again. It can help your hand to be more synchronized with your mind and you can create your
hatches and shading better. If you get very skillful
in this technique, You can be very successful in real and hyperreal techniques
in with pen as well. This is actually
the most basic way you can practice
your pen technique. This is what's all
sketching is about. The lines that I'm creating are actually meeting the work
with the background. I hope you've enjoyed this tutorial as
much as the others. See you in the next ones.
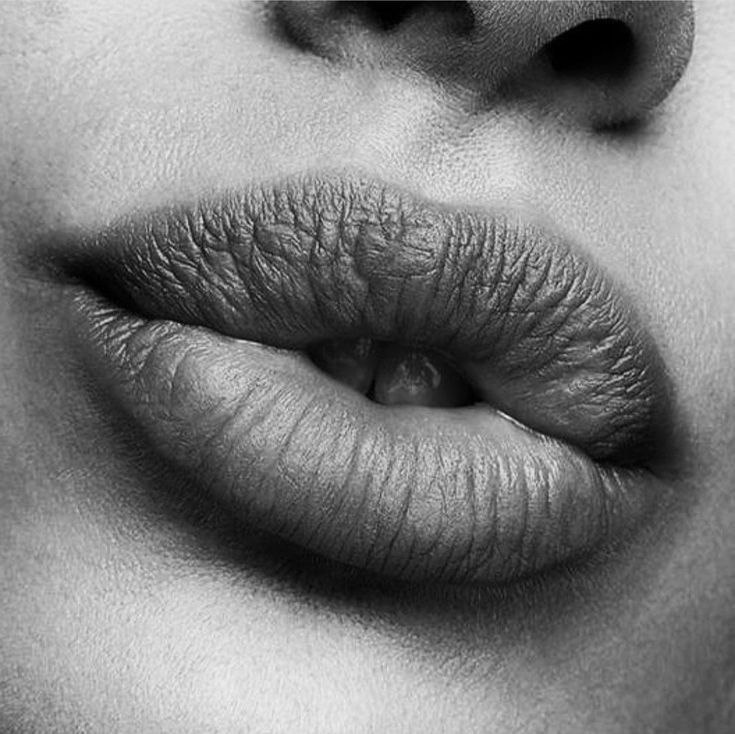
13. Primary sketching of the lips: Hello to all of my dear friends. Welcome to a new chapter of
Sketching with Pen With Me. In this chapter, we are going to work on another
part of the face, which is the mouth, or basically the lips, that we are going to sketch this beautiful
model with our pen, just like the previous ones. For getting my primary sketch, I darken the back of my model. Then I place my
model on my paper where I want primary
sketch to be. Then I start going over my main lines and even some
small details with my pencil. In this case, I can easily get my primary
sketch very fast. I'm just placing the
lines that I need. Here they go. I would also
work on the teeth as well. I'll just check it once I can see my sketch is
transferred or not. As you can see, when you check, you figure out
which parts you've forgotten all over these
parts and we're done. This is a primary
sketch of my mouth. Now in the next step, we are going to shade this beautiful mouth to
lips and a bit of tooth.
14. Start shading the lips and create the texture of the upper lip: Hello, welcome to the first
episode of the Sutorial. Okay, in this part,
in this episode, in this chapter
first I'm going to determine the darkness and the textures of the lip itself. Then after that, I can
work on my main shades. Just like that, I try to apply the darkness
on this corner. So I'll continue from
here, or better say, I'll start from here to
apply my darkness and start my shading slowly from
different directions. I apply my darkness. Okay, here it is. You see I am fading. My darkness, surroundings,
and edges completely. Also, on this side, I create the darkness exactly as I can see it in my
model and in my reference. Okay, here it goes. I apply the dark shades and the darkness over here all the way till I get
to the other side. And also on the
bottom, here it is. Now I'm going to start shading from inside of the
lips, toward the teeth. There is a darkness like that. Also from here I've got a
darkness like this one, a very dark place. Now, first I'm going to work on the textures that
I have on the lip. By that I mean the upper lip, I start from the
bottom of the lip. I try so hard to create
these textures as similar as my reference in
their own placement, but they are created randomly. Totally randomly. There it is. On the bottom parts of the
textures, I go darker. As I move up toward the
top of my upper lip, they'll be lighter basically, I'm working on the upper lip, on some parts it's darker on the bottom
of it, it's darker. As I move up, the textures
get lighter Also, I let go of the more. Okay, so just like that, as you can see on the
top of my upper lip, the textures and the lines
are very light and faded. Okay, I'll do the
same thing over here, creating all of
these ful textures. They are so easy to create, you just have to pay
attention to two things. First of all, they should
be created as randomly. They shouldn't be too organized, or they wouldn't look
real natural or good. You can try to put them in the place that you
see in the model, but if they don't come around exact same place, that's okay. The second thing you should pay attention to, as I told you, is that on the bottom
of these textures, on the bottom of these lines, you should shade darker, and as you move up,
make them lighter. I want to do the same thing on the other side of my lip
from the other corner. Of course as you
can see the other, this other corner is dark. But I'm still going to place these textures in their
own placement and I'll try to fade them
because this area is a complete
darkness in my work. Due to that, I work
on these parts. Darkness more and more again, As I get to the top of the work, I'll lighten my shades. Here it is. In this way, okay. Now I should also work
on the central part and the middle part of the lip, and then again, I work on my lips. Textures in this area very easily based on what
I see in my reference. Most of it is based on that. Again, I say if you
don't get these textures in the exact same place as
you can see in your model, impossible, don't
worry about it. They are more random
than organized. Okay, now in the next step, the thing that I should do
is that very cohesively, I should start shading my work. Meaning from the center
part of the lip, it means the inner
part of the upper lip. Let's start with shading, especially dark on that area, On the center, right
above the teeth. But as I move toward outside,
decrease this darkness. Then I framework the lip. I determine the area
around the lip. Now, just like that, I move on to do the
rest of the shading. I'll continue my
work very easily. Very easily. It's just a matter of you
to take your time. Okay? Over here I should bring
more darkness into my work. Just as you can see here, I'll have more
darkness in my work, in this prominent
part of the lip. I'll just repeat the same
thing here as you can see. Because this contrast
that I'm creating over here is basically showing
you the volume of the lip. I've got to go
darker on the edges and wider on the center
to show the prominence. Okay, now in the shape
of these textures, I bring darkness into the work. And from the darker areas
I go up toward the light. I try to apply my darkness on the textures that I have
already placed here. Just as beautiful
as that it's done. Okay, now from these sides, I should apply more
darkness into the work. In this way. See, I will spread this darkness all around my lip. And then I'll fade it as well. I'll spread it and I'll fade it. Then I bring a very
soft and smooth shade for the surroundings
of my lip. Like this. As we did in our
previous sketches, it's just for getting the lip separated
from its background. Then I need more darkness over
here from above the teeth. That will be actually the
inner part of the upper lip. I'll create it and I'll try to fade it outwards and lighten
it at the same time. Here it goes. Then I would also apply
some more strong darkness for here in order to show
some wrinkles on the lip. That they have even more
depth part of the texture. But are some cuts. Okay. I'll try to keep these textures
that I've created here. I don't want to lose them in
all of this shading stuff. You know, as I told you, I even emphasize
on some of them, like when your lips
go dry and they create wrinkles, as I told you, I even create a
very general shade around the lip to
make it pop out. Now, also for the
other side of the lip, I'll do the exact same
thing from the bottom. I move toward, up with hatching. I'll try to create a very
strong darkness and fade it. This side, as always
said, is darker. So that's what I need to do now. I'll try to keep the hatches that I create
close to each other. As I move my hand, I can actually get softer and smoother shades if your hatches are right next to each other and very
close to each other. Okay? Now, from this part of the lip, I would bring more
darkness into the work. And then little by little, I fade this darkness
in this area. Okay? Now, just as always, I should bring the darkness from this part of
the lip upwards. But again, I tell you that you should work
on the darkness, on these shapes based on what things that
you wanted to create, based on the textures that
you have already created. K. Be very careful
about the placement of the darkness and light
in your reference or model because the volume and the direction of your
work is determined by them. You shade it all
light or all dark. You don't get to see this be
useful volume in your work. I'll just make the shadings
over here more cohesive. Basically, I go over them. These shades will
just be a bit more darker even on the textures that I've already had created. For the lip, I should emphasize on them
and go darker on the. Okay, Then I'll try to darken
the shadings of this area, making them a little bit more cohesive comparing to the
parts surrounding it, but it's still lighter
than the other parts. Step by step is shape this beal. Then I also create
some more textures like creating tree
branches and sticks. That's so easy, you just
have to pay attention to the way that you're
going to create your texture and the
way you shade it. So we're going to
continue in next episode.
15. Creating the lower lip texture: Hello again to all
of my dear friends, and welcome to the last part
of this tutorial with me. Okay, so we're going to work on the rest of
this beautiful sketch. Well, I'm going to increase the darkness in
these parts again, and then I place some darkness
as the shape of textures. I would also actually keep some lights so I can
create a contrast as well. This area has a very
strong darkness. I increase my hand pressure, therefore I can get a very
strong darkness here. Then I come more to the middle. Again, I work on
some dark shades. Actually, I'm
dragging the textures upwards and I move up. I create my textures
lighter and smaller. They should be thinner, finer, and smaller, and
also a bit lighter. Okay, now for the lips, we also need some
horizontal textures. I'm going to create
them like this, Therefore, I can show the
skin on the lip better. I would also have to create
a strong darkness over here. This area in the center
of the upper lip, I would have a lighter part. By darkening both sides of it, I can show it's more prominent. You see here it goes. Just like that. We had our work. Now, I want to work
on the teeth here. First of all, I should
determine the line for the lower lip and then the
line between the teeth. Here, I create dark
areas of the teeth, the parts of which there's
a space between them. And I can see inside
of the mouth. Then from the corner, from the darkest areas, I create a very faded
and light shade toward the left side. You see again, I have a
stronger darkness here. Then as I move to the
center of the tooth, I lighten my shades also
from the lower part. But as you can see, I want the whole shaving to
be more cohesive. Therefore, I go over
it once then again, I would increase the darkness
for this area, even here. Okay. Now I'll do the same thing. I'll follow the same process for this other tooth as well. One very general shading, I faded from this lower area. Then in this part
between the two teeth, I'll do the same thing. I'll darken this area completely
between the two teeth. Again, I say, okay. I fade this area like that, I create the darkness
toward the teeth. Okay? Then I come to the
lower parts of my tooth. I work on this area as well. Okay. Now we can
start on creating the lower lip exactly as
I did for the upper lip. I'll do the thing like the text string and the shading
on the lower lip as well. As you can see,
first I've frame, worked my lower lip. I know the concentration of
my darkness is over here. That is also spread it downward. In this step, I'll
just place it like that very strong darkness, which is spread it a
little bit downward. And then I'll start creating the textures on my
lower lip the way I see them in my reference here. You see I also create some more textures from the darkness I have on
the bottom of the lip, the bottom of the lower lip. Just to clarify, I would also consider
some textures over here. You should pay a lot of attention to the direction
of the textures. Your textures should be in the direction of
your lips curve. It's important that
you do not just create straight lines for
these textures because these are the things that
can create your volume and you should put them in the correct and the
right direction. It's very important be
very careful about them. They can give your work
a whole new look or ruin it completely. Okay? As you can see, I'm creating different kinds of
textures for the. I even consider some of them
for the center of the lip. Here, you can see easily I've worked on the lips textures and I've placed them in
their own positions. Okay. Now from the
slower part of the lip. Again, based on my direction
I come and I'll continue my texturizing. Here it goes.
16. Shading the lower lip and completing the design: Okay, now, exactly like what
I've done in the upper area, I'm going to start
creating the shadings here for my lower lip basically. I'm going to start
from the bottom of my lower lip with a
controlled hand pressure. I'm doing my shading here, I am creating those
beautiful shades. I also do it from this side with a high amount of darkness. Okay, here it goes. And it will be like this. Obviously, don't forget that you should go in
different directions. I come all the way up. Just be careful that this prominent part of the
should be definitely light. When I get my darkness
to this area, I'll decrease the amount and the strength
of the darkness. Just getting my light and getting actually
my shades lighter. Okay. So here it goes. And then again, I also shade
in the opposite direction. It's actually coming
to life even from now. We just have to work
harder on it a bit. Okay. Then I'll make my
shadings more cohesive. Okay. And then I increase the
darkness of this area. With creating textures
like this over here, I'll do the same thing. I should pay attention to the deep textures on
the corner of the lip. You shouldn't just
forget about them. Okay, here it goes. I've texturized it, I
shade it dark over here. I should also fade this darkness to outside
of the lip as well. See. So it's the same way. Okay. Now I also want to do it in the opposite direction to have a more cohesive
shade. Of course, just as you can see here, I would also fade this darkness toward my
background completely, should be totally faded again. If you do that, it's
going to look like the lips and mouth is
coming out of the paper. Like what we did
for the eye part. For the eye chapter, I've got to place some strong
darkness here of fading it. And I would also take some of this
darkness upwards as well. Just drag a bit of it up so I can get a darker shade on
the bottom of my lower lip. Okay, here it goes. Okay. I would also want to work on the darkness on the
corner of the lip. I'll try to fade it toward
the outside as well. With a soft and smooth
hatches and shades. I'll fade them toward outside. It's very soft and smooth
shades and hatches. It's an easy thing to do if you're paying enough
attention to it. Just as beautiful as this, we are actually getting
our work to come together and create
a perfect outcome. Again, as always, I insist on the fact that if you
spend more time on it, you're definitely going
to get a better outcome. Don't be afraid of that
and don't rush through it. I should also increase the
darkness in this area, both on the outside and inside, Doing the same thing
for both sides. Okay? As you can see,
I've got the volume of my lips perfectly
and completely. I should also apply
some more darkness from this area to my lip,
below the teeth. As I told you, I'm keeping the middle part lighter to show that this area is
more prominent. I give it a color, but it's very light. Then I want to go over the
shape of this textures. I'm going over my textures once more to give them a better
shading because some of them might get just
lighter or even a bit faded while you're working on the other areas
for the touch ups, you should go over them
again and emphasize on the lines of your textures
to show how deep they are, to show how they
really are and so on. All right, then, here we go. Okay, I'm getting this shades in order. Then from the side area, I increase this
darkness a bit more. Again, I want to add
some more darkness to this corner, left corner. I would also like to consider some very small
textures for this area. They are not too big
and not too dark. Some small, fine textures, they are little, but
in general shape, they give my work a good touch. Also, I'll do more darkening on the lower
part of my lower lip. Basically forever else. I think it's need
more darkening. I'll apply it either
it's on the lower part, the upper part on the textures themselves or even in the
background like here. Okay, I'll just work on
the background a bit more, giving it more effort, it'll look better,
might think like that. But actually working on the background is
very important too. Because if you get that right, as I told you before, you can show your in your mouth or
whatever you're creating is coming out of the paper
makes your work more volumiz, more three D. I should also apply a bit of darkness over here in the
center of my lip, Above the upper lip, this curve on the upper lip
to show its volume better. So here we go, getting all these shades all
over this place. Okay, Now in next step, I'm going to use
my white pen and I'm going to create
some light spots. White lights actually,
wherever I can see them, very strongly and very sharp. You see I am
creating some white, or better say, lighter
spots, some of them here. Some light in this area. But again, I emphasize
on the fact that your lights that are created with your white pen
should be really sharp, even in this light, or whiter areas on
your upper lip. Got to do the same thing.
Use your white pen. Okay, we are almost done
with this whole sketch. You can see how
attractive it got. Okay, this tutorial
is also over. I hope you've enjoyed it as much as I enjoyed it doing it. I hope you can follow us in the next chapter. See you later.
 Amelie Braun, Artist & Cartoonist