Transcripts
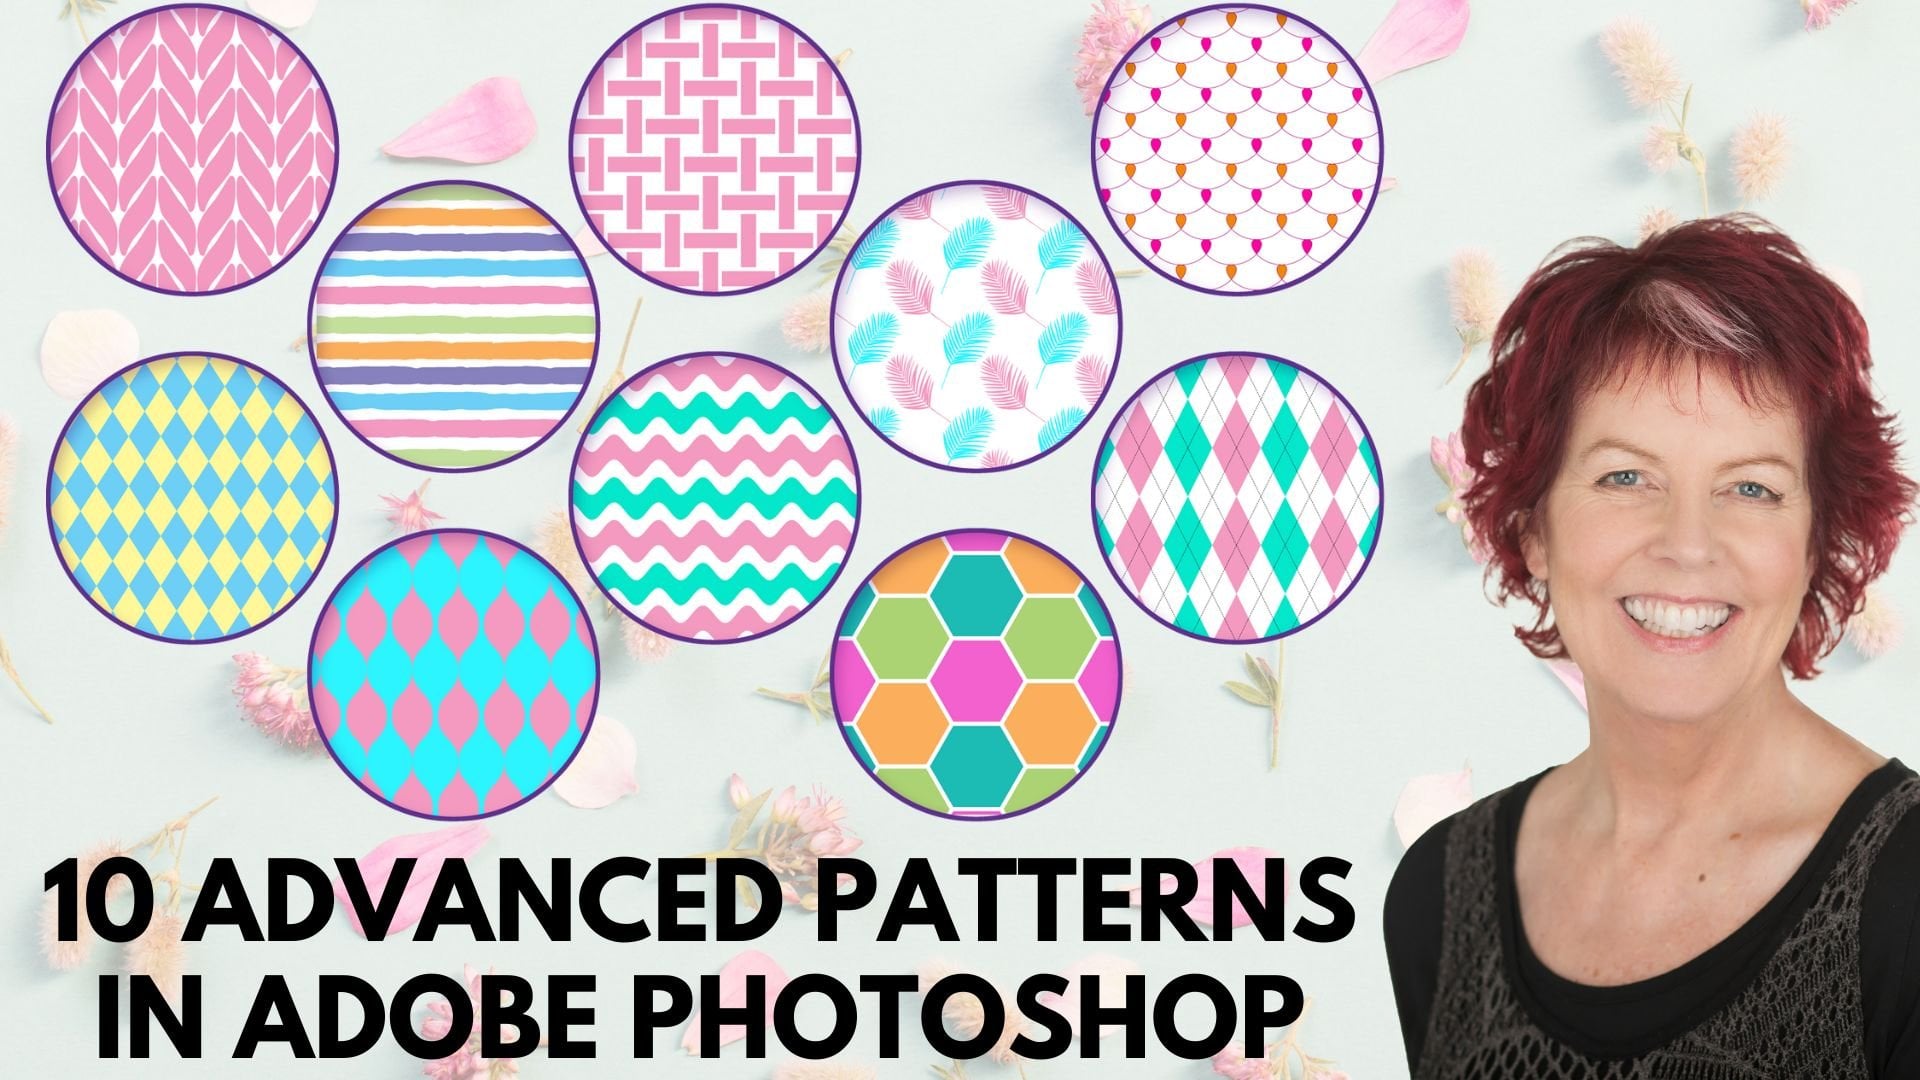
1. Introduction to Making a Pattern in Pattern Effect in Photoshop: Hello and welcome to this
class on creating a pattern in pattern or double layer
pattern in Adobe Photoshop. My name is Helen Bradley and I'm a Skillshare top teacher. I have over 270 courses
here on Skillshare and over 165 thousand
student enrollments. In this class, we
will look at how to combine two patterns
in Photoshop to make a single pattern
swatch that includes both patterns at
different scales. We'll look at the
process of doing this from scratch and then look at the somewhat tricky process for doing it with existing patterns. By the time you
finish this course, you'll have a couple of
jeweler pattern swatches. And as with every graphic
design for lunch class, you'll have a range of new
Photoshop tools and techniques that you can put to work
in your everyday workflow. So without further ado, let's get started making
pattern in pattern or double layer patterns
in Adobe Photoshop.
2. Pt 1 - Why are we doing this?: Before we get started on the
technicalities of how we're actually going to build
these multilayer patterns. Let's have a look and see
what it is that we're looking at and why
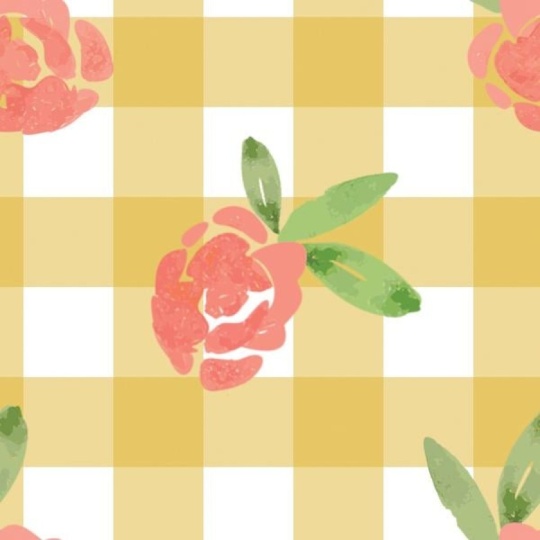
this is important. So here I have two patterns. Let's just switch to the
two individual layers. So I have a floral pattern and I have a Gangnam
check pattern. And they're being put together
into a single pattern. But you'll see that
the Gangnam checks, which are actually just these
four little squares here, repeat far more quickly
than the flowers do. So I've created these as two separate patterns and layer them on top of each other. The result is this. This is just a single pattern. Everything is put together
in a permanent presentation. This technique varies
in importance from nice-to-have to
absolutely critical. So let's talk Spoonflower. Spoonflower is a site where
you upload a pattern swatch, just one pattern swatch
for one piece of fabric. Spoonflower requires
the pattern swatch because of the technicalities. So impaired doesn't
know whether you want to make a billboard, a piece of wallpaper, or just a fat quarter. And so Spoonflower wants
the actual pattern swatch, so then they can repeat it
over and over and over again. Fill whatever size document
it is that you want. You can't send two patterns to Spoonflower and ask them to just line them up on
top of each other. That's not how
Spoonflower works. If you're making designs in Photoshop that you want
to sell on Spoonflower, then you have to know this. If you want these sorts
of multilayer designs, There's nothing that you
can do to avoid this. Now, if you're selling patterns, you probably also want to know this because you want to be able to give your buyer the
pattern for the flowers. You want to be able to give them the pattern for the gang. And because that's what
they might want to use, then you also want to give them the one pattern that
you've designed where everything is put
together at a scale that works, that's pleasing to
the eye that you as the designer have determined this is what you want to sell. You're going to get a lot
less pushback from buyers. If you sell them the
pattern already assembled, then if you sell them to individual patterns and suggest that they might stack them
on top of each other. So I think that
this is worth it to understand from the point of
view of a pattern seller. And in this class
I'm going to be creating a lot of
scrapbook size images just to showcase how a design might look at
scrapbook paper size. But of course you're going to be having a look at it
through your own lens. You might be a fabric designer and so you're looking at it from the point of
view of printing onto fabric or whatever. But if you're selling on Spoonflower and you want to create these kind of patterns, then the only way to do that is to understand
how you can put them together so that
they will repeat seamlessly as a single pattern, because that's all you can
upload to Spoonflower. Now that you know
what it is that we're aiming for to
put two patterns together so that they
repeat and so that they're not seams and
it's not all wonky. Then let's go ahead and we're first of all going
to create this one. And then we're going
to move through some successively more
difficult processes developing these patterns.
3. Pt 2 - Make the Gingham Check: To get started with our design, we're first going to create
a tagging them check. Now the important thing to
consider at this point is that we don't want to have to apologize later on if
we can possibly help, but I'm making things bigger
in Photoshop is fraught with difficulty because you're likely to get some pixelization. So we want to start out the way we want to
end up if you like. And so what I'm going to do is I'm going to create
a Gangnam check and I'm going to do it
with a document that's 200 pixels by 200 pixels. We'll talk about that
in just a second. So 200 pixels by 200 pixels, I'm making sure that
art boards here is disabled in the most recent
versions of Photoshop, I just want to be working
with a single art board. The resolution doesn't
really matter too much. And as for the background
contents, well, I'm going to make it
transparent so we can build up the
pattern from scratch. So I'll just click Create. Let's talk about what a 200
pixel by 200 pixel design is. Ideally for sites like Spoonflower or any
online printing side. And indeed for scrapbook paper, most people are
looking at something that's going to
print at 300 DPI. Now, there's times
300 DPI and 300 ppi. And for our purposes,
they're interchangeable. They're not the same, but
just think of them as being the exact same thing for this purpose of getting
our designs correct. So if we're printing
at 300 DPI or PPI, I've got a document here
that is 200 pixels wide. So that means that printing, it's going to be about
two-thirds of an inch. And if you're working
in centimeters, then it's going to be something like about 1.75 centimeters. So that's the repeat. That's what our Gangnam
check is going to look like one complete pattern. So thinking about this before you actually start
is really important. How big do I want my Gangnam? Do I want a kingdom check
that's eight inches wide for a single check
willing to start off with a document that's
going to work for that. I'm starting with one
that is going to be the equivalent of about
two-thirds of an inch wide, something like about one and
three-quarters centimeters. So I'm going to start out with the rectangle tool because
it's fairly easy to do. I'm going to drag over here and looking at my little tool tips. I want to stop when
I get to 100 by 200. That's half this document. So I've got a selection here that is half
of the document. Let's change the
color of our kingdom. Check this time, and let's
do a purplish kingdom check. Gonna go for something color. I'll click. Okay, so it's set as my
foreground color here. If I press Alt and Backspace, that would be option. Delete on the Mac, I can fill that rectangle, selected rectangle
with my color. Now if you miss that
keyboard shortcut or you want to do
it a different way, you can go and get
the paint bucket tool and just drop the
paint in there. And then we're going
to choose, select and deselect and learn as we do. That's Control or Command D. In our Layers panel, you'll see that we've
got a layer that is half purple and half Nothing. Well, we're going
to duplicate it, so I'm just going
to drag it onto the plus symbol at the
bottom of the screen. I'm going to rotate it. So I'm going to click on adhere, have the Move tool in hand, and I'm just going to
hold the Shift key as I rotate it around. So it's constrained to moving
in set numbers of degrees. And I want to stop when I get
it about 90 degrees around. And I'm just placing
it in the top here, and I'll just click
the check mark. Now I need some white in here, so I'm going to add a new layer, and I'm just going to drop
it down at the bottom here. Let's go and fill it with white. So let's use the paint
bucket this time. Now, the problem with
our pattern so far is that we don't have
the kingdom check. We don't have light here, light here and darker over here. But if I select these two layers and decrease the opacity, then we are going to have that. I'm just going to slide
down the opacity to about 50 per cent and
just check that as I go. Now what I'm using here are what are called scrubby sliders. Typically in Photoshop,
anytime you see a word, you can adjust the slider
by just dragging on it so you don't have to drop this down and try and find
50 per cent here, if you prefer, you can
just drag over the slider. So I'm just looking
for something that is an attractive sort
of Gangnam check. This is all I need to
make, making them check. So I'm going to choose
Edit and Define Pattern. I'm going to call
this purple kingdom. Now that I've
created my pattern, I'm going to put it into
a working document so I can see how everything's
working as we go ahead. I'll choose File and
then New this time we're going to do a working
document that's 3600. By 3600, I'm going to make it at a resolution of 300 because
this is scrapbook paper size. And if you weren't
creating scrapbook paper, you could create a
different size document. Want to make sure
that everything's looking pretty good as I go for the purpose for which I want to use this particular pattern, I'll click Create, and now
we're going to fill it. So to fill it, and we want to fill it at its current size. So I'm just going to
use edit and fill. Now the trick here
is to work out where your pattern is because Photoshop does a few
really weird things these days with patterns. So you're going to
find your pattern at the very bottom of the
patterns dialogue. So in contents we've got
pattern selected here. And then we've got
a custom pattern which will be set to something. And then you're going to
come down here to the end. And this is my purple
pattern in the interim, I'm just going to remove these so they don't get in our way. So let's just click, Okay. This is what our pattern
is going to look like on a sheet of
scrapbook paper. Now at this point, if
you think it's too big, you would go and resize it. Now we could scale it
down at this point, but I'm happy with
this right now. If you want it to be bigger
than you're going to need to create your
document at a bigger size. We could actually
resize this one, increase the size of it. It wouldn't matter here
because it's squares. But typically with
other patterns, resizing is going
to be a problem. So we've got our
working document, we've got arguing them. Check in the next video, we're going to create
the flowers at a scale that's going to be different to the kingdom check. So they're going to work
really well together.
4. Pt 3 - Make the Flower: Now that we've got our
gang and pattern here, I'm just going to click
the plus sign and I just want to get a brush
with some color on it. So let's just go and get
something that's going to contrast highly with what
we've got in the kingdom. Check. What I wanted to do is work out roughly how my flowers
are going to work. So I was thinking something
about 600 by 600 pixels, which would mean it would
be the equivalent of about three of these
Kingdom checks. So what I'm gonna
do is I'm going to have a flower in here. And then over here I'm going
to have a flower here. And approximately over here, I'm going to have a flower now. I'm doing an offset pattern, so I'm going to have a
flower bed here, one here. And I'm just looking
at the relative scale of this to see if it's
actually going to work for me. And if it's not going
to work for me, then I'm going to rethink
my process at this point. I'm going to show
you a little bit later as to how you can mock this up to get an idea of how
things are going to look. But I had thought that this
design might look good. And I'm looking at right now, I'm thinking, yep, that's
going to work for me. So let's just trash out
working elements if you like, and let's go and create
the document that would support what it was
that I just design. And what I want is something
that's 600 by 600. Doesn't matter the resolution that's immaterial right now. It does need to be transparent because
it's going to go over the genome if you
make white going to get into all sorts of
trouble at this point, and we'll click Create. Now before we go further, let's note that initially we made this
document 200 by 200, and this document is 600 by 600. So it's easy for us to divide two hundred
and six hundred. It goes three times. So if we were to fill this
document with our pattern, Let's just go and do that. You'll see that it
evenly fills it. And that's critical for
this process to work. Things have to scale
within themselves. We have to be able to drop this kingdom
patterning and it has to be a perfect repeat
inside this shape. And we've just
proven that it is, so I'm just going to undo that. So let's have a look and say now how are we going to
create this flower? And for the flower, I'm
going to use a brush. So let's just go and see
the brush that I'm using. I want it to be relatively hard, so I'm going to wind up my
hardness as to the size. I can change that on the fly. I wanted to work with black, so I'm going to press D to get the default colors to
make the brush smaller, I'm going to use the
open square bracket. Close square bracket
would make it larger. And so I'm just going to
create my basic flower shape. And for this I'm
going to start with a circle in the middle
and then I'm just going to add some
elements around it. Now this flower shape is
really simple to create, but it does end up
looking pretty good. I'm just doing
this with a mouse. It doesn't have to be perfect. In fact, the design is going to work better if it's not perfect. But what you do
want to do is you want to make sure that
the ends overlap. So you don't want to do this and leave something with a gap in it that's not going to
help in just a minute. So let's just do a
few more of these. And when you're done
with the flower, you can add some leaves. Again, you want these to
connect with each other. I'm not concerned that the veins and the leaves are
not reaching the edge here, but I am concerned that the middle element is
reaching the edge. Now I'm going to bring this down a little bit more centrally into the document
to add our color, I'm going to add a layer
beneath the dark line layer. I'm going to make a selection. I'm using the Magic Wand Tool. Now, the magic wand tool has
something called tolerance. And that says that not only are we going to pick up
transparent pixels, but we're also going to
pick up a little bit of the edge detail because I
used a semi hard brush. You can see that there
are some fluffy edges in this design that's by design. But what we want to do is
when we actually select these areas in here that we
pick up into the gray area. In fact, we could increase that tolerance a little
bit if we wanted to. It's on a scale of 0 to 255. So something like 50 is probably
a reasonably good value. Let's make sure that we're
on the layer that we're actually working on that
has the line work on it. And I'm going to select
some of these elements. You can see I'm not selecting
it particularly well. I'm going to solve that a
different way in just a minute. I am working on contiguous. You do need to have
contiguous checked. That means that we're
isolating the selection to just the area that
has a border around it. And that's why we
created borders. I'm going to hold the Shift
key and add to my selection. I'm going to add these outer
leaves to my selection. Now because my selection was a little bit
on the small size, I'm going to expand it. I'll go to Select
and then modify. And I'll go to expand. And I'm thinking that
I probably want to expand it by about four pixels. That's going to eat
into this black area. So I'll click Okay. It's eight and into the
black area really nicely. I don't want to put my
color with my line work. I'm going to put my color
on the layer underneath. So I'm selecting the
layer underneath. Let's go and find a
color to use knowing that we had a purple kingdom. So I'm going to choose
something in the pinks here. I'm going to use dark colors on the outside and lighter
pink towards the middle. So now I've got my selection, I've got my empty layer, and I've got my color. Again, we're going to
do the same thing. Alt, Backspace,
option Delete to fill that selected area
with the color and then select, de-select. So that's the reason why
we really probably want to learn these keystrokes. So we're going back to this layer that has
the black on it, going back to the
Magic Wand Tool, going back to select
the next set of leaves. Because we're going to be
doing this a few times. What I'm gonna do
is I'm going to make a very quick action. So I'm going to Window
and then Actions. I'm going to click here
to make a new action. And I'm going to call this
expand by four pixels. And click Record. So I've got my
selection in place. All I want to do is go
through that expansion, Select, Modify,
Expand four pixels. Click, Okay, while I'm at it, Let's go and select
the layer that we're actually going to be
putting the color on it. Now I've got my action recorded. I need to stop the action. So let's go back to
the Actions panel. You can see I've got my
Expand select layer two. Now I need to just
stop recording. So I'm going to click here on
stopped playing recording. I've done it for
this particular sets are more ready to
add the colors. So let's go back
and add the color. And then the next
one we're going to actually use our action. So I've selected my color, Alt Backspace option Delete
to fill it with the color. Then we'll just do
select, de-select. I'm going to use the
keyboard shortcuts. Next up. Let's go back to layer with the
black on it. Shift. Click on these leaves. Let's go to our Actions and
let's just run our action. So I'm selecting expand by four pixels and just running it. You'll say that the action has
done the expansion at all. So I moved us to
the correct layer. Whenever you are doing
something that is slightly repetitive like this, it's a really good idea to make an action for a
couple of reasons. One is because you'll get plenty of practice making actions. And you'll find that they can be really valuable for
speeding things up and just making sure that you don't dump your color
on the wrong layer. For example, let's
go to this one. Let's run our action. Let's go and select that color. I'm going to do a
yellow center of my flower or Backspace
option Delete. I don't really even
need to look at the labs because I know
that the action is going to make sure that I do it perfectly every single time. Let's go back. Though. I do need to look at the
layers in terms of making sure I select the right colors here or
the right color area. So I'm selecting one
side of the leaves. Go back to our actions,
run our action. Let's go and get
some green color for one side of the leaves. And then we're going
to do the last bit. Select over it, just make sure
we've got all that error. If you need to add to
it with the Shift key, press down, you can just
click to add to it. So here our actions. Got that selected. I'm gonna go for a slightly
lighter color on the leaves. At this point, alt
backspace option, delete, and then de-select. I'm finished with my actions. Now, this is my
basic flower shape. I'm going to have a flower here. I'm going to have a
quarter of an up here, quarter of an up
here, quarter here, and a quarter of it here. But we've started in the process of creating
the flower that's going to be incorporated with our kingdom pattern
in the next video.
5. Pt 4 - Create the Flower Pattern Test and Edit It: Now that we've created the
elements for our pattern, it's time to go and
make the pattern. Now there's a couple of
things to think about here. One of them is how easy
this is going to be. The second one is how
flexible can we make it? So I'm going to go for ease
rather than flexibility. So what I'm gonna
do is I'm going to jam together the
black and the color. So they put together
on a single layer. It's going to make, making
a pattern more simple. And so if you're new to making patterns in Photoshop this way, That's exactly what I would do, but you'll see that I've already saved this
as flour layered. So that means that by
saving it as flower bled, I've got these layers
saved independently. So if I ever wanted to get
back to that, I could. But for now, I'm going to
grab these two layers, right-click and
choose Merge Layers. So that gives me a single
flower on a layout, so everything's jammed together. One of the things
that potentially you might look at doing, I'm just going to undo
this for a minute. In terms of being a
little bit more creative, is I've got the
colors selected here. So if I did this, I would be able to create
a pattern that has a color offset where the colors are moving a little bit
away from the lines. That's a really attractive
whimsical result. By merging these two layers together when they were
perfectly lined up. I've made it a lot more
difficult for myself and getting that sort of look
to my flower later on. So yeah, that's what I mean
by losing flexibility. There's a whole lot of
flexibility that we're going to compromise by sandwiching
these layers together. I think in terms of
making the pattern. But at least the first
pattern we're making here, a little more simply than jamming them together
is a good idea, but make sure you save
the layers so that you could come back and do something a little bit
different later on. So we've got one flower
in the middle here. I'm going to select
on this flower and I'm going to check
and see how big it is. I'm going to the Properties
panel and I'm looking here and it is to 78 by 328, which tells me that this
is true even numbers. Now, if it was not even numbers, what I would do is make sure
that when I hover over this, it says maintain aspect ratio. So that tells me that right now the aspect ratio is
not being maintained. What I would do is I would round it up to the
next even number. I'm actually going to round this up to different numbers here. So I'm taking it
up to 280 by 330. It's marginally
increasing the size. It's not compromising the
look of this shape at all. But it does mean that
it's even numbers. And in terms of even numbers, that means placing the
center of this shape over these corners is
going to be dead accurate. If you're half a pixel out, it's going to be curtains, your patterns not
going to line up. And it's going to
be really quite obvious that it's not lining up. So the first thing that
you need to do before you start on your
pattern is to make sure that the element that is
going to be the repeat is an even number of
pixels wide and tall. And we've made sure that it is. So let's go and get this and drag it onto the
plus symbol here. So that means we've got
two copies of it with the topmost brand
new copy selected. I'm going to take it to
roughly where it needs to be and that is the top
corner of this document. I'm going to try and place
that in the top corner. If I miss out, that's fine. We're going to solve that. So I'm going to press
Control or Command T to get these free
transform tools. You may find that this
little check mark up here is not selected while
you want to select it. And you want to make
sure that all of these nine little boxes, the middle one is selected. So that means that all
those values are referenced to the center of
our flower shape. And we're going to make sure
that the x and y as zeros 0, which they are, that's fine. We'll just click the check mark. If they were not zeros 0, then we would make them 00. I'm going to take this shape
and I'm going to drag it onto the new icon so
I get another copy. Let's take it over here. Let's drop it into position, but let's not get it in
exactly the right position. So I can show you how you
will control or command T. We're going up here, you'll see that this setting is sticky. So once you set it on,
it's going to be on. This should be at 6000. It's, neither of those
values are correct, so let's make it 600 by
just typing on top of it. Be better if I selected
everything before I did that, 600, and this is going to be 0. So we now know that the
center of this shape, this combined shape, is exactly over the top
corner of the document. Perfect. Let's click
the check mark. Now we're going to take both these flowers with us this time. So I'm going to select
the two top ones. I'm going to drag them
onto the new icon that deselects the set underneath and just leave selected
my brand new copies. I want to move them down. I'm going to, with
the move tool here, start moving them down and
I'm adding the Shift key because that means
that they're going in a perfect vertical direction. So I know that the alignment, one of these alignments
is going to be correct. The 2 May 1 not be. Let's just drop
them there and then let's look at each of
them individually. I'm looking at this one now. Control or command T. Well, the 600s, correct, but this should be 600
as well and it's not. So let's just select it and type 600 and click the check mark. And then we'll go back
to this other one because if the first
one was wrong, then this one's going to
be wrong and it is 600. If you're making patterns, this accuracy has to
be pixel perfect. Because if you don't do that, it's just not going to work. So we now have the pattern element that
is going to be our design. So I'm going to choose
Edit and Define Pattern. I'm going to call
this pink flower. Now, I may go ahead
and save this, giving it a different name. So I do File and then Save As and give it
a different name. So I'm not overwriting
my flower layered, but this is going to be
perhaps my pattern master. But let's go and test it out on our sample document
because it may not work. I'm going to choose Layer, New Fill Layer,
and then Pattern. I'm going to click Okay. Now it's going to default
to this set of leaves, but we're just going down to the very bottom of the
pattern dialogue here. Click on the flower
and click Okay, and just make sure
that it looks okay. Well, this time it has
worked Photoshop these days, has a rather nasty habit of doing things a little
bit weirdly when you've got elements that are over
the edge of the document, but that hasn't caused
us issues here. This is what our pattern
is going to look like. This is a basic pattern. There are some things
that we can do to it that are going
to improve its lock. One of them is perhaps to rotate the flower that's in the
middle of these four, so that we have a sort of alternating flower that's going
in a different direction. And we could also
change the middle of this flower so it looks
a little bit different. So let's have a look and
say how we would do that. So we can get some
elements that we could use to create a little bit more
of an interesting design. So what I'm gonna
do here is grabbed this one because this is
the easiest to rotate if we were rotating the outside ones where it's
just going to be a nightmare. So don't touch the outside ones, they're working perfectly. I'm going to hold the Shift key. As I rotate this around, I'm going to find a slightly
new position for this. I'm going to click the
check mark and I just might rearrange its position relative to the
ones in the corner. Again, I don't want to
touch any of these in the corner because that's where the pattern
is going to break. But I can do anything I like
with this one in the middle. And what I'm looking
for is roughly even spacing around here. So I think it didn't need
to be moved a little bit. So let's save this
as another pattern I'm going to call this
pink flowers rotated. Go back to this document now the reason why I
used a pattern fill out and didn't just fill the law was because I can
double-click on this, go to the flyout menu here, and just click my new pattern. So it just makes working with these patterns when you're
looking at the result, I'm trying to see
whether you could improve it just that
little bit easier. I'm liking this. I think
this could be a pattern, but let's have a look
at the alternatives for re-coloring the middle
one of these flowers. So let's go back to our
flower or elements again, I don't want to touch
the ones on the outside, but I can touch this one here. I'm going to choose
Image adjustments and I'll go to Hue Saturation. Now here what I wanna
do is I just want to change the pink so I don't
want the leaves to change, but I would like my
flower to change. So I'm going to isolate the channel in which I think
these pink colors are. My guess is that
they're probably a bit more magenta
than they are red. I'm going to select magenta. And now I'm going to
walk this color around. And if I select it correctly, then the color should
change and it is changing. So what I'm thinking
of is something a little bit more orange here. So I've got pink flowers
and orange flowers. But you can see that the leaves
haven't changed because I isolated all my color change
to the magenta channel. If I'd gone with the
basic RGB channel, the, all the channels together, then moving the color
around for the flower would also have taken
the leaves with me. Didn't wanna do that,
so I'll just click. Okay. So now we have
multicolored flowers, Edit, Define Pattern,
multicolored flowers. Back to the document in which we're assembling our pattern just to see how
things are looking. Open up this panel, go to the flowers and click Okay and check and
see what it looks like. I'm happy with this. It's still not a single pattern, it's still two patterns
on top of each other. In the next video, we're
going to put it all together into a single repeat.
6. Pt 5 - Put the Patterns together: So we now have some
designs that we like in terms of creating this
as a combined pattern. But as I said, it's not
a combined pattern yet, the flowers or a pattern, the gang as a pattern. Let's put them both together. We're going to do that
in a document that is the same size as
the flower pattern, the larger of the two. This pattern was 600 by 600. This pattern is 200 by 200. It fits exactly
inside this document. So let's do File New
and we're going to create a pattern assembly
document of 600 by 600. Again, the resolution
doesn't matter because that's an
output resolution. It's not going to change
the document stage. Let's click Create. I'm going to bring in
my genome pattern. So I'm going to choose, edit and fill and bringing my
gang and pattern, select pattern here,
make sure that the custom pattern is set
to my kingdom and fill it. I'm going to add a
brand new layer, and I'm going to fill
it with the flower, Edit, Fill going to the flower. And for this one, I'm going to choose the
multicolored flower. This is a repeat pattern swatch. The whole of it put together
is a repeat pattern swatch. So let's go and make it
a repeat pattern swatch, Edit, Define Pattern,
kingdom and flowers, gangnam and
multicolored flowers. Click Okay, we need to test it because you have to test this to make sure
that they're working. And I suggest that
you test them as you build them just in
case there's a problem. Double-click on this, go
back to the flyout menu. Here is our pattern. Click on it, click Okay, and make sure that
it's repeating and it doesn't have any
fracture lines in it. So let's go in here
and have a look. There are no fracture lines, there's no pixel or
two pixels out here. Everything is looking perfect. So what we have now is a pattern that has both
elements together. It's got the kingdom and
it's got the flowers. Now at this point, we might
also say, you know what, those pink flowers,
when they were just pink flowers
was really good too. So let's go and make one
with just the pink flowers. So I'm going to trash this. I'm going to add a new layer and fill it with just
the pink flowers. Edit, Fill. This is the one that's got the middle flower
that is rotated. These are different. You can say that the
flower leaves go in this direction for one of the flowers and in a
different direction here. This is now a pattern. If we choose Edit
and Define Pattern, I'm going to do Kingdom
and pink flowers. Let's go back and test it. Double-click here, go down. It's going to be the last
pattern in the box here. This has kingdom
and pink flowers. We can test it. Make sure that it is working
perfectly, which it is. I'm not going to make
the Gangnam with the flower where they're all pointing in the same direction. Don't like that pattern. Don't think it's sophisticated
enough for this purpose. Just going to settle for these. So we've now got some patterns swatches that combined
both elements. So I'm going to my
patterns panel, which you can get to by choosing Window and then patterns. And down the very
bottom of this panel are the patterns
I've just created. So there's the basic
king and pattern. If I hover over it, you will see that there's a
tool tip that says purple, give them 200 by 200 pixels. It's got its size and
what its name was. This is the single pink flower. Don't really want that. So I could actually at
this point remove it. So it's just not getting
in the way because it's not the sophisticated
pattern that I want it. So I'm going to delete that. But this one is good. This is the one that
has the flower rotated. It's a pink flowers rotated
at 600 by 600 pixels. This is the
multicolored flowers, again, 600 by 600 pixels. This is the first
of our patterns. The completed put both
together patterns. This one is a Gangnam and
the multicolored flowers. And then we have the kingdom
and the pink flowers. So we've now got five patterns. And that's without
making any changes at all to the color of the kingdom. For example, if we change
the color of the gingiva, we could end up with a totally
different set of patterns. We're going to do
that and then we'll go ahead and create
a different pattern using a different process for creating the pattern itself.
7. Pt 6 - Make additional colour ways: I mentioned earlier
when we were putting these flowers together
and sandwiching them into a single
layer that it was going to make life potentially a little bit difficult later on for creating some
different elements. But because this gangnam
is a separate layer, I could make some
changes to the Gangnam. I'm going to choose Image
and then adjustments. I'm going back to
Hue Saturation. I'm using the master channel, which is the RGB channel. And I'm going to
look at what this would look like with
a different color, Gangnam, for
example, a blogging. And I like this way of changing colors because
we can see it in situ. We're not just creating a
kingdom and going well, I hope that works. But in actual fact
here where able to look at the impact of changing the Gangnam
color and see how it might impact
the image itself. I could increase the saturation
or I could decrease that. So you get a chance to work with saturation and also
lightness here too. I'm just looking for something that is
going to work for me. The pink on pink
is kind of nice. So let's just make
that into a pattern. I'm going to choose Edit
and then Define Pattern. I'm going to do this
pink on pink flowers. Then because Murphy's Law, which says that if something can go wrong, it will go wrong. Let's go back to our master document and let's make sure that
it's going to work. So this is our 3600
by 3600 document. I'm going back to make
sure that this pattern that I just created still works, that there's no
problems with it. There is another pattern
that we can use. We can go back into our gang and we could
change it again. Image adjustments,
hue, saturation. Let's see it with a
blue background here. Blogging, I'm looking perilously like my old school uniform. Let's go to Edit, Define Pattern blogging
and pink flowers. Again, we're going
to test it because we need to make sure before we ship it out that
it is going to be perfect and nothing has
gone wrong with it. Blogging them pink flowers. We're building up a
whole collection of different patterns using the elements
that we started with. We're now up to seven patterns, the individual flowers and then these combination designs, and we haven't used this
multicolored flower yet. So we could have done that
with the pink and the blue. And then we would have
had two more patterns. We've now built up
these seven patterns. And because of the way
that Photoshop behaves, these patterns are going
to be available inside Photoshop next
time we open it up and it's going to
be available for every document that we make until the day
that they're not. Because it can happen that you'll lose your
patterns in Photoshop. There are some
scenarios in which they are guaranteed
to disappear. So we need to protect this work so that we
would have it saved away and out of
Photoshop so that if you were to lose your
patterns in Photoshop, you would still
have a backup copy. That's the topic
of the next video.
8. Pt 7 - Save the Patterns: To protect ourselves
in case we lose the patterns from
inside Photoshop, we're going to save them
to an external file. We do that by choosing
window and then patterns. Now this is the new patterns
dialogue in Adobe Photoshop. If you're using an older
version of the patterns, that's gonna be done
in a different way. But let's look at the
new version first. I'm going to select my pattern. So I'm clicking on
the last one and I'm shift clicking on
the first one here. So that's selecting
all of these. If we wanted to do
it individually, I would be Control or Command clicking to select the
ones that I wanted, leaving out the ones that I
simply didn't want to save. But here I'm selecting them all. You can say that I've also
changed my document and the process that's
immaterial right now. I'm going to the flyout
menu and I'm going to choose Export Selected Patterns. This is going to take
me to the place where Photoshop expects to
find these patterns. If later we needed to re-establish them inside
the pattern's dialog. Now, you may or may not
want to put them here. You could put them in a separate patterns folder
because for example, if you wanted to sell them, you're going to have to
extract them out into this PAT Patterns file so that you could sell
them to somebody else. So make a decision, probably for me, I
would do it twice. So I would call this kingdom
and flowers and click save. So now I've got them
where my version of Photoshop expects to find them if they disappear
from this dialogue. But for sale, I'm
going to again export these patterns and
I'm going to put them somewhere where I could sell
them for argument's sake, let's put them on the desktop. And I'm going to call
these kingdom and plows. Because on the desktop now I have a set of these
patterns that's in a package that would be suitable for sharing with somebody
else, easy to find. But I do want those two copies. I want my copy where my version of Photoshop is
going to look for them. If I lose them out of
this patterns dialogue, it's going to be very easy
for me to get them back. Let's just see how easy
that is. I've removed them. So let's go and get them back. I'm going to import
patterns here. Photoshops gone to where it
expected my patterns to be. And here they are,
I'll just click load. And they're going to be
here in a little collection of kingdom and flowers so I can get them back for
my own purposes. I've got a set that
I can easily give to somebody else in an
easy place to find. This is really important because at some
stage I might say, you know what they're
getting and pattern. I'd like to use that with
some kitchen utensils as a design so I
don't have to go and recreate the kingdom pattern
that's already created. I just need to go and create
the extra elements so you want to protect
your own work as well as have things prepared in
a way that's going to be easy for you to share them with other people or to
sell them obviously.
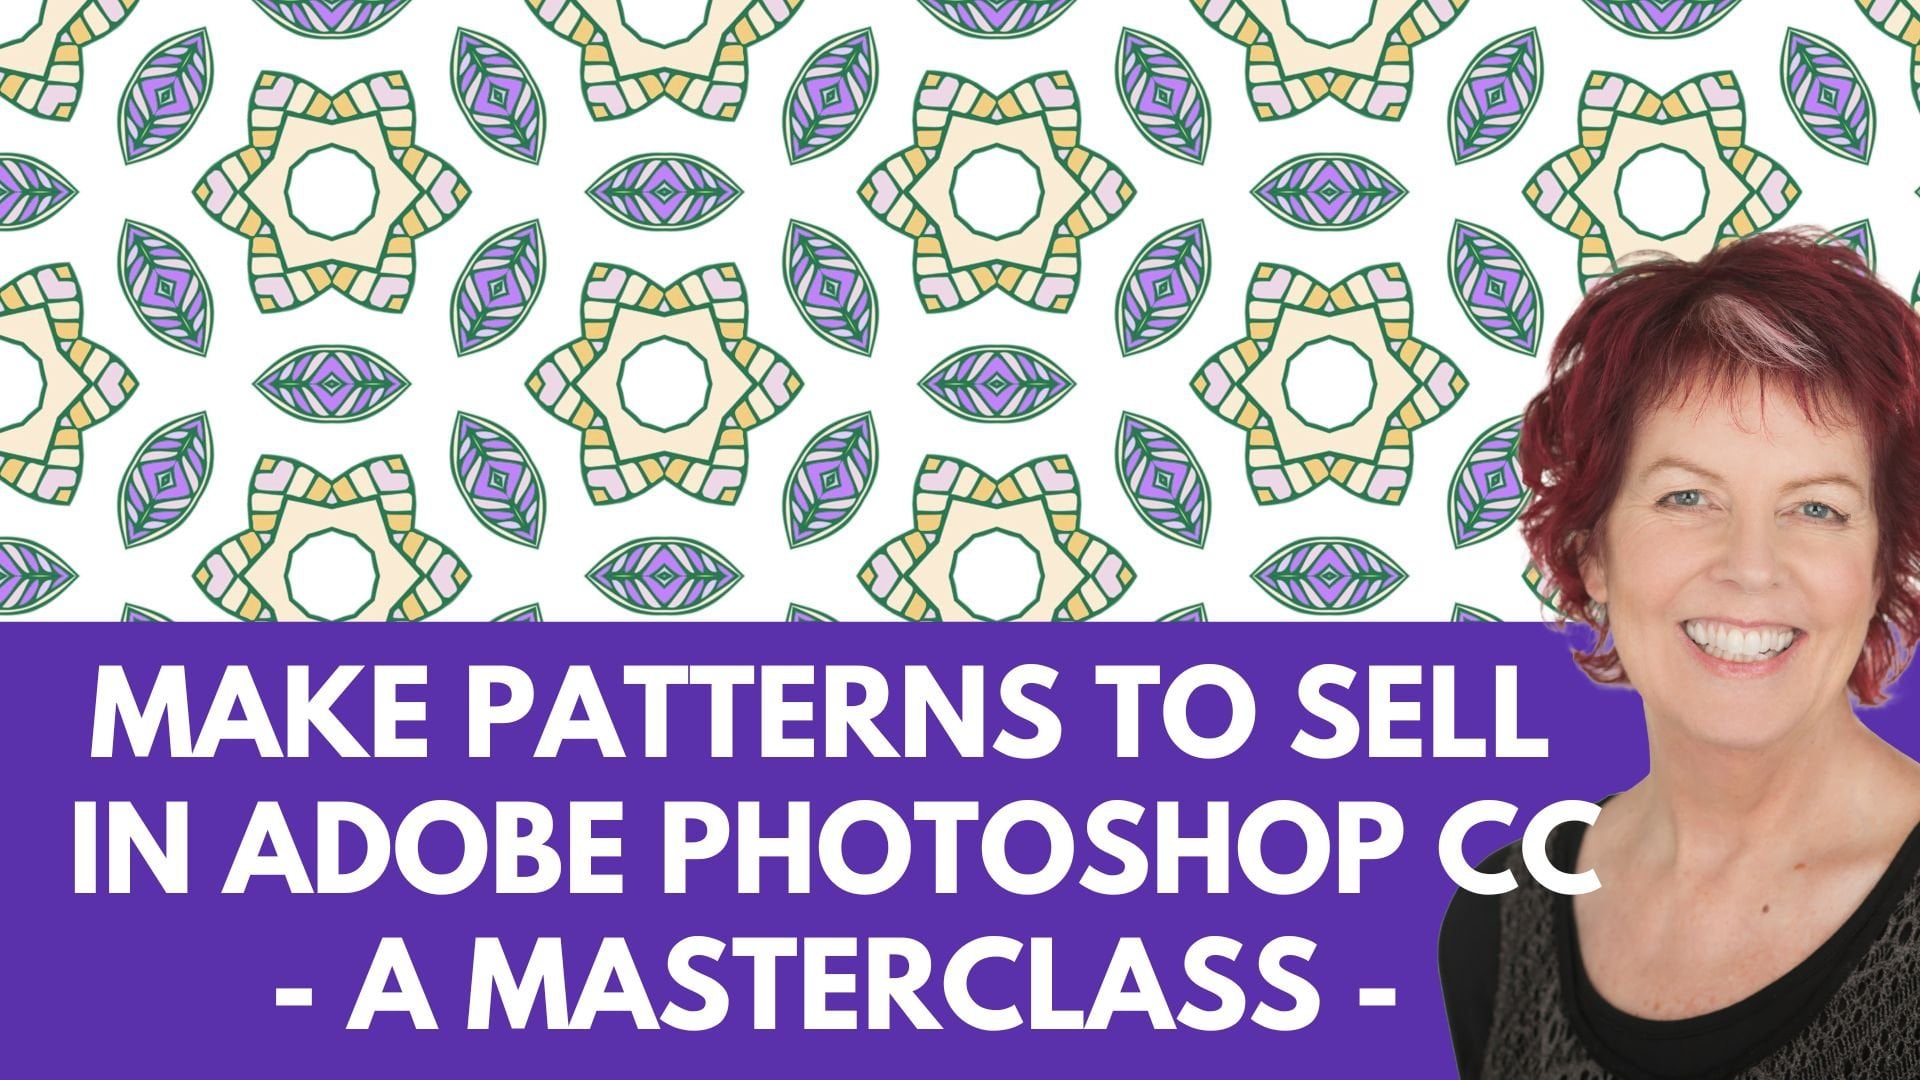
9. Pt 8 - Planning a more complex design: The next pattern we're
going to create is a level more sophisticated than
the one we just created. In this case, we're
going to be using some vintage flower elements
that are free to download. And so we're going to overlap, but the vintage
flower elements over the top of a very
simple geometric grid. And putting those two
together is going to give us this more
sophisticated pattern. So to locate these elements, we're going to start
out on the web. And I'm going to give you a link to download these elements now, these are free for
download and they're also free to use in
commercial projects. There's a license in the file, so these are a really, really good set of
illustrations to use. And you'll see here
that there are actually nine flowers in this collection. They are high res Ping images. So all the cutouts
been done for us. These are just
exquisite elements. So I think that you're going
to really like going to this heritage type website and looking in their
free downloads. But this is the one
that we're going to use for this particular project. So you're going to come
here and downloaded. Then because it's a zip file, you are going to expand it
so that you have access to all the PNG images so
that we can use them. The next thing we're
going to look at is how we're going to put
this thing together. So this is my plan. I've got a plan where I can
use eight of these images. So each of these in the
middle here is going to be a whole flower in the swatch
that we're going to create. So this would be the swatch, the area that is covered
by the gray box. We're going to have
flowers on the side here. We're going to have
half of the flower on either side of the design. When the design is tiled, it's going to line up perfectly. And we're going to
have half a flower at the top and the bottom. Then the flat and
the corner is going to be a quarter of the flower. So when we put the four
quarters together, we're going to have
a single flower. And if you have a look here, then we've got eight
flowers in total. So out of the nine flowers
that we just downloaded, we're going to use
eight of them. When we take this
basic swatch and put it all together
into a larger document, this is what it would look like. Here is the swatch
we're going to have. For example, if we were creating a sheet of
scrapbook paper, potentially we would have three of these flowers across the top. So there's going to
be multiple ones of each of these flowers to
fill the entire document. So it's going to look rich and
really, really attractive. Now, I'm gonna give you
these images because this will help you
plan out your designs. So you could see that
this is how you would arrange eight elements to make a seamless
repeating pattern. For example, here's my
plan inside Photoshop. I'm going to create a
document that's 1200 by 1200. And I'm going to mark out a grid so that I can line
up my flowers. These are going to be the
positions for the whole flask. There's going to
be five of them. There's a position
here for each of the half flowers and a position here for each
of the half flowers. And then a position
in the corner for every one of those
quarter plows. And if I set up a grid
inside Photoshop, it's going to make
it really easy for me to take the design that I had and move it
across into Photoshop. And again, this is the document that I'm going to
give you because it's a really nice way of working out how everything's
going to fit. So now that we have a basic plan and an idea of what
we're aiming for. We're going to head to Photoshop
and put it all together.
10. Pt 9 - Assemble a Draft of the Pattern: So now we have a plan for
what we're going to do. We're going to start by creating a file into which we
can build our pattern. I'm going to create a document 1200 pixels by 1200 pixels. And I'm going to
lay out that grid that we saw in the
previous video. And for that I'm going to
use those measurements of 1545751050 and they're
going to be guides. I'll go to View and
then New Guide. I'm going to start
with the horizontals. I'm just going to
type in 150 and press Enter for the second one,
horizontal still selected. So we'll just type
for 50 and I'll continue to make my
horizontal guides. Having done the
horizontal guides will do the vertical ones. With my guides in place. I could save this. So I could save this
as a document that I could use in future
as a template. So I won't have to
re-create those guides. This would be an ideal template for a design where we wanted eight individual elements
to be used in the design. So I've just gone ahead and save my document is
1200 by 1200 grid. Now we're ready to
drop in our images. I've got my images in a
folder there, nine images. I only want to use eight. So I'm going to select all
of them and I'm going to Control click on the one
I don't want to use. So here are the age. Because this window is open
over my Photoshop document. I can just drag and drop the
images into my document. And they're going to come
in at one at a time. I'm just going to
click the check mark. My eight images are now in
place to make things a lot easier when I'm
working in Photoshop now with the Move Tool selected, I'm going to make sure
that I have auto select, selected because that
means I can just drag any one of these
images into position. I don't have to locate them
in the layers palette. It's just going to
save me a lot of time. And I'm going to move them
roughly into position. Now this one is
not in a position. I want it to be in.
It's upside down, so I'm going to rotate it. Now. Had trouble with
this in Photoshop today. I don't know why
it's doing this, but every time I
go to rotate it, it just skews out of alignment. So what I'm gonna do is
just not do it that way. I'm going to press
Control or Command T. And up here in the
transform dialogue, I'm just going to
set the angle to 180 and that just turns
it up the right way. As I said, it may
not happen to you, but certainly happening to me. So I'm going to position these flowers roughly
where I want them to be. There's going to be a flower. I'm going to put
those at the top, a flower in the
center over here. There's going to be
a flower over here. This glucose is going to
be one in the corner. So let me go and put
this one in the corner. Then there's one in
each of these boxes. So I'm just looking
at the pairings of the flowers here to see
how they're looking. So very roughly this is what my pattern is
going to look like, but we need to recreate the
corner and the top ones. So to do this, I'm going to select this shape now
in the Layers palette, I need to work out
which one it is because I need a
second one of these. So I'm going to drag and drop
it onto the New Layer icon. Now you can move at
a couple of ways. Either you can select it and add 1200 to its position to
move it across here. Or you could do it
using an offset filter. So I've got my one
additional shape, the one that is an
exact duplicate of the one underneath selected. I'll choose Filter and then
Other and then Offset. For this, I don't want to
move it vertically at all. It's in a perfect
vertical position, so I'm just going
to set that to 0. But as far as the
horizontal is concerned, I wanted to move it all
the way over to this side. So I'm going to type 1200. And when I do that, the duplicate flower is moved 1200 pixels across and that's over the edge
of the document. It's perfectly aligned. So it's going to line up with this shape when they put
together in a pattern. For this one, I'm going to
do the same thing firstly, create a duplicate copy of it, making sure that I
don't move it at all once I have created a duplicate, except focusing on
doing it the right way, I'm going to choose
Filter Other Offset. Now this time we do want
to move it vertically, but we don't want to
move it horizontally. So I'm going to set 0 for the horizontal and for vertical, I'm going to type 1200. And you can see the
duplicates appearing down here. I'll click Okay. Now for this plot over here, it needs to appear
in all four corners. We're going to do
it a different way. I'm going to start it over in this top corner just because it's going to be a little bit
easier to manage from here. I'm locating it here
in the Layers palette, and I'm going to
drag and drop it onto the New Layer icon. So this is the
first of my copies. I'm going to press
Control or Command T to get the transform tools up. I'm going to work
from the middle of the shape. That's fine. You can work from any position. The x value is what
we need to change. We need to move it across here. It's y-value can stay
exactly where it is. And in actual fact, you
shouldn't change its y value. You only going to change
one value at a time. For x value, we're going to add 1200 to the current
value. So it was 46. We're adding 1200 to it. So it's now 1246. You'll see on the layers palette that what happened
previously when we were using the offset filter
as we got a smart filter, because these shapes
are coming in as smart objects when we just do the method that I've
shown you here now we don't get those
additional smart filters. It's six of 1.5 a dozen of
the other to some extent. So just be aware of that. I'm going back to this one. This time. I'm going to make a duplicate
of it to go down here. I'm going to drag it onto
the New Layer icon here. I'm going to press
Control or Command T for the duplicate. This time I want to change its y value and leave
its X in place. I'm going to add 1200 to it. So at the moment it started
out reading two pixels, it's now at 1202. Then I can take this one
and move it across here. So I need to work
out where it is. It's here, going to drag it
onto the New Layer icon. So I've got a duplicate
Robert Control or Command T. This time, we're happy
with the y position. That's exactly
where it should be, but the x needs to be
1200 more than it is. It started off at 46. So I'm going to make it 1246
and click the check mark. And so now this is
the base pattern. I'm going to create
a pattern from this. I'm going to choose
edit, define pattern, and I'm going to
call this first run. And click. Okay, we'll create a brand new
document to test it in. We'll choose File and then New. I'm going to make
a document 3600. By 3600, I'll click Create. I want it to be white
as the background. I've got white as my
background color here. I'm going to press
Control Backspace. That would be command
Delete on the Mac. Alternatively, you could just
switch these colors and use the paint bucket tool to fill it to add our pattern
the easiest way, their way that's going
to be a little bit more flexible as we
develop this pattern and make it look
better is to go to layer new fill layer
and then pattern. Click. Okay. Then from the
drop-down list we're going to the last pattern here, which is the one that
we just created. It's called first run. I'll click Okay. At this point we
can have a look at our pattern and see what it is that we want to do in terms
of making changes to it. We'll do that in the next video.
11. Pt 10 - Perfecting the Design: Now that we've got the first run of this pattern in place, we can have a look and see what it is that we want to change. I think these two flowers
are a little bit close. I'm going to work on that. That's these two here. So I can simply move this one into a slightly
different position. When you're working
on this pattern, you want to avoid
moving anything that's around the
edge of the document, but the ones inside, you can certainly move those. I'm going to test this
new rearrangement. In this document. When we
open up the Layers palette, we can just double-click on the layer thumbnail here and
just select our new pattern. Having it already in place just saves a little
bit of effort. So I'm relatively
happy with this, but I'd like some
elements that are going to beef it up if you like. So let's go back into this design and let's
see what we can borrow. I'm thinking that
this leaf would be really nice to
fill in some gaps. So I'm going to zoom
in on that leaf. And we're also going
to use the move tool to work out which
layer I'm working on, which is this one here
and it's now selected. I'm going to the lasso tool. I'm going to lasso around
this leaf and take a little bit extra with me because it's going to be
easy enough to remove it, really difficult
to add it back in. I'll go to Layer and then New and I'm choosing Layer via Copy. That's really important
because I want a duplicate of this leaf
on a layer all by itself. I don't want to be removing the leaf from the actual plant. Moving this leaf out away from the original plant so I can see it and so I can work on it. I'm going to the eraser tool. I'm going to zoom in
and I'm going to start erasing the excess that
I brought with me. Most are looking
at this leaf and it's got some blemishes on it. So I'm going to the spot
healing brush tool here, going to make my brush
a little bit larger. You can do that with the open and closed square bracket keys. You can change its size. I'm just going to
click on some of these really yellow brown
areas to remove those. Now as for the rest of the leaf, you can see that
it's pretty yellow. So again, I'm going
back to the Lasso tool. I'm going to lasso the
bottom edge of these leaves. I'm going to image and then adjustments and I'm
going to hue saturation. So this particular adjustment is going to be baked
into these leaves. That's a very
simple thing to do. Now I don't want to change the master channel because
what's going to happen is that it's going to be really obvious what's
happened here. But I do want to change the yellow channel
because that's where this yellow color is. So I'm going to select yellows. And now I can move
the slider around and I can remove some of
the yellow from the leaves. I don't wanna go too far, but this is the before
and this is the after. It just looks a little
bit more attractive. I'm going to deselect my
selection with select, de-select or control and
Command D. I'm going back to the spot healing brush
tool because there are some brown bits that's
still need to be removed. So now I have my fixed up leave. So at this point, I can use
the Alt drag command again to make some duplicates of
this leaf to fill in the spaces near these plants. And provided I only work in the inside area and
don't touch the flowers, let go of the edge. Everything's going
to be pretty okay. I think I do need to add some
leaves into this edge area. To do that, I'm going to Alt or Option drag leaf over here. And I'm going to have
to do the same process as I did earlier to make a duplicate of the leaf over here on the very edge. So making sure I know
which leaves this is, I'm going to drag it
onto the New Layer icon. And I'm going to
Control or Command T to get my Transform tools. I want to move it across here, which means I'm going to
add 1200 to its x value, leaving its Y-value intact. So that's just going to
take this up to 1200. Then if I want one down here, I'm going to have to
do the same process, Alt or Option, drag
one into position. This time I'm going
to rotate it. Make a duplicate of it. Control or Command T to
get the transform tools. And this time I'm going
to move it across here. It's at a negative x value. So I'm going to need
to move it just slightly less than 1200 pixels. I'm gonna get out my calculator. I'm going to type
in 1200 and I'm going to subtract
the current x value, which is 3.5 or
it's negative 3.5. So that means I'm going
to move it over 1.5196. You've got negative values. You probably will need
to get your calculator out just to work out
exactly what the value is, because you can't afford
to be even a pixel off. At this point. If you wanted
to add an extra layer, if you could, I'm going
to call that good. And we're going on in the next video to create
the geometric pattern, to put with this overall design to make our final
combined pattern.
12. Pt 11 - Create the Geometric Pattern and put everything together: Now that we've created
our floral pattern, we're ready to create the geometric design
that will go with it. For this to work, the geometric design has to fit evenly inside our
floral pattern. Floral pattern document
is 1200 by 1200, that's as big as our swatches. So whatever we do in terms
of our geometric pattern, the values of its width
and height need to divide evenly into the width and height of our pattern, floral pattern. So they need to divide evenly so there no fractional
parts left over. I'm going to create my
geometric pattern as a square that will make
things a little bit easier. My floral pattern is a square, so that makes things easy to, I need to come up with
some dimensions for my square that will divide
evenly into this design. The design being 1200 by 1200. Obviously 1200 would
divide in there. We'd just go one time. 600 would go in there twice. So we get plenty of repeats. We get four repeats inside
our floral pattern swatch. We could use 300 or 200 or 100, because each of those
numbers divides into 1200, leaving no fractional
part leftover, but so too will 50, and I'm going to use 50. I'm going to choose
File and New. And I'm going to create
a document 50 pixels by 50 pixels with a
transparent background. That's really small. So I'm just going to
enlarge it and little bit. This, I need a line, so I'm going to the line tool and I'm going to make sure
that it has a black fill. So here's my black fill and I don't want it to have
any stroke at all. So I'm going to
remove the stroke. I want its width
to be two pixels. And so I'm just going
to draw my line. It needs to go over
the edge of my shapes. So let's just draw it out. Now it's really important
as I draw this line that I end up with a length that
is an even number of pixels. If it's not an even
number of pixels, then it's not going
to line up perfectly. And that's always a struggle with these geometric designs. So I'm looking for a
number here in my length. You can say that I've
got a little pop-up here showing me how long it is. It's a 106 pixels long. That's an even number
two will divide into it. And so I'm just going to
let go and just settle for my 106 pixel line. Now it's height as
reading off at one pixel. Fact, it is two pixels wide. So things are looking
pretty good here right now. I want to line this up to
the center of the document. So with my line selected, I'm going to press Control or Command T. Want to make sure that of these nine little boxes here I have the
middle one selected. The very middle of
a document that is 50 pixels by 50 pixels
are going to be 25 pixels and 25 pixels now, it's not in the exact middle, so I'm going to make sure it is in the exact middle and click the check mark because that's one transformation that I
want to set in concrete. Now I'm a bit concerned
at this stage, this shape looks like
it's only one pixel wide, so I am going to make
it two pixels wide. Absolutely has to
be two pixels wide. Let's just double-check
its positioning in the middle of the document. It is positioned still in
the middle of the document. So now I'm going to rotate it. I'll press Control or
Command T. And I'm going to make sure that the
middle selector is here, the middle of these nine boxes. And I'm going to
rotate it through 45 degrees and click
the check mark. Now, what we're looking
for here is that this line goes right
across these corners. If it doesn't go across
the corners and it will be pretty obvious that it's
not meeting in the corner. You want to undo it and start
again and work out what went wrong because it's really
easy for it to go wrong. And if it doesn't go
perfectly across the corner, then it's just simply
not going to work. So this one is
working just fine. Let's go back to our layers. Let's re-select our line, which as you see is
still a line and it's still going over the
very edges of document. That's really important. I'm going to make a
duplicate of this. I'm going to rotate
it the other way. So with this line selected, I'm going to press
Control or Command T again to bring up
these transform handles. Again, make sure that
everything is in reference to the center
point on the line, which of course is lined up at the very center of the document. I want to bring it
back the other way, so I'm just going to rotate
it negative 90 degrees. Do a visual check on it. Looks just fine. Click the check mark
Double-check to make sure that it's
crossing in the corners, which it is, which tells me
everything's going just fine. Going to add another layer. On this layer, I'm going
to drag out a circle. So let's just go and
get the ellipse tool. Again, I'm working with a
black fill and no stroke and hold the Shift key as
I drag out a circle. And then I'm just going to place it in the middle
of the document. And of course, if
we want to make sure it's in the middle
of the document, we're going to press
Control or Command T. We'll make sure that the
middle of these nine boxes is selected to make sure that the reference point is the
middle of this circle. Makes sure it's at 2525. If it's not, we're
going to change those values and
click the check mark. Now we've got a
circle in the middle. We need to have a circle
on the edges because ultimately these lines are going to intersect
to another point. So let's go back to the layers. Let's take our ellipse
and we're going to drag and drop it onto
the New Layer icon. So we've got a
duplicate ellipse. To throw this one
into the corners. We're just going to rasterize. It's going to make life
a little bit easier. I'll right-click it and
choose Rasterize Layer. Then I'm going to apply
a offset filter to it. So with this last selected, we'll go to Filter and then
Other and then Offset. Now this filter,
simplest filter to use, you're just going to
take the dimensions of the document and
divide them by two. So the dimensions of
the document with 5050, so I'm going to set its
horizontal to 2525. That just throws the object, that quarter of the object
into each of these corners, I'll click, Okay,
everything is perfect. At this point. I'm going to
select, Edit, Define Pattern. I'm going to call
this cross and dots. Now let's go and add
it as a pattern to our project as it is so far. I'm going to click on the
base layer because I want my new fill layer to go
in underneath my flowers. I'll choose layer,
new fill layer, and then pattern, click. Okay, and of course
then we're going to the very last pattern, which is our design. Now let's just zoom in. I'm really happy with the
pattern and its size. I think it looks great,
but the color is way off. It's just way too dark. So let's go back
to our document. I think at this point I'm just going to restaurants everything. So I'm going to select all
the non rasterized layers, right-click and I'll
choose rasterized layers. And I can also stick all
those together if I want to. There's no point. Naught two. It's going to right-click
and I'm going to merge all those layers into one. This allows me to now fill this design with a
different color. So I'm going to click here
on this lock pixels icon. So we're locking the
transparent pixels. Now I can pick a gray because I think this is going to look
better in a gray. I'm going to make it
my foreground color. And the command that we have, fulfilling the
current layer with the current foreground layer is Alt Backspace option
Delete on the Mac. And so that just
fills these pixels up with a lighter gray color. If it's not the right color, you can just change it so
you could go back and say, You know what, It's
not quite dark enough. Let's just go at that again. Alt Backspace to fill it with the current foreground color on the Mac, it's Option Delete. Happier with this, Let's go
to Edit and Define Pattern, cross and circle gray. Go back to our master document, double-click on this pattern, fill layer and go and
select the last pattern, which is this
lighter gray color. Still think it's a bit too dark. So I'm going to work on that, just changing the color until I find something that suits me. I've gone and done just that. I've taken it down to be
very light because as a geometric pattern
that seems to be quite dark in the final design, even though the colors in
this pattern are very light. So I'm happy with this. I'm happy with this
being my final design, but of course it's
not ready yet because it's still two
layers of patterns. We're going back to the flower design and
into this design, we need to add our pattern
out, geometric pattern. Now, you can do this one
of a number of ways. Probably what I would do is save this out as a design itself. So I'll choose File
and then Save As, and I'm going to save it
giving it a different name. So I've just called
it flower complete. I've got the original with
all these layers in it, but now I've got another version which is my completed design. What I'm going to
do is I'm going to grab all of these layers. And I'm just going to
merge them all together. I'm just clicking
on Merge layers. Now I have a single layer
that has my design in it. Not the sort of thing
that you want to do if you want to be able to
edit the patent later on, but I've already got my layered
file elsewhere right now. All I want to do is to put this design and my
geometric together. So I'm going to add a new layer with layer, new fill layer. I'm going to pattern,
I'm going to add my geometric pattern. Of course, it's
coming in on the top and I want it to be underneath. Now if I wanted to sell this as a pattern that had
transparency in it, then I would go ahead and save the pattern swatch
at this stage, but I want to sell this
with a background. So I'm going to add my new layer and I'm going to
fill it with white. White is my current
background color, Control, Backspace
command, Delete. So this is now the
pattern swatch. This is what's going to
give me a pattern repeat. So it's going to be
a perfect repeat on all ages for not
only the flower, but also the geometric. So let's go to edit,
define pattern. We're going to call this flower
and geometric completed. Of course we need to test it. So we're going back to
our master document. I'm going to turn
off these layers. Let's add a brand new layer, Layer, New Fill Layer Pattern. Click Okay, go and find
the very last pattern, which is going to
be our geometric. And you can see here that by turn the background
layer off here, the geometric pattern is forming a perfect design
underneath the flowers. And it's got its
background with it. So this pattern contains not only the geometrics
and the flowers, but also the white background. The final step in this
process would be to pick up the flour and the
geometric pattern and the combined pattern
and make sure that we export those as a file so that we've always got them on our computer in case
something happens.
13. Pt 12 - Put together already created patterns: It's time now to have a
look at the situation where the patterns have
already been created and we want to put two
patterns together. So somebody else has made choices are about the
size and the scale. And we're just left
with the basics to put together into some
semblance of order. So to do that, first of all, I'm going to create a new file. So my new file is going to be 36 by 3600 because that's going to give me a feel for how this
thing is going to look at, at a size of 12 by 12. So the starting point is to look at the patterns
we're going to use. I'm going to use one from the patterns selection in the newer versions of Photoshop. So I'm going to patterns
and I'm going to water, and I'm going to use
this water pattern here, this darker one. I'm going to choose layer, new fill layer and
go to Pattern. I'll go to okay, I'm going to go down here and
select the water pattern. And this is the one
I'm looking at. The reason why I'm
doing this through a new fill layer is
because I can scale it. And that's pretty important
because we want to get a feel for how big or small. Ultimately, we want
this pattern to be. Now, so far is 12
by 12 is concerned. I'm thinking this pattern is a pretty good size
at 100 per cent. Of course, we want to be really
careful if we're going to scale it up because that's going to start to
pixelate things. Although I think this pattern itself could probably
take some scaling up because it is so detail we're not going to
lose a lot of that detail. But you want to be critical about the choices you're making. If you're scaling things
up, scaling things down, not nearly so much of a worry, but I'm saying to
myself right now, yep, this one looks pretty good. The second pattern
we're going to use, I'm going to give you
for a few reasons. One of them is that it's
going to give you a chance to import patterns
into Photoshop. So we're going to go to the
patterns dialogue which we can get to by choosing Window
and then patterns here. I'm going to the flyout menu and I'm going to choose
Import patterns. Now the pattern that I've got, I've put it on the desktop
and it's ABAB quatro foil. It's saved as a PAT file. That's a Photoshop pattern file. That's what Photoshop expects to say in terms of
importing patterns. I'm going to click on
that and click load. And now we should see
our Barb quatro foil. Here. It's being
imported into a folder, the name of the file, and this is the pattern. There was only one
pattern in there. So this is the pattern
we're going to use. So again, I'm going
to do it using a fill layer because
I want to see what the pattern
looks like at 100%. I also want the chance to scale up really easily
if it's not right. So let's just go and
do pattern fill. Let's go and get
bob quatro foil. I'm looking at this and
I'm saying to myself, I want to create
this as a swatch for Spoonflower or I want to create
this as scrapbook paper. What do I want it to look like? And 100 per cent is just
not working for me. This is a really big pattern. So I'm going to scale it
down to about 50 per cent and ask myself if that's
looking a little bit better. I'm thinking that probably is I'm like go even
a bit smaller, Let's go to 40 per cent. I'm a bit happier with that. So what we're looking at now is the water pattern
is going in at a 100% size and there's barbed quatro foil is going
in at about 40 per cent. Ultimately, what we want is something that looks
a bit like this. At this point, that's
all we're looking for, is how big do I want
my pattern to look? What's the baseline of what I think this thing
wants to look like? And then we're
going to go and do the technical bits of
putting it all together. And the first thing is to determine just what
we're working with. So I'm going over here to the pattern's dialog and I'm looking here at
the water pattern. I'm hovering over it, and it says water pool
946 by 946 pixels. Now, for this first exercise, I'm working with square
documents because this is enough of a
mathematical head spin without working with
patterns that are not square. So this is 946. By 946, we need to write this down because we need
to work with that. Let's go and see what
the barb quatro foil is. Well, it's 490 and for
90 again it's square. And I chose that
for this reason, gave it to you for this reason, we want to be working with square documents at this point. So that's what we're
starting with. But we know that this
Bob quatro foil, if we want to use
it in our design. If we use the water
at 100 per cent, the barb quatro foil needs to be down kyle down to
about 40 per cent. So let's go and
get a calculator. And let's go and say
what for 90 looks like scaled down to
about 40 per cent. So I'm going to type in for 90 and I'm going to multiply it by 40 per cent, which is 0.4. And I'll just press Enter. And we're looking here at what the resulting value
is, n, it's 196. So 196 isn't going to divide into anything
particularly easily. But I'm looking at
it and thinking 196 isn't nearly 200 and that
would be really good to 100. Two 100 size pattern will divide evenly into
all sorts of things. And I'm also looking at my water pattern because
I know that's 946. To stretch it out to say 1 thousand wouldn't
be a big ask. So that's what I'm going to do. I'm going to enlarge the water pattern to one
thousand, one thousand. I'm going to scale my
barbed quatro foil so that it feels something
that's 200 by 200. And then we're going to
have exactly what we need. So let's go and do that. The first thing I'm going
to do is to create a brand new file and I'm going to make it the size of the
water pattern. The water pattern
was 946 by 946. So if I create this
document and if I fill it with the water pattern,
select Pattern. Go down here to this water
pattern and click Okay, this is one repeat. It's exactly one repeat. So it's going to line up
absolutely perfectly. But it's 946 by 946, I would like it to be
just a little bit bigger. Image, image size. I can scale it so that the
width and height to change together because this is a square and I want to
end up with a square. So I'm going to take
it up to 1 thousand. I need to re-sample because you can't enlarge
without re-sampling. I'm just going to use automatic. That should be pretty good. I'm going to click, Okay. And now I should end
up with an image. And I can see down at the
very bottom corner here that my document is a
thousand by 1 thousand. This is still a repeat. It's just being
enlarged a little bit by around seven or eight per
cent, something like that. This is my new pattern. I'm going to have to save it because I need it
saved at this size. So we're going to edit and
we're going to define pattern. I'm going to call us water. And it's 1 thousand by one
because I need to make sure that that is the patent
that I use in a minute. So that's sorted out the
water pattern problems. We'll close this document. Let's go and sort out the barbed quatro foil problems File New the Bob quatro foil. We had a look at it in the pattern's dialog
and we determined that the original pattern
size was for 90 by four ninety, four, ninety, four ninety and fill it with one instance of the barb
quatro foil pattern. One exact pattern. It was for 90. We decided that we wanted
to scale it down to 200 Image, Image Size. We can click on this
icon here because again, we want it to end up to be a square document
started off square. We want it to end up
being a square for this west significantly
reducing it. So we may want to use something
like by cubic sharper because we can see here that it's recommended for reduction. If you were enlarging a lot, you would choose one of
these enlargement options, but we're just reducing. But again, we are
reducing by a lot. We Neely Having the size of
this. So let's just click. Okay. I'm checking down the bottom
to make sure I have a 200 by 200 pixel
document, which I do. So now what I'm gonna do is save this pattern because I want
it saved at this size. Quatro foil 200 by 200, again, marking this as the pattern that is sized correctly
for our project. I'm going to close
this document. I don't need it any longer. Now to create my pattern swatch, I need to fit
everything in together. Five of my barbed
quadrat foils at 200 pixels by 200 pixels are going to feed in
my water pattern. They're going to
fit horizontally and they're going
to fit vertically. The water pattern that we have re-size is one
thousand, one thousand. So we're going to create
a document 1 thousand by 1 thousand because
that's going to be the size of our
pattern swatch. 1 thousand by 1 thousand. And enter that will fit one entire element of
this water pattern. I'm going to choose
edit and fill, and I'm just going to go
and get the water pattern. And then I'm going
to add a new layer and I'm going to fill
this with my quatro foil. Fill this time, let's
go for the quatro foil. We want this one, the one that is
created at 200 by 200, if you're confused as
to which is which just hover over them until
the tool tip appears, but of course the tooltips
not going to appear here. Yep, there it is. And
we'll just click. Okay. So now I've got five by five
of my Barb quatro foil. So you can see that
the quadrat foils are repeating exactly. And we're trusting that the water pattern is
repeating as well. We haven't actually tested that. We are about to
in just a minute. At this point, I'm going to make a aesthetic choice because I think the barb quatro
foil is way too dark. I'm going to take
it down and change its opacity down a little bit. I'm also seeing a little bit
of the water through there. I'm quite happy with that. I like this as a better result. This is going to feel a
sheet of scrapbook paper. They're going to be about 3.5 of these vertically
and horizontally. This is the pattern that we
would send to Spoonflower. This is a single repeat
that can go to spoon flour, but we need to
save it of course. So we're going to Edit
and Define Pattern. This is going to be
water and quatro foil. Now let's go and
test it because you want to test it before
you go too far. I'm going to test it
on something that is scrapbook paper size just
to make sure it's working. I'm just going to use
Edit fill and I'm going to choose my
new combined pattern. What we wanna do
is we want to look at where the seams
potentially are, and that's in this area here. We already determined that
we would fit three and a bit across and
three and a bit down. So the first theme is likely
to be in this area here. And I'm just looking to see if I can see any vertical seams and I can't I can't see it in the quatro foil that's
as clear as can be. But I'm also not seeing
it in the water pattern, that water pattern
was a true repeat. It doesn't have sames in it. So that is working
absolutely perfectly. So here we have a sheet
of scrapbook paper. But inside the
patterns dialogue, we have got a pattern
that we could take to Spoonflower or any
other site that requires the actual
pattern swatch. And then at Spoonflower, we will be able to print it. Now, we've already looked at saving patterns in
previous videos, but let's have a look
and see how we would actually get this
out to Spoonflower. And for Spoonflower, this
is what we're going to use this as our mockup
of our pattern. And this is a pattern swatch. So we would just export this as a high-quality JPEG and then send that to Spoonflower
because this is the swatch That's
Spoonflower requires.
14. Pt 13 - Putting together uneven size patterns: Let's now have a look at a slightly more
difficult situation where one of the objects, one of the patterns we're
working with is not square. I'm going to create a new file because I need to test this or that to see what sort of
scale I want to work out. So I'm just using scrapbook
paper because it's an easy enough size for me
to be able to visualize. Now, I'm going to give
you these two patterns. It's a herringbone pattern
and a floral pattern, because we need to scale
them at this stage, I'm going to use layer, new fill layer and then pattern. The first one is the
geometric pattern. It's going at the back. This is a herringbone
pattern right now, it's way too big. I'm thinking that
the scale should probably be something
like 30 per cent. Fact, I still think that
that's a little bit big. Let's try for something
more like 15 per cent. I think that's pretty good. I'll click. Okay. And now we're going to add
another fill layer, Layer, New Fill Layer, and
go to pattern again. This time we're going to use the floral pattern
that I'm giving you. And you can see
here that this is rectangular box
one looks square, may not be, but this one's
definitely rectangular. So I'm looking at the
design here and thinking this is probably just
a little bit too big. So I'm gonna make it 90%. I'm also looking at the
herringbone and thinking that right now it's probably
a little bit too dark. So if I bring down
its opacity to, well, let's see what
90% looks like. I'm pretty happy with that. If I had a single pattern that produced an
image like this, I would be happy. So we want to get to this stage before we do anything else. So you need to get
everything sized and just get a really
good picture as to where you're aiming for. And then you're going
to reflect back to your high school math days and you going to remember those
times when you thought, When am I ever going
to use this math? And you're either
going to be really pleased that you paid
attention or you're going to think that
you should have paid attention because now we're
getting into the math. We need to do a bit of
math to make sure that we scale these patterns so
they're going to fit together. We need to end up with
a seamless repeat. So I'm going to the
patterns dialogue here. I'm going to hop over this pattern and I'm noting
that it's nearly a square, but it's not a square. It's 383 by 384. We'll need to do
something about that. And this one here, let's have a look and
see how big it is. Well, it's 2161626. So the first thing
I'm doing is writing down both these values. I'm going to do that
on a sheet of paper. And I'm going back to my
layer and I'm going to read off the percentage
scale that I use. So if I reduced or
increased these in any way, I need to know that as well. So this larger pattern I'm
writing beside that 90%. And then the
herringbone pattern, I'm writing 15 per cent because we need to
know those values. Now we need to look at the
mathematics of scaling this. We've got one pattern
that's really big, that's the flower pattern. And we've got one
pattern that's really small and that's
the herringbone. So we want a certain number of the herringbone pattern to fit
inside the flower pattern. And if we can get
that to be nice, and even then we're going to end up with a seamless repeat. So the next thing to do is
to get out a calculator. And we're going to assume
that we can reduce the herringbone
pattern to a square. That's like a gibbon. At the moment, it's 383. So let's just type in here 383. Now we know that we wanted to
reduce that to 15 per cent. So we're going to multiply
it by 15 per cent. So at some point, this pattern
needs to be reduced in size to something
around about 57 pixels. That's nearly 60. I'm holding that thought, but that will reduce it to about the size
we're seeing here. So let's go and have a look
at the larger pattern. So the larger pattern, one of the dimensions
of that was 2160 and we needed to
reduce that to 90 per cent. So I'm multiplying it by 90%. So somewhere along the way, the longer dimension of
this pattern needs to be somewhere around
about 1944 pixels. And we're going to do the
same for the other dimension. So that was 1626. We're going to multiply
it by 90% as well. So we need to reduce that one
to somewhere around 1463. So I'm just writing
these values down as whole numbers so that we
can have a look at them. And quite obviously, the 57
by 57 herringbone pattern, if I took that up to 60, I'd have something
that would divide evenly into sort
of larger numbers. So I'm thinking that that's a gibbon, the
herringbone pattern. If I take it to 60 by 60, it's not only going
to be square, but it's also going
to be pretty much the size that I
see on the screen. So assuming that the
herringbone pattern is 60, Let's go and grab the first of our larger measurements
than 1944. I'm going to type that in and
I'm going to divide it by 60 because I wanted to
see how close we are. Well, it goes in 32
and a bit times, so I can choose 32 or 33, I'm going to say 32. So I'm going to change that
measurement to 32 times 60. So let's go and do that. Let's calculate what
that's going to be. If I make it 1920, then it will divide
evenly by 60. It'll divide 32 times. So we could get 32 of the little herringbone patterns
across that long side. So that's going to be perfect. Let's go and test out
the other measurement, the shorter side, it was 1463. So we're going to divide that
by 60 and see where we are. Well, it's 24 and a beat, 24 third, Let's go for 24. So let's calculate 24 by 60 because that's going to give us the length of
that other side. So it needs to be 1920 by 1440. If we make the large pattern, 1920 by 1440 and the
herringbone 60 by 60 be herringbone pattern
is going to fit exactly inside the
larger floral pattern. And it's going to
do it evenly with no extra little
bits over the edge. So we're going to make a
seamless repeating pattern. So now that we've got
the size of sorted out, we just need to go and
create the elements at the right size so we
can put them together.
15. Pt 14 - Put Together the Uneven Size Patterns: We already know what the pattern elements
sizes need to be. So let's first create a document that will fit the
floral pattern in it. And if we remember
when we looked at it in the patterns
dialogue, it was 2160. By 1626. I've created a document that
is the exact size of the existing floral pattern. This is really critical. We've gone to all the work
of working out the numbers. Now we have to squeeze
these documents or enlarge or shrink them so
they're the right size. So we're going to start
off with something that will fit the
entire pattern piece. I'm going to choose
Edit fill and I'm going to choose that floral pattern. So I should have
one repeat of this. I'm just checking
visually that things look like they're going to
line up and they do. So now I need to reduce this to the measurements
that we decided on. So I'm choosing Image
and then Image Size. The measurements we decided
on where 1920 by 1440. I need to disable
this option here. So make sure that these
are not linked because the width and the height needs to be independently changed. Now, this is not going to be a really big re-sizing
of this document. There's going to
be a little bit of squishing in one direction. But these are
hand-drawn flowers. We're not going to be making
such a big change to it that is going to be visible at
all. So let's just click. Okay. I'm checking down the bottom to make sure the size is correct. So this is what the pattern
pace is going to look like. This is the floral bit. So we're going to save this now. Ultimately, this is also going to have the herringbone
pattern in it. So it's going to be
our pattern swatch. This would be a way of
saving the pattern swatch. So when I say, but
I'm going to call it herringbone and flowers. I've saved that
part of the work. We now need to work
on the herringbone. So I'm going to create
a document that is the size of the original
herringbone pattern. You remember it was
slightly off being square. So it's 383 by 384. Then we're going to drop
our herringbone into it. Then we're going to re-size it to the size that we determined, which was 60 by 60. Again, making sure that this was not locked because
we're actually sizing it not in exactly
the proportions. It was created at 60 by 60. Now for this, I'm going to
set my re-sample option to by cubic sharper because
we're reducing this shape. I'm reducing it quite
significantly in size that it started
out at nearly 400, it's ending up at 60. So that's a big resize. So I'm making sure that the algorithm that
is going to compute that re-size is one that is supportive of reducing objects. I'll just click, Okay, and this is my pattern piece. I'm going to choose Edit
and Define Pattern, and I'm going to recreate
this herringbone. Now I can swing across
to my herringbone and flowers design and I can
add my herringbone Layer, Layer, New Fill Layer Pattern. I'm bringing in my herringbone, but I'm not going to
change its proportion. That's really important. We want to make sure that
we grabbed the 60 by 60 version and just click, Okay, now it's coming on
top of the flower, so I'm just going to move
it to behind the flowers. So this is a seamless repeat. So the edge pixels here, I'm going to line up with
the edge pixels here. And the edge pixels here are
going to line up with these, remembering that this looks
really quite big right now, but it's just the
pattern repeat, this is what we would send
to Spoonflower for example. But of course we want to
reduce the opacity down. I think what we used last time. Let me just check
and see what it was. It was 90 per cent, so we know that that's
going to work well when we actually get
it put together. So I'm just going to set
that to 90 per cent. This being my pattern swatch. I can now save it. And then we'll go and test it
on our full size document. I'm going to turn these
layers off and I'm going to add a new fill layer
with my pattern in it. This is the pattern that we've created in use in a document. Of course, if we were
going to spoon flour, this is what we
would be sending to Spoonflower because
this is a repeat. Drop it in and you could make a billboard size piece of
paper or fabric or whatever. And this would be a
seamless repeating pattern. So just being clear about
what we've got here. Here it is at
scrapbook paper size. Here it is ready for any site that requires
a pattern swatch. And in the patterns dialogue, we've got the individual pieces. I've got the herringbone, I've got the final design, but I didn't ever save this
one out at the correct size. If we hover over this, we'll say that it's
not the correct size. So before we leave here, Let's just turn off the herringbone and
let's say this one out as a pattern to just
for the sake of completion. Rechecking the
patterns dialogue. These are the three
pieces that we would save out as a set. So this is the herringbone
at the correct size. This is our final combination and this here is
the resized one. This is the one we need
some grabbing all three of them and I'm going
to export them. This is the file here that
I'm going to give to you. That's the unsized version so that you can
practice with it. This is the completed
version that has everything at
the right size. So these are the patterns in a PHP file ready
for me to share, sell, whatever I want to do. So there's lots of purposes for which we could
use these patterns. We just need to be
really clear in our planning as to what
we want to use them for and how are we going to put this all together and
how we're going to deliver it to our client
in a meaningful way.
16. Project and Wrapup: We've now completed the video training
portion of this course, so it's over to you. Your project for
this class is to create a double layer pattern in Photoshop incorporating different scale repeat
pattern elements. Post an image of your
completed pattern as your class project. Now, I hope that you've enjoyed this course and that
you've learned lots about making more complex
patterns in Adobe Photoshop. If you did enjoy this course and when you see a prompt that asks if you would recommend
this class to others, please. Would you do two things for me? Firstly, answer yes, that
you do recommend this class. And secondly, write
even just a few words about why you enjoyed the class. Your recommendations help
other students to say this is a course that they too might enjoy and learn from. If you'd like to leave me a comment or a
question, please do so. I read and respond to all of
your comments and questions, and I look at and review
all your class projects. My name's Helen Bradley. Thank you so much
for joining me for this episode of graphic
design for lunch, and I'll look forward to
seeing you in another class here on Skillshare very soon.
 Helen Bradley, Graphic Design for Lunch™