Transcripts
1. Welcome: Hi. My name is George and I've been an artist for
over 10 years. I've studied architecture in a high-school and then moved on to six years of art school
in sculpture and painting. I've been part of
many exhibitions, both group and solo shows. During this time, I've
developed the passion for teaching both online
and in-person. Working with both
adults and children, I've developed a very
special method of teaching that focuses
more on the project and the experience and joy that the student
feels when painting, and gradually going
into some beautiful, well-placed guidance in order to create this wonderful painting. In this course, you will
learn everything you need to know about color
and color harmony. This might sound
complicated, however, with some well-placed
exercises and tricks, you will learn how to play
with colors with freedom. This class has some big goals, is meant to teach you more about painting and color than
four years of art school, in just one hour and
some minutes without feeling like a boring
informational course. Everything will be fun, free-flowing, and with
a lot of laughter. If that sounds exciting to you, let's start playing with colors.
2. Materials: For the course, you will
need a few materials. You can use any size canvas. This is a square canvas. It's a 35 by 35 centimeters. Also a mixing plate, a palette knife to mix those
colors onto the plate, and a medium round brush. It's a very simple
and beautiful brush to make wonderful shapes, and a big flat brush. This is from the hardware store
to make flats big shapes. You'll also need some
Amsterdam acrylic paint. This is white, this is yellow, some blue, and some reds, and of course, some neon pink. You'll be using the primary
colors in order to learn more about mixing beautiful
and wonderful colors. That's all you need
for this course. Let's go into the project.
3. Before you start: Before you start, there
are some key concepts and ideas that are needed
for this course. You don't need to
make the exercises, the information is enough to
get you through the process. However, if you wish to play
around with the exercise, you will get a deeper
understanding. Now let's go and play
with a few compositions.
4. Simple and fun color tricks: After simple and
fun color exercise, you will know more about color
than 90 percent of people. Now let's play a little
bit with colors. Let's first talk about
analogous color contrast. We have here a white, yellow, and then we
can put an orange. We can put a darker and
less saturated orange. We can also add a
light brown and the dark brown in order to have a beautiful array
of analogous colors. Of course, this is going towards
the warm side of yellow. You can also go towards the cool side of yellow by
going towards the green. This is what we are going
to do in the painting. Now you know that when it
comes to analogous colors, you can go towards some warmer tones or
some cooler tones, depending on what
color you choose.
5. Make your own color wheels : For this exercise, you will
learn everything about shapes and how to position
them in the right order. Let's have some fun with shapes. This time, with some
green analogous colors, you can start to position
the big shapes first. If you put the big shapes first, then you can have more freedom in putting down
other beautiful shapes. This is called big,
medium, small. But when it comes to the order, you don't always have
to put it like this; big, medium, small. You can have it
big, small, medium. You can vary the shapes
around in order to create more interesting
compositions. Let's add another big shape, this time, a little bit more
green, lighter in tone, and also add some
small shapes onto the edges of the big ones
that you've put first. You can already start to see
how easy everything becomes. Going further and
introducing a little bit, since we moved so much in
the cold area of colors, we can now introduce a little
bit of blue over here. Let's put a big shape
just over here and some smaller ones just to
make it more interesting. If you want, you can now
go towards the orange as well to learn a little
bit more about color. Let's place a big one here, and then let's find another
small one over here, and add another medium
one just over here. This brings us to another
beautiful lesson, which is to have clean colors. Don't worry, you will get
specific details on how to have your clean colors in the
actual project of this course. Of course, you don't
need to have all of these colored papers around
to understand colors better. You can just play around
with your own colors, make them, and
paint on a canvas. Much simpler to do. This is just a teaching device. Going into another beautiful
exercise about color, let's start seeing how we can create our own color wheel, and from an analogous contrast, move closer and closer to a
more complete color contrast. Let's start working with
some orange from here and create this beautiful
analogous color contrast. From orange, we can create it
towards the green as well. Let's put the lighter
version first. Perfect. Then you can continue from the brown towards the red. Let's move them a
little bit lower, and then you can add
a beautiful pink and a lighter version of this
pink just over here. From the green, you can go towards a blue and
a more turquoise version. I think they are
the opposite way. Turquoise is much
closer to green than blue and a darker,
beautiful blue. We can also add this
wonderful color, since it's closer to the blue, it will seem more purple
if we add it on top. You can start to see what a beautiful
color wheel we have. Some people tend
to stay away from different colors,
for example, browns, but you can start to see how
beautiful browns look if you integrate them in an
analogous color contrast, as well as add some other
vibrant colors on top. Brown and gray colors
are very useful to bring out the vibrancy
of other colors. If you have a bedrock of
gray and brown colors, whenever you put a
vibrant color on top, it will seem even more
vibrant than just on its own. Well, of course, the table
is a little bit brownish, so it will seem vibrant as well. Another very important
thing that people get wrong about colors is moving too fast towards more
interesting colors they like. Whenever you move
towards a color, try to gradually move on the
color wheel in order to not find yourself having
gray or brown colors if you don't need them. Analogous colors move very
easily in-between them. If you go from this
orangey color, towards this green, it will
move nicely and organically. It will harmonize
very easily together. But if you move from this
orange to this pink, you will obtain a gray, muddy color that is not
pleasant to the eye. When it comes to
analogous colors, you don't really need a lot of changing and
cleaning the palate, and waiting for the
painting to dry. You can work through
them and continue until things get a little
bit too gray or too muddy, but they do move and
harmonize very well together. Problems can arise whenever
you are moving from the warm to the cold or from
the cold to the warm side. That's when you need to
clean your palate and your brush in order to have and keep those colors vibrant, and then let them harmonize
with other beautiful, warmer colors as you
gradually apply them. As you can see, there
are a lot of things to talk about when it
comes to colors. However, for now, this is all you need
for this course.
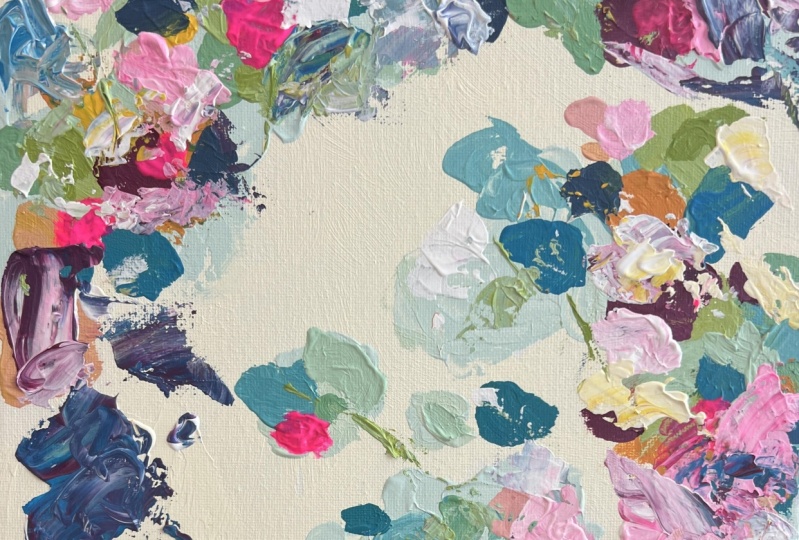
6. Fun composition secrets : Let's now play around with a little bit of
compositional theory. It's just playing
around with shapes. It can be very easy. You can just draw around
some analogous colors, small and then big, just draw them around. Try to think just a
tiny bit about big, medium, small, and grouping
the colors together. Also, try to add some
breaks into the shapes. You can position it like
this and break the shape. You can start to see
two beautiful shapes that are the same. Just one more shape over here and it breaks that
wonderful illusion. Over here, you can start to see two shapes
that are very big. If we overlap them a little bit, then this is a big one, this is a small one, and we can add another smaller
one on the other side. Group this a little bit more, so it instantly becomes better. We can also add some more
long shapes over here. Maybe move this one
somewhere over here and add another beautiful rounder
shape just over here. Now, this one is quite
similar to this one. Let's just turn it around and see if we can make it
a tiny bit bigger. We can also position it
just over here so it creates some sort flowing. Now we've moved into this
beautiful analogous colors, very fast and loose. You don't have to worry too much about it as long
as you know that you need to work from light
to dark, it's very easy. Now we can make this
brown a little bit more warm by adding some
red and keep it still as dark or
even darker and play around a little bit more
with these beautiful shapes. Now we would clean our brush
and our palette in order to go towards the cooler
side of the color wheel. You can start to
see how as we go towards darker tones
and more cooler tones, the composition has started to become much more interesting. We've added another element
to the composition. At this point, you can go even
darker and cooler. Maybe add some beautiful
complimentary contrast just over here with the
orange and the turquoise. We can also put a medium
shape of turquoise and overlap it just over here
coming out of the edge, move this a little
bit more down. You can start to see
how easy it is to just play with this wonderful color. Now we have a little
bit of turquoise here, but we might want to balance it out by adding another one
just outside over here. Now let's just make this
color a little bit lighter, creating the analogous
color contrast. This might go well, just over here as well. Let's just keep it very
simple and add the dark blue. So we've worked from light green towards a turquoise
and then a blue, and now a darker blue. We can complete the beautiful
analogous color contrast just over here, and then add another
complimentary over the orange. You can start to
see how they easily harmonize once you know a
little bit of the rules, how easy it is to just find
a place for the colors. Now, this red over here does not have some analogous contrast, so we need to add some pink
and some smaller shapes. Try to keep in mind
big, medium, small. Maybe change it with this
bigger one and this one needs a small one as well
over the orange over here. This area needs a tiny bit of color and maybe coming
out of the shape. Let's throw in some very
light pink as well over here coming out of the
side of the canvas. To go over the basics, you need first to
start from big, just the big canvas, a bit smaller but still big, and then medium,
and then smaller. First with some analogous
colors and then clean the palette when you move
towards some more cool colors. That's how easy it is
to move around and play with a composition
once you know the rules. Rules in painting
create freedom. You first need to
know the rules in order to know how to break
them in the right way.
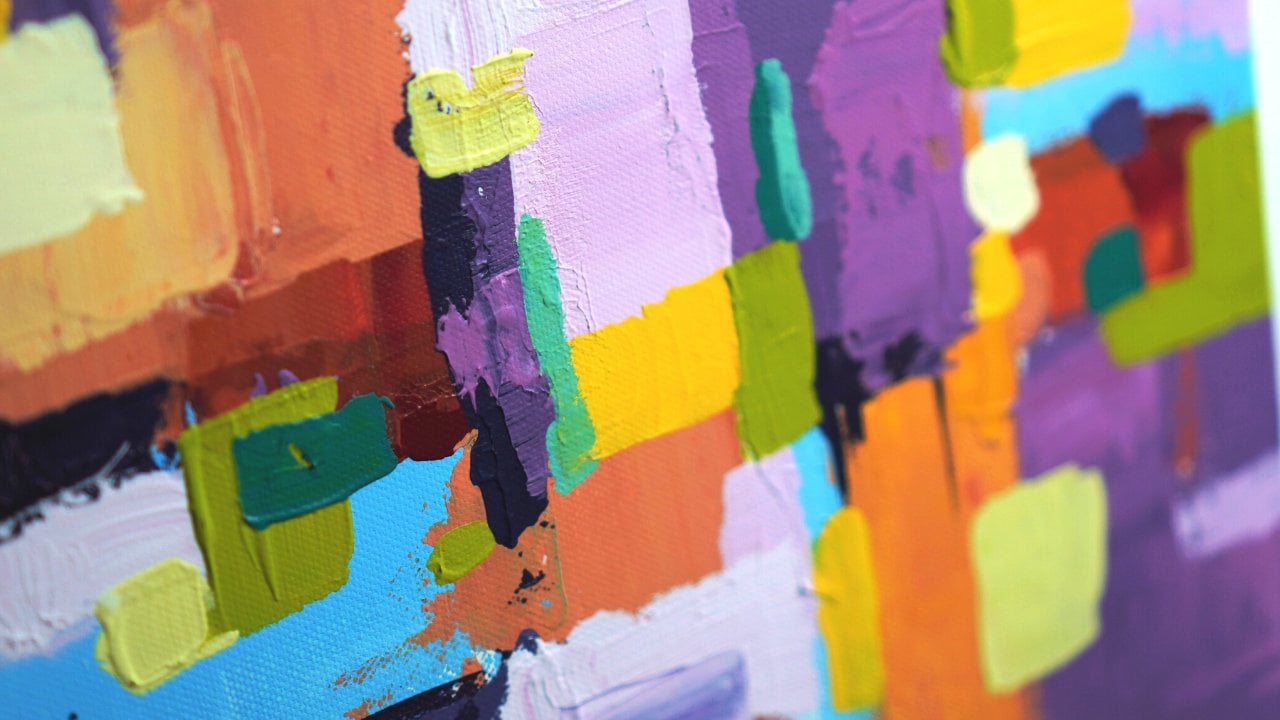
7. Order : You can start to see
that this is advance. Let's clean up a little bit and start having a tiny bit of fun. When you're taking
out the big shapes, the composition looks
much more dull, even though it has
the same colors. Having so many little things
in the composition makes it so much less interesting, less colorful, less
dynamic and vibrant. As you can see, you can learn
a lot about color by just ordering them and putting them in beautiful piles like this. When it comes to colors, it's a very interesting
way of playing and organizing colors and
then disharmonizing them, disorganizing them and letting the paint have its own thing. Because if you only use these kinds of shapes and
you don't use texture, for instance, when
using a palette knife, you could take this color and smudge it and create textures, break the edges, and make some
fun and interesting chaos. Too orderly can be boring. Everybody knows this from
cleaning their house. For some people, it's fun. Some people might like
cleaning their house. This is the same with painting. Everybody forgets that you
should have fun and play. Then try to make it
nice and beautiful.
8. Synergy within colors : Let's play around with another composition and
explain to you a little bit of the thought process
and some stuff that you need to keep
in mind when painting. For instance, you don't need to remember everything
all the time. You can just play around, let the information
you've soaked in come through in
what you are doing. Throw some paint
around like this, papers around like
this and then say, okay, it seems like I don't
have a really small shape. If I put it over here
and I make it like this, it seems like it
gets cut over there. It also makes a river
over here and over there. Or maybe I want to
dis-harmonize them. Then on the other side,
make another breakaway. This is very easy and simple. You don't always have to
keep in mind everything. You don't have to remember
all those beautiful details. You can just play around
and see what happens as you go along since
this is about having fun. Let's throw some more
green over here and now, let's go into the
beautiful blues. Let's put some bigger shapes
of blue just over here, maybe over here, and one smaller one over here, a bit lower over the edge. This one on this side, just coming out of this edge, and we need a small
one maybe over here. Another small one
just over here. Going into some turquoise, now you can start to think
about where this can fit. It can only fit close
to some blue since it will create that beautiful
analogous contrast. You can position it first a little bit more to the side
and then put the blue over here and now these
two feel connected to this one because
here they overlap. Now going into another
more complex shape, you can put it over the green
and create more contrast. You can create much more
interesting colors. But when you do, consider the fact that
if the paint is wet, it will make a little bit
of a desaturated color. So it will be something in-between this
green and this blue. Now let's go even darker with
some medium shapes of blue. Let's put it over here making a lot of light and
dark contrast, but also having some shapes
maybe looking like this. Then make another smaller
one and we can finish this contrast over here by also adding some
turquoise just here, and another blue one over
here so it completes this wonderful
analogous contrast and we've now transitioned
to a dark color. We can clean our brush and our palettes and go
towards some warmer tones. You can start with
warmer tones if the paint is not dry in
the light areas first. So you don't mix too
much of the colors. You can start to see that the shapes have become
smaller and smaller in order to not go overboard
and ruin the big shapes. Let's put this one
over here to create some nice and
wonderful contrast, with the blue and orange
being almost opposites. Now going darker to a brown, let's throw in some shape, group them together
just over here, creating a light
and dark contrast, and then over the
green over here and one on the edge
just over here. This will be very nicely
once we add the red, and we need a medium red. Maybe very contrasting with
the green in the corner, and then moving it
towards the other green and another wonderful
one just over here, over the green and it also
might need a medium shape. Let's change this one with a smaller one and add another
medium one over here. Let's take a step back and
see what we can improve. The first thing
that sticks out is this edge not having
anything come out of it. Let's put a beautiful
green over here and maybe some orange
because medium, small. Now there is a little bit
of a mistake over here, since we've gone from
very saturated red and not considered the fact that we might need some pinks. Now we need to
clean our brush and our palette in
order to have this beautiful pink stand
out and be vibrant. After we put it around
here and over here, the blue and the green, add another one
smaller over here, and maybe a medium one over
the green and the orange, thus creating a little bit of an analogous contrast and with the green some
complimentary. And adding some more
white to this pink, adding it over here to complete a little bit of this
analogous color contrast and a smaller one
breaking out of the edge over here to create
it on this side as well. Make a bridge over
the ground over here and the orange as well, the beautiful light orange. That's a very simple and
easy composition to make. You can do it as fast
and as slow as you want. You can also take things away. For instance, if
you look around, this area might seem a
little bit too busy. Let's group them a little
bit more together towards this side and clean
up the areas. See another thing that
can be improved about this is the flow of things. We've just moved things
a little bit around, grouping them a
little bit tighter, and the background is now
a big, beautiful shape. If you just put things very
close together and not have a clear defined
shapes on the yellow, then it seems like
everything is a mess. We can order it, making a little bit of a
mess and then ordering it. Of course, when it
comes to painting, it's a little bit harder
and tricky, not too much. Quick and easy tip is to
decide on some areas that will be calm and peaceful and not touch them until the
end of the painting. That's how you organize your composition
before creating it.
9. Let's Go, base colors: In this video, we'll be playing around with the
big flat brush and the palette knife
in order to create a beautiful background for
your abstract painting, you will understand how to
better mix colors as well as apply them with confidence with the brush and
the palette knife. At the end you will make some beautiful marks
with the round brush. Let's go into the step. On the mixing plates. Let's add some beautiful
yellow just over here in the left
side of the plate. Let's also add some
white in order to have some light
beautiful pastel colors. Let's add more white. Of course, with
the palette knife, mixing it very well together. You can bring all the
white to the middle of the plate and mix. You can start to
see how beautiful this yellow becomes a
very pastel yellow. Looks like butter. Just mix it very well together and it's very
important to have colors mixed thoroughly
before you apply them. Get the big flat brush
clean the palette knife on the wonderful canvas
in the lower part. With the big flat brush
start making some shapes in the right-hand side
corner of the canvas and going in the corner
and at the edge. Be careful to cover the
edges very thoroughly. Look at how beautiful and
buttery this color is. Take a lot of color
on the brush and move towards the
left-hand side corner. At the top, you can start to see a little bit of a
bridge in the middle. Let's put the brush to
rest onto the plates. Position the canvas
a little bit more. You can add some blue, just a tiny bit of blue in the left-hand side of the plate, as well as some more white
just over the yellow. Now combining it over the
yellow underneath with the white will make this color
much more beautiful. It will green it up. It will make it much more green. Mix it very well together
with the palette knife, this is called going on the colder side of the
yellow with the analogous, you can also go with the
red towards the warm side. Of course that's a
very nice and easy way to think about it. You add red, you
make it more hot, and you add blue to
make it more cold. Now let's make some
beautiful greenish color and apply it with the
palette knife at the top on the
right-hand side canvas. Let's now learn how to make some beautiful marks
with the palette knife. The palette knife is very good, because you can make some
very interesting edges, right, where the
two colors meet. Let's move a little bit
more to the middle, take some more color and add
it to the right-hand side, just spreading that color
like greenish butter. Now in the middle and at the
top you can play around at the intersection between the
colors and in the corner, on the right sides. Don't worry if you
have too little color, you can always make more. In the middle, just
spreading that color around, you can start to see it
has some blue accents here and there and at the edge. Maybe a little bit
over the yellow, just mix it very well. Scrub that paint off the
canvas and apply it again. Then moving towards the
middle once again to break those edges even more and create more
interesting textures. At any stage of the painting, the painting can be finished. This is a very interesting
way of working. You don't apply things
that you don't want. You just apply color and
let it play with texture. Keep the yellow zones and
the green zones clean. Some areas you can decide
on which areas can be clean and which ones
need more textures. Let's add some more white, mix some blue into it with the palette knife
makes it very well. You can also grab the plate
in order to have it nicely. Still add some yellow. You can start to see
there is a lot of color. This is another important thing. Whenever you have lots of color, it's easier to just
spread it around, especially if you
have a larger canvas. With the palette
knife, let's clean it. You can start to see this
tiny bit more green, don't worry, it's still in
the analogous color contrast, grabbing the round brush, dipping it into the color and on the corner
on the left side, just starting to
mix it very well. You can start to see
that the brush is much, much better at covering a lot
of distance and very flat. Then you can start to make some other textures on the
bottom corner in the left, just grabbing more color
and spreading it around. Very loosely. Just spreading and making a big, beautiful flat shape with
this new-found color. Grabbing some more
color this time. In this side we have
a lot of green. Let's add a beautiful shape onto the right side bottom and a smaller one and
an even smaller ones. This is big, medium, small. We will touch on this
subject a little bit later. At the top, another
shape just like that. Just a flat round the
shape and the line. Then on the middle, just a few more breakaway lines. It's important to
have a lot of color on the brush when you're
doing those marks. They seem flat and beautiful. They don't just blend
in the background since the background is wet. When it comes to
analogous colors, you've learned
that you can go on the hot side or the cold side of the color wheel by also practicing and painting
on the canvas, you've learned that
you can mix them well together when they are on
a side of the color wheel, they don't blend and
make ugly colors, but they harmonize and
make beautiful ones. Now let's go into the next step.
10. Big medium small: This step is a very
important one, you'll play around with
some blues and stretch that analogous color contrast in order to bring to
life the composition. It's going to be a short step, but you will learn
a lot about how colors that are on
the same side of the color wheel in
an analogous slice can mix and harmonize
together very well. Let's go into the step. As you can see, the
canvas is still wet. The colors don't need to be dry that's because we are
still on the analogous colors. Let's add some more blue
and mix it together with the same color we have on the
plate, the beautiful green. You can also make it
by adding some white and some yellow if
you don't have it. [MUSIC] It's very easy to make. Grabbing some more
paint and mixing it very well together
on the mixing plate. Looking at the color and
seeing where it can go, thinking a little
bit on the canvas. Let's go in the top side
and add some textures. Dab this beautiful
palette knife at the top, and then move a little
bit to the right. These shapes can be
considered medium shapes. You've played at first
with big shapes, and now you're playing with some more medium-sized shapes. I'm grabbing some more of
this color and adding it at the top and in the corner
just a few textures. Even though the shapes
are very textured, they become one because they
are very close together. Let's grab this
beautiful round brush, mix the color well together, and start applying some colors, and make some more flat colors. Going in towards the right, you can start to see
that the color has changed a little bit and
harmonized even more. This is why this analogous
color contrast is so special, and then mixing
the color once you put some color down
you can mix it onto the plate once again to
have a flat beautiful color. Let's add some more
smaller flat shapes and bring some of
this color into the palette knife
texture and calm it down a little
bit at the top and towards the right and in the middle of the canvas
just a tiny bit of a touch. In the middle just two
more beautiful shapes. I'm looking back at it and thinking where to put some more, maybe on this left side and
on the right side edge. There you go with this step, such a simple and easy step. You're playing around with some more textures,
with the palette knife, getting more comfortable with just applying some textures, pressing down, and
being confident. You can start to see
how much freedom the analogous color contrast can give to your
painting process. You first have to know the
rules in order to break them. Let's make some fun
mistakes in the next step.
11. Expanding into yellow : In this step you'll be
bringing some more vibrancy with some beautiful
greens by adding some more yellow and mixing
it with the blue as well as developing
the composition. Keep in mind that you need
to have some calmer areas. You have to decide
where the calm areas are and where to
keep them as they are because the painting needs some space to breathe
and some areas and some spaces of tension in order to create a
beautiful contrast. Let's go into the step. Let's grab this
beautiful round brush, some yellow, and mix it over this white
that has some blue. The brush has some blue in it, from the last step
some turquoise. You can also add some
more blue if you feel like the color
is too yellow. Let's add it at the
top of the edge, break that edge down
a little bit more, and then move towards the left edge and in the
middle of the canvas. You can start to see the brush
has picked up some blue, so let's mix the color well
together on the plate and add another shape onto the left. I'm grabbing some more color, adding a smaller shape,
keeping that medium, small, dynamic and another
shape onto the right corner. Let's move the brush
around a little bit and position another shape just
at the edge on the left. You can start to see the
yellow is untouched. There are some calmer areas onto the right-hand side corner at the bottom and onto the left-hand side
corner at the top. I'm adding another
beautiful shape just down at the bottom. There you go with
this wonderful step. In this step you've
learned how to bring back some vibrancy, but still keep it in the
analogous color contrast. This very vibrant
green yellow has beautifully brought
together the composition. Talking about composition, you've also understood
that it's very important to keep some areas very clean and some areas very textured in order to create some gorgeous
contrast and tension. Let's go into the
next step. [MUSIC]
12. Play between the colors : In this great step, you'll bring forth
even more vibrancy. As you can see in this
painting process, the painting can
be left like that at any point and it
will look finished. It's very much like
playing with colors, instead of just making a row of colors as an exercise
that is very boring, you now make a full on painting and understand much
more about colors. The painting is still wet, but you can still add colors
as long as they are in the same slice of
analogous contrast. Now let's go into the step. Talking about some
interesting ideas. Let's make some mistakes. Let's grab some of this color in the corner and make some chaos, make some beautiful textures. Just grab it out of the canvas
and put it back again in order to create some
organic interesting shapes. Let's add some yellow right over here with the tip of the knife. Grabbing another
beautiful pile of yellow. Now, grabbing the brush and mixing it and making
it a tiny bit bigger, spreading that yellow around. Right where you've
put some chaos let's add some beautiful order. Another shape just
onto the right, on the yellow, it will mix
very well with the yellow. Now another smaller shape in the middle next to
the big yellow shape. Let's mix this yellow
into the blue, straight onto the blue, creating a much richer
and deeper turquoise. At the top on the edge, just a nice beautiful shape. Going lower and doing
the same on the edge. Over this area in the middle, it creates a very beautiful
contrast analogous from green towards the darker shades of turquoise and
on the left side, on the edge, as well
as on the middle, right next to the green. At the top. Higher and
onto the left edge, smaller shapes just touching
the canvas pressing down. Therefore, you have to
press hard in order to make some beautiful shapes. A smaller one, right over
here onto the left-hand side. Let's add some more shapes
onto the right sides. We've picked some green, so let's mix the color
as well before we apply another small
one onto the top. Let's find another space. Just over here onto the
lower side in the middle. Let's make this shape
a tiny bit bigger. There you go with
this wonderful step. In this step you've
stumbled upon another beautiful
painting concept, working from light to dark, even though the painting
is very colorful, if you turn it black and white, you can individually
see each step, even though it felt like
playing with vibrancy, you've actually played
with dark, and light. Since you've limited the amount
of white with each step. Now let's go into the next one.
13. Pastel before vibrant: What an interesting
journey this has been. However, it's about to get even better because
you are about to bring in some beautiful
red on the composition. Until now, you haven't
clean the brush, but now, it's the perfect moment
to do it because you are changing
from cold colors towards the hotter side of
the color wheel by bringing in some beautiful
reds and oranges. Let's go into the step. As a rule of thumb, you always need to clean
the brush when you're changing on a different
side of the color wheel. Let's bring in some
red on the plate. You can notice it's
right next to the yellow so we can already make
some beautiful oranges. Let's add some more yellow
to the mixing plate. Once you've done that, you can also add some white onto the right side of the plates. Just a beautiful
big lump of white. You can see the colors, stay away from the side of
the plate that contains blue. Now, over the green, you can mix very well. The painting is still wet. Don't worry, we're
not going too far away from the contrast. Just bring that color and mix it very well over with some yellow and some white getting this
beautiful orange color. Let's make it more
light since it needs to be worked from light to
dark or in our case, from light to more vibrance
and even more whites. Let's create this
beautiful light, pastel orange because it will
harmonize very well with the yellows being very
close [inaudible]. Let's think a
little bit where we should put this wonderful color. It seems like right over here in the middle
over the yellow, we're positioning it at
over the yellow because, of course, it
harmonizes very well. Let's find another
spot, this time, a little bit over
on the lower side, still on the yellow, so it doesn't mix
yet with the blue. Let's make this shape
a tiny bit bigger. Now, let's go a little
bit closer to the blue. Mix the color well
on the pallete. Since we've touched a
tiny bit into the blue, we can now go into
the green area, adding more white and
mixing it very well on the plate going even lighter and going on
the side of the canvas, onto the right and onto
the left edge, as well. Look at how beautiful
this newfound color looks on the composition. Let's find another spot for
this beautiful light color. Right over here on
next to the blue, on the right side, and at the top, let's find a beautiful spot displaying with the brush [inaudible] and right
next to that one, make another smaller one. Onto the right, you can see there has been just a little bit of
blue touched, but mainly, the color has stuck to
the yellow and greens, so it doesn't go very muddy. In the middle, let's add
another beautiful small shape. Let's grab some more yellow and add it to this
beautiful color, bringing the color towards
a beautiful orangey yellow. With this color, we can go even more into the blues and the greens since
it now has so little reds. But still it makes that
transition in-between those light pastel oranges
and the harsh cold blues. Let's add another shape
into the middle of the canvas, smaller this time. Onto the right, look at how beautiful and
vibrant this color is. At the top, another
smaller one on the edge and tiny one
next to it on the right. Going and adding some
more yellow to bring forth even more vibrancy. Going onto the blue just in
the middle of the canvas, trying to keep the color clean. Let's mix it very well
together in order to put it back on the canvas. Now, going and mixing
the color well on the mixing plate in
order to have clean, beautiful colors so it doesn't
have streaks all over. Going in the left corner and touching it a
little bit more, since the color is a
tiny bit more green now. Playing around with the
brush and deciding to put a tiny bit more
over this turquoise. Mixing the color again so it
doesn't leave blue marks, just makes it flat, beautiful color right
onto the right-hand side, lower corner, three
beautiful shapes. Going towards the left and making some more over the
green, touching the blue. There you go with
this wonderful step. In this step, you've played around with some beautiful pastel
oranges and yellows. You've now expanded the
analogous colors to include some warm pastel tones. You've also learned
how to integrate those beautiful warm tones by adding a transitionary color, in this case yellow. Let's go into the next step.
14. Darker complementary : Now that you have some
beautiful warm pastel tones, you can add some
more vibrancy to them by adding some oranges. It sounds complicated, however, it's a very easy process
and a very organic one. Let's go into the step. With the brush still having some of that yellow
just to integrate the color, grab some reds, add it over the yellow
and mix it very, very well together until you have a wonderful orange color. You can start to see it's closer to the yellow than it
is towards the red. Trying to find a space for it right next to
the pastel pink. You can start to
see how pink it is after you've put the orange. Let's find another space for
it over this wonderful blue. Just press hard in order to
make a flat, beautiful shape. Mix the colors well
together once again and add it over the pastel
pink in the middle. Thus expanding the analogous
colors of the oranges, and going towards
the bottom here. Another beautiful
orange shape and towards the left in the
corner over the blue, just to create more contrast. We've now reached the
point where we can add some different contrast
called complimentary, going with this orange
over the blue turquoise, and let's think for another
shape in the left edge, and at the top, right next to the blue. Mixing the colors
well together on the plate just so you have
a flat beautiful color. This is another
beautiful secret to keep clean and harmonize together
colors. That's fine. Another spot right over
here, another small shape. Starts to get a little
bit bluish, don't worry, just mix it very well on the
plate and add it once again. Let's make this shape a
little bit bigger and continue on to the right corner, next to the edge, with another beautiful shape, and there you go with this
wonderful step as well. What a simple and
easy step this was. However, it was very
impactful since you now have stumbled upon the
complementary contrasts. You've expanded the
analogous contrast until it almost has
ended on opposite sides. Now that you have
orange and turquoise, you can also add the complimentary contrast
into your painting by adding some of this orange onto the beautiful turquoise. You've also learned a
very important thing about painting and colors. You've learned that whenever you touch a wet color on the canvas, you need to mix
it very well back on the mixing plate
in order to have them harmonize well together and keep those colors
clean and decisive. Let's go into the next step.
15. Letting go of Perfection and having FUN: The composition right
now looks very tame. It's very organized, it's
very well put together, it needs a little
bit of that chaos, a little bit of that
creamy texture and colors blending together in a
nice, harmonious way. This is where you let go
and embrace the mistakes. Let's go into the step. Let's grab some of this orange
with the palette knife. Mix it very well
together until it mixes that beautiful turquoise with
a little bit more green, and with a little bit
of trust in yourself, and a lot of courage. Let's go in this beautiful
right-hand corner over the orange and
scrape that color, apply it, grab some more, and press even harder leaving
that beautiful color, you can scrape it down, put it, take it off, apply it once again, get more color, and put it over it
slowly and nicely, creating these
beautiful bold shapes. Now going on the
opposite corner, on a diagonal on the
right-hand side, and now changing it
up a little bit. Pressing very fast and loose on the middle of the
canvas, just over here, you can start to see where
that beautiful turquoise in the background
starts to take shape. In the left-hand side, at the middle of the
canvas, near the edge, just scraping that color, and putting it back
onto the canvas. The canvas is still wet. Those colors have not dried yet. Now, on the right side, just over here at the bottom, creating some more
beautiful textures. Mixing them well together, so they get a bit more
muddy and beautiful. This is where the beautiful
vibrant colors can make a wonderful contrast between vibrant and colorful nuances. Going on to the right and scraping and applying
the color once again, just to create more chaos, such a simple and easy step. In this one, you've
learned that in order to have beautiful and
vibrant colors, you have to have them on
a bedrock of grayish, brownish colors that
mix very well together. You've also learned
how to let go and create beautiful and
wonderful chaos. As adults, we tend to lose
the pleasure of just making mistakes and letting go of
what we think is right. Let's rekindle that beautiful
childish happiness of play. Let's go into the next step.
16. Darks: You've added some colors, now it's time to add
the order back to calm those crazy textured areas
and make them more beautiful. Also, you will expand that beautiful
complimentary contrast by adding some violet, some pinks as well
as some purples. You will also play
with big, medium, small just to get the composition fitting
very well together. By adding some blue and some turquoise back
into the painting, you will get those colors from the background to the front. Let's go into the course. Grabbing this beautiful round
brush and mixing it over the oranges and
adding some more red, just to make that orange
tiny bit more beautiful. Let's first calm this area in the corner down and
a little bit higher. You can start to
see with only two brush marks it looks
much more calm, and over near the
edge on the left another beautiful orange spot and in the corner at the top, going a little bit lower and adding some smaller ones
near the edge on the left, and making this
one a bit bigger, so it makes the big
and medium shape, and another one just
here at the bottom. Let's grab some yellow
and add it over this wonderful turquoise
at the bottom. Grabbing this beautiful
color and adding some blue into it to make this color much more green and wonderful, very
saturated green. Let's add some white to
make it more pastel. Bringing those greens
back to the forefront, adding some more white so we can make it
even more pastel. We start to work from a
beautiful light color. Let's add some blue and now mixing it in with
the white and light green, creating that
wonderful pastel color of the background,
the bluish color. Let's calm this beautiful
area in the middle with this wonderful color and on
the right side in the corner, as well as even lower. Let's grab some more white
and make it even lighter, and add it over this
wonderful brownish orange in the middle and on this green orangey
patch just to calm it down and in the middle over this beautiful
yellow next to it. Let's grab some more yellow
and mix it in to bring some of that vibrancy out right over this
beautiful green, calming it down even more, and on the orange-brown
next to it, making this shape a
little bit bigger. We are playing with a big and a medium shape and
another one at the top, making it a tiny bit bigger. The same play, we already have the yellow
right next to it, that is a medium and lower
with two beautiful strokes, and on the edge, on
the left, another one. Grabbing some blue, mixing
it very thoroughly, and grabbing a lot of
color onto the brush. This is another
concept in painting, working thin to thick. Adding it to just over here, adding this vibrant turquoise on the right corner and making that shape
a tiny bit bigger, so it's a medium shape, and now moving towards
the middle of the canvas, going lower and to the left. Adding another one. Look at how beautiful it
contrasts with the orangey, green in the background
because they are complementary colors
going a little bit lower and to the right, making a medium
and a small shape, and then in the middle
over the green, so the green doesn't
stand out so much, and adding some more
red into those blues, we are moving slowly towards
the violets and the purples. Mixing it very well together so you have a flat,
wonderful color, this blue, purplish dark color, and let's put it just over
here, over the green. Let's add some more red into it. Mix it well together
over this orange, it will fit quite nicely. Right over the first blue, you can add a little bit
more of this violet, and in the middle right
next to the yellow, since purple and yellow
are complementaries, trying to think more
about complementaries, this violet also has
a little bit of blue, so it goes very well towards
the oranges next to them, and another smaller shape
right above the first one, and lower next to the edge finding
another beautiful spot. There is a wonderful spot
for it on the left edge, and now going into some reds, mixing it very well, and then applying it lower on the yellow and then
next to the purples, and then next to the beautiful
turquoise at the top, a medium and a small shape going towards the middle left side and adding another
beautiful shape. Now, right next to the green, since red and green
are complementaries, they go very well together. Going and making another shape over this green in the middle, and making this
shape a little bit bigger so it keeps that
big, medium, small, dynamic, looking at the painting a little bit more to
see what we can add. Adding a tiny bit of
yellow just to make this big, bold, beautiful, violet shape onto the left, big, medium, small. At the top, adding
this wonderful shape, same big, medium, small. Let's make this medium
one a bit bigger and look at how beautiful
the painting is becoming. You've seamlessly integrated
some complementary colors, learning about big,
medium, small, as well as some
more color theory, or how I like to
call it color play. Let's go into the next step.
17. The Special something: Painting looks
absolutely wonderful, but it needs that special
little something. In this case that will
be beautiful, neon pink. Of course, it will be
integrated and all that you have learned until now will
play a role into applying it. You will be applying it
onto the opposite colors as well as onto the
analogous colors. By adding this beautiful nuance, you will expand the
color palette even more. Let's go into this step. Let's add some beautiful
neon pink just over here, onto the top side over
the purplish reds. Of course, we add it here
just so it fits nicely on top of a color that it blends well with and it
integrates well with. Let's just grab
some neon pink and dab it over the
complementary colors first, just at the top over
the purplish violet, and onto the left over
the violet as well. Now I'm getting some
more and adding it at the top just to expand
that shape a bit more. Now, grabbing some more color and thinking a little
bit more of where exactly to position
this color right here over the green and
the turquoise. It contrasts very well
since they are opposite. Let's also make a small one. As you can see, you can keep on grabbing the color
just to make it thicker and expand slowly the shape so it doesn't blend with the turquoise
and the green. Going and having another
shape just in the middle, as you can see already, the color has started
to shift a little bit. Let's put it just over
the blue and the violet. Thinking of another
spot where to put it, just a small little
shape just over here at the top on the right, and grabbing some more color going back to that
idea where you need to mix the
color in order to have them beautifully match. Going lower on the edge, making a medium shape. Now let's mix those colors back in and have a
beautiful flat color. Once again, let's expand
this shape at the top, making it a medium shape, and going over and
making another smaller one in-between
them so it's big, medium, and small. Now lower, right next to this beautiful pink light color, grabbing some more paint
and adding it over this turquoise and orange just over here on the left side. Another one just
over the pink on the right edge and a smaller one just to keep
that dynamic going. Let's add some white to
this wonderful neon pink, just to bring that
analogous color contrast even more into the light. Let's position it just over
here next to the other pink. You can start to see how
orange it looks compared to this wonderful
light neon pink and another one just to the left and in the middle of the canvas, and in the corner to the
left on the lower side, and at the top on the opposite
corner over the orange. Look at how beautiful
this painting looks, what a wonderful
journey this was. You've learned so
much about color. You've learned how
to integrate it and create wonderful nuances. You've also expanded
your skills on making brush marks and playing
with the palette knife. I hope you enjoyed this course and if you
are gracious enough, you can leave a review. Thank you so much
for being part of this community and see
you in the next one.
 George-Daniel Tudorache, Together we will create amazing things.